Uniswap V2 Swap from Polkadot via XCM
by Alberto Viera
Introduction
In this tutorial, we’ll perform a Uniswap V2-styled swap from a relay chain (what Polkadot is to Moonbeam) using Polkadot's intra-operability general message passing protocol called XCM. To do so, we'll be using a particular combination of XCM instructions that allow you to call Moonbeam's EVM through an XCM message. Consequently, any blockchain that is able to send an XCM message to Moonbeam can tap into its EVM and all the dApps built on top of it.
The content of this tutorial is for educational purposes only!
For this example, you'll be working on top of the Moonbase Alpha (Moonbeam TestNet), which has its own relay chain (similar to Polkadot). The relay chain token is called UNIT, while Moonbase Alpha's is called DEV. Doing this in TestNet is less fun than doing it in production, but developers must understand that sending incorrect XCM messages can result in the loss of funds. Consequently, it is essential to test XCM features on a TestNet before moving to a production environment.
Throughout this tutorial, we will refer to the account performing the Uniswap V2 swap via XCM as Alice. The tutorial has a lot of moving parts, so let's summarize them in a list and a flow diagram:
- Alice has an account on the relay chain, and she wants to swap
DEVtokens forMARStokens (ERC-20 on Moonbase Alpha) on Moonbeam-Swap, a demo Uniswap V2 clone on Moonbase Alpha. Alice needs to send an XCM message to Moonbase Alpha from her relay chain account - The XCM message will be received by Moonbase Alpha and its instructions executed. The instructions state Alice's intention to buy some block execution time in Moonbase Alpha and execute a call to Moonbase's EVM, specifically, the Uniswap V2 (Moonbeam-Swap) router contract. The EVM call is dispatched through a special account Alice controls on Moonbase Alpha via XCM messages. This account is known as the Computed Origin account. Even though this is a keyless account (private key is unknown), the public address can be calculated in a deterministic way
- The XCM execution will result in the swap being executed by the EVM, and Alice will receive her
MARStokens in her special account - The execution of the remote EVM call through XCM will result in some EVM logs that are picked up by explorers. There is an EVM transaction and receipt that anyone can query to verify

With the steps outlined, some prerequisites need to be taken into account, let's jump right into it!
Checking Prerequisites
Considering all the steps summarized in the introduction, the following prerequisites need to be accounted for:
- You need to have UNITs on the relay chain to pay for transaction fees when sending the XCM. If you have a Moonbase Alpha account funded with DEV tokens, you can swap some DEV for xcUNIT here on Moonbeam Swap. Then withdraw the xcUNIT from Moonbase Alpha to your account on the Moonbase relay chain using apps.moonbeam.network
- Your Computed Origin account must hold
DEVtokens to fund the Uniswap V2 swap, and also pay for the XCM execution (although this could be paid in UNIT tokens asxcUNIT). We will calculate the Computed Origin account address in the next section
You can get DEV tokens for testing on Moonbase Alpha once every 24 hours from the Moonbase Alpha Faucet
Calculating your Computed Origin Account
Copy the account of your existing or newly created account on the Moonbase relay chain. You're going to need it to calculate the corresponding Computed Origin account, which is a special type of account that’s keyless (the private key is unknown). Transactions from a Computed Origin account can be initiated only via valid XCM instructions from the corresponding account on the relay chain. In other words, you are the only one who can initiate transactions on your Computed Origin account, and if you lose access to your Moonbase relay account, you’ll also lose access to your Computed Origin account.
To generate the Computed Origin account, first clone the xcm-tools repo. Run yarn to install the necessary packages, and then run:
yarn calculate-multilocation-derivative-account \
--ws-provider wss://wss.api.moonbase.moonbeam.network \
--address INSERT_MOONBASE_RELAY_ACCOUNT \
--para-id INSERT_ORIGIN_PARACHAIN_ID_IF_APPLIES \
--parents INSERT_PARENTS_VALUE_IF_APPLIES
Let's review the parameters passed along with this command:
- The
--ws-provideror-wflag corresponds to the endpoint we’re using to fetch this information - The
--addressor-aflag corresponds to your Moonbase relay chain address - The
--para-idor-pflag corresponds to the parachain ID of the origin chain (if applicable). If you are sending the XCM from the relay chain, you don't need to provide this parameter - The
-parentsflag corresponds to the parents value of the origin chain in relation to the destination chain. If you're deriving a multi-location derivative account on a parachain destination from a relay chain origin, this value would be1. If left out, the parents value defaults to0
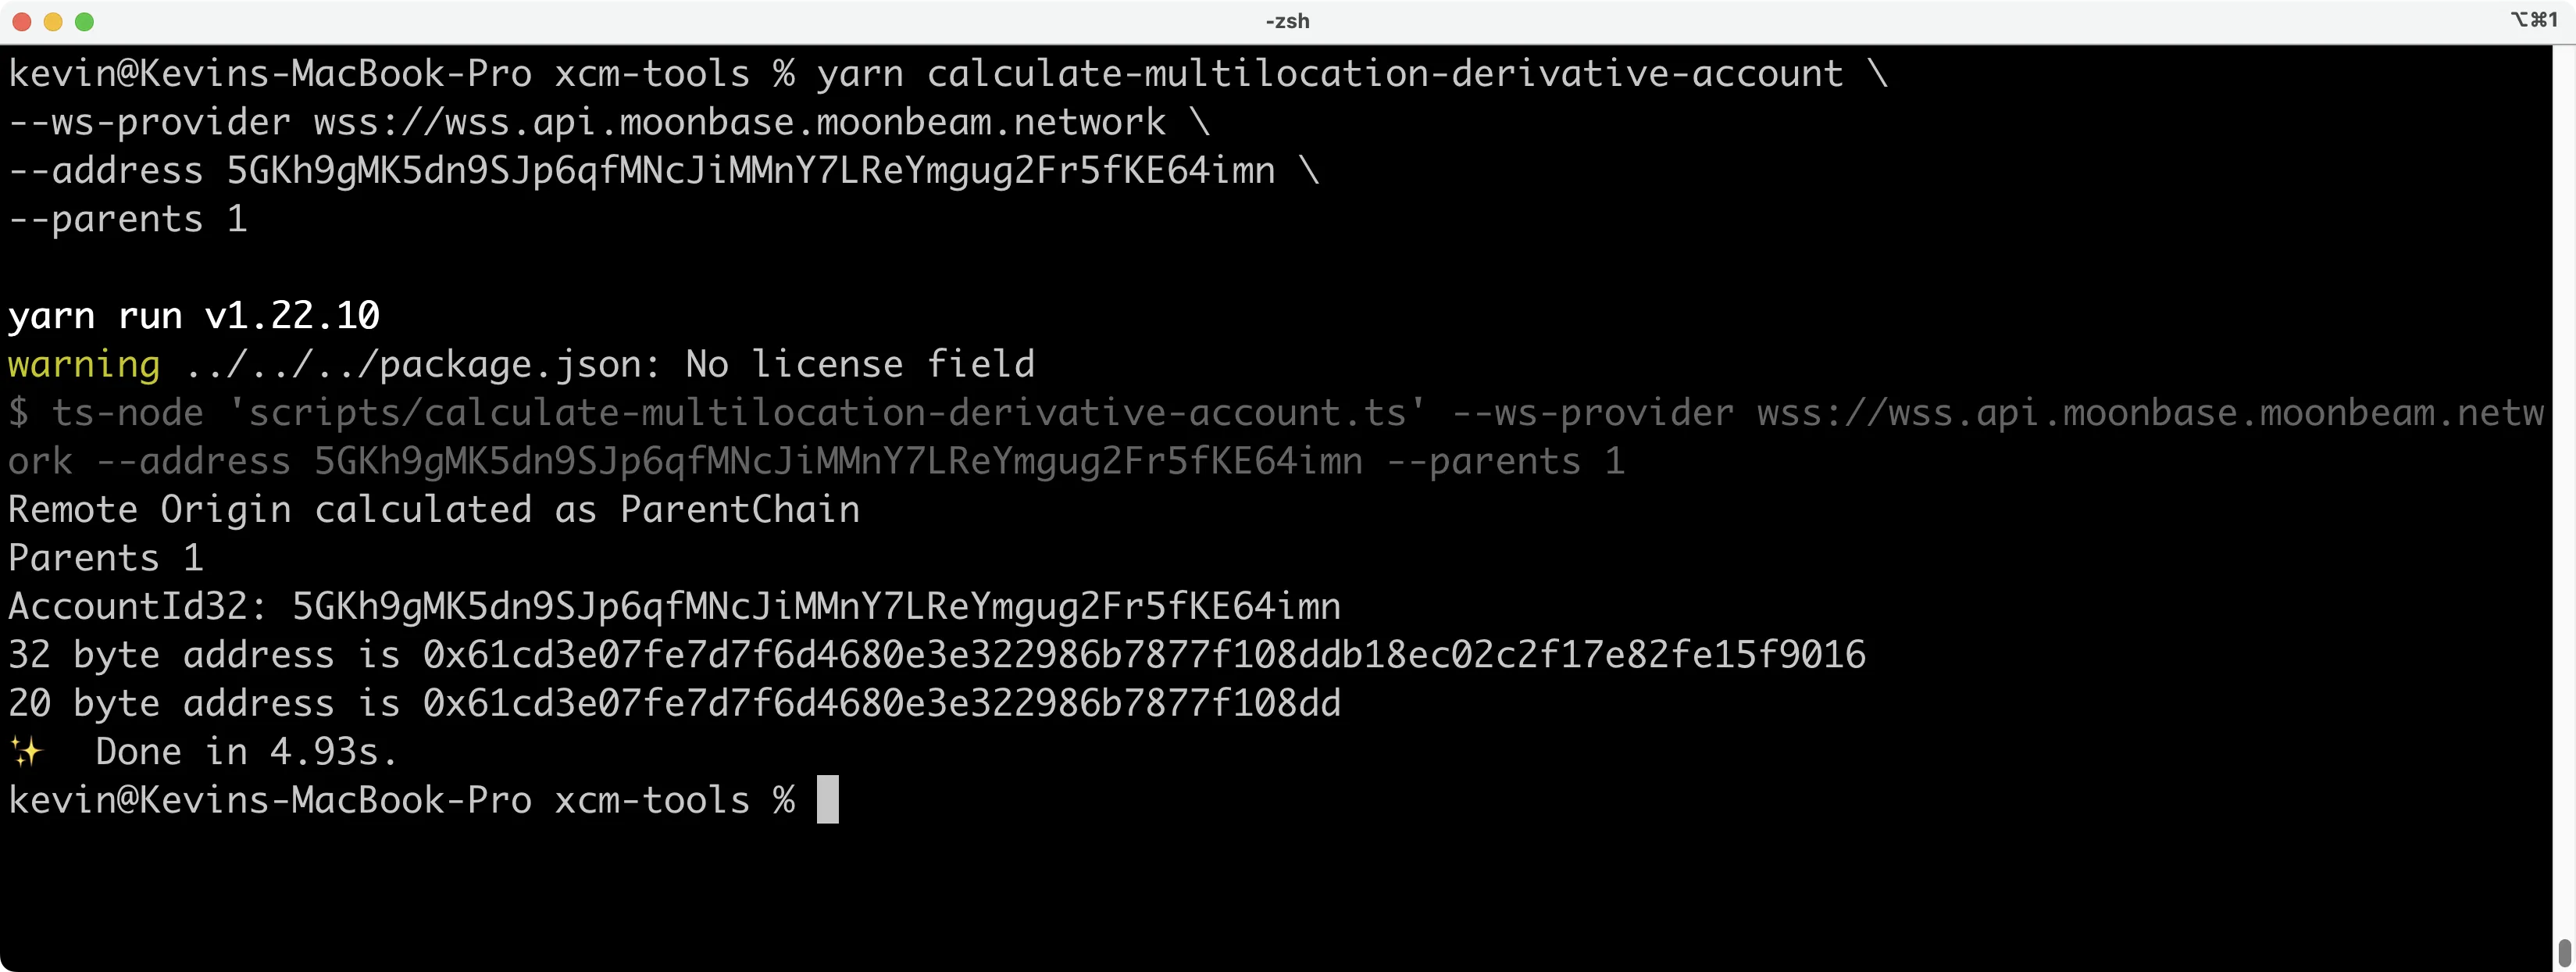
For our case, we will send the remote EVM call via XCM from Alice's account, which is 5GKh9gMK5dn9SJp6qfMNcJiMMnY7LReYmgug2Fr5fKE64imn, so the command and response would look like the following image.
yarn run v1.22.10 warning ../../../package.json: No license field $ ts-node 'scripts/calculate-multilocation-derivative-account.ts' --ws-provider wss://wss.api.moonbase.moonbeam.network --address 5GKh9gMK5dn9SJp6qfMNcJiMMnY7LReYmgug2Fr5fKE64imn --parents 1
Remote Origin calculated as ParentChain Parents 1 AccountId32: 5GKh9gMK5dn9SJp6qfMNcJiMMnY7LReYmgug2Fr5fKE64imn 32 byte address is 0x61cd3e07fe7d7f6d4680e3e322986b7877f108ddb18ec02c2f17e82fe15f9016 20 byte address is 0x61cd3e07fe7d7f6d4680e3e322986b7877f108dd ✨ Done in 1.02s.
The values are all summarized in the following table:
| Name | Value |
|---|---|
| Origin Chain Encoded Address | 5GKh9gMK5dn9SJp6qfMNcJiMMnY7LReYmgug2Fr5fKE64imn |
| Origin Chain Decoded Address | 0xbc5f3c61709f218d983fc773a600958a07fb18047418df7eeb0501d0679e397a |
| Computed Origin Account (32 bytes) | 0x61cd3e07fe7d7f6d4680e3e322986b7877f108ddb18ec02c2f17e82fe15f9016 |
| Computed Origin Account (20 bytes) | 0x61cd3e07fe7d7f6d4680e3e322986b7877f108dd |
The script will return 32-byte and 20-byte addresses. We’re interested in the Ethereum-style account - the 20-byte one, which is 0x61cd3e07fe7d7f6d4680e3e322986b7877f108dd. Feel free to look up your Computed Origin account on Moonscan. Next, you can fund this account with DEV tokens.
You can get DEV tokens for testing on Moonbase Alpha once every 24 hours from the Moonbase Alpha Faucet.
Getting the Uniswap V2 Swap Calldata
The following section will walk through the steps of getting the calldata for the Uniswap V2 swap, as we need to feed this calldata to the remote EVM call that we will build via XCM.
The function being targeted here is one from the Uniswap V2 router, more specifically swapExactETHForTokens. This function will swap an exact amount of protocol native tokens (in this case DEV) for another ERC-20 token. It has the following inputs:
- Minimum amount of tokens that you expect out of the swap (accounting for slippage)
- Path that the take will trade (if there is no direct pool, the swap might be routed through multiple pair pools)
- Address of the recipient of the tokens swapped
- The deadline (in Unix time) from which the trade is no longer valid
The easiest way to get the calldata is through the Moonbeam Uniswap V2 Demo page. Once you go in the website, take the following steps:
- Set the swap from value and token and also set the swap to token. For this example, we want to swap 1
DEVtoken forMARS - Click on the Swap button. Metamask should pop up, do not sign the transaction
- In Metamask, click on the hex tab, and the encoded calldata should show up
- Click on the Copy raw transaction data button. This will copy the encoded calldata to the clipboard
Note
Other wallets also offer the same capabilities of checking the encoded calldata before signing the transaction.
Once you have the encoded calldata, feel free to reject the transaction in your wallet. The swap calldata that we obtained is encoded as follows (all but the function selector are expressed in 32 bytes or 64 hexadecimal characters blobs):
- The function selector, which is 4 bytes long (8 hexadecimal characters) that represents the function you are calling
- The minimum amount out of the swap that we want accounting for slippage, in this case,
10b3e6f66568aaeeis1.2035MARStokens - The location (pointer) of the data part of the path parameter (which is of type dynamic).
80in hex is128decimal, meaning that information about the path is presented after 128 bytes from the beginning (without counting on the function selector). Consequently, the next bit of information about the path is presented in element 6 - The address receiving the tokens after the swap, in this case, is the
msg.senderof the call - The deadline limit for the swap
- The length of the address array representing the path
- First token involved in the swap, which is wrapped
DEV - Second token involved in the swap,
MARS, so it is the last
1. 0x7ff36ab5
2. 00000000000000000000000000000000000000000000000010b3e6f66568aaee -> Min Amount Out
3. 0000000000000000000000000000000000000000000000000000000000000080
4. 000000000000000000000000d720165d294224a7d16f22ffc6320eb31f3006e1 -> Receiving Address
5. 0000000000000000000000000000000000000000000000000000000063dbcda5 -> Deadline
6. 0000000000000000000000000000000000000000000000000000000000000002
7. 000000000000000000000000d909178cc99d318e4d46e7e66a972955859670e1
8. 0000000000000000000000001fc56b105c4f0a1a8038c2b429932b122f6b631f
In the calldata, we need to change three fields to ensure our swap will go through:
- The minimum amount out, to account for slippage as the pool may have a different
DEV/MARSbalance when you try this out - The receiving address to our Computed Origin account
- The deadline to provide a bit more flexibility for our swap, so you don't have to submit this immediately
This is OK because we are just testing things :), do not use this code in production! Our encoded calldata should look like this (the line breaks were left for visibility):
0x7ff36ab5
0000000000000000000000000000000000000000000000000de0b6b3a7640000 -> New Min Amount
0000000000000000000000000000000000000000000000000000000000000080
00000000000000000000000061cd3e07fe7d7f6d4680e3e322986b7877f108dd -> New Address
00000000000000000000000000000000000000000000000000000000A036B1B9 -> New Deadline
0000000000000000000000000000000000000000000000000000000000000002
000000000000000000000000d909178cc99d318e4d46e7e66a972955859670e1
0000000000000000000000001fc56b105c4f0a1a8038c2b429932b122f6b631f
Which, as one line, is:
0x7ff36ab50000000000000000000000000000000000000000000000000de0b6b3a7640000000000000000000000000000000000000000000000000000000000000000008000000000000000000000000061cd3e07fe7d7f6d4680e3e322986b7877f108dd00000000000000000000000000000000000000000000000000000000A036B1B90000000000000000000000000000000000000000000000000000000000000002000000000000000000000000d909178cc99d318e4d46e7e66a972955859670e10000000000000000000000001fc56b105c4f0a1a8038c2b429932b122f6b631f
You can also get the calldata programmatically using the Uniswap V2 SDK.
Generating the Moonbeam Encoded Calldata
Now that we have the Uniswap V2 swap encoded calldata, we need to generate the bytes that the Transact XCM instruction from the XCM message will execute. Note that these bytes represent the action that will be executed in the remote chain. In this example, we want the XCM message execution to enter the EVM and perform the swap, from which we got the encoded calldata.
To get the SCALE (encoding type) encoded calldata for the transaction parameters, we can leverage the following Polkadot.js API script (note that it requires @polkadot/api and ethers).
import { ApiPromise, WsProvider } from '@polkadot/api'; // Version 10.13.1
import { ethers } from 'ethers'; // Version 6.12.0
import BN from 'bn.js'; // Importing directly from bn.js

// 1. Input Data
const providerWsURL = 'wss://wss.api.moonbase.moonbeam.network';
const uniswapV2Router = '0x8a1932D6E26433F3037bd6c3A40C816222a6Ccd4';
const contractCall =
  '0x7ff36ab50000000000000000000000000000000000000000000000000de0b6b3a7640000000000000000000000000000000000000000000000000000000000000000008000000000000000000000000061cd3e07fe7d7f6d4680e3e322986b7877f108dd00000000000000000000000000000000000000000000000000000000A036B1B90000000000000000000000000000000000000000000000000000000000000002000000000000000000000000d909178cc99d318e4d46e7e66a972955859670e10000000000000000000000001fc56b105c4f0a1a8038c2b429932b122f6b631f';

const generateCallData = async () => {
  // 2. Create Substrate API Provider
  const substrateProvider = new WsProvider(providerWsURL);
  const ethProvider = new ethers.WebSocketProvider(providerWsURL);
  const api = await ApiPromise.create({ provider: substrateProvider });

  // 3. Estimate Gas for EVM Call
  const gasLimit = await ethProvider.estimateGas({
    to: uniswapV2Router,
    data: contractCall,
    value: ethers.parseEther('0.01'),
  });
  console.log(`Gas required for call is ${gasLimit.toString()}`);

  // Convert ethers' BigNumber to Polkadot's BN and add some extra
  const totalGasLimit = new BN(gasLimit.toString()).add(new BN(10000));

  // 4. Call Parameters
  const callParams = {
    V2: {
      gasLimit: totalGasLimit, // Estimated plus some extra gas
      action: { Call: uniswapV2Router }, // Uniswap V2 router address
      value: new BN(ethers.parseEther('0.01').toString()), // 0.01 DEV
      input: contractCall, // Swap encoded calldata
    },
  };

  // 5. Create the Extrinsic
  const tx = api.tx.ethereumXcm.transact(callParams);

  // 6. Get SCALE Encoded Calldata
  const encodedCall = tx.method.toHex();
  console.log(`Encoded Calldata: ${encodedCall}`);

  api.disconnect();
};

generateCallData();
Note
You can also get the SCALE encoded calldata by manually building the extrinsic in Polkadot.js Apps.
Let's go through each of the main components of the snippet shown above:
- Provide the input data for the call. This includes:
- Moonbase Alpha endpoint URL to create the providers
- Uniswap V2 router address which is the one the call interacts with
- Encoded calldata for the Uniswap V2 swap that we calculated before
- Create the necessary providers. One is a Polkadot.js API provider, through which we can call Moonbeam pallets directly. The other one is an Ethereum API provider through Ethers.js
- This step is mainly a best practice. Here, we are estimating the gas of the EVM call that will be executed via XCM, as this is needed later on. You can also hardcode the gas limit value, but it is not recommended
- Build the remote EVM call. We bumped the gas by
10000units to provide a bit of room in case conditions change. The inputs are identical to those used for the gas estimation - Create the Ethereum XCM pallet call to the
transactmethod, providing the call parameters we previously built - Get the SCALE calldata of the specific transaction parameter, which we need to provide to the
TransactXCM instruction later on. Note that in this particular scenario, because we need only the calldata of the transaction parameters, we have to usetx.method.toHex()
Once you have the code set up, you can execute it with node, and you'll get the Moonbase Alpha remote EVM calldata:
Gas required for call is 596363 Encoded Calldata: 0x2600019b40090000000000000000000000000000000000000000000000000000000000008a1932d6e26433f3037bd6c3a40c816222a6ccd40000c16ff286230000000000000000000000000000000000000000000000000091037ff36ab50000000000000000000000000000000000000000000000000de0b6b3a7640000000000000000000000000000000000000000000000000000000000000000008000000000000000000000000061cd3e07fe7d7f6d4680e3e322986b7877f108dd00000000000000000000000000000000000000000000000000000000a036b1b90000000000000000000000000000000000000000000000000000000000000002000000000000000000000000d909178cc99d318e4d46e7e66a972955859670e10000000000000000000000001fc56b105c4f0a1a8038c2b429932b122f6b631f00
The encoded calldata for this example is:
0x2600019b40090000000000000000000000000000000000000000000000000000000000008a1932d6e26433f3037bd6c3a40c816222a6ccd40000c16ff286230000000000000000000000000000000000000000000000000091037ff36ab50000000000000000000000000000000000000000000000000de0b6b3a7640000000000000000000000000000000000000000000000000000000000000000008000000000000000000000000061cd3e07fe7d7f6d4680e3e322986b7877f108dd00000000000000000000000000000000000000000000000000000000a036b1b90000000000000000000000000000000000000000000000000000000000000002000000000000000000000000d909178cc99d318e4d46e7e66a972955859670e10000000000000000000000001fc56b105c4f0a1a8038c2b429932b122f6b631f00
And that is it! You have everything you need to start crafting the XCM message itself! It has been a long journey, but we are almost there.
Building the XCM Message from the Relay Chain
We are almost in the last part of this tutorial! In this section, we'll craft the XCM message using the Polkadot.js API. We'll also dissect the message instruction per instruction to understand what is happening every step of the way.
The XCM message we are about to build is composed of the following instructions:
WithdrawAsset— takes funds from the account dispatching the XCM in the destination chain and puts them in holding, a special take where funds can be used for later actionsBuyExecution— buy a certain amount of block execution timeTransact— use part of the block execution time bought with the previous instruction to execute some arbitrary bytesDepositAsset— takes assets from holding and deposits them to a given account
To build the XCM message, which will initiate the remote EVM call through XCM, and get its SCALE encoded calldata, you can use the following snippet:
import { ApiPromise, WsProvider } from '@polkadot/api'; // Version 10.13.1

// 1. Input Data
const providerWsURL =
  'wss://relay.api.moonbase.moonbeam.network';
const amountToWithdraw = BigInt(1 * 10 ** 16); // 0.01 DEV
const devMultiLocation = {
  parents: 0,
  interior: { X1: [{ PalletInstance: 3 }] },
};
const weightTransact = 40000000000n; // 25000 * Gas limit of EVM call
const multiLocAccount = '0x61cd3e07fe7d7f6d4680e3e322986b7877f108dd';
const transactBytes =
  '0x2600019b40090000000000000000000000000000000000000000000000000000000000008a1932d6e26433f3037bd6c3a40c816222a6ccd40000c16ff286230000000000000000000000000000000000000000000000000091037ff36ab50000000000000000000000000000000000000000000000000de0b6b3a7640000000000000000000000000000000000000000000000000000000000000000008000000000000000000000000061cd3e07fe7d7f6d4680e3e322986b7877f108dd00000000000000000000000000000000000000000000000000000000a036b1b90000000000000000000000000000000000000000000000000000000000000002000000000000000000000000d909178cc99d318e4d46e7e66a972955859670e10000000000000000000000001fc56b105c4f0a1a8038c2b429932b122f6b631f00';

// 2. XCM Destination (Moonbase Alpha Parachain ID 1000)
const dest = { V4: { parents: 0, interior: { X1: [{ Parachain: 1000 }] } } };

// 3. XCM Instruction 1
const instr1 = {
  WithdrawAsset: [
    {
      id: devMultiLocation,
      fun: { Fungible: amountToWithdraw },
    },
  ],
};

// 4. XCM Instruction 2
const instr2 = {
  BuyExecution: {
    fees: {
      id: devMultiLocation,
      fun: { Fungible: amountToWithdraw },
    },
    weightLimit: { Unlimited: null },
  },
};

// 5. XCM Instruction 3
const instr3 = {
  Transact: {
    originKind: 'SovereignAccount',
    requireWeightAtMost: { refTime: weightTransact, proofSize: 700000n },
    call: {
      encoded: transactBytes,
    },
  },
};

// 6. XCM Instruction 4
const instr4 = {
  DepositAsset: {
    assets: { Wild: 'All' },
    beneficiary: {
      parents: 0,
      interior: { X1: [{ AccountKey20: { key: multiLocAccount } }] },
    },
  },
};

// 7. Build XCM Message
const message = { V4: [instr1, instr2, instr3, instr4] };

const generateCallData = async () => {
  // 8. Create Substrate API Provider
  const substrateProvider = new WsProvider(providerWsURL);
  const api = await ApiPromise.create({ provider: substrateProvider });

  // 9. Create the Extrinsic
  const tx = api.tx.xcmPallet.send(dest, message);

  // 10. Get SCALE Encoded Calldata
  const encodedCall = tx.toHex();
  console.log(`Encoded Calldata: ${encodedCall}`);

  api.disconnect();
};

generateCallData();
Note
You can also get the SCALE encoded calldata by manually building the extrinsic in Polkadot.js Apps.
Let's go through each of the main components of the snippet shown above:
- Provide the input data for the call. This includes:
- Moonbase Alpha relay chain endpoint URL to create the provider
- Amount of tokens (in Wei) to withdraw from the Computed Origin account. For this example,
0.01tokens are more than enough. To understand how to get this value, please refer to the XCM fee page - The multilocation of the
DEVtoken as seen by Moonbase Alpha - The weight for the
transactXCM instruction. This can be obtained by multiplying25000and the gas limit obtained before. It is recommended to add approximately 10% more of the estimated value. You can read more about this value in the Remote EVM Calls through XCM page - The Computed Origin account as it will be needed later for an XCM instruction
- The bytes for the
transactXCM instruction that we calculated in the previous section
- Define the destination multilocation for the XCM message. In this case, it is the Moonbase Alpha parachain
- First XCM instruction,
WithdrawAsset. You need to provide the asset multilocation and the amount you want to withdraw. Both variables were already described before - Second XCM instruction,
BuyExecution. Here, we are paying for Moonbase Alpha block execution time inDEVtokens by providing its multilocation and the amount we took out with the previous instruction. Next, we are buying all the execution we can (Unlimitedweight) with0.001 DEVtokens which should be around 20 billion weight units, plenty for our example - Third XCM instruction,
Transact. The instruction will use a portion of the weight bought (defined asrequireWeightAtMost) and execute the arbitrary bytes that are provided (transactBytes) - Fourth XCM instruction,
DepositAsset. Whatever is left in holding after the actions executed before (in this case, it should be onlyDEVtokens) is deposited to the Computed Origin account, set as thebeneficiary. - Build the XCM message by concatenating the instructions inside a
V2array - Create the Polkadot.js API provider
- Craft the
xcmPallet.sendextrinsic with the destination and XCM message. This method will append theDescendOriginXCM instruction to our XCM message, and it is the instruction that will provide the necessary information to calculate the Computed Origin account - Get the SCALE encoded calldata. Note that in this particular scenario, because we need the full SCALE encoded calldata, we have to use
tx.toHex(). This is because we will submit this transaction using the calldata
Challenge
Try a more straightforward example and perform a balance transfer from the Computed Origin account to any other account you like. You'll have to build the SCALE encoded calldata for a balance.Transfer extrinsic or create the Ethereum call as a balance transfer transaction.
Once you have the code set up, you can execute it with node, and you'll get the relay chain XCM calldata:
The encoded calldata for this example is:
0x450604630004000100a10f0410000400010403000f0000c16ff286231300010403000f0000c16ff286230006010700902f500982b92a00fd042600019b40090000000000000000000000000000000000000000000000000000000000008a1932d6e26433f3037bd6c3a40c816222a6ccd40000c16ff286230000000000000000000000000000000000000000000000000091037ff36ab50000000000000000000000000000000000000000000000000de0b6b3a7640000000000000000000000000000000000000000000000000000000000000000008000000000000000000000000061cd3e07fe7d7f6d4680e3e322986b7877f108dd00000000000000000000000000000000000000000000000000000000a036b1b90000000000000000000000000000000000000000000000000000000000000002000000000000000000000000d909178cc99d318e4d46e7e66a972955859670e10000000000000000000000001fc56b105c4f0a1a8038c2b429932b122f6b631f000d01000001030061cd3e07fe7d7f6d4680e3e322986b7877f108dd
Now that we have the SCALE encoded calldata, the last step is to submit the transaction, which will send our XCM message to Moonbase Alpha, and do the remote EVM call!
Sending the XCM Message from the Relay Chain
This section is where everything comes together and where the magic happens! Let's recap what we've done so far:
- We've created a relay chain account that is funded with
UNITtokens (relay chain native tokens) - We determined its Computed Origin account on Moonbase Alpha and funded this new address with
DEVtokens (Moonbase Alpha native token) - We obtained the Uniswap V2 swap calldata, in which we'll be swapping
0.01 DEVtoken forMARS, an ERC-20 that exists in Moonbase Alpha. We had to modify a couple of fields to adapt it to this particular example - We built the SCALE encoded calldata in Moonbase Alpha to access its EVM via XCM
- We crafted our transaction to send an XCM message to Moonbase Alpha, in which we will ask it to execute the SCALE encoded calldata that was previously built. This, in turn, will execute an EVM call which will perform the Uniswap V2 swap for the precious
MARStokens!
To send the XCM message that we built in the previous section, you can use the following code snippet:
import { ApiPromise, WsProvider, Keyring } from '@polkadot/api'; // Version 10.13.1
import { cryptoWaitReady } from '@polkadot/util-crypto';

// 1. Input Data
const providerWsURL =
  'wss://relay.api.moonbase.moonbeam.network';
const MNEMONIC = 'INSERT_MNEMONIC'; // Not safe, only for testing
const txCall =
  '0x450604630004000100a10f0410000400010403000f0000c16ff286231300010403000f0000c16ff286230006010700902f500982b92a00fd042600019b40090000000000000000000000000000000000000000000000000000000000008a1932d6e26433f3037bd6c3a40c816222a6ccd40000c16ff286230000000000000000000000000000000000000000000000000091037ff36ab50000000000000000000000000000000000000000000000000de0b6b3a7640000000000000000000000000000000000000000000000000000000000000000008000000000000000000000000061cd3e07fe7d7f6d4680e3e322986b7877f108dd00000000000000000000000000000000000000000000000000000000a036b1b90000000000000000000000000000000000000000000000000000000000000002000000000000000000000000d909178cc99d318e4d46e7e66a972955859670e10000000000000000000000001fc56b105c4f0a1a8038c2b429932b122f6b631f000d01000001030061cd3e07fe7d7f6d4680e3e322986b7877f108dd';

const sendXCM = async () => {
  // 2. Create Substrate API Provider
  const substrateProvider = new WsProvider(providerWsURL);
  const api = await ApiPromise.create({ provider: substrateProvider });

  // 3. Create Keyring Instance
  await cryptoWaitReady();
  const keyring = new Keyring({ type: 'sr25519' });
  const alice = keyring.addFromUri(MNEMONIC);

  // 4. Create the Extrinsic
  const tx = await api.tx(txCall).signAndSend(alice, (result) => {
    // 5. Check Transaction Status
    if (result.status.isInBlock) {
      console.log(
        `Transaction included in blockHash ${result.status.asInBlock}`
      );
    }
  });

  api.disconnect();
};

sendXCM();
Once you have the code set up, you can execute it with node, and the XCM message will be sent to initiate your Uniswap V2 swap in Moonbase Alpha:
And that is it! You've sent an XCM message, which performed a remote EVM call via XCM and resulted in a Uniswap V2-styled swap in Moonbase Alpha. But let's go into more detail about what happened.
This action will emit different events. The first one is the only relevant in the relay chain, and it is named xcmPallet.Sent, which is from the xcmPallet.send extrinsic. In Moonbase Alpha, the following events emitted by the parachainSystem.setValidationData extrinsic (where all the inbound XCM messages are processed) are of interest:
parachainSystem.DownwardMessagesReceived— states that there was an XCM message receivedevm.Log— internal events emitted by the different contract calls. The structure is the same: contract address, the topics, and relevant dataethereum.Executed— contains information on thefromaddress, thetoaddress, and the transaction hash of an EVM call donepolkadotXcm.AssetsTrapped— flags that some assets were in holding and were not deposited to a given address. If theTransactXCM instruction does not exhaust the tokens allocated to it, it will execute aRefundSurplusafter the XCM is processed. This instruction will take any leftover tokens from the execution bought and put them in holding. We could prevent this by adjusting the fee provided to theTransactinstruction, or by adding the instruction right after theTransactdmpQueue.ExecutedDownward— states the result of executing a message received from the relay chain (a DMP message). In this case, theoutcomeis marked asComplete
Our XCM was successfully executed! If you visit Moonbase Alpha Moonscan and search for the transaction hash, you'll find the Uniswap V2 swap that was executed via the XCM message.
Challenge
Do a Uniswap V2 swap of MARS for any other token you want. Note that in this case, you'll have to remotely execute an ERC-20 approve via XCM first to allow the Uniswap V2 Router to spend the tokens on your behalf. Once the approval is done, you can send the XCM message for the swap itself.
| Created: December 10, 2022