Interacting with Moonbeam Safe
Introduction
A single-signature wallet, or singlesig for short, is a wallet in which only one owner holds the private key, and therefore has control over all the assets that account holds. Moreover, if the private key is lost, then access to the wallet and the funds are lost forever.
To solve this problem, multi-signature wallets, or multisig for short, have been introduced. With a multisig wallet there is more than one owner, so one owner could lose their keys and the others would still have access to the wallet and funds. In addition, multisig wallets can require threshold signing, where a proposal is only executed as a transaction if a certain amount of approvals are attained. Therefore creating an extra layer of security.
To help manage singlesig and multisig wallets, Gnosis Safe was forked to create Moonbeam Safe. The Safe can be configured as a multisig contract that allows two or more owners to hold and transfer funds to and from the Safe. You can also configure the Safe to be a singlesig contract with only one owner.
This guide will show you how to create a multisig Safe on the Moonbase Alpha TestNet. You will also learn how to send DEV and ERC-20 tokens to and from the Safe, and how to interact with smart contracts using the Safe. This guide can be adapted for Moonbeam and Moonriver.
Checking Prerequisites
Before diving into the guide, you'll need to have a few MetaMask accounts loaded up with funds, some ERC-20 tokens on hand to send to the Safe, and a deployed smart contract to interact with.
MetaMask Accounts
For this guide, you will be creating a Safe on Moonbase Alpha to interact and manage your funds with. To connect to the Safe, you will need to have:
- MetaMask installed and connected to Moonbase Alpha
- At least two accounts each loaded with funds. You can get DEV tokens for testing on Moonbase Alpha once every 24 hours from the Moonbase Alpha Faucet
You will need at least two accounts because you will be setting up a multisig Safe with 3 owners, and 2/3 confirmations for any transaction to get executed. Therefore, throughout this guide you will need to switch back and forth between at least two of the accounts to be able to confirm and send transactions.
This guide will use the following accounts:
- Alice — 0xf24FF3a9CF04c71Dbc94D0b566f7A27B94566cac
- Bob — 0x3Cd0A705a2DC65e5b1E1205896BaA2be8A07c6e0
- Charlie — 0x798d4Ba9baf0064Ec19eB4F0a1a45785ae9D6DFc
ERC-20 Tokens
Later on in this guide, you will be learning how to send and receive ERC-20 tokens to and from the Safe. So you will need to have deployed some ERC-20 tokens and added them to your MetaMask account. To do so, you can check out the Using Remix to Deploy to Moonbeam guide, in particular the Deploying a Contract to Moonbeam and Interact with a Moonbeam-based ERC-20 sections will show you how to deploy an ERC-20 token and import it into MetaMask.
Deployed Smart Contract
Towards the end of this guide, you will be learning how to interact with a smart contract using the Safe. So you will need to have a smart contract deployed to interact with. If you would like detailed instructions, you can refer to the Deploying a Contract to Moonbeam using Remix guide.
You can head to Remix and create a new file for the following SetText.sol contract:
pragma solidity ^0.8.0;

contract SetText {
    string public text;

    function setTextData(string calldata _text) public {
        text = _text;
    }
}
This is a simple contract with a single function, setTextData, that accepts a string and uses it to set the text variable.
You will need the contract address and the ABI, so make sure you have copied those somewhere or have access to them for later on.
Create a Safe
To get started creating a Safe, navigate to the Moonbeam Safe. For the purpose of this guide, you'll create a Safe on Moonbase Alpha, but you can also adapt the instructions to create a Safe on Moonbeam or Moonriver. To switch networks, simply click the network dropdown in the top right hand corner of the page.
Connect MetaMask
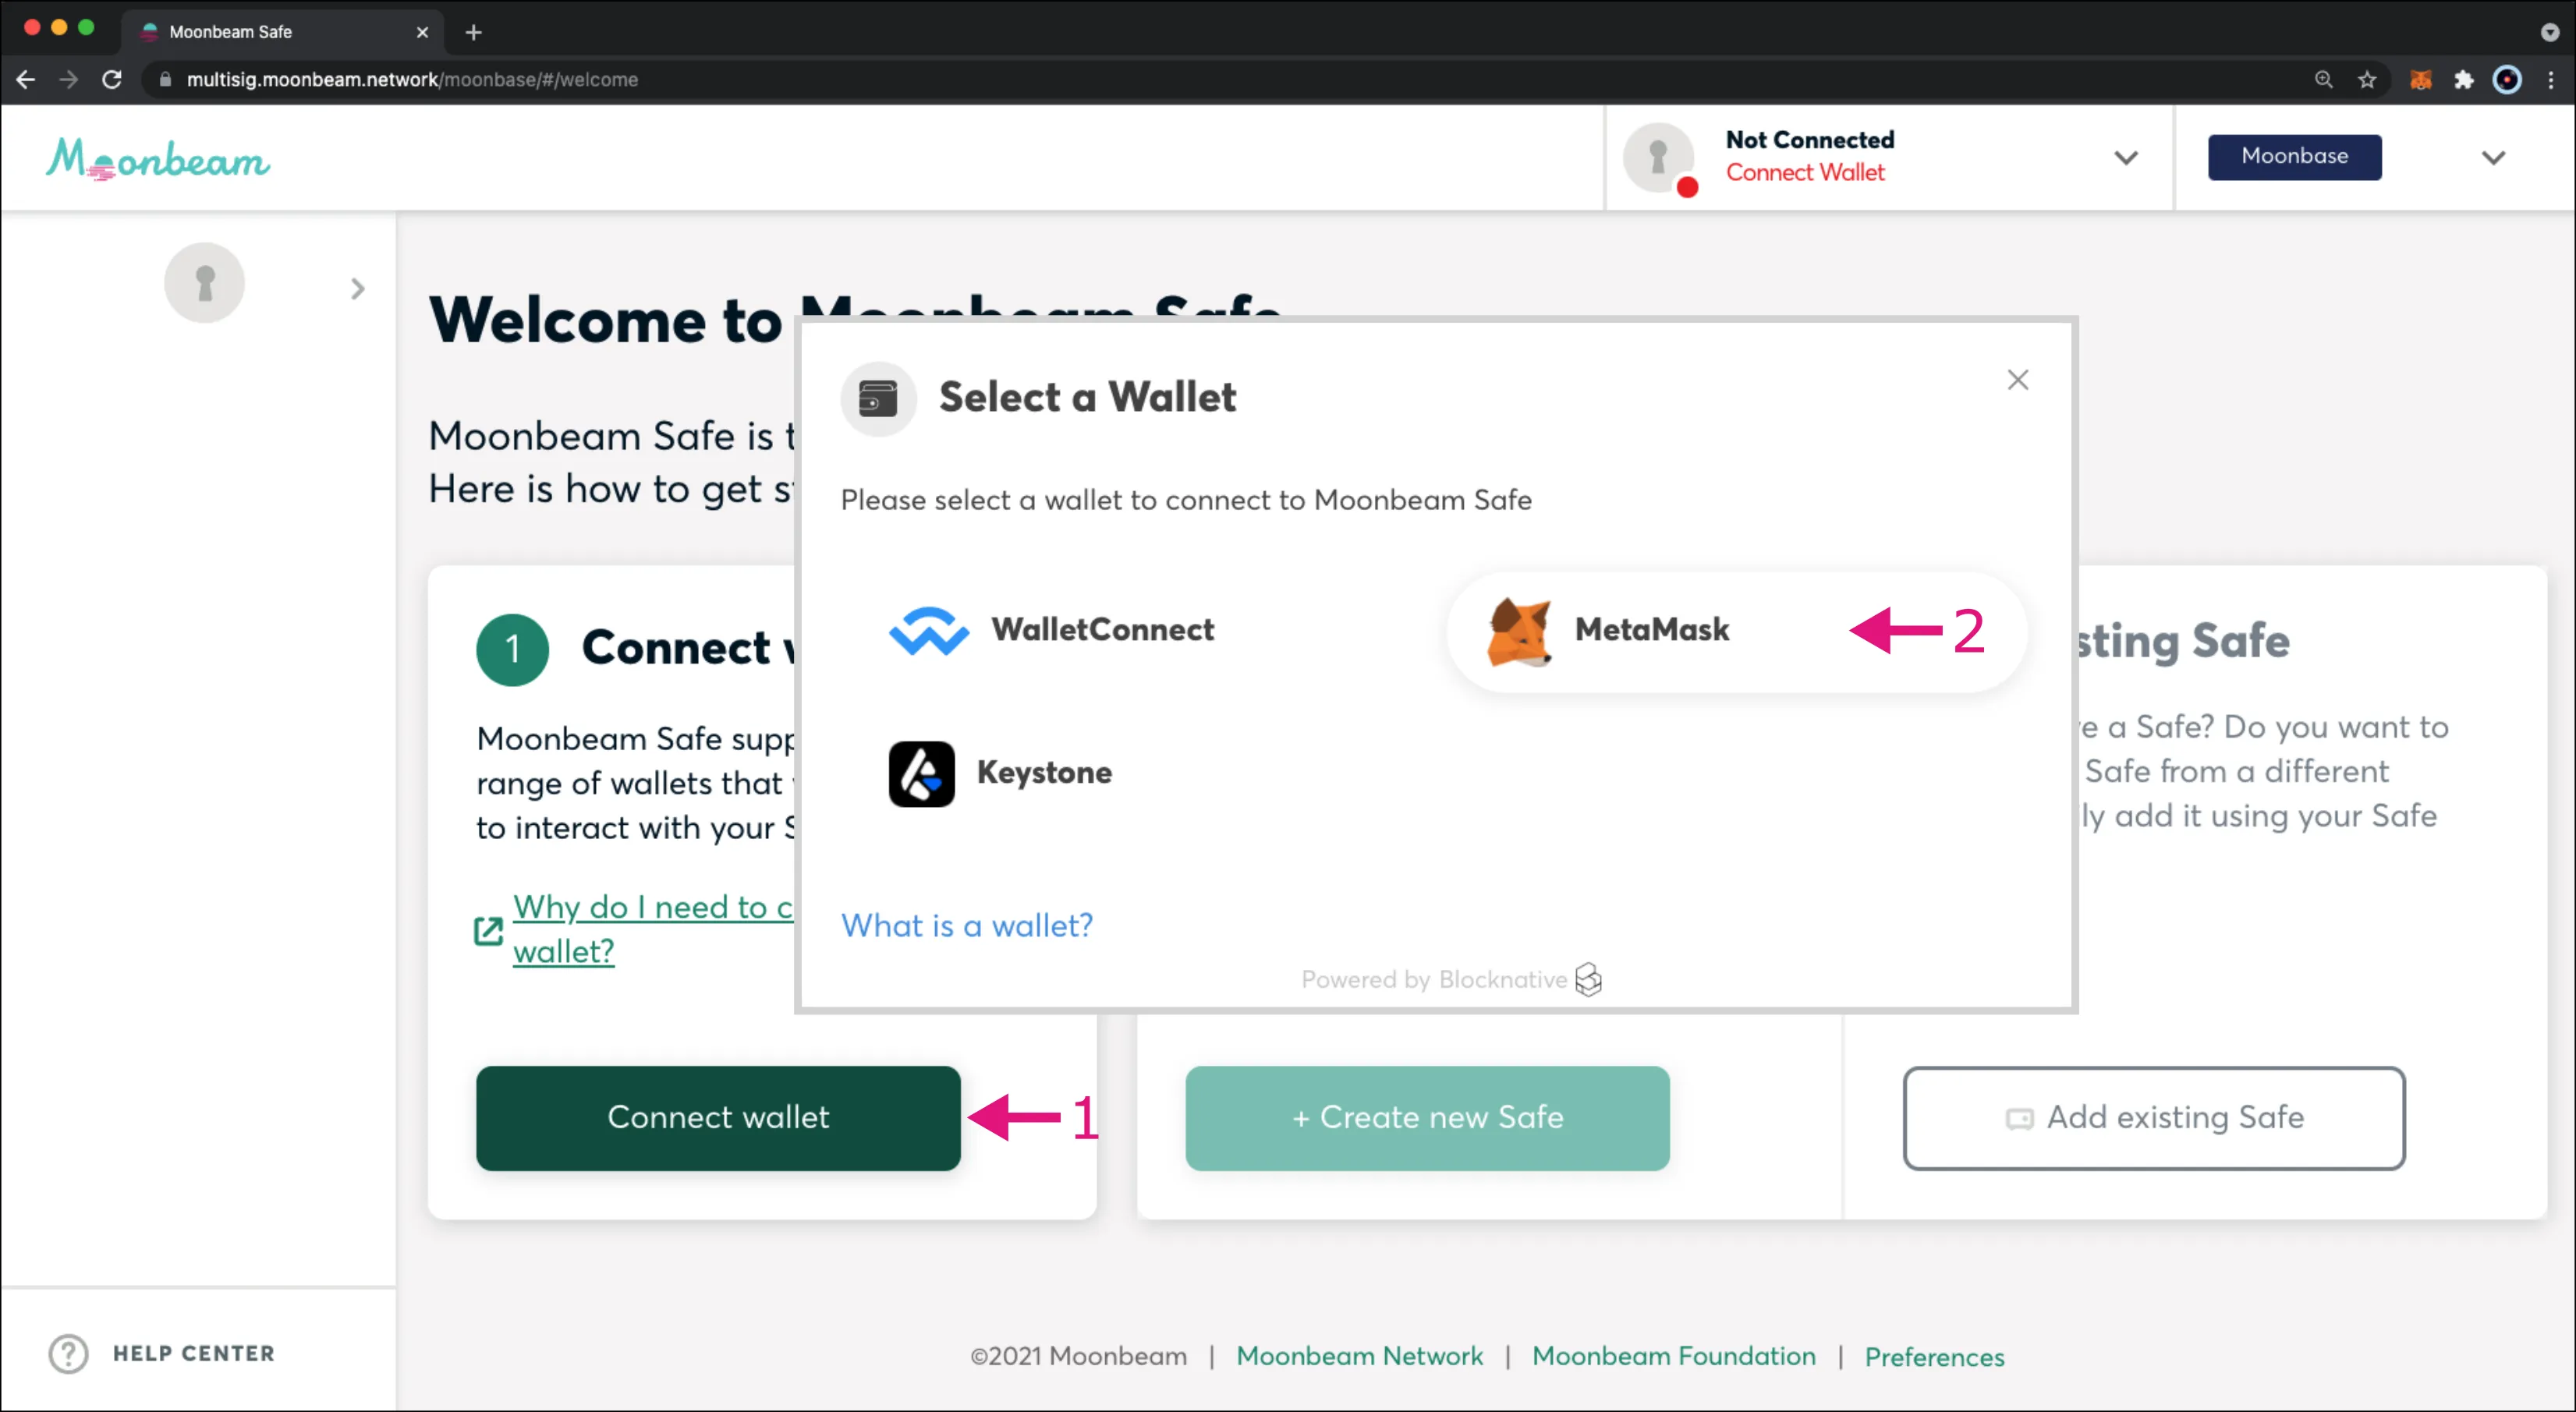
Once on the Moonbase Alpha page, you can begin to create a Safe by first connecting your wallet:
- Click Connect Wallet
- Select a wallet to connect to Moonbeam Safe. For this example you can use MetaMask. If MetaMask doesn't appear in the list of options, click Show More and select MetaMask
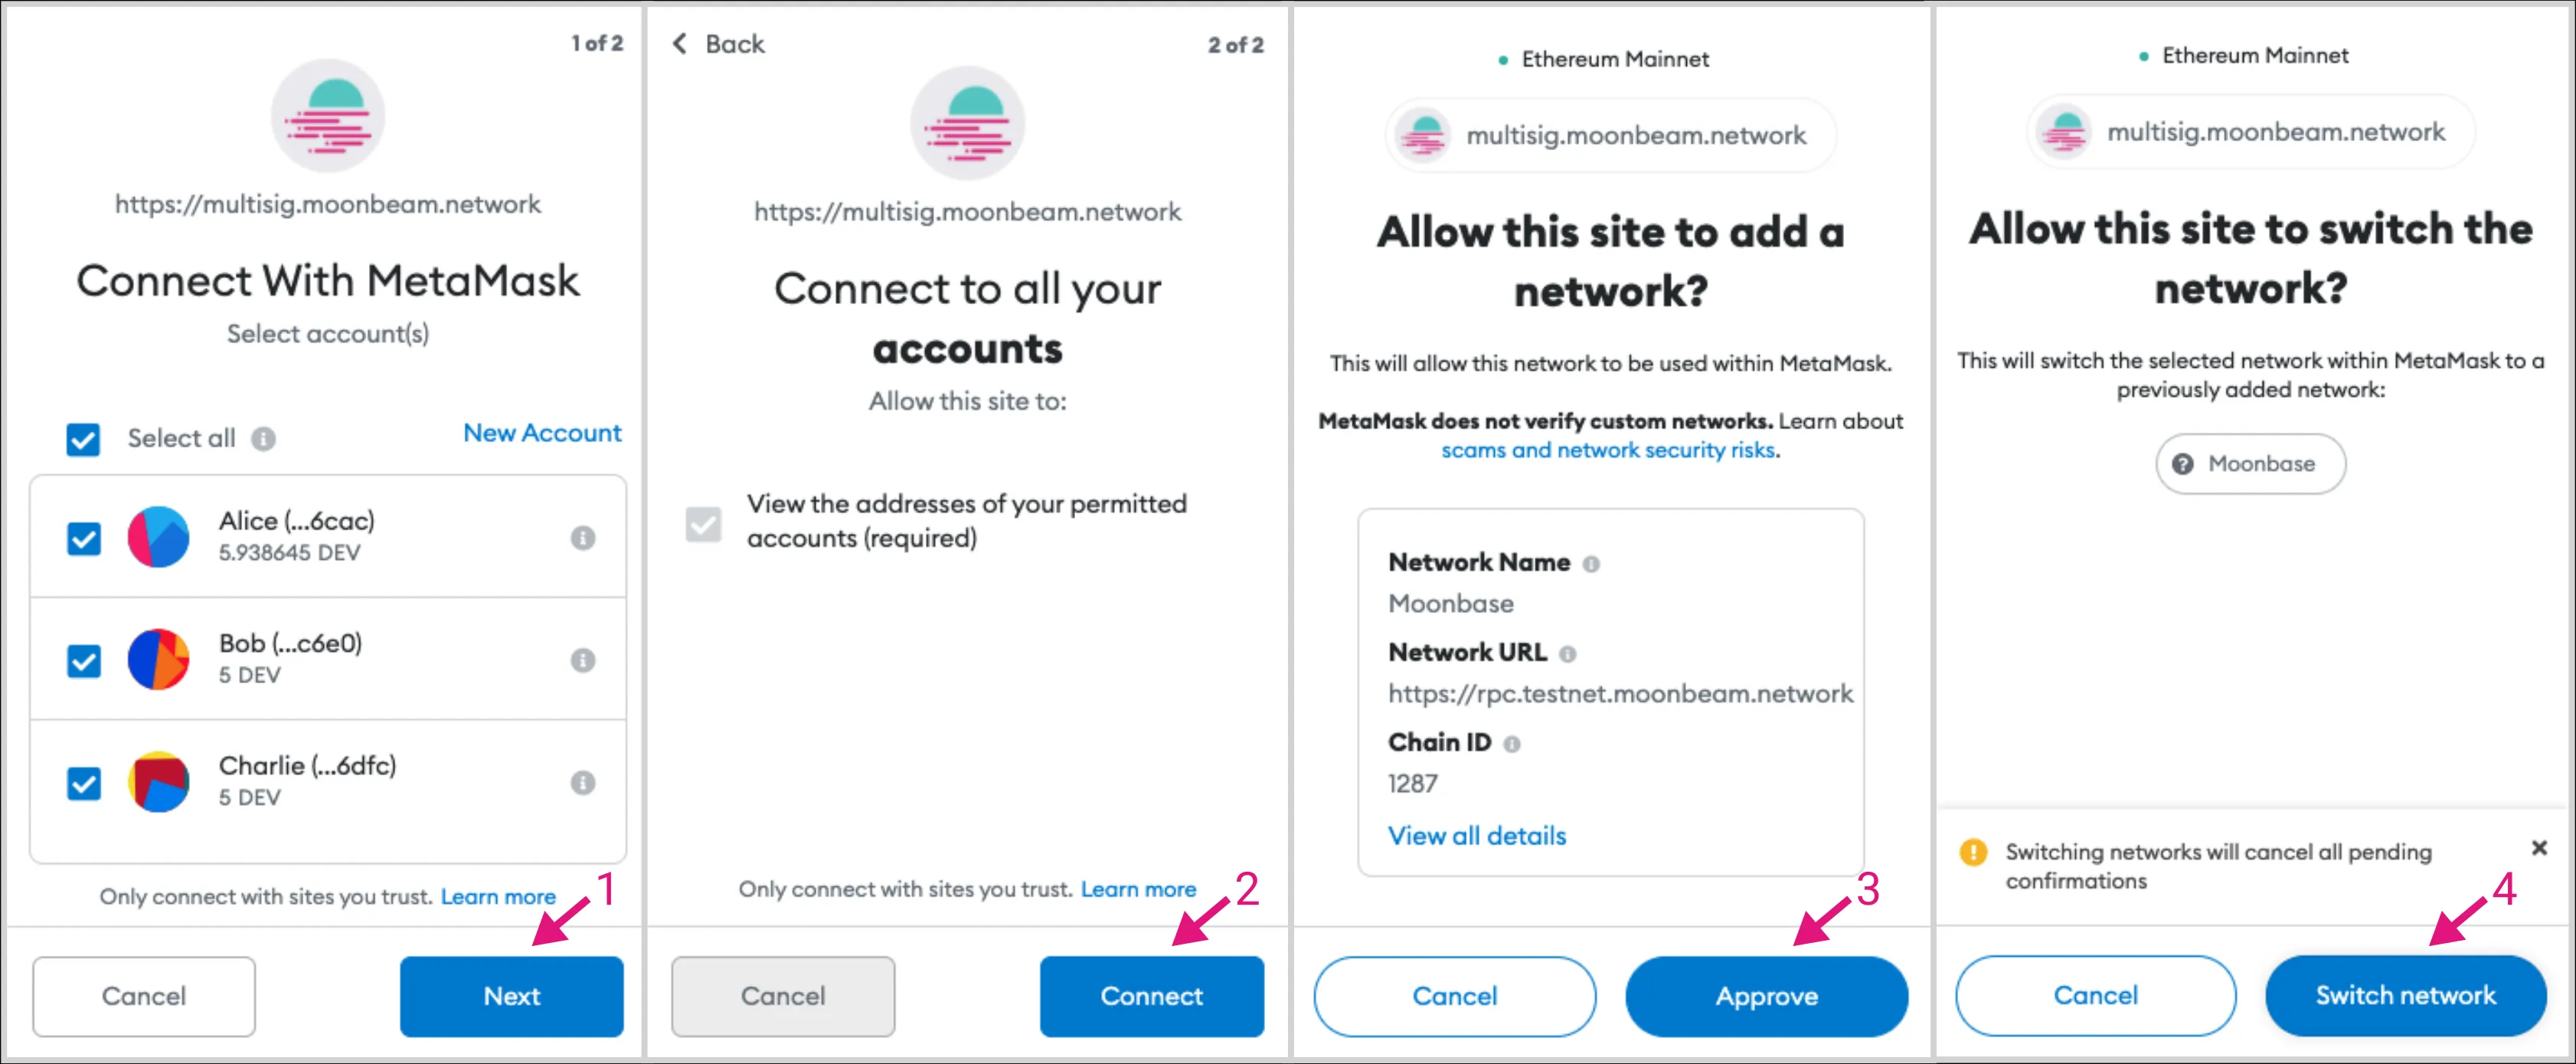
If you're not already signed into MetaMask, you will be prompted to sign in. You will then be guided through adding and connecting your accounts, and adding and switching to the Moonbase Alpha network:
- Select an account and connect to the Safe. You'll want to select at least 2 of the 3 owner accounts and then click Next. For this example, Alice, Bob, and Charlie's accounts have all been selected
- Connect to the selected accounts by clicking Connect
- If you are not connected to Moonbase Alpha, nor do you have the network added to your MetaMask, add Moonbase Alpha as a custom network by clicking Approve
- Switch the network to Moonbase Alpha by click Switch Network
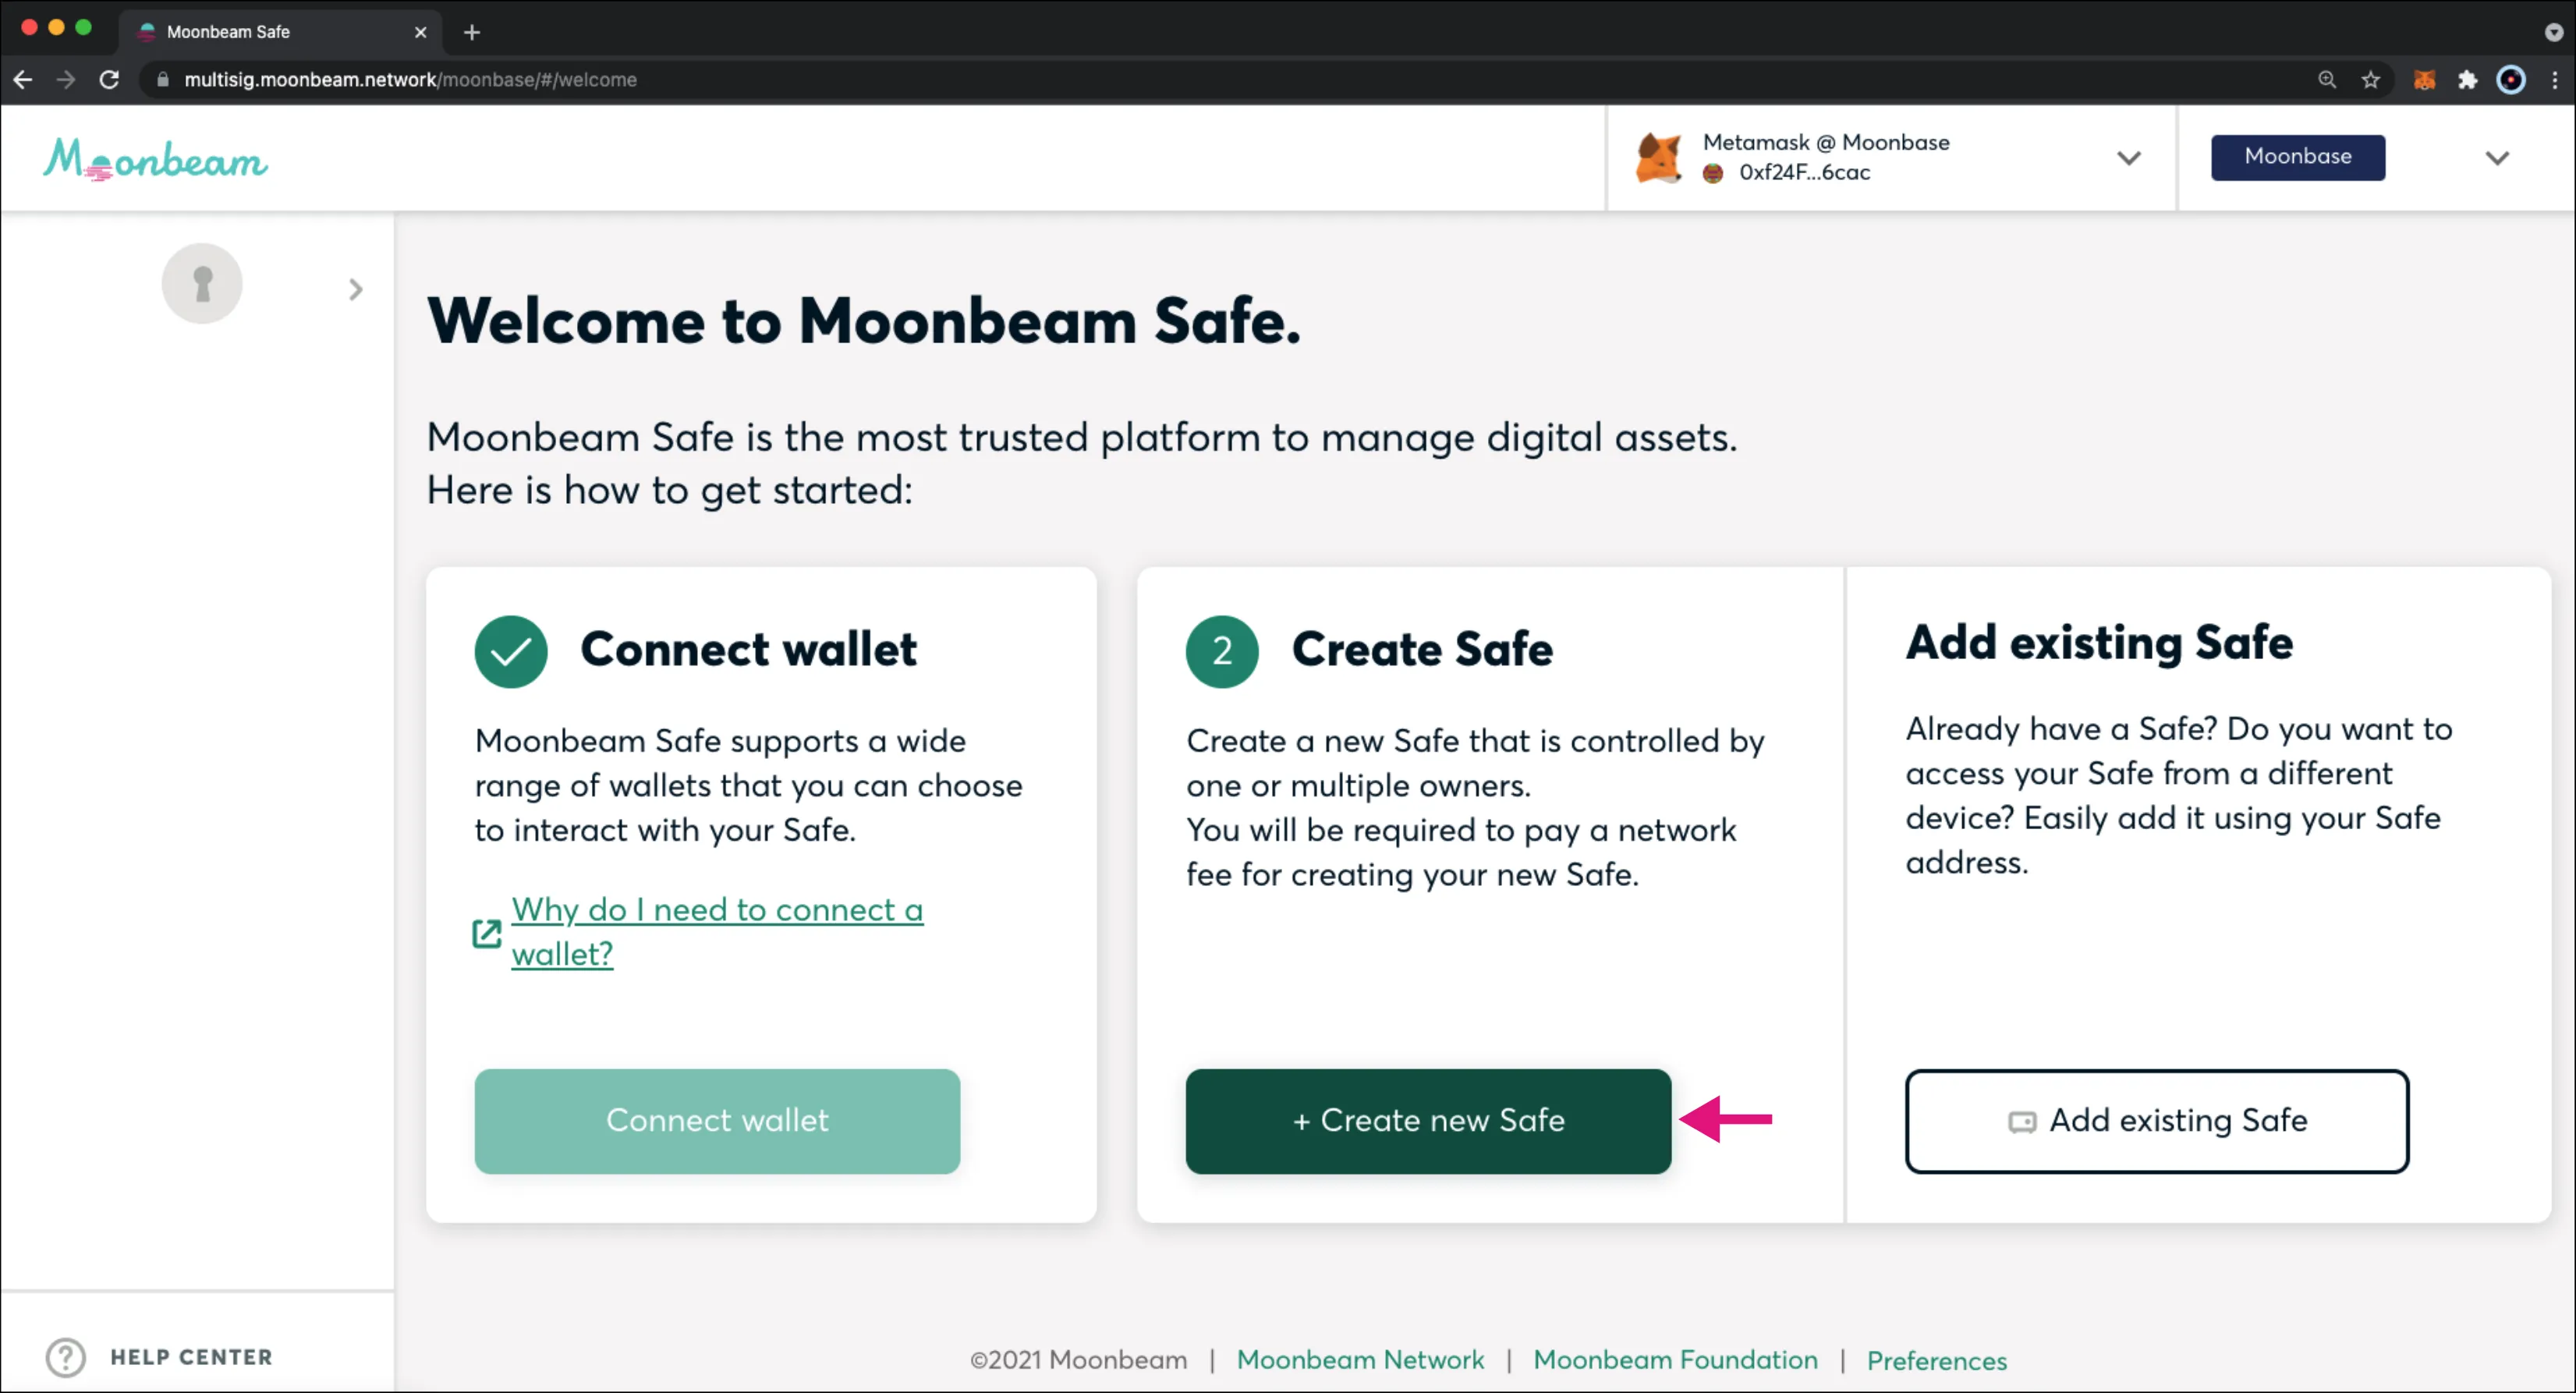
Now, in the top right hand corner, you can confirm you are connected to your MetaMask account on the Moonbase Alpha network. If you're using the development accounts, you should see Alice's account address. If not, double check your MetaMask and switch to Alice's account.
Create New Safe
To create a new Safe on Moonbase Alpha, click Create new Safe. You will be taken to a wizard that will walk you through creating your new Safe. By going through these steps and creating your Safe, you are consenting to the terms of use and the privacy policy. So, feel free to look those over before getting started.
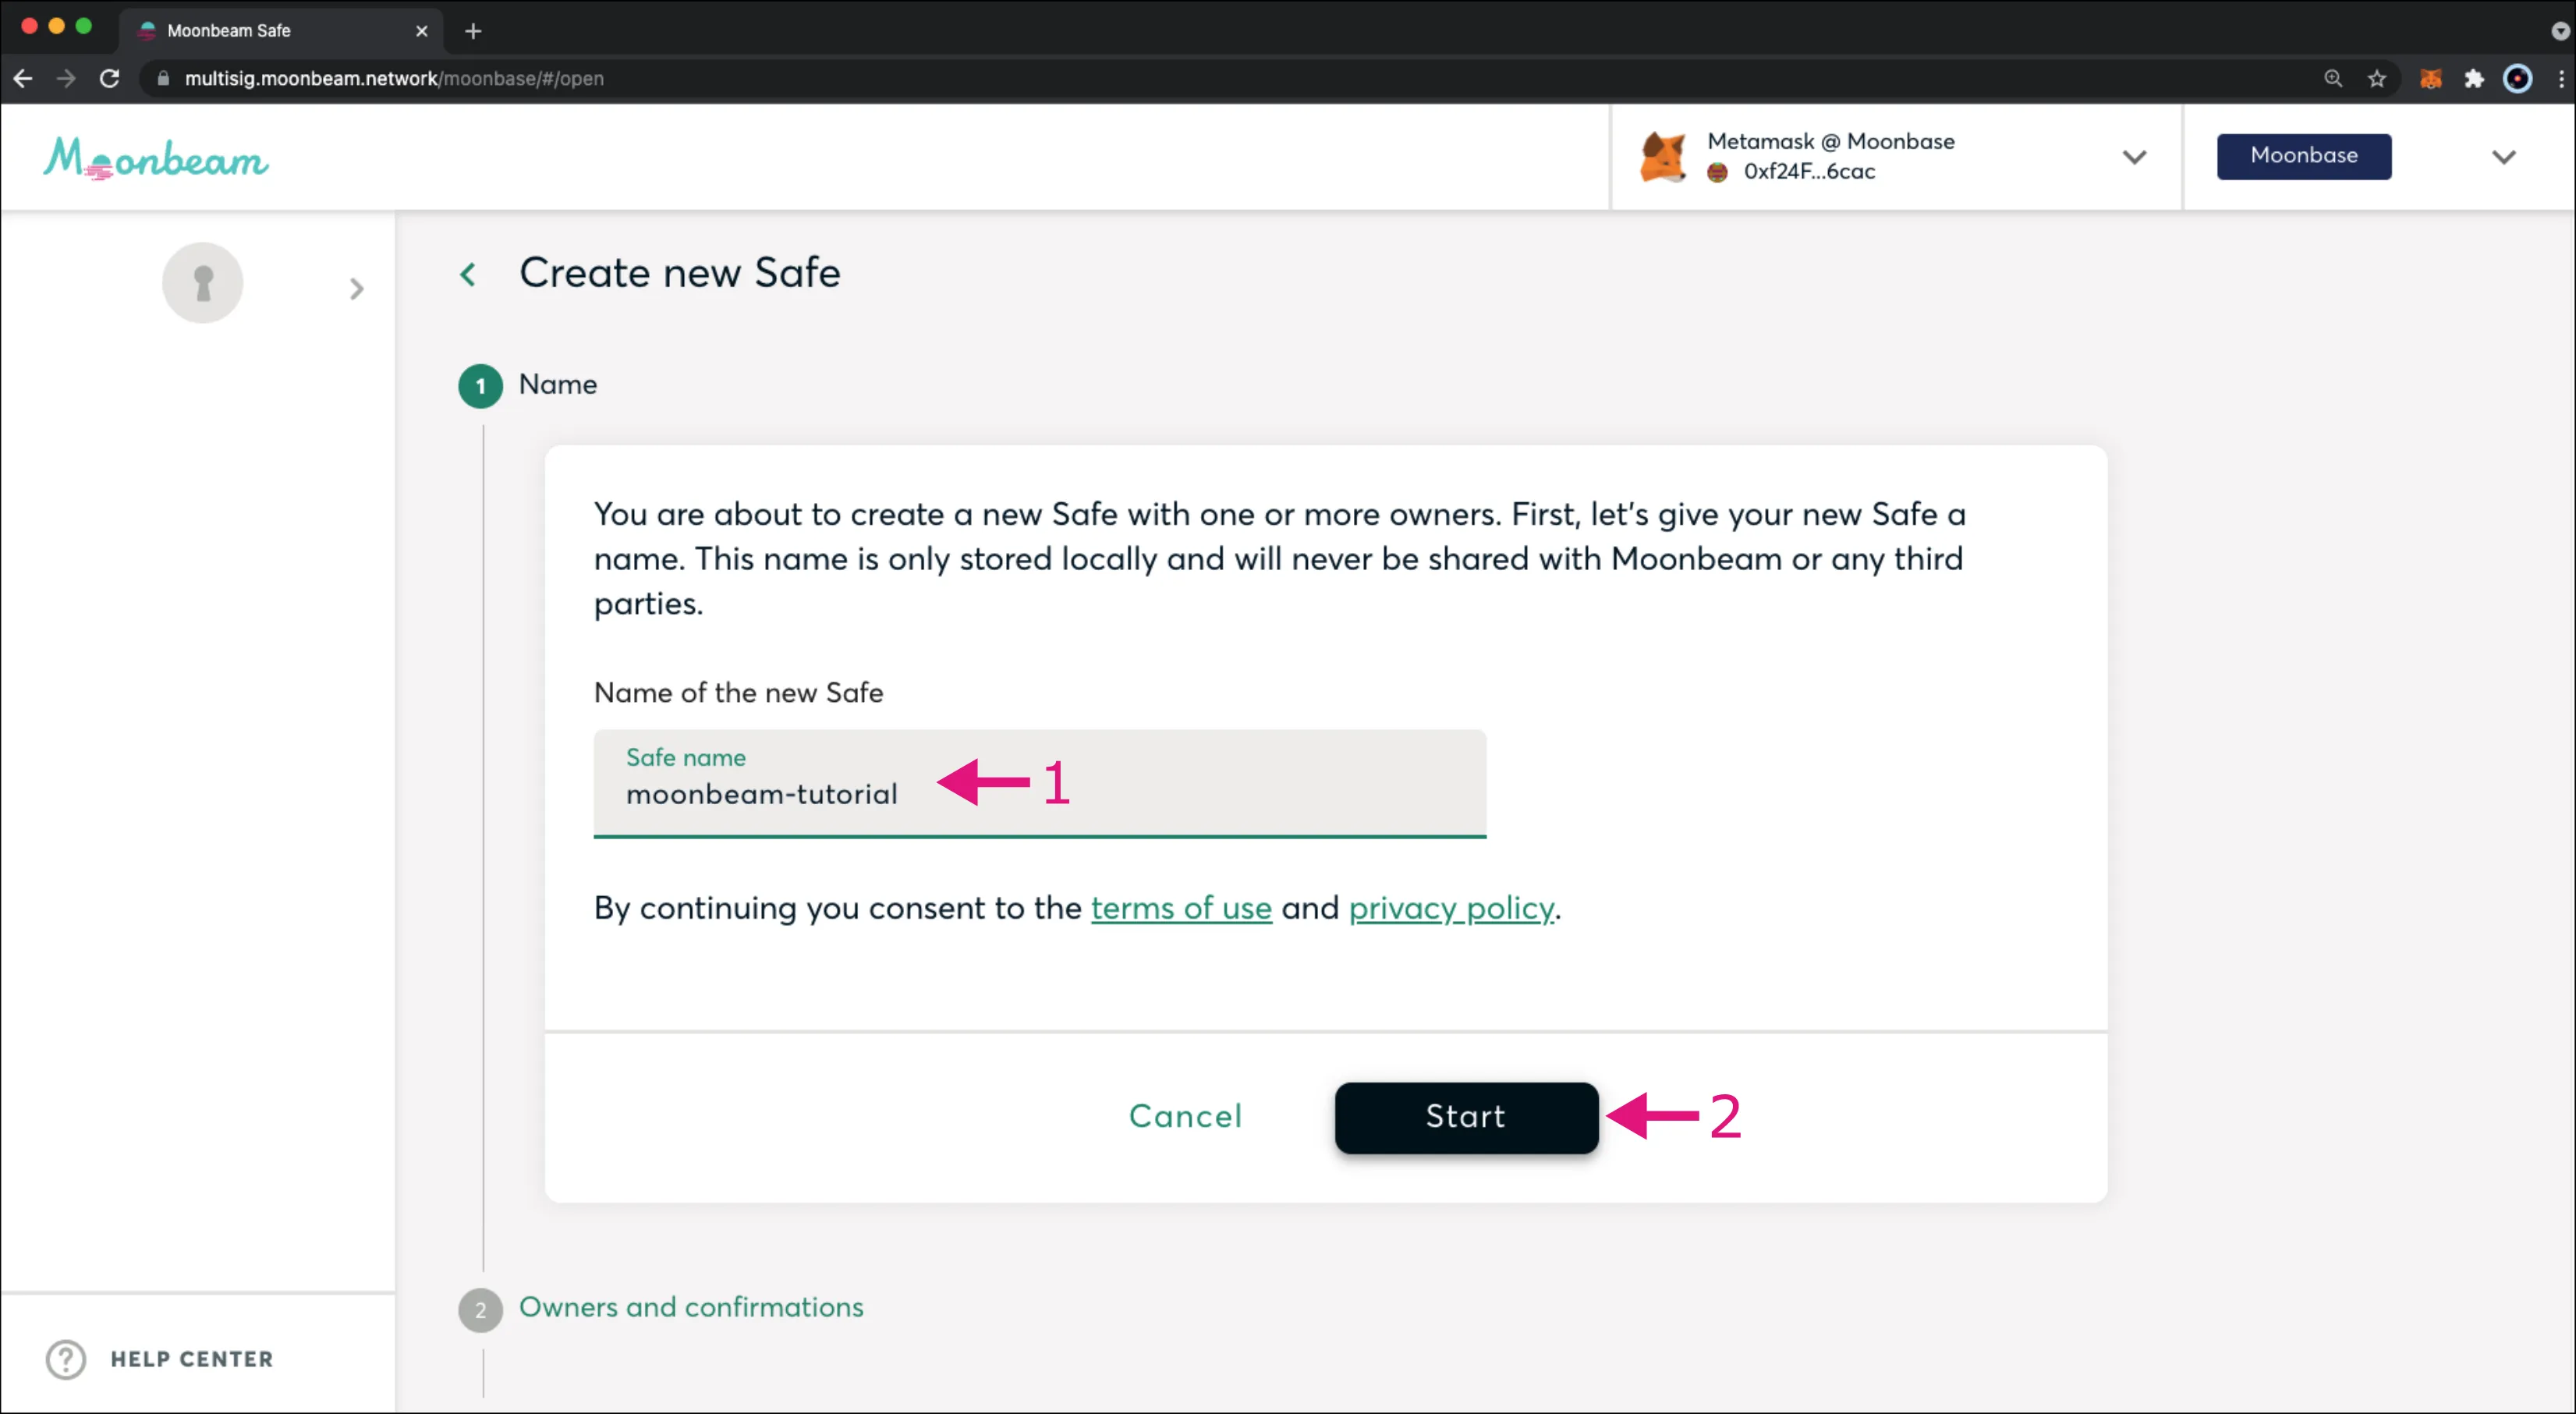
You will need to give your Safe a name:
- Enter the name of your new Safe, you can use
moonbeam-tutorial - Click Start
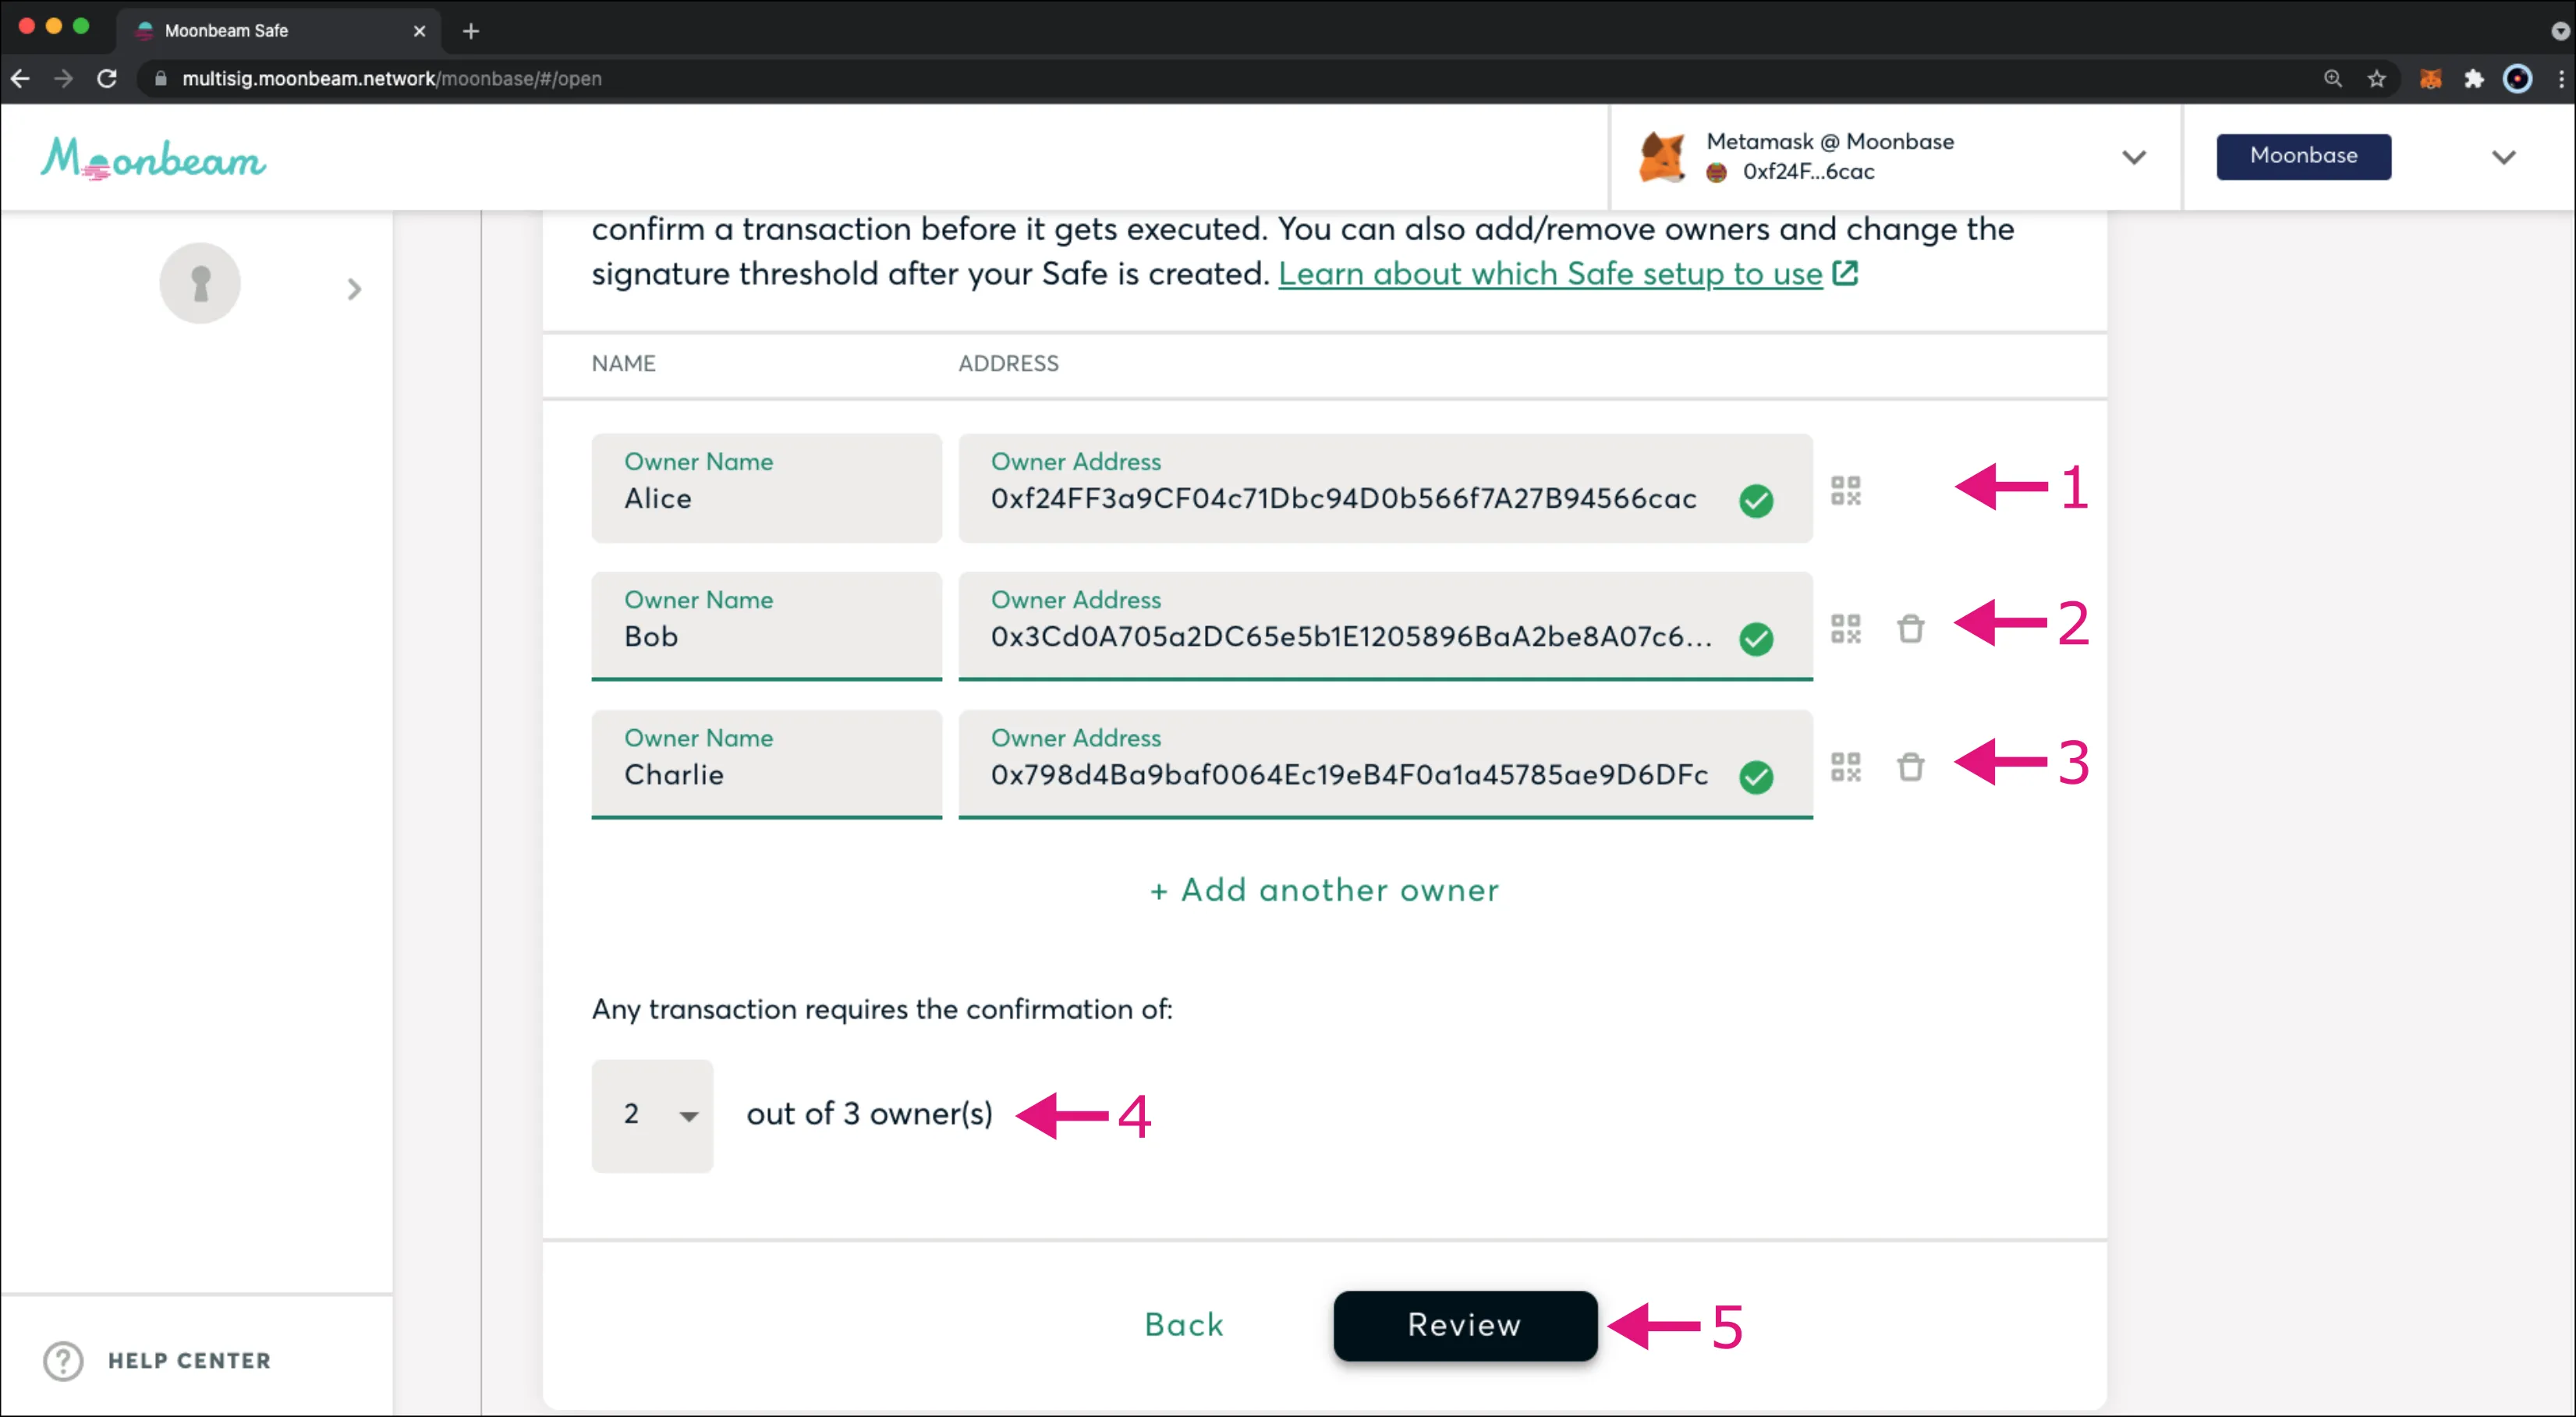
Next up is the owners and confirmations section of the wizard. In this section, you will add the owners of the Safe and specify the threshold. The threshold determines how many of the owners are required to confirm a transaction before the transaction gets executed.
There are many different setups that can be used when creating a Safe. There can be 1 or more owners of the Safe as well as varying threshold levels. Please note that it is not advised to create a Safe with just 1 owner as it creates the possibility of a single point of failure.
For this guide, you will create a multisig setup that has 3 owners and requires a threshold of 2, so at least 2 out of the 3 owners keys are required to execute transactions through the Safe.
Your account will automatically be prefilled in as the first owner, however this can be changed if you would like to use different accounts. For this example, Alice's account has been prefilled. In addition to Alice, you can also add Bob and Charlie as owners:
- Click Add another owner
- Enter Bob as the second owner, along with his address:
0x3Cd0A705a2DC65e5b1E1205896BaA2be8A07c6e0 - Enter Charlie as the third owner, along with his address:
0x798d4Ba9baf0064Ec19eB4F0a1a45785ae9D6DFc - Set the confirmation threshold to 2 out of 3 owners
- Click Review to go to the last step in the wizard
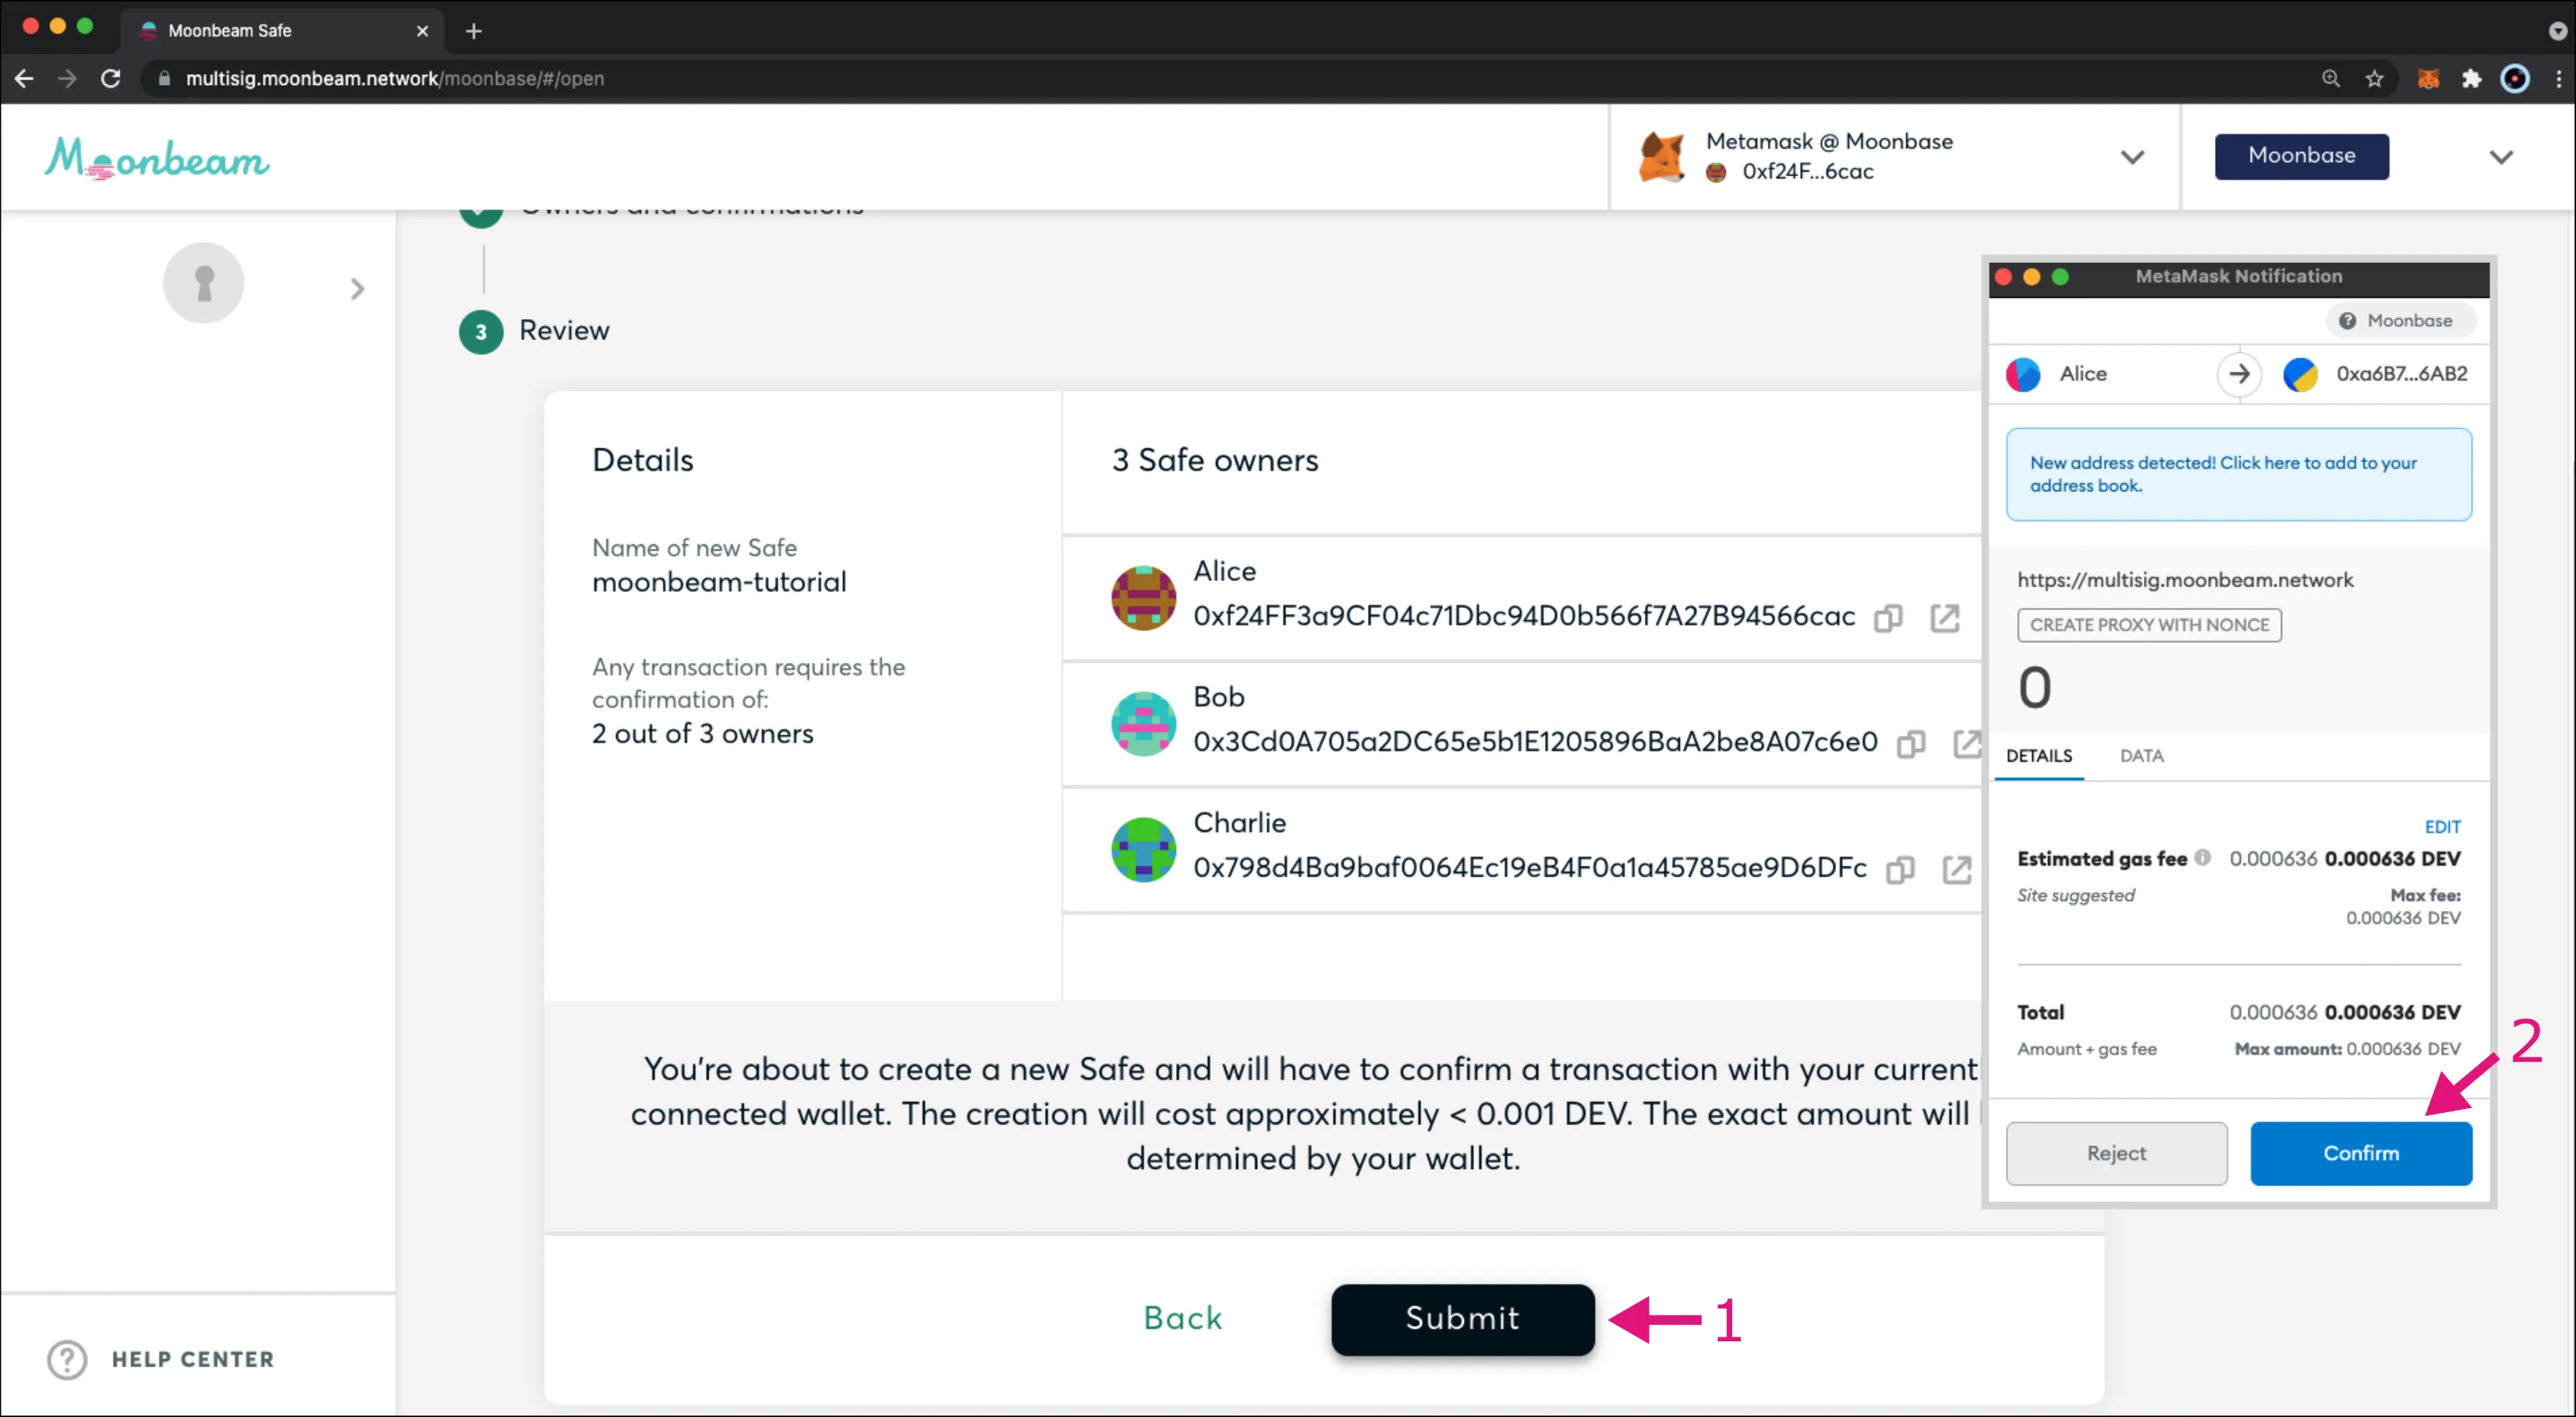
Finally, you can review all of the Safe and owner details and if everything looks ok:
- Click Submit to create your new Safe. The creation of the Safe will cost approximately less than .001 DEV tokens on Moonbase Alpha. MetaMask will pop-up and prompt you to confirm the transaction
- Click Confirm to send the transaction and create the Safe
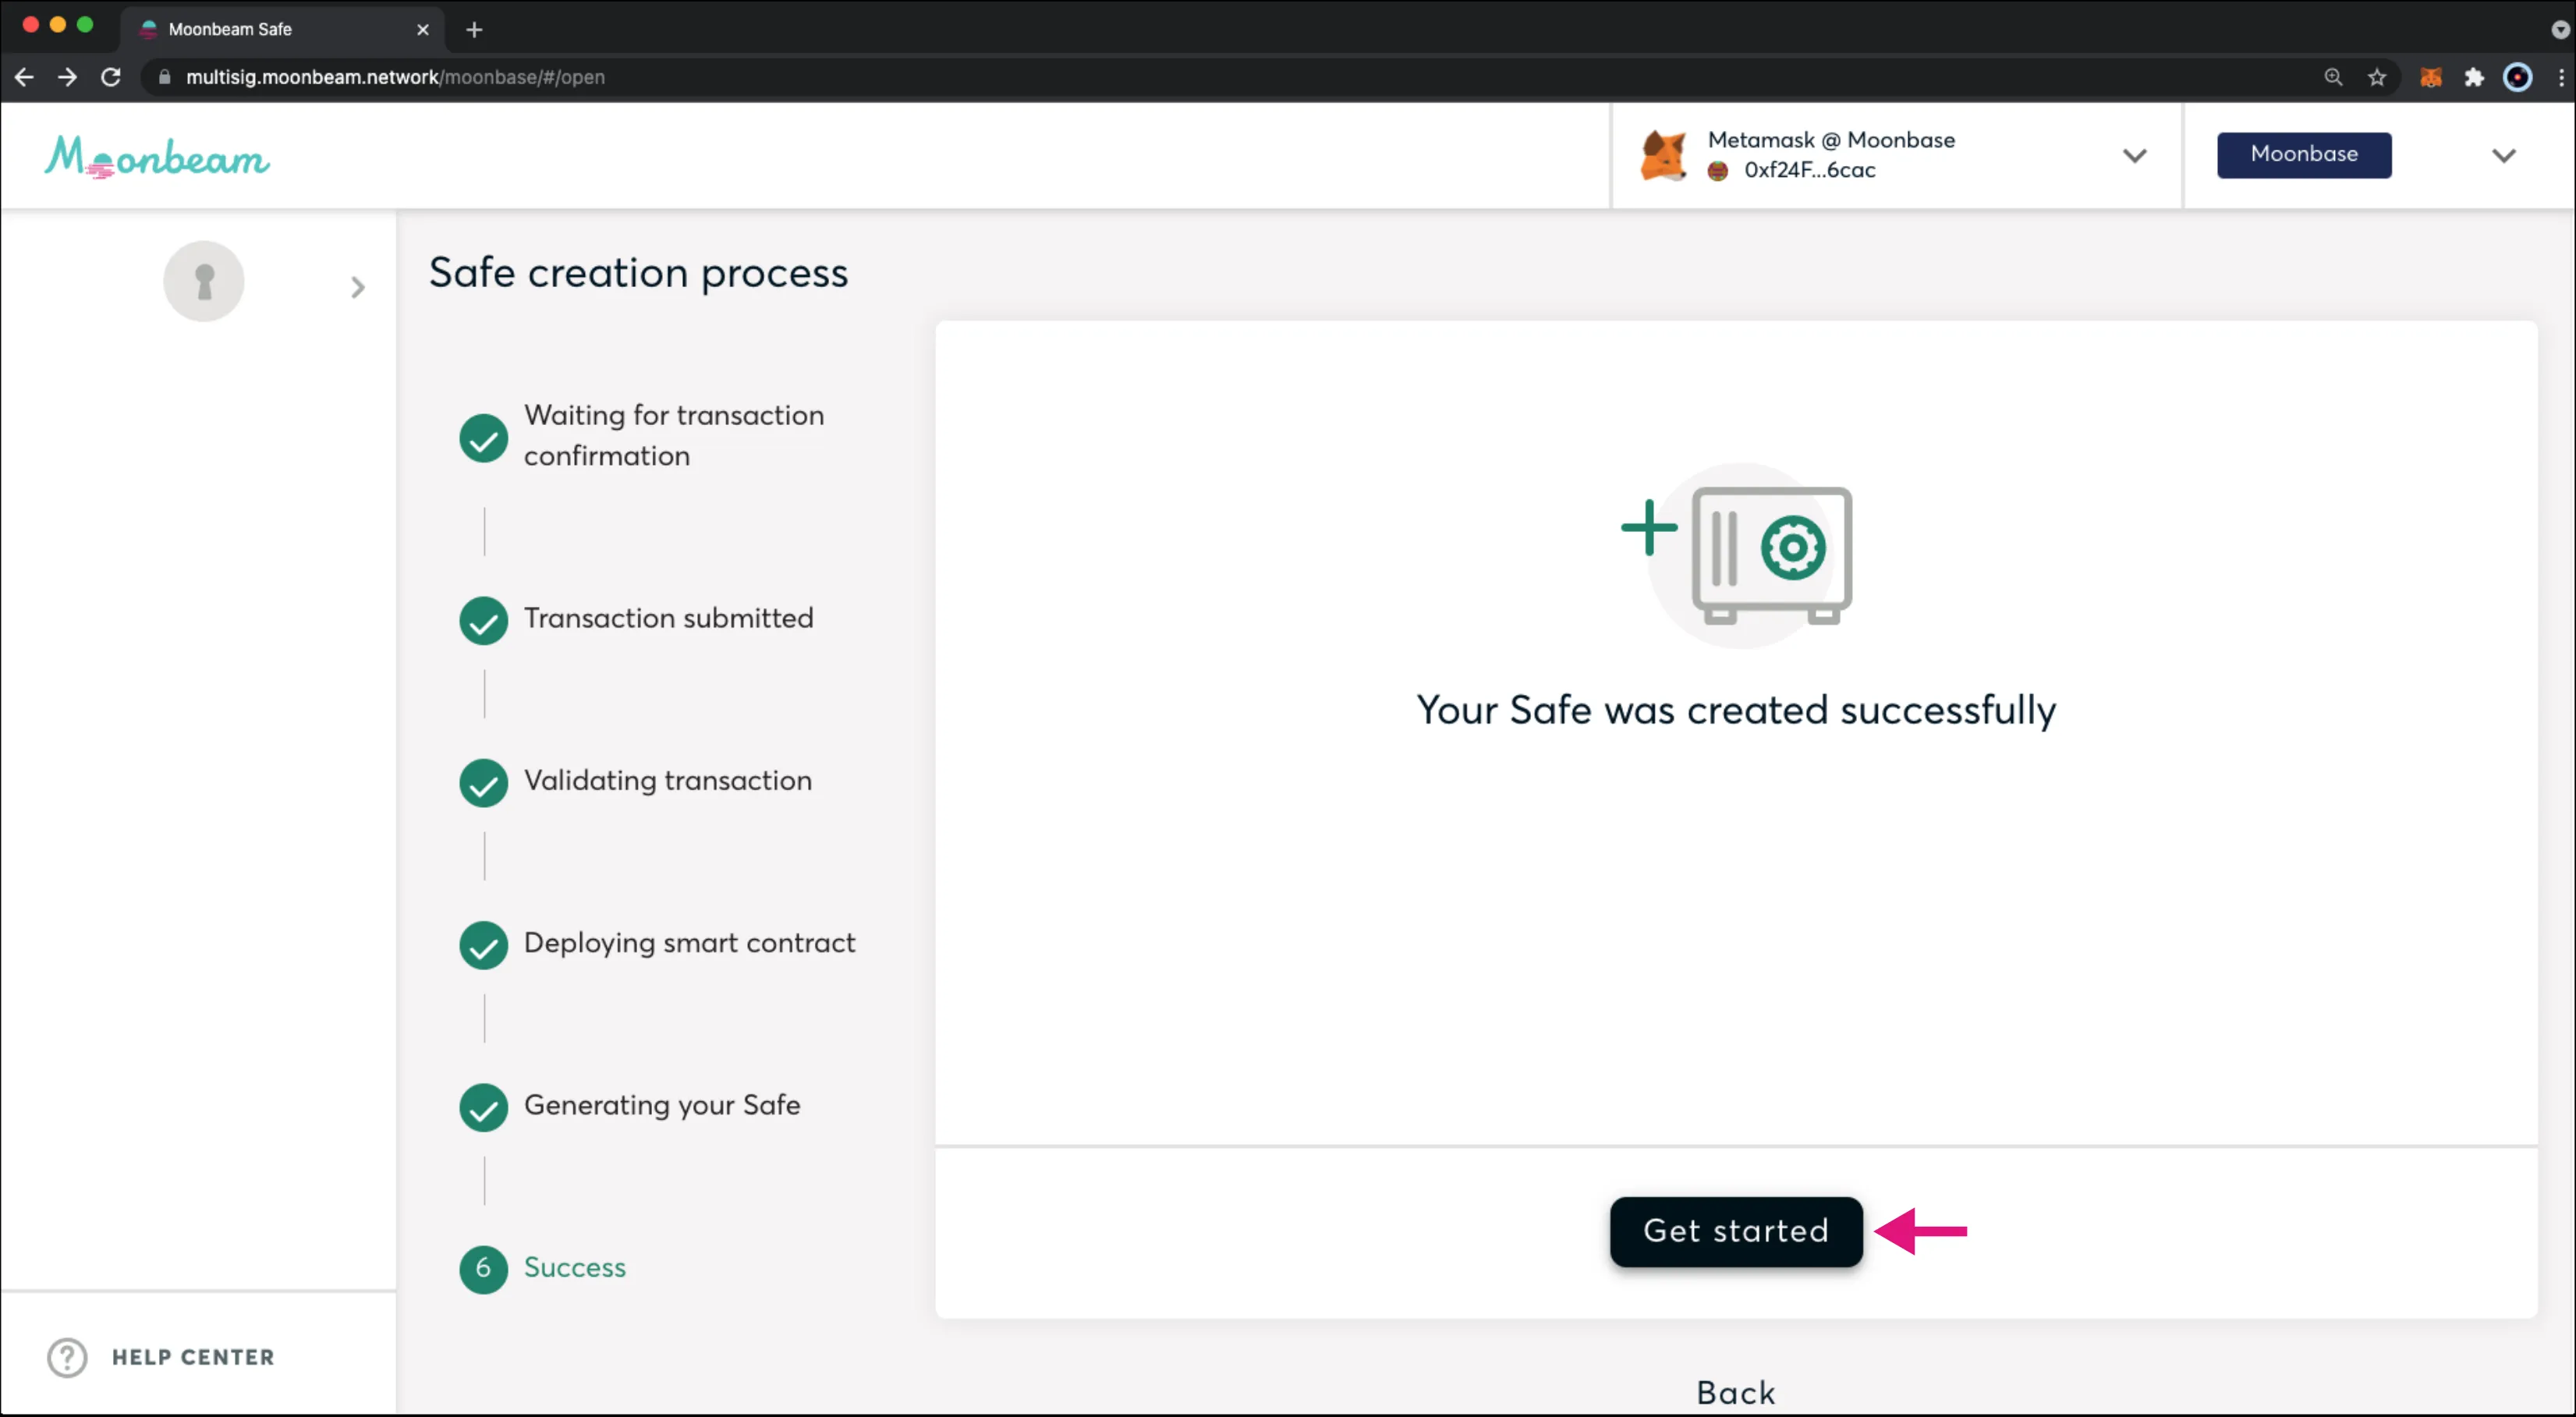
It could take a few minutes to process the transaction and create the Safe, but once it has been created you should see a message saying "Your Safe was created successfully". From there, you can click Get Started to load your Safe and start interacting with it.
Configure Safe
You can always manage your Safe and change some of the parameters set when creating it. To do you can click in the Settings option on the left hand side menu.
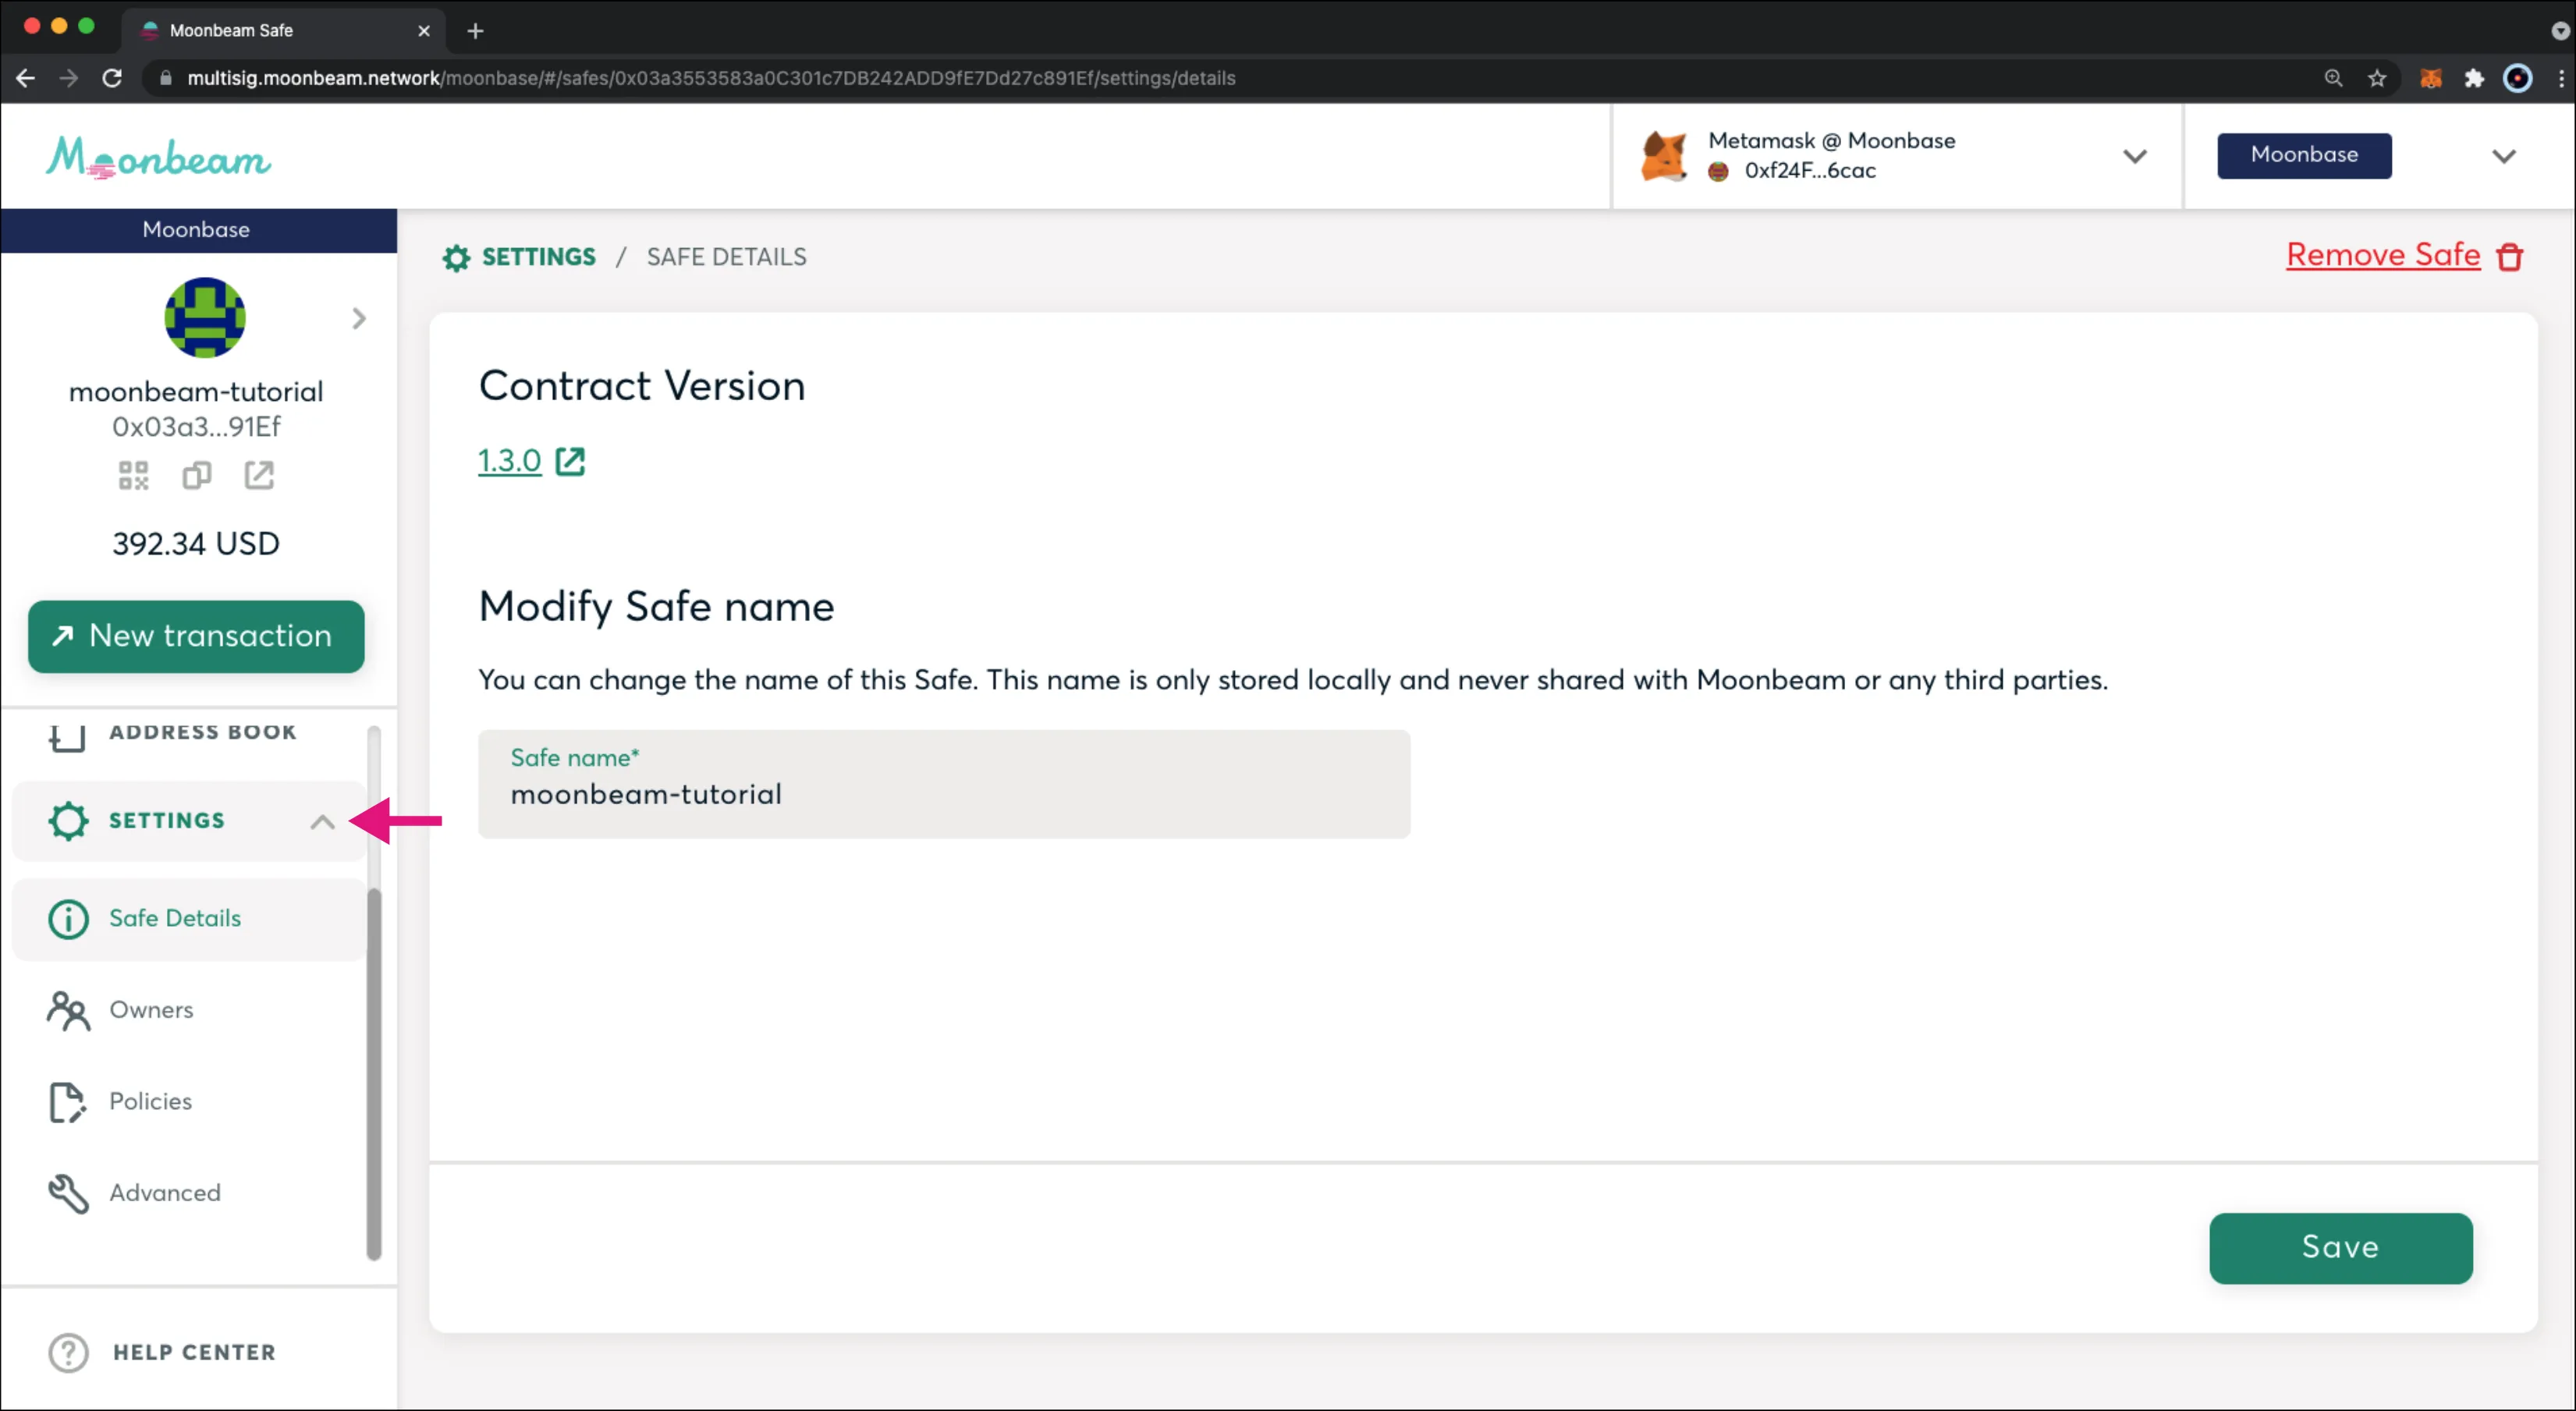
In there you have the following options:
- Safe Details — allows you to change the Safe name. This is a local action that requires no on-chain interaction
- Owners — allows you to initiate a on-chain proposal to add/remove owners to the Safe
- Policies — allows you to initiate a on-chain proposal to change the multisig threshold to execute the proposal as a transaction
- Advanced — allows you to check other parameters from the Safe, such as the nonce, modules, and transaction guard
Receive and Send Tokens
Receive Tokens
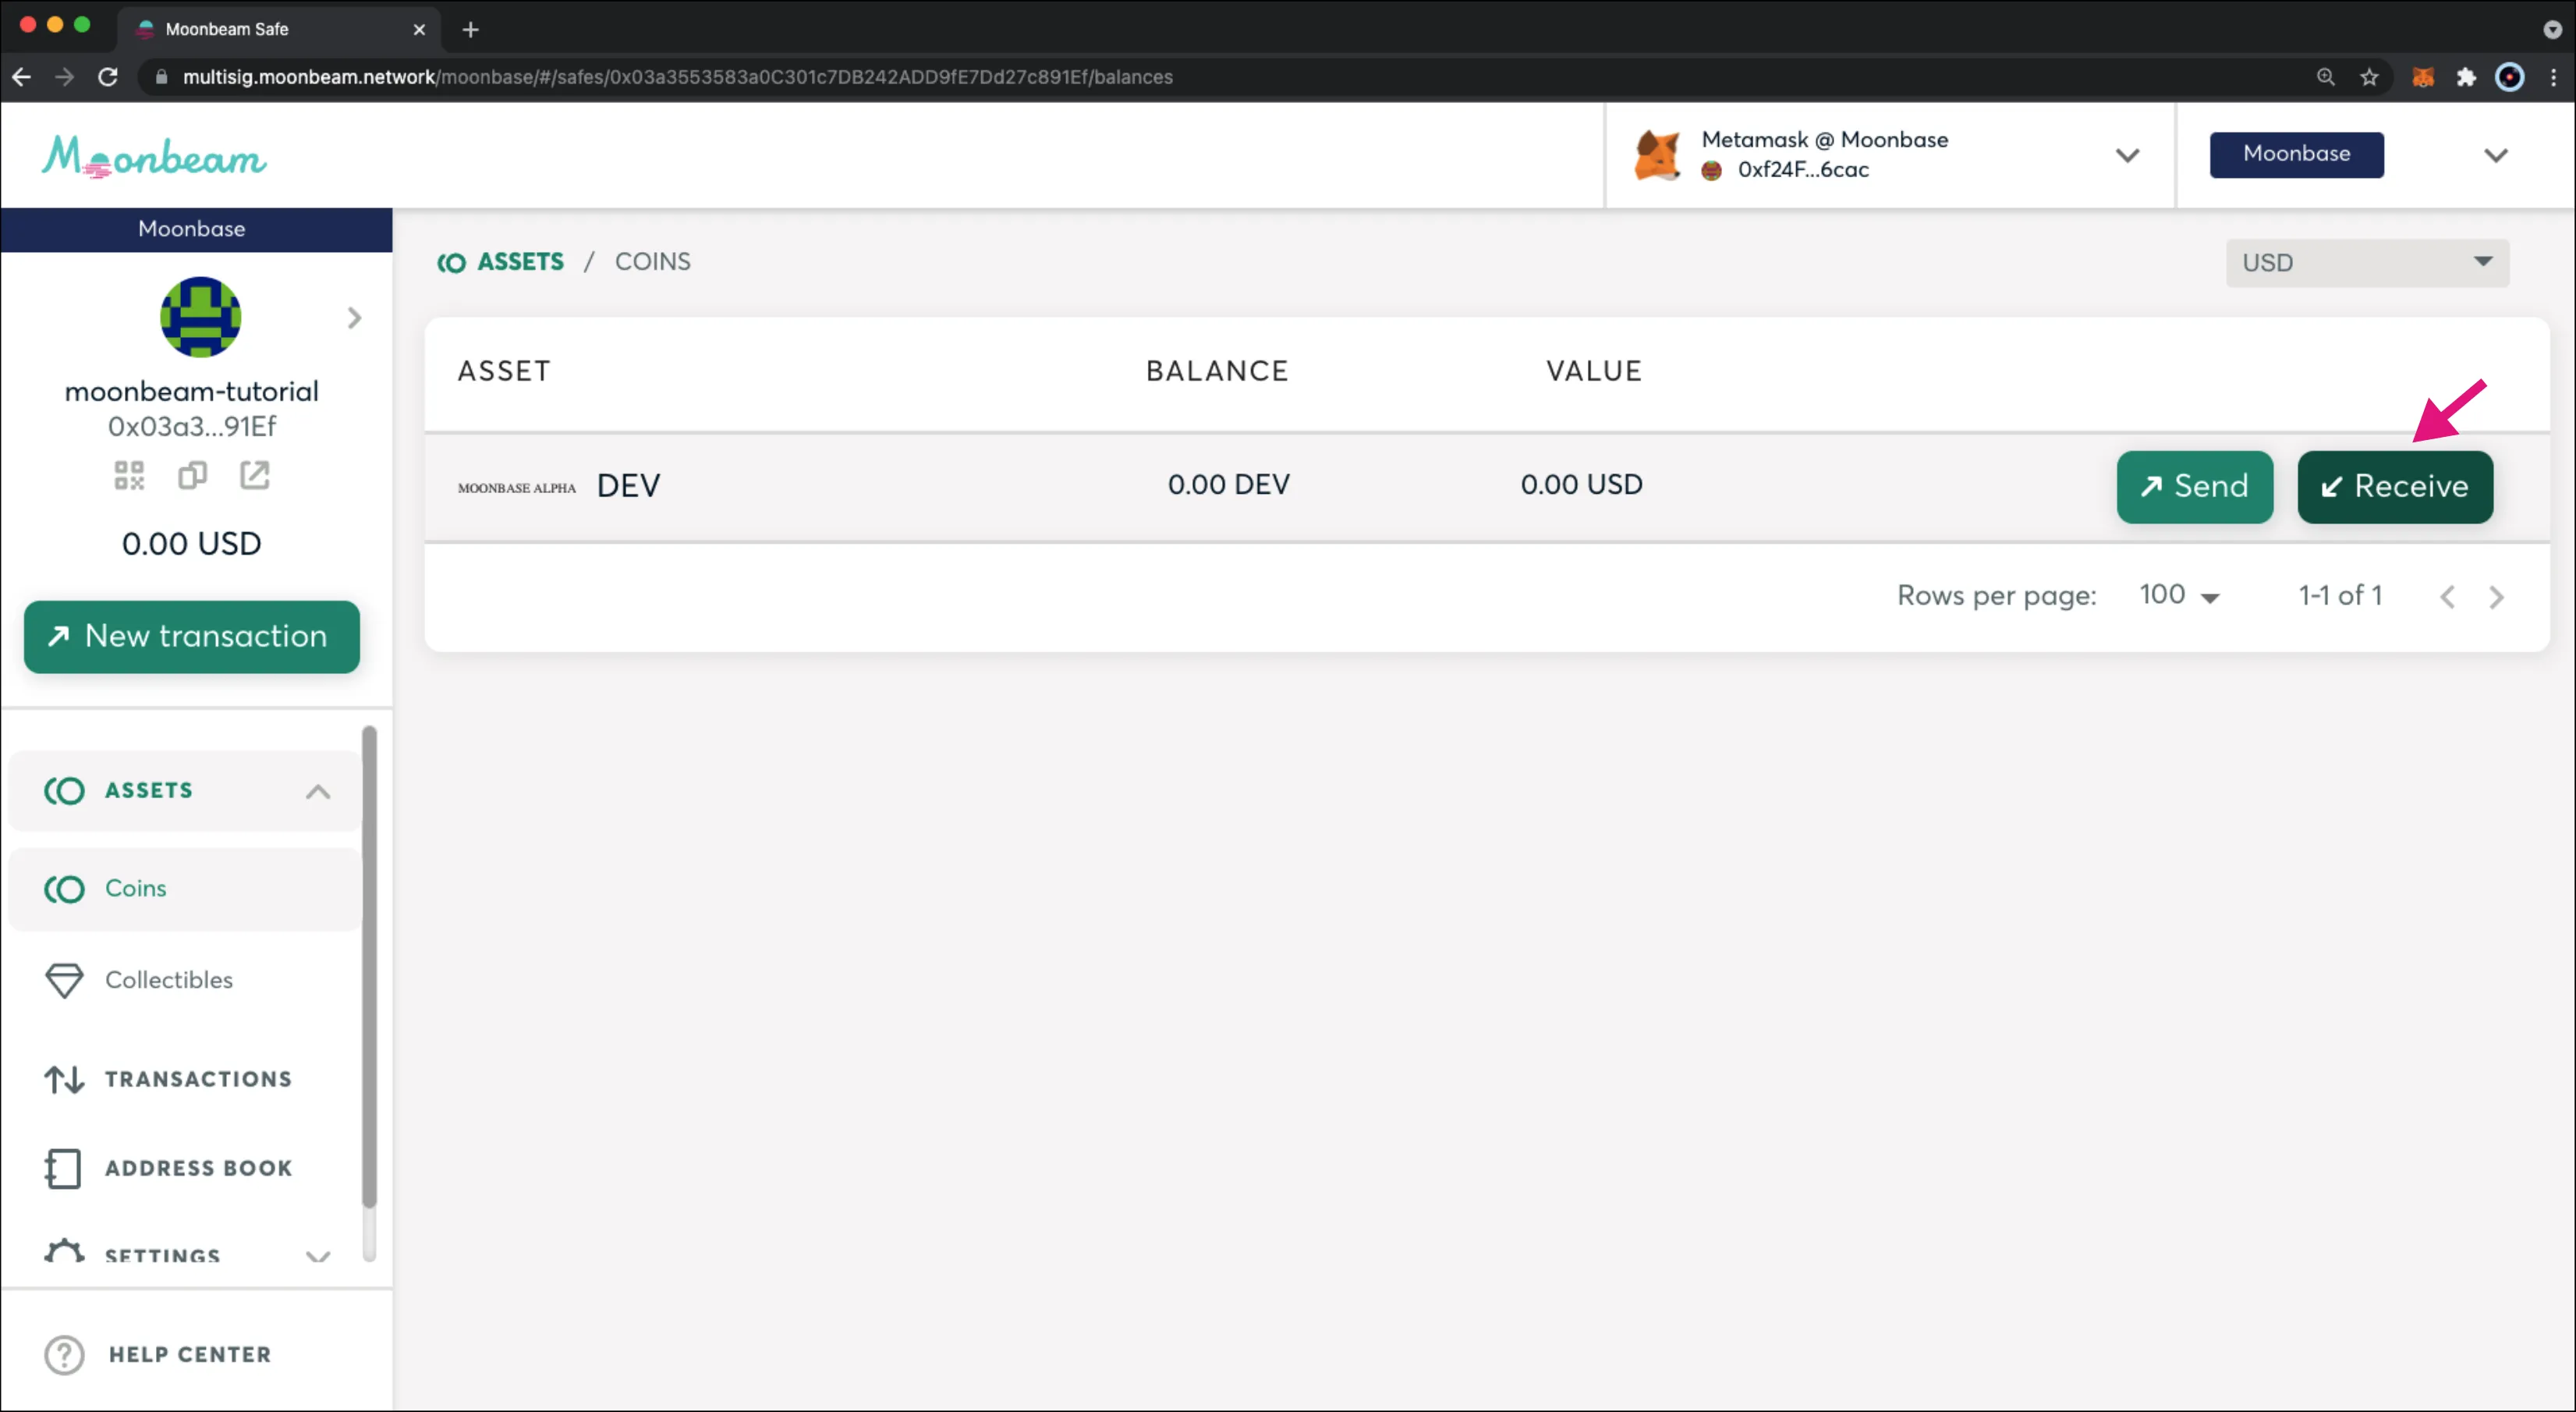
Now that you have created your Safe, you can start interacting with it. First, load up the Safe by sending some DEV tokens to it. You can send funds to the Safe from any account with DEV tokens. For this example, you can use Alice's account. Hover over DEV in the list of assets to reveal the Send and Receive buttons. Then click Receive.
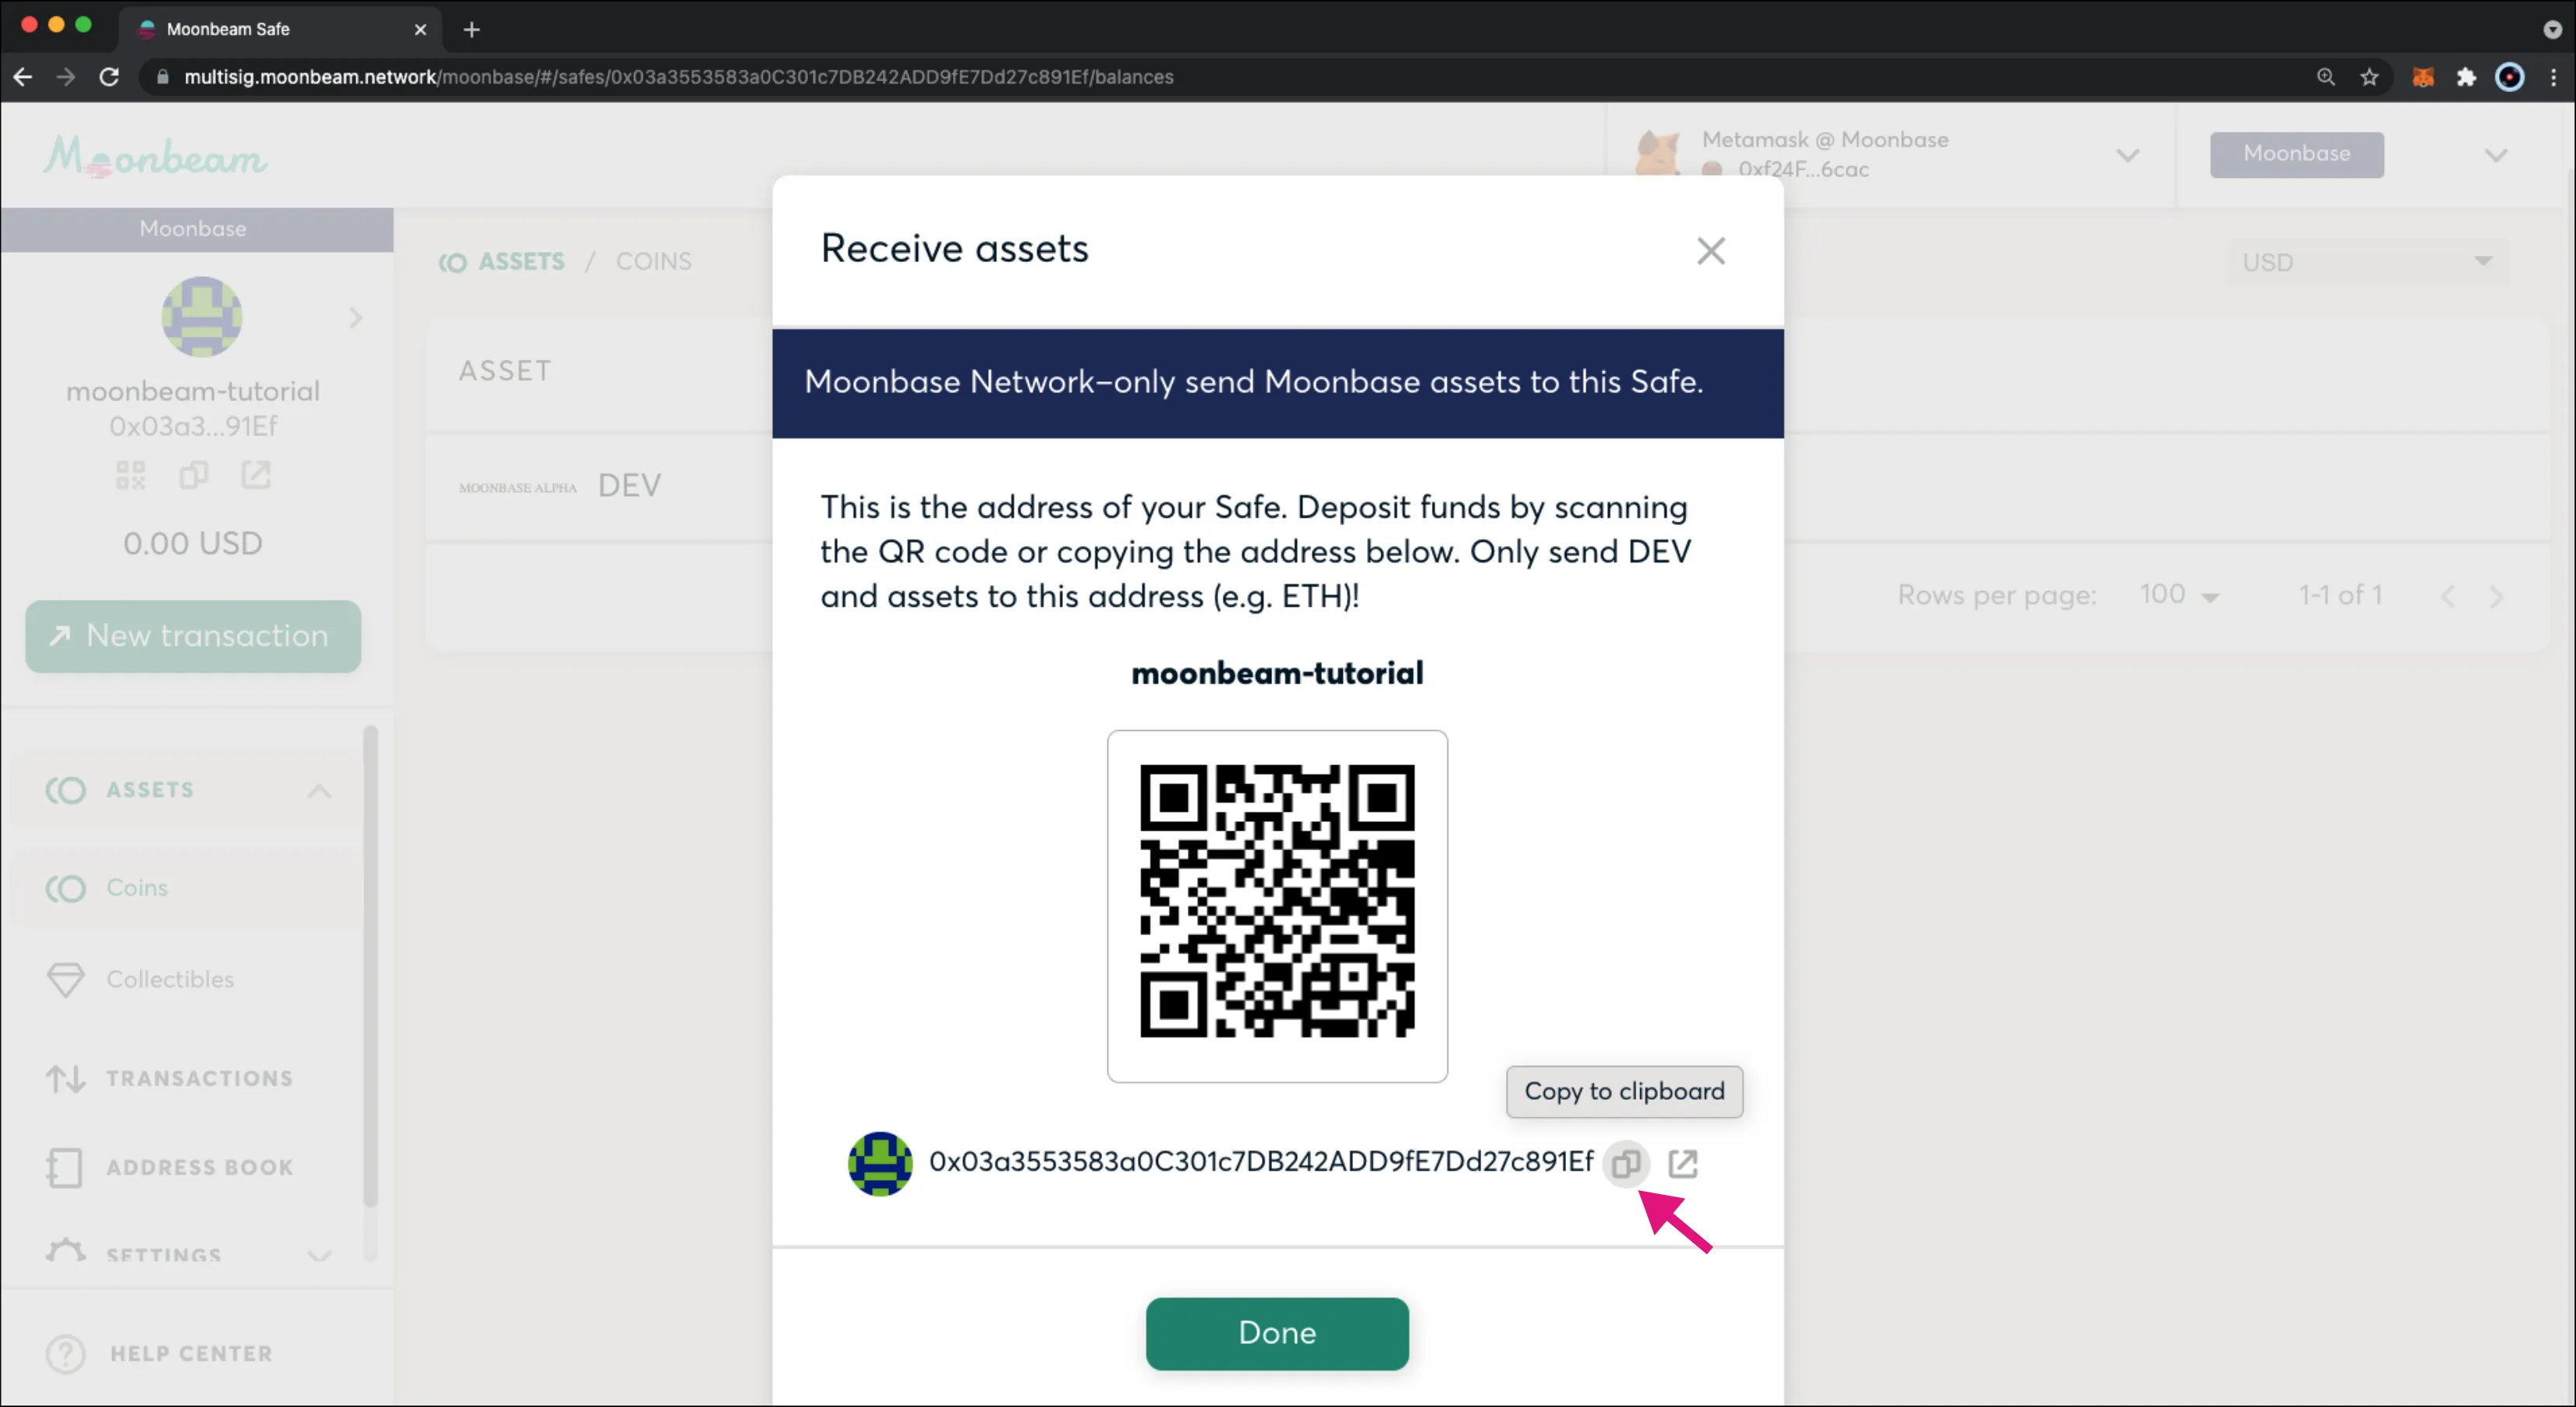
A pop-up will appear with the address of the Safe. Copy the address and click Done.
Next, open up your MetaMask to initiate a transaction:
- Click Send to send a transaction
- Paste in the address of the Safe
- Enter the amount of DEV tokens you would like to send to the Safe. For this example, you can use 2 DEV tokens
- Click Next
- Review the details of the transaction and click Confirm
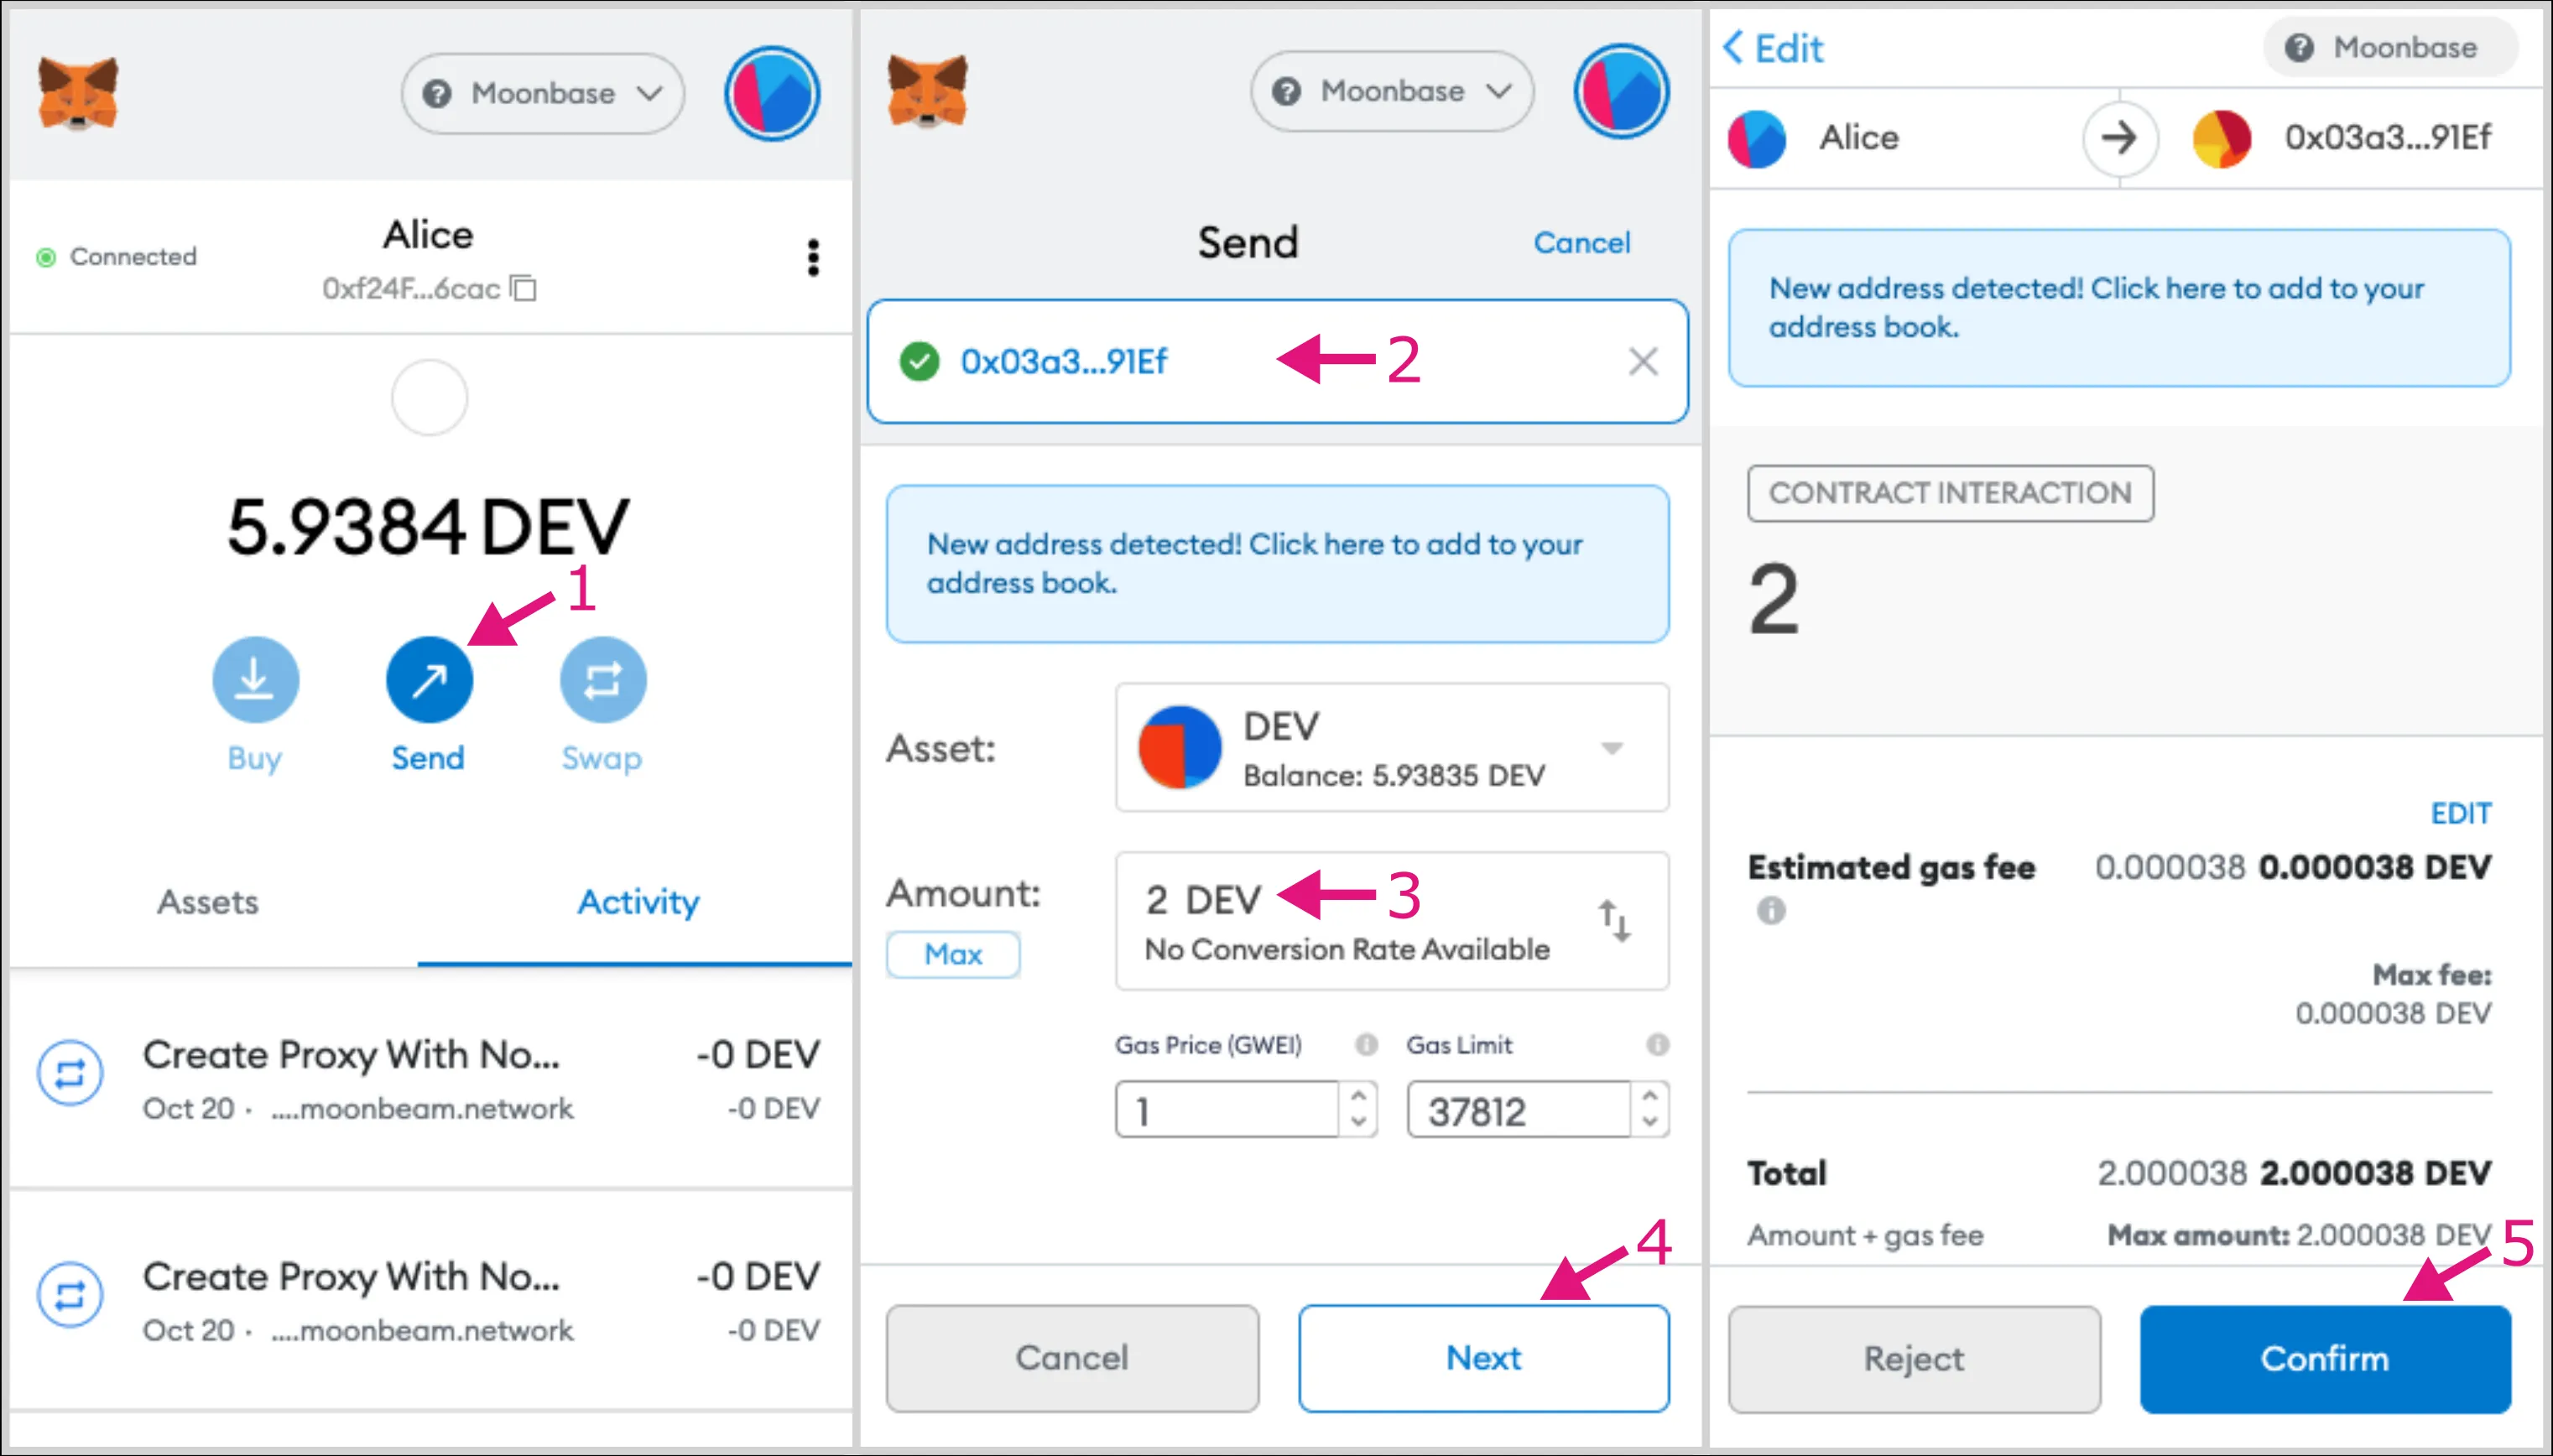
The transaction will be sent and your balance for DEV tokens will be updated on the Safe.
Send Tokens
Now that you have funds in the Safe, you can send funds from the Safe to another account. For this example, you can send 1 DEV token to Bob's address. Hover over DEV in the list of assets, and this time click on Send.
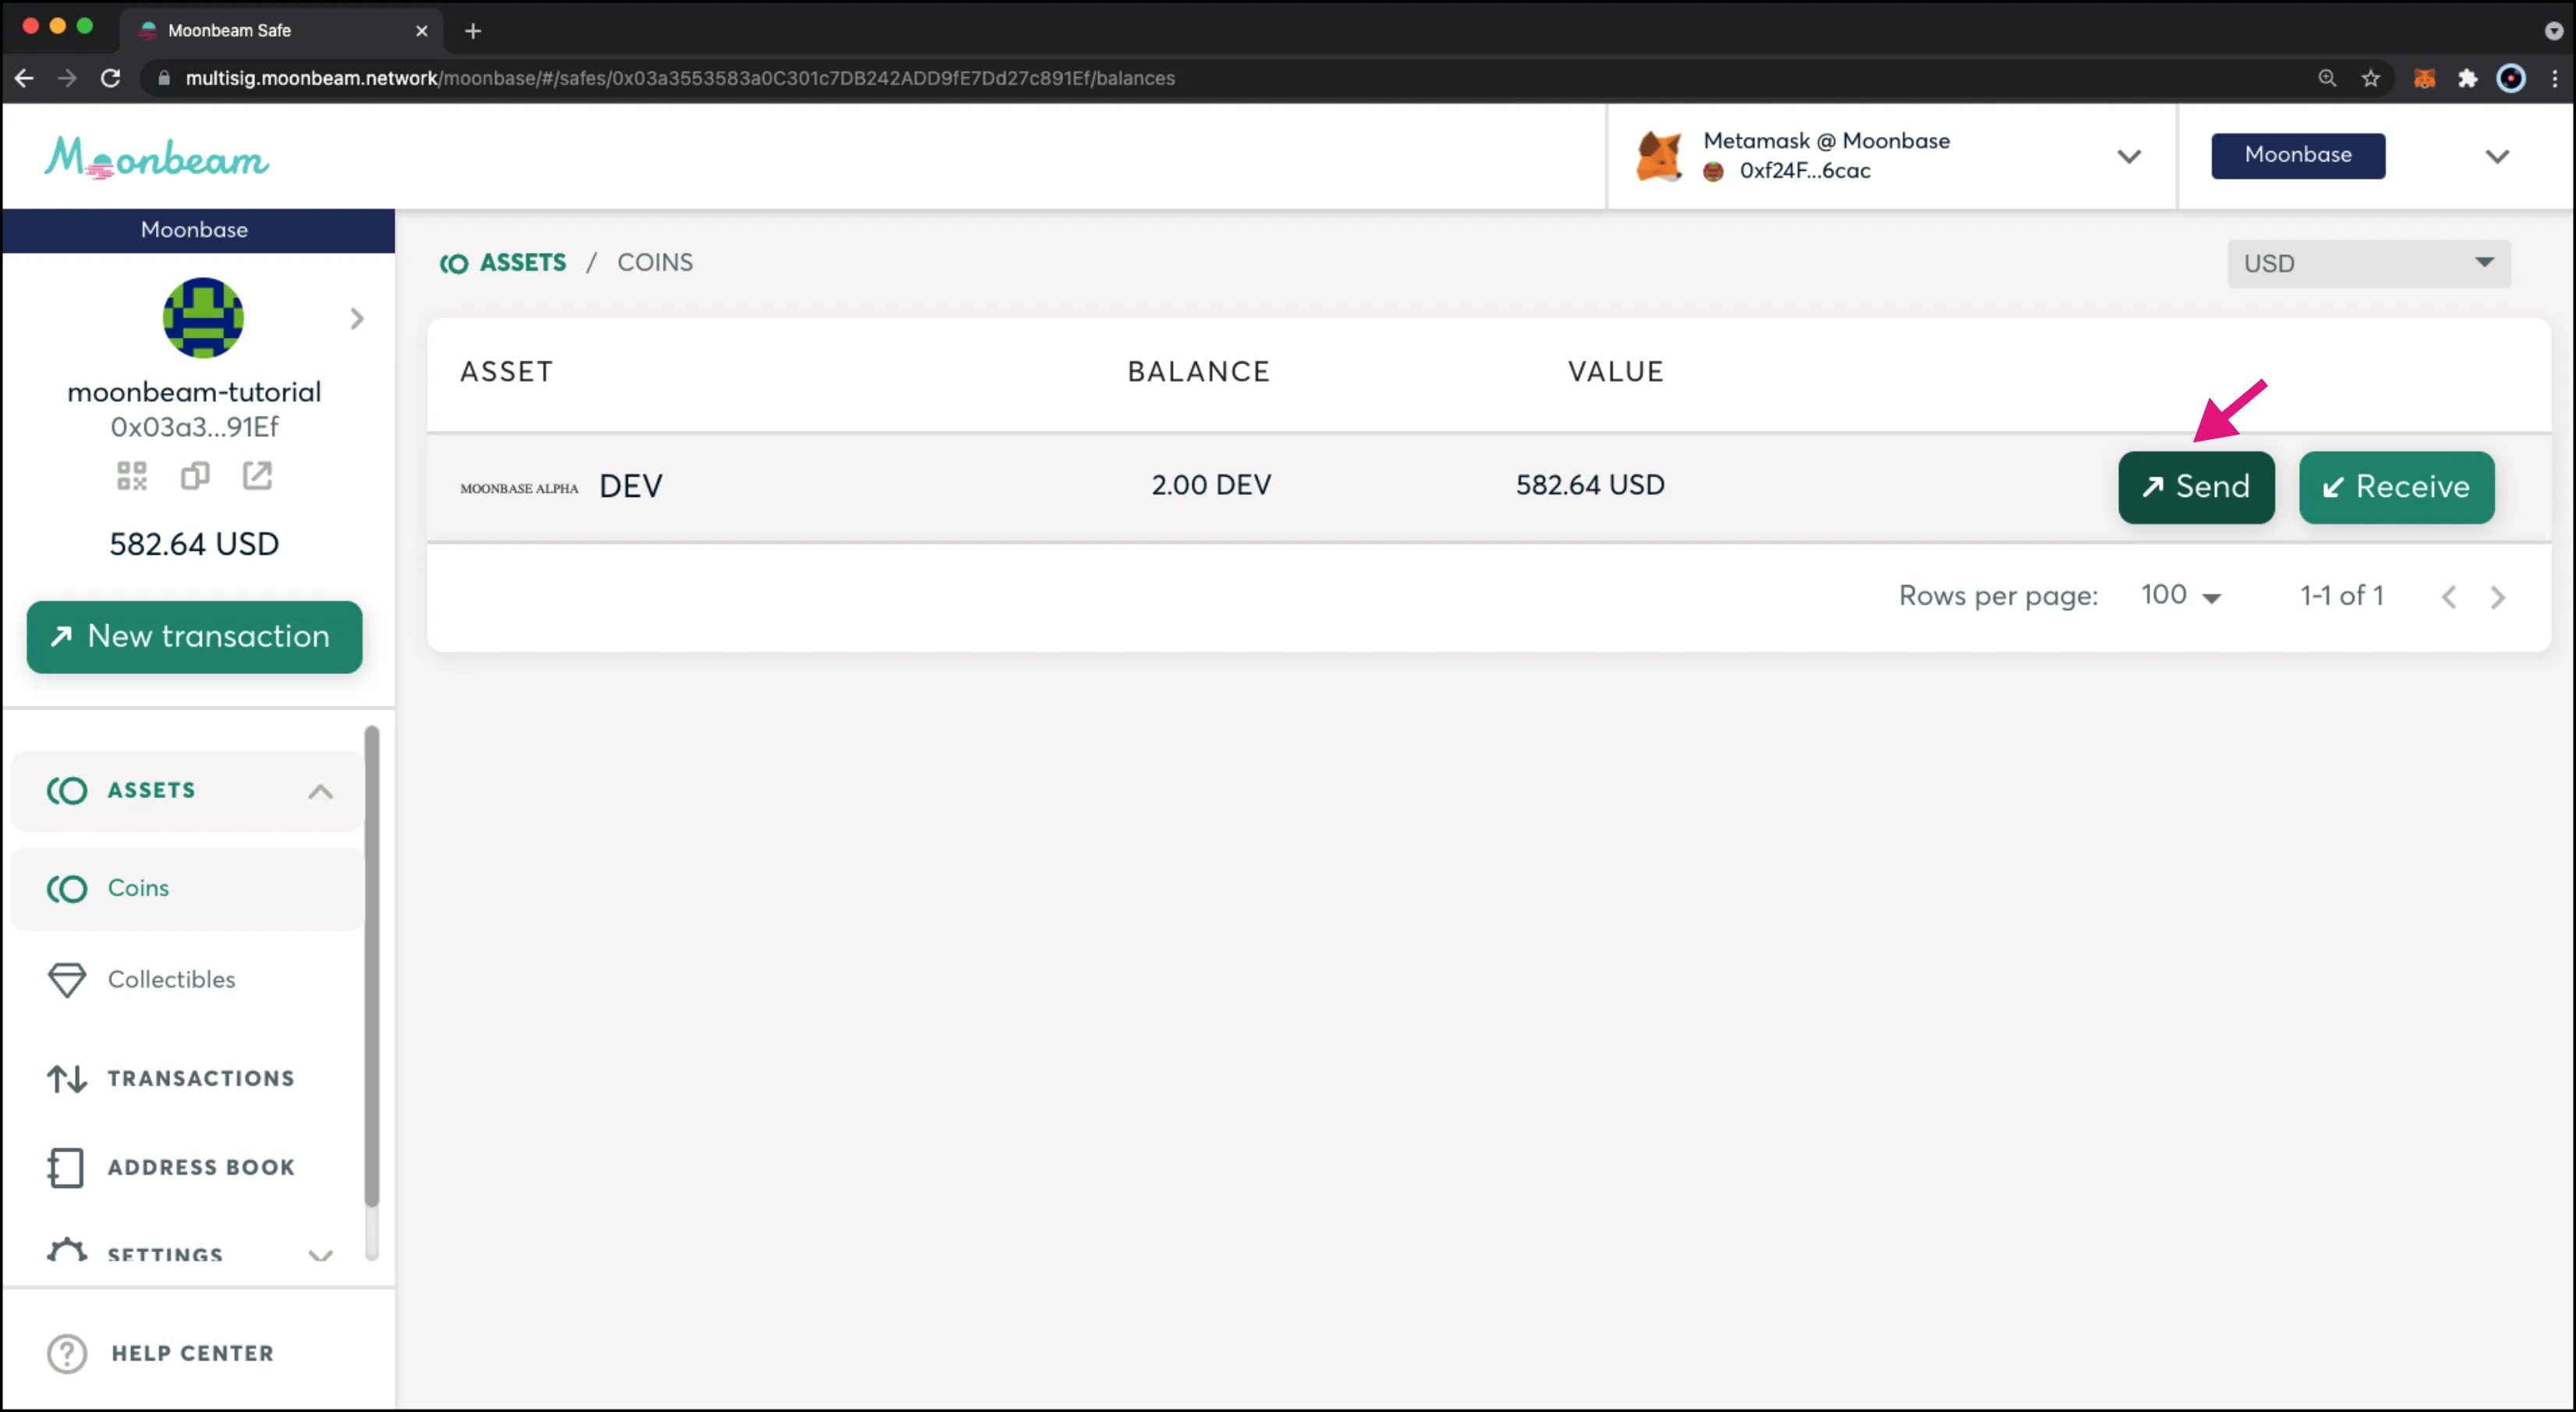
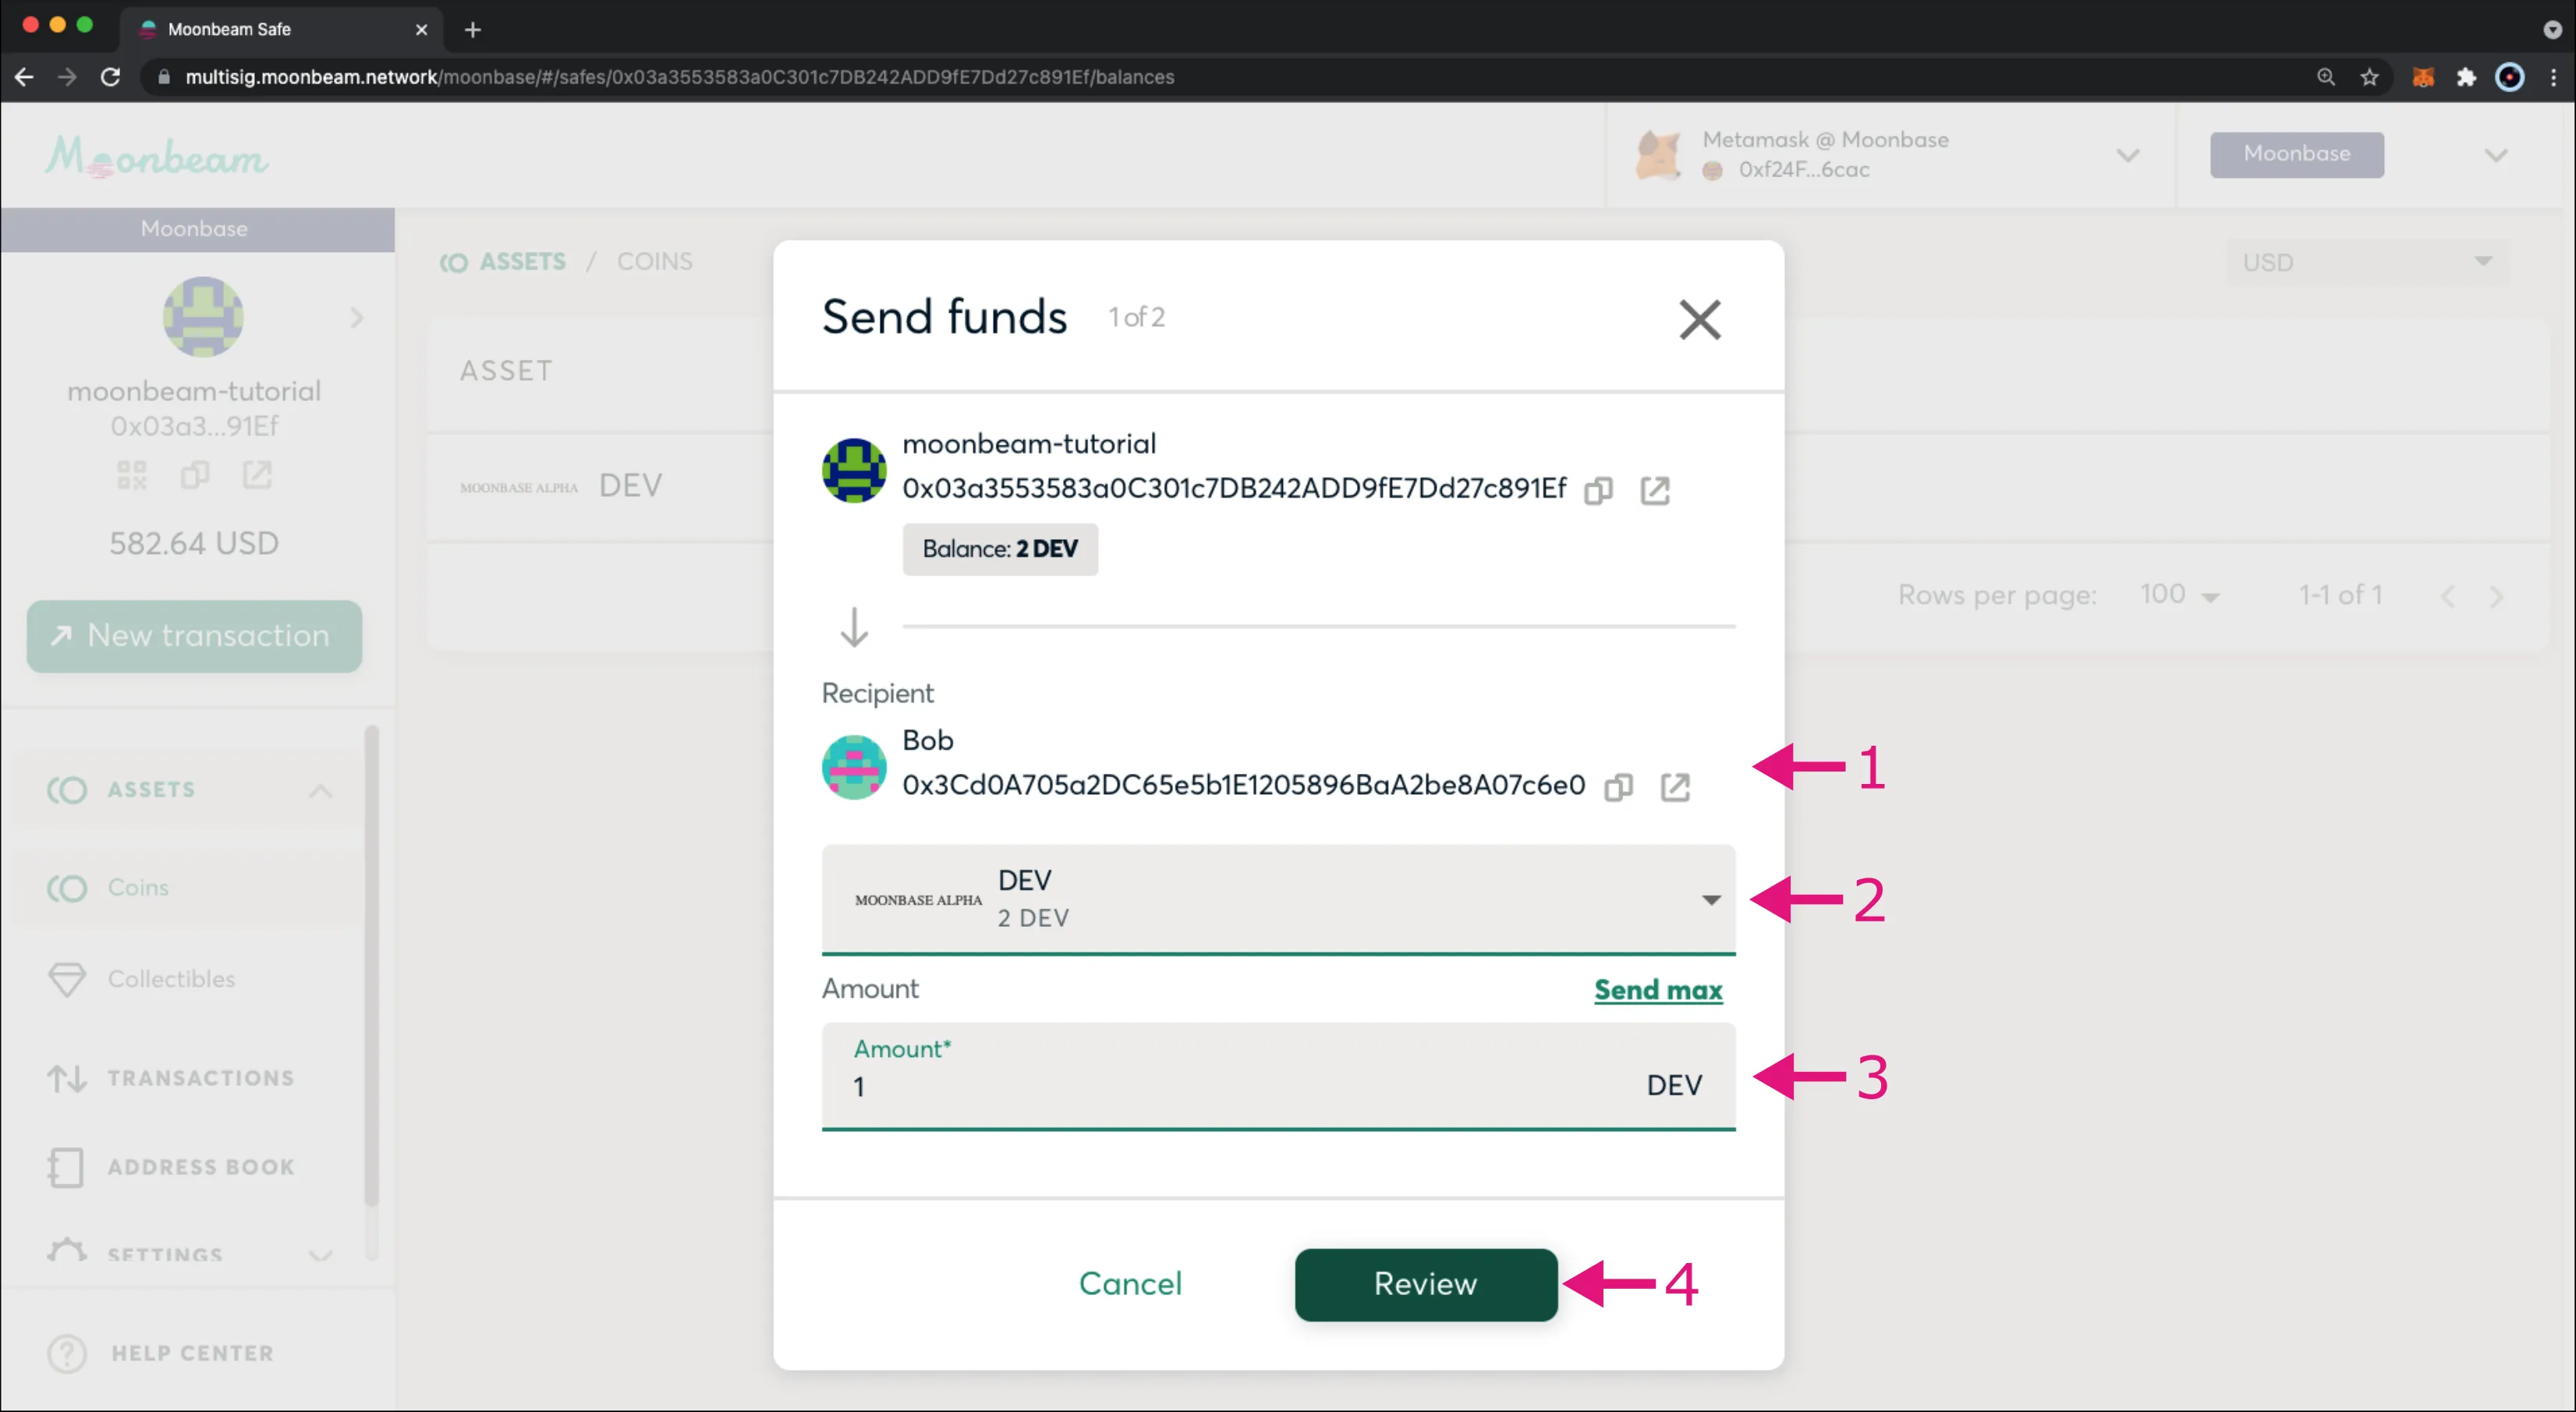
A pop-up will appear where you can enter the recipient and the amount of DEV tokens to send:
- Enter Bob's Address
- Select DEV from the list of assets
- Enter 1 DEV token
- Click Review
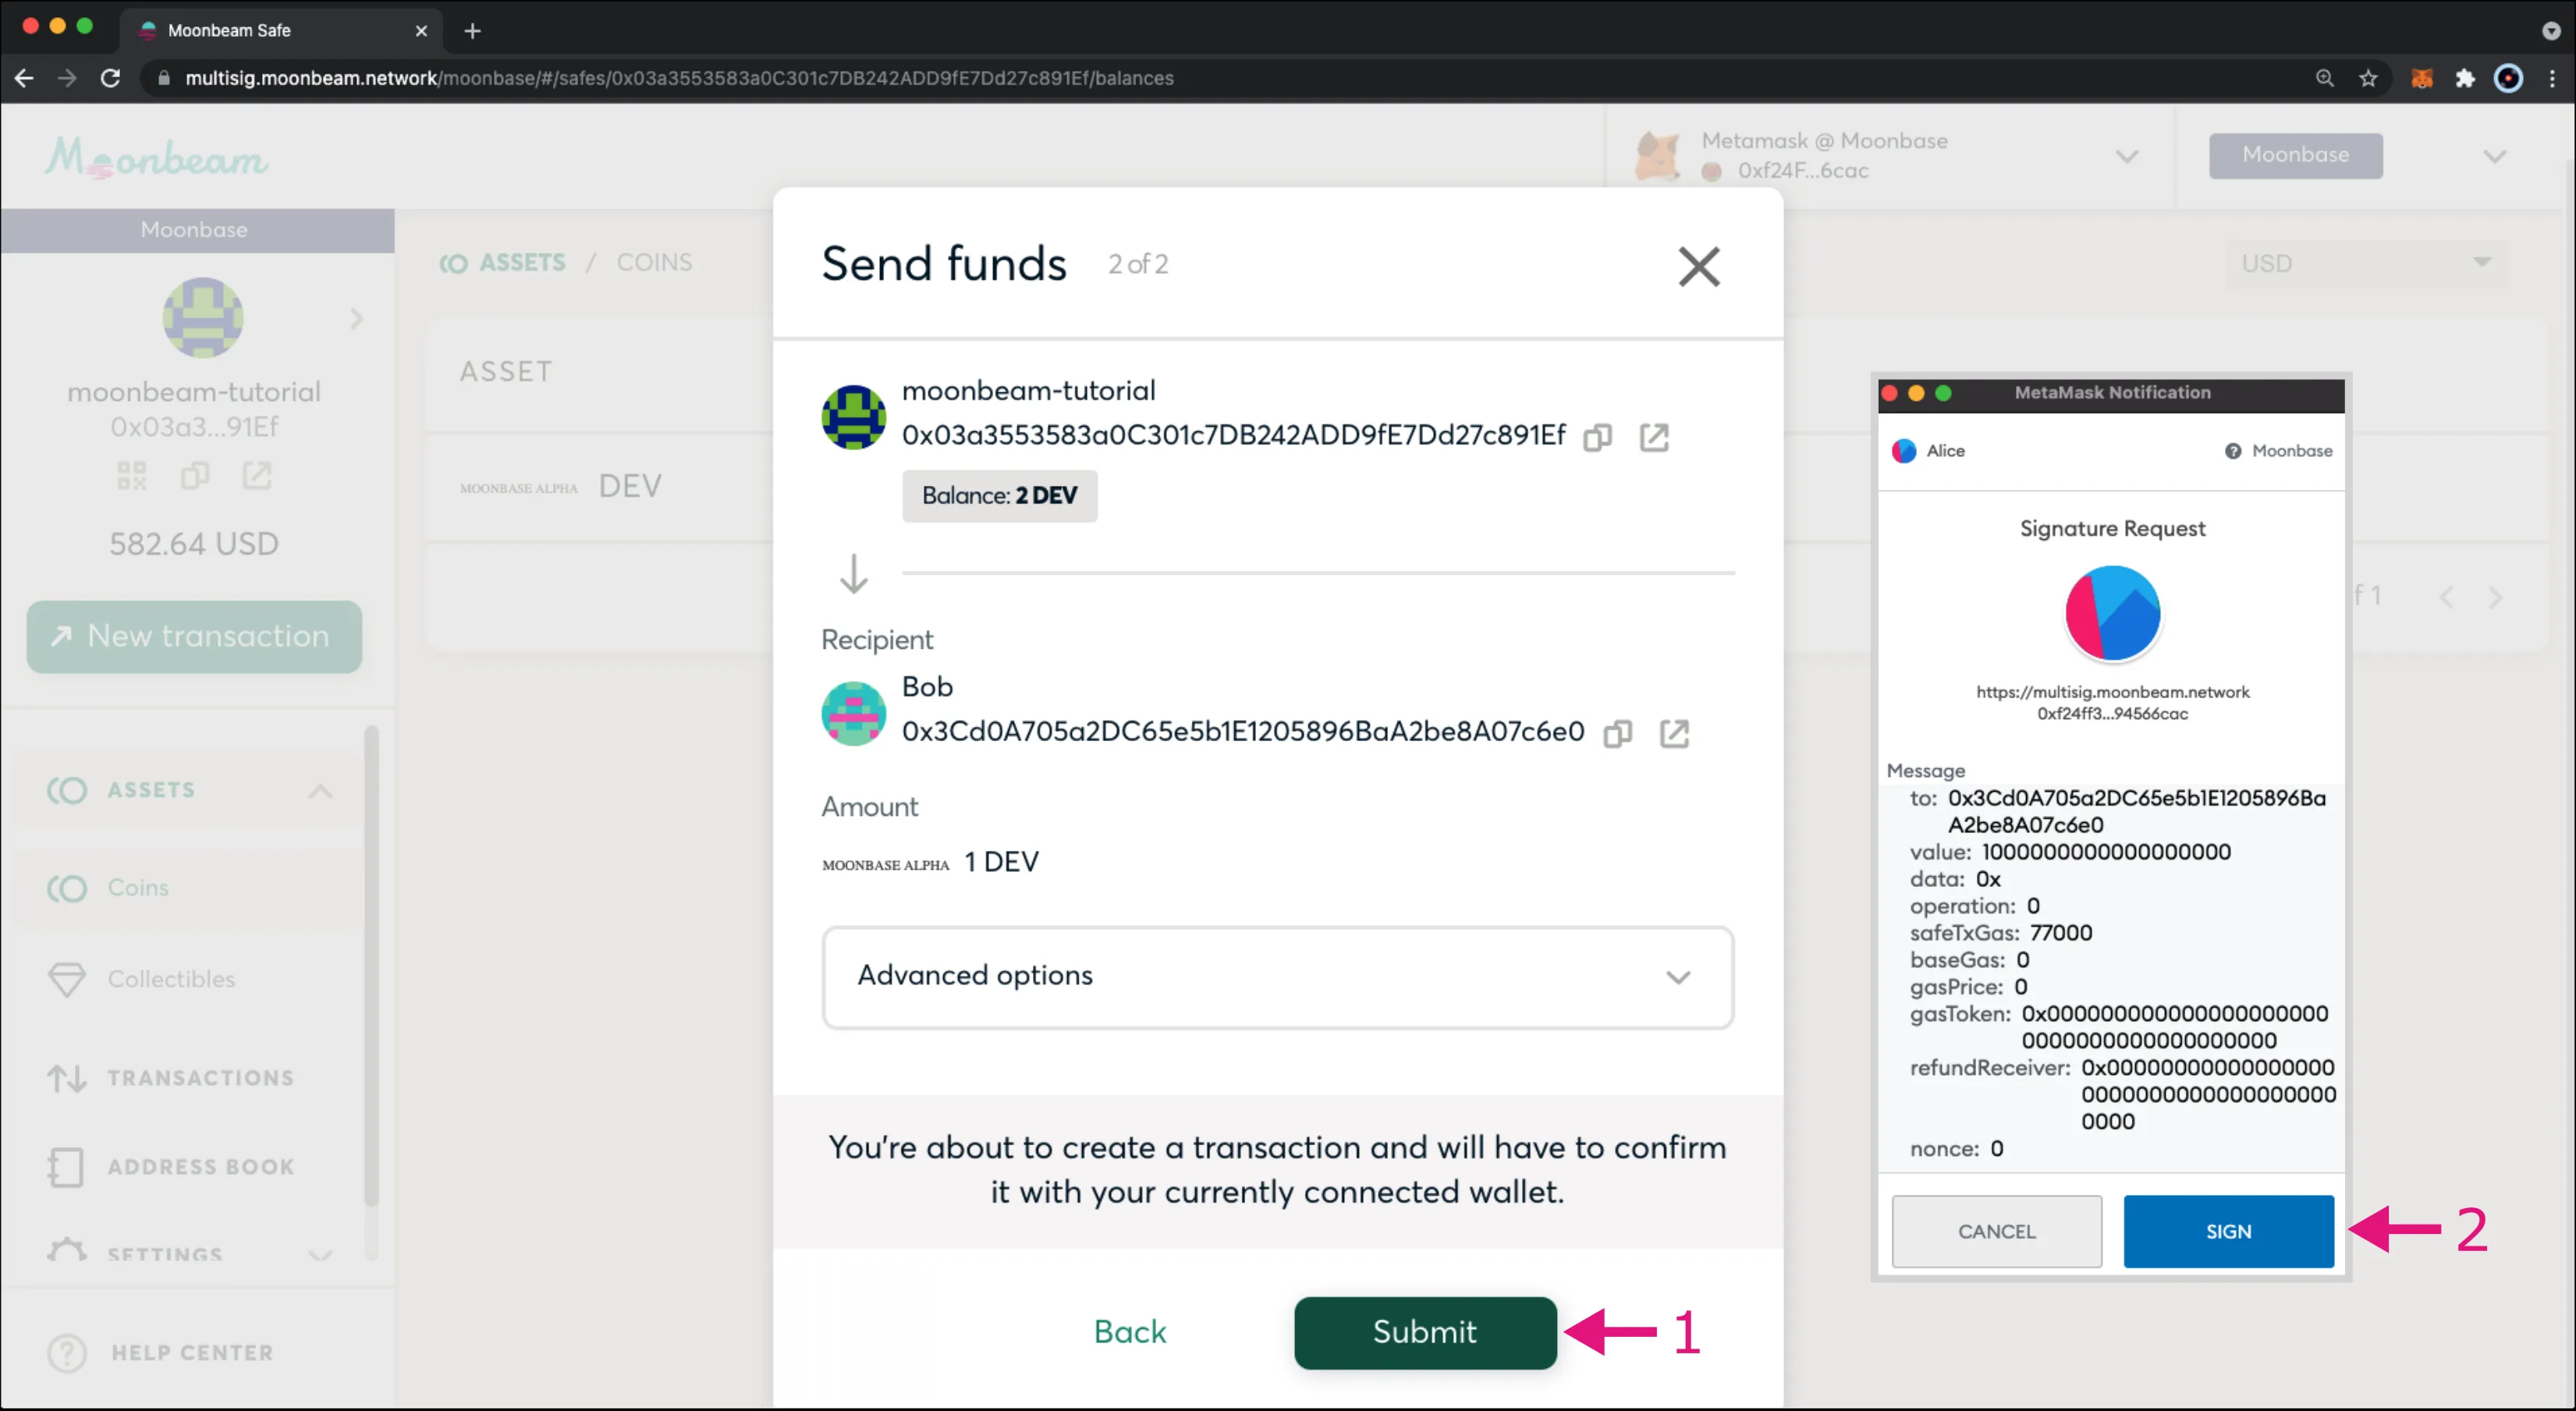
- Review the details and click Submit. MetaMask will pop-up and you'll notice that instead of sending a transaction, you're sending a message
- Click Sign to sign the message
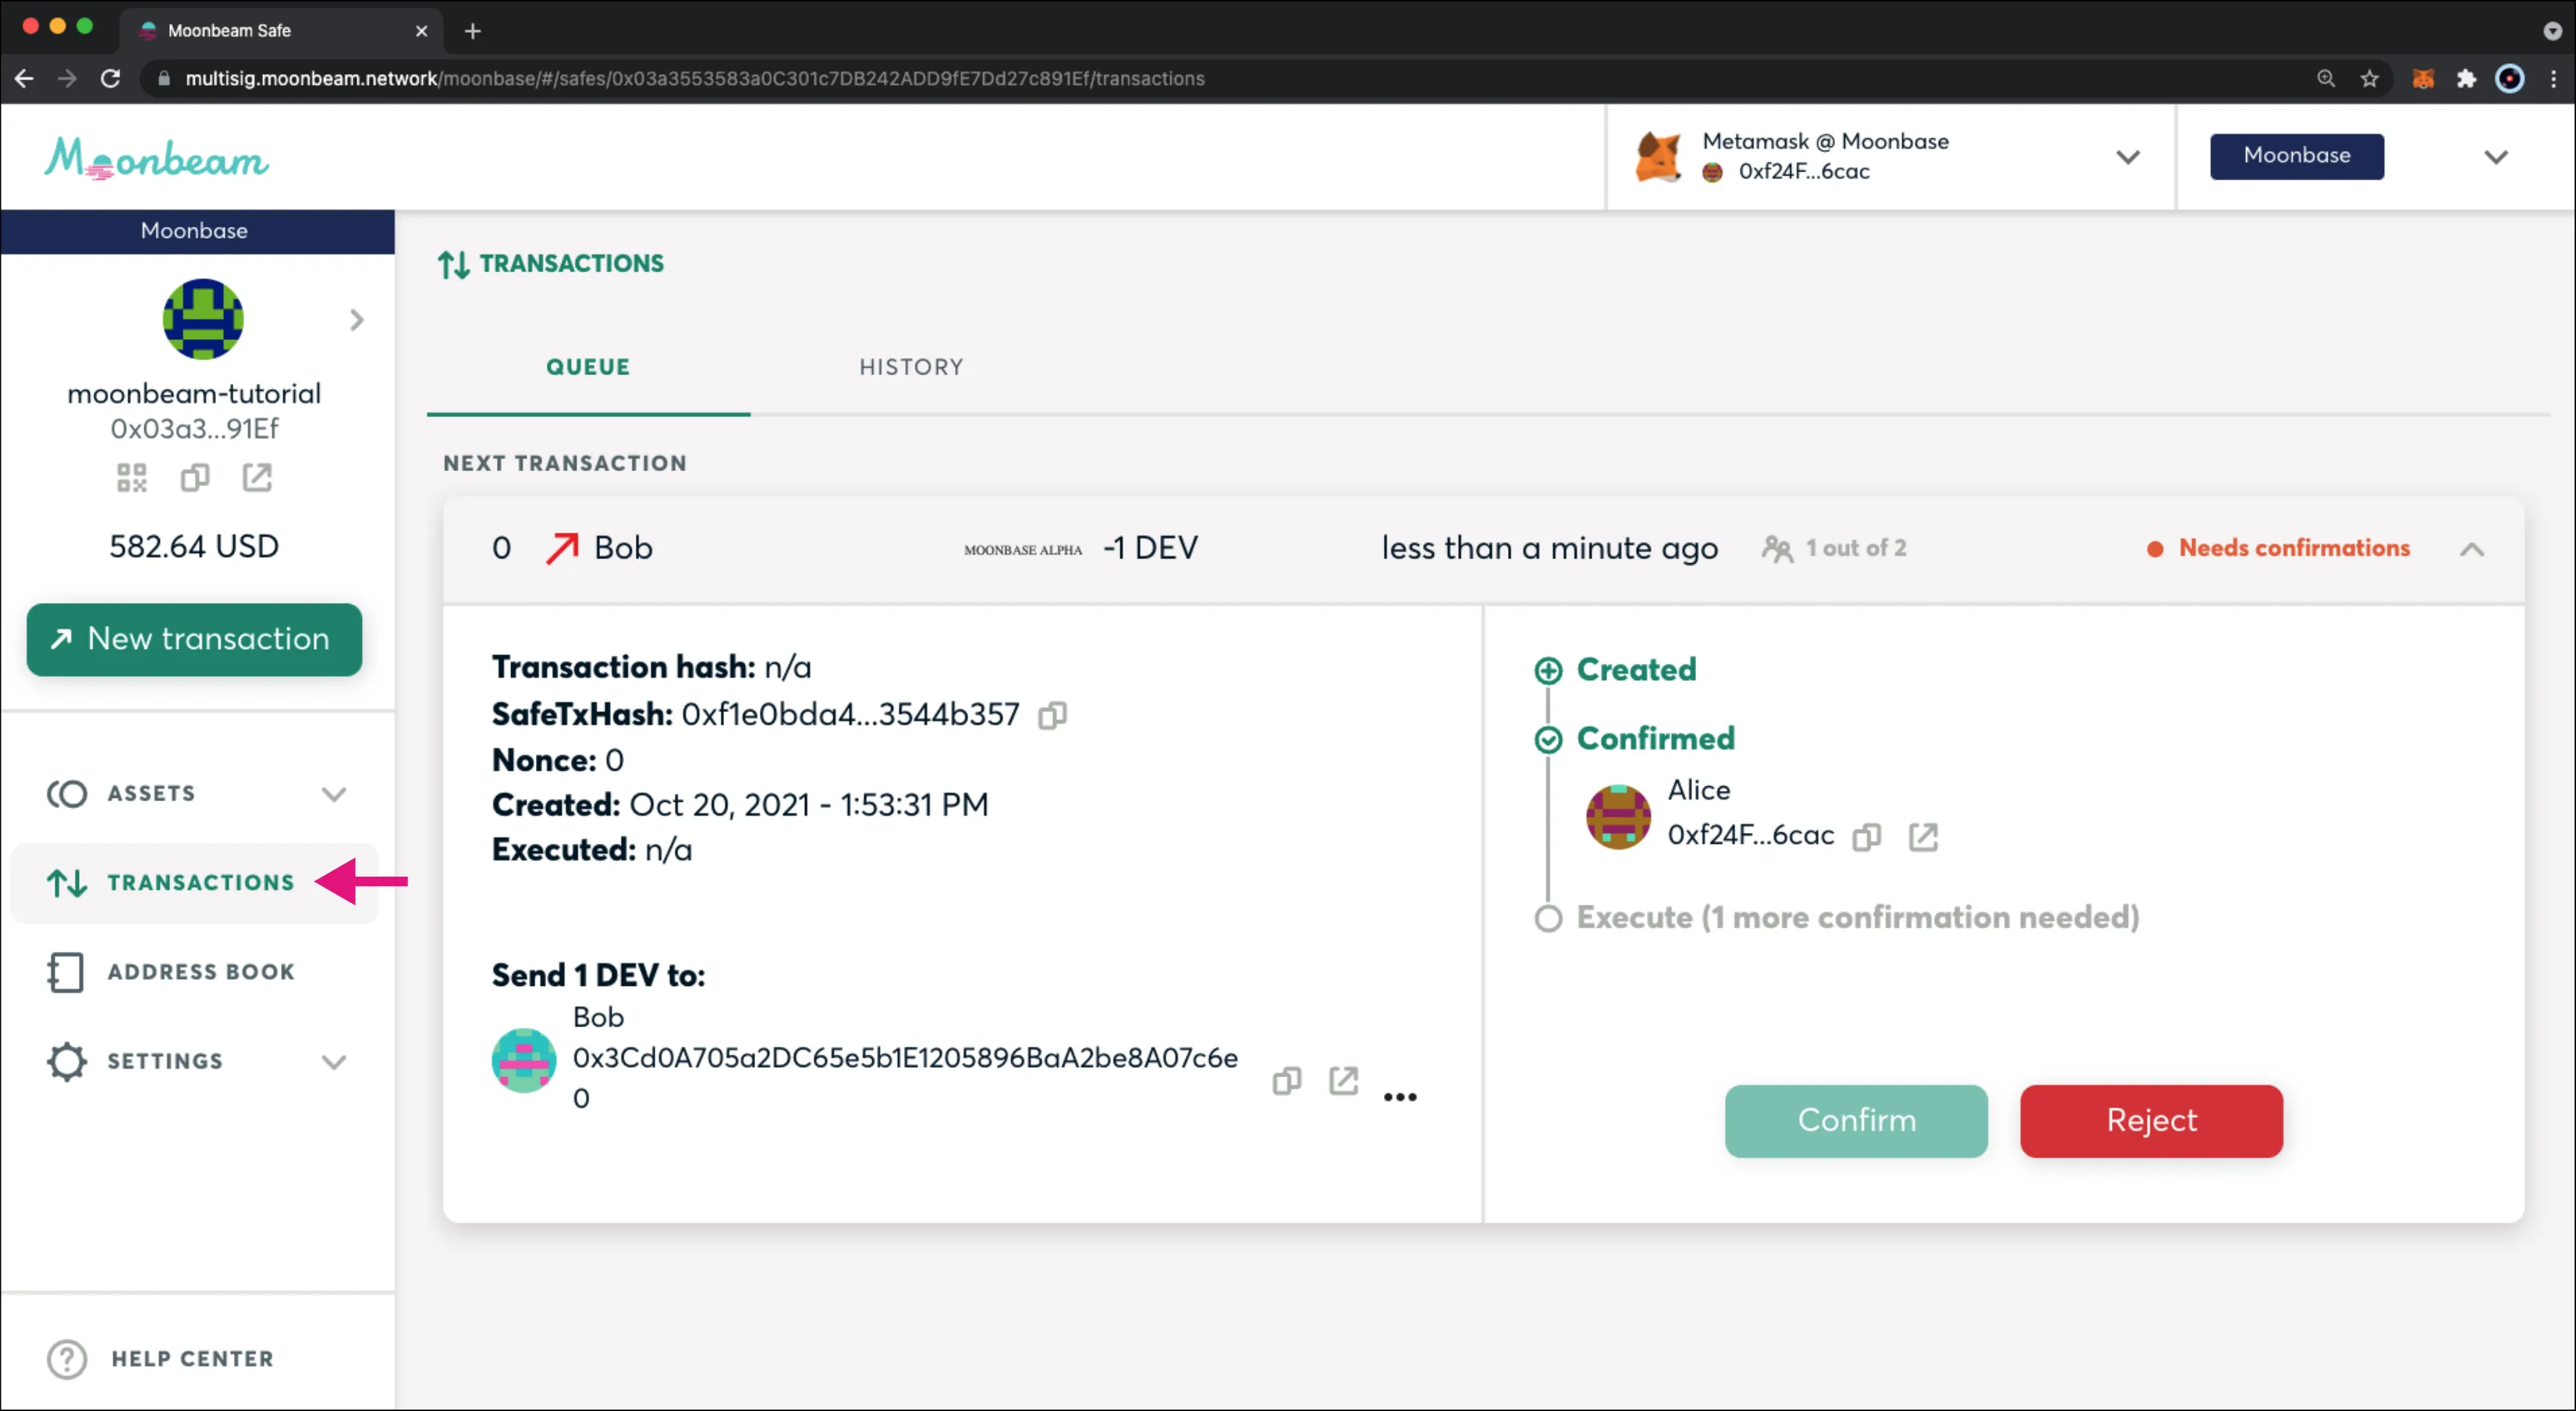
Now, if you go back to the Safe, under the Transactions tab, you should be able to see that there has been a transaction proposal initiated to send 1 DEV tokens to Bob's address. However, you should also see that only 1 out of 2 confirmations have been received and that 1 more owner is required to confirm the transaction before it gets executed.
Transaction Confirmation
The process of confirming (or rejecting) a transaction proposal is similar for all the use cases of a multisig Safe. One of the owners initiates the proposal to execute an action. The other owners can approve or reject the proposal. Once the signature threshold is reached, any owner can execute the transaction proposal if approved, or discard the transaction proposal if rejected.
In this example, if 2 of the 3 owners decided to reject the proposal, then the assets would remain in the Safe. However, in this case, you can confirm the transaction from either Bob's or Charlie's account.
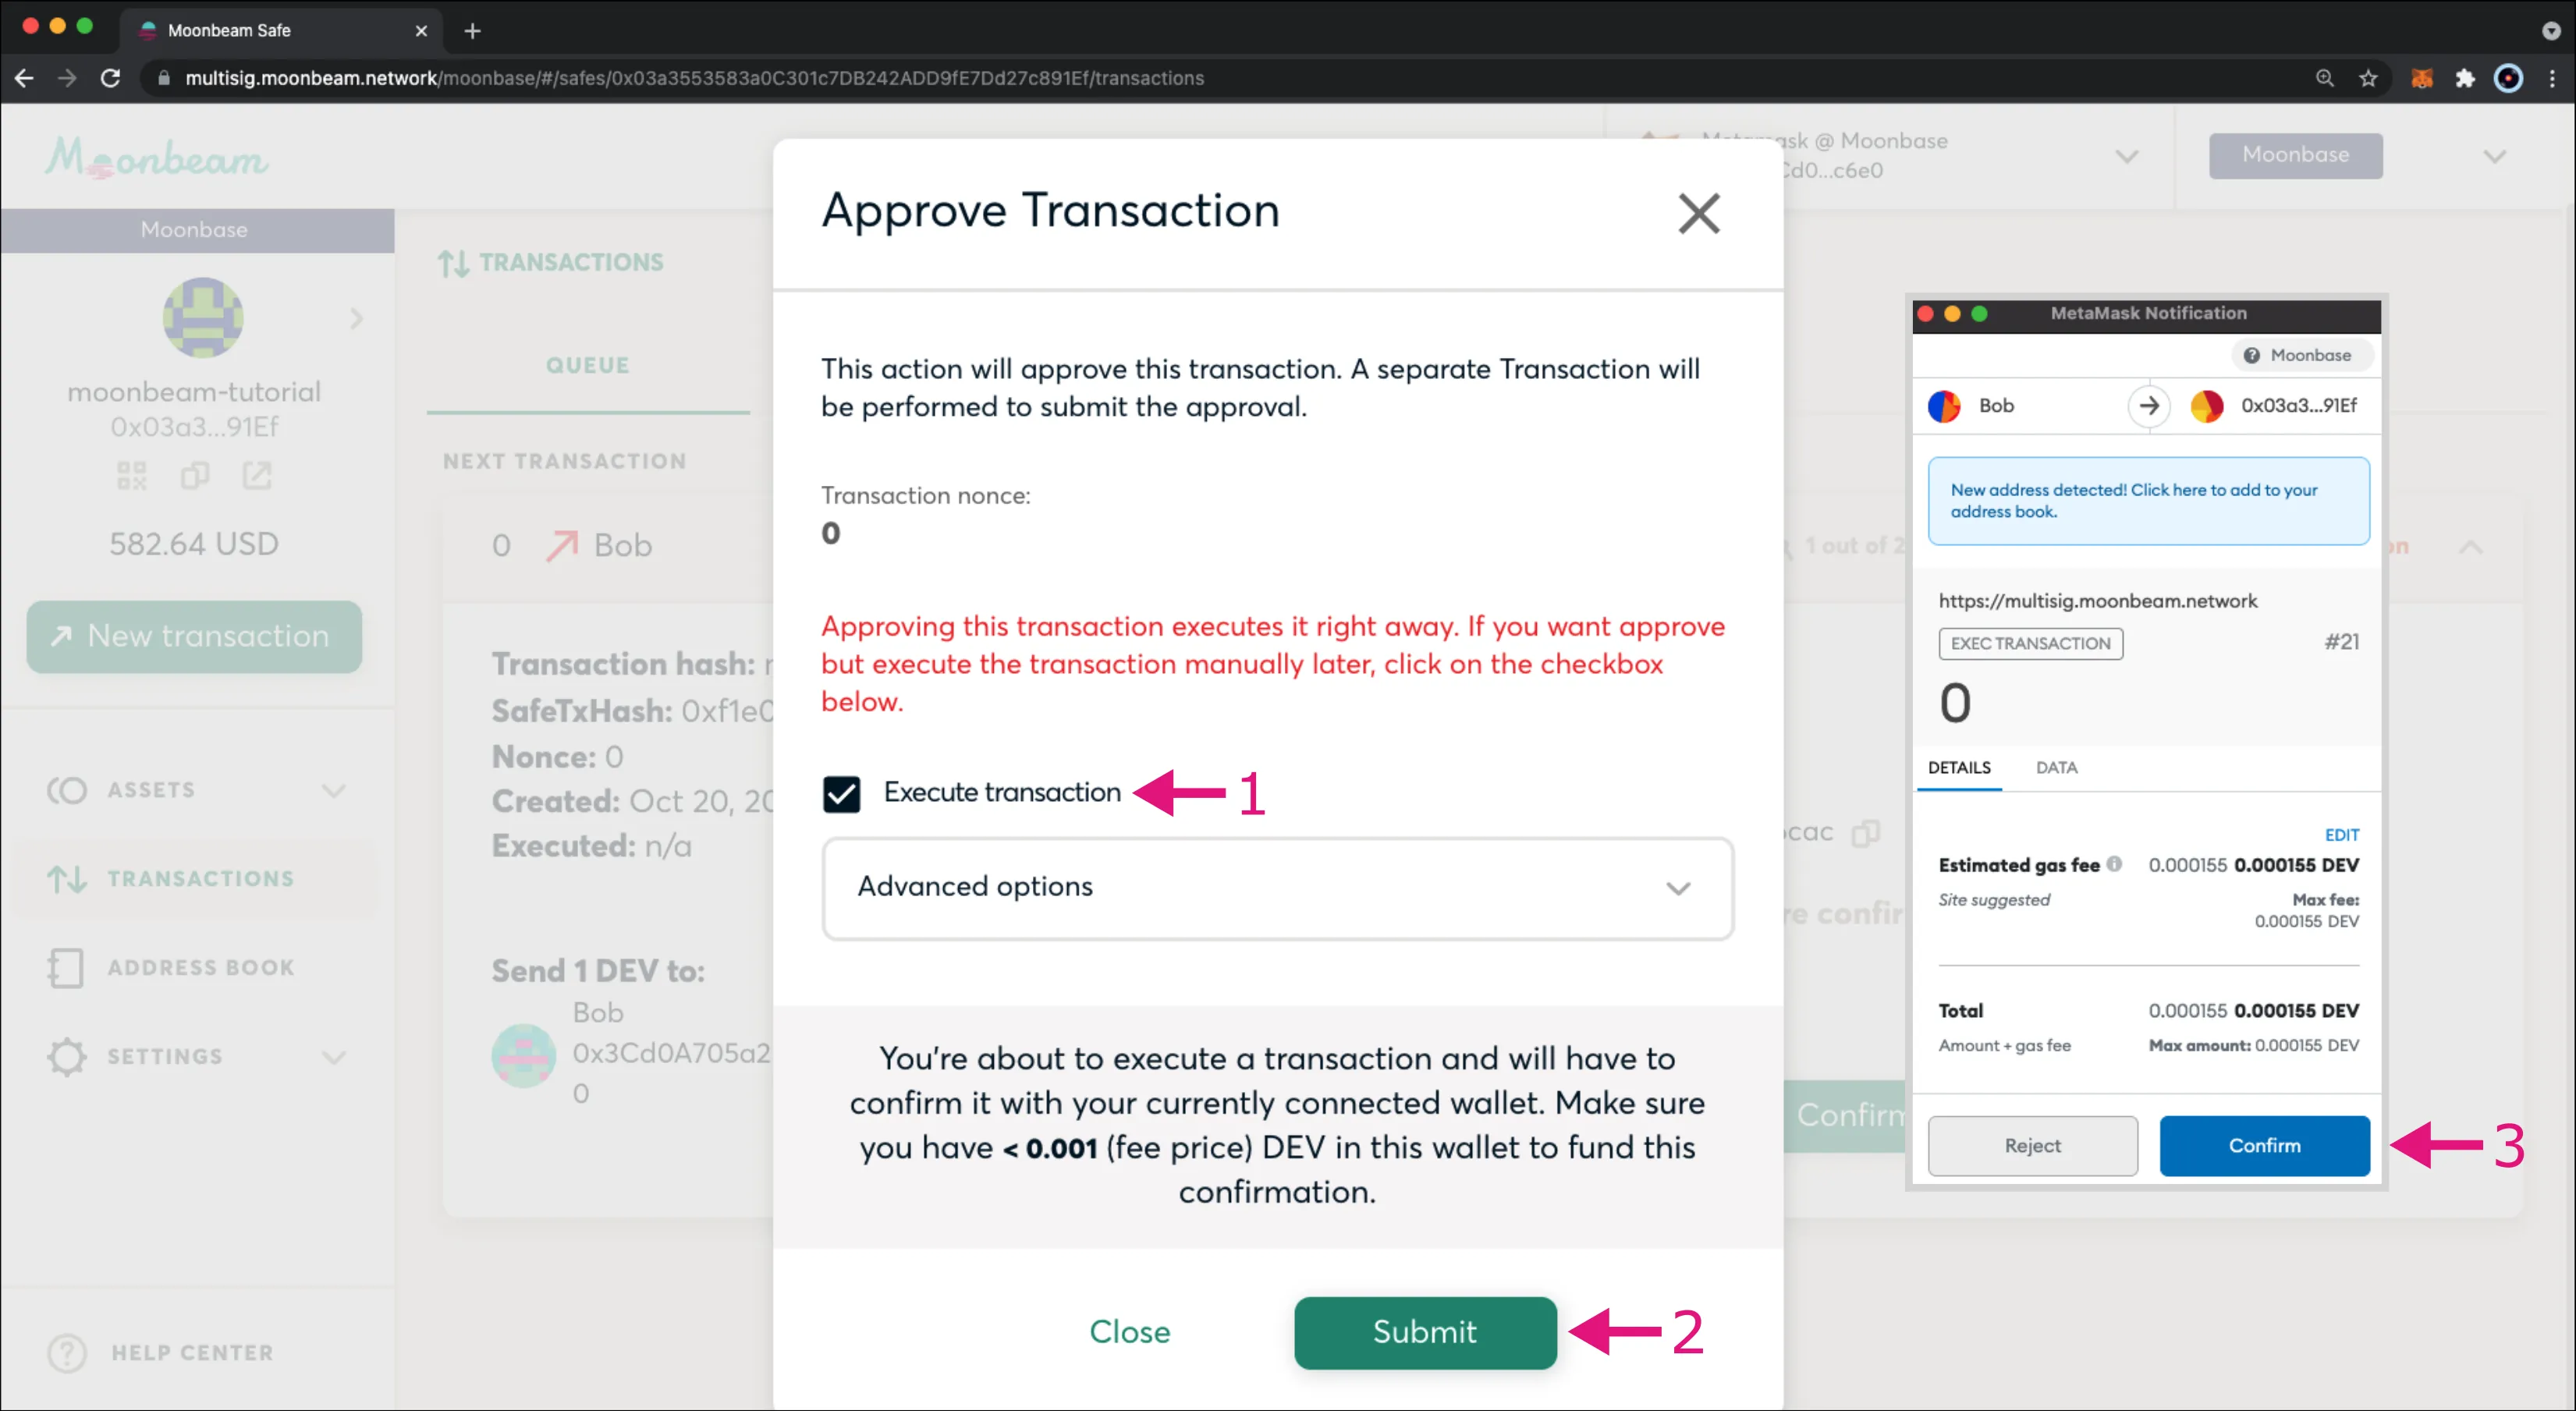
Switch accounts in MetaMask to Bob's account (or Charlie's). Then go back to the Safe connected as Bob. The Confirm button should now be enabled. As Bob, go ahead and click Confirm to meet the threshold and send the transaction. A pop-up will appear for you to approve the transaction:
- Check the Execute transaction box to execute the transaction immediately after confirmation. You can un-check it for the transaction to be executed manually at a later time
- Click Submit
- MetaMask will pop-up and ask you to confirm the transaction, if everything looks good, you can click Confirm
Note
If you receive an error stating the transaction might fail, you may need to increase the gas limit. You can do so either in the Advanced options or in MetaMask.
The transaction will be removed from the QUEUE tab and a record of the transaction can now be found under the HISTORY tab. In addition, Bob's balance has now increased by 1 DEV token, and the Safe's balance for DEV tokens has decreased.
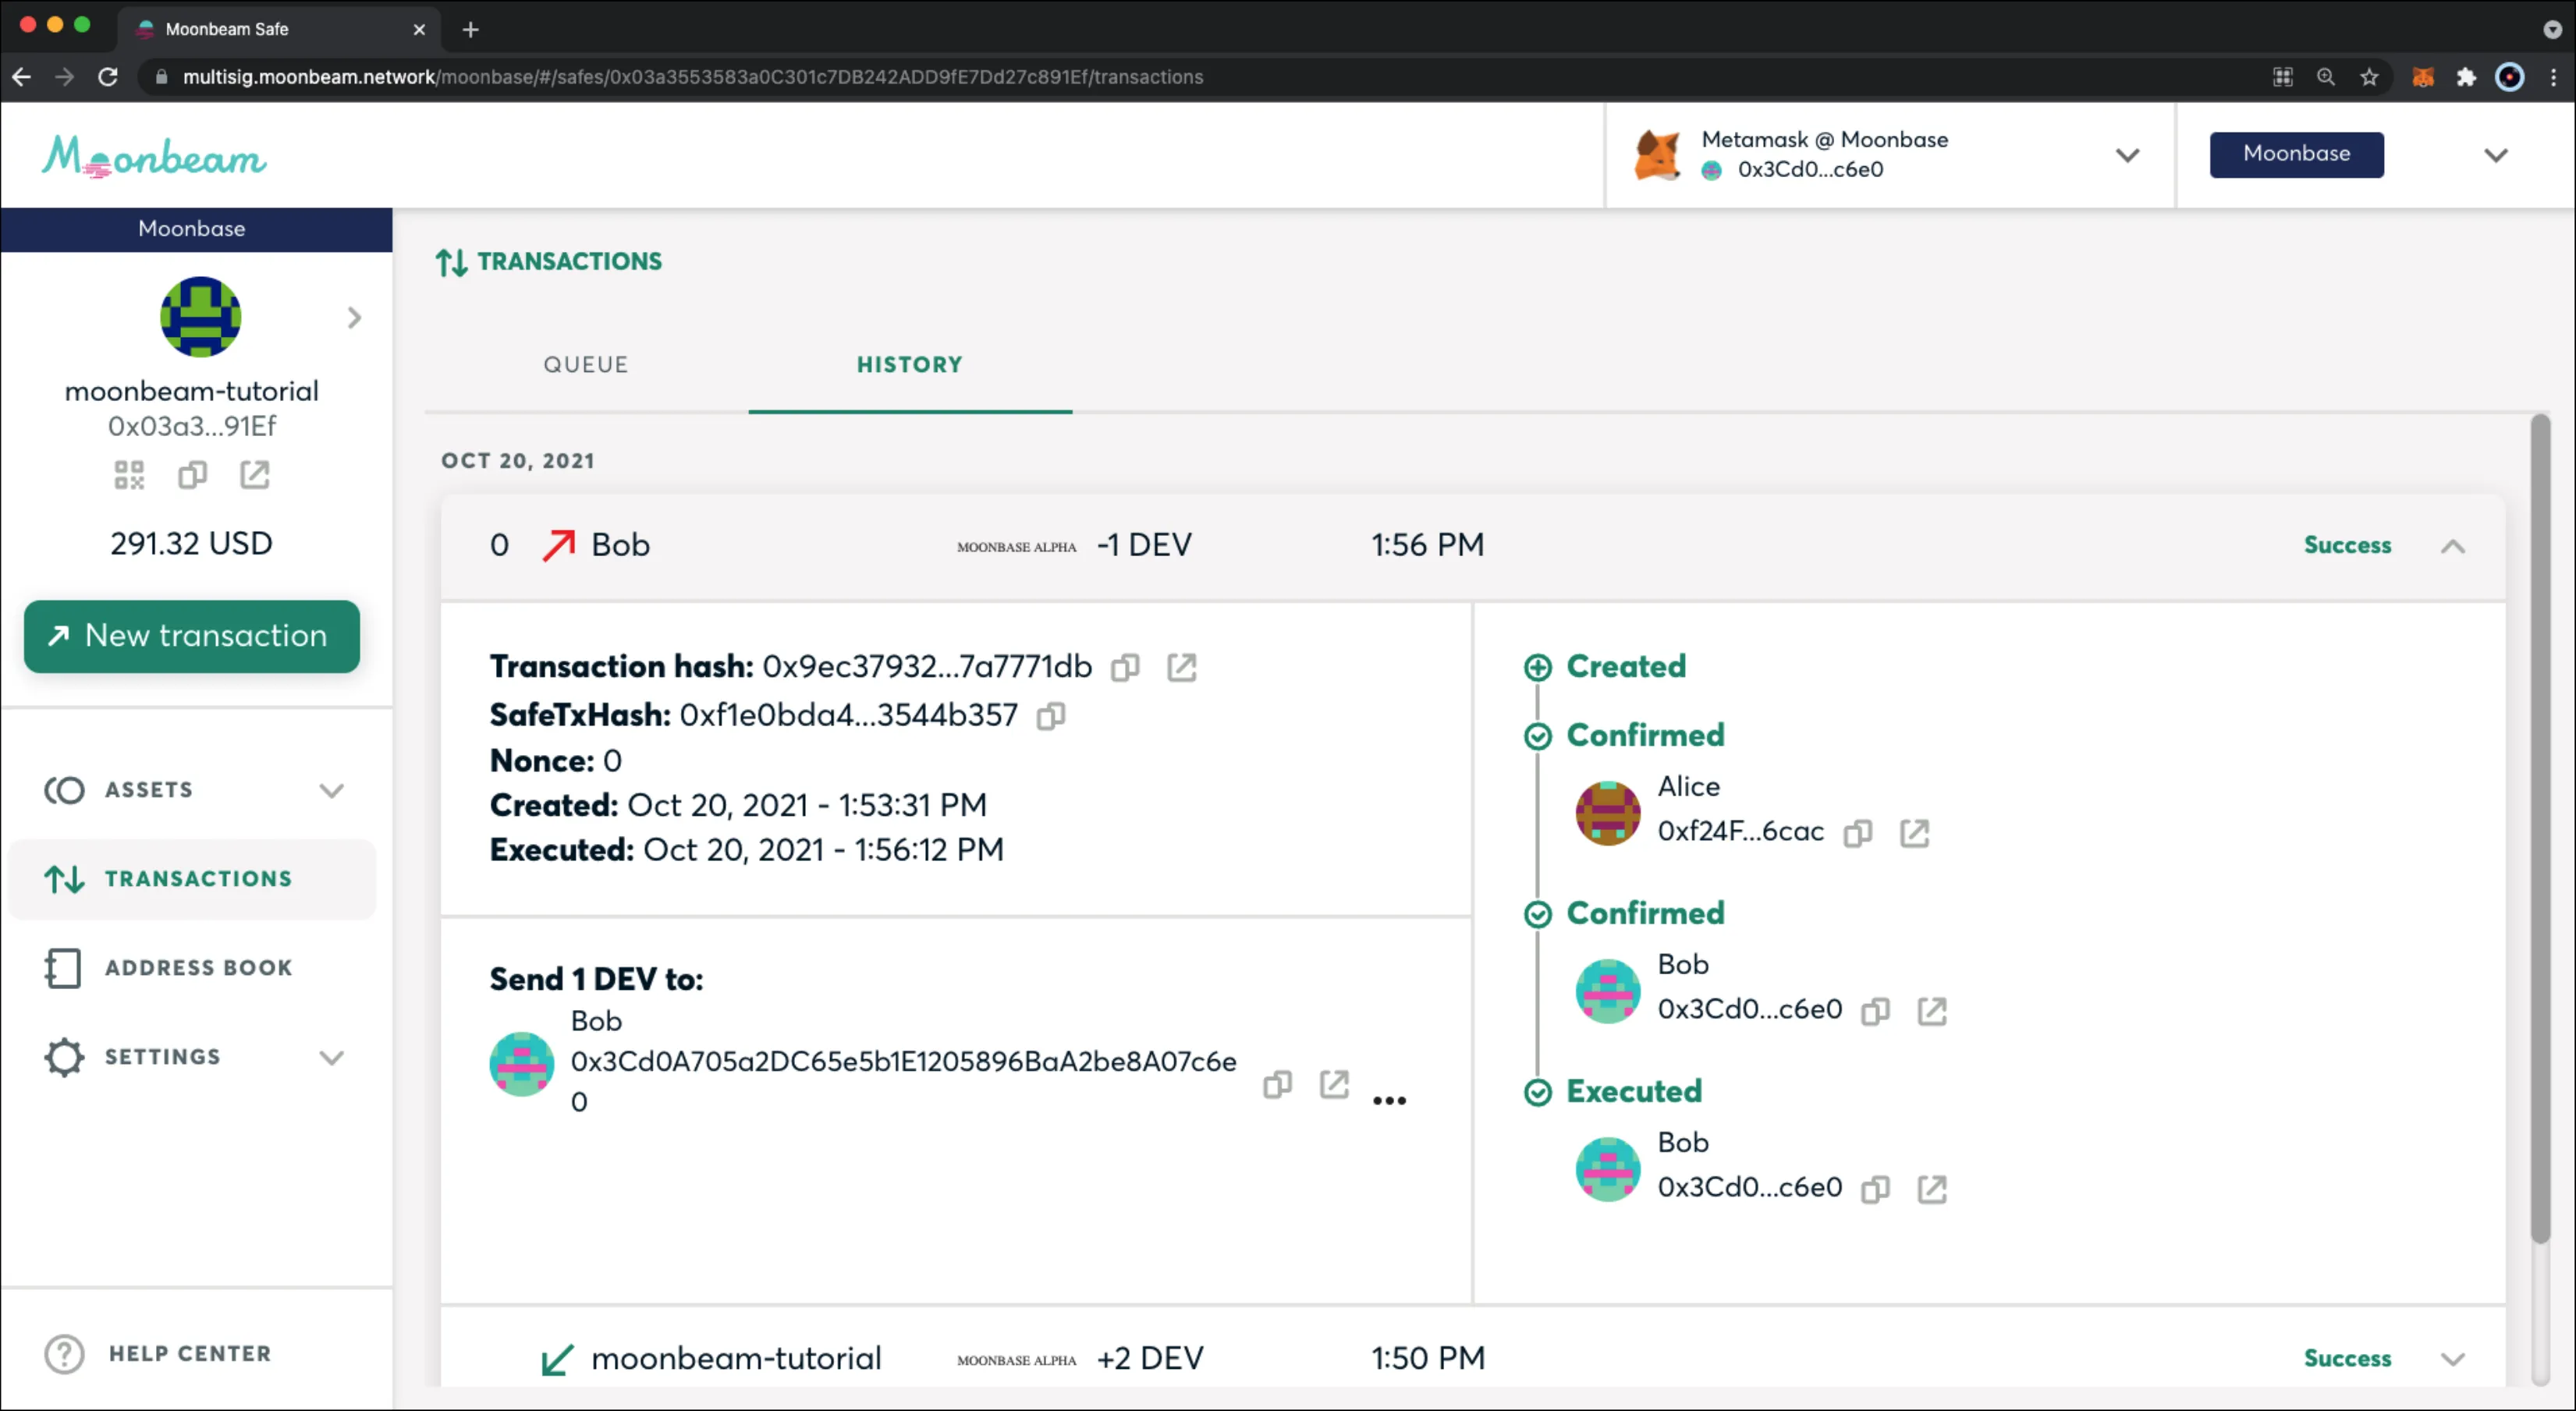
Congratulations, you've successfully received and sent DEV tokens to and from the Safe!
Receive and Send ERC-20 Tokens
Receive ERC-20 Tokens
Next up is to receive and send ERC-20s to and from the Safe. You should already have loaded up your MetaMask with MYTOK ERC-20 tokens. If not, please refer back to the ERC-20 Tokens section of the prerequisites.
You should still be connected to Bob's account for this example. So, you'll be sending MYTOK tokens from Bob's account to the Safe.
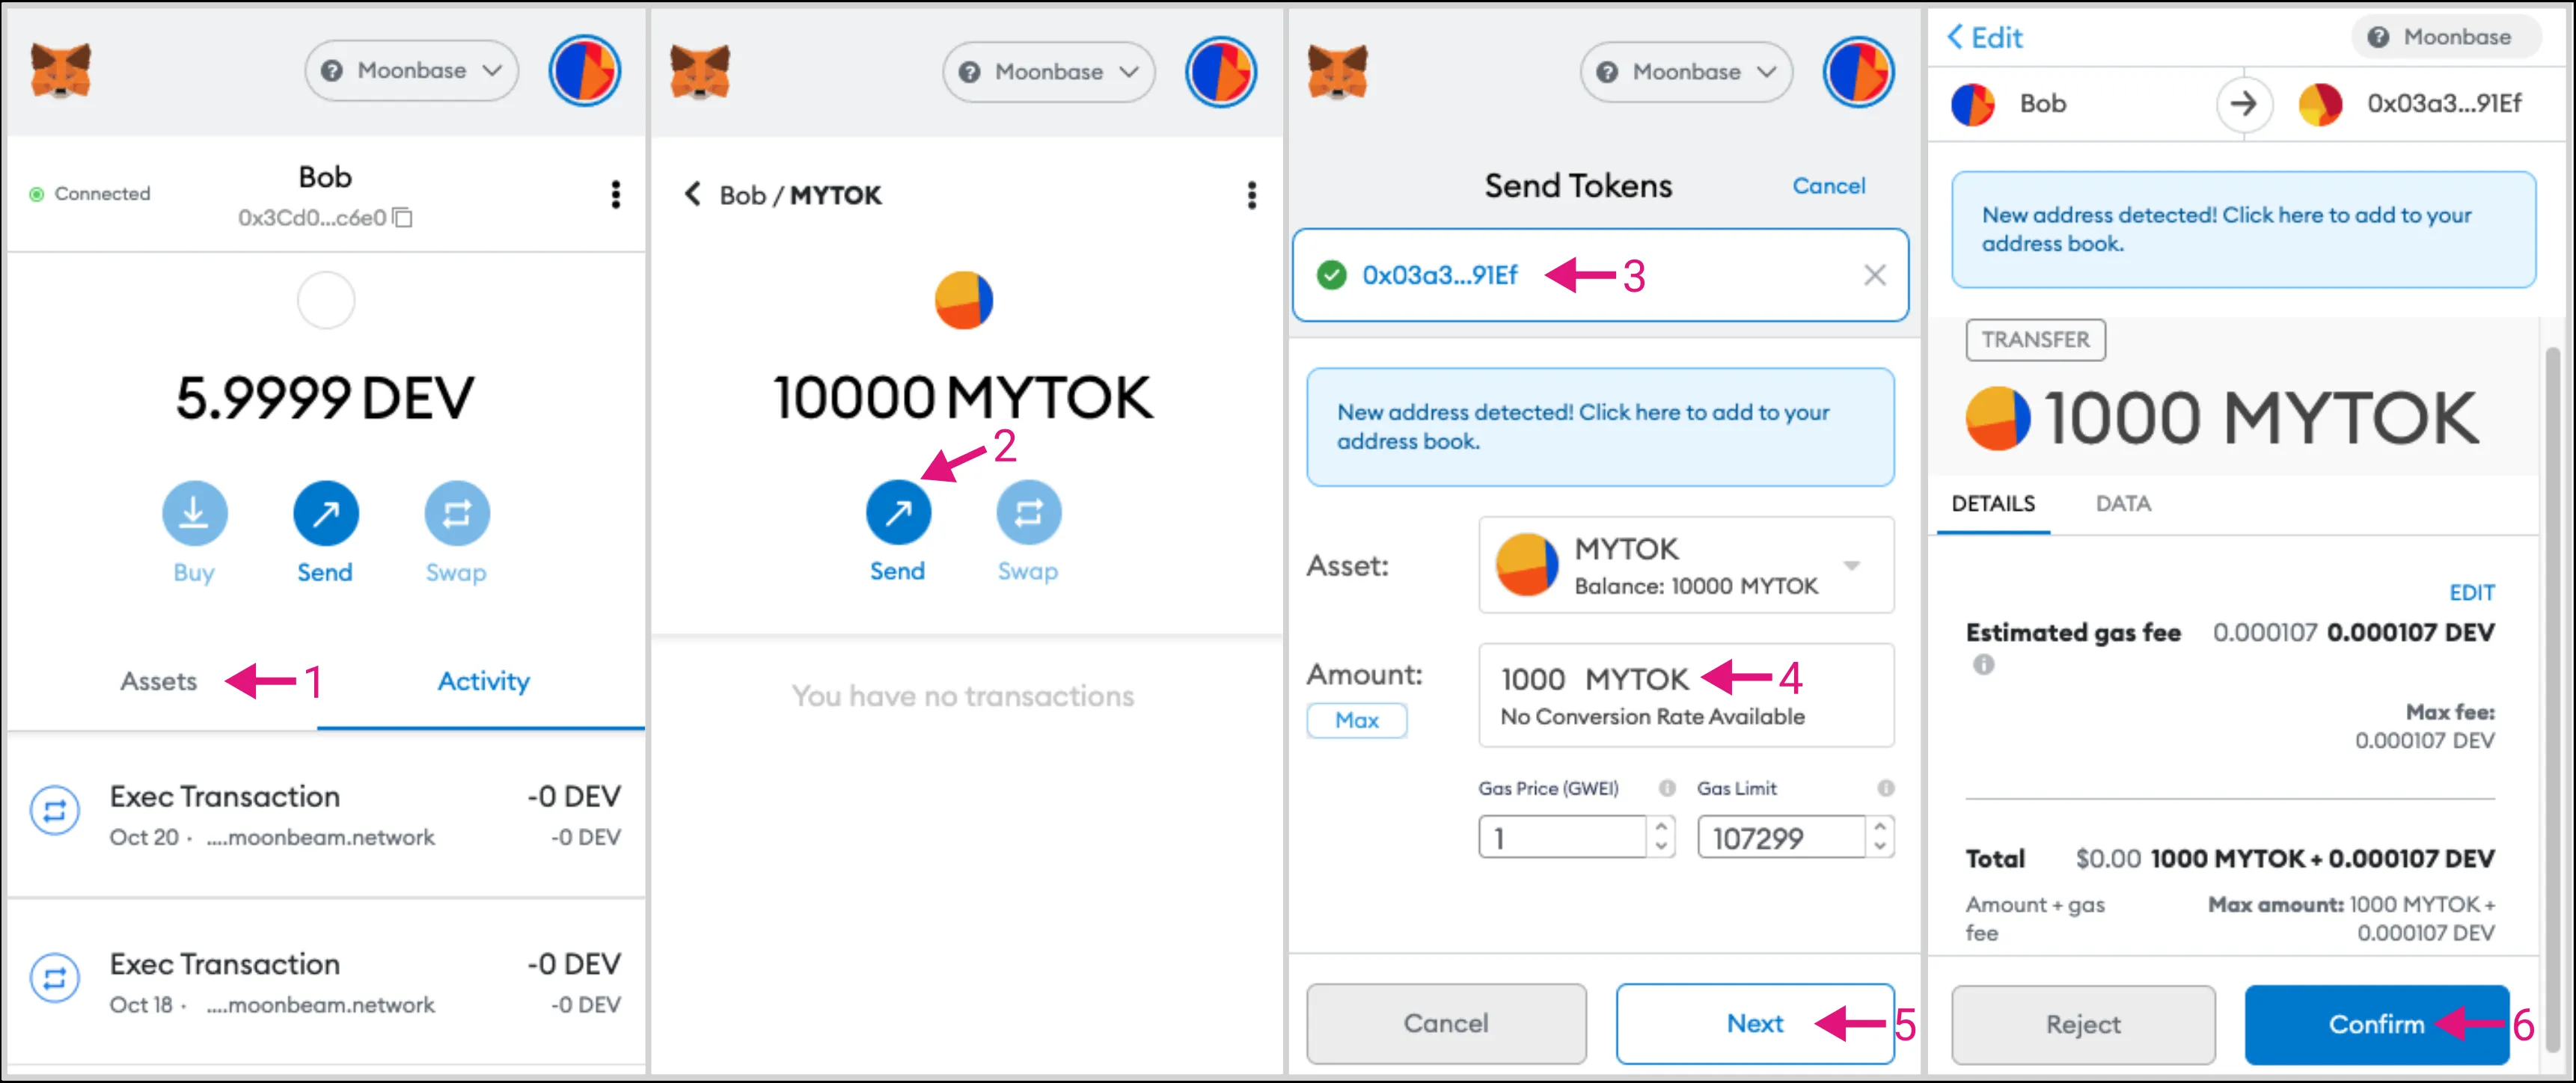
You'll need to get the Safe's address again, you can do so by clicking on the Copy to clipboard icon in the top left hand corner. Once you've got your Safe's address copied, open up MetaMask:
- Switch to the Assets tab and select MYTOK from the list
- Click Send
- Paste in the Safe's address
- Enter amount of MYTOKs to send. You should have minted 8M MYTOK tokens in the Using Remix to Deploy to Moonbeam guide. So for this example, you can enter 1000 MYTOKs for the amount to send
- Click Next
- Review the transaction details and then click Confirm to send the transaction.
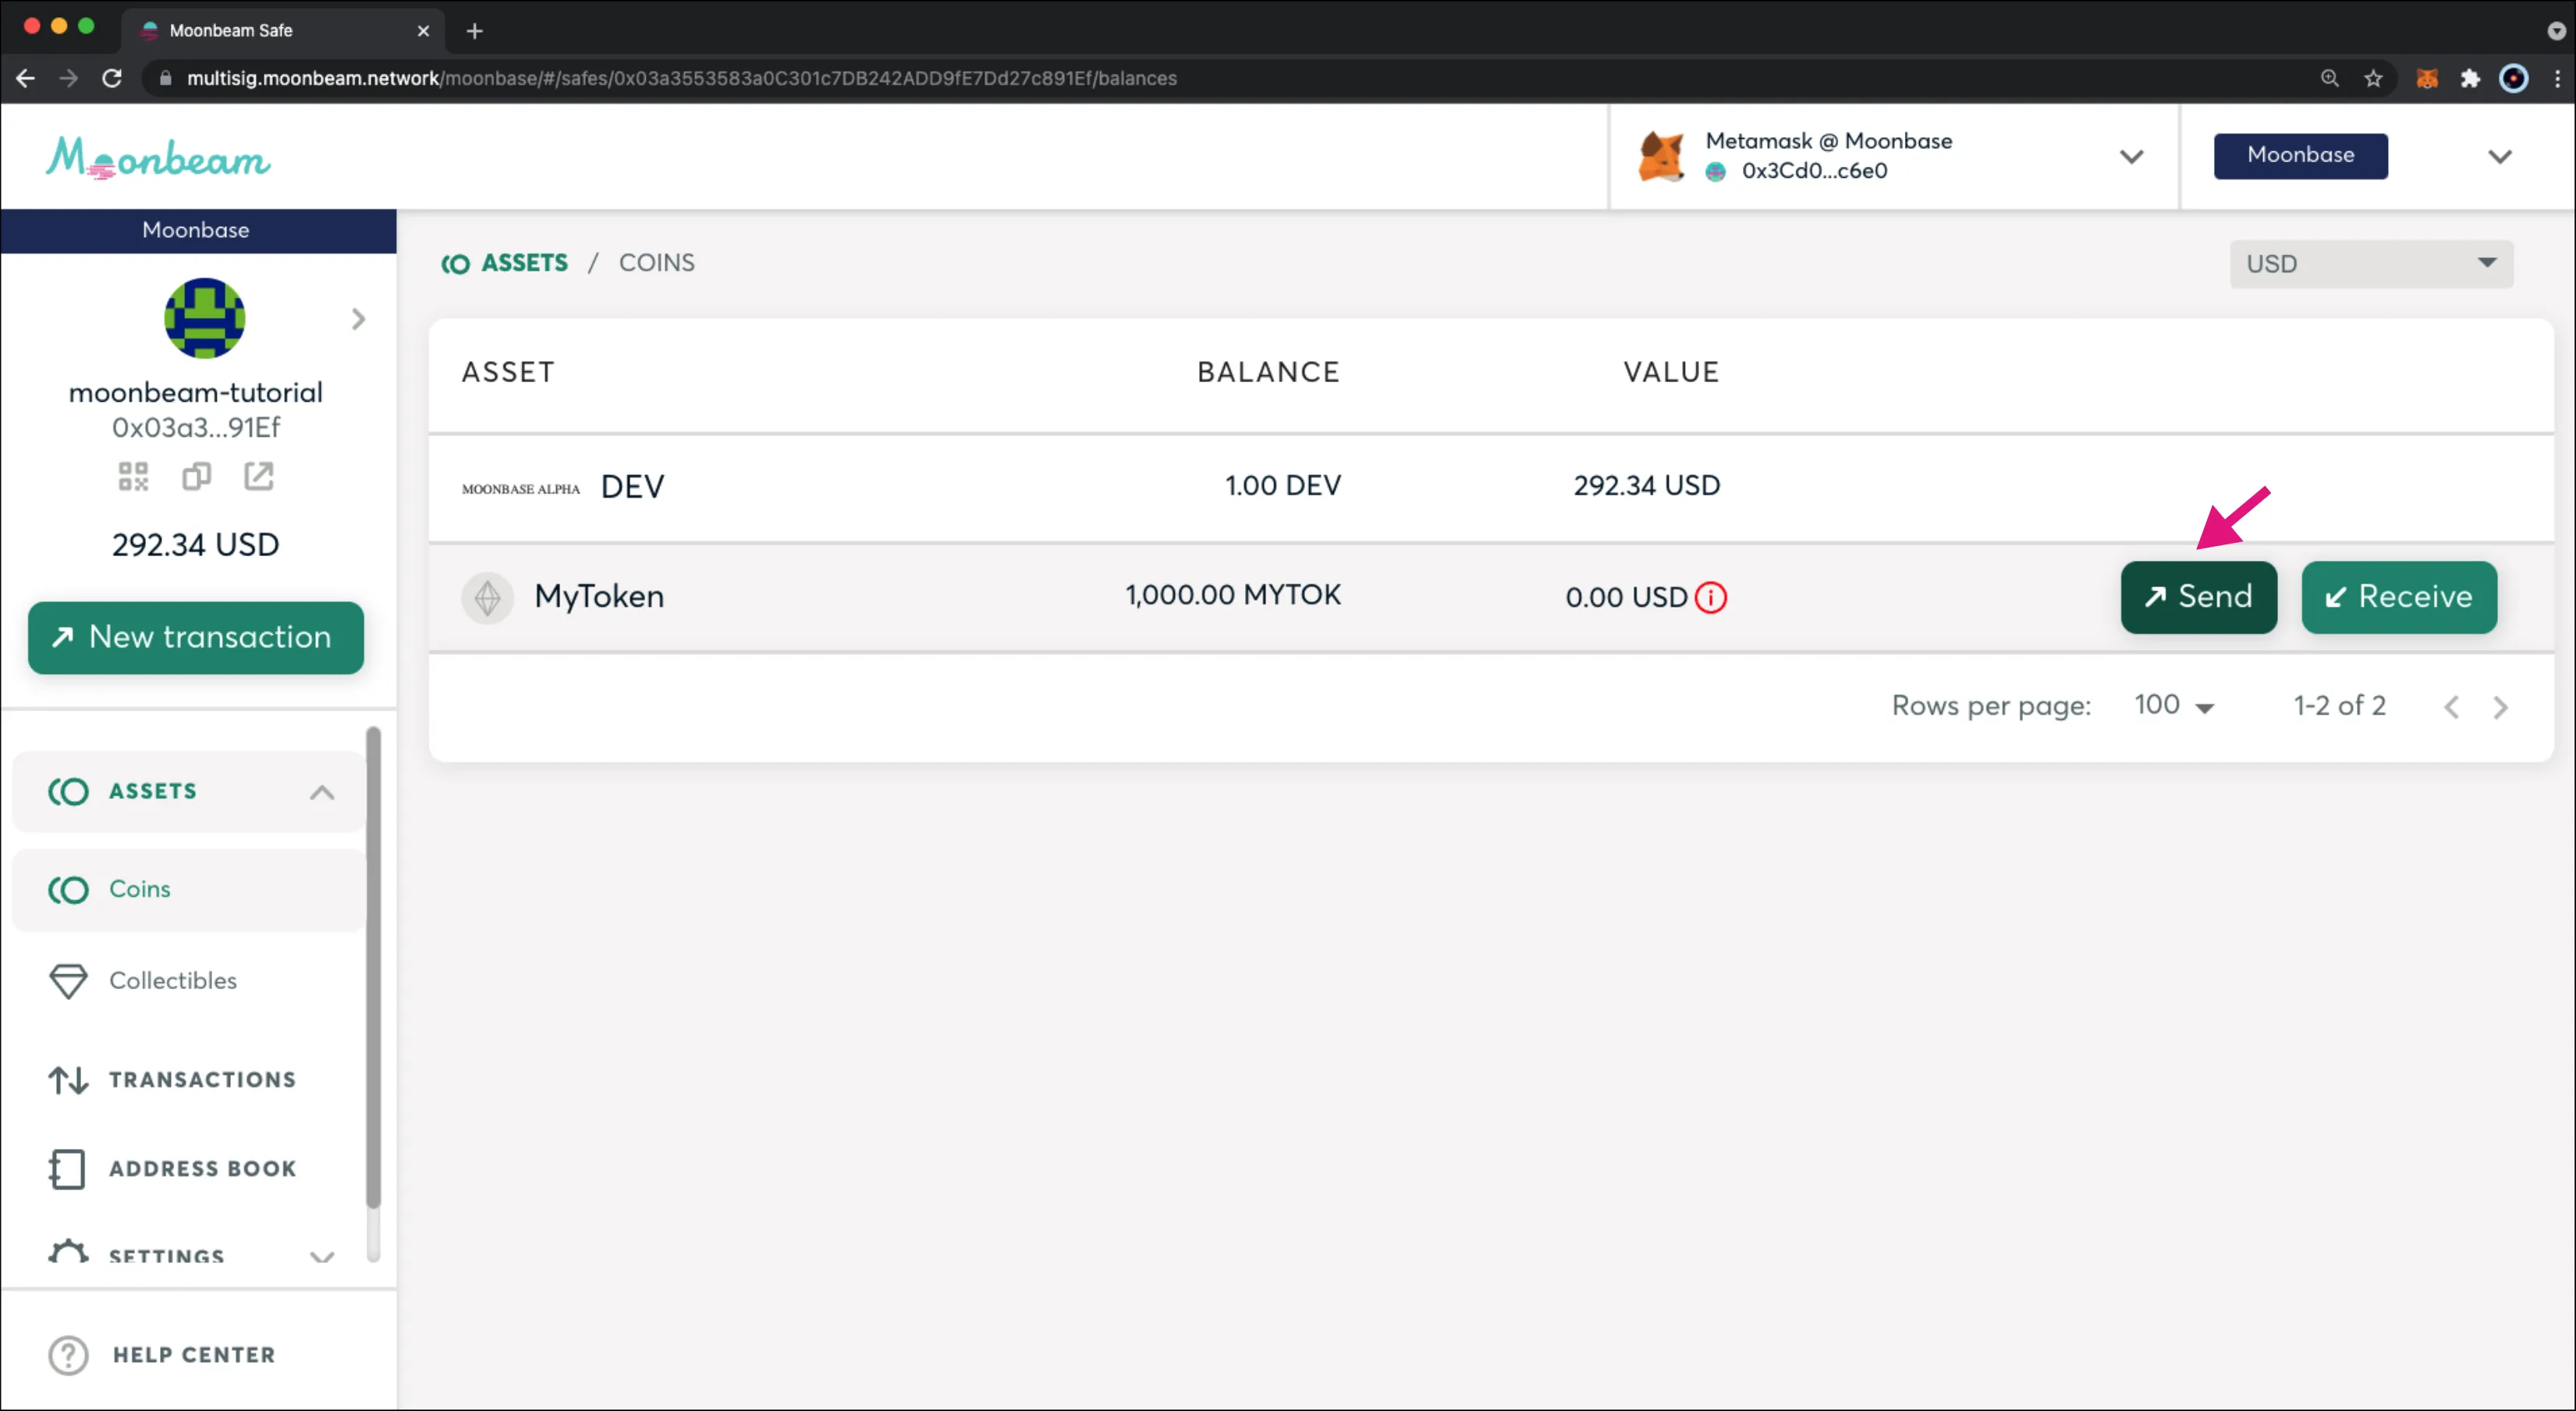
If you navigate back to the Safe, in the list of Assets you should now see MyToken and a balance of 1000 MYTOKs. It could take a few minutes for MyToken to appear, but there is nothing for you to do to add the asset, it will appear on it's own.
Send ERC-20 Tokens
Now that you have loaded your Safe with MYTOKs, you can send some from the Safe to another account. For this example, you can send 10 MYTOKs to Charlie.
Hover over MyToken in the list of assets, and this time click on Send.
A pop-up will appear where you can enter the recipient and the amount of MYTOK tokens to send:
- Enter Charlies's Address
- Select MyToken from the list of assets
- Enter 10 MYTOK tokens
- Click Review and review the details
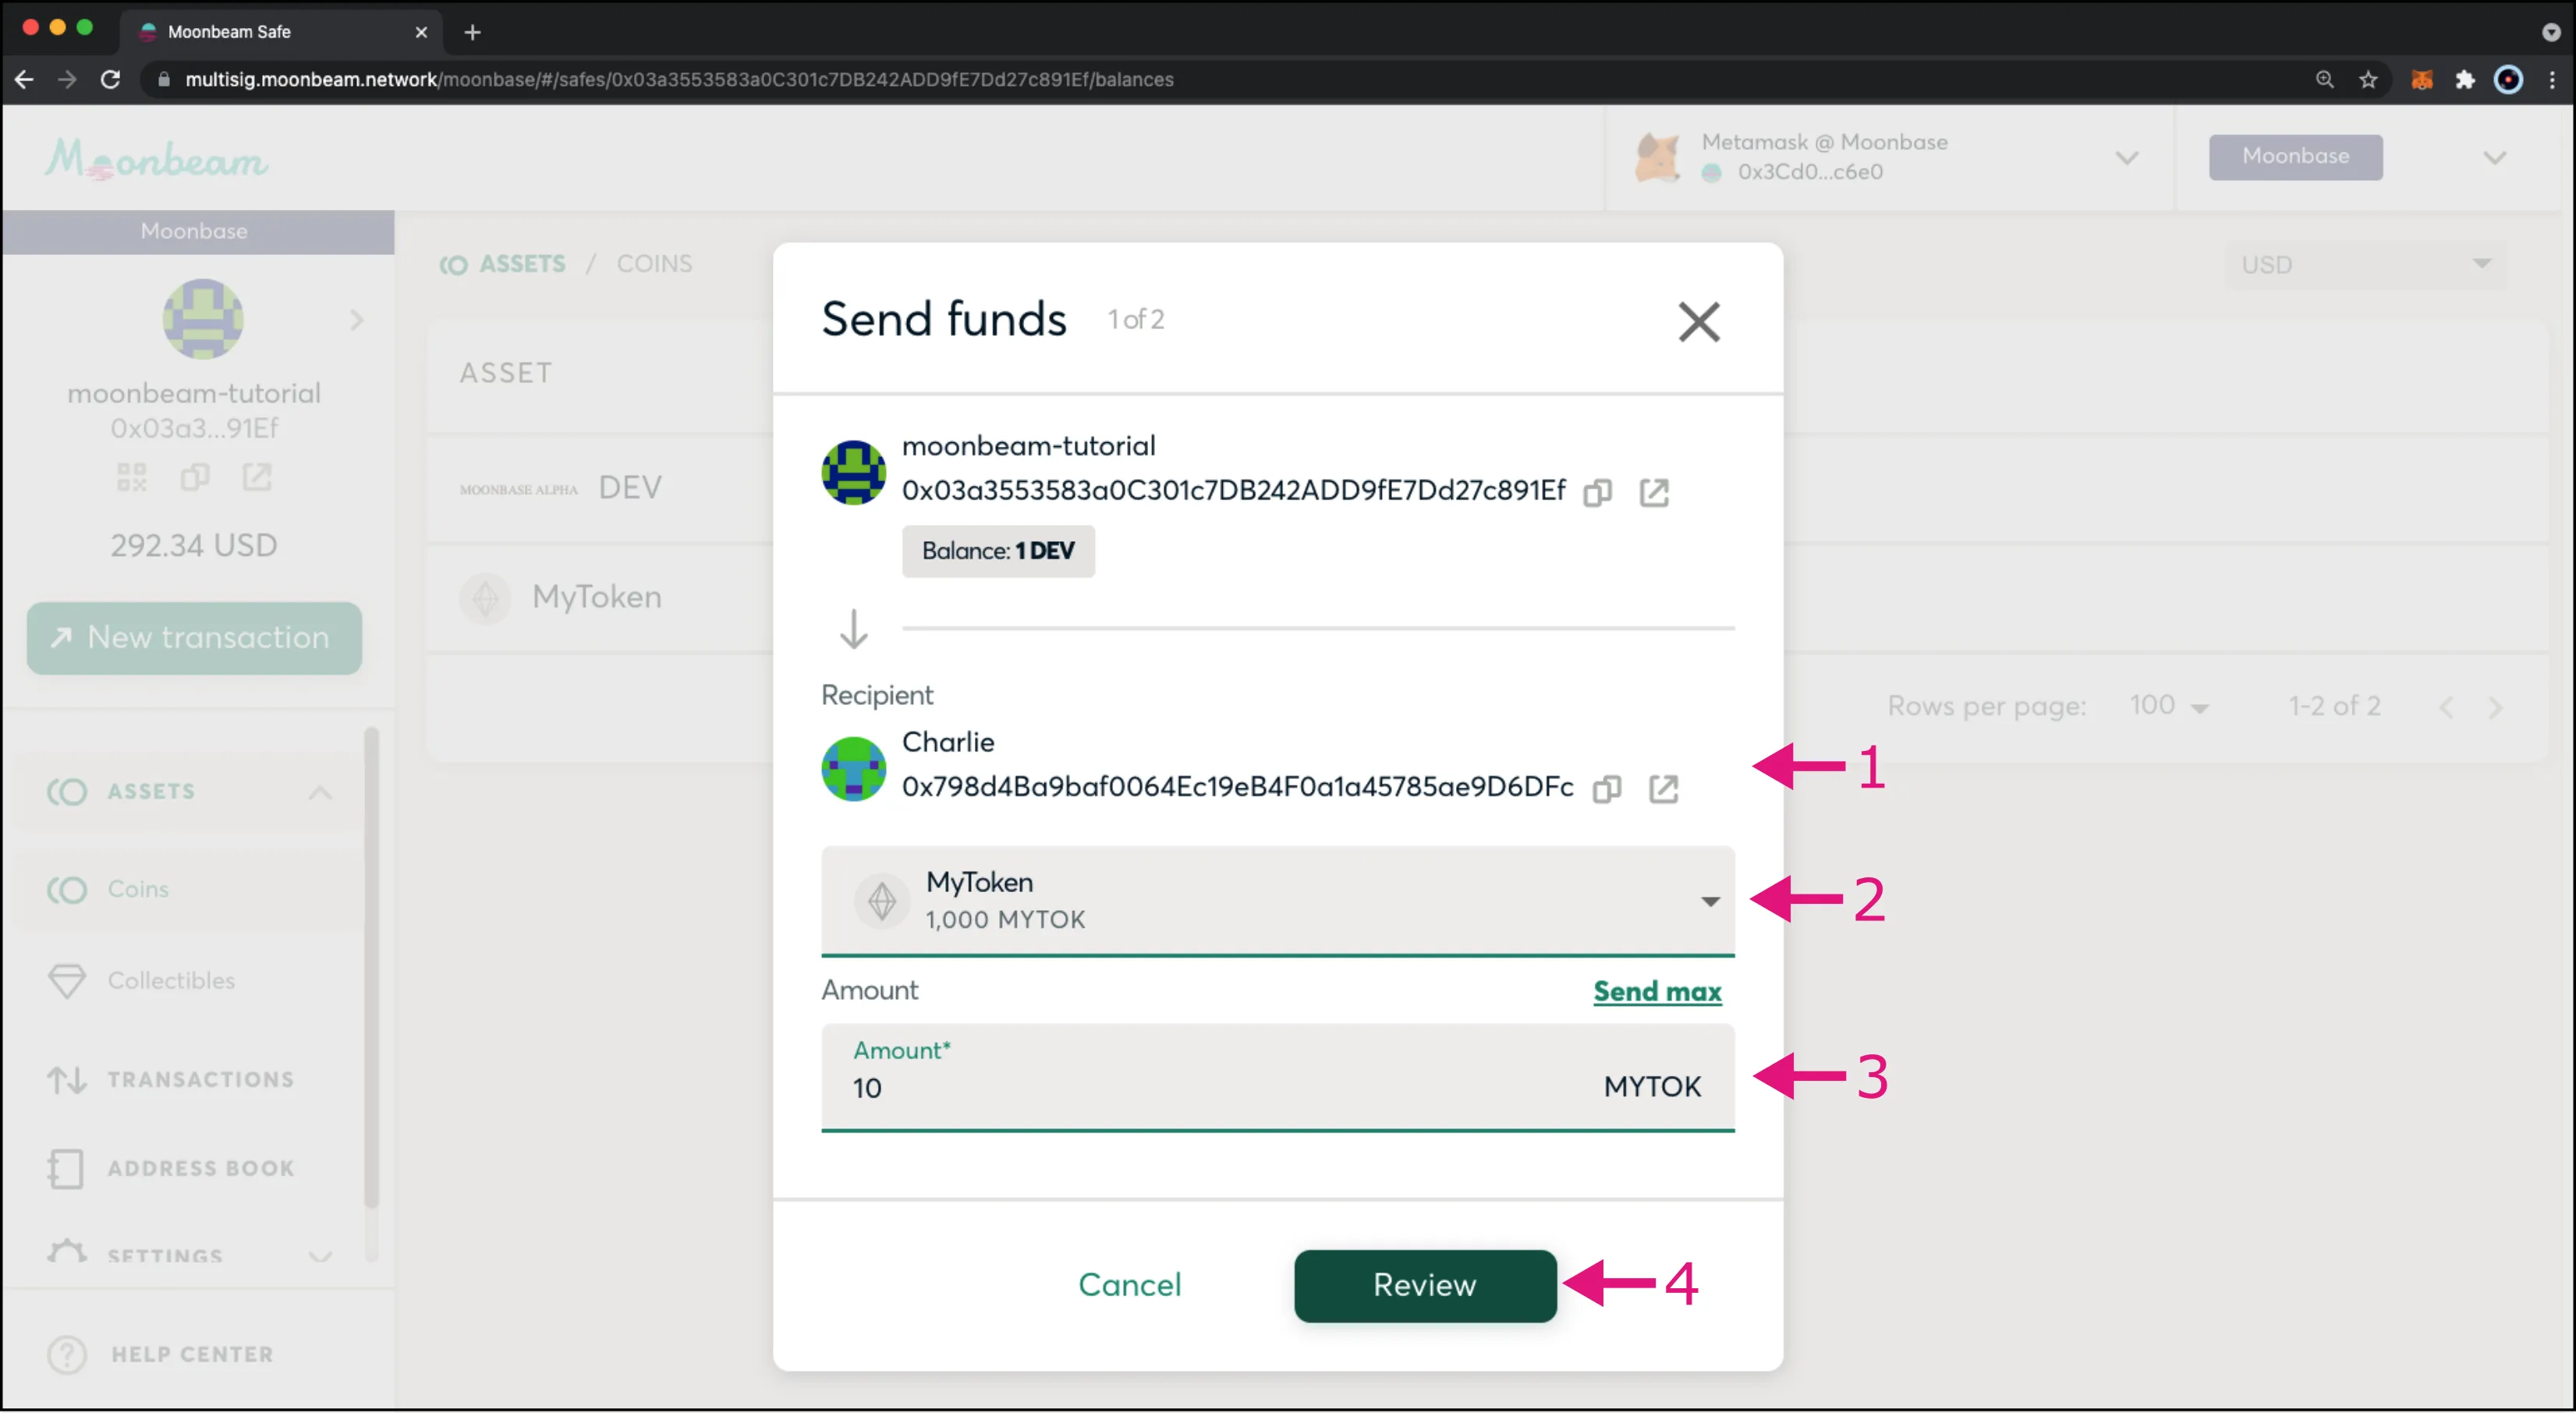
If everything looks ok, you can:
- Click Submit. MetaMask will pop-up and you'll notice that instead of sending a transaction, you're sending a message
- Click Sign to sign the message
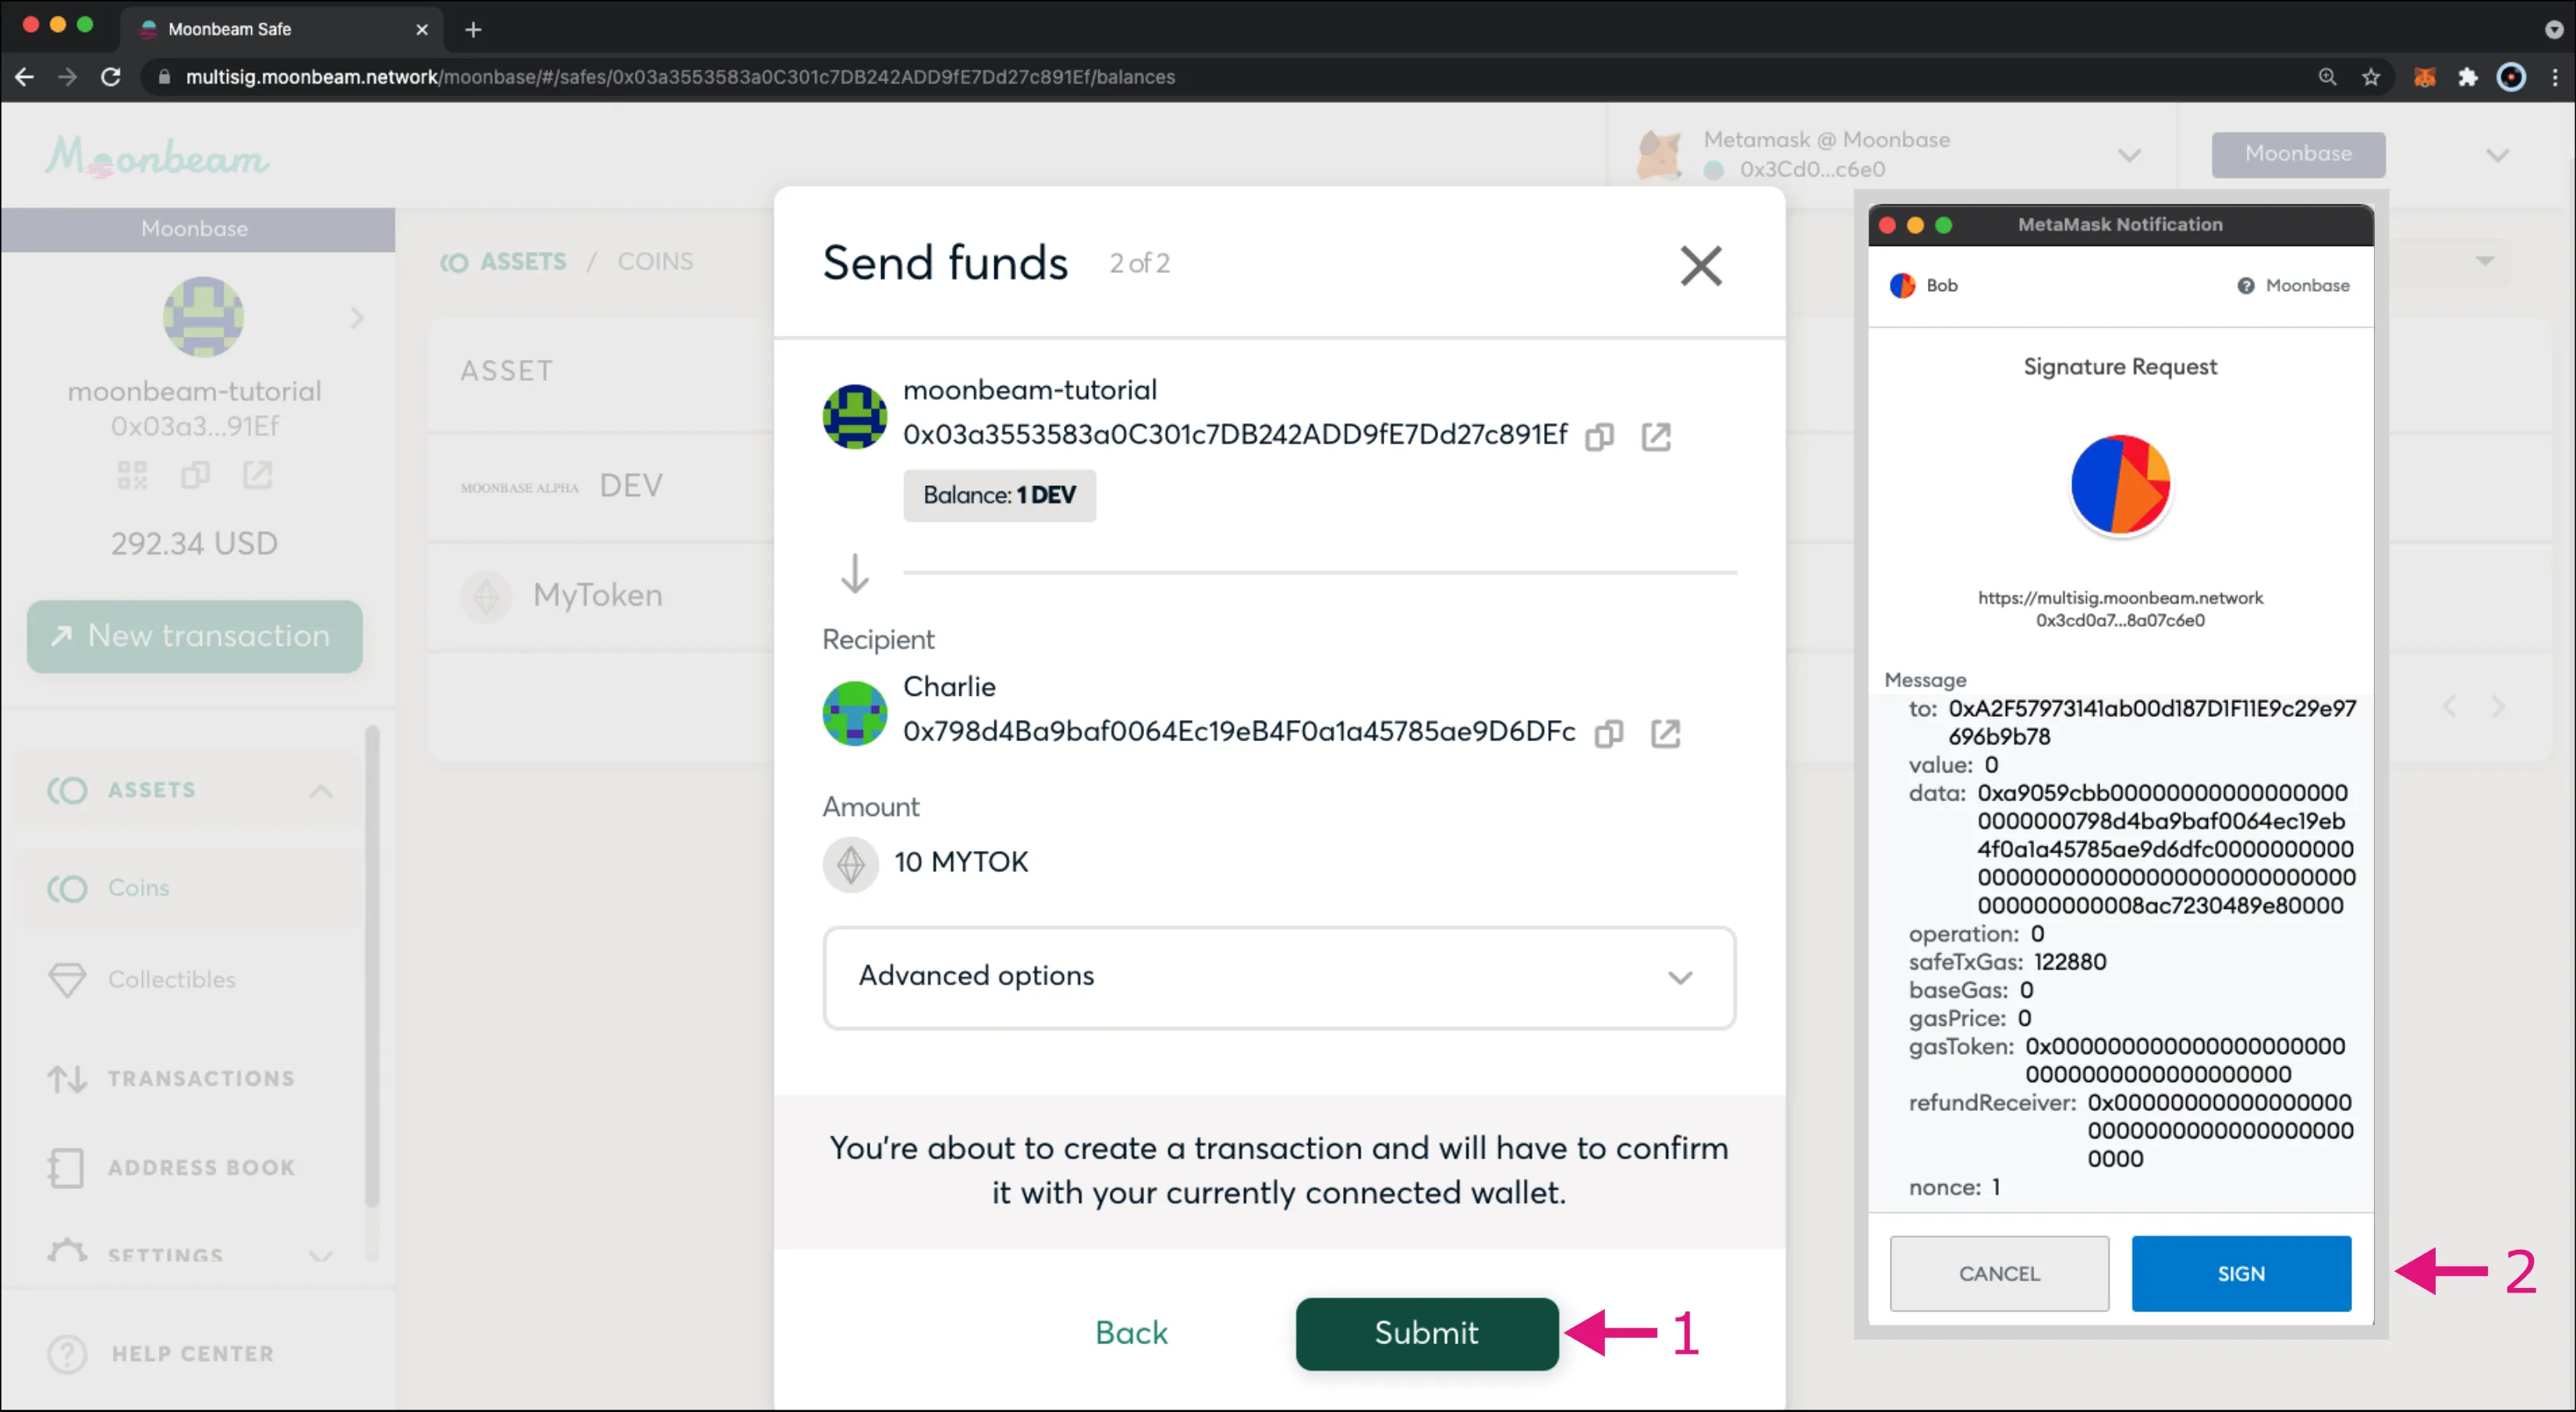
Now, if you go back to the Safe, under the Transactions tab, you should be able to see that there has been a transaction proposal initiated to send 10 MYTOK tokens to Charlie's address. However, you should also see that only 1 out of 2 confirmations have been received and that 1 more owner is required to confirm the transaction before it gets executed.
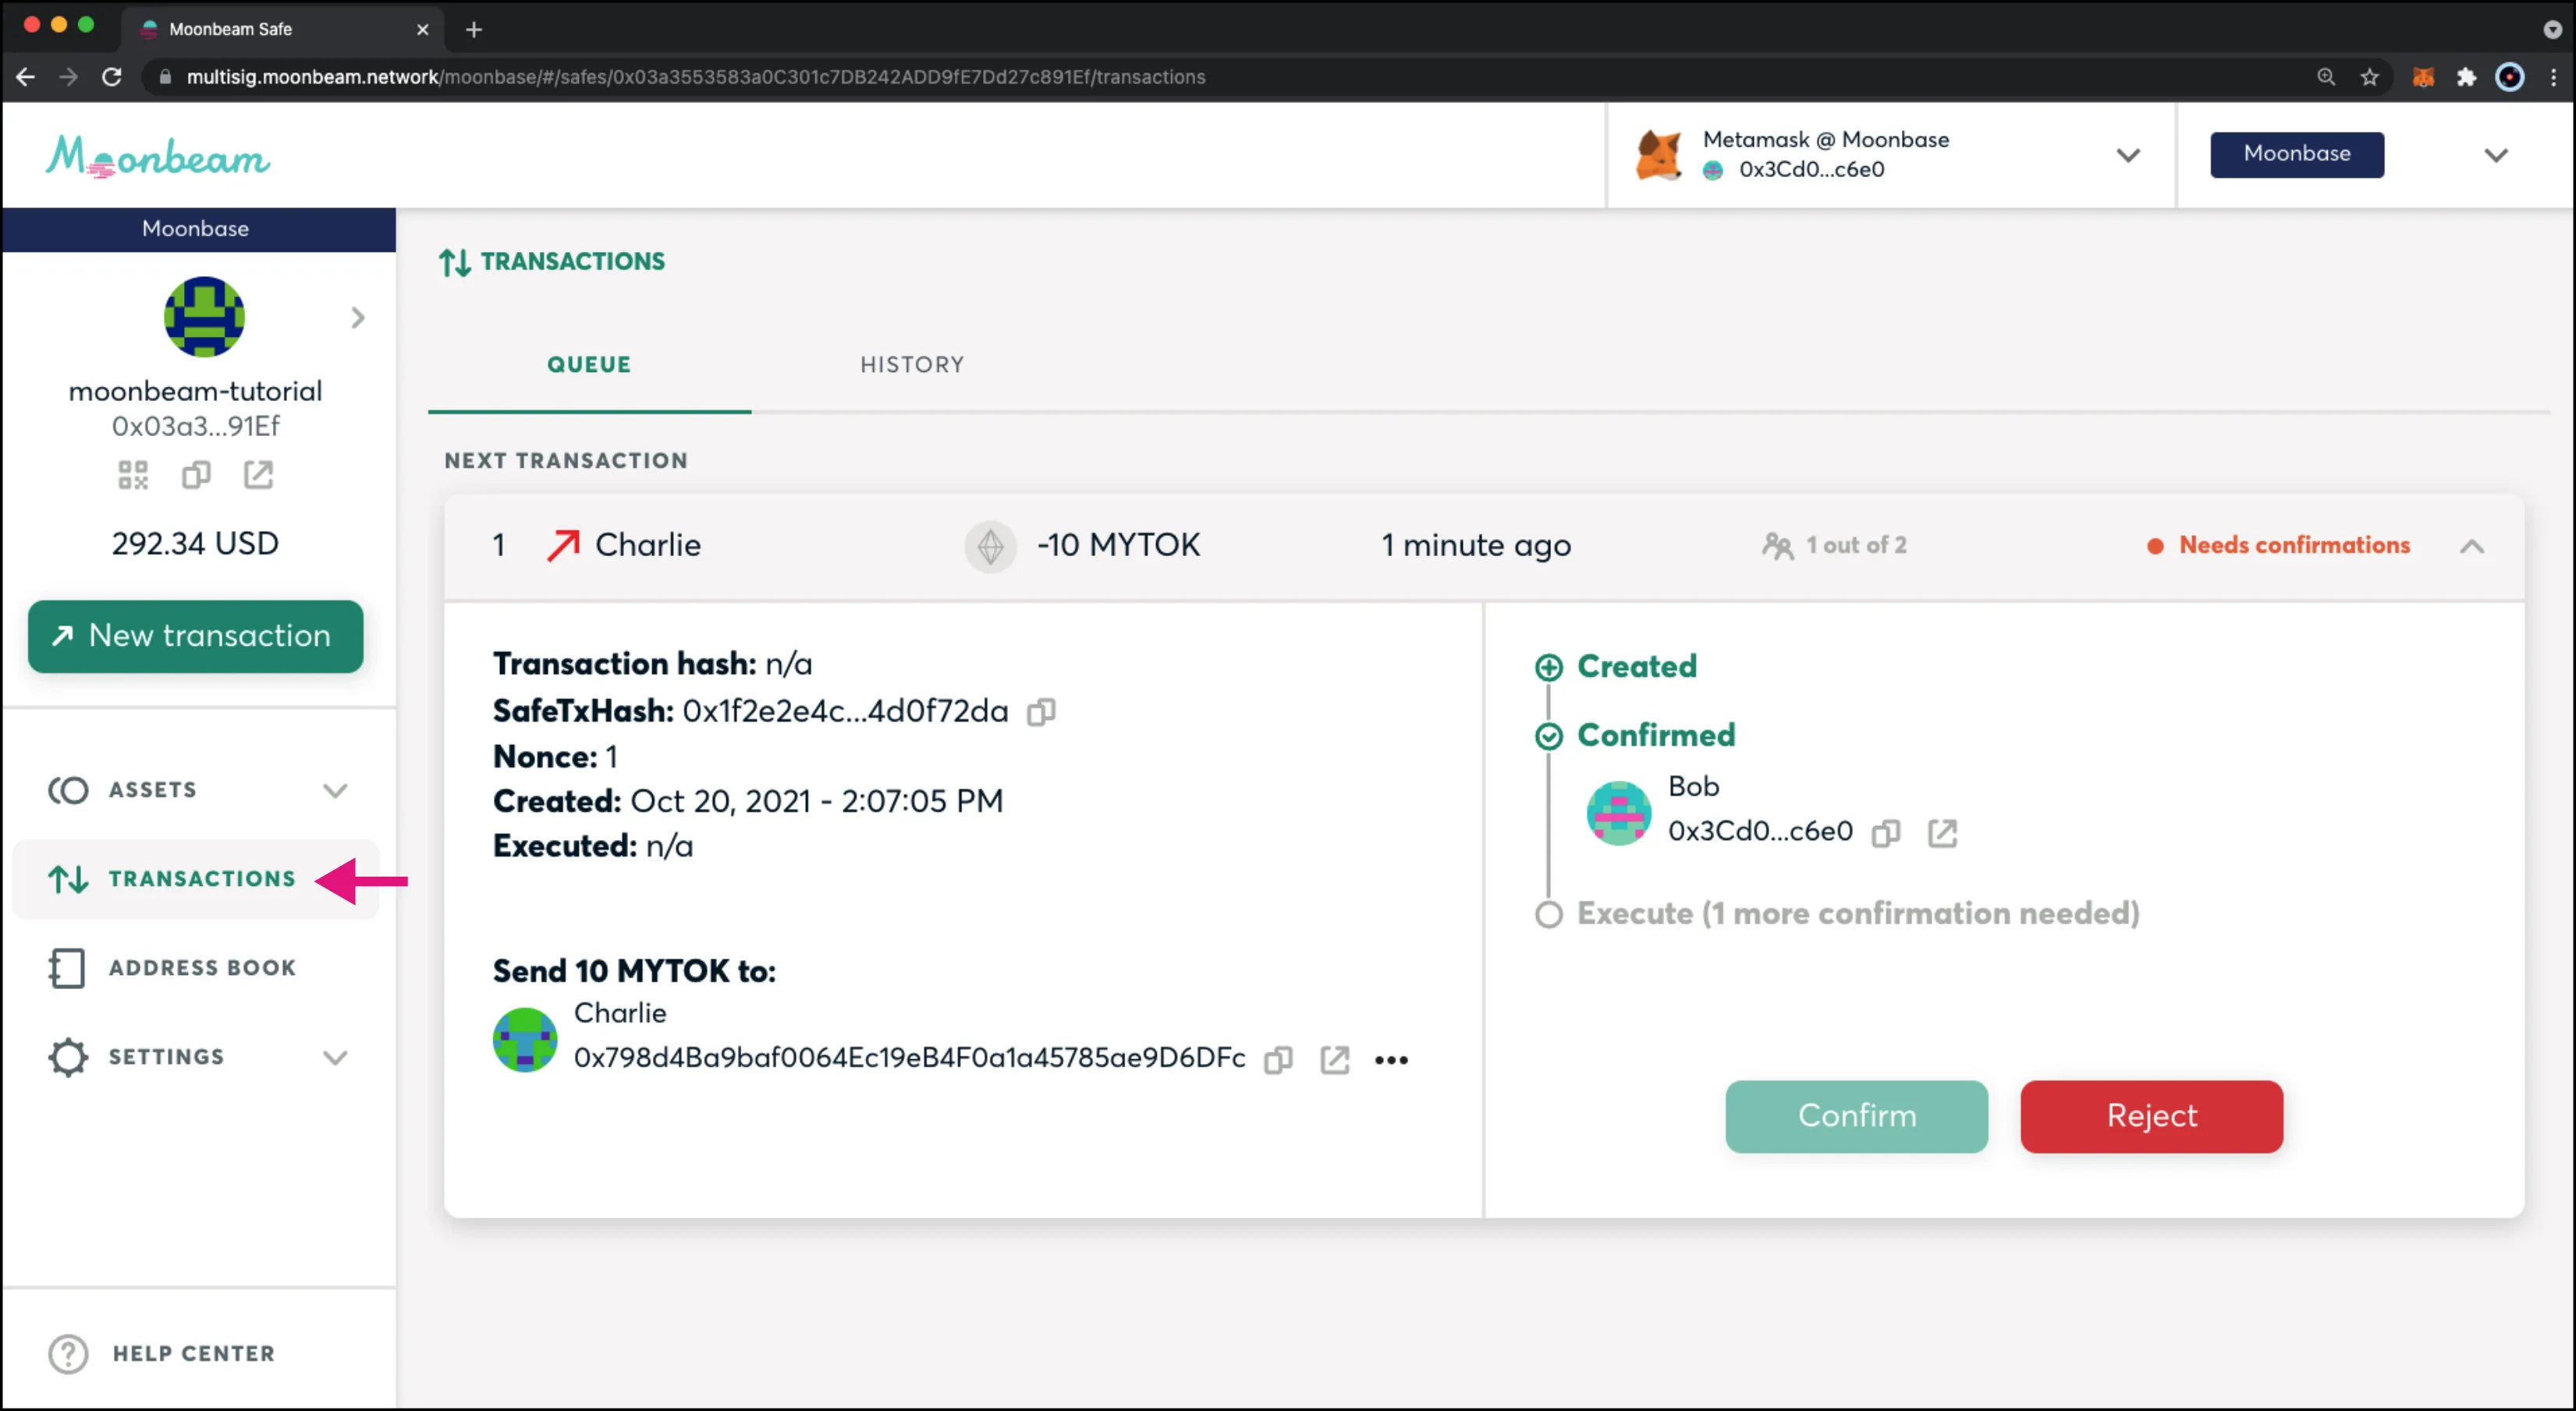
You will need to switch accounts to Alice or Charlie and confirm the transaction to execute it. You can follow the same steps outlined in the above Transaction Confirmation section.
Once the transaction has been confirmed from one of the other two accounts, the transaction will be moved to the HISTORY tab.
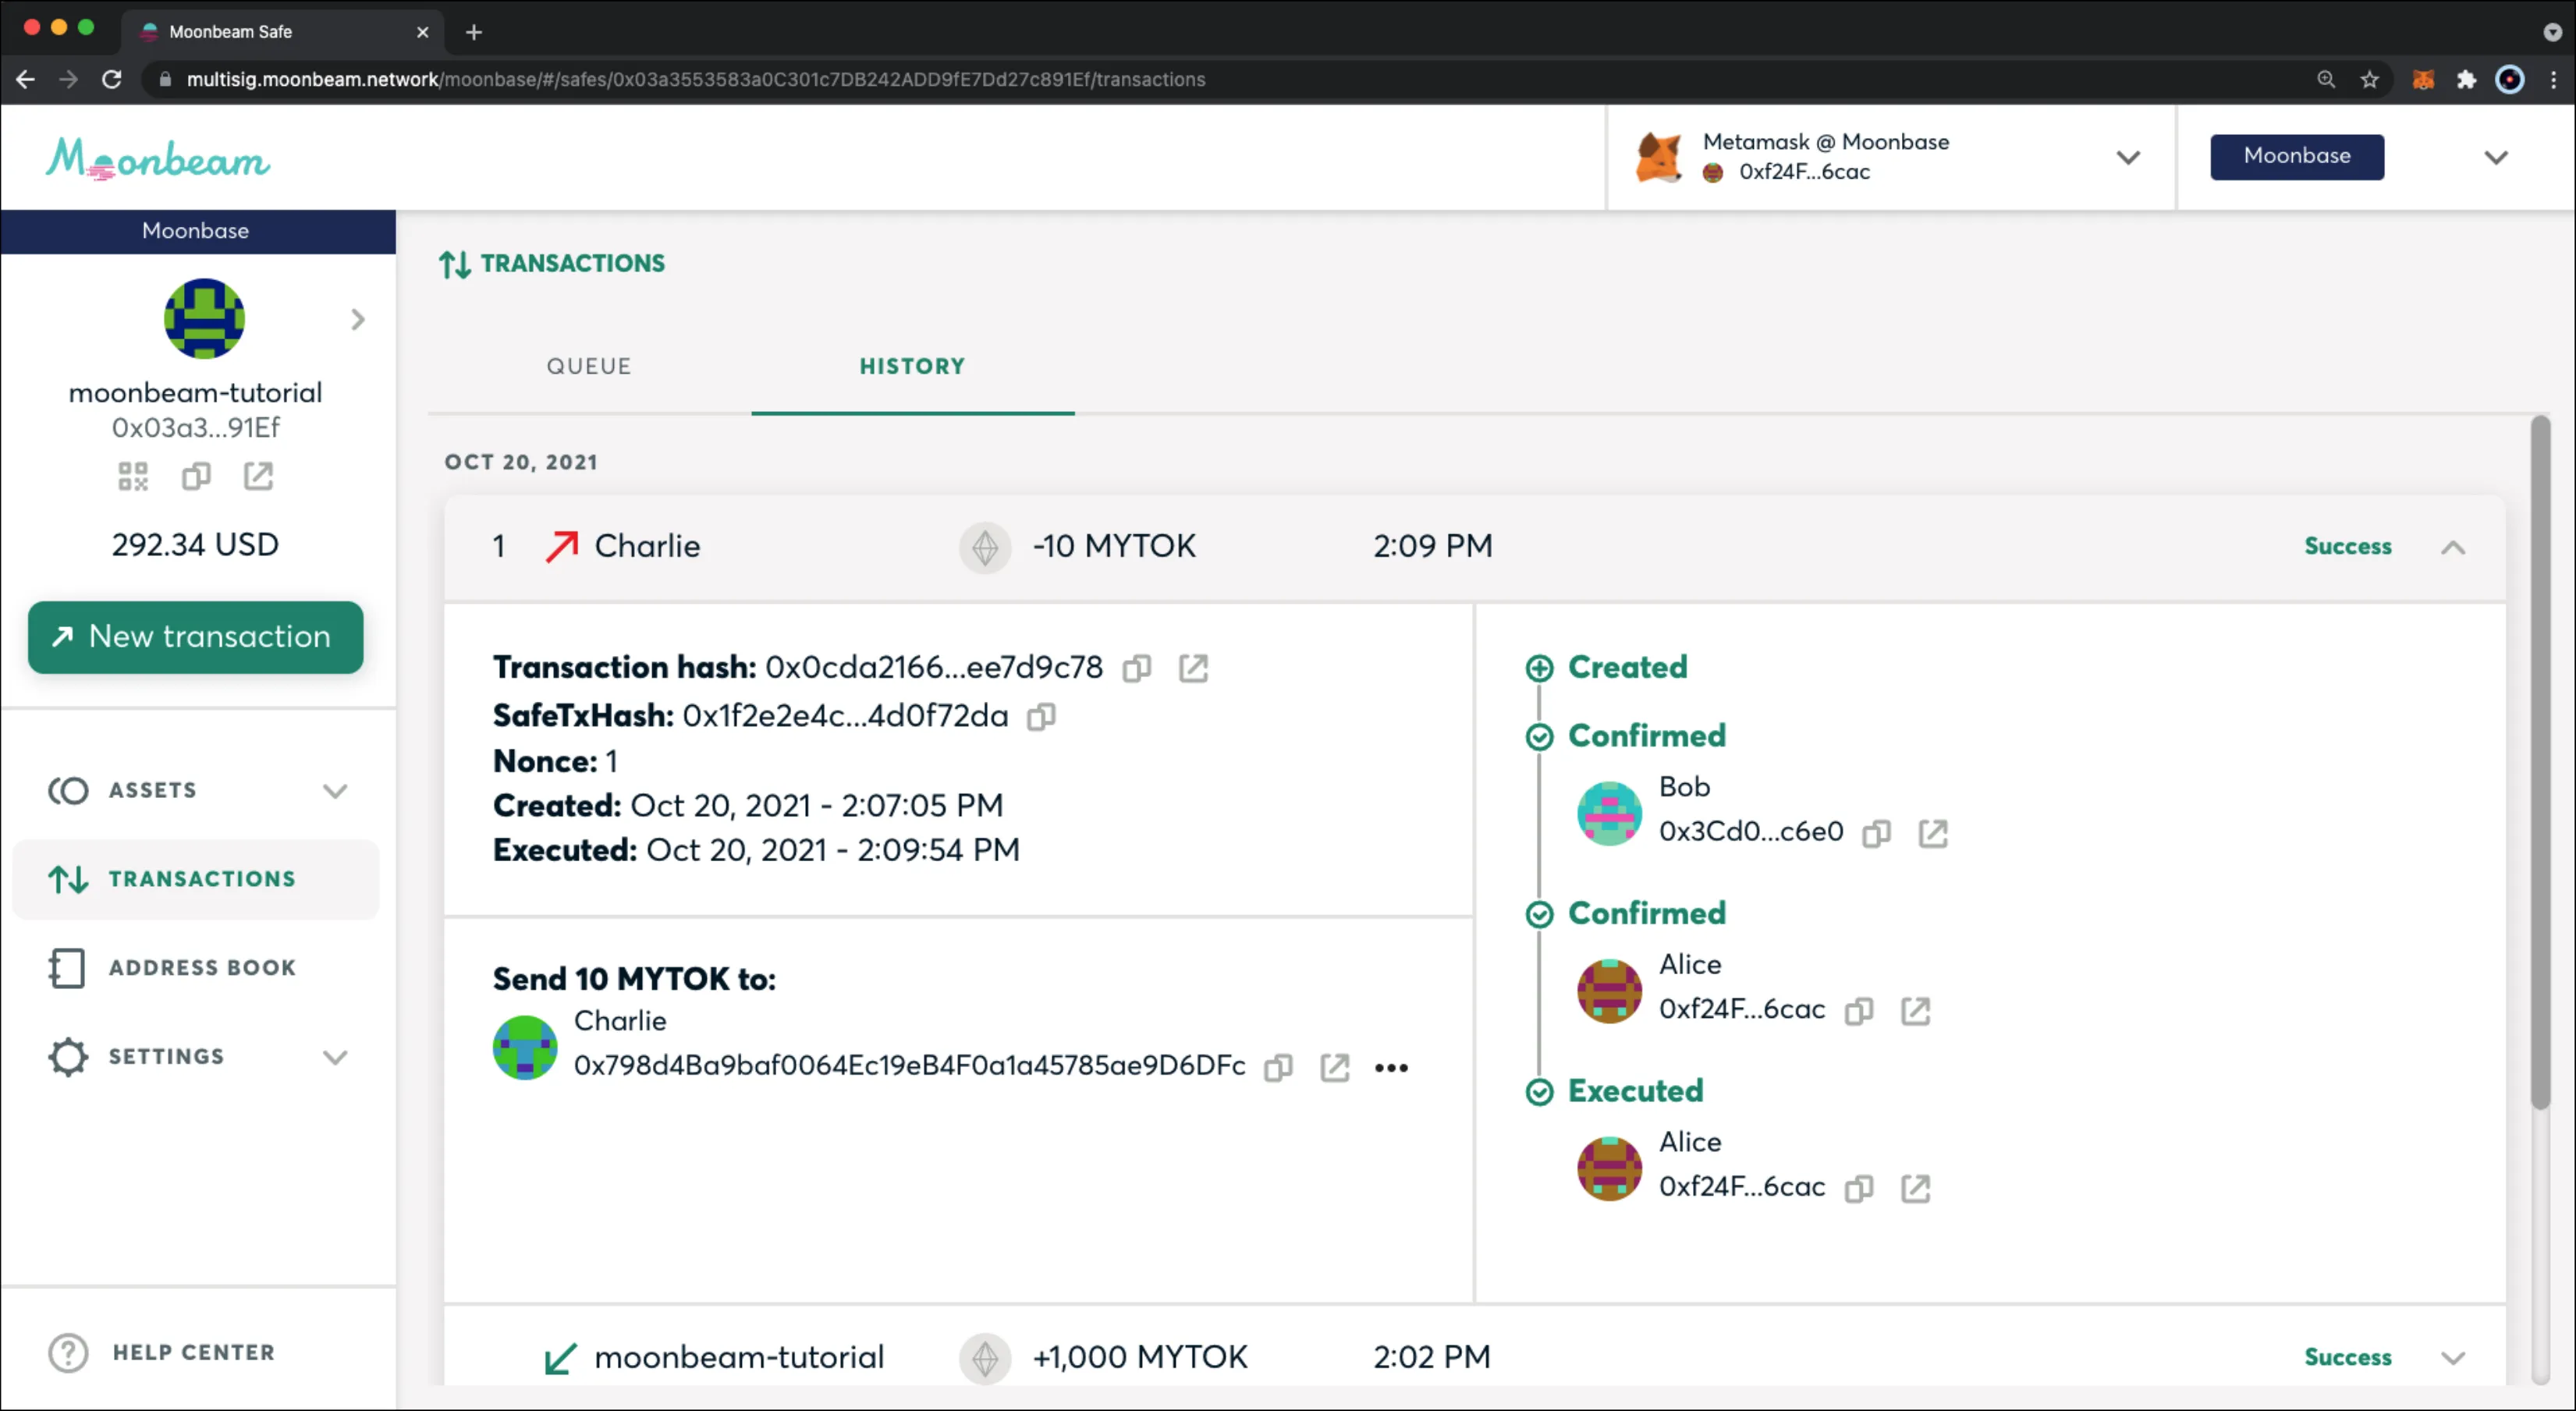
Congratulations! You've successfully received and sent ERC-20 tokens to and from the Safe!
Interact with a Smart Contract
For this section, you will be interacting with a smart contract using the Safe. You should have already deployed the SetText.sol contract using Remix, if not please refer back to the Deployed Smart Contract section of the prerequisites.
You should still be connected to Alice's account for this section of the guide.
From the Safe:
- On the left hand side click on New Transaction
- Then select Contract interaction
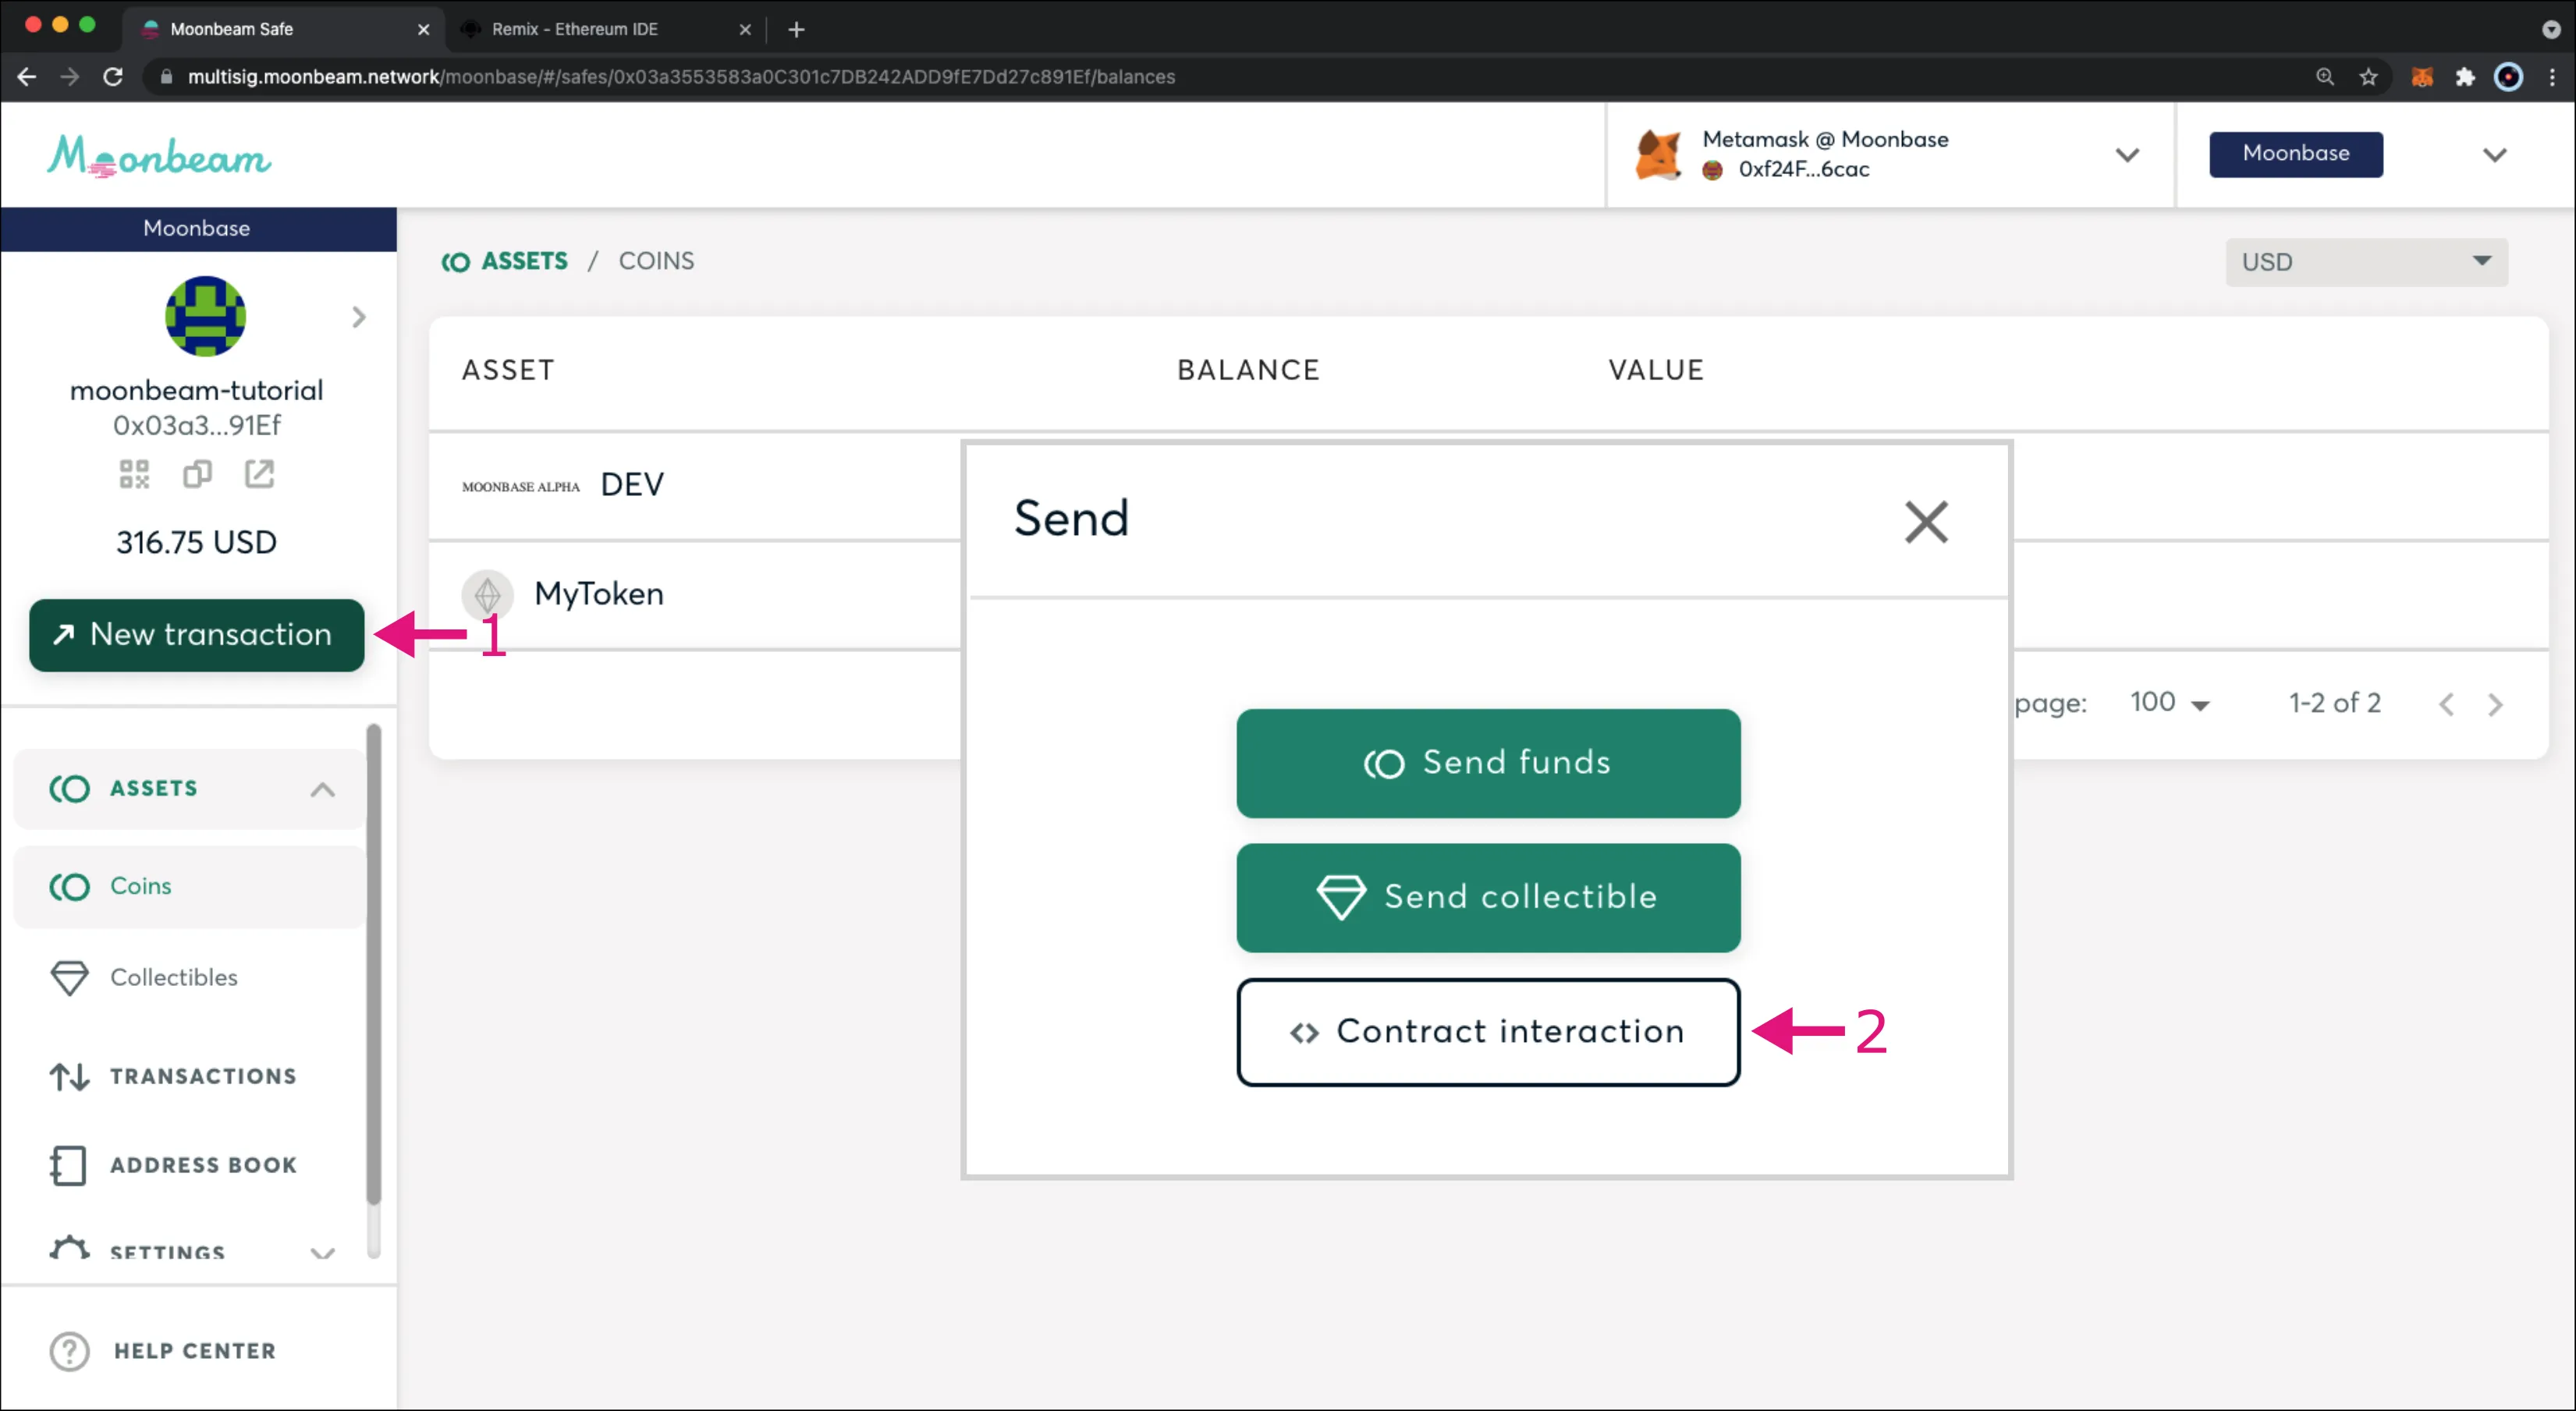
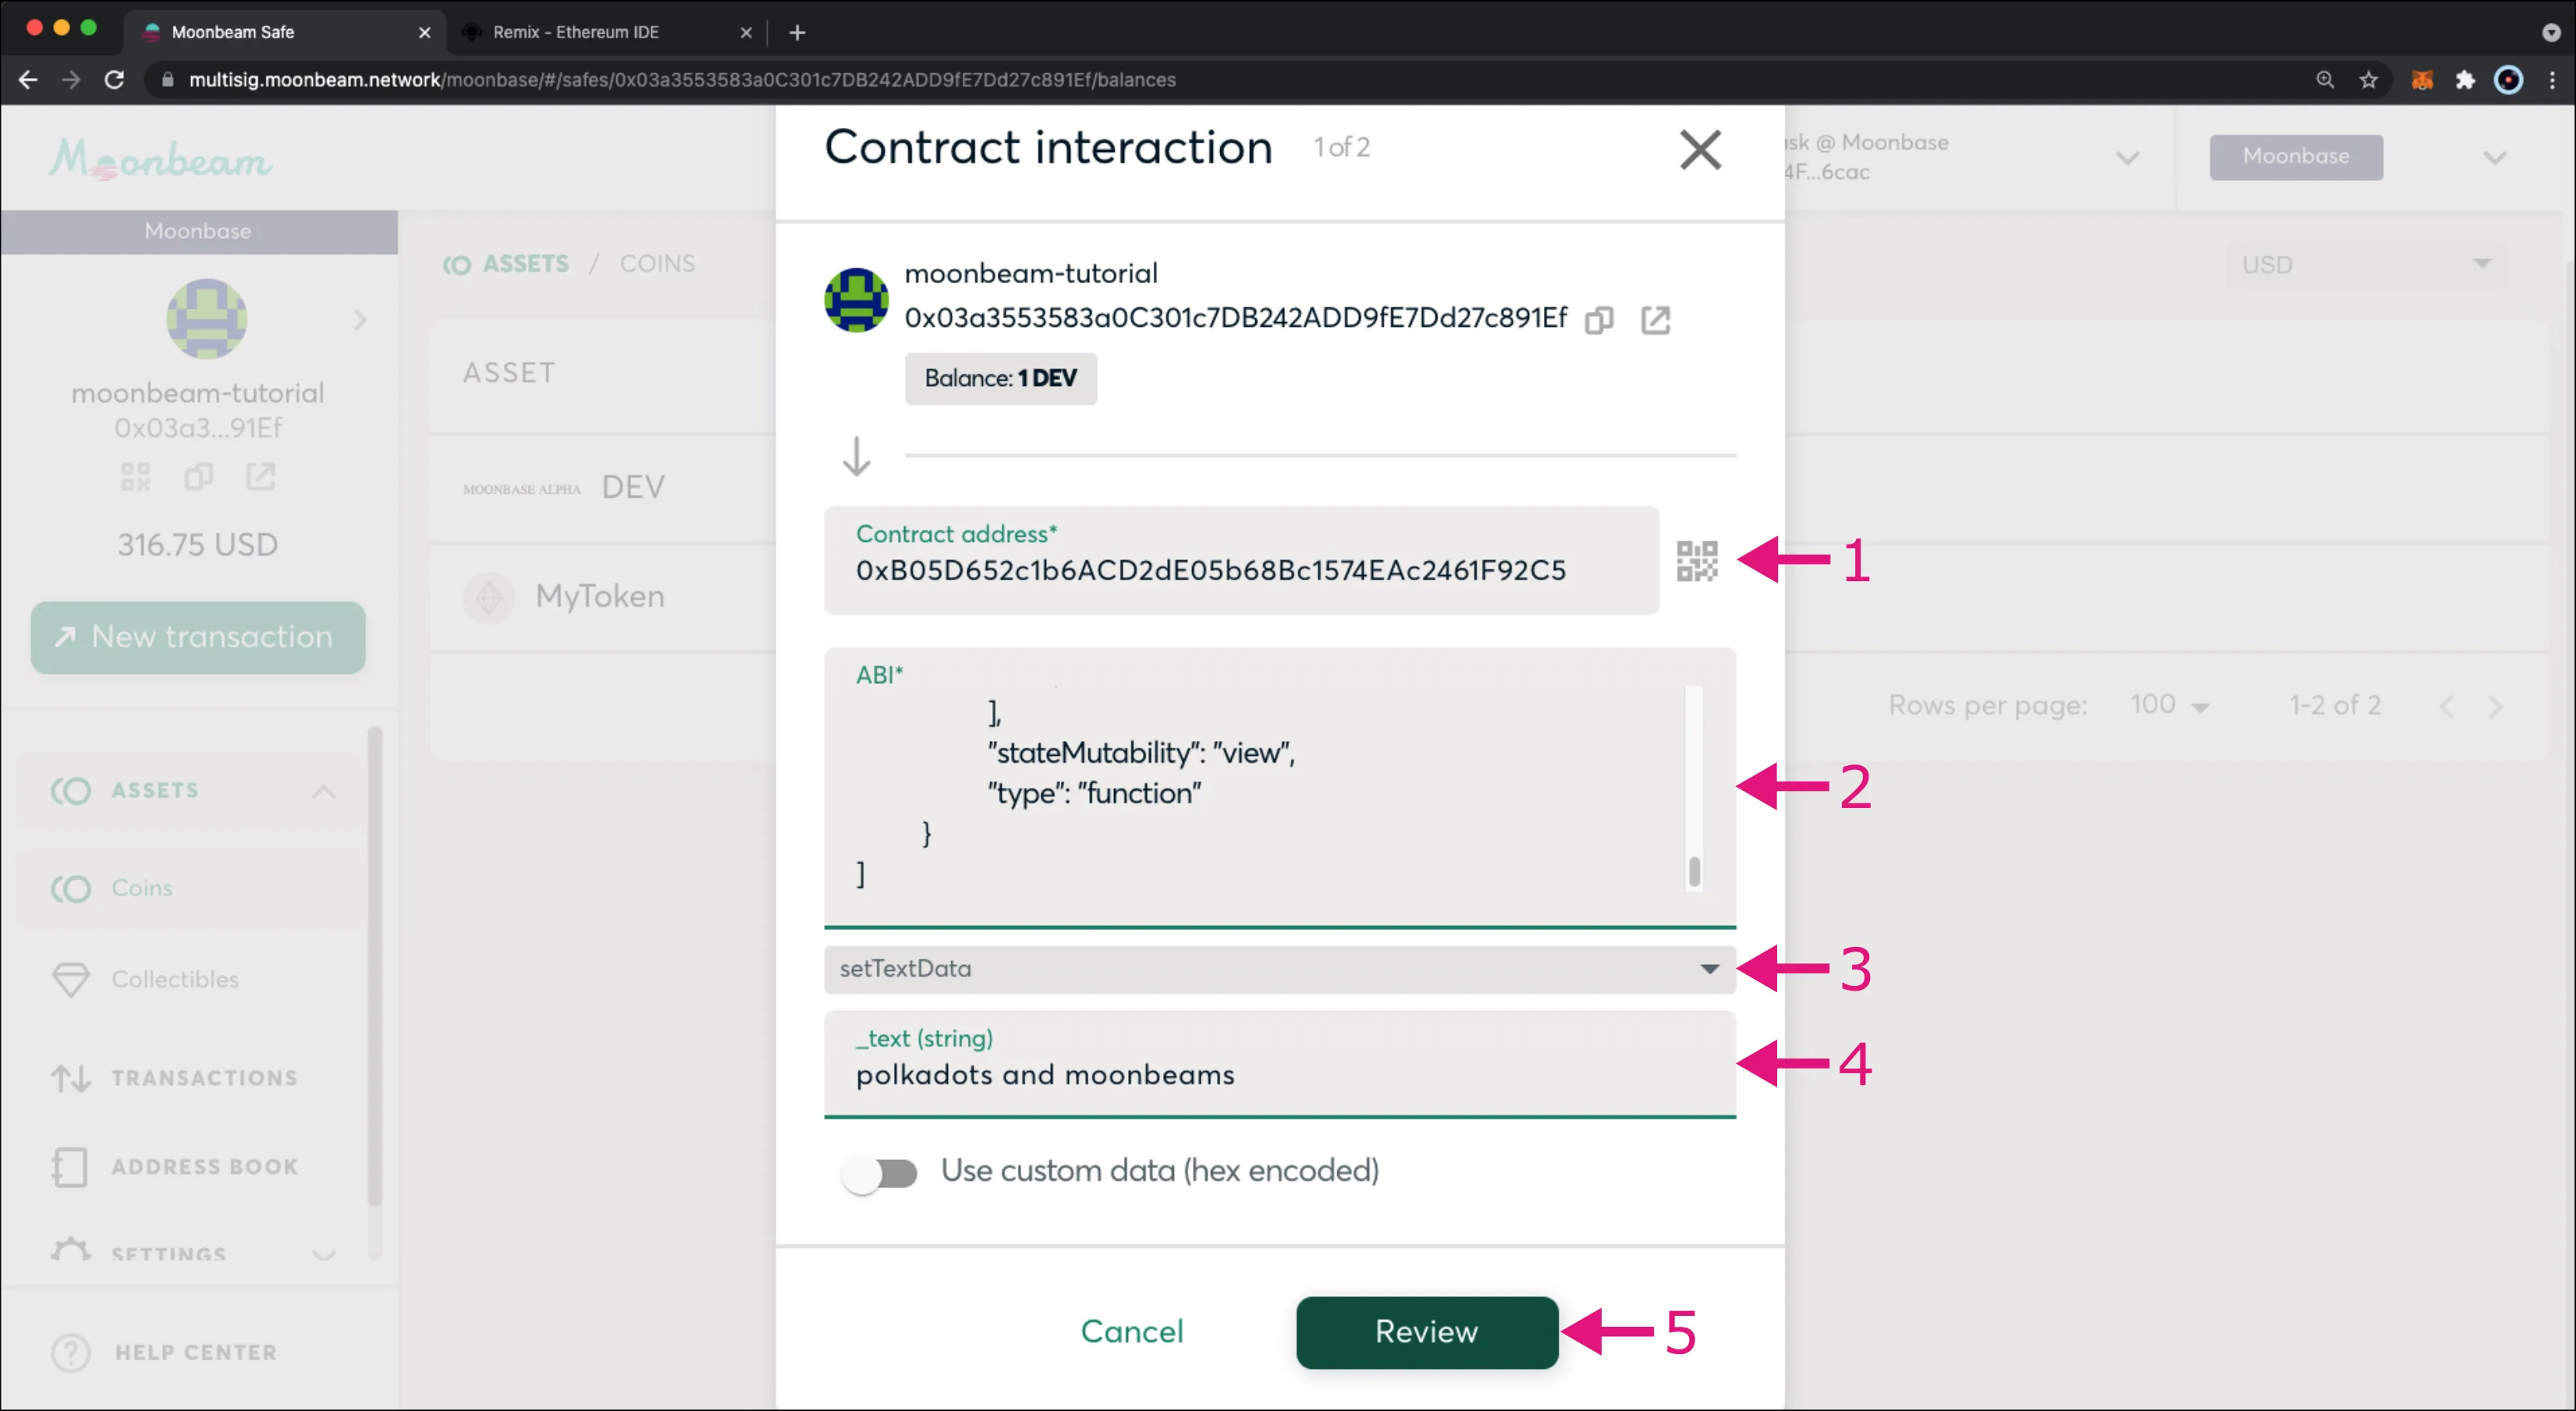
The Contract interaction pop-up will appear and you can fill in the contract details:
- Enter the contract address into the Contract address field
- In the ABI text box, paste the ABI
- A Method dropdown will appear. Select the
setTextDatafunction - Then a
_textinput field will appear. You can enter anything you would like, for this example, you can usepolkadots and moonbeams - Click Review
If the details look ok, go ahead and:
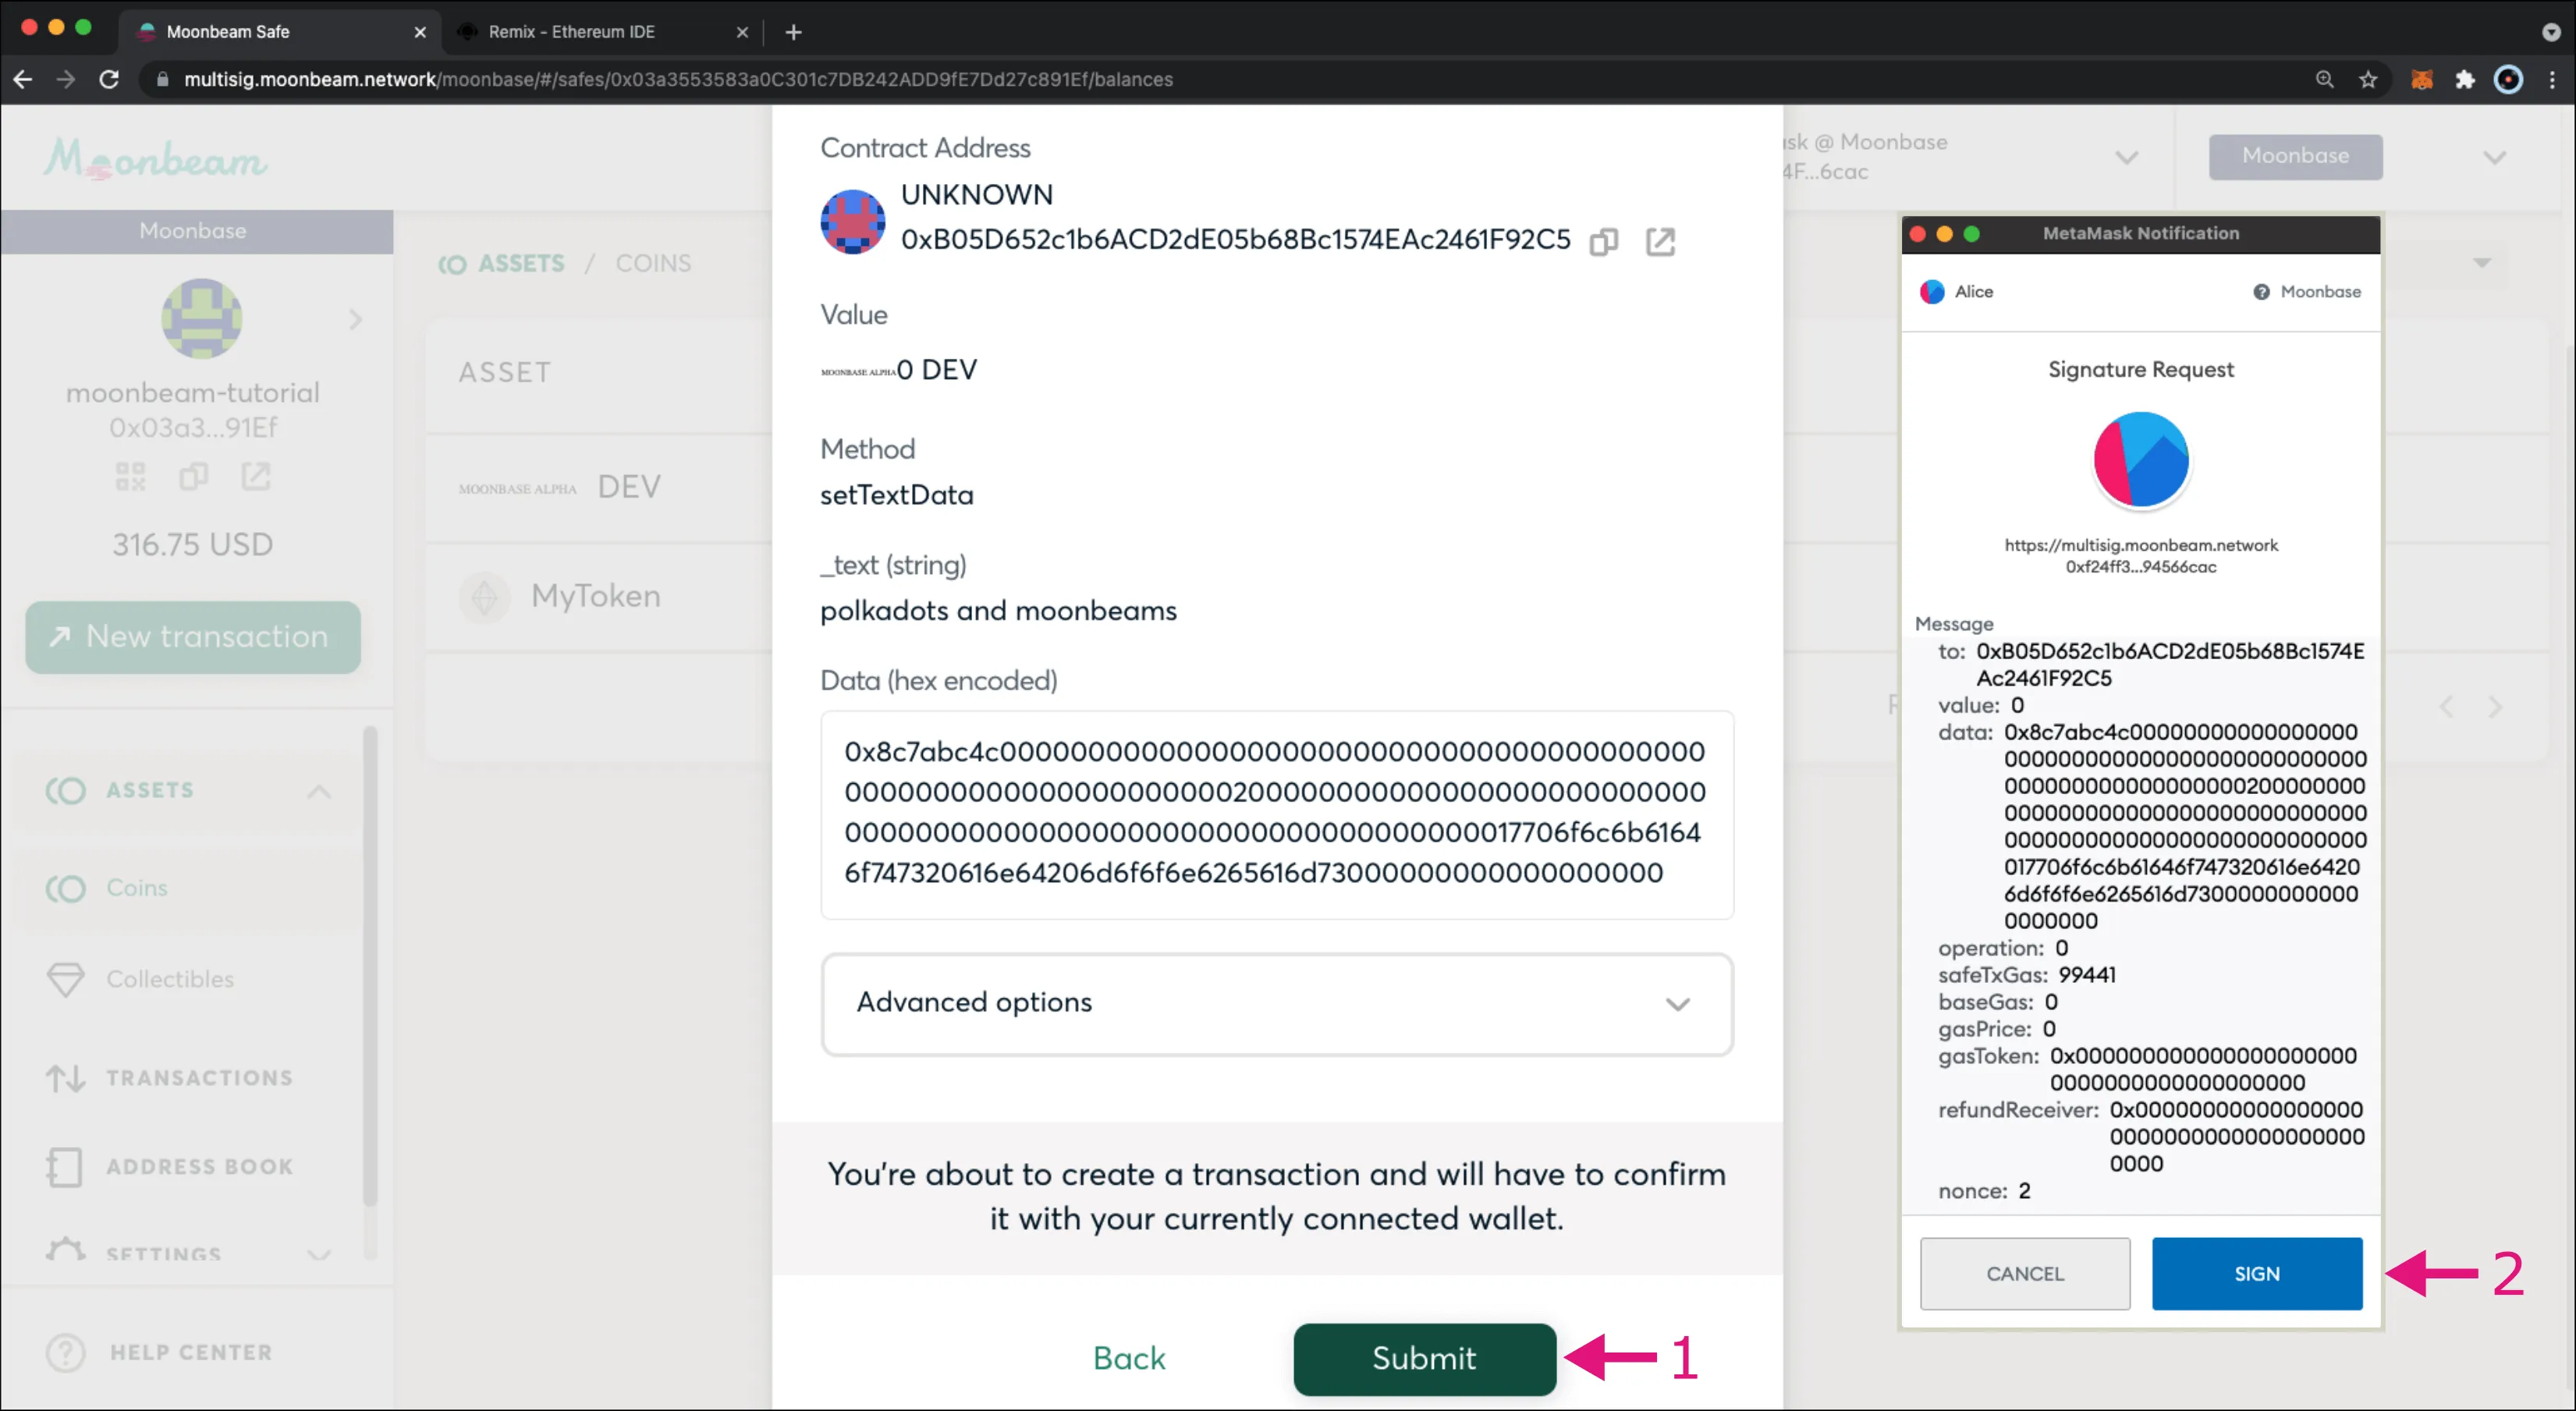
- Click Submit. MetaMask will pop-up and you'll notice that instead of sending a transaction, you're sending a message
- Click Sign to sign the message
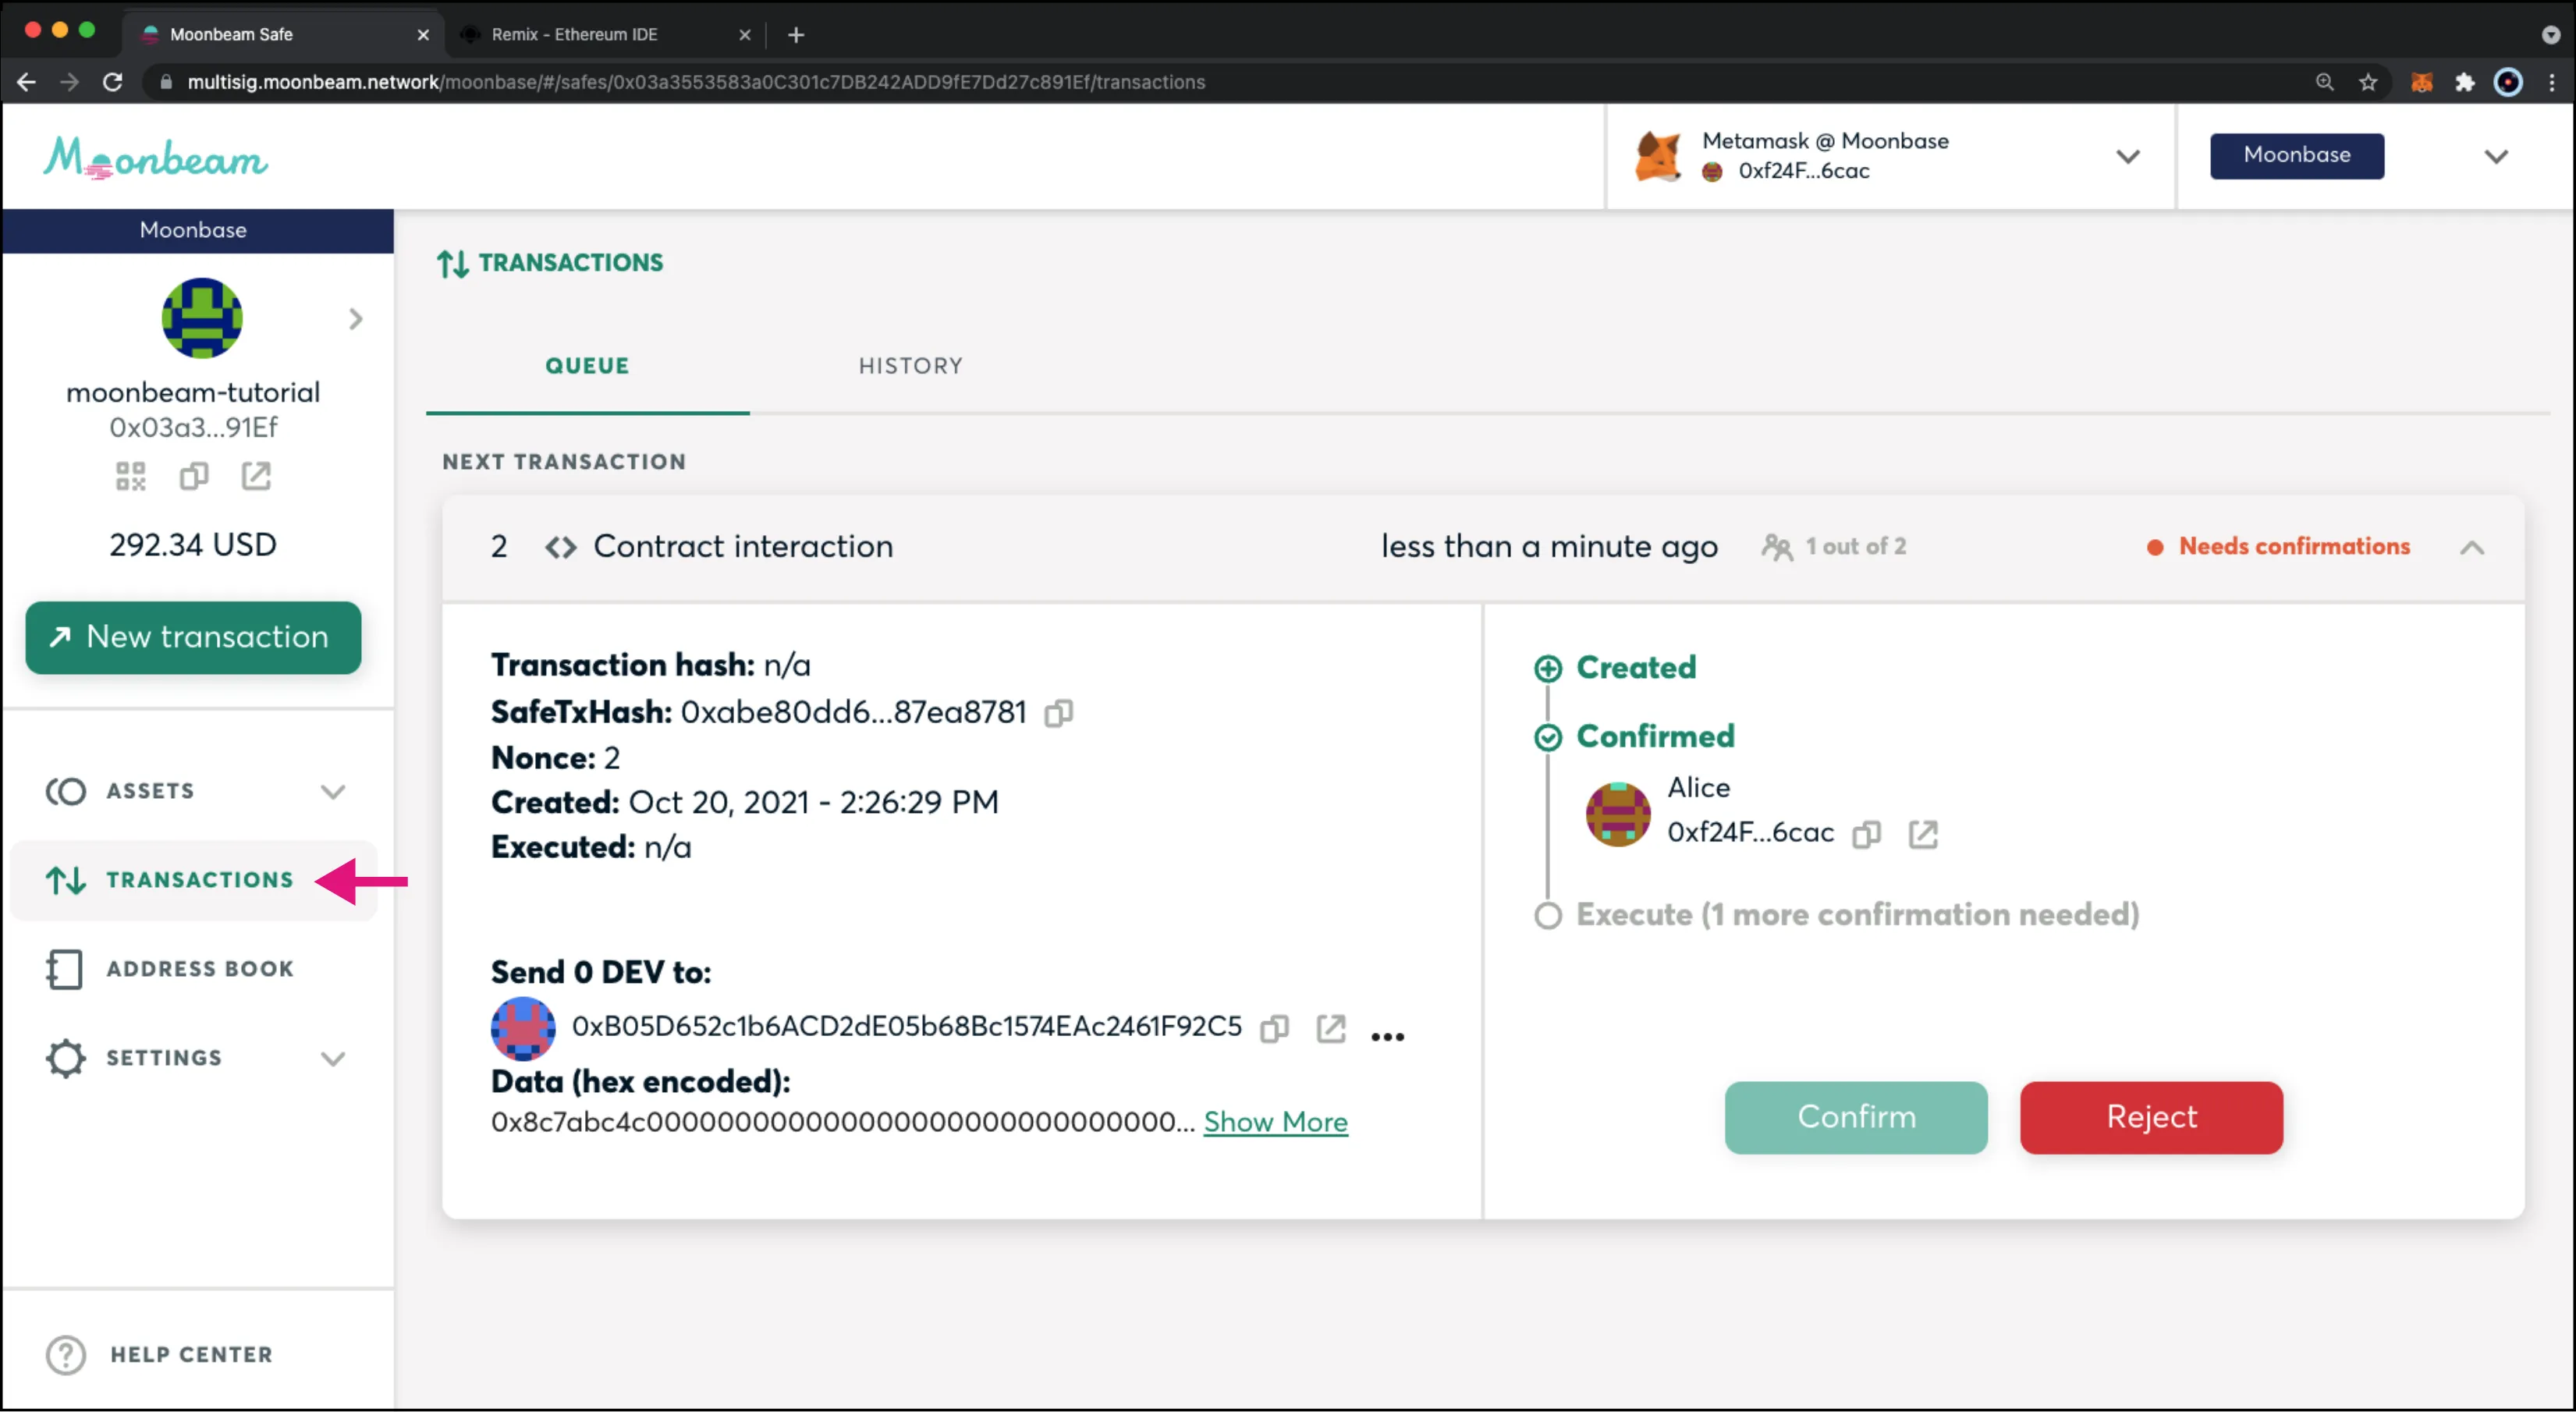
Now, if you go back to the Safe, under the Transactions tab, you should be able to see that there has been a transaction proposal initiated for a Contract interaction. However, you should also see that only 1 out of 2 confirmations have been received and that 1 more owner is required to confirm the transaction before it gets executed.
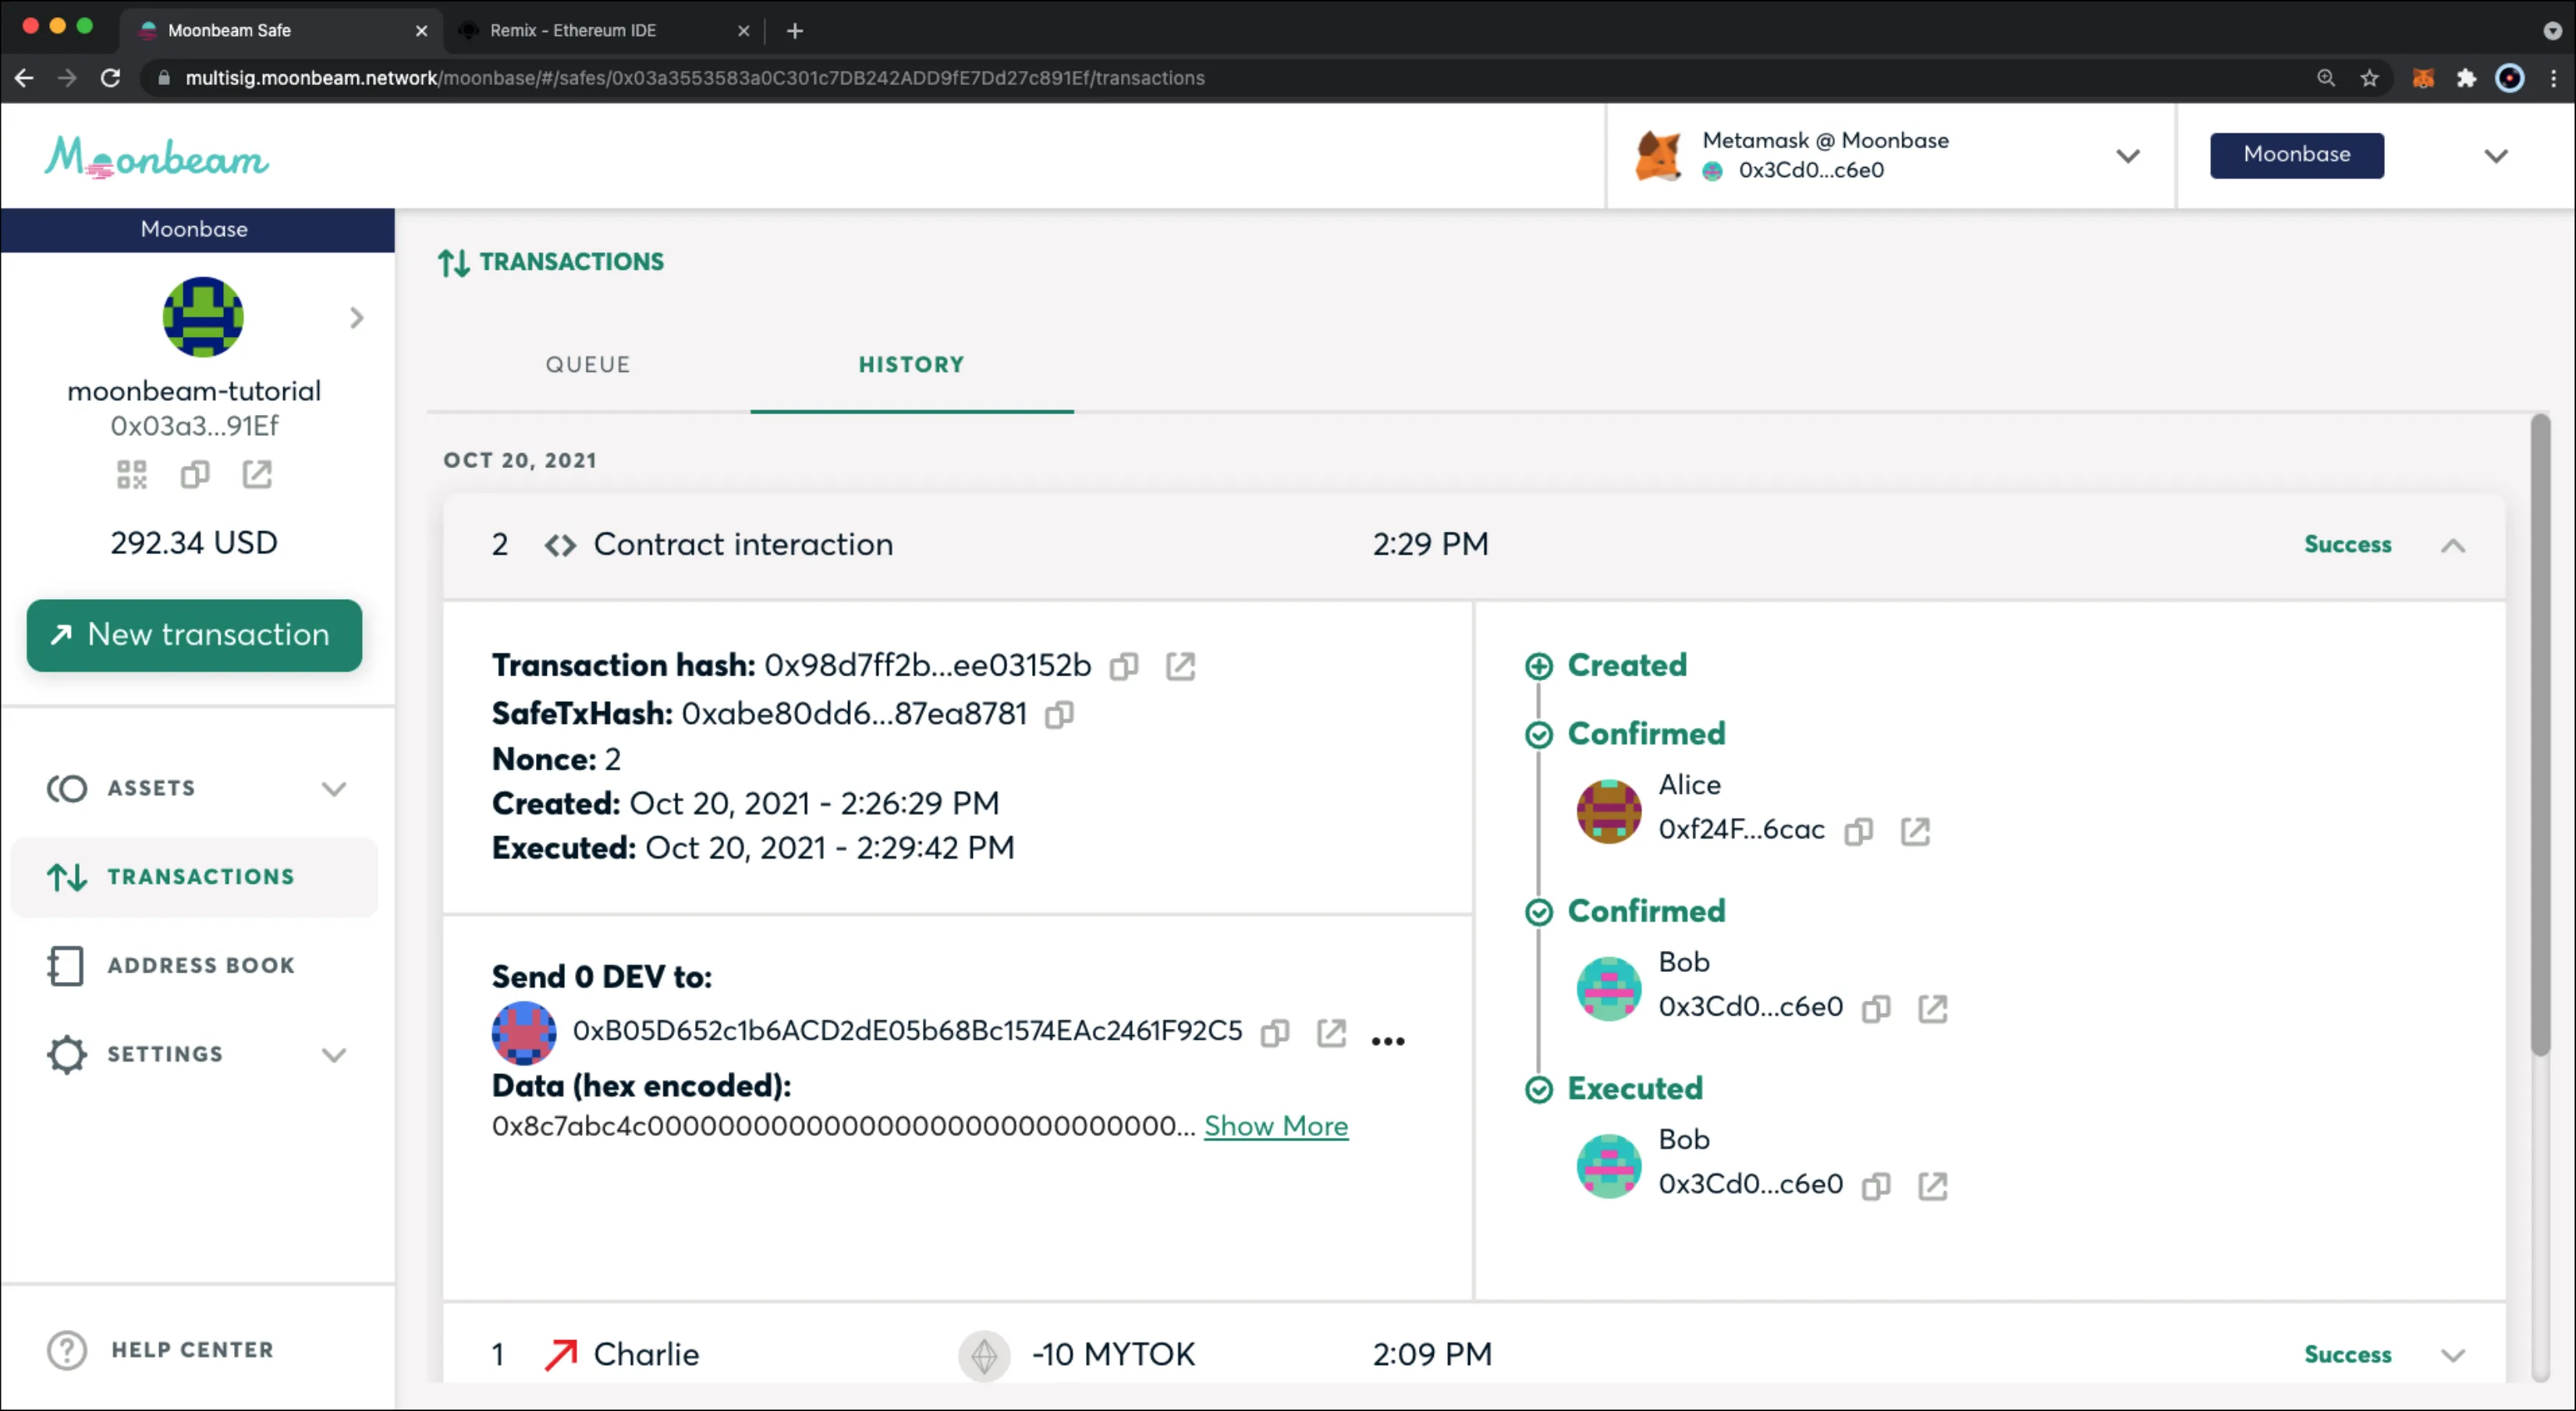
You will need to switch accounts to Bob or Charlie and confirm the transaction to execute it. You can follow the same steps outlined in the above Transaction Confirmation section.
Once the transaction has been confirmed from one of the other two accounts, the transaction will be moved to the HISTORY tab.
To double check that the correct text was set, you can go through the process again except instead of selecting setTextData from the Method dropdown, you can select text to read the text value. This will be a call instead of a transaction, so a Call button will appear. Click on it and directly within the pop-up, you should see the result of the call, polkadots and moonbeams.
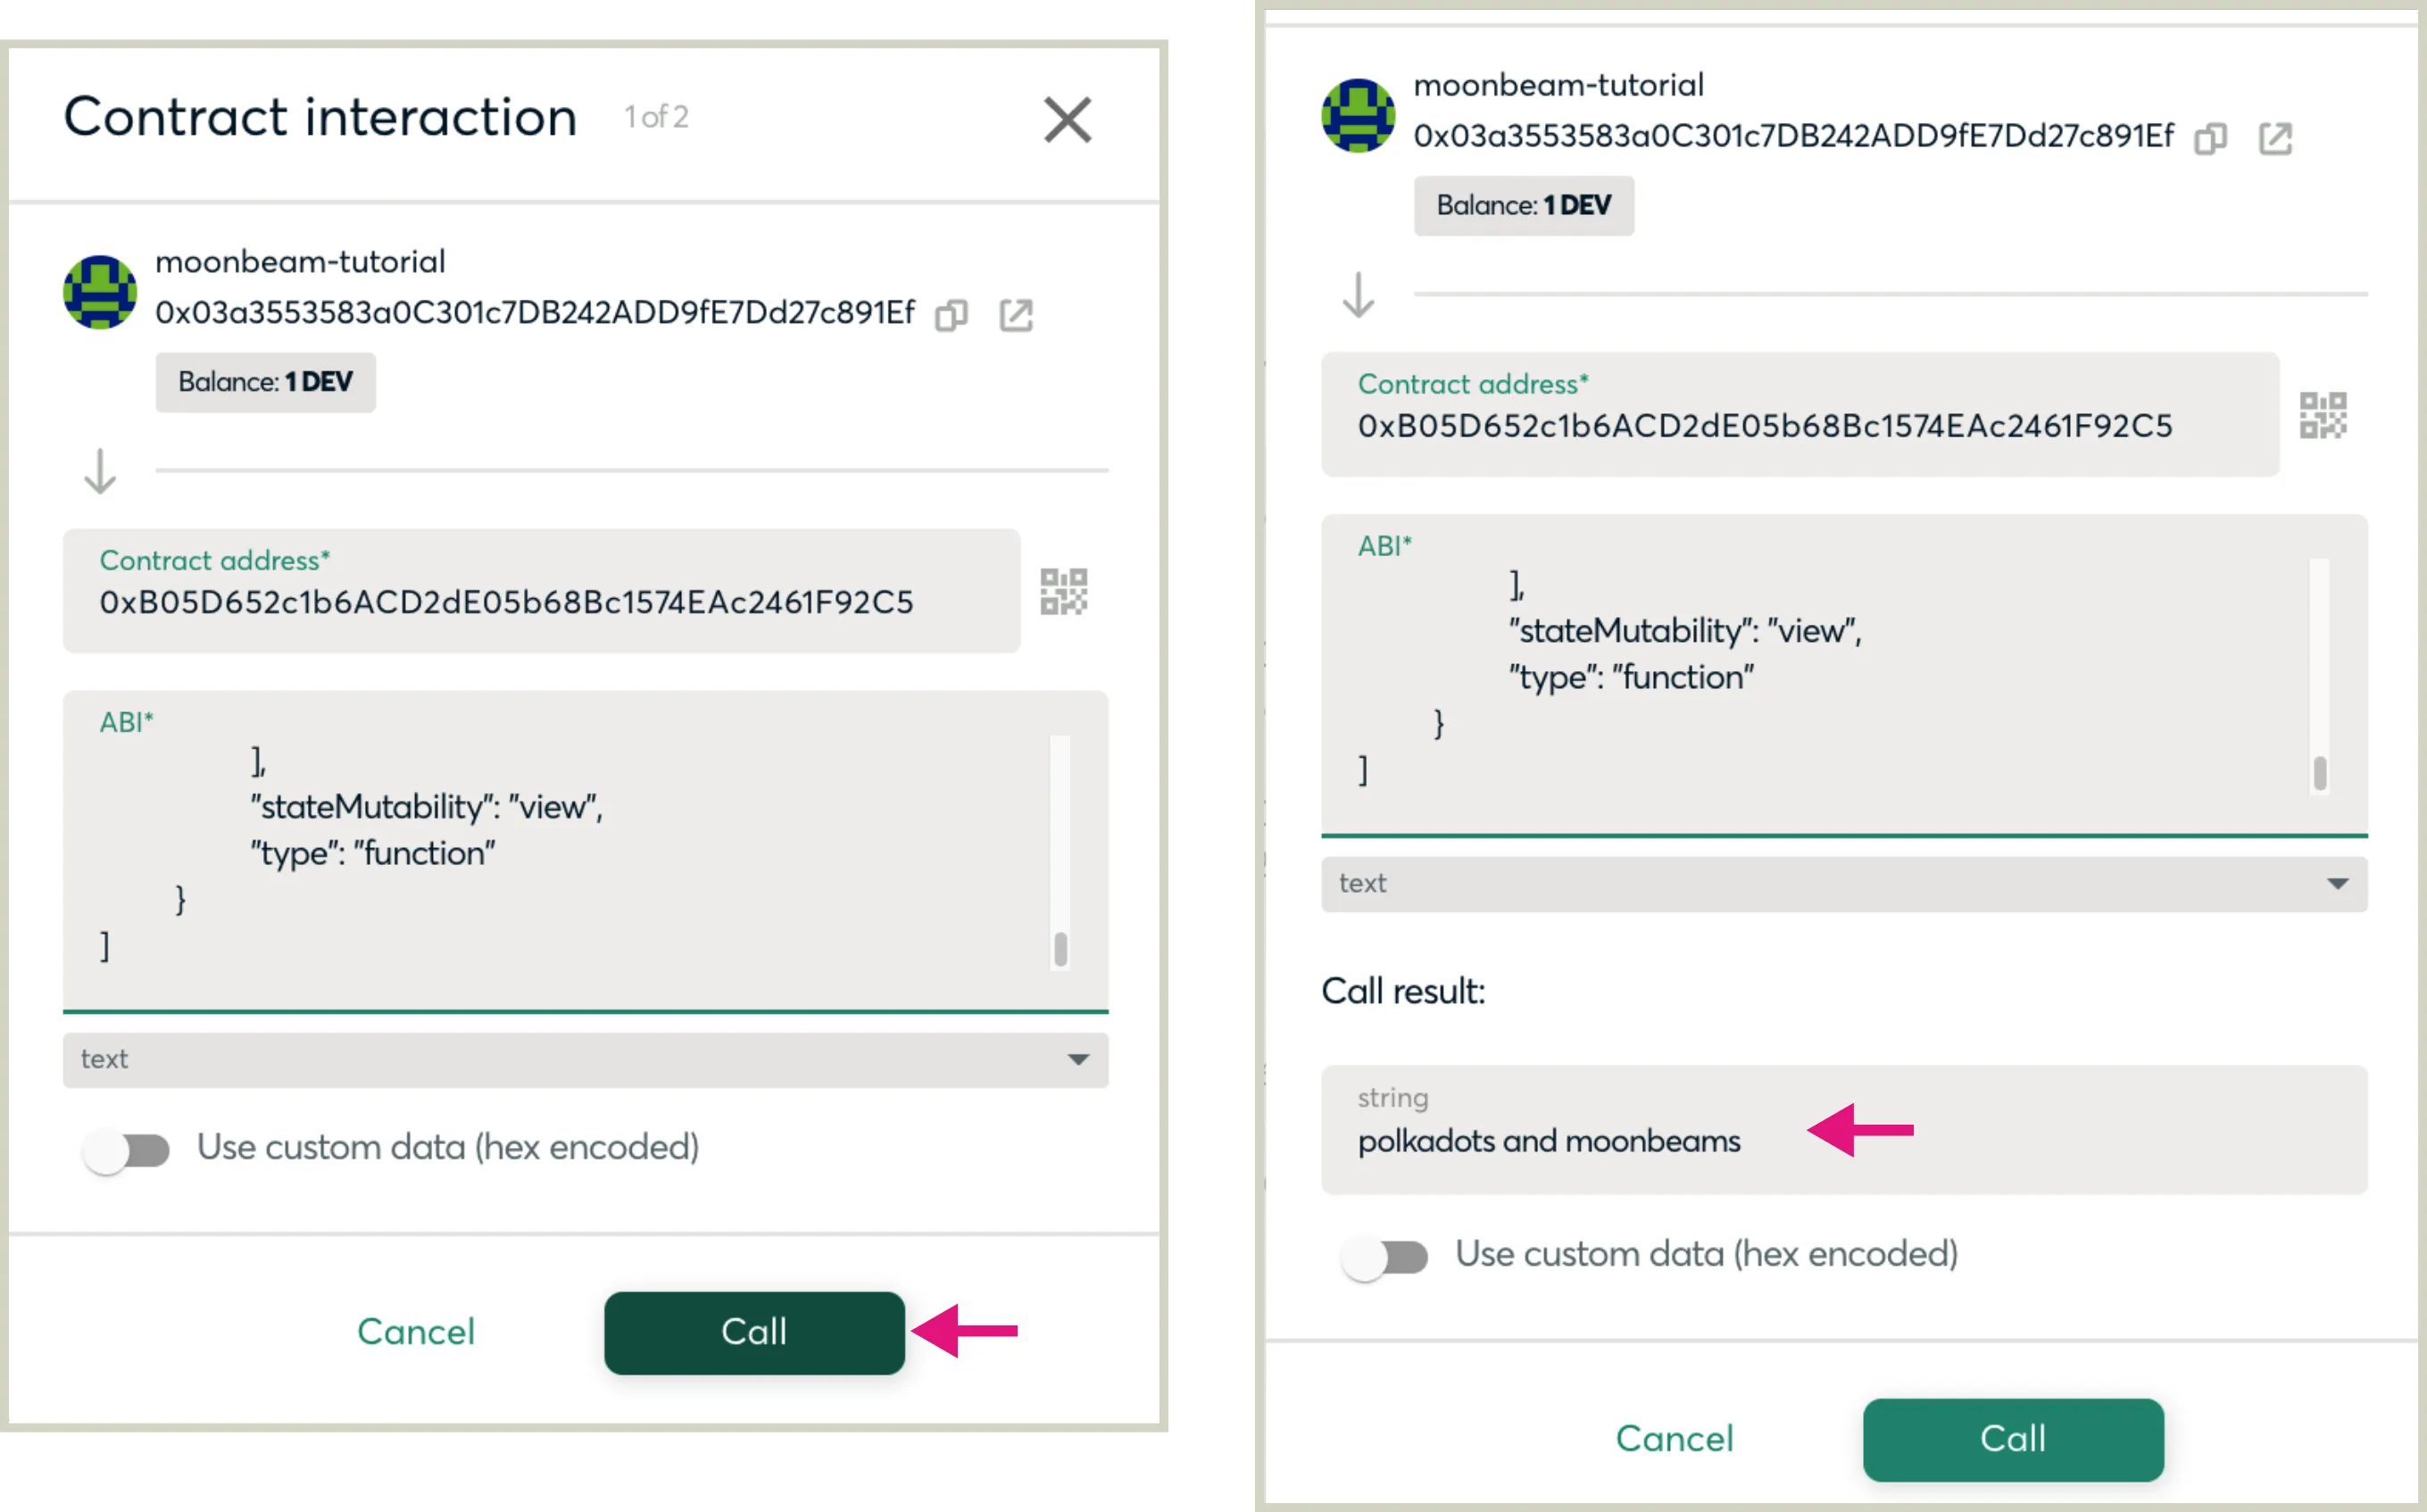
Congratulations, you've successfully interacted with a smart contract using the Safe!
Using Moonbeam Safe APIs
There are APIs available to read from and interact with Moonbeam Safes for Moonbeam, Moonriver, and Moonbase Alpha.
https://transaction.multisig.moonbeam.network/
https://transaction.moonriver.multisig.moonbeam.network/
https://transaction.moonbase.multisig.moonbeam.network/
As an example of using the API, try retrieving information about Safes from the Moonbeam Safe API. From the Safe page, copy the address of your Safe:
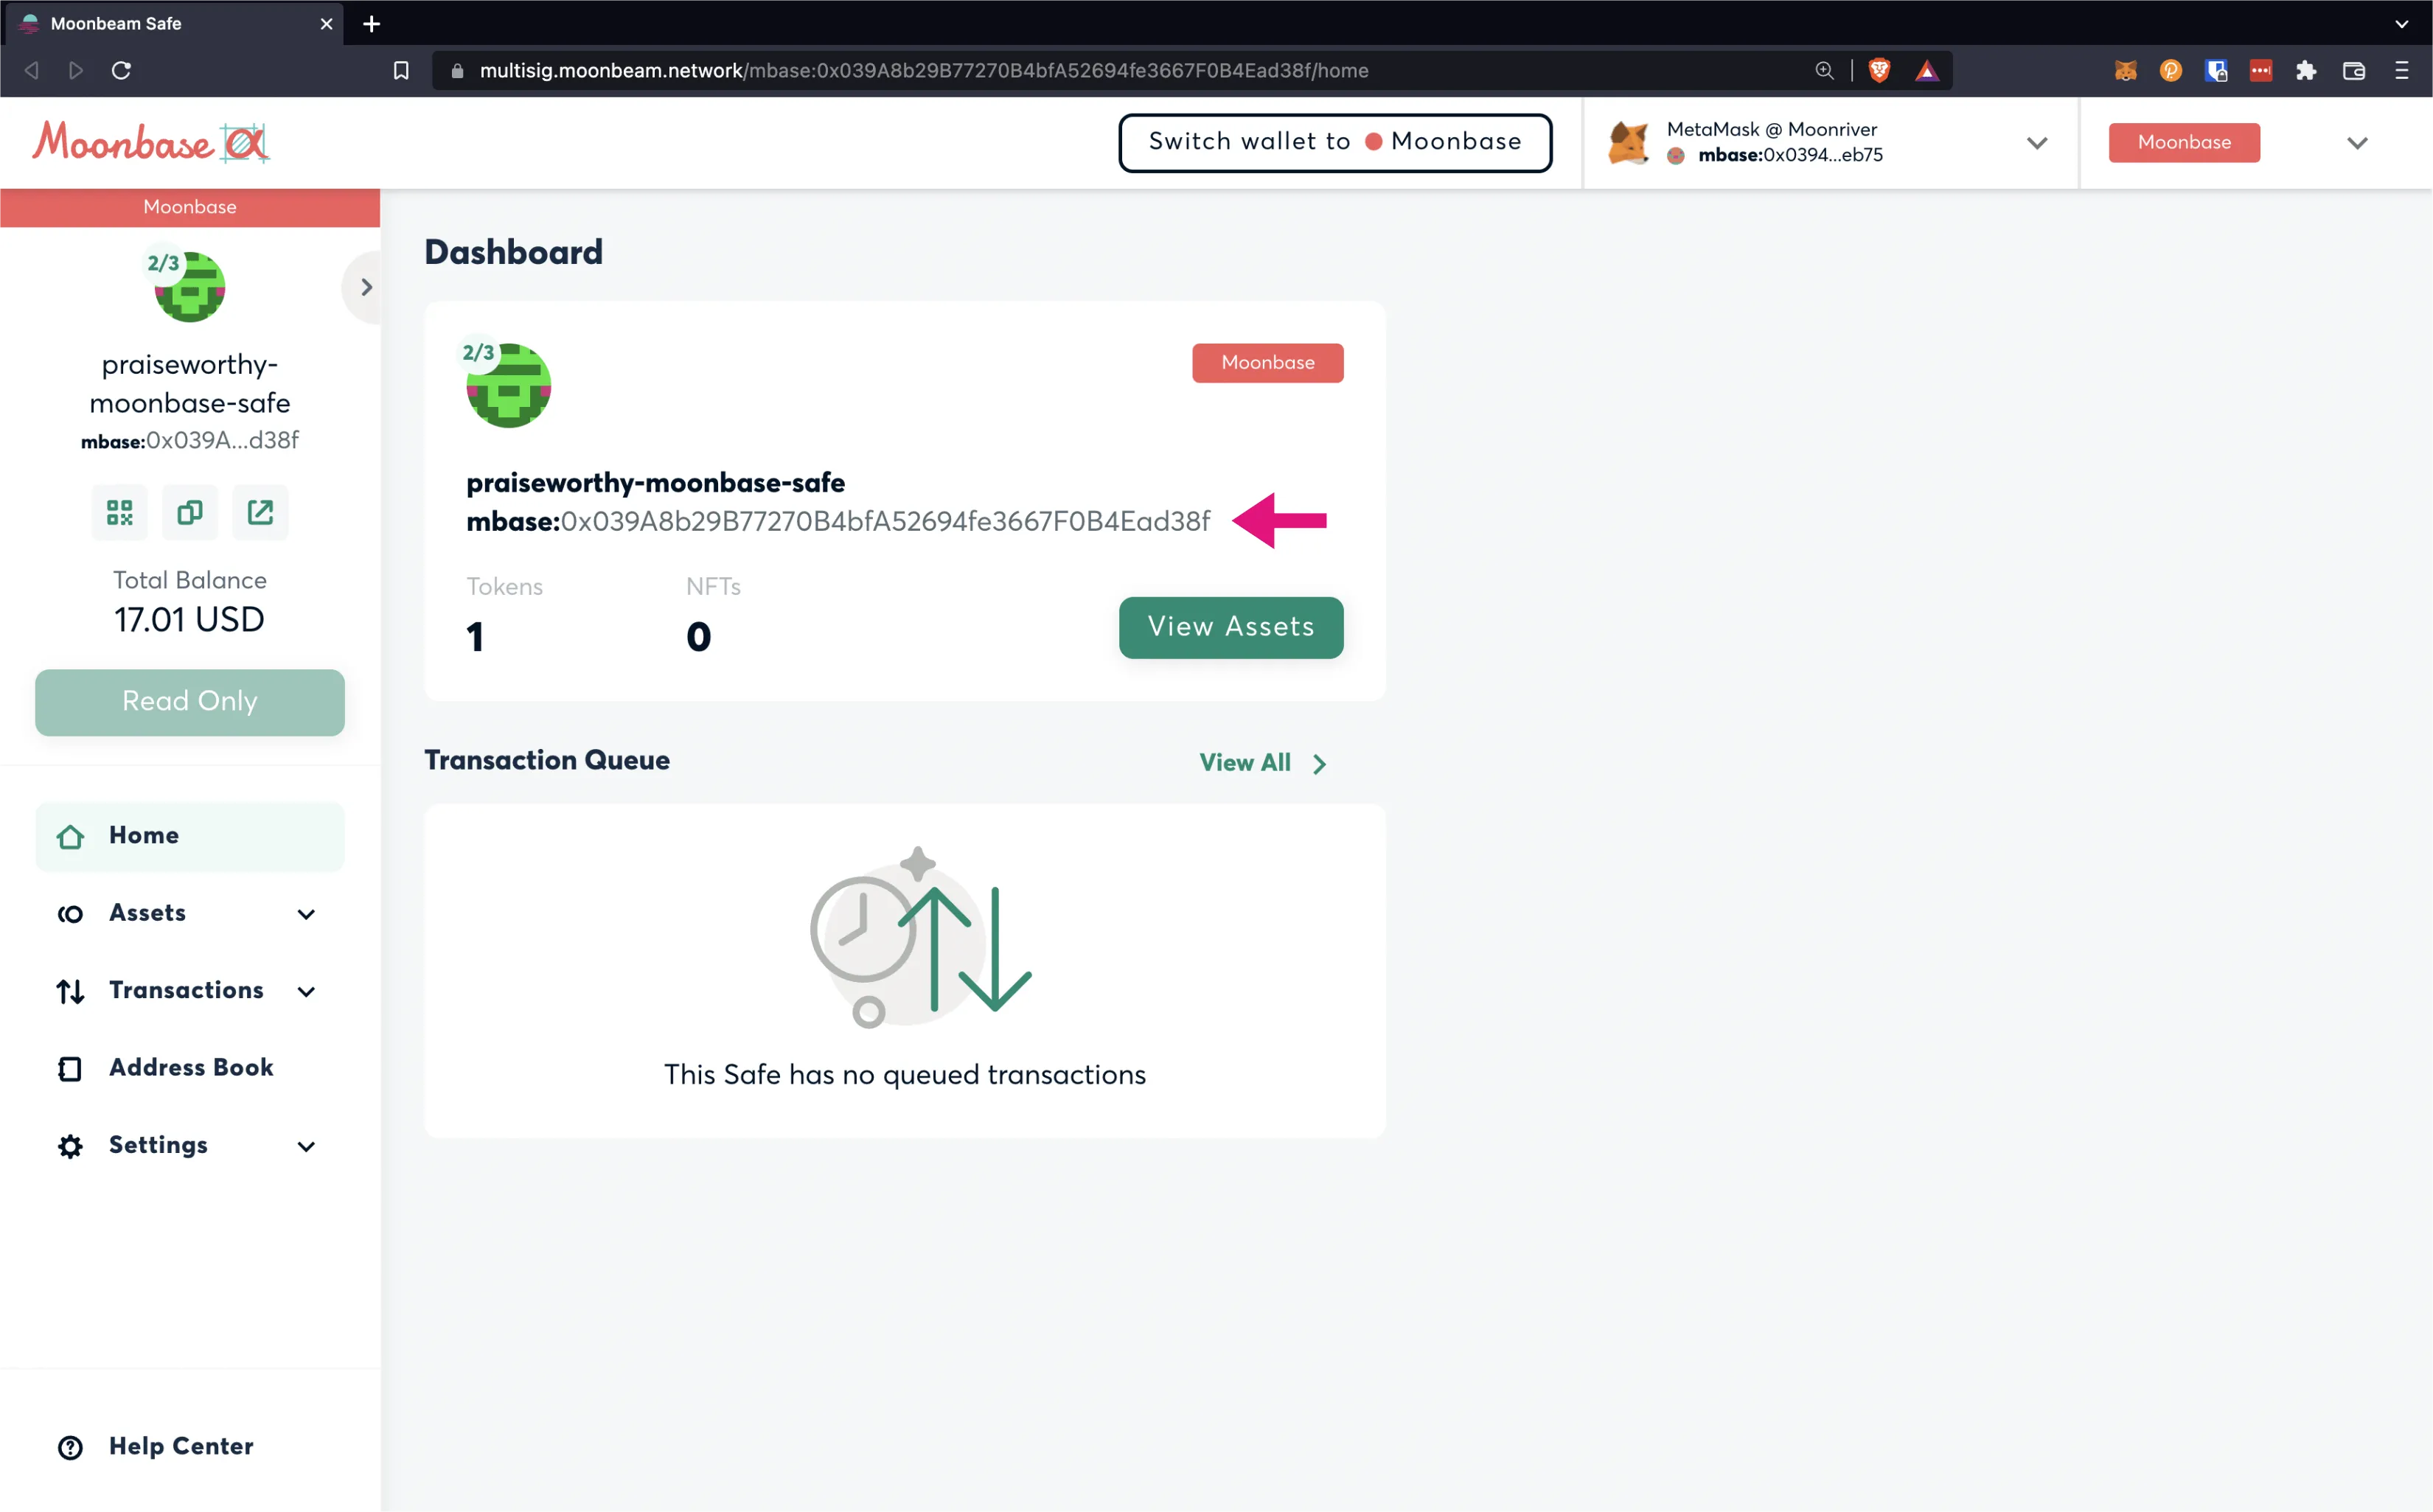
Now you can use the API:
- Open the API page for the corresponding network
- Scroll down to the safes section and click on the /safes/{address}/ endpoint section to expand its panel
- Click the Try it out button on the right
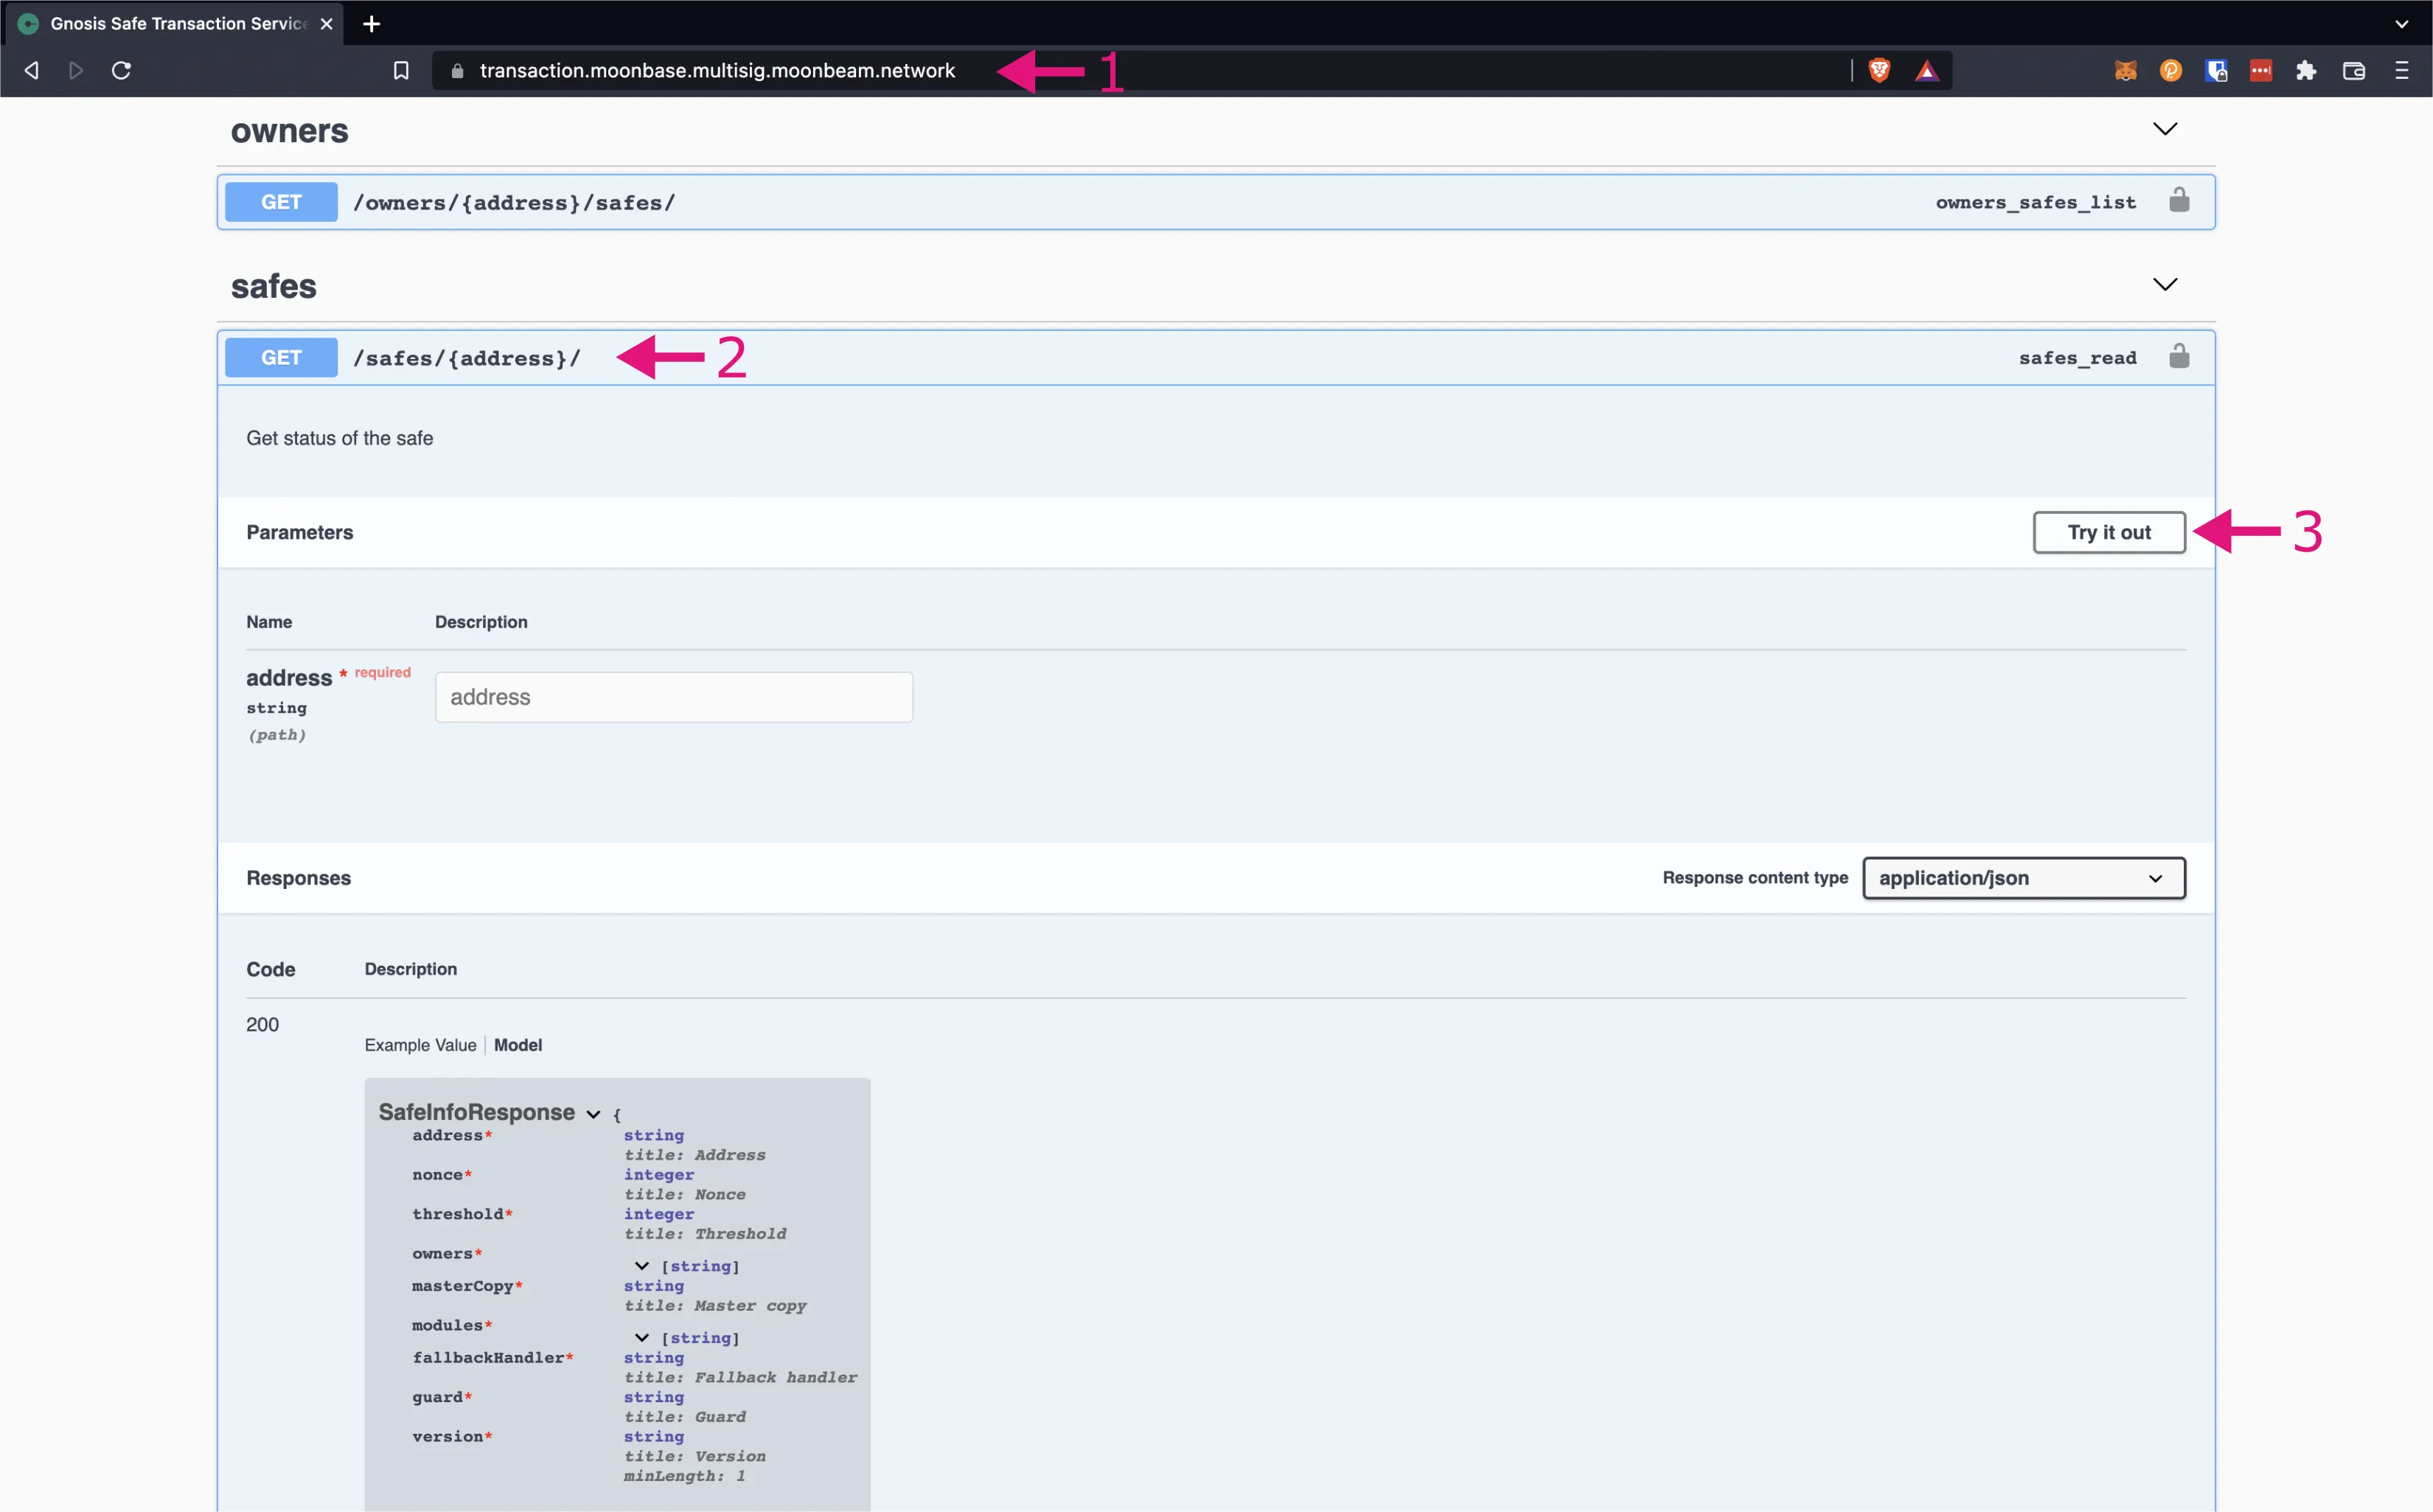
A large Execute button should appear in the panel.
- Paste the address of your Safe into the address input
- Press Execute
- Information about your safe will appear below
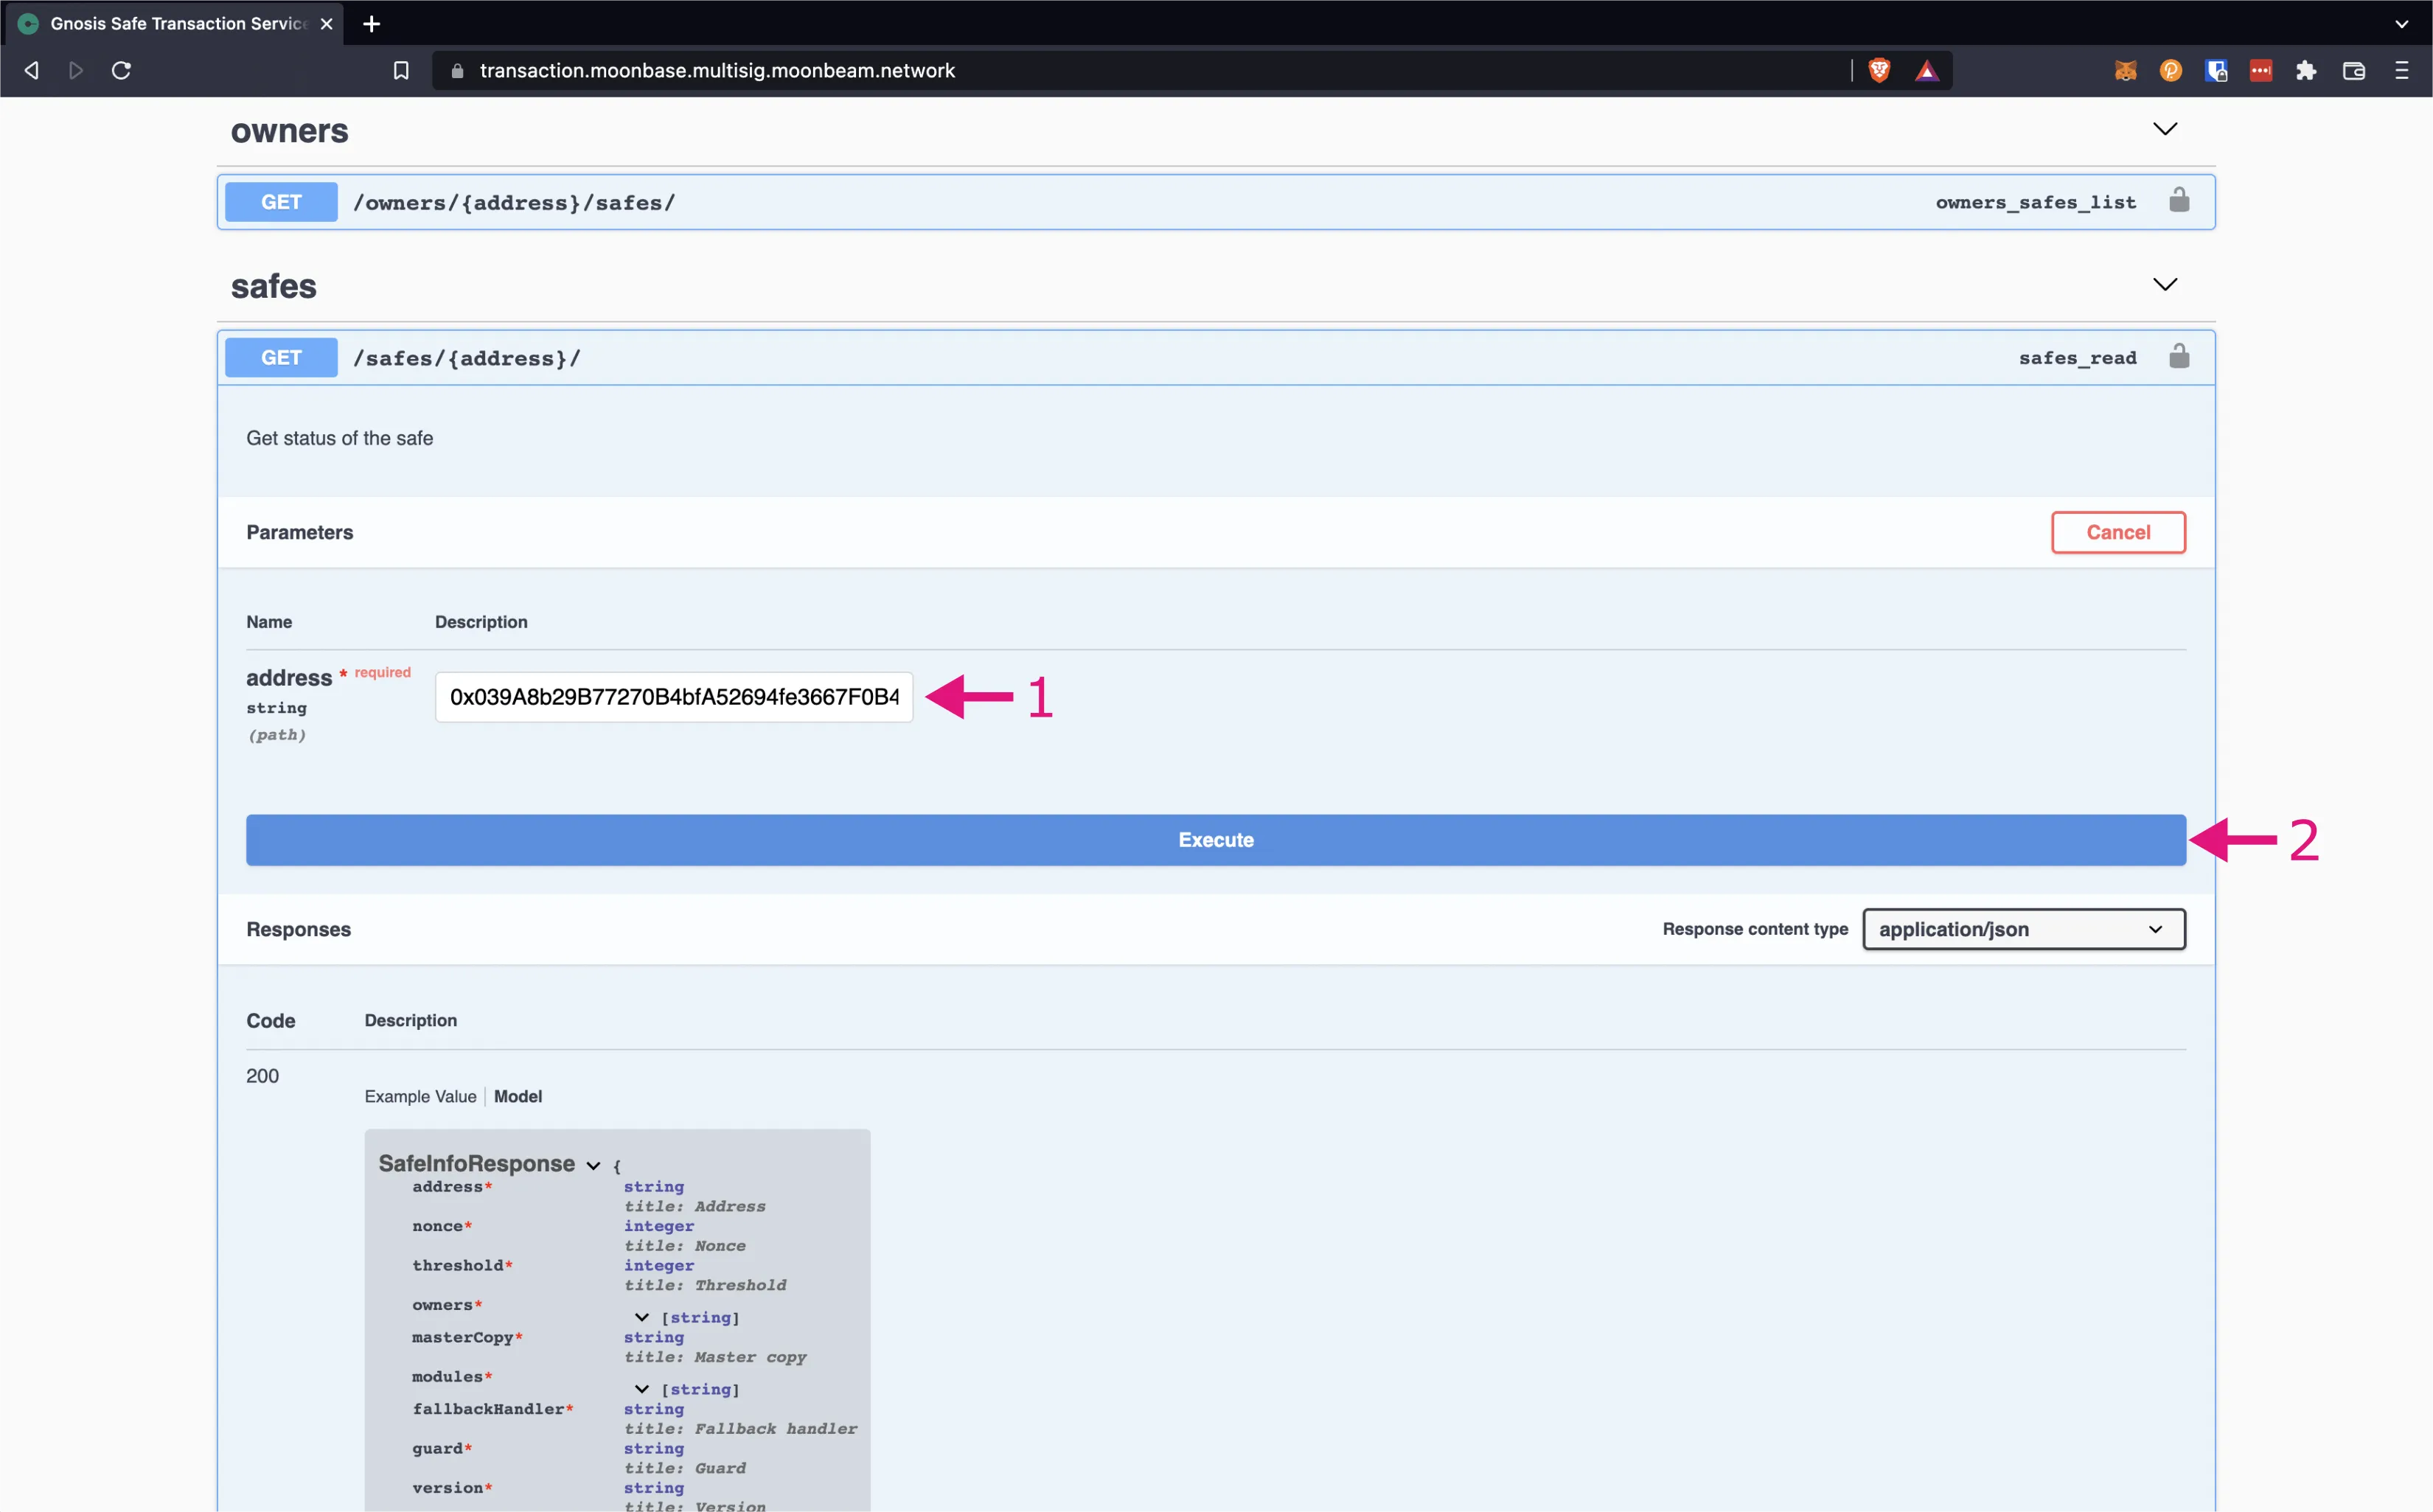
Congratulations! You have successfully used the API for Moonbeam Safes. There are still many other endpoints to use, either for convenience or to add into your own app.
| Created: October 21, 2021