Managing your Account Identity
Introduction
The Substrate Identity pallet is an out-of-the-box solution for adding personal information to your on-chain account. Personal information can include default fields such as your legal name, display name, website, Twitter handle, Riot (now known as Element) name. You can also take advantage of custom fields to include any other relevant information.
Once your identity information is on-chain, you can request verification of your identity from a registrar. A registrar will perform proper due diligence to verify the submitted identity information and based on their findings will provide their judgement on-chain and a green check mark will appear next to your account.
This guide will show you how to set an identity, clear it, and request judgement on the Moonbase Alpha TestNet. This guide can also be adapted to be used on Moonbeam and Moonriver.
General Definitions
To store your information on-chain, you must bond some funds, which eventually will be returned once the identity has been cleared. There are two categories of fields: default and custom. If custom fields are used, you will be required to submit an additional deposit for each field.
-
Default fields include - your legal name, display name, website, Twitter handle, Riot (now known as Element) name
-
Custom fields include - any other relevant information. For example, you could include your Discord handle
| Variable | Definition | Value |
|---|---|---|
| Basic deposit | The amount held on deposit for setting an identity | 1.0258 GLMR |
| Field deposit | The amount held on deposit per additional field for setting an identity | 0.0066 GLMR |
| Max additional fields | Maximum number of additional fields that may be stored in an ID | 100 |
| Variable | Definition | Value |
|---|---|---|
| Basic deposit | The amount held on deposit for setting an identity | 1.0258 MOVR |
| Field deposit | The amount held on deposit per additional field for setting an identity | 0.0066 MOVR |
| Max additional fields | Maximum number of additional fields that may be stored in an ID | 100 |
| Variable | Definition | Value |
|---|---|---|
| Basic deposit | The amount held on deposit for setting an identity | 1.0258 DEV |
| Field deposit | The amount held on deposit per additional field for setting an identity | 0.0066 DEV |
| Max additional fields | Maximum number of additional fields that may be stored in an ID | 100 |
Checking Prerequisites
For this guide, you will need the following:
- To connect to the Moonbase Alpha TestNet on the Polkadot.js Apps explorer. You can also follow along and adapt the instructions for Moonbeam or Moonriver.
- To create or import an account into Polkadot.js Apps
- Make sure you have funded your account. You can get DEV tokens for testing on Moonbase Alpha once every 24 hours from the Moonbase Alpha Faucet
Get Started
There are a couple different ways to set and clear an identity using the Polkadot.js Apps, depending on the information to be included. If you intend to register your identity using only the default fields, you can follow the instructions for Managing an Identity via the Accounts UI. This is the recommended way to set and manage your identity.
If you are looking for a more customizable experience and want to add custom fields beyond the default fields, you can follow the instructions for Managing an Identity via the Extrinsics UI.
Note
Please note that it is recommended to use the Accounts UI on Polkadot.js Apps to manage your identity as it provides an easy-to-use interface that enforces character limits. If you use the Extrinsics UI, please be aware that your input for each field (i.e, name, email, etc.) must be 32 characters or less, otherwise, your information will be cut off.
Manage an Identity via Accounts
Set an Identity
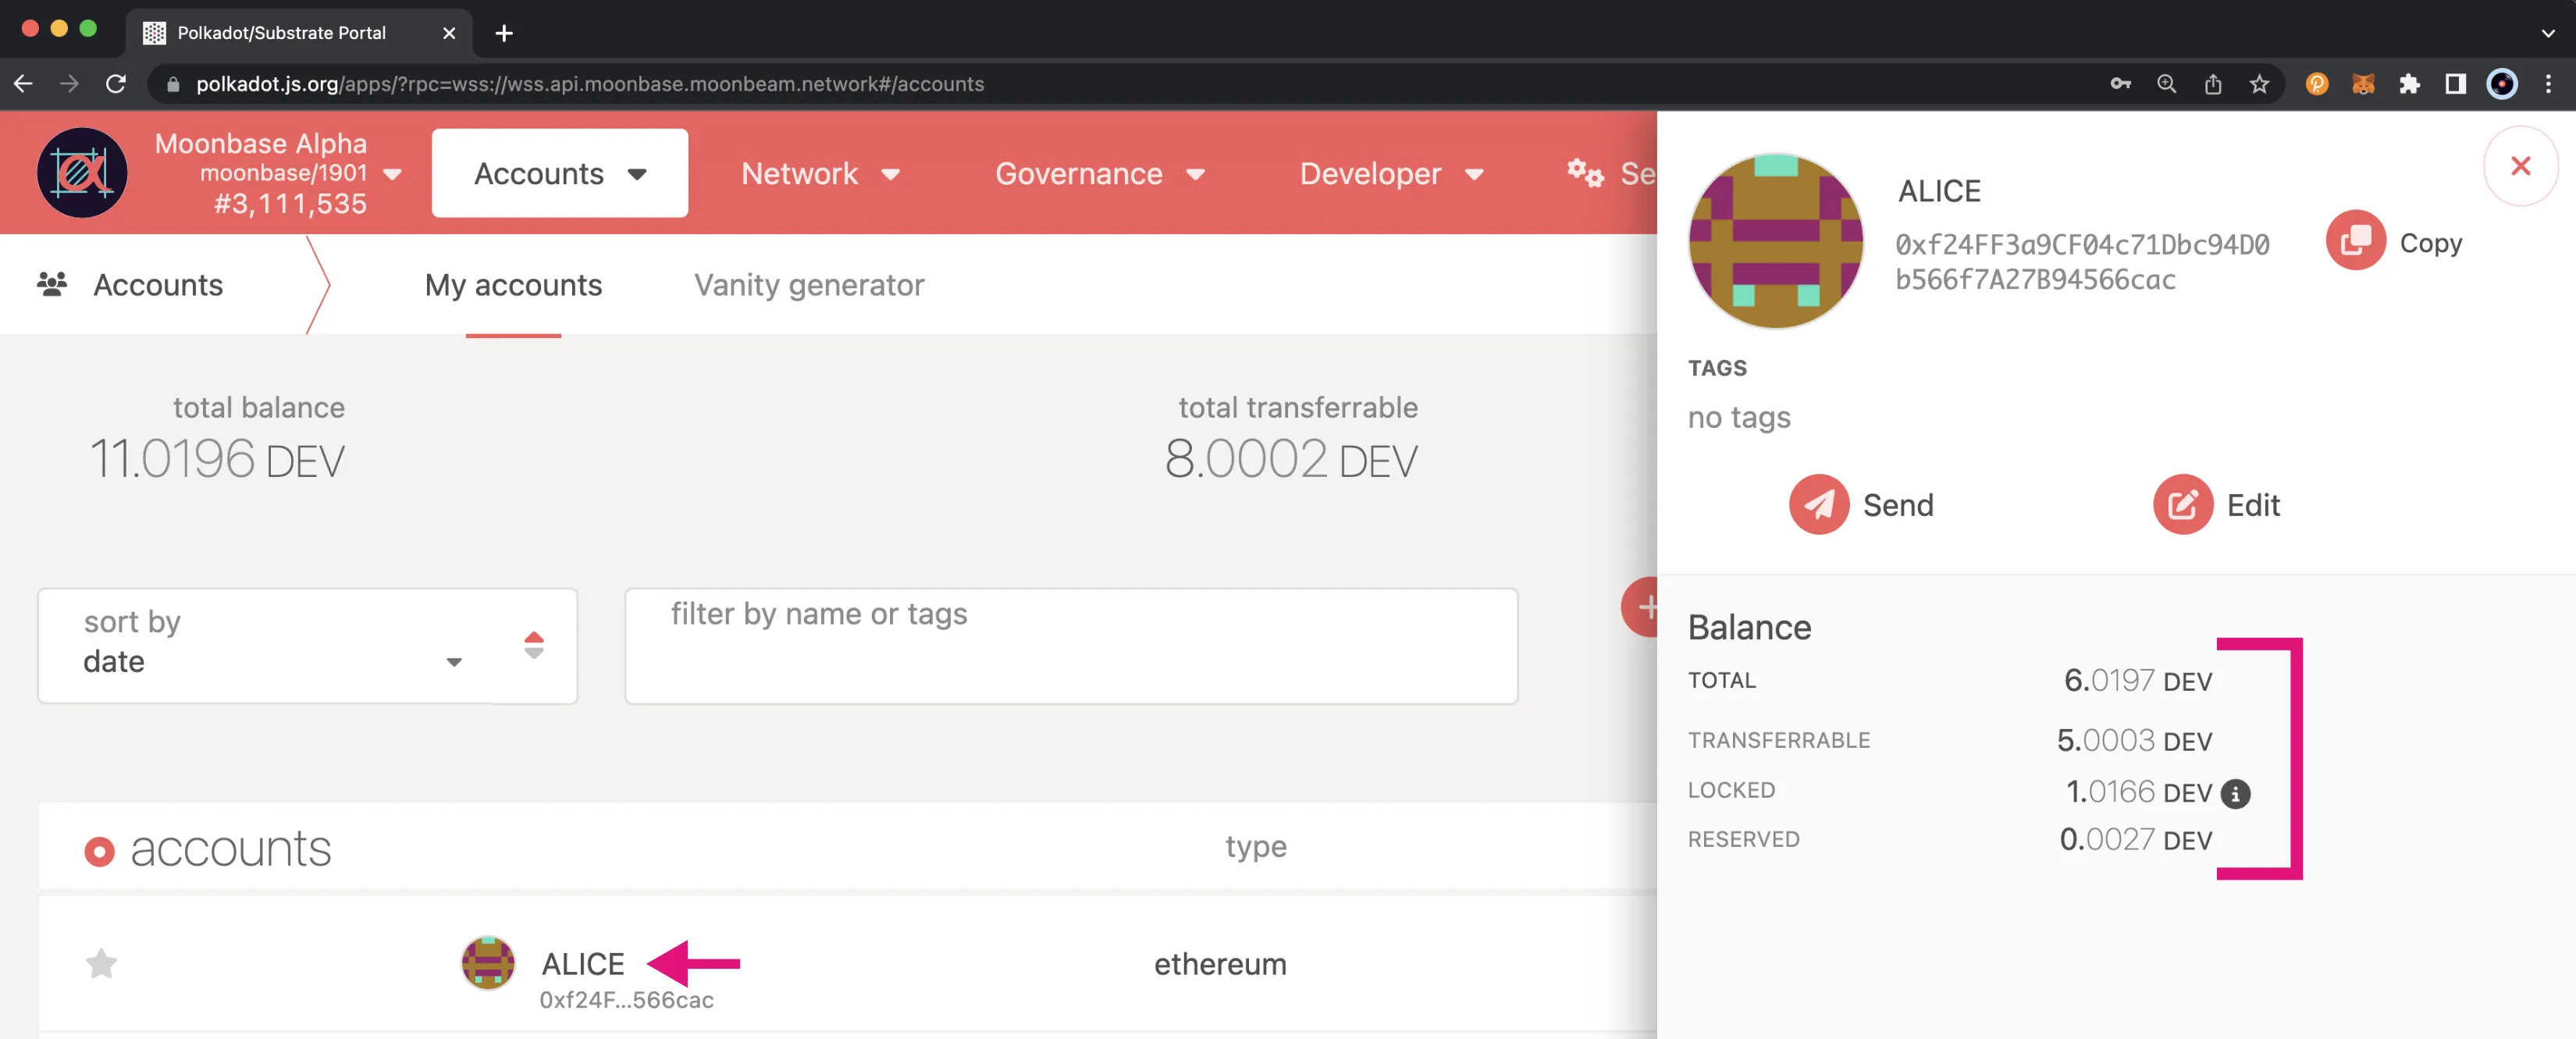
To get started with setting an identity using the Accounts UI, head to the Accounts tab on the Polkadot.js Apps explorer.
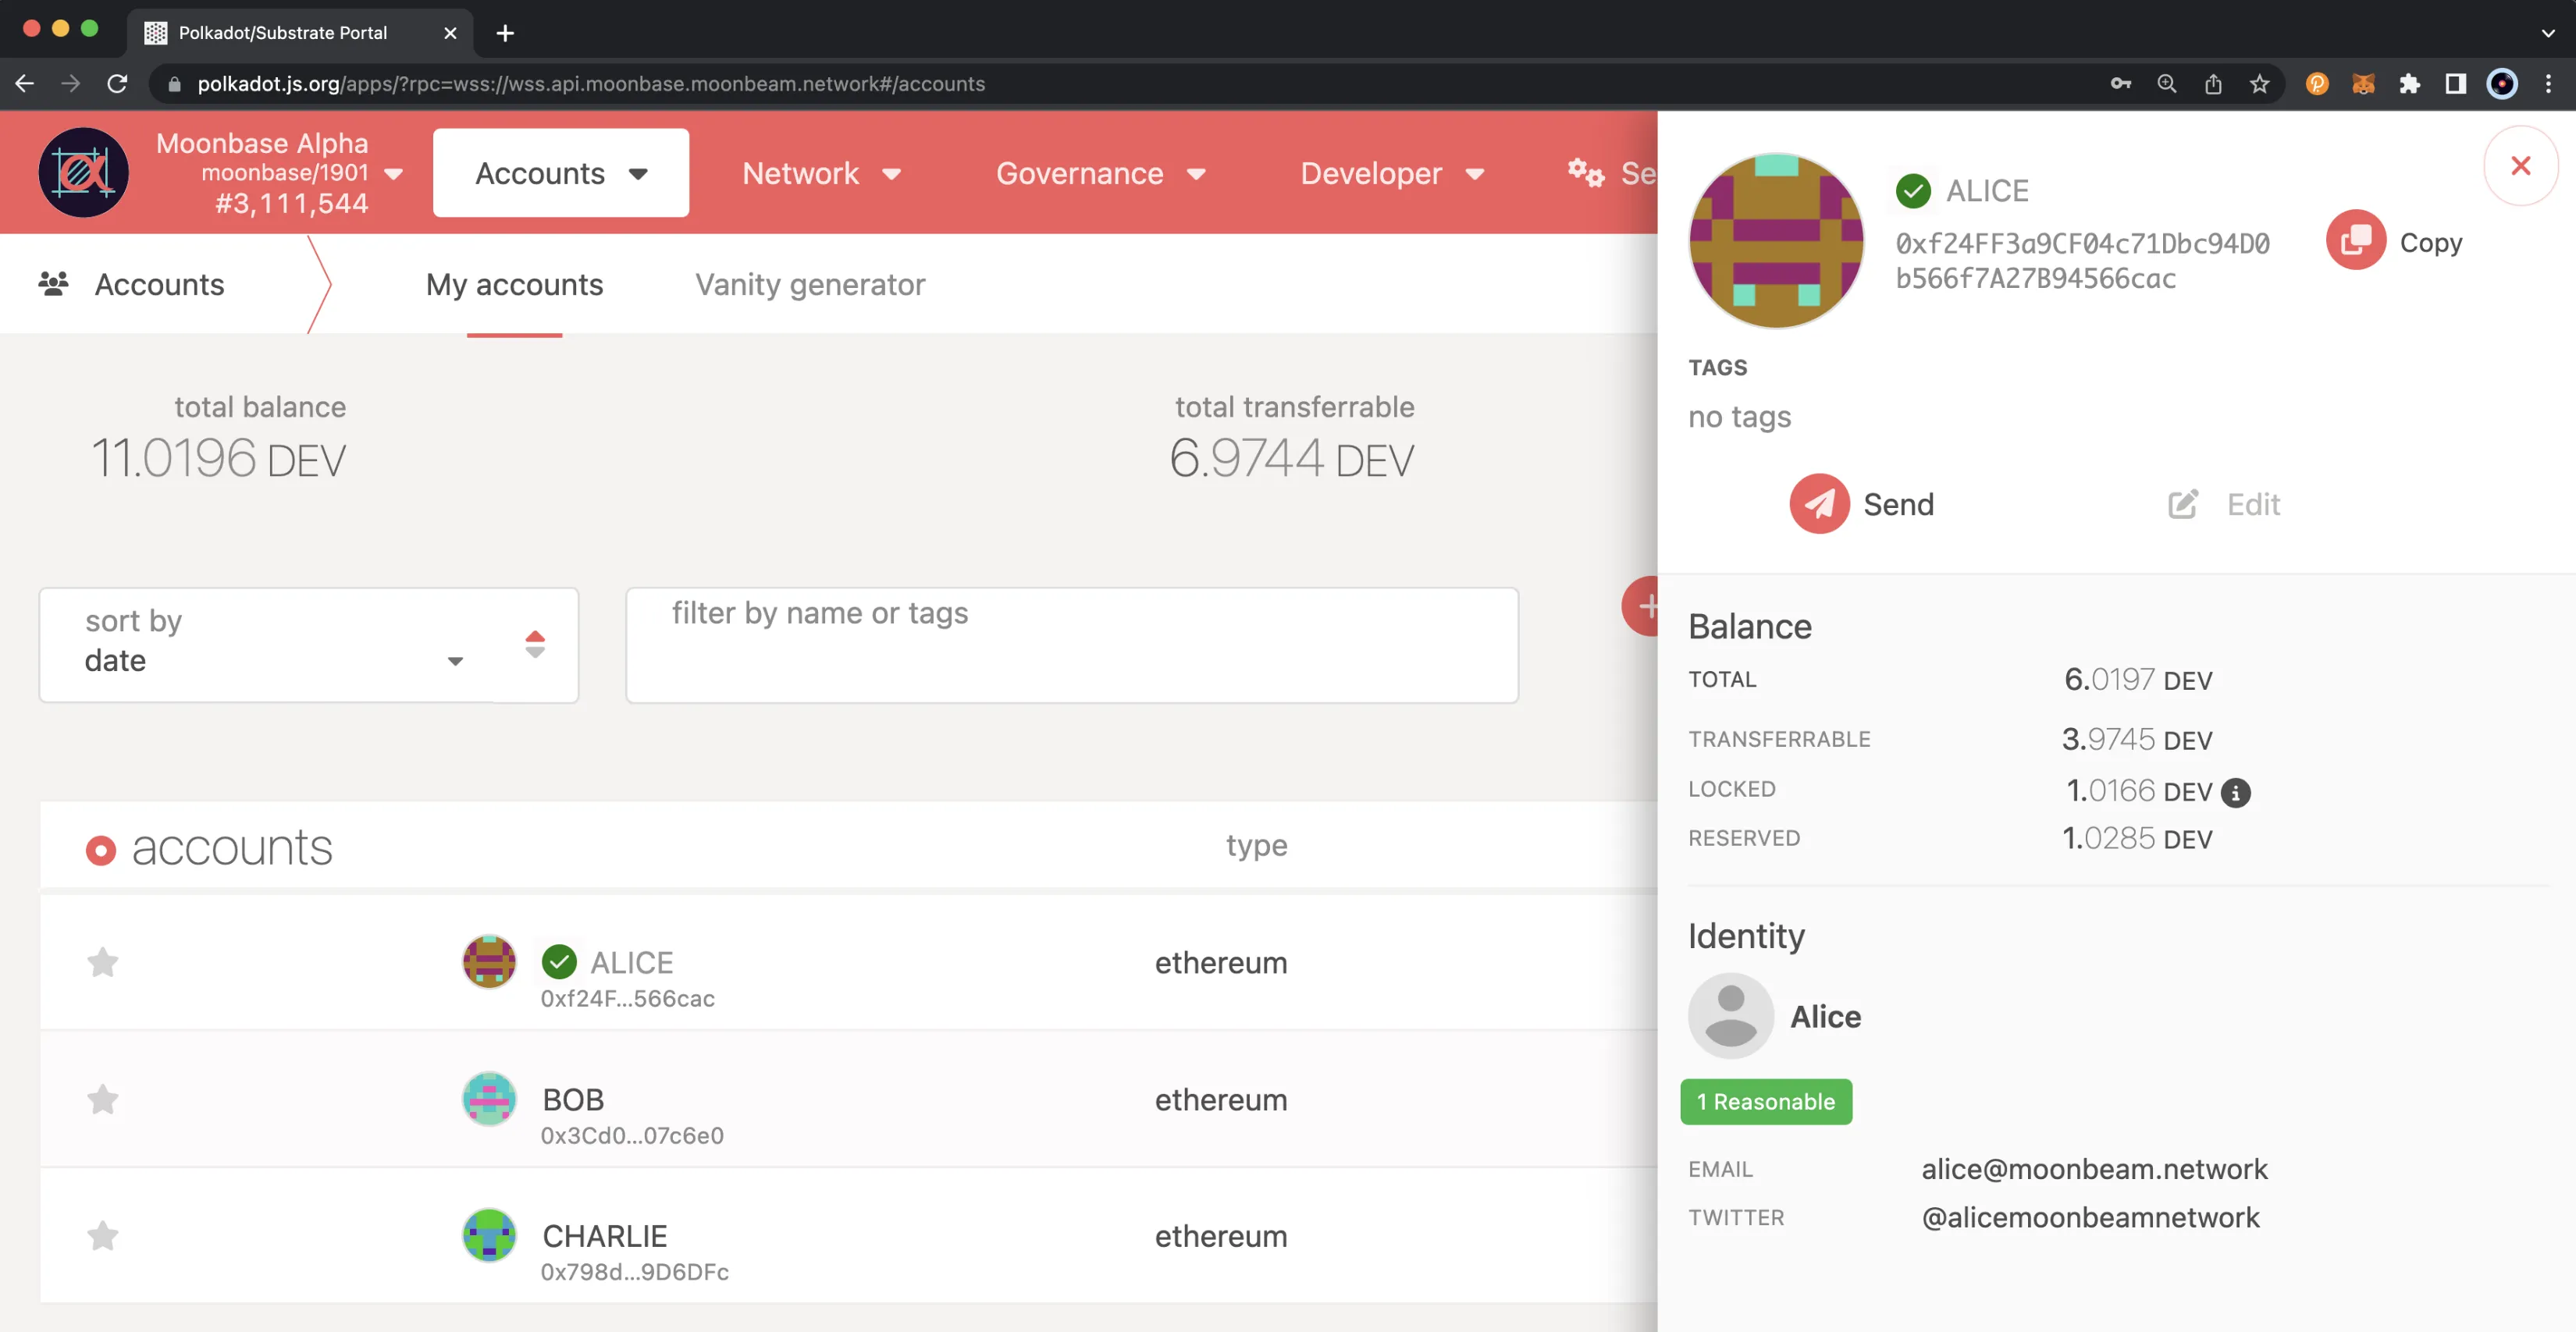
You should already have an account connected, so you can go ahead and click on your account name to verify and take note of your balances. After you send the transaction to set an identity, the deposit(s) you submitted will be moved from your transferable balance to your reserved balance.
To set your identity, you'll need to:
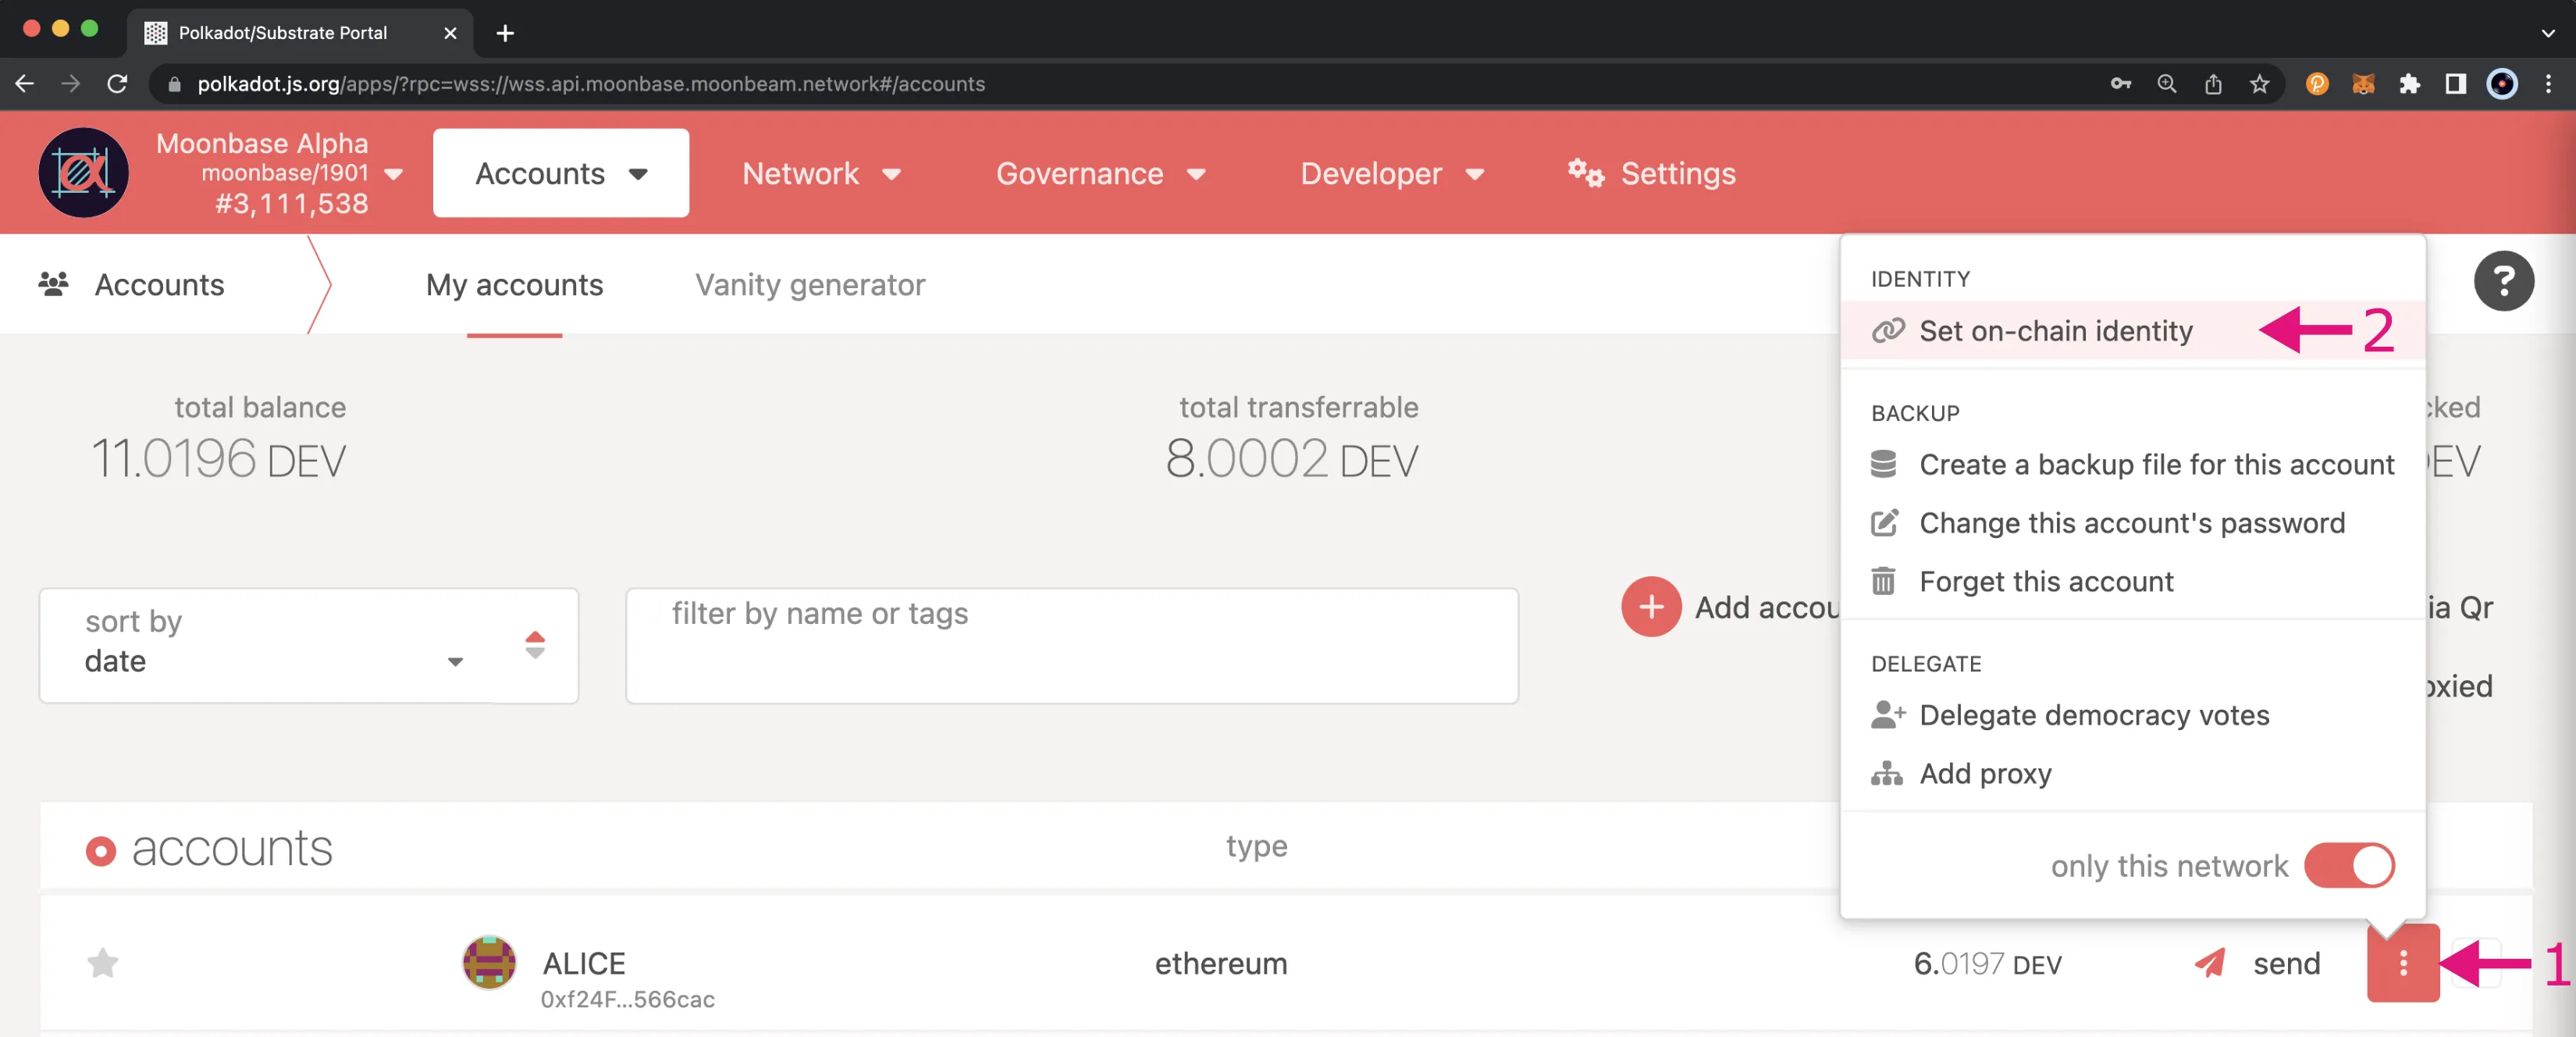
- Click on the 3 vertical dots next to the account you would like to set an identity for
- A menu will pop up. Click Set on-chain identity
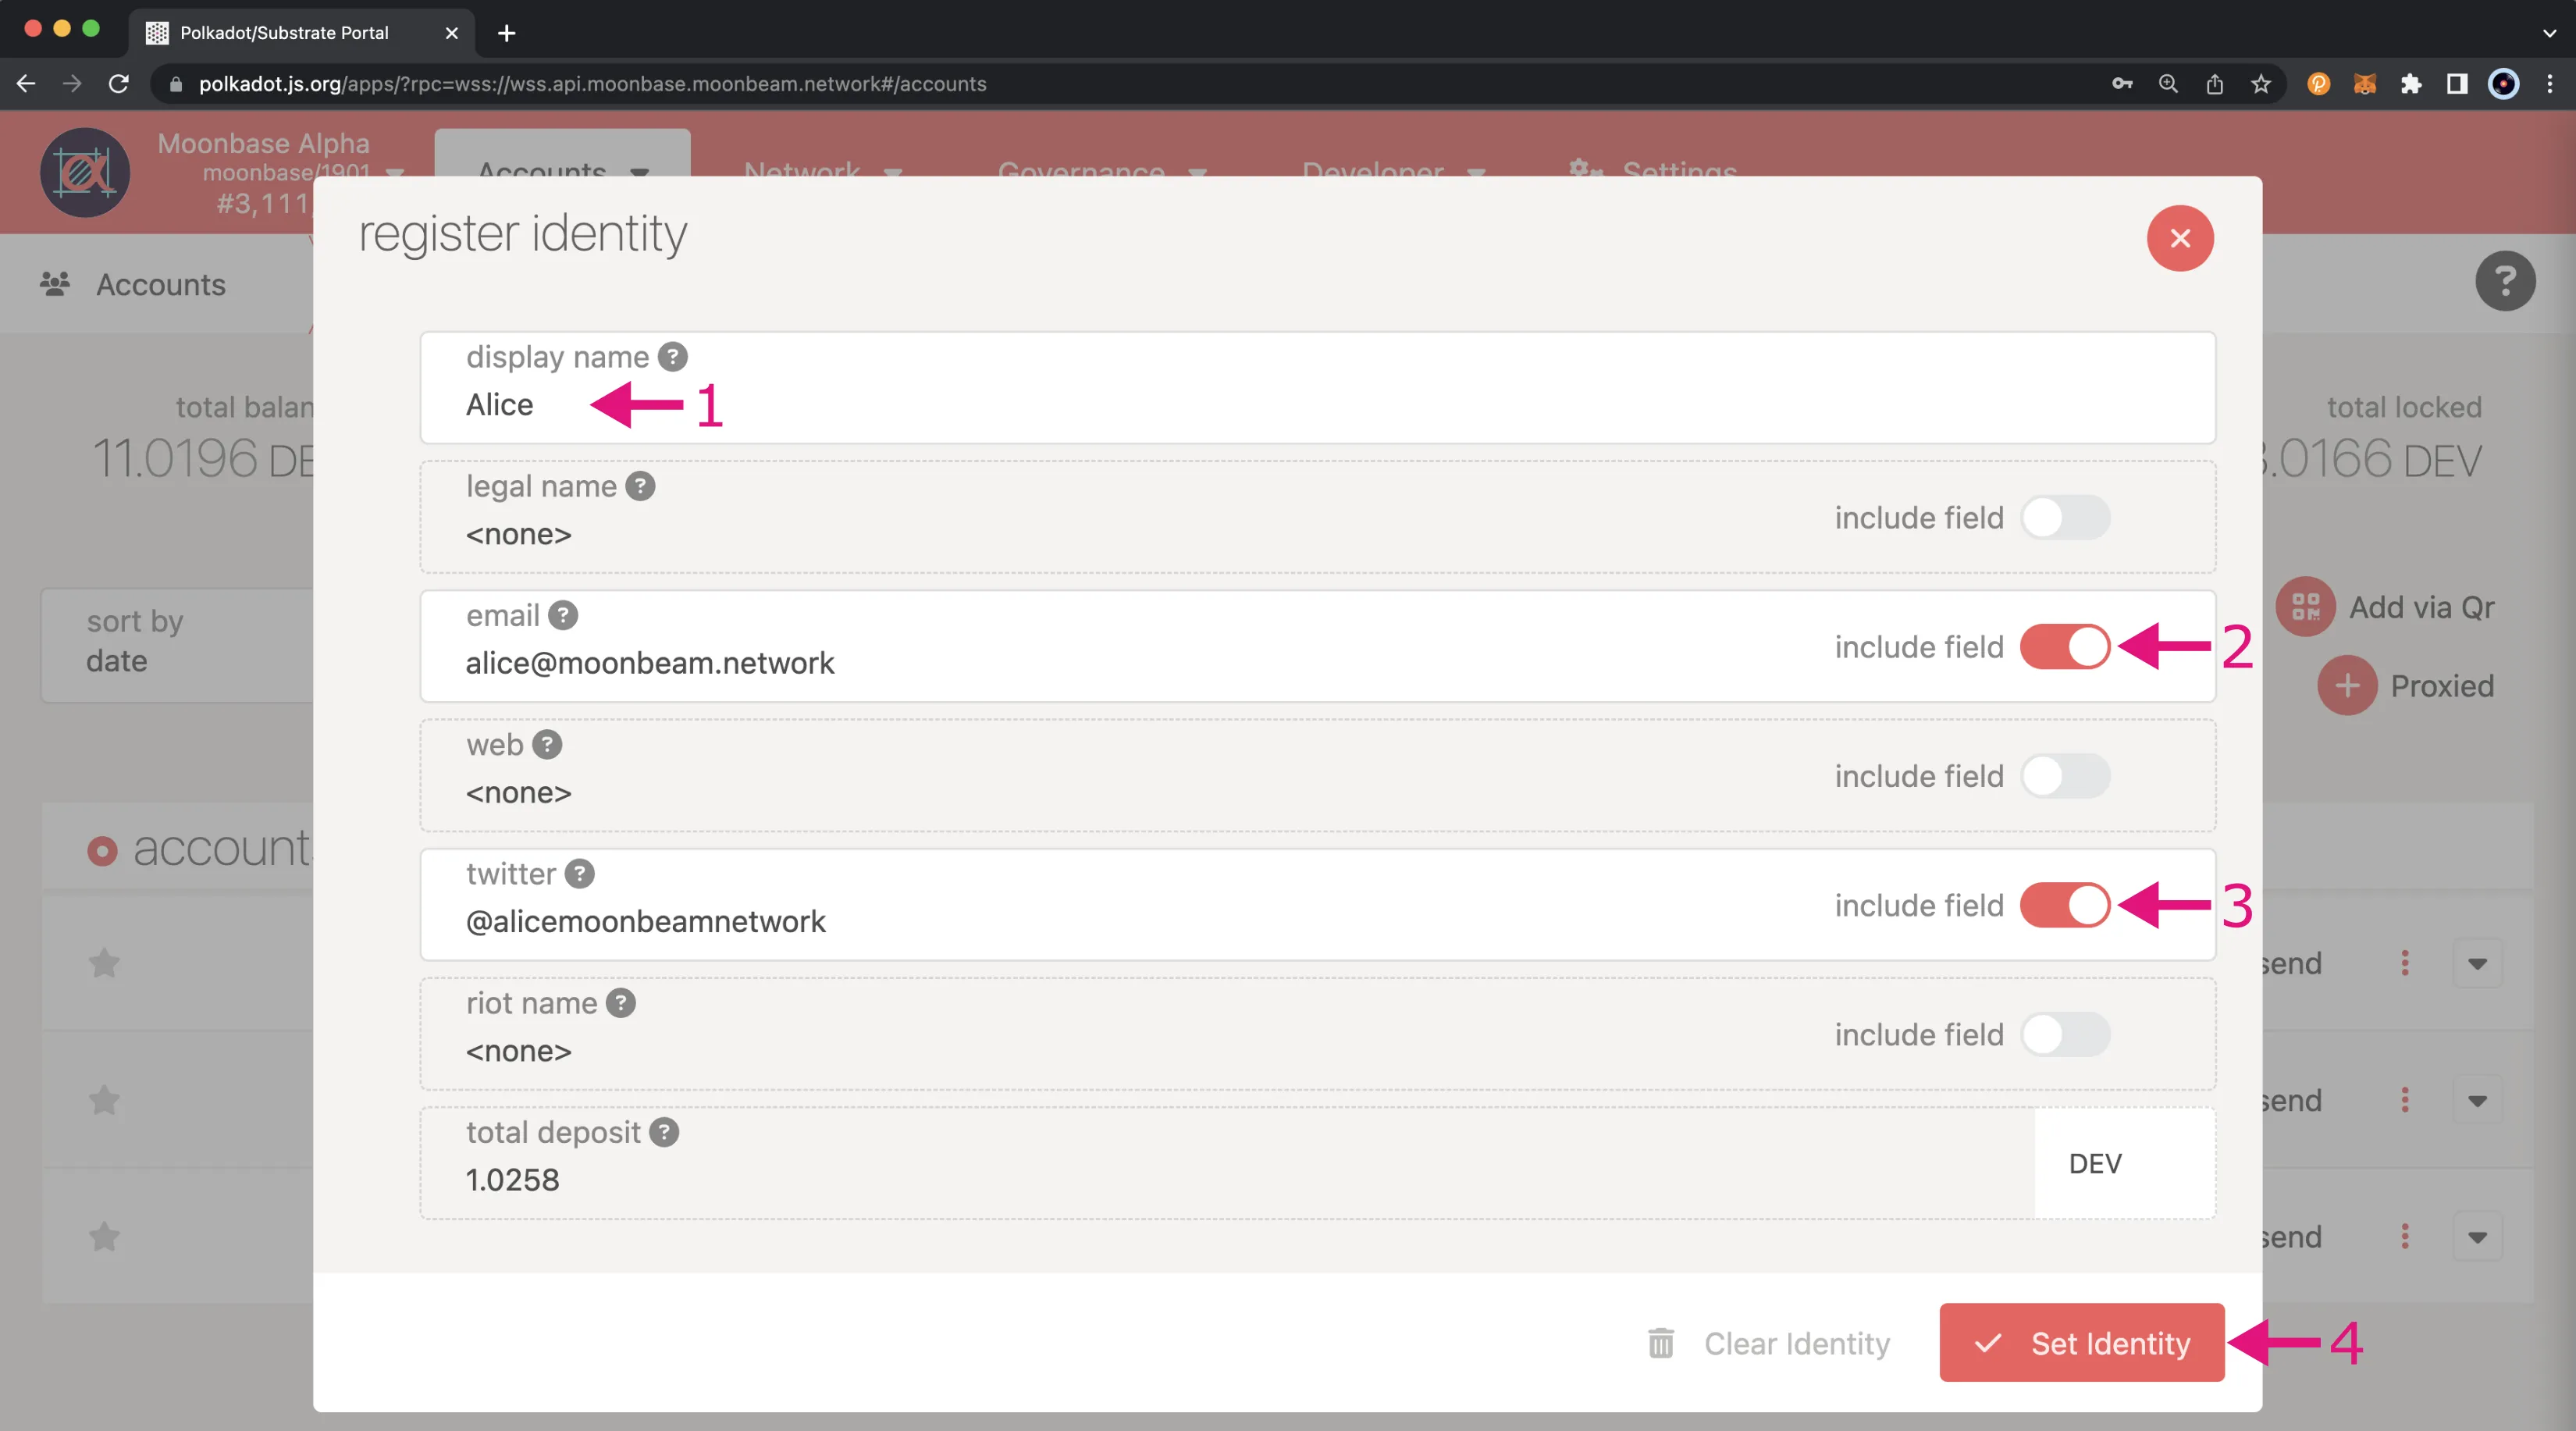
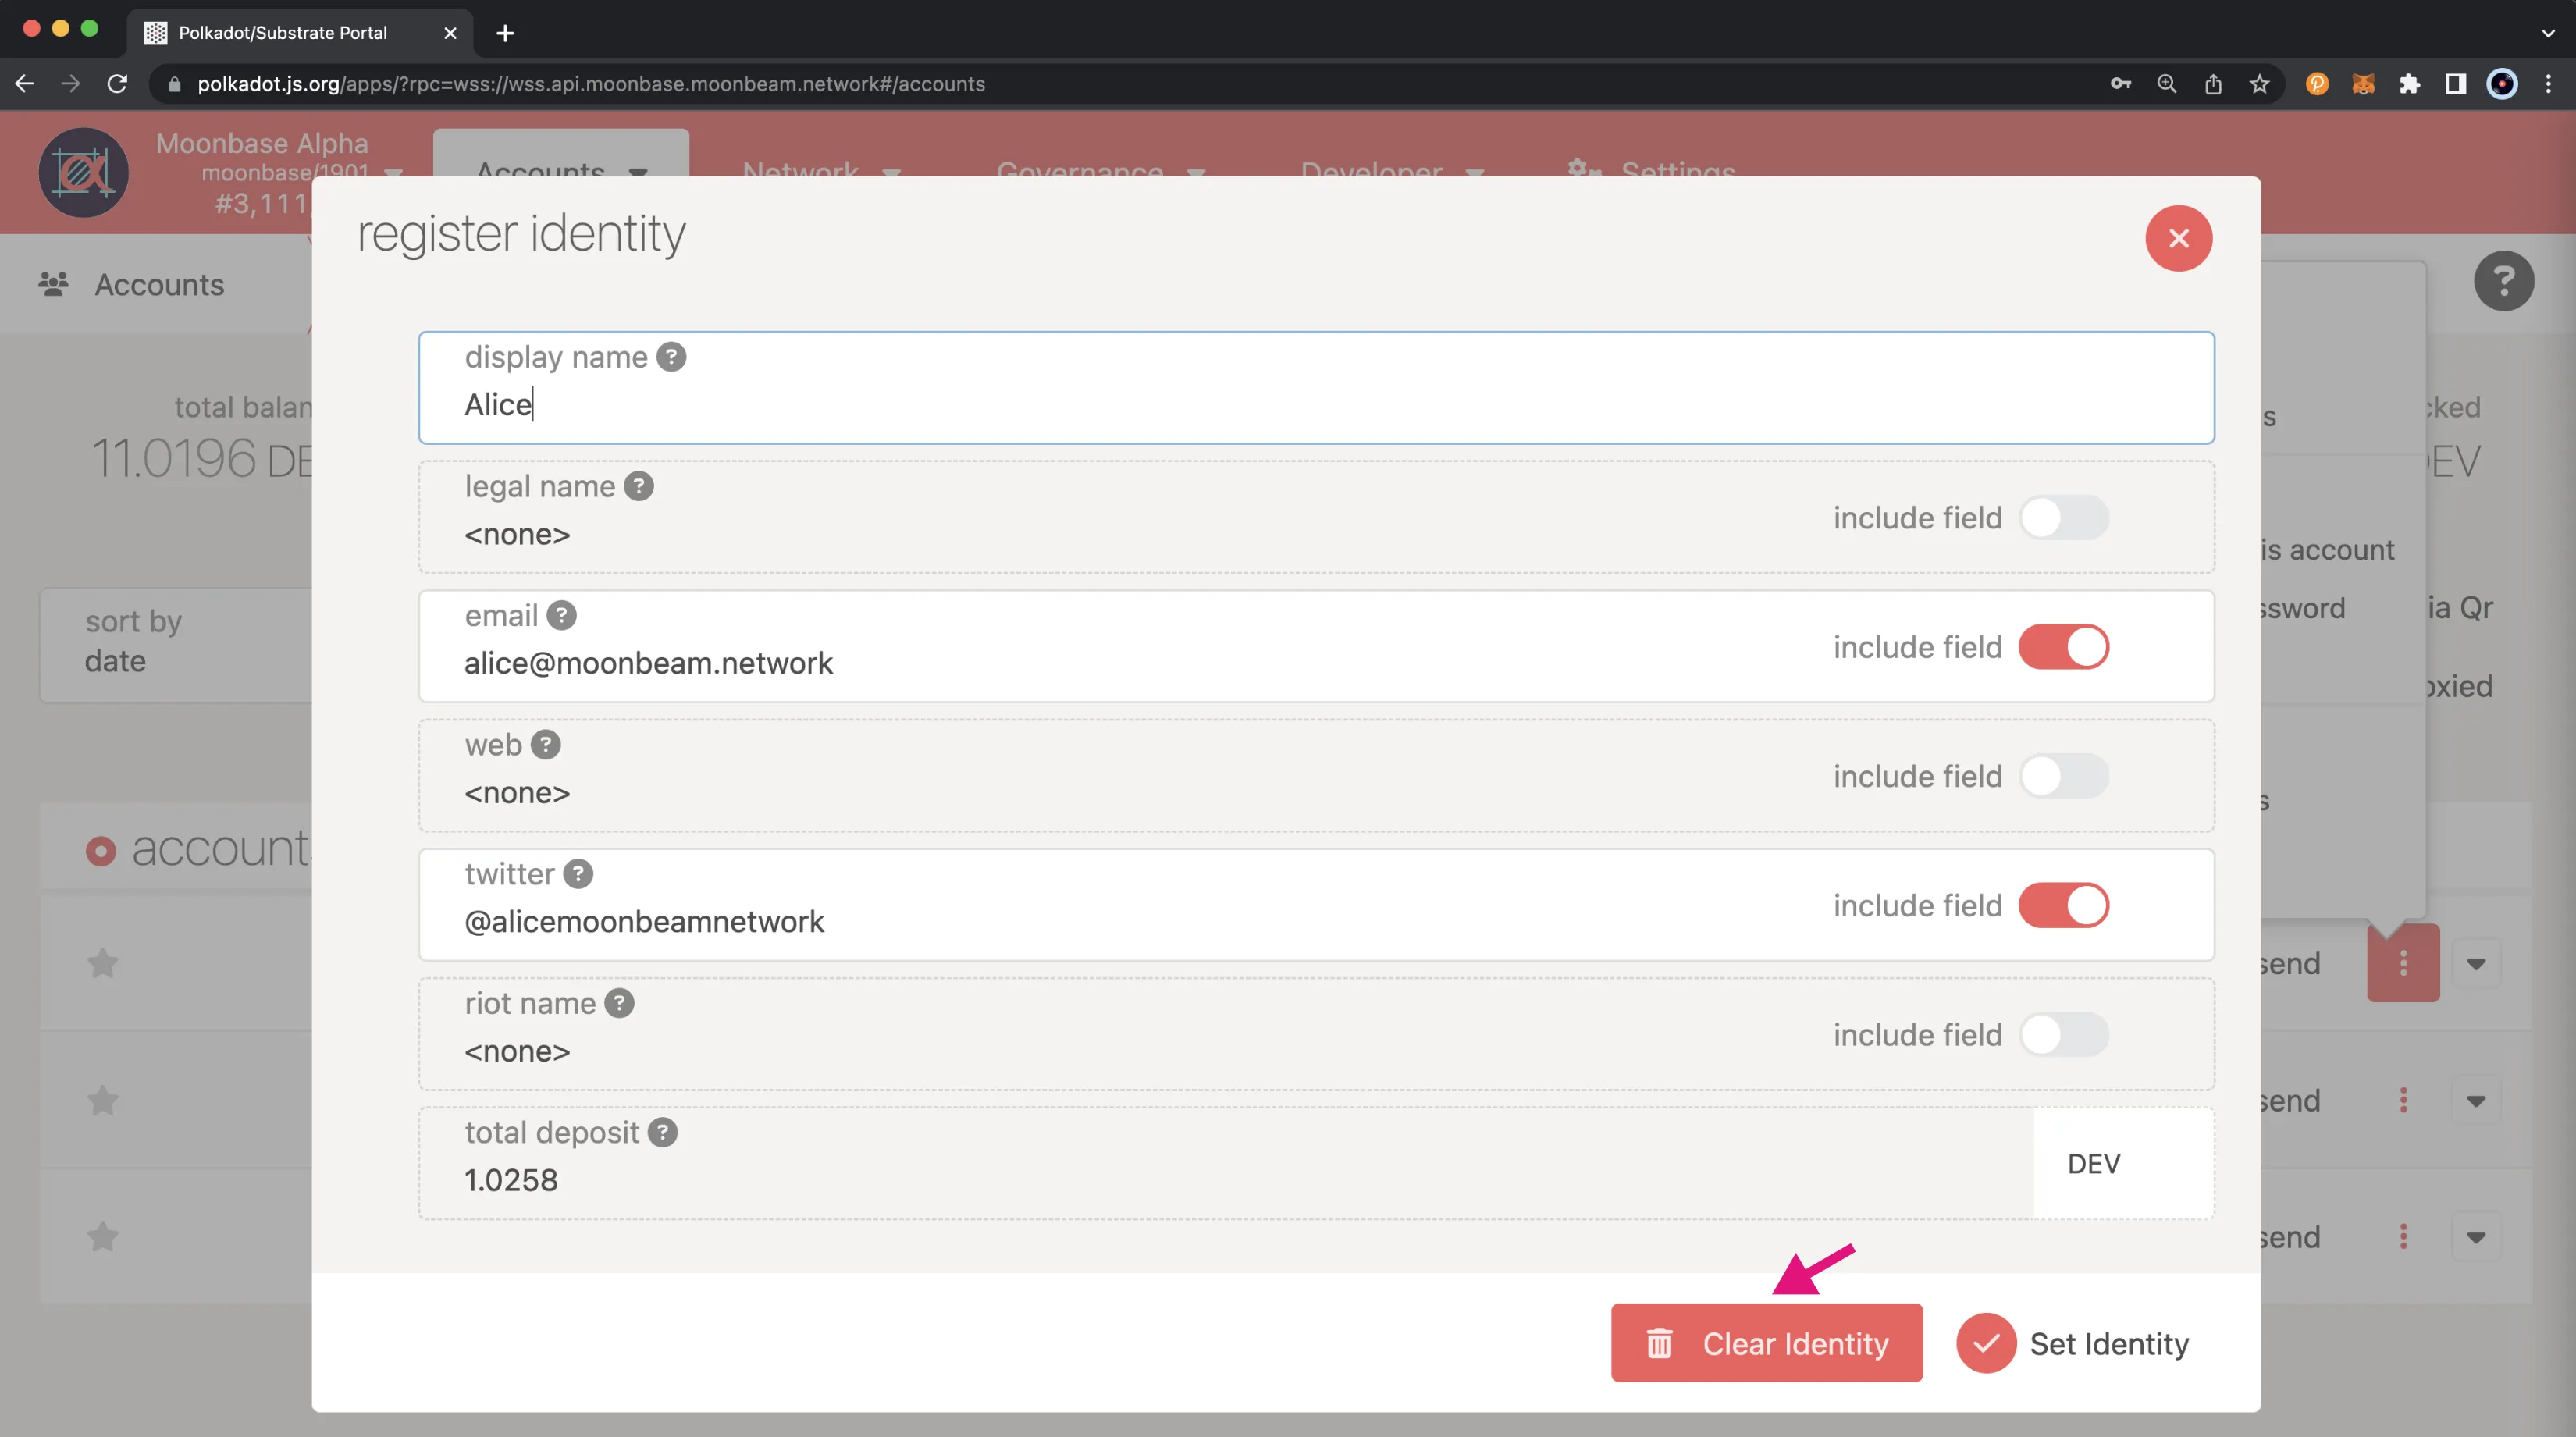
Next, the menu to register and set your identity will pop-up and you can start filling in your information. You are not required to enter information for every single field, you can choose to fill in just one field or all of them, it's up to you. For this example:
- Set your display name
- Click on the include field toggle for email and then enter in your email
- Click on the include field toggle for Twitter and then enter in your Twitter handle
- After you're done filling in your information and the deposit amount looks alright to you, click Set Identity
You will then be prompted to sign the transaction. If everything looks good, you can enter your password and click Sign and Submit to sign and send the transaction.
You should see status notifications pop-up in the top right hand corner. Once the transaction has been confirmed, you can click on your account name again and the panel will slide out on the right side of the page. Your balances will have changed, and you’ll also see your new identity information.
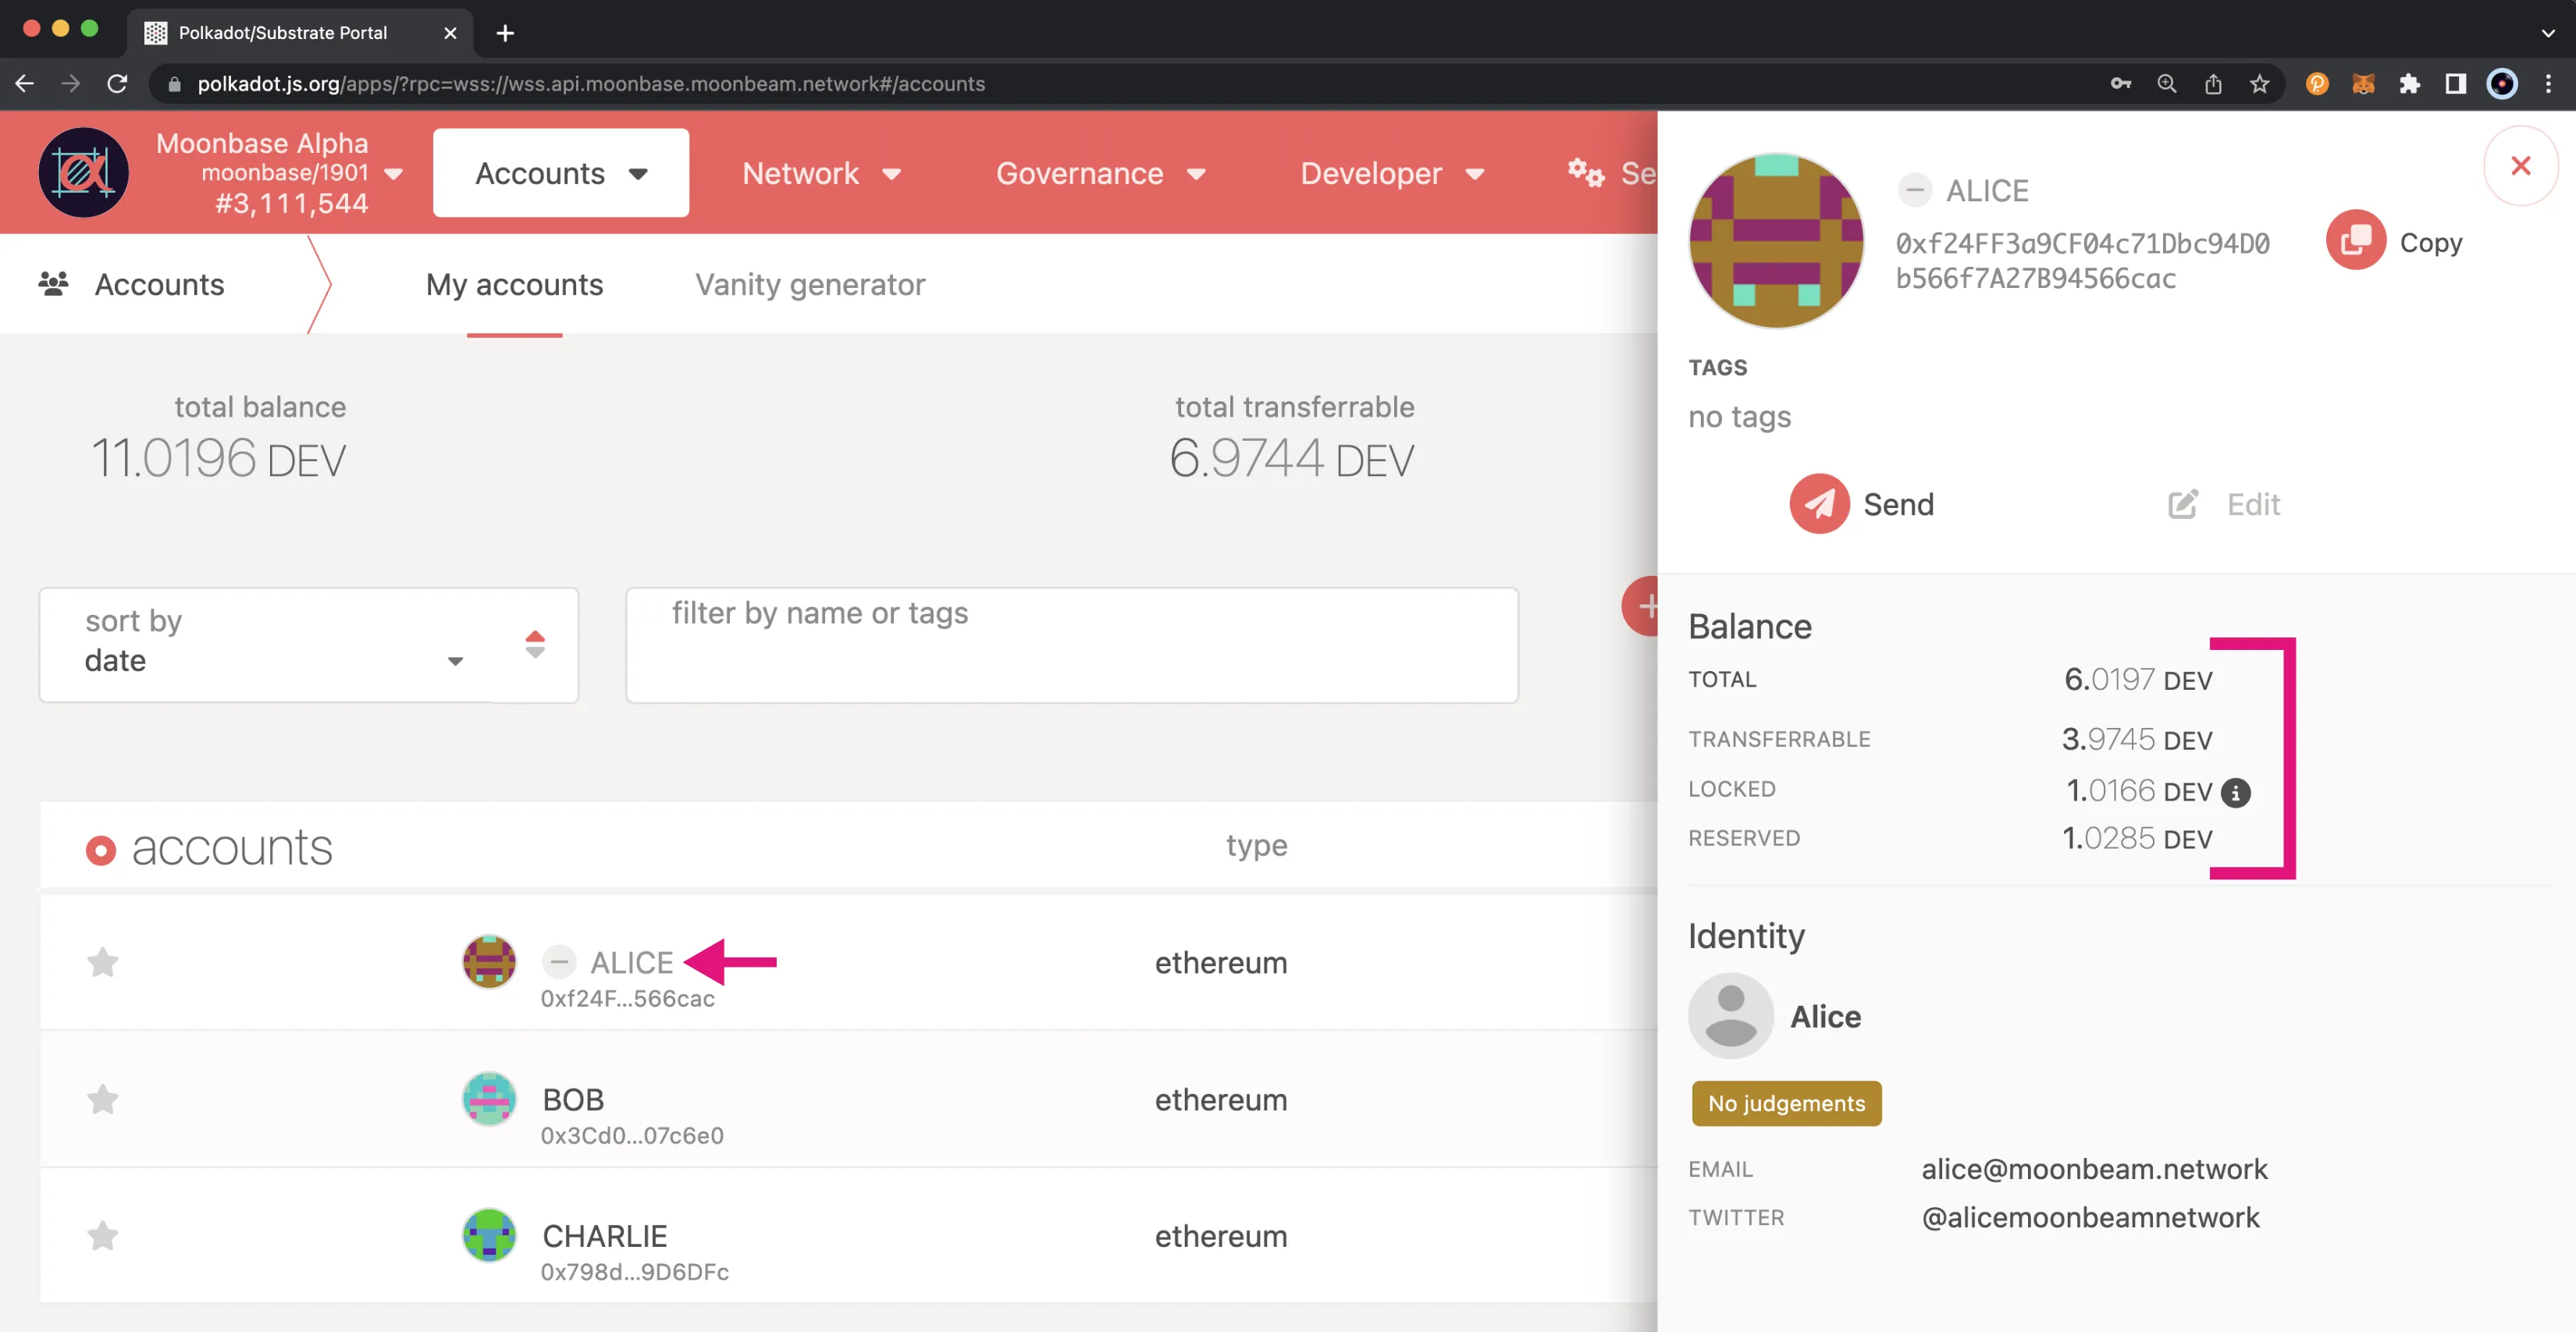
If the identity information matches what you entered, you’ve successfully set an identity!
Once you clear your identity, the deposit in your reserved balance will get transferred back to your transferable balance. If you need to make changes to your identity, you can go through the process of setting your identity again. Please note that you will need to ensure all fields are re-entered, even if only one field needs to be changed, or they will be overwritten. You will not need to pay another deposit, unless custom fields are used, but you will need to pay gas fees.
Clear an Identity
To clear your identity from the Accounts tab of the Polkadot.js Apps UI, you'll need to:
- Click on the 3 vertical dots next to the account you would like to add identity information for
- A menu will pop up. Click Set on-chain identity

The identity menu will pop-up with your information already filled out. You'll need to click Clear Identity.
You will then be prompted to sign the transaction. If everything looks good, you can enter your password and click Sign and Submit to sign and send the transaction.
You should see status notifications pop-up in the top right hand corner. Once the transaction has been confirmed, you can click on your account name again and the panel will slide out on the right side of the page. You can see your reserved balance was transferred back to your transferable balance, and your identity information has been removed.
That’s it! You’ve successfully cleared your identity. If you want to add a new identity, you can do so at any time.
Manage an Identity via Extrinsics
Set an Identity
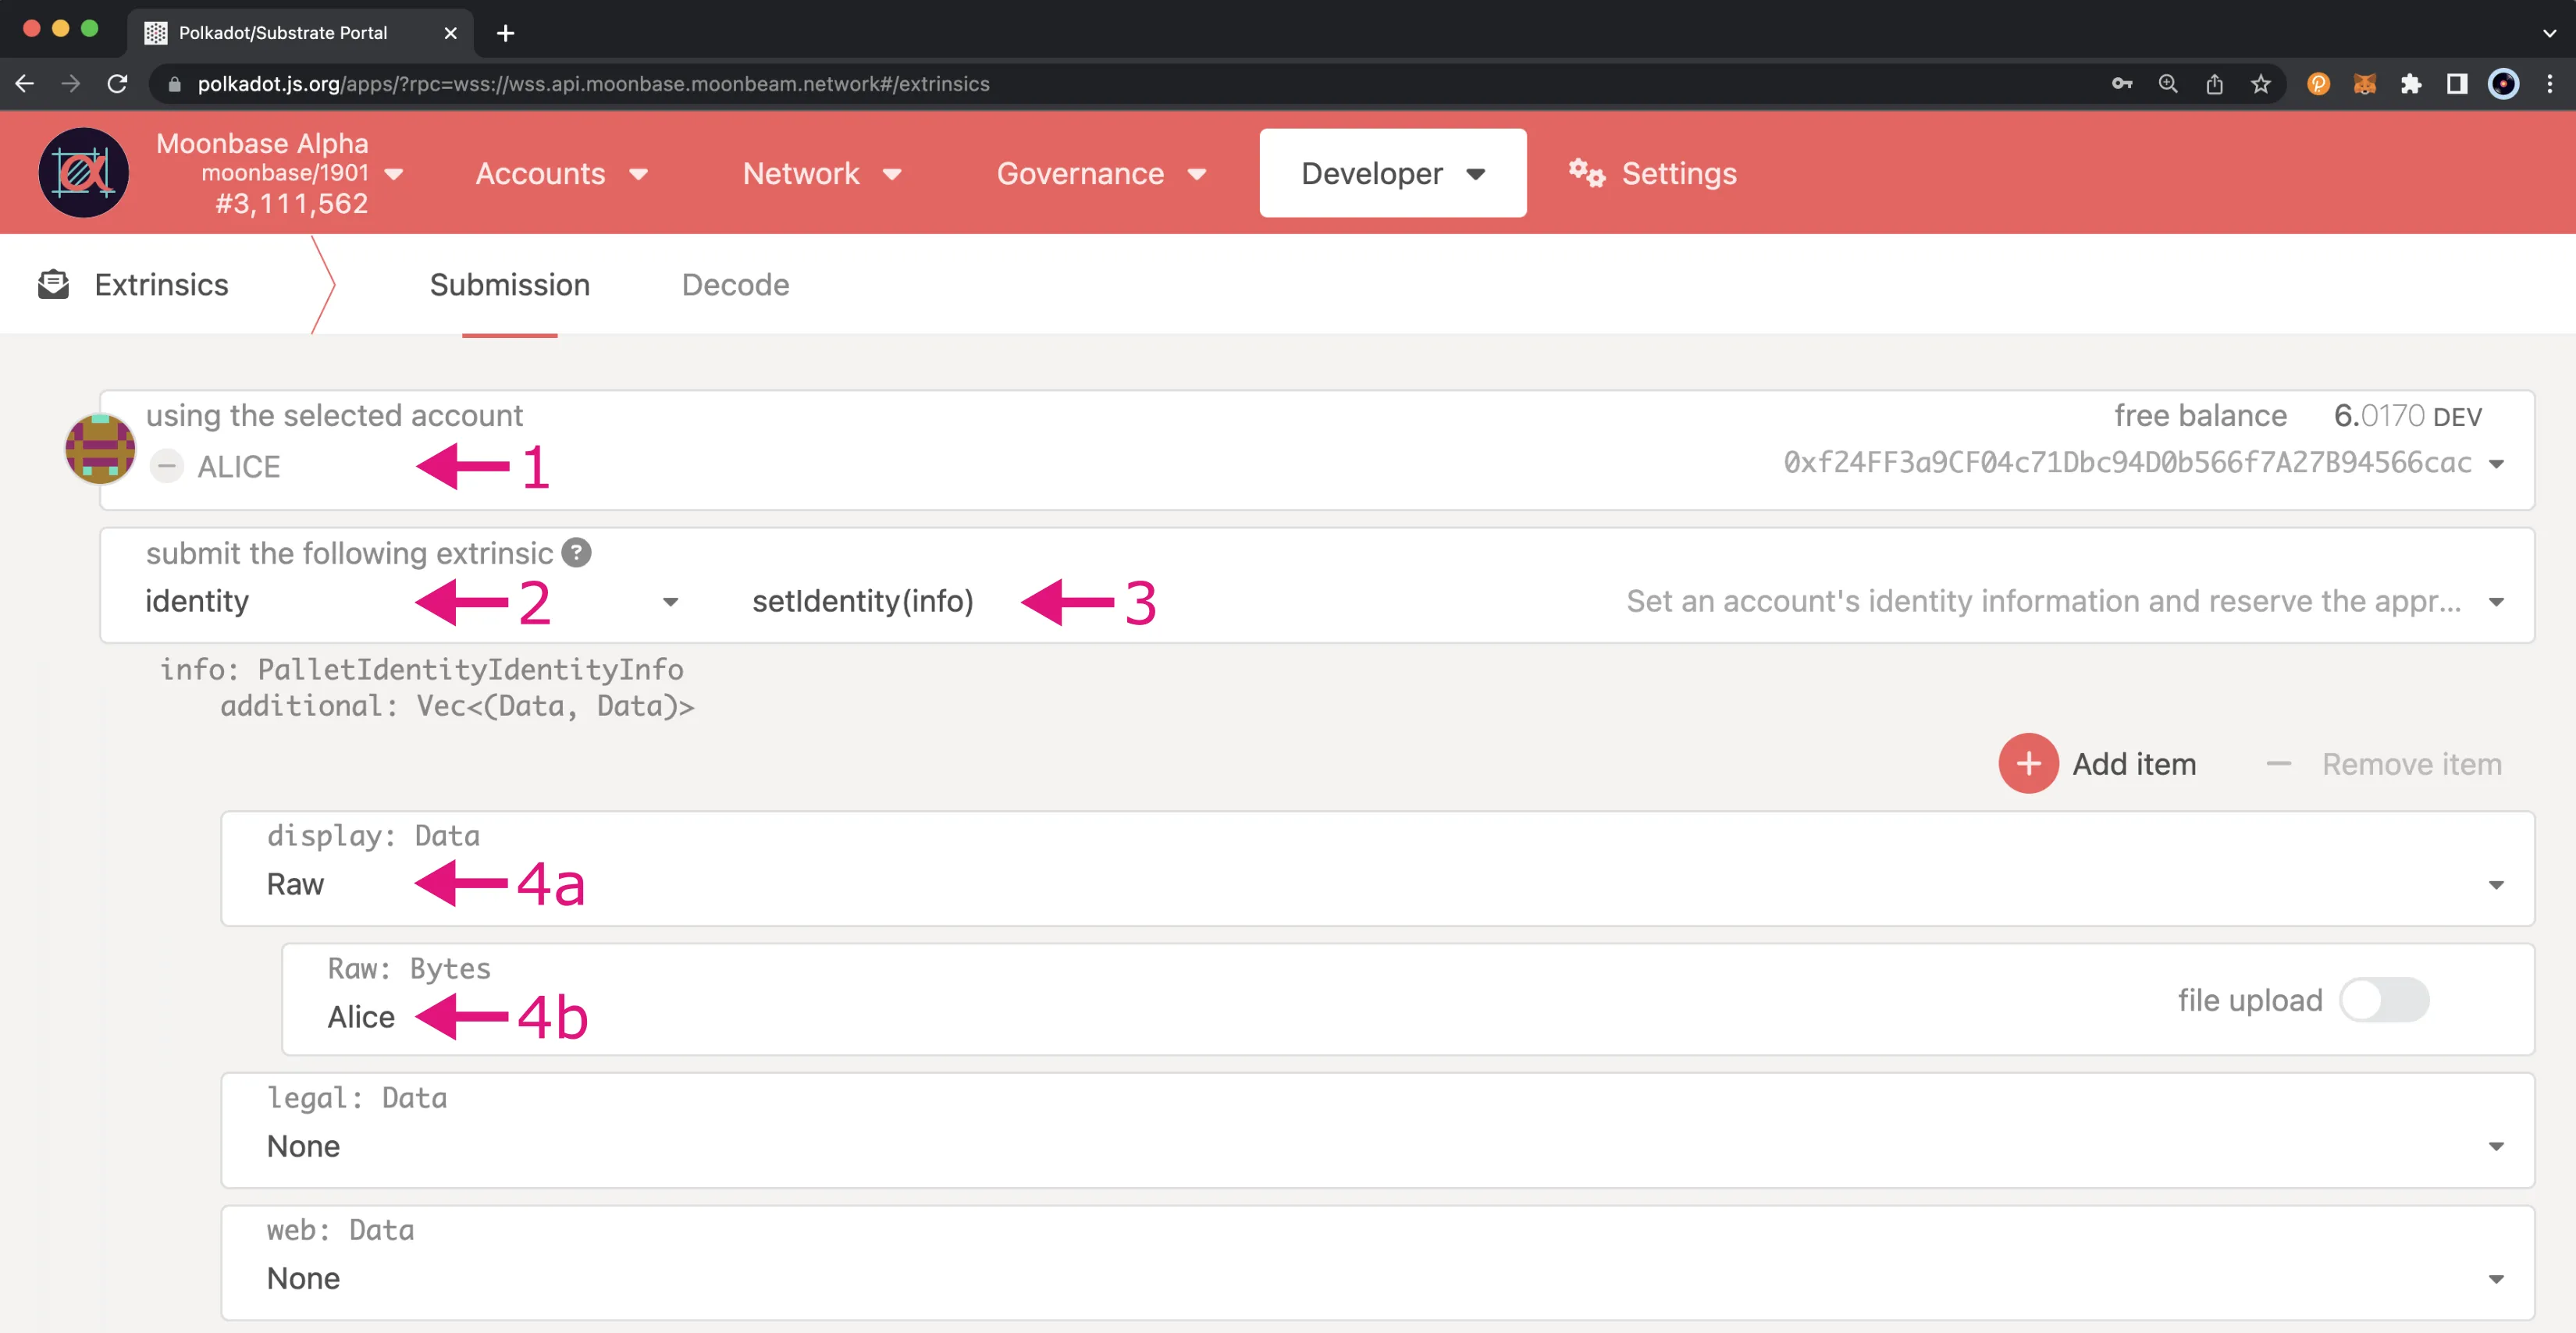
To register an identity using the extrinsics UI, navigate to the Extrinsics page on Polkadot.js Apps. Then, you'll need to:
- Select your account
- Select identity from the submit the following extrinsic dropdown
- Then select the setIdentity(info) function
- Start filling in your identity information. Please make sure that for each field, your input does not exceed 32 characters
- Select the format of the data. For this example, you can use Raw data but you also have the option of entering your data in BlackTwo256, Sha256, Keccak256, and ShaThree256 hashed format
- Enter the data in that format
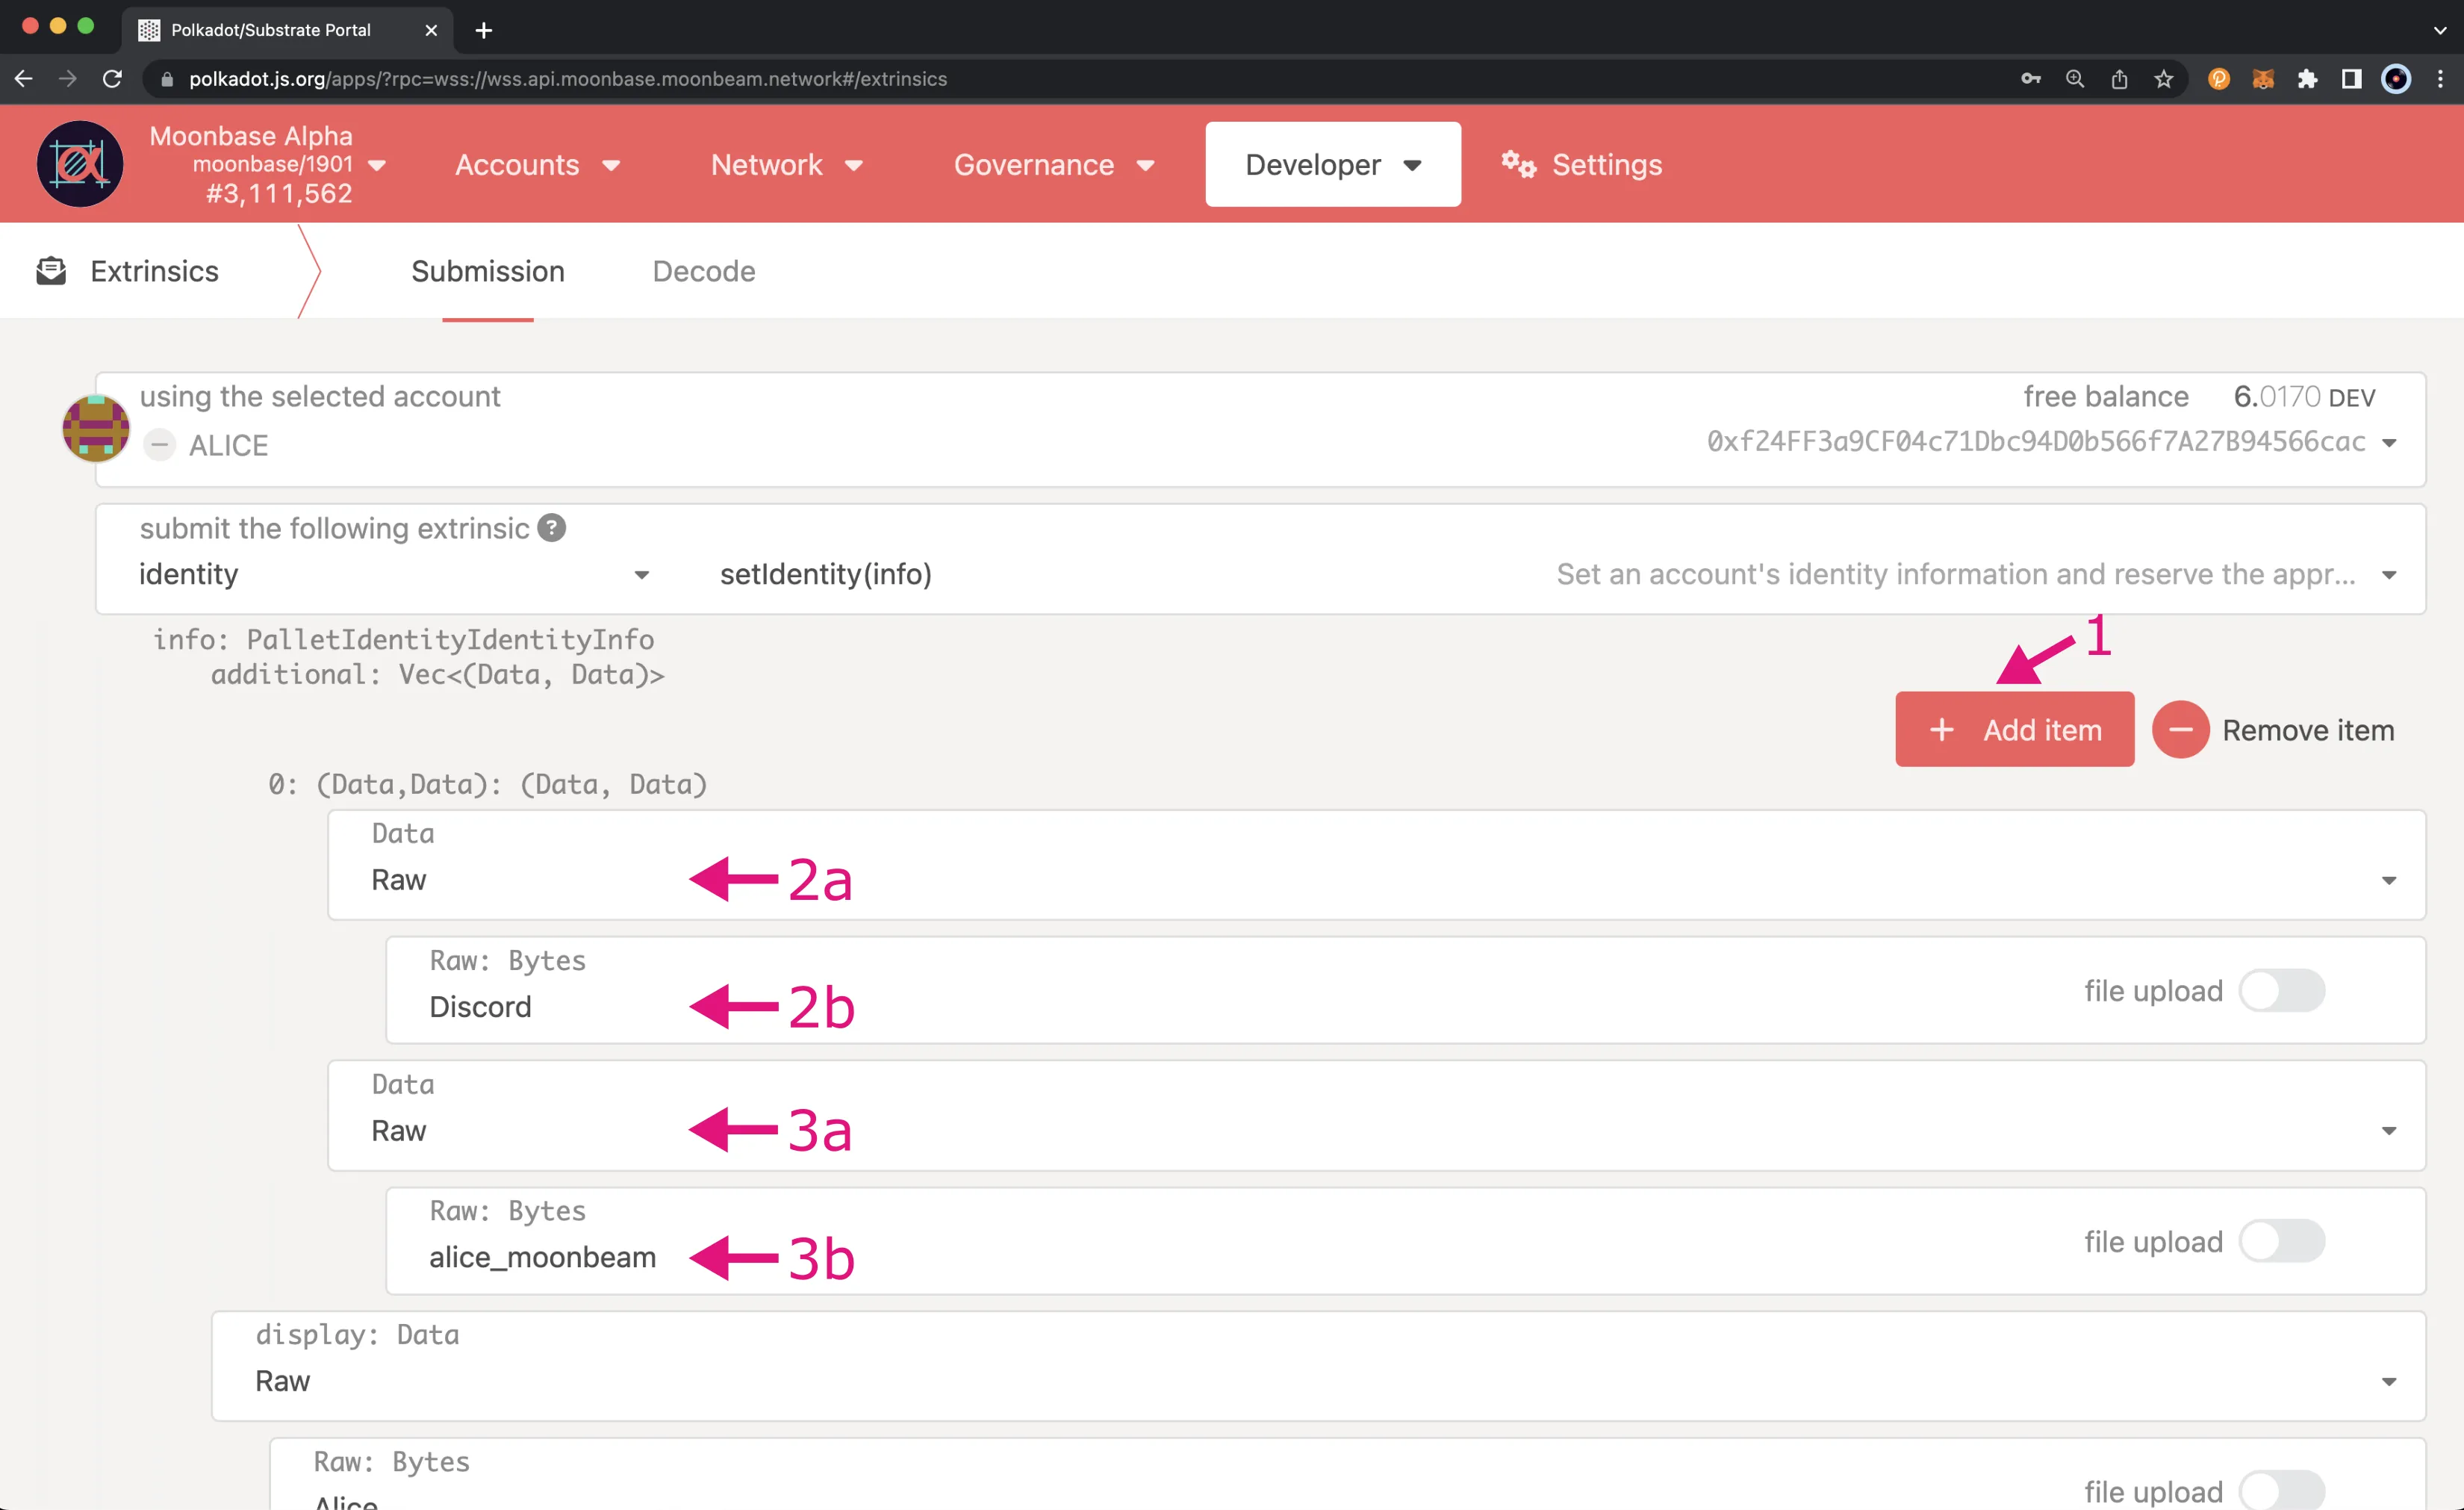
Optionally, if you would like to enter custom fields, you can do so by:
- Scrolling to the top and clicking on Add item
- Two fields will appear: the first for the field name and the second for the value. Please make sure that for each field and value, your input does not exceed 32 characters. Fill in the field name
- Select the format of the data for the field name. Again, you can use Raw data
- Enter the field name in the selected format
- Fill in the value
- Select the format of the data for the value. Again, you can use Raw data
- Enter the value in the selected format
Finally, once all of your identity information has been added, you can scroll to the bottom of the page and click Submit Transaction.
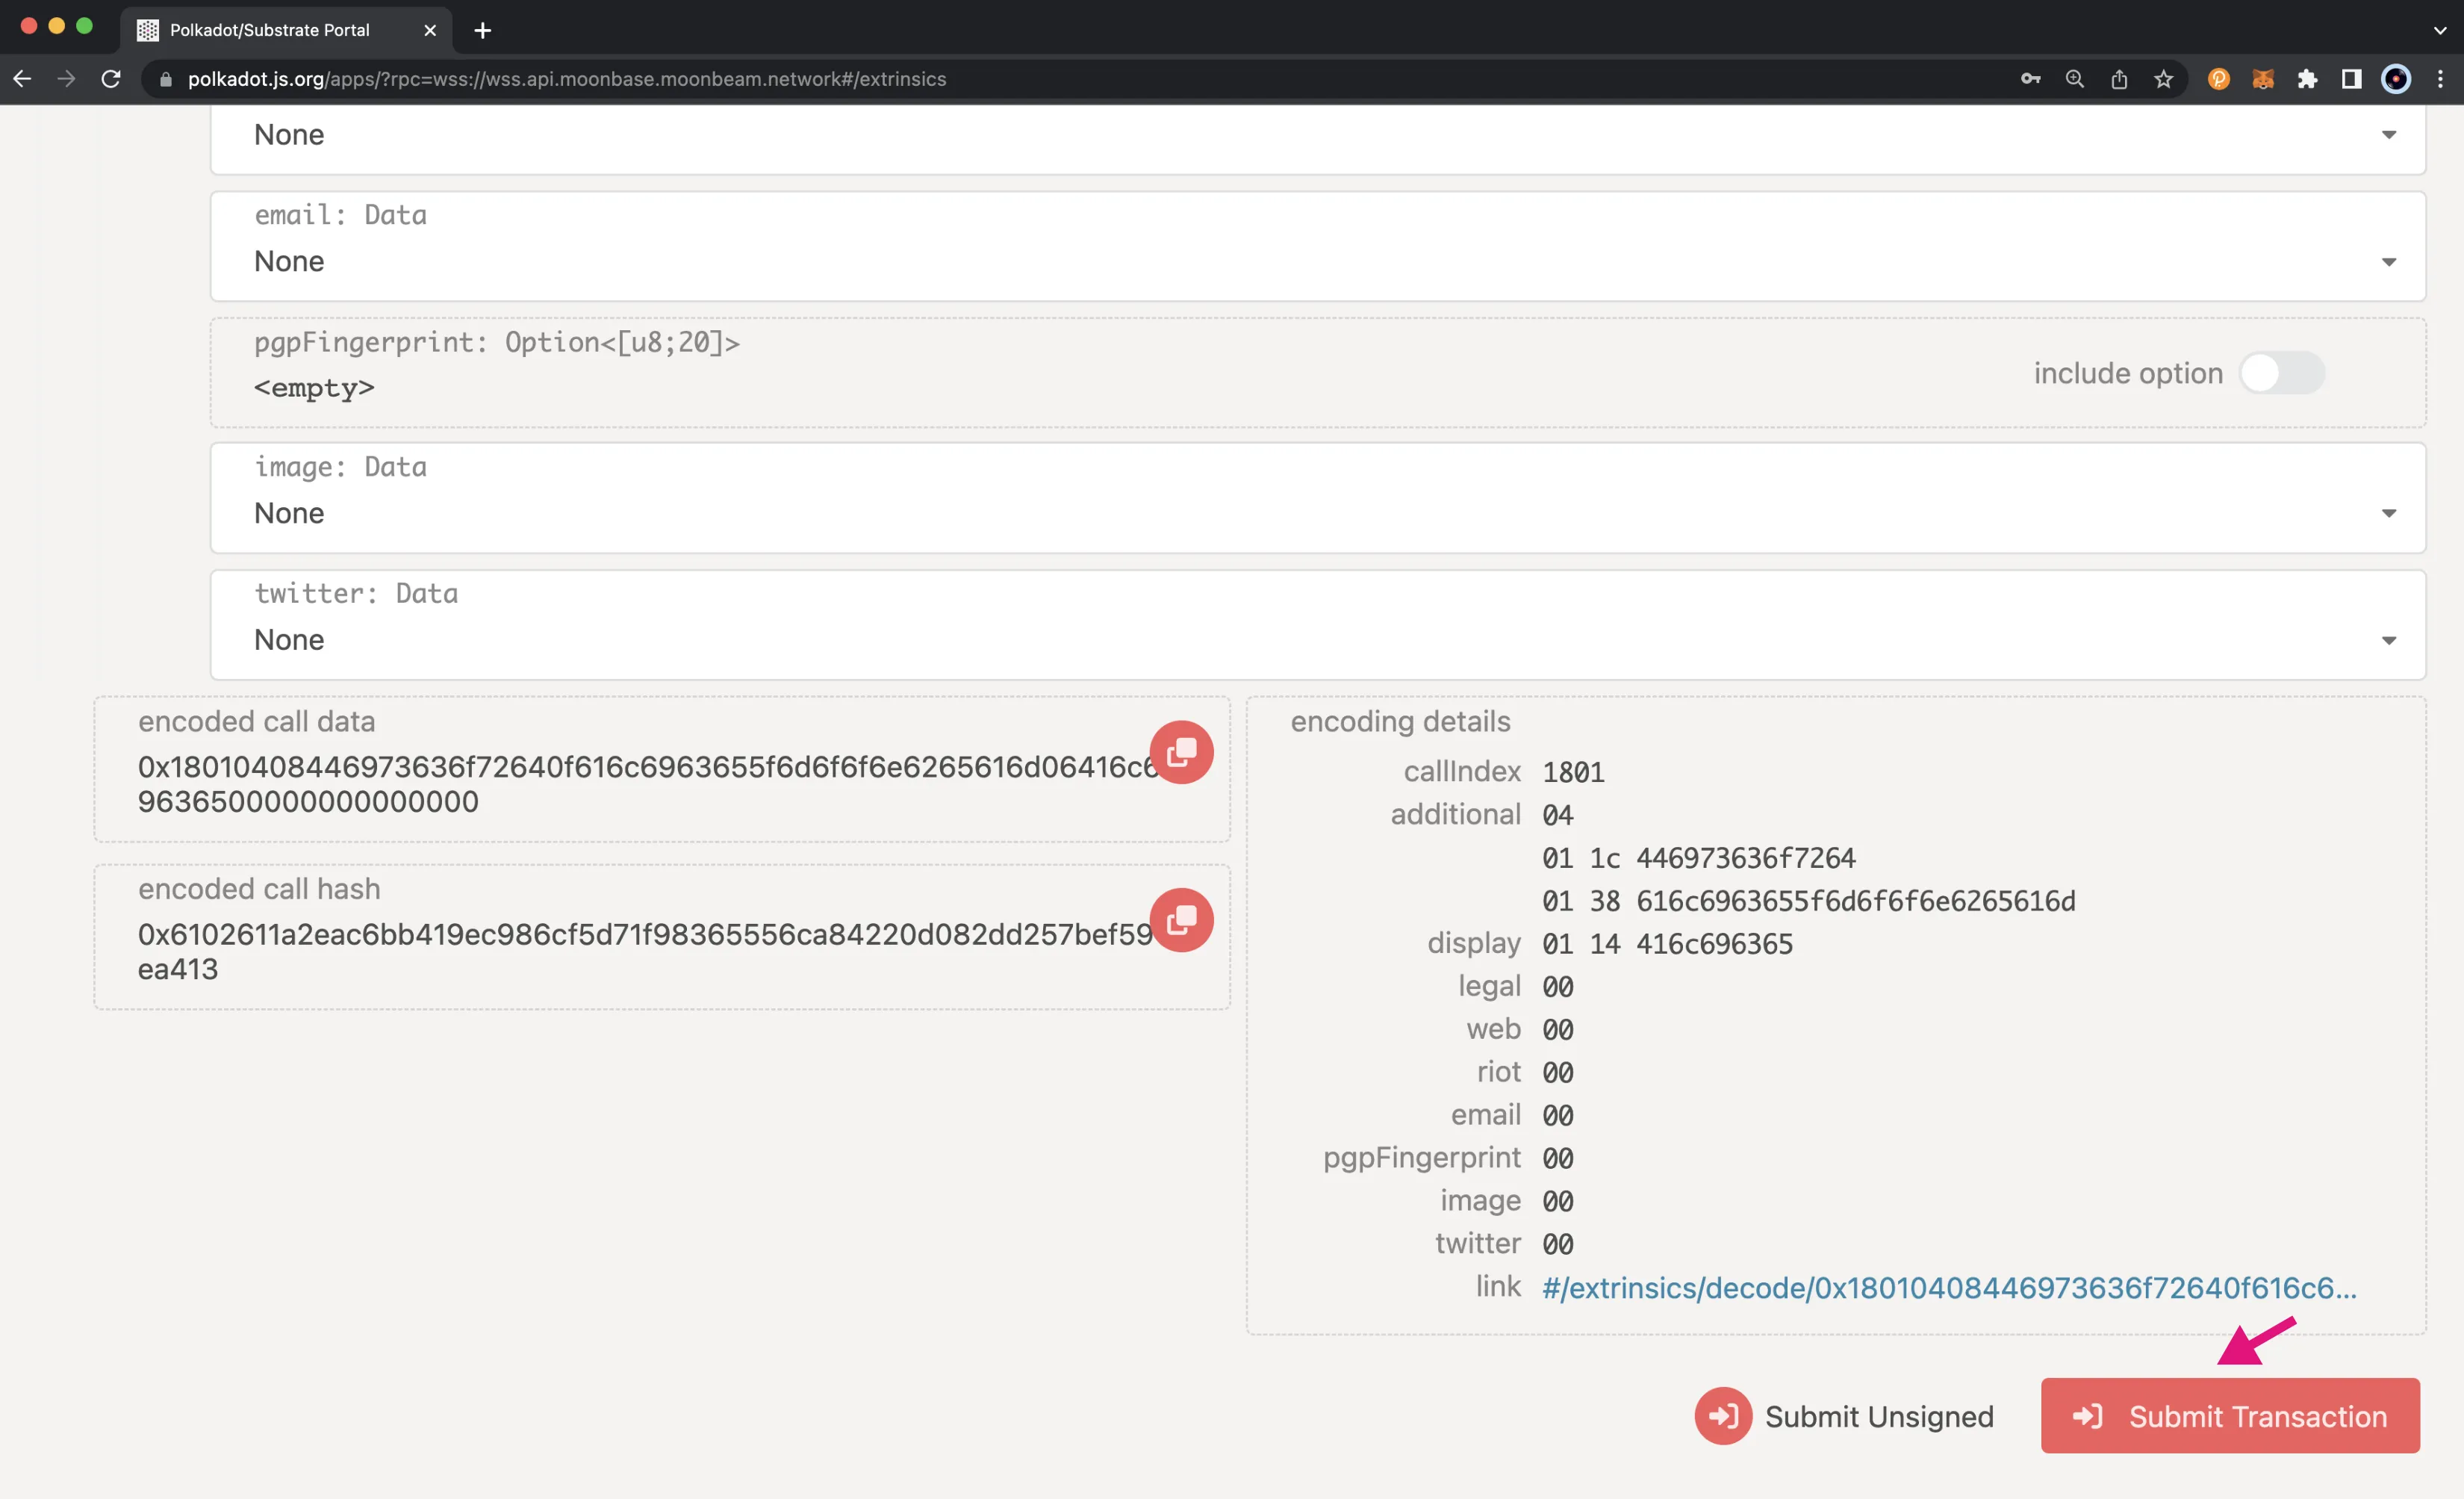
You will then be prompted to sign the transaction. Remember, there is an additional deposit required for each additional custom field. If everything looks good, you can enter your password and click Sign and Submit to sign and send the transaction.
You should see status notifications pop-up in the top right hand corner confirming the transaction. If successful, you’ve set an identity! Congratulations! To make sure everything went through and your identity information looks good, next you can confirm your identity.
Confirm an Identity
To verify the addition of your identity information, you can click on the Developer tab and then navigate to Chain state.
On the Chain State UI, make sure Storage is selected. Then you can start to request your identity information:
- Set selected state query to identity
- Select the identityOf(AccountId) function
- Select your account
- Click the + button to get your identity information
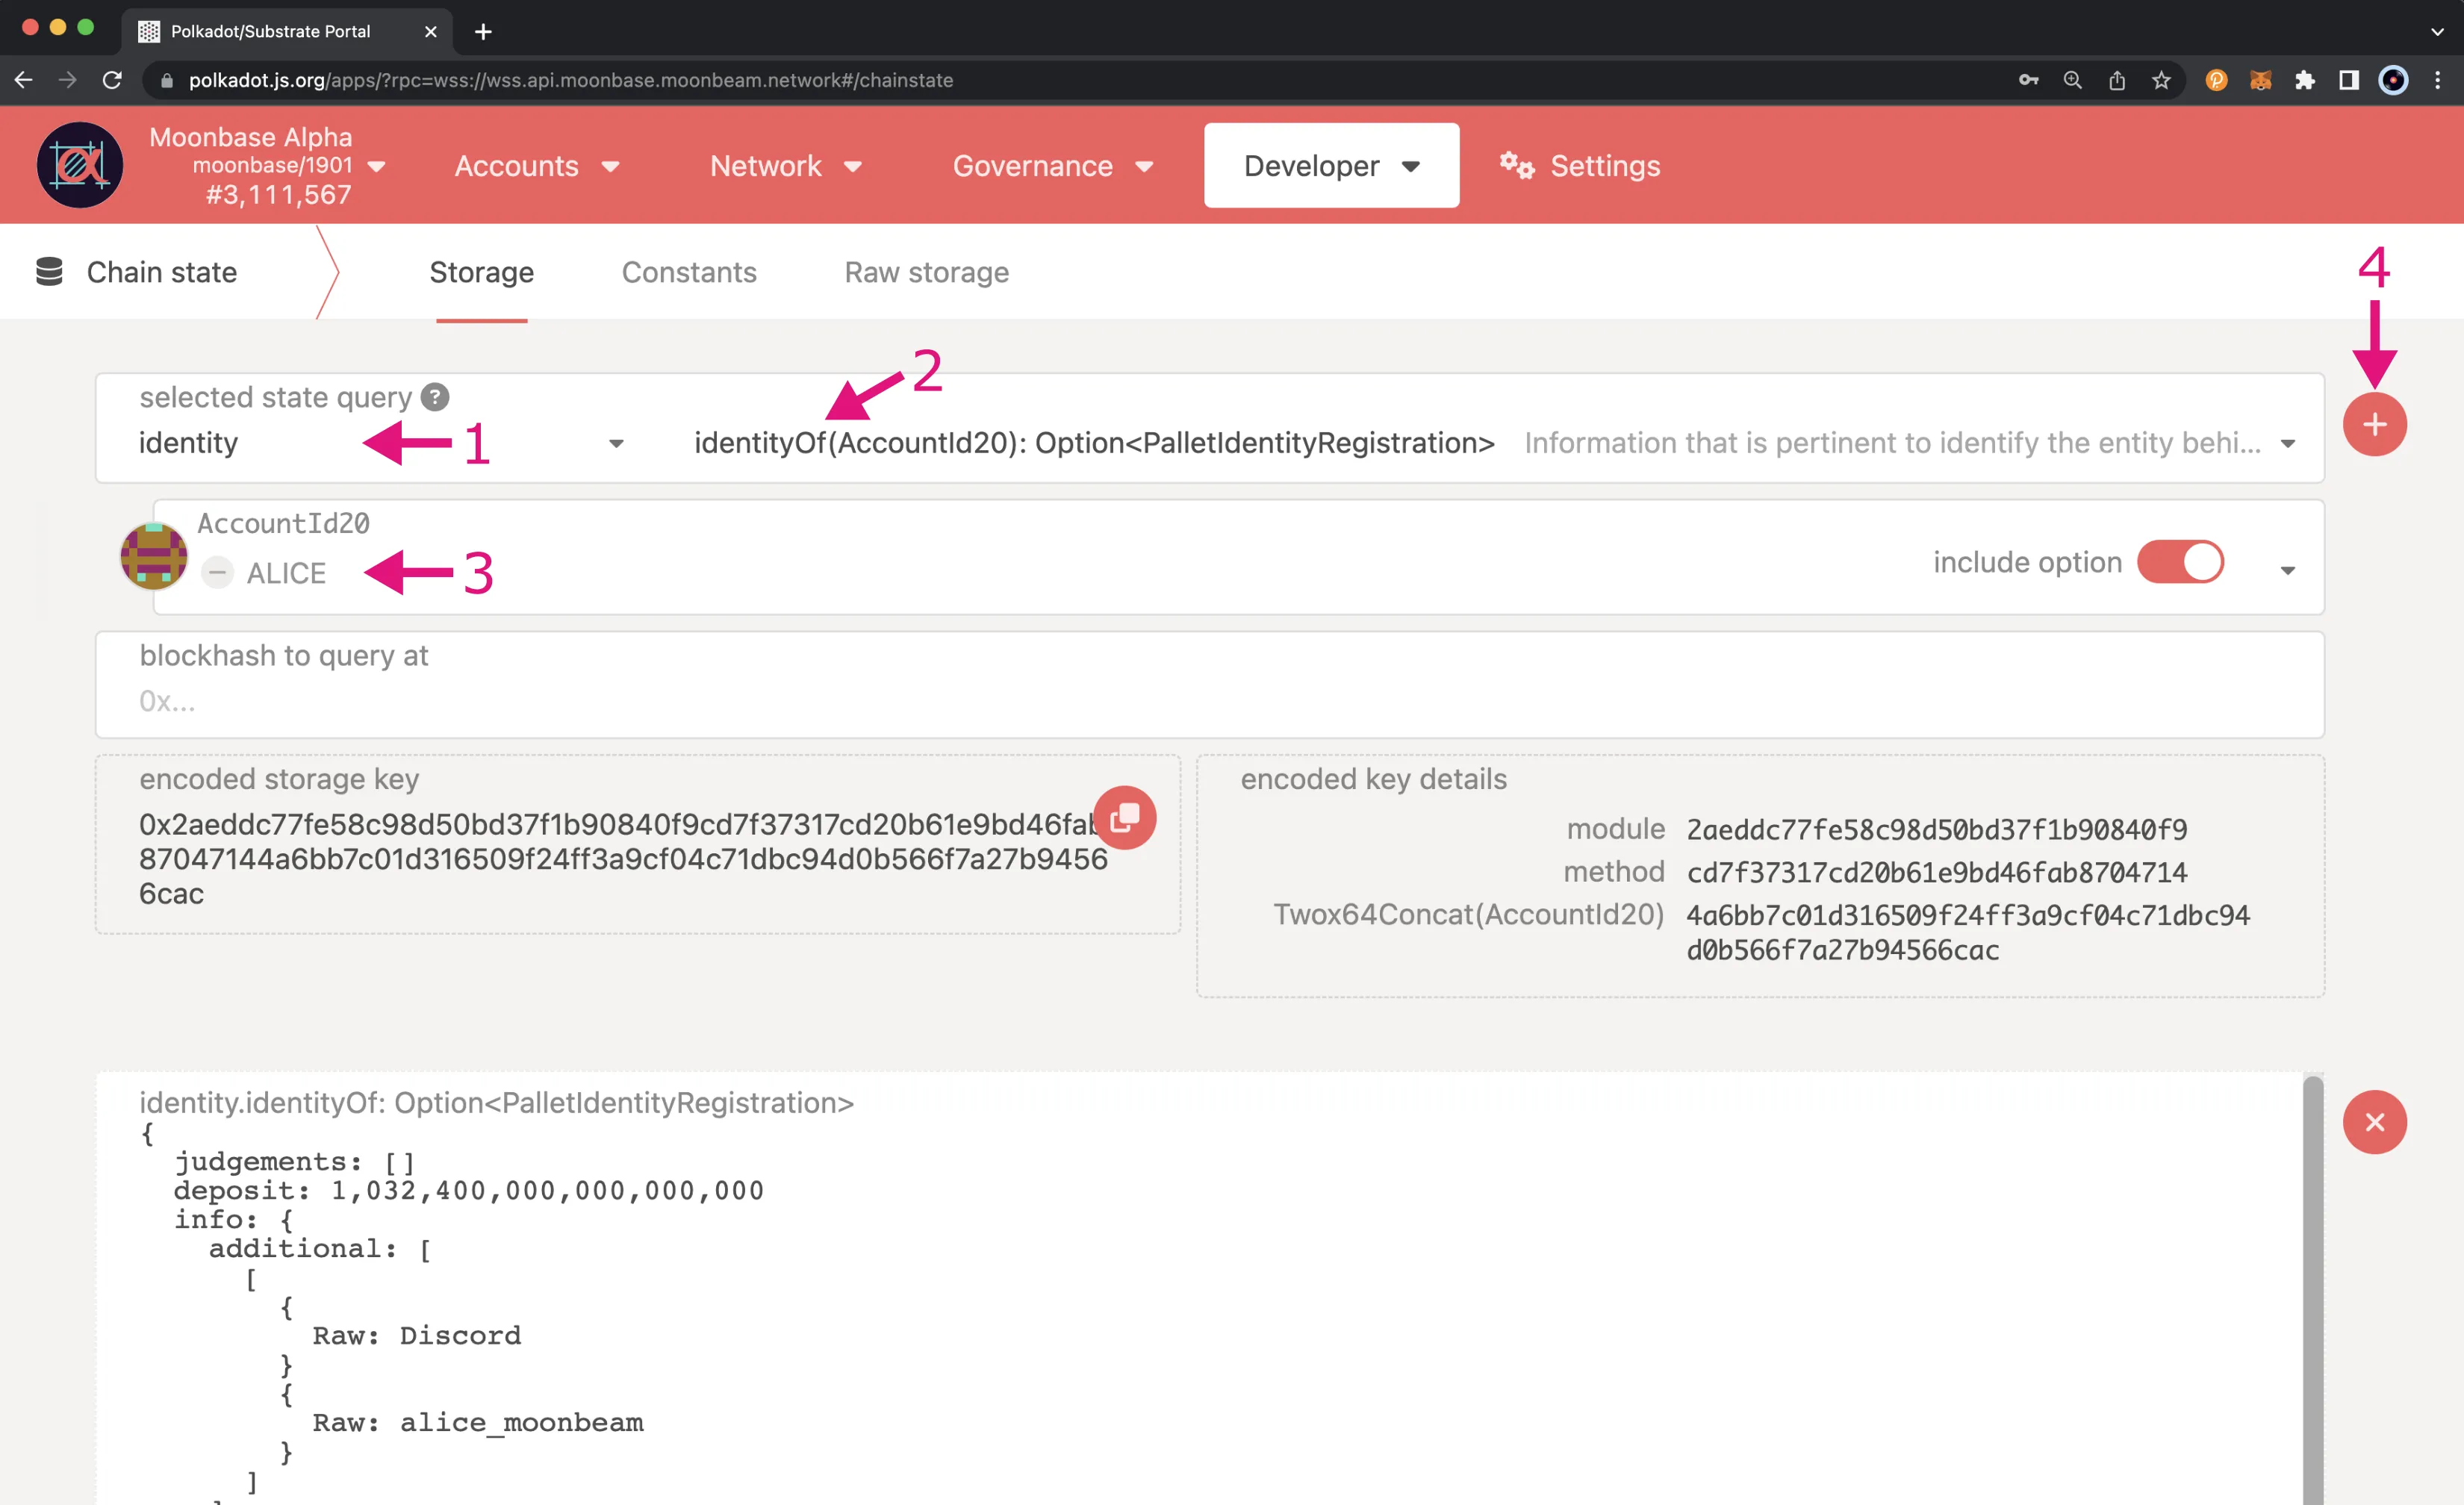
You can see now that you’ve successfully set an identity! Once you clear your identity, the deposit in your reserved balance will get transferred back to your transferable balance. If you need to make changes to your identity, you can go through the process of setting your identity again. Please note that you will need to ensure all fields are re-entered, even if only one field needs to be changed, or they will be overwritten. You will not need to pay another deposit, unless custom fields are used, but you will need to pay gas fees.
Clear an Identity
To clear your identity from the Extrinsics tab of the Polkadot.js Apps UI, you'll need to:
- Select your account from the using the selected account dropdown
- Select identity from the submit the following extrinsic dropdown
- Then select the clearIdentity() function
- Click Submit Transaction
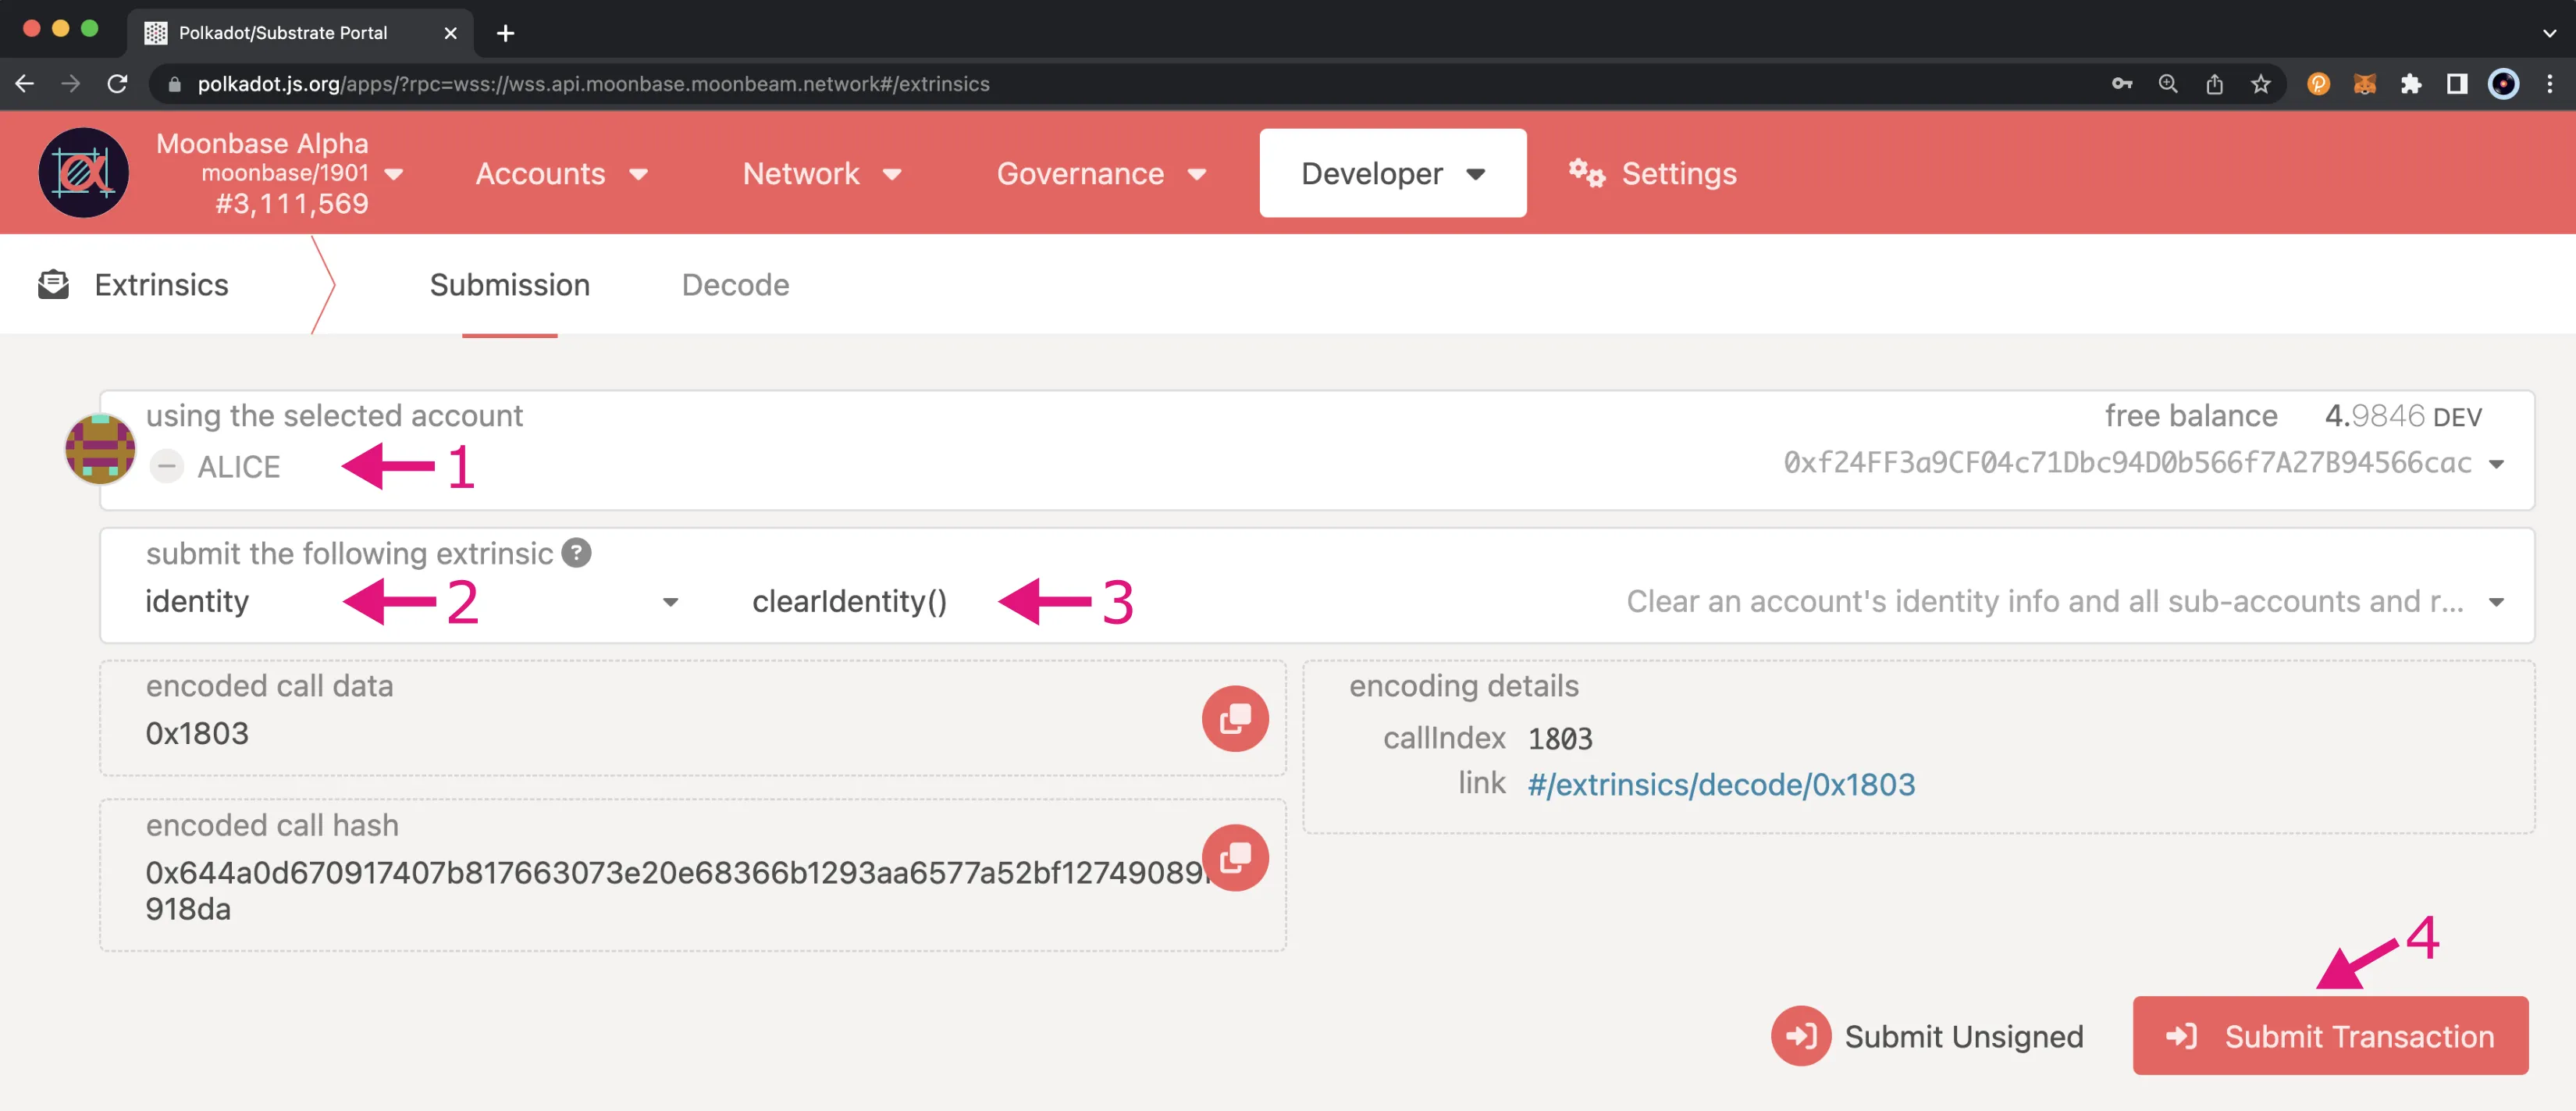
You will then be prompted to sign the transaction. If everything looks good, you can enter your password and click Sign and Submit to sign and send the transaction.
You should see status notifications pop-up in the top right hand corner confirming the transaction.
To verify the removal of your identity information, you can follow the steps in the Confirm an Identity section again. Instead of seeing your identity information, this time you'll get a response of none. Meaning, you no longer have any identity information associated with your account. If you check your balances, you should see that the initial deposit for setting your identity has been returned to your transferable balance. That’s it! Your identity has been cleared.
Identity Judgement
After submitting your identity information, you can request verification of your identity from a registrar. Registrars are tasked with verifying the submitted identity information and can set a fee for their services. When you request judgement, you'll need to specify the registrar you want to verify your information and the maximum fee that you're willing to pay them for providing judgement. The request will only be processed if the selected registrar charges less than the maximum fee that you specified, otherwise the transaction will fail. The fee will be locked until the registrar completes the judgement process and only then will the fee be transferred to the registrar. The registrar fee is in addition to the deposit paid when you intially created your identity.
Registrar applicants are appointed via on-chain democracy. If an appointed registrar issues incorrect judgements or proves to be untrustworthy, they can be removed through democracy.
A registrar will perform proper due diligence to verify the submitted identity information and based on their findings will provide judgement and assign up to seven levels of confidence:
- Unknown - no judgement made yet. This is the default value
- Fee Paid - indicates a user has requested judgement and it is in progress
- Reasonable - the information appears reasonable, but no in-depth checks were performed using legal identity documents
- Known Good - the information is correct and is based upon review of legal identity documents
- Out of Date - the information used to be good, but is now out of date
- Low Quality - the information is low quality or imprecise, but can be updated as needed
- Erroneous - the information is erroneous and may indicate malicious intent. This state cannot be modified and can only be removed if the entire identity has been removed
Current Registrars
When requesting identity judgement, you'll need to provide the index of the registrar you want to complete your request.
The current registrars are as follows:
| Registrar | Operator | Address | Index |
|---|---|---|---|
| Registrar #0 | Moonbeam Foundation | 0xbE6E642b25Fa7925AFA1600C48Ab9aA3461DC7f1 | 0 |
| Registrar #1 | Chevdor | 0xeaB597B91b66d9C3EA5E3a39e22C524c287d61a5 | 1 |
| Registrar | Operator | Address | Index |
|---|---|---|---|
| Registrar #0 | Moonbeam Foundation | 0x031590D13434CC554f7257A89B2E0B10d67CCCBa | 0 |
| Registrar #1 | Chevdor | 0x2d18250E01312A155E81381F938B8bA8bb4d97B3 | 1 |
| Registrar | Operator | Address | Index |
|---|---|---|---|
| Registrar #1 | Chevdor | 0x4aD549e07E96BaD335A8b99C8fd32e95EE538904 | 1 |
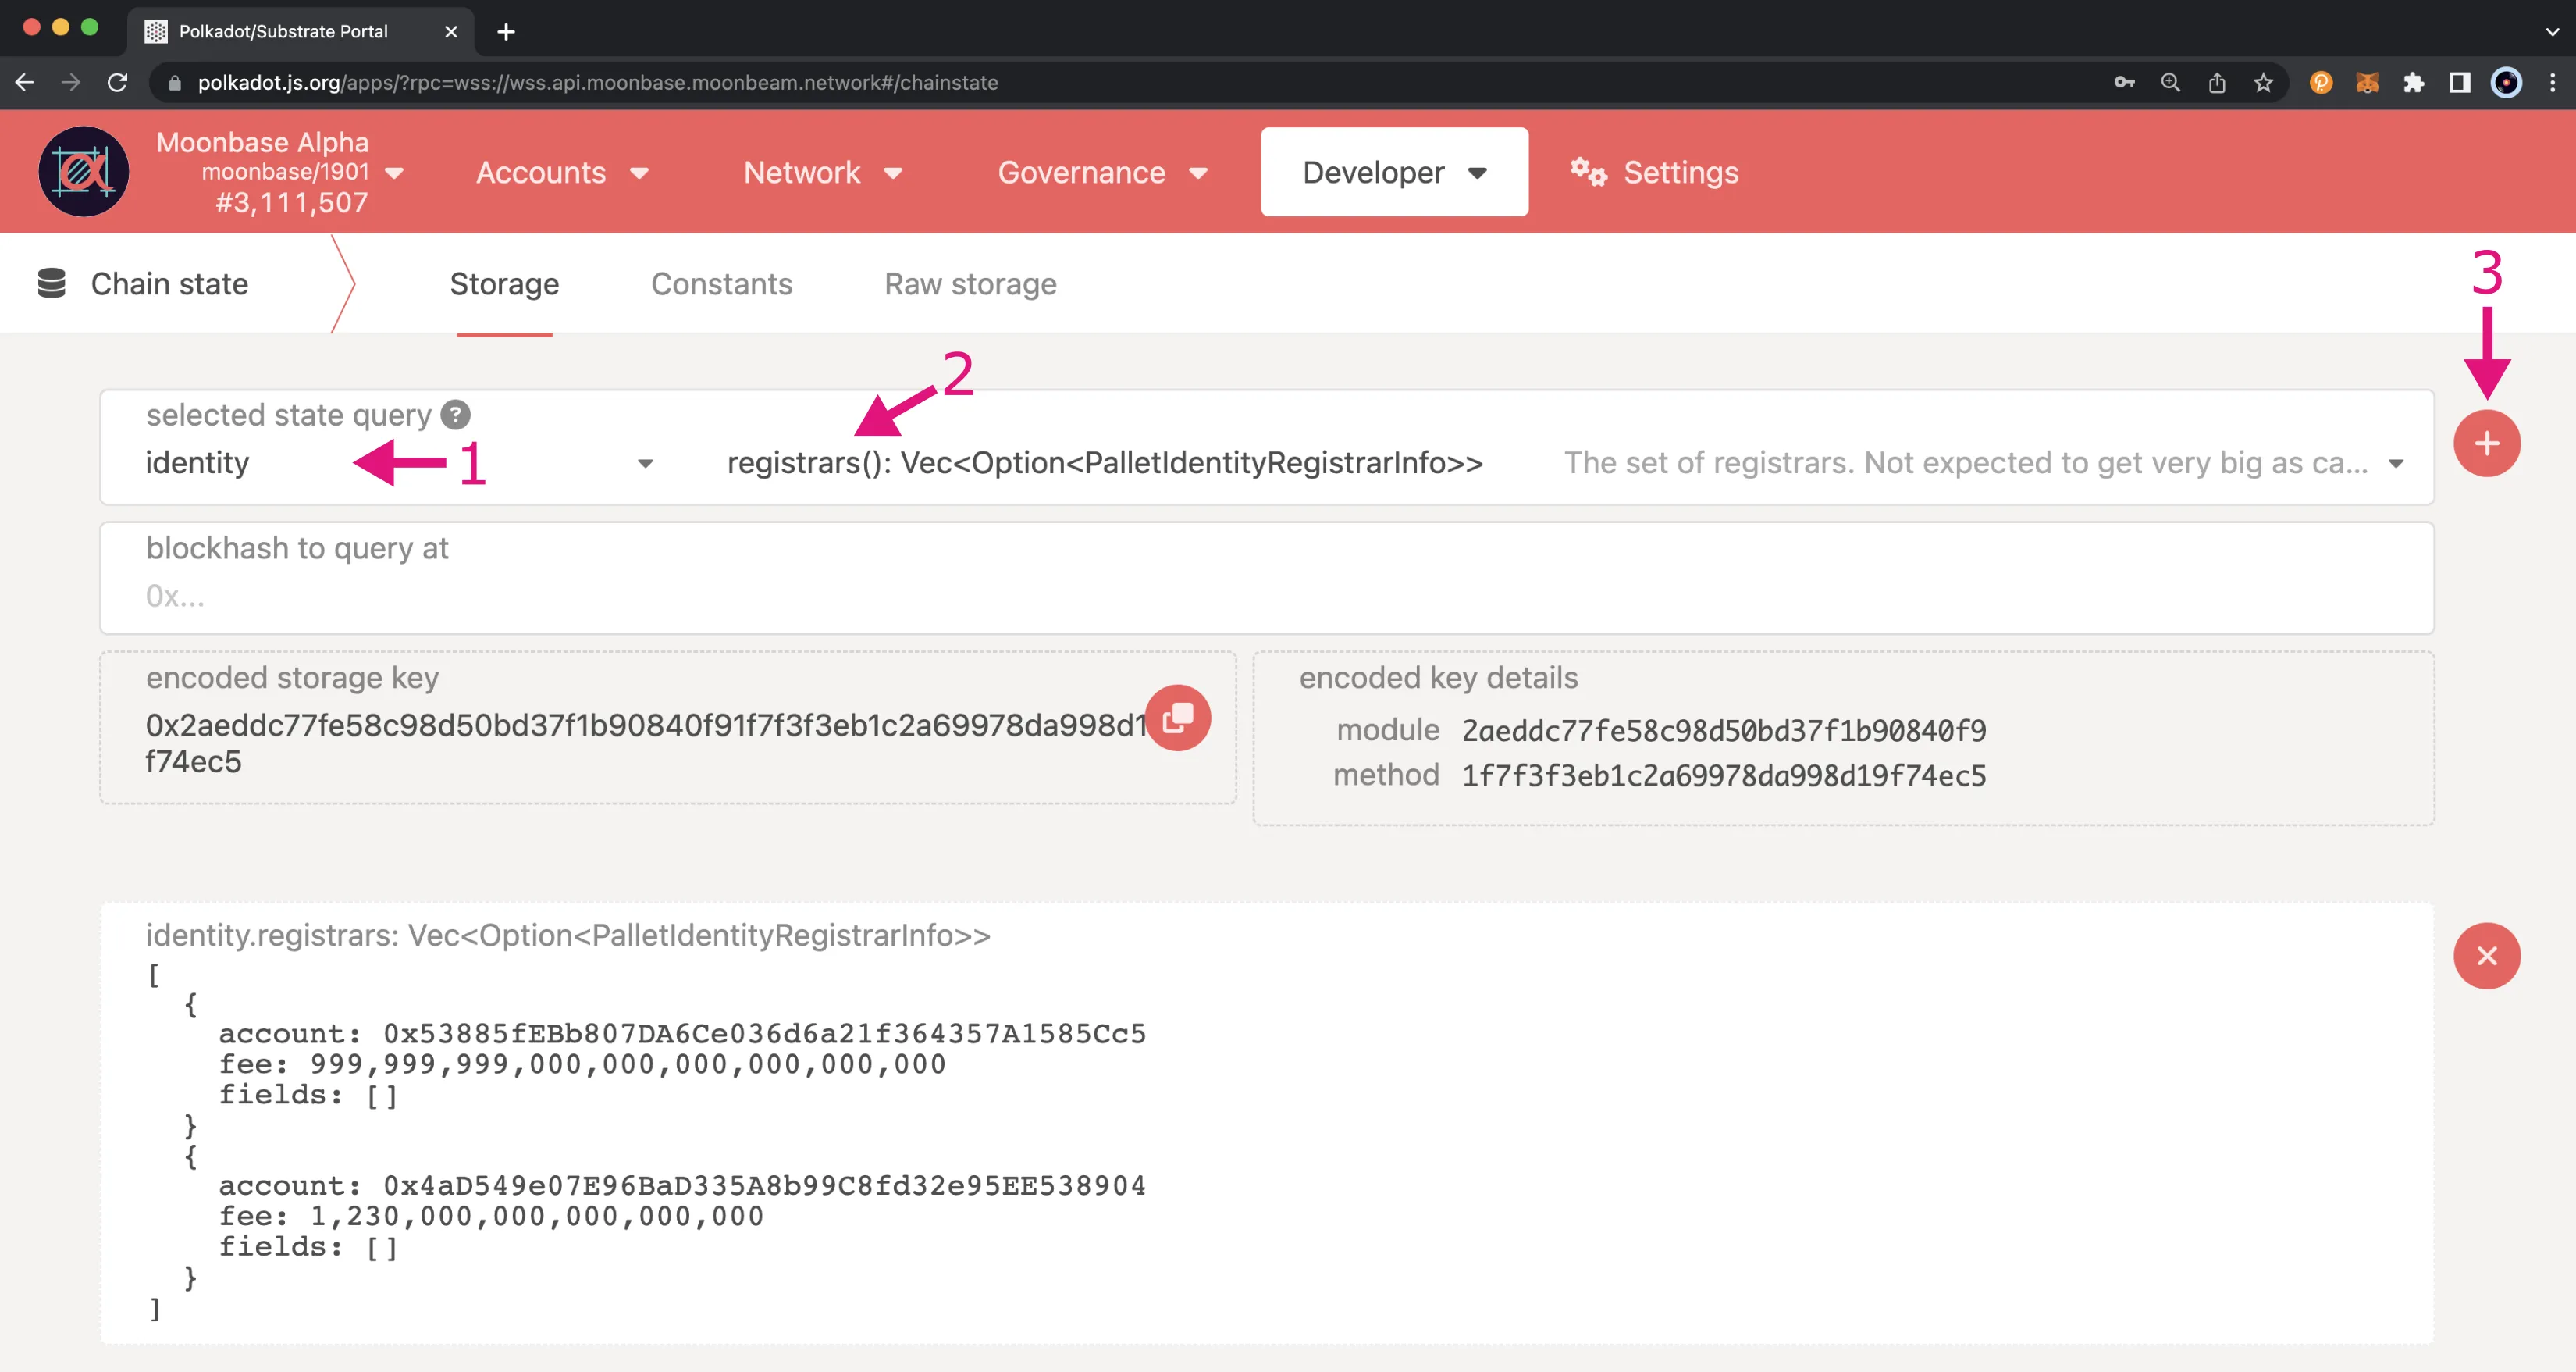
You can get a complete list of the current registrars, including the fees that each registrar charges, by heading to Polkadot.js Apps, selecting the Developer tab, choosing Chain State from the dropdown, and taking the following steps:
- Select the identity pallet
- Choose the registrars extrinsic
- Click the + button
Request Identity Judgement
To request identity judgement, from the Extrinsics page, you can take the following steps:
- Select your account from the using the selected account dropdown
- Select identity from the submit the following extrinsic dropdown
- Then select the requestJudgement() function
- Enter the index of the registrar you want to review and provide judgement on your identity information
- Enter the maximum fee you're willing to pay in Wei. This must be higher than the fee set by the registrar, otherwise the transaction will fail
- Click Submit Transaction
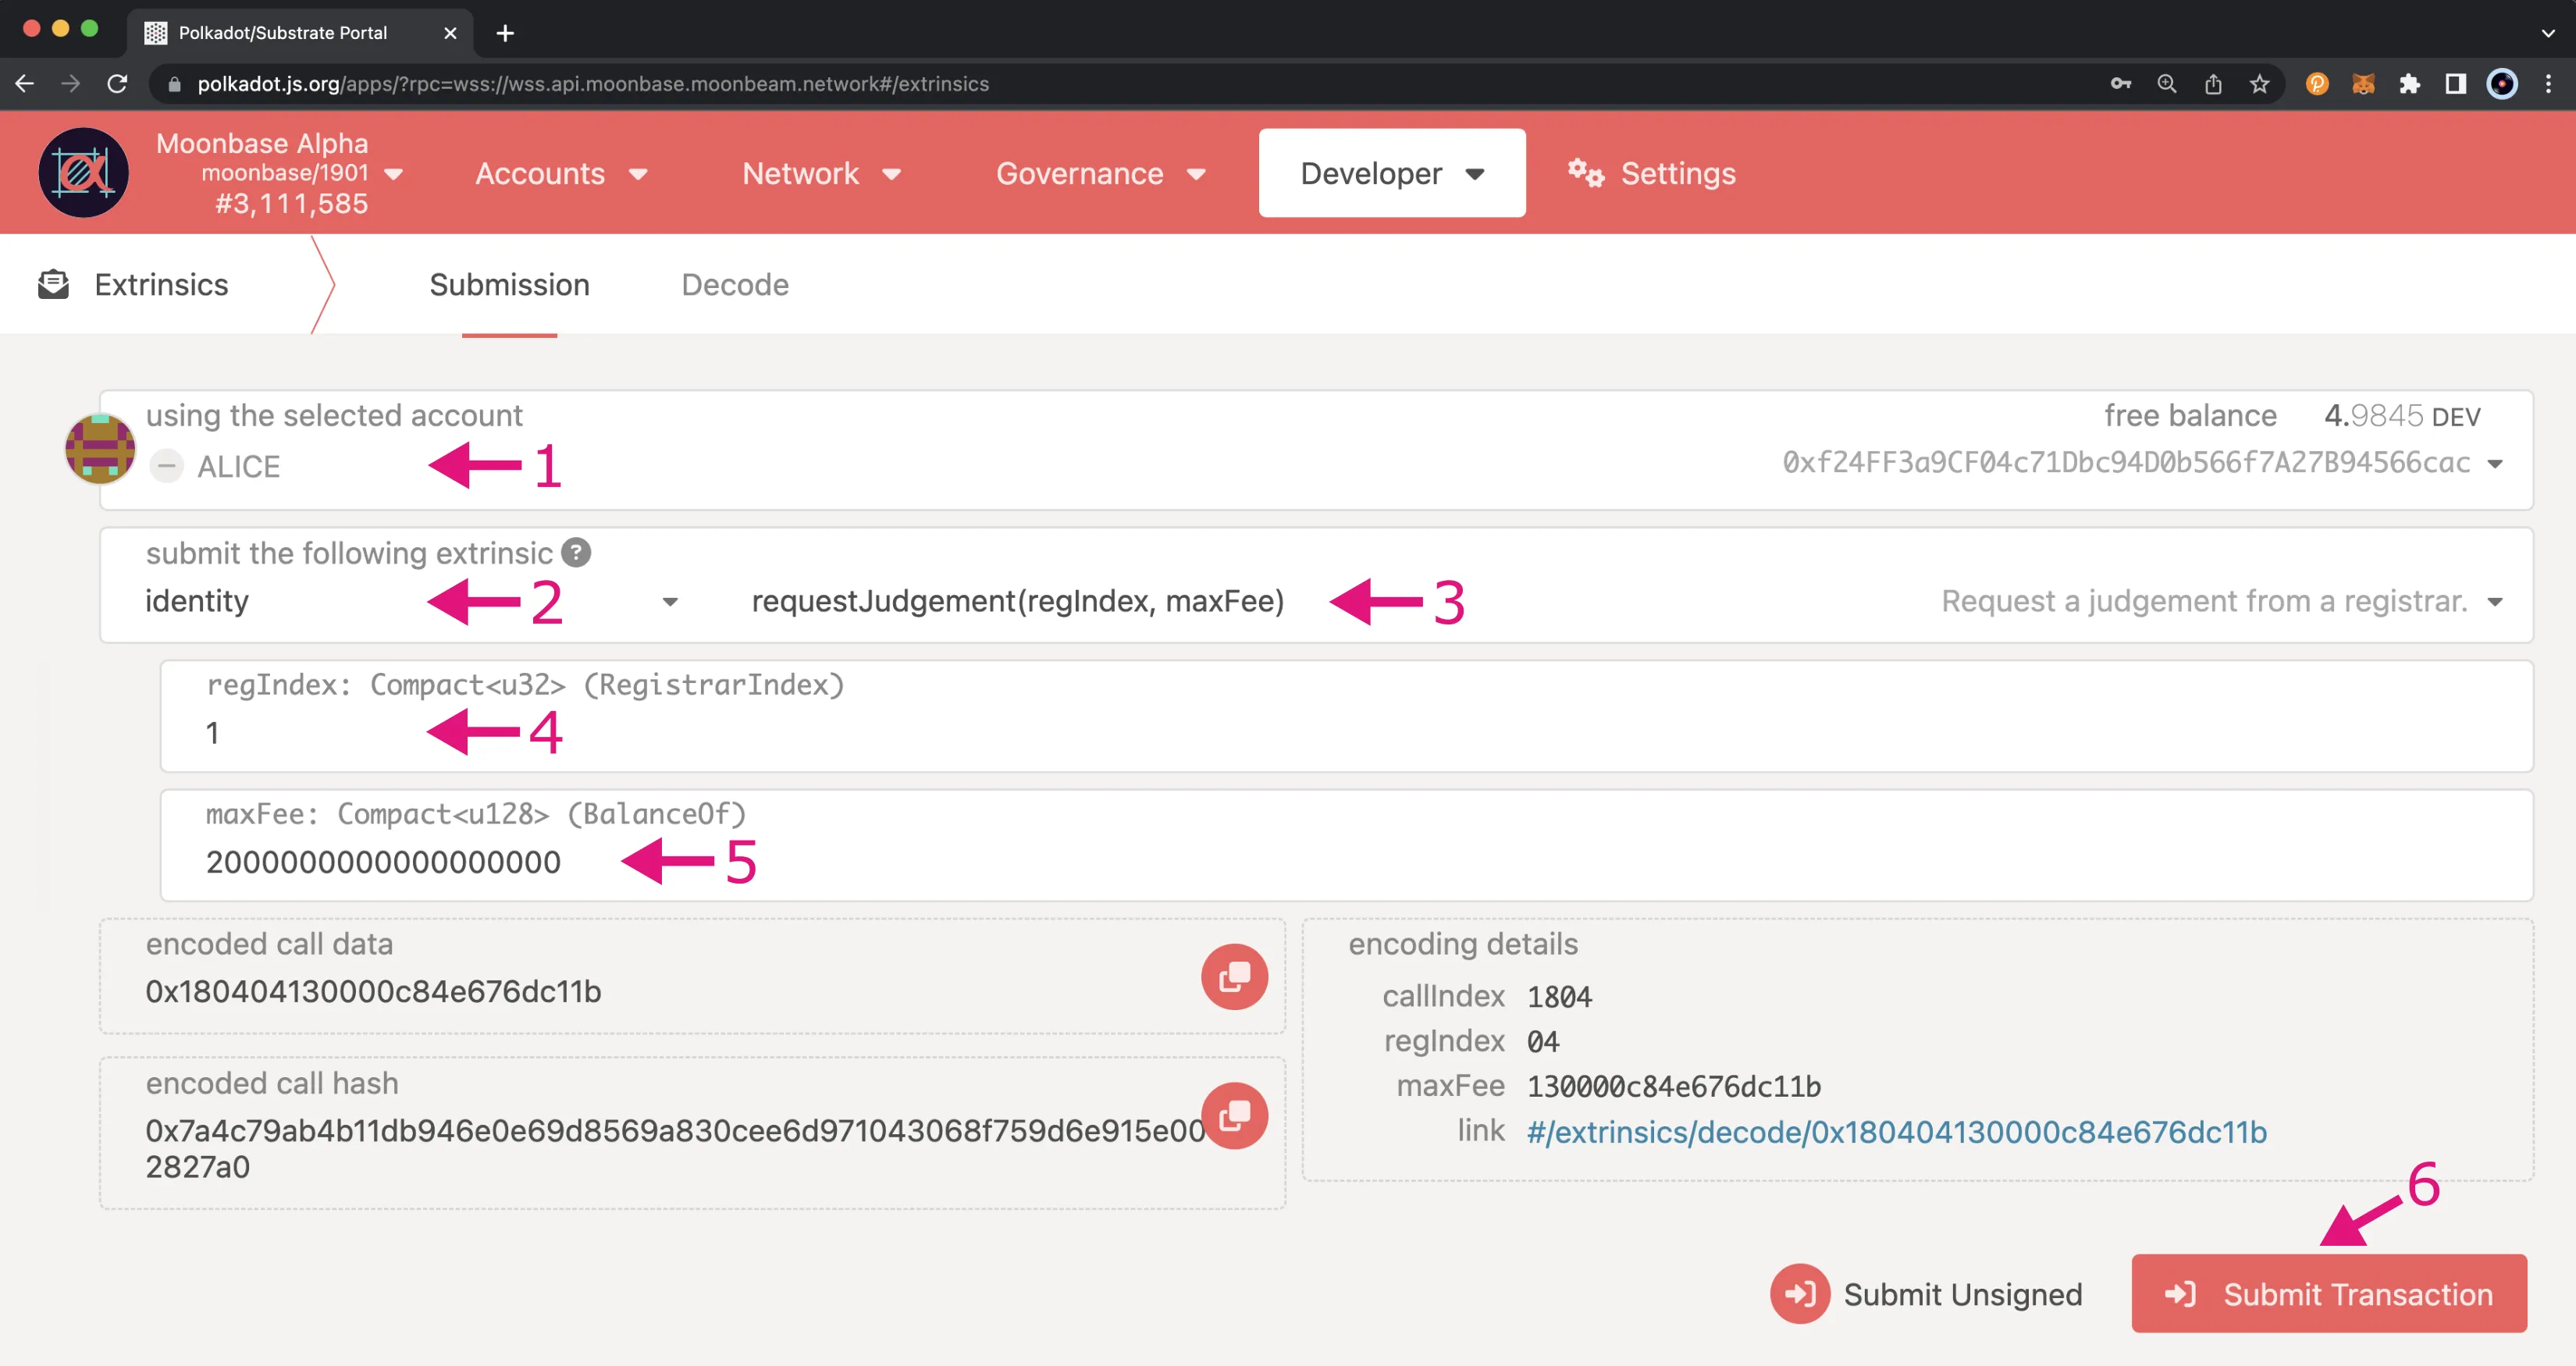
Once the transaction goes through, the fee will be taken from your free balance and locked until the judgement is complete.
After the judgement is complete and you've been successfully verified, a green check mark will appear next to your account. If successful, your identity will be assigned one of these three levels of confidence: low quality, reasonable, or known good. From the Accounts page, you can click on your account name to review your identity information and your identity judgement results.
Cancel Identity Judgement Request
If the registrar hasn't completed your judgement, you can cancel the request and receive the locked fee back. To do so, from the Extrinsics page, take the following steps:
- Select your account from the using the selected account dropdown
- Select identity from the submit the following extrinsic dropdown
- Then select the cancelRequest() function
- Click Submit Transaction

You'll then be prompted to sign and send the transaction. Once it goes through, your locked funds will be returned to you.
| Created: September 27, 2021