How to Vote on a Proposal in Governance v2: OpenGov
Introduction
Referenda are simple, inclusive, and stake-based voting schemes. Each referendum has a proposal associated with it that suggests an action to take place. In OpenGov, each referendum will have a specified Origin class that the proposal will be executed with, and each Origin has its own Track that proposals will process through. Although referenda are completed by a common process, the requirements for approval are Track-specific.
Token holders can vote on referenda using their own tokens, including those that are locked in staking. The weight of a vote is defined by two factors: the number of tokens locked and the lock duration (called Conviction). This is to ensure that there is an economic buy-in to prevent vote-selling. Consequently, the longer you are willing to lock your tokens, the stronger your vote will be weighted. You also have the option of not locking tokens at all, but the vote weight is drastically reduced.
In Moonbeam, users are able to create and vote on proposals using their H160 address and private key, that is, their regular Ethereum account!
This guide will outline the process, with step-by-step instructions, of how to vote on referenda in Governance v2: OpenGov. This guide will show you how to vote on Moonbase Alpha, but it can be easily adapted for Moonbeam and Moonriver.
Note
This page goes through the mechanics of how to vote at a more technical level. Token holders can leverage platforms such as Polkassembly to vote using a more friendly user interface.
Definitions
Some of the key parameters for this guide are the following:
-
Voting — a mechanism for token holders to support (Aye), oppose (Nay), or remain neutral (Abstain) on a proposal. For Aye and Nay, the voting weight is determined by both the number of tokens locked and the lock duration (Conviction). Abstain votes do not receive additional weighting
- Conviction — the time that token holders voluntarily lock their tokens when voting; the longer they are locked, the more weight their vote has
- Lock balance — the number of tokens that a user commits to a vote (note, this is not the same as a user's total account balance) Moonbeam uses the concept of voluntary locking, which allows token holders to increase their voting power by locking tokens for a longer period of time. Specifying no Lock Period means a user's vote is valued at 10% of their lock balance. Specifying a greater Conviction increases voting power. For each increase in Conviction (vote multiplier), the Lock Periods double
-
Maximum number of votes — the maximum number of concurrent votes per account
512 votes512 votes512 votes -
Approval — minimum "Aye" votes as a percentage of overall Conviction-weighted votes needed for approval
-
Support — the minimum portion of Aye and Abstain votes (ignoring conviction) needed as a percentage of the total active supply for a proposal to pass. Nay votes do not count toward Support
-
Lead-in Period — the initial proposal voting and discussion period. At this stage, proposals are in an undecided state until they pass some criteria for the given Track. The criteria include:
- Prepare Period — the minimum time the referendum needs to wait before it can progress to the next phase after submission
- Capacity — limit for the number of referenda on a given Track that can be decided at once
- Decision Deposit — the minimum deposit amount required for a referendum to progress to the decision phase after the end of the Lead-in Period. Since each Track has a defined Capacity, this deposit is larger than the submission deposit, and its goal is to mitigate spam
-
Decide Period - token holders continue to vote on the referendum. If a referendum does not pass by the end of the period, it will be rejected, and the Decision Deposit will be refunded
- Confirm Period - a period of time within the Decide Period where the referendum needs to have maintained enough Approval and Support to be approved and move to the Enactment Period
-
Enactment Period - a specified time, which is defined at the time the proposal was created, that meets at least the minimum amount of time that an approved referendum waits before it can be dispatched
-
Vote Delegation — a voter can give their voting power, including Conviction voting, to another token holder (delegate), who may be more knowledgeable and able to make specific decisions
- Multirole Delegation — the ability to delegate voting power on a Track-by-Track basis, where a token holder can specify different delegates for each Track
For an overview of the Track-specific parameters such as the length of the Decide, Confirm, and Enactment Period, the Approval and Support requirements, and more, please refer to the Governance Parameters for OpenGov (Governance v2) section of the governance overview page.
Roadmap of a Proposal
This guide will cover how to vote on public referenda, as seen in the steps highlighted in the proposal roadmap diagram below. In addition to learning how to vote on referenda, you'll also learn how the proposal progresses through the Lead-in Period, the Decide and Confirm Period, and the Enactment Period.
You can find a full explanation of the happy path for an OpenGov proposal on the Governance overview page.

Forum Discussion
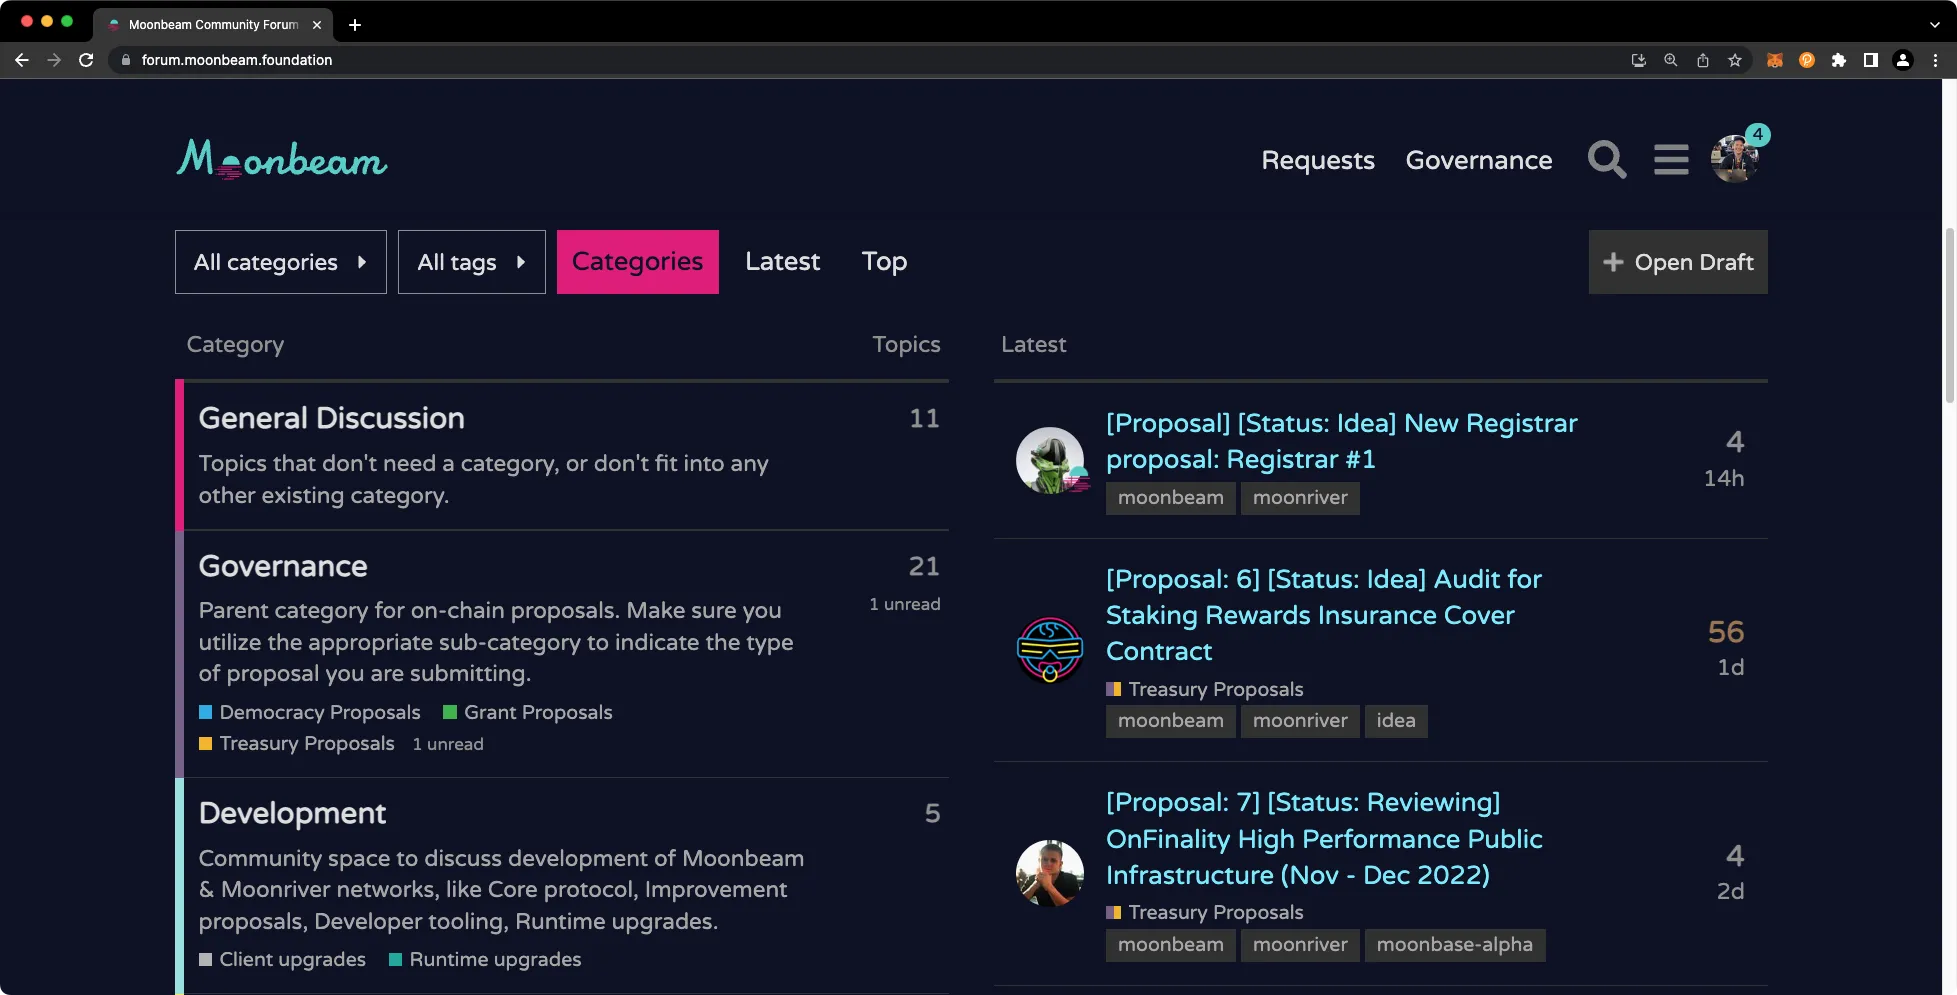
A vote on a democracy referendum is a binary outcome. However, a token holder's opinion is often more nuanced than yes or no, which is why it's strongly recommended that you preface any proposal with a post on Moonbeam's Community Forum.
The forum serves the critical role of providing a platform for discussion and allowing proposers to receive feedback from the community prior to an on-chain action. Creating a post on the forum is quick and easy, as shown in the Using the Moonbeam Community Forum guide. There are categories corresponding to each type of proposal, including democracy, treasury, and grant proposals. While this step is optional, explaining the details of the proposal and following up with any questions raised may increase the chances of the initiative being accepted and subsequently passed by the community.
Voting on a Referendum
This section goes over the process of voting on a public referendum in OpenGov (Governance v2) on Moonbase Alpha. These steps can be adapted for Moonbeam and Moonriver. The guide assumes that there is one already taking place. If there is an open referendum that you want to vote on, you can adapt these instructions to learn how to vote on it.
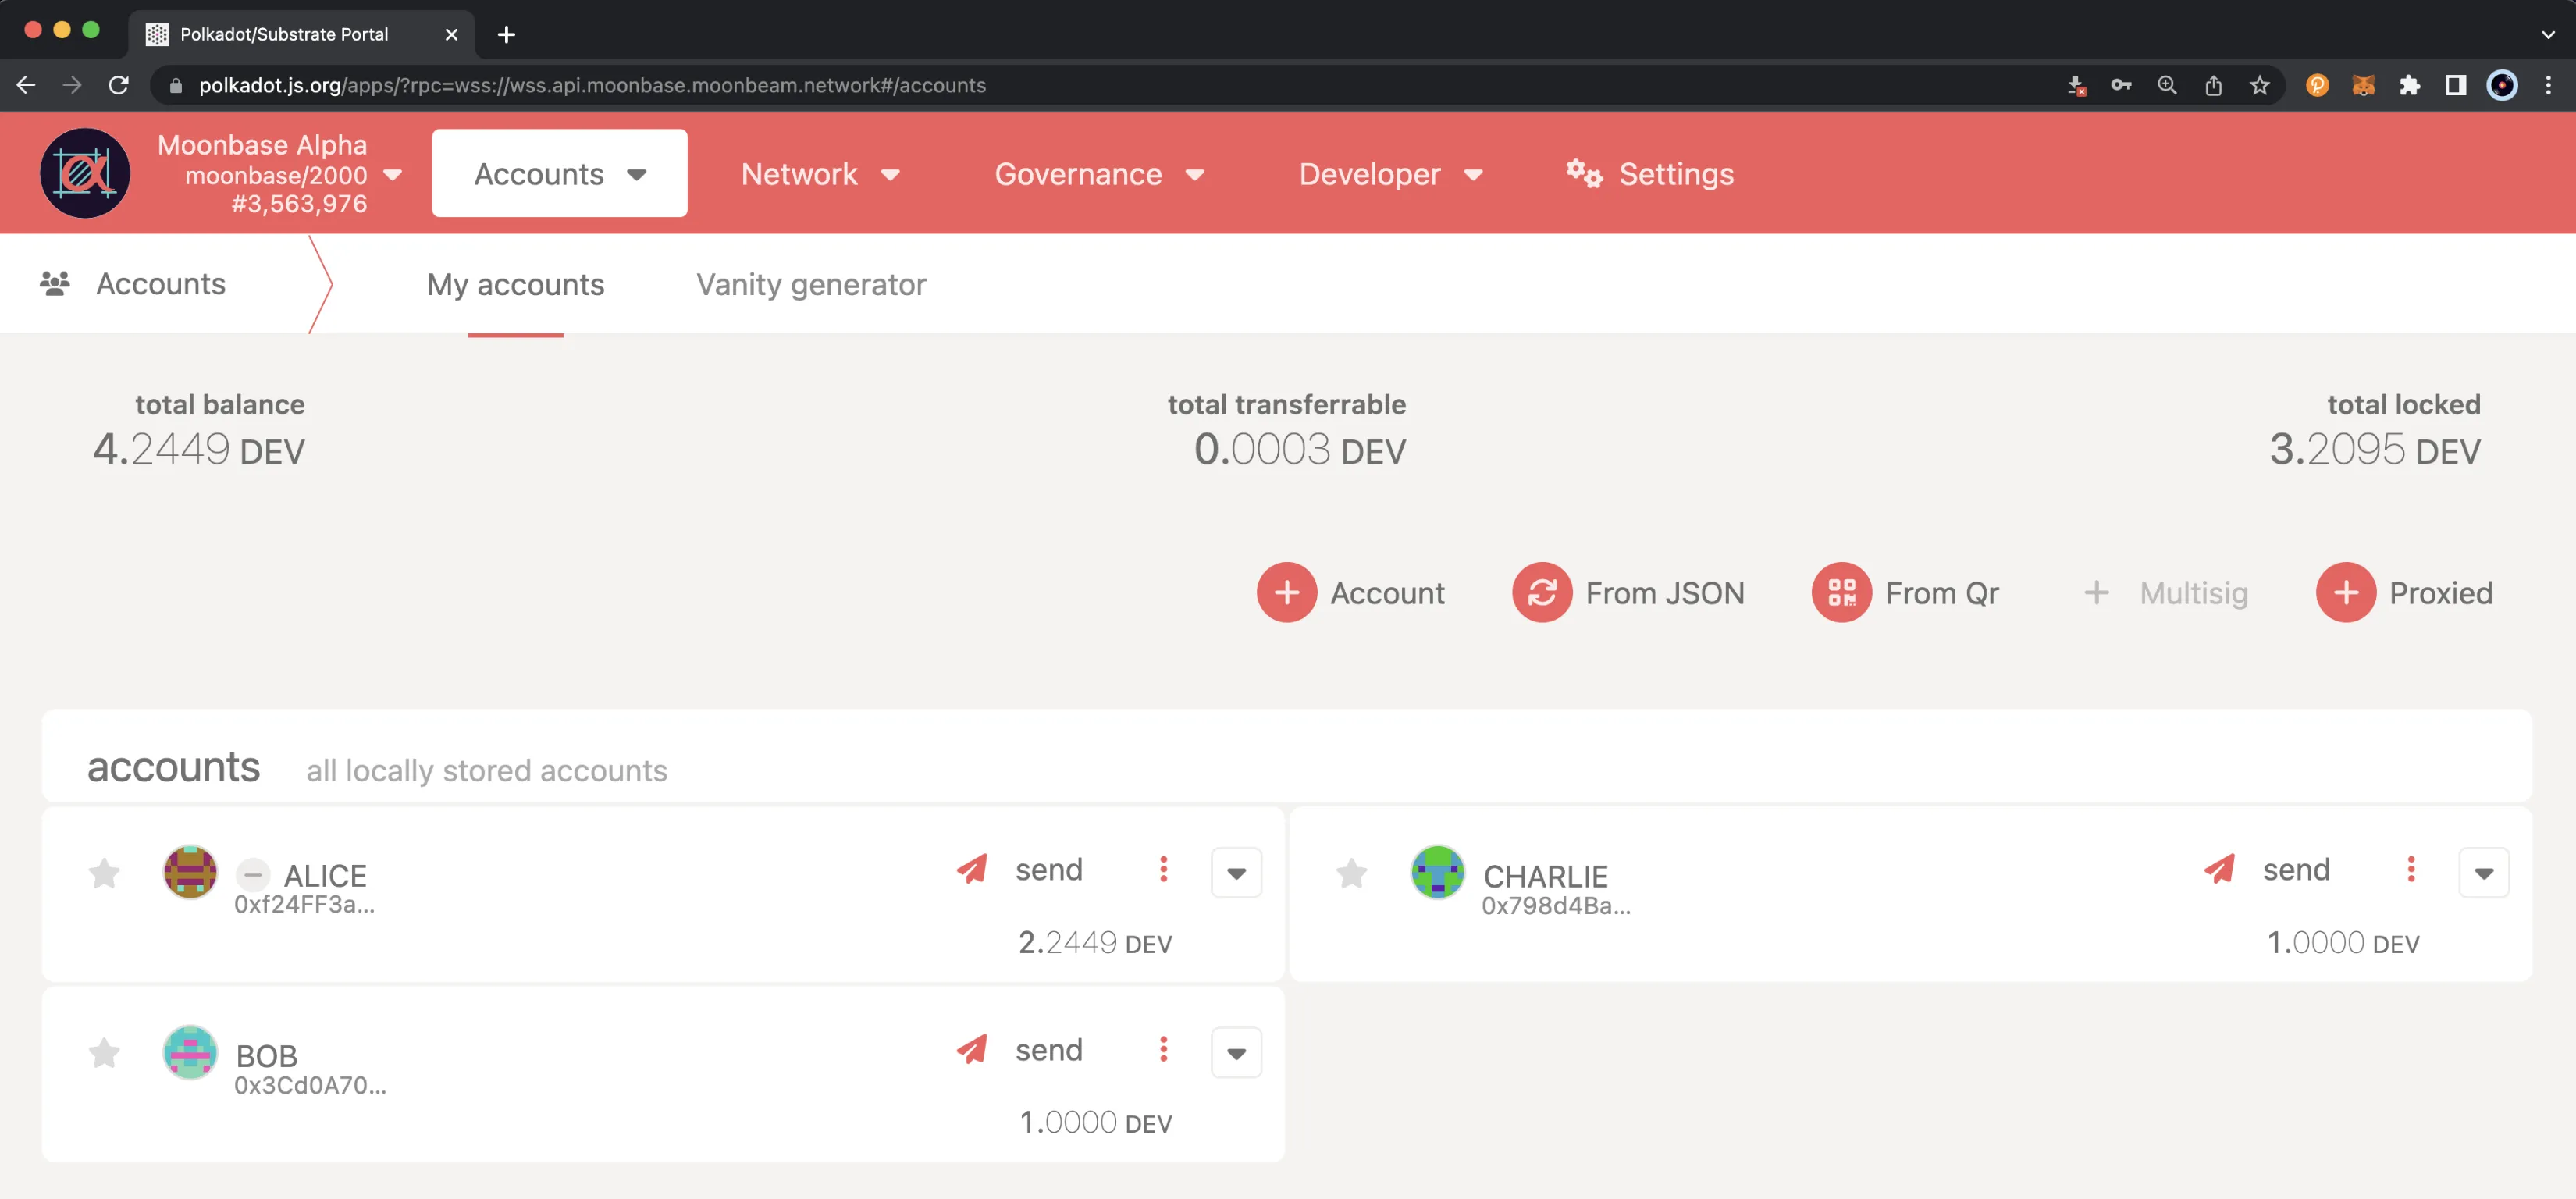
To vote on a proposal on the network, you need to use the Polkadot.js Apps interface. To do so, you need to import an Ethereum-style account first (H160 address), which you can do by following the Creating or Importing an H160 Account guide. For this example, three accounts were imported and named with super original names: Alice, Bob, and Charlie.
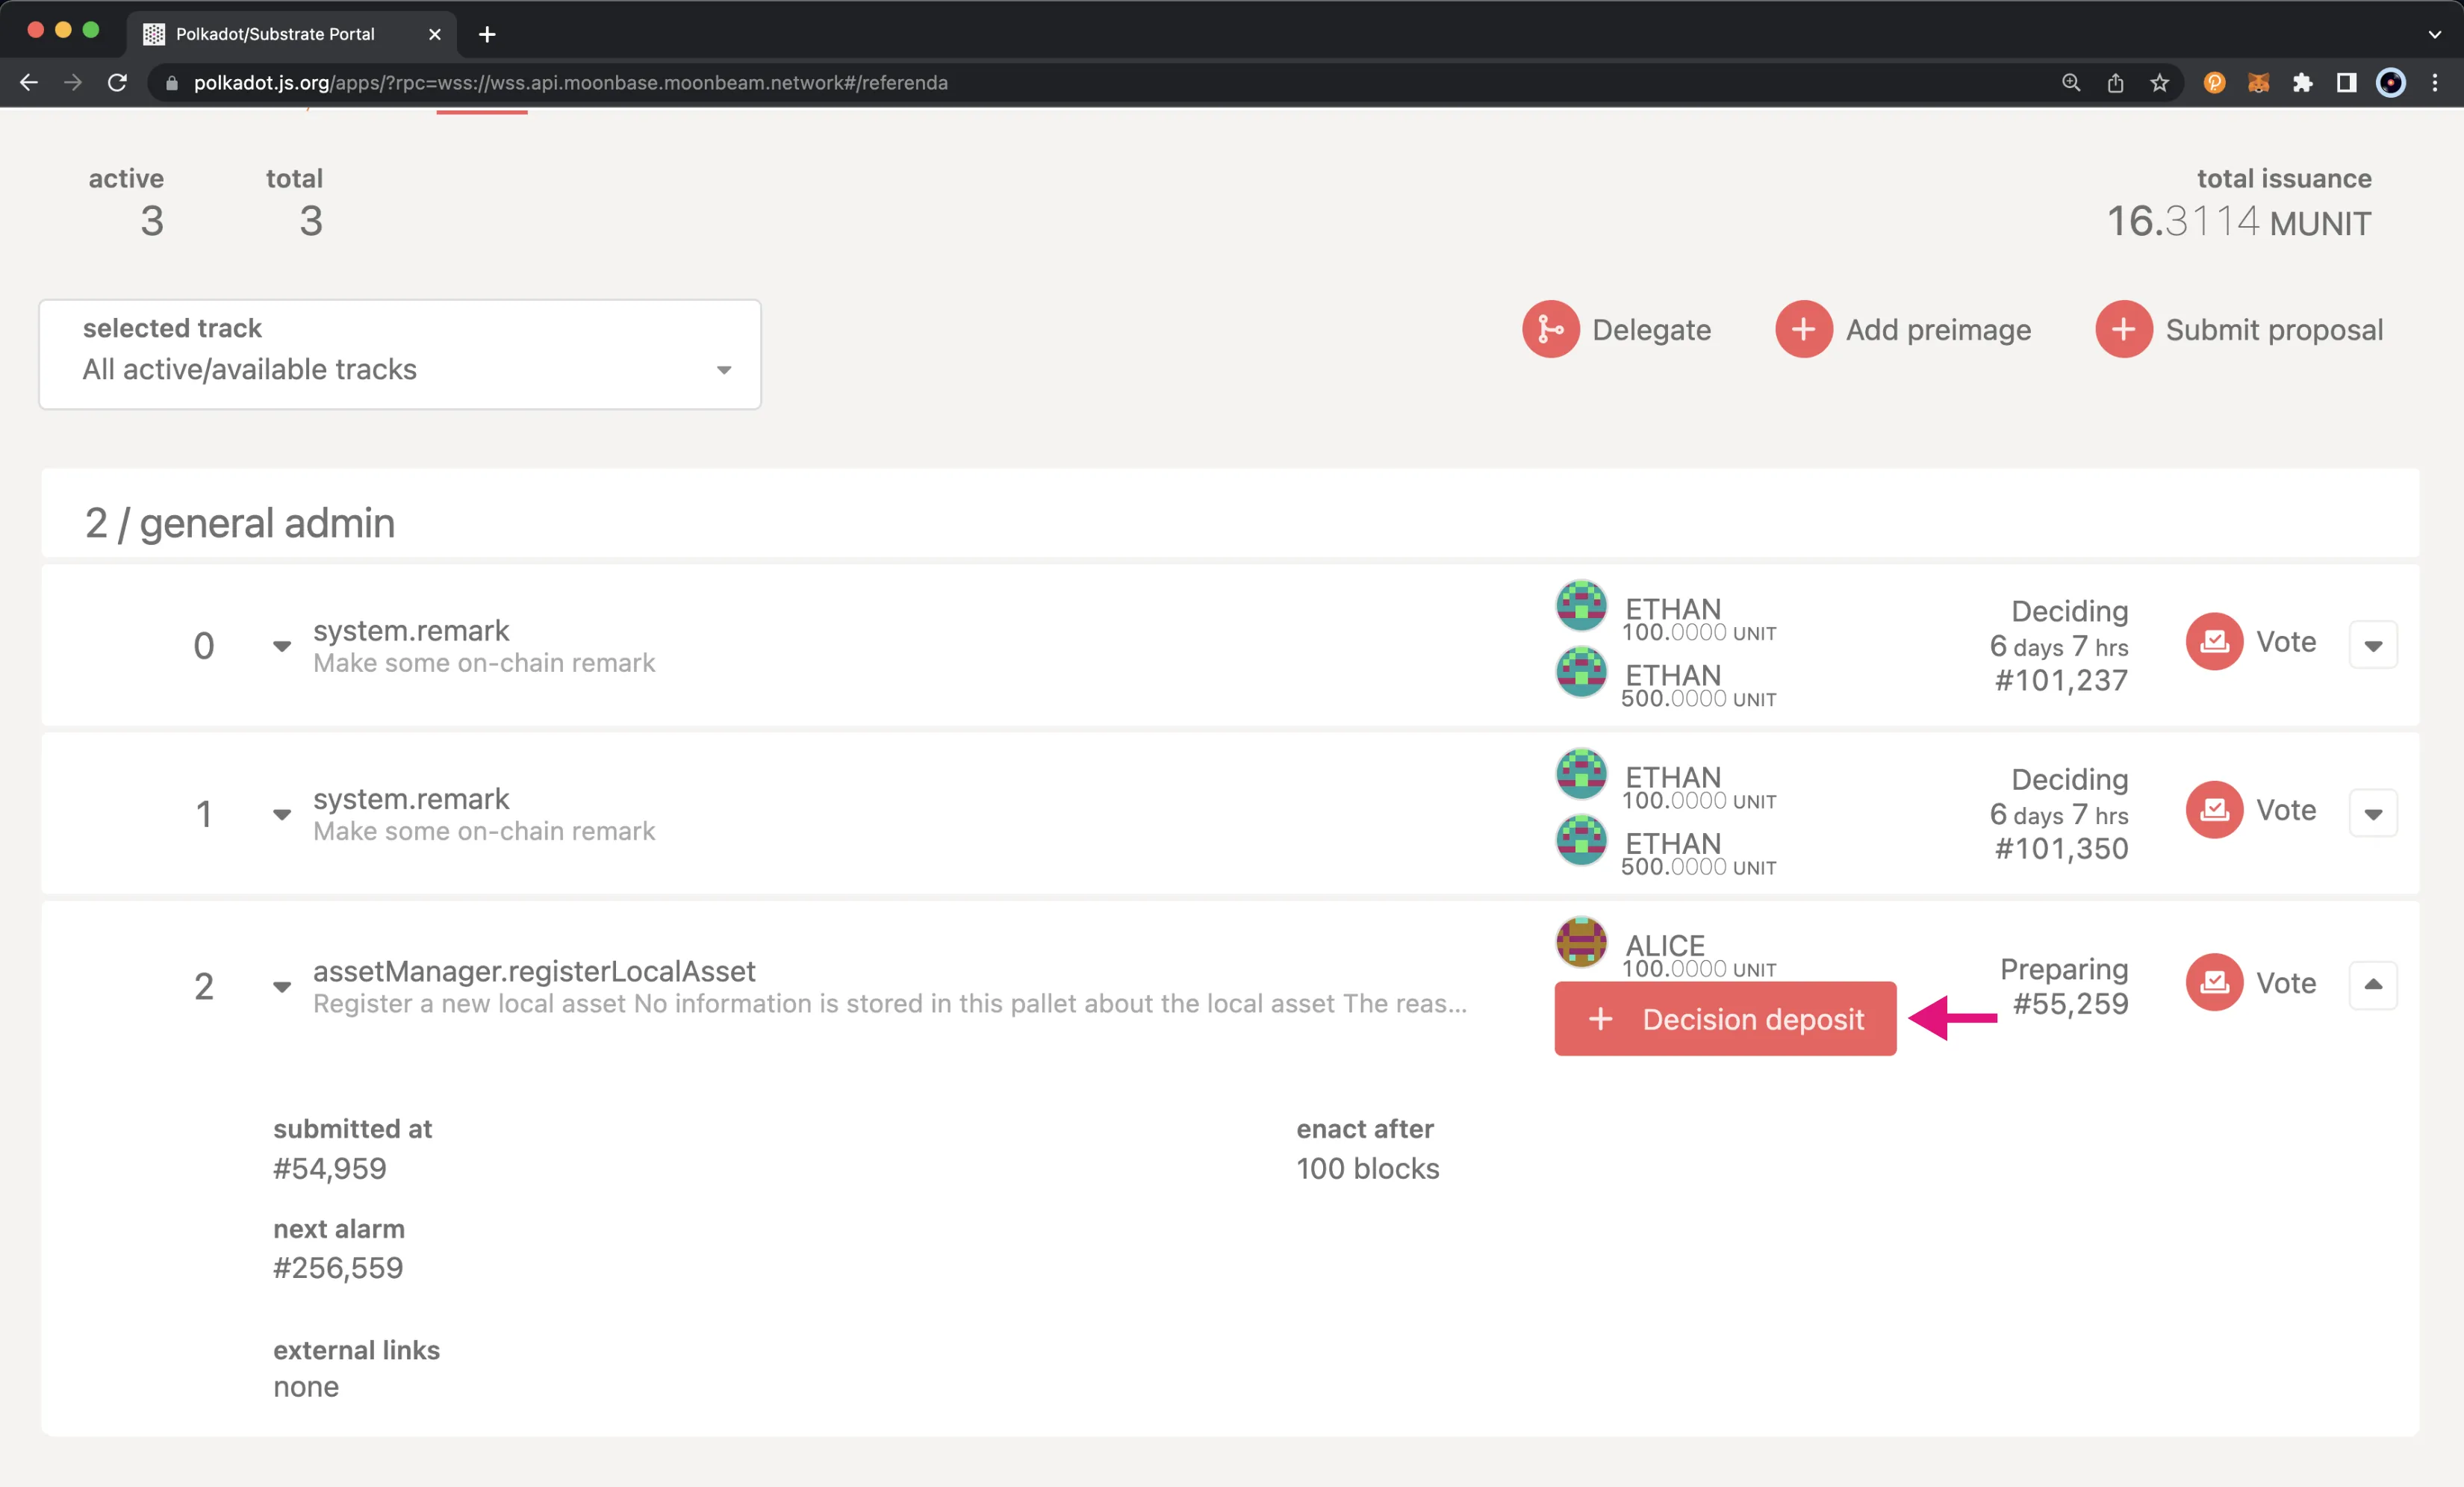
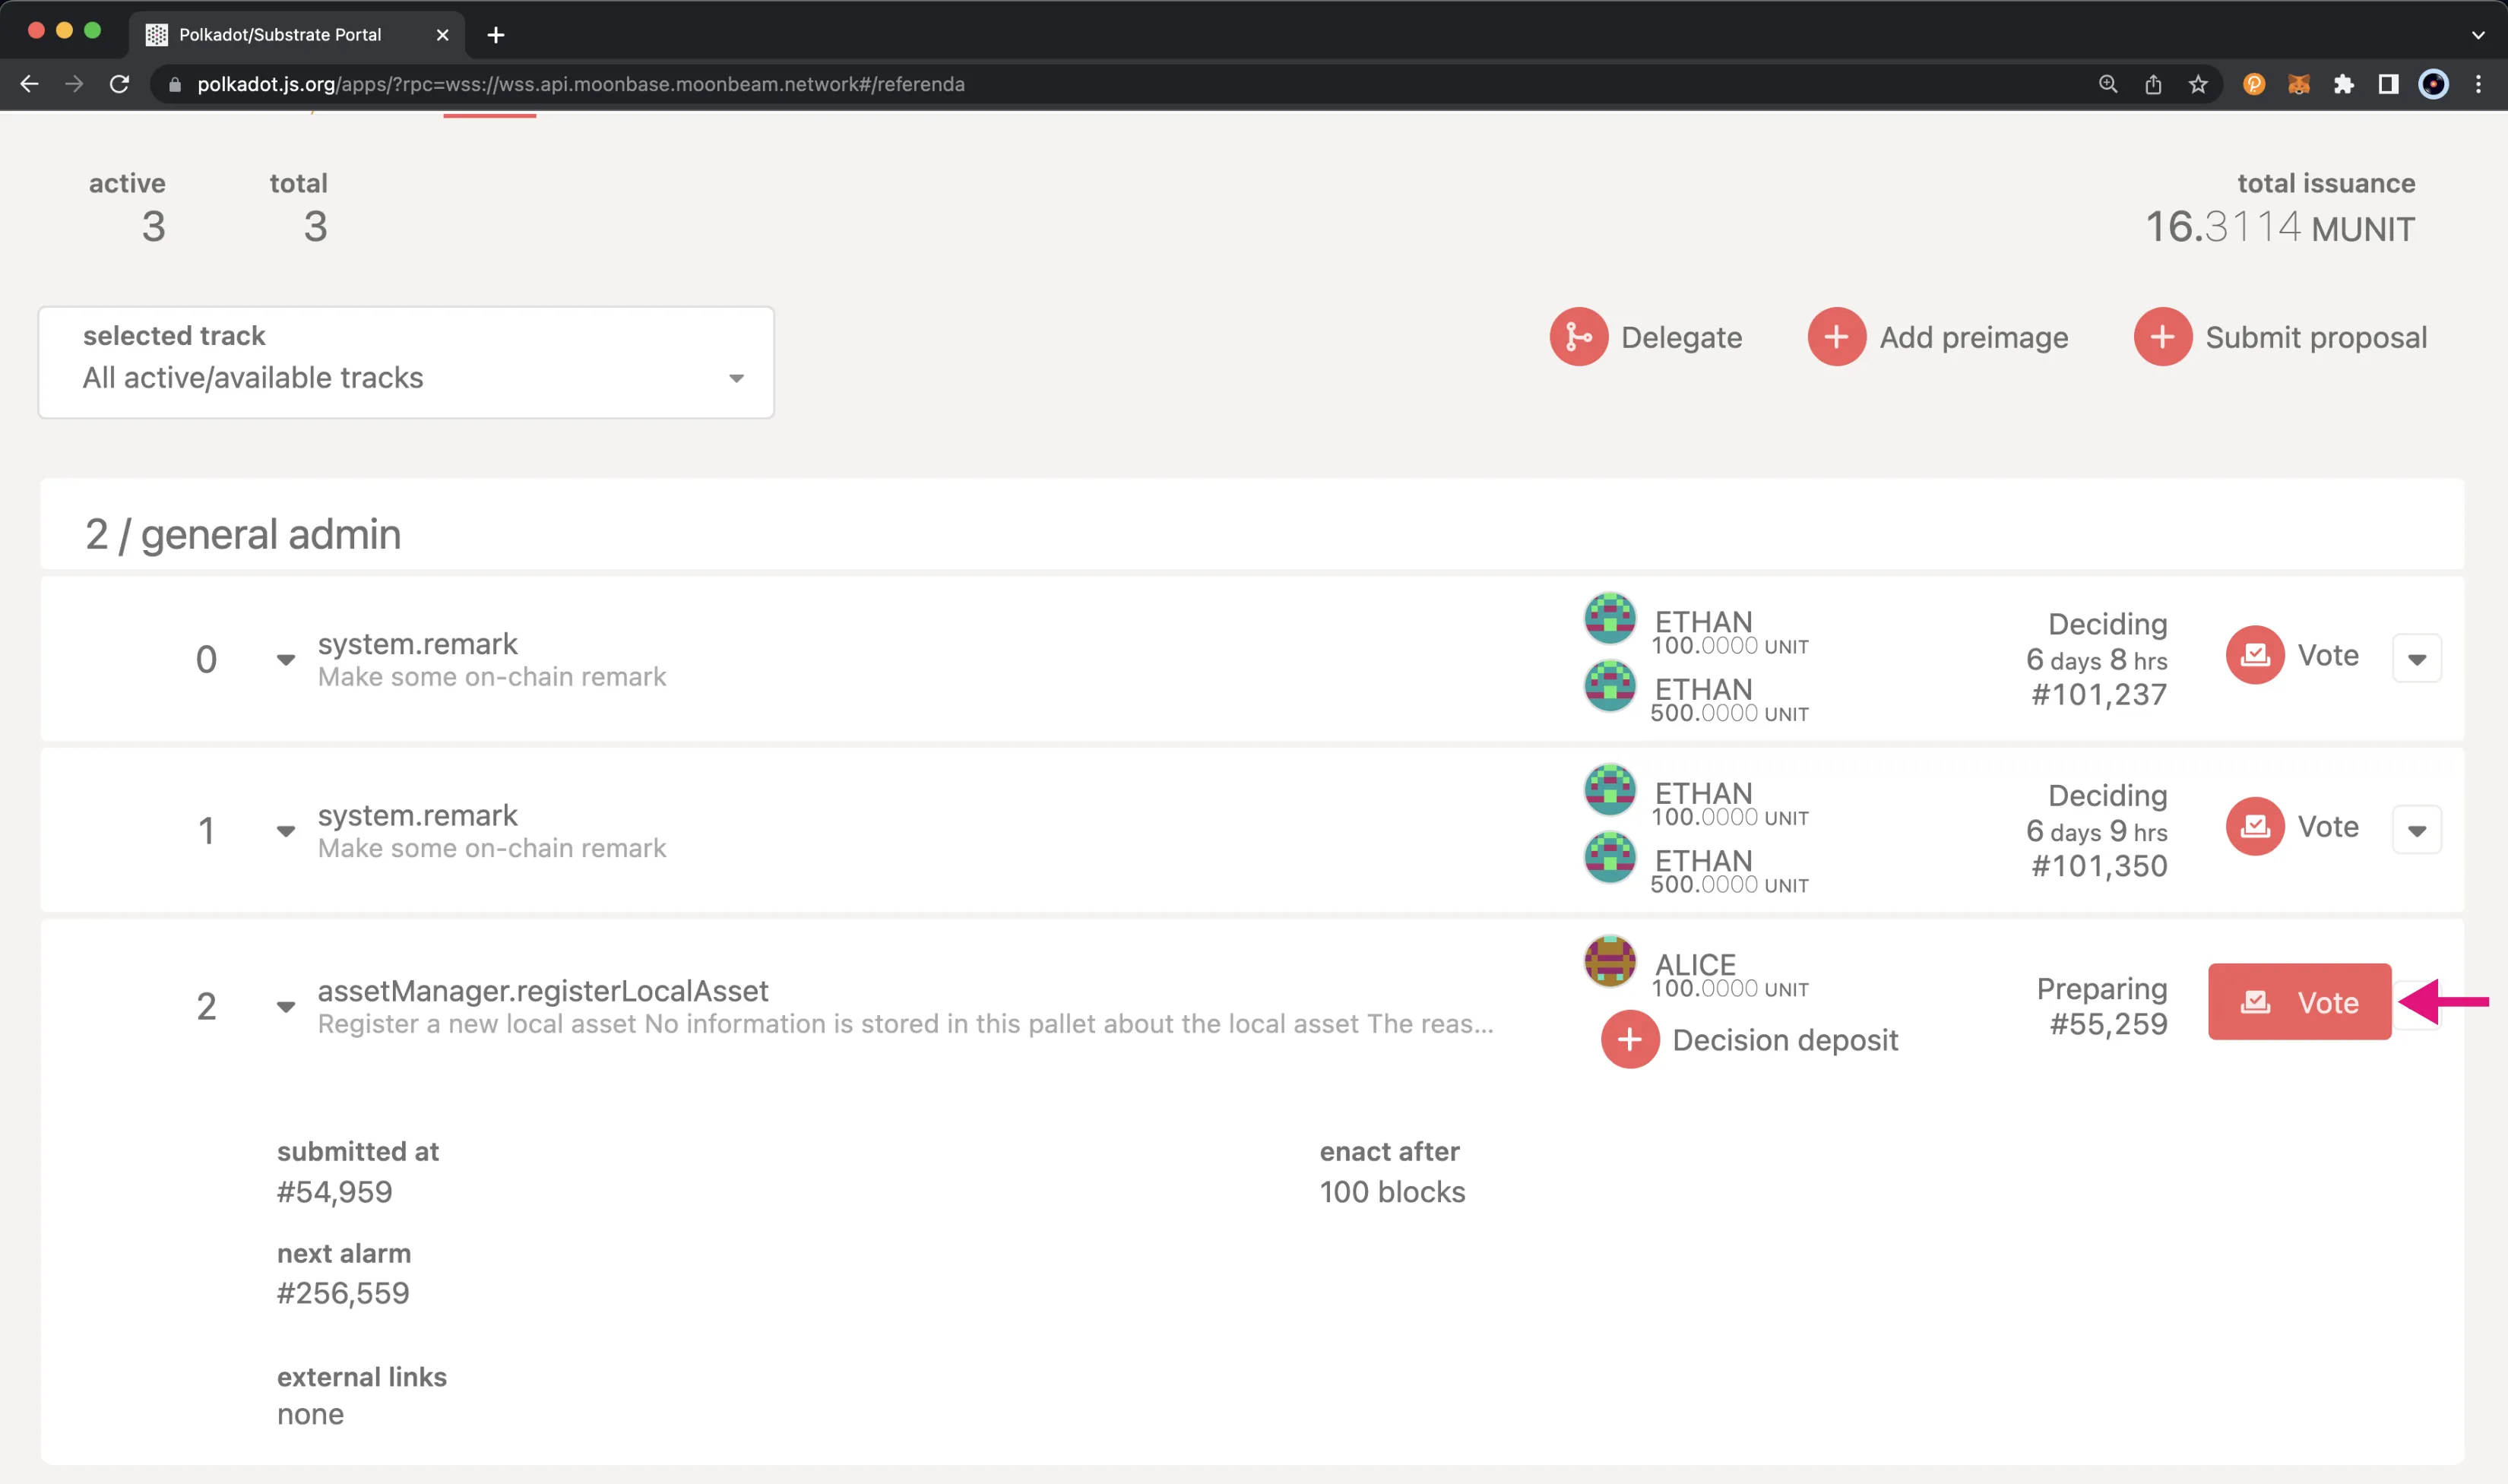
To get started, you'll need to navigate to Moonbase Alpha's Polkadot.js Apps interface. Everything related to governance lives under the Governance tab. To view all of the referenda, you can choose Referenda from the Governance dropdown. On the Referenda page, you'll see a list of referenda organized by Track. To view the details of a specific referendum, you can click on the arrow next to the description. The number next to the action and description is called the referendum index.
How to Support a Proposal by Contributing to the Decision Deposit
In order for a referendum to move out of the Lead-in Period into the Decide Period, the Decision Deposit must be submitted. This deposit can be submitted by the author of the proposal or any other token holder. The deposit varies depending on the Track of the proposal.
For example, a referendum that is in the General Admin Track has a Decision Deposit of 500 on Moonbase Alpha.
From the list of referenda on Polkadot.js Apps, you may notice that some proposals are in the Preparing state. If a referendum requires the Decision Deposit to be submitted, you'll see a Decision deposit button. To submit the deposit, you can go ahead and click on this button.
Then take the following steps to submit the deposit from a specific account:
- Select the deposit from account. This account does not need to be the author of the proposal; it can be from any token holder. However, if the proposal is deemed malicious, the Decision Deposit will be burned. So, before placing the deposit, it is advised to do your due diligence to ensure the proposal is not malicious
- The referendum id and decision deposit fields will automatically be populated for you based on the referendum and Track it belongs to
- Click Place deposit and sign the transaction
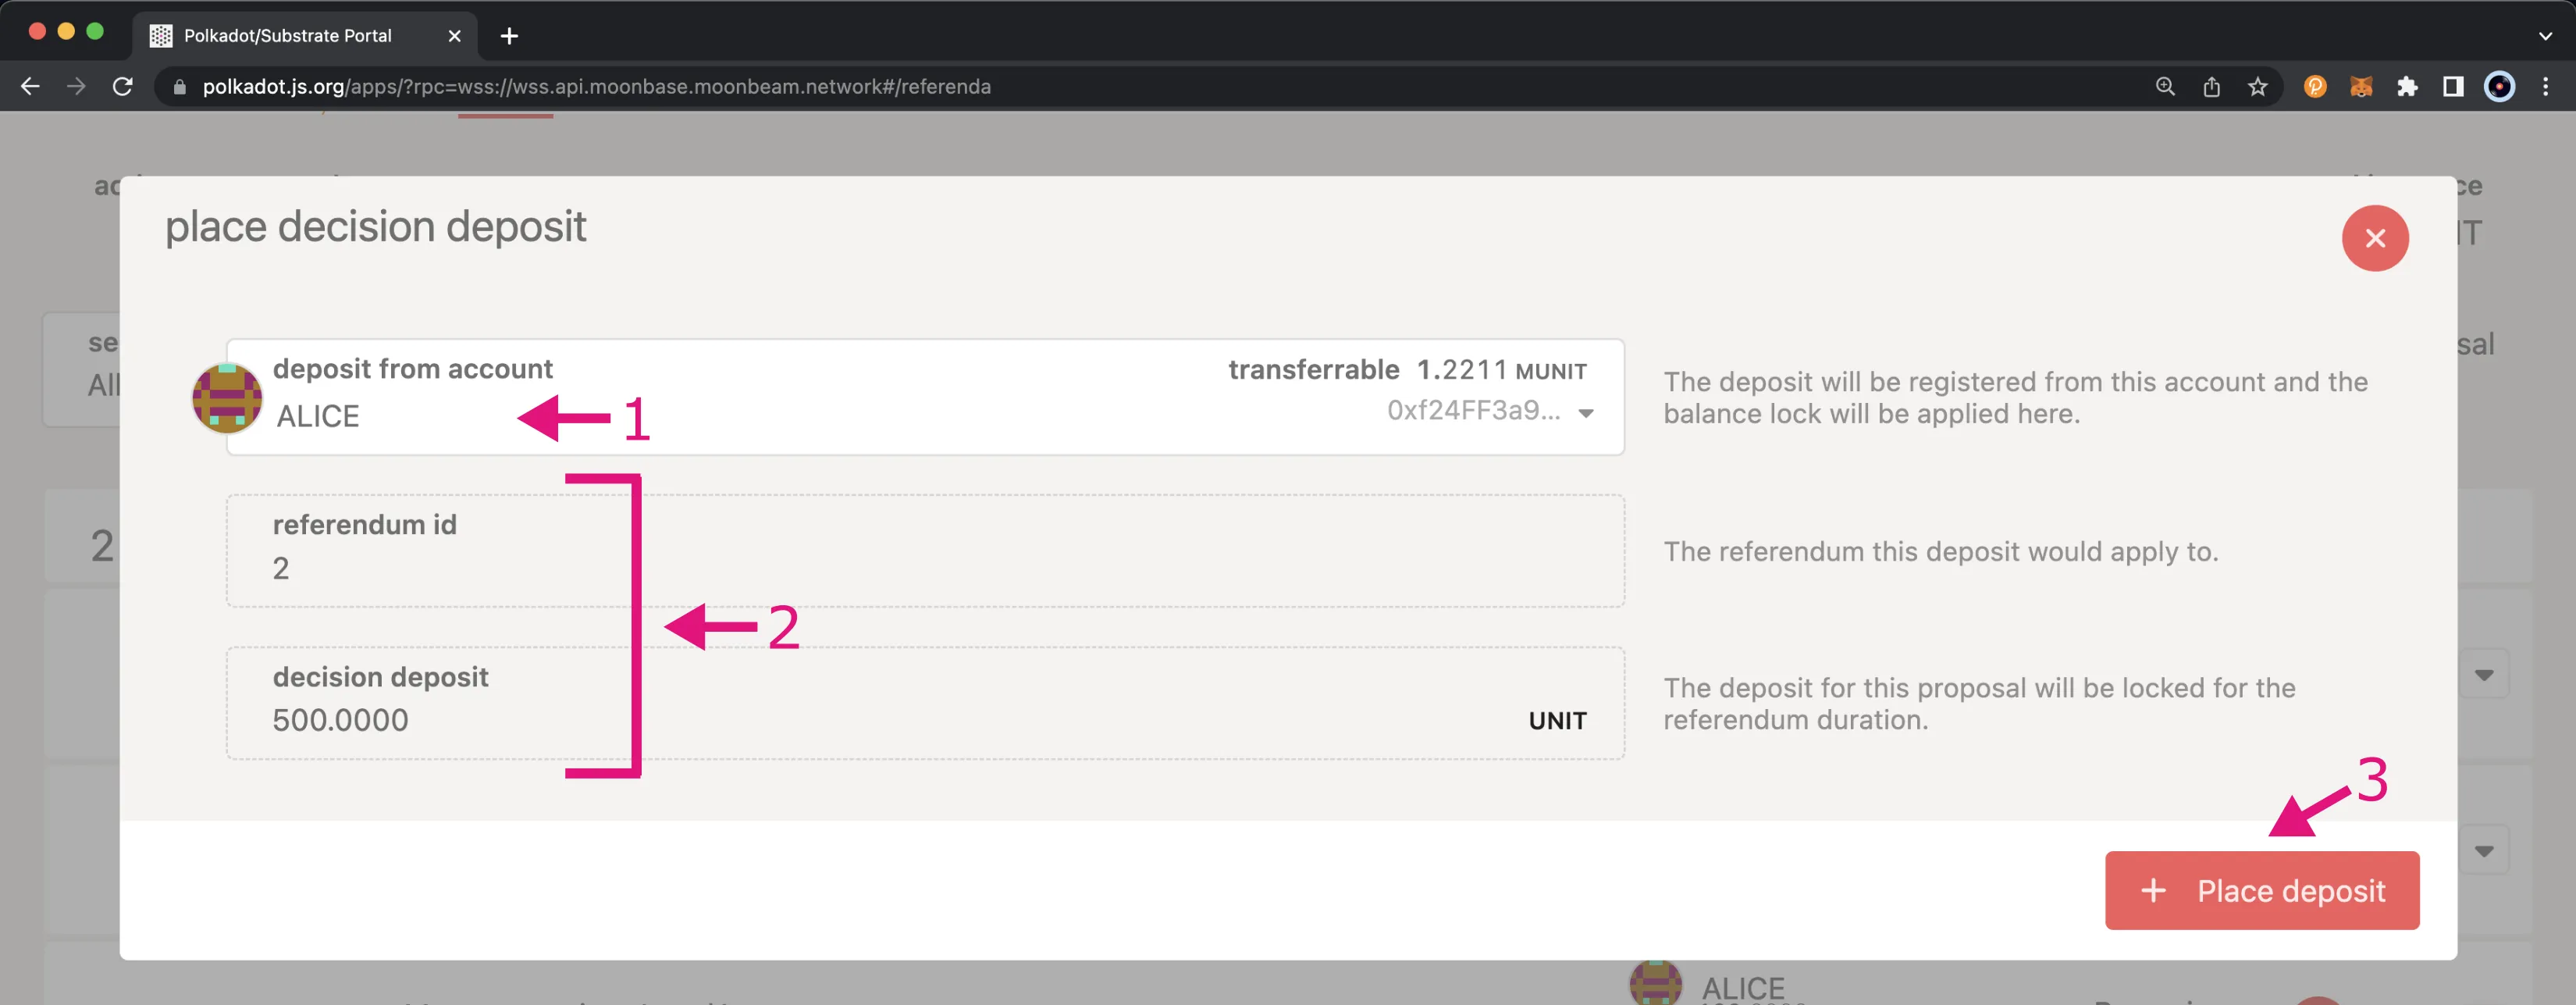
Once the deposit has been placed, Polkadot.js Apps will update and display the account that paid the Decision Deposit along with the amount of the deposit. Now this referendum is one step closer to meeting the criteria of the Lead-in Period.
If the Prepare Period has passed and there is enough space for a referendum in the General Admin Track, this proposal will move on to the Decide Period.
How to Vote
As you may have noticed, voting is not required in the Lead-in Period. However, it is essential in the Decide Period. The steps in this section will apply to referenda in both the Lead-in Period and the Decide Period.
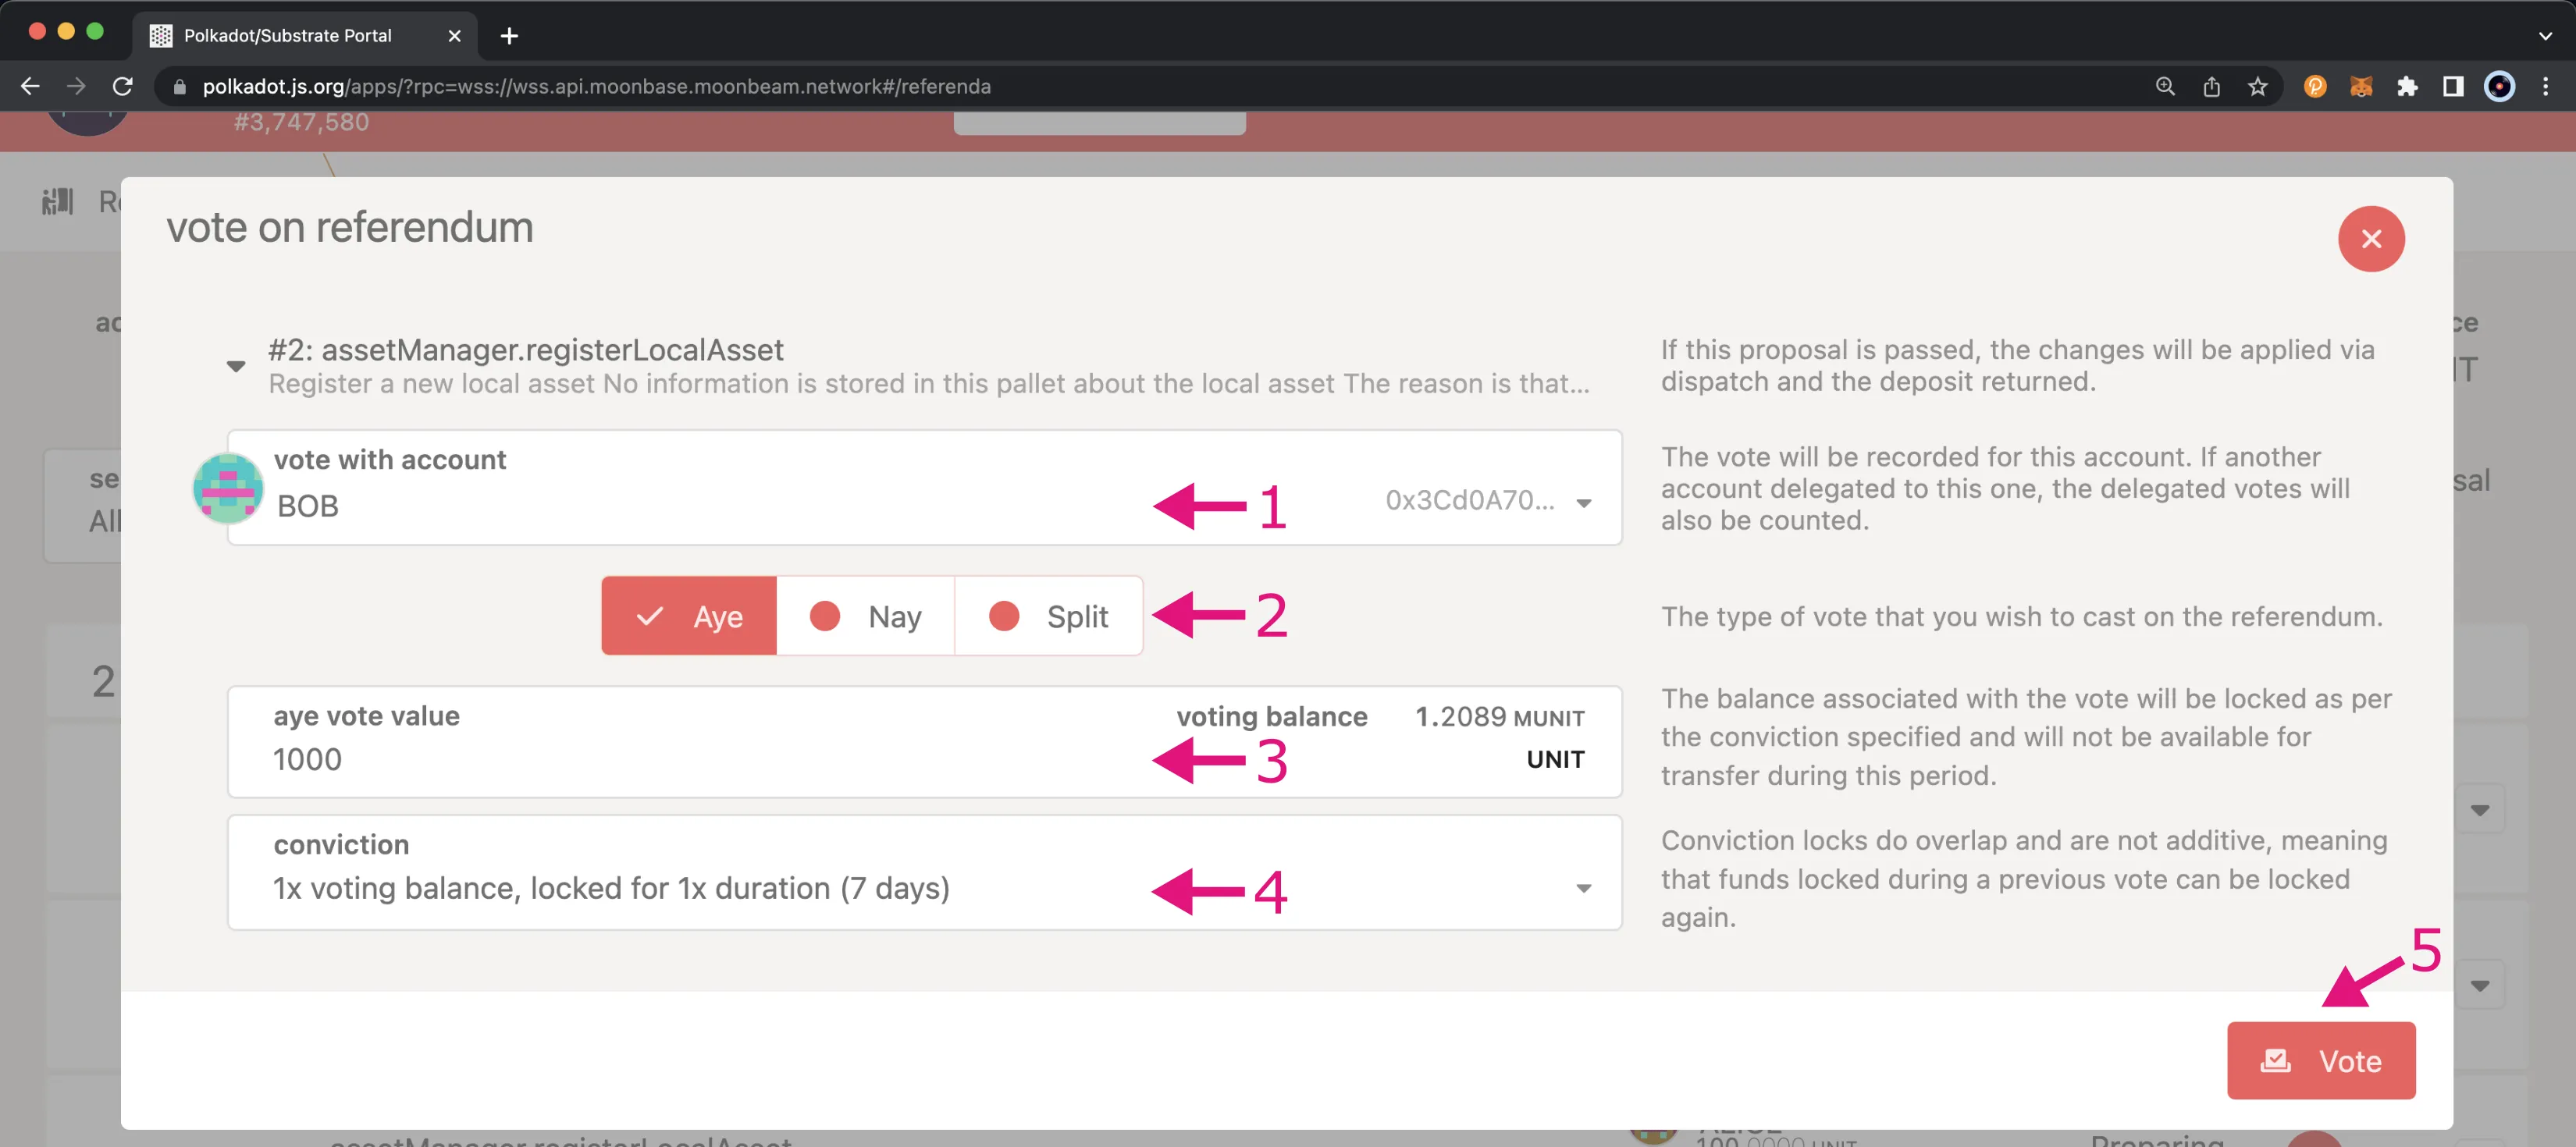
To vote and lock tokens either in favor of or against a referendum, you can get started by clicking on the Vote button next to the referendum you want to vote on.
Then you can take the following steps to fill in the details of the vote:
- Select the vote with account
- Choose how you would like to vote on the referendum. You can choose Aye in favor of the referendum, Nay in opposition to it, or Split if you want to specify an "Aye" vote value and a "Nay" vote value
- Enter the vote value
- Set the vote conviction, which determines the weight of your vote (
vote_weight = tokens * conviction_multiplier). Please refer to the Conviction multiplier docs for more information - Click Vote and sign the transaction
Note
The lockup periods shown in the previous image are not to be taken as references as they are subject to change.
To see how your vote and all of the other votes for a referendum impacted the Approval and Support curves, you can click on the arrow next to the Vote button. You'll notice there are two charts, one for each curve. If you hover over the charts, you can see the minimum Approval or Support required for a specific block along with the current Approval or Support.
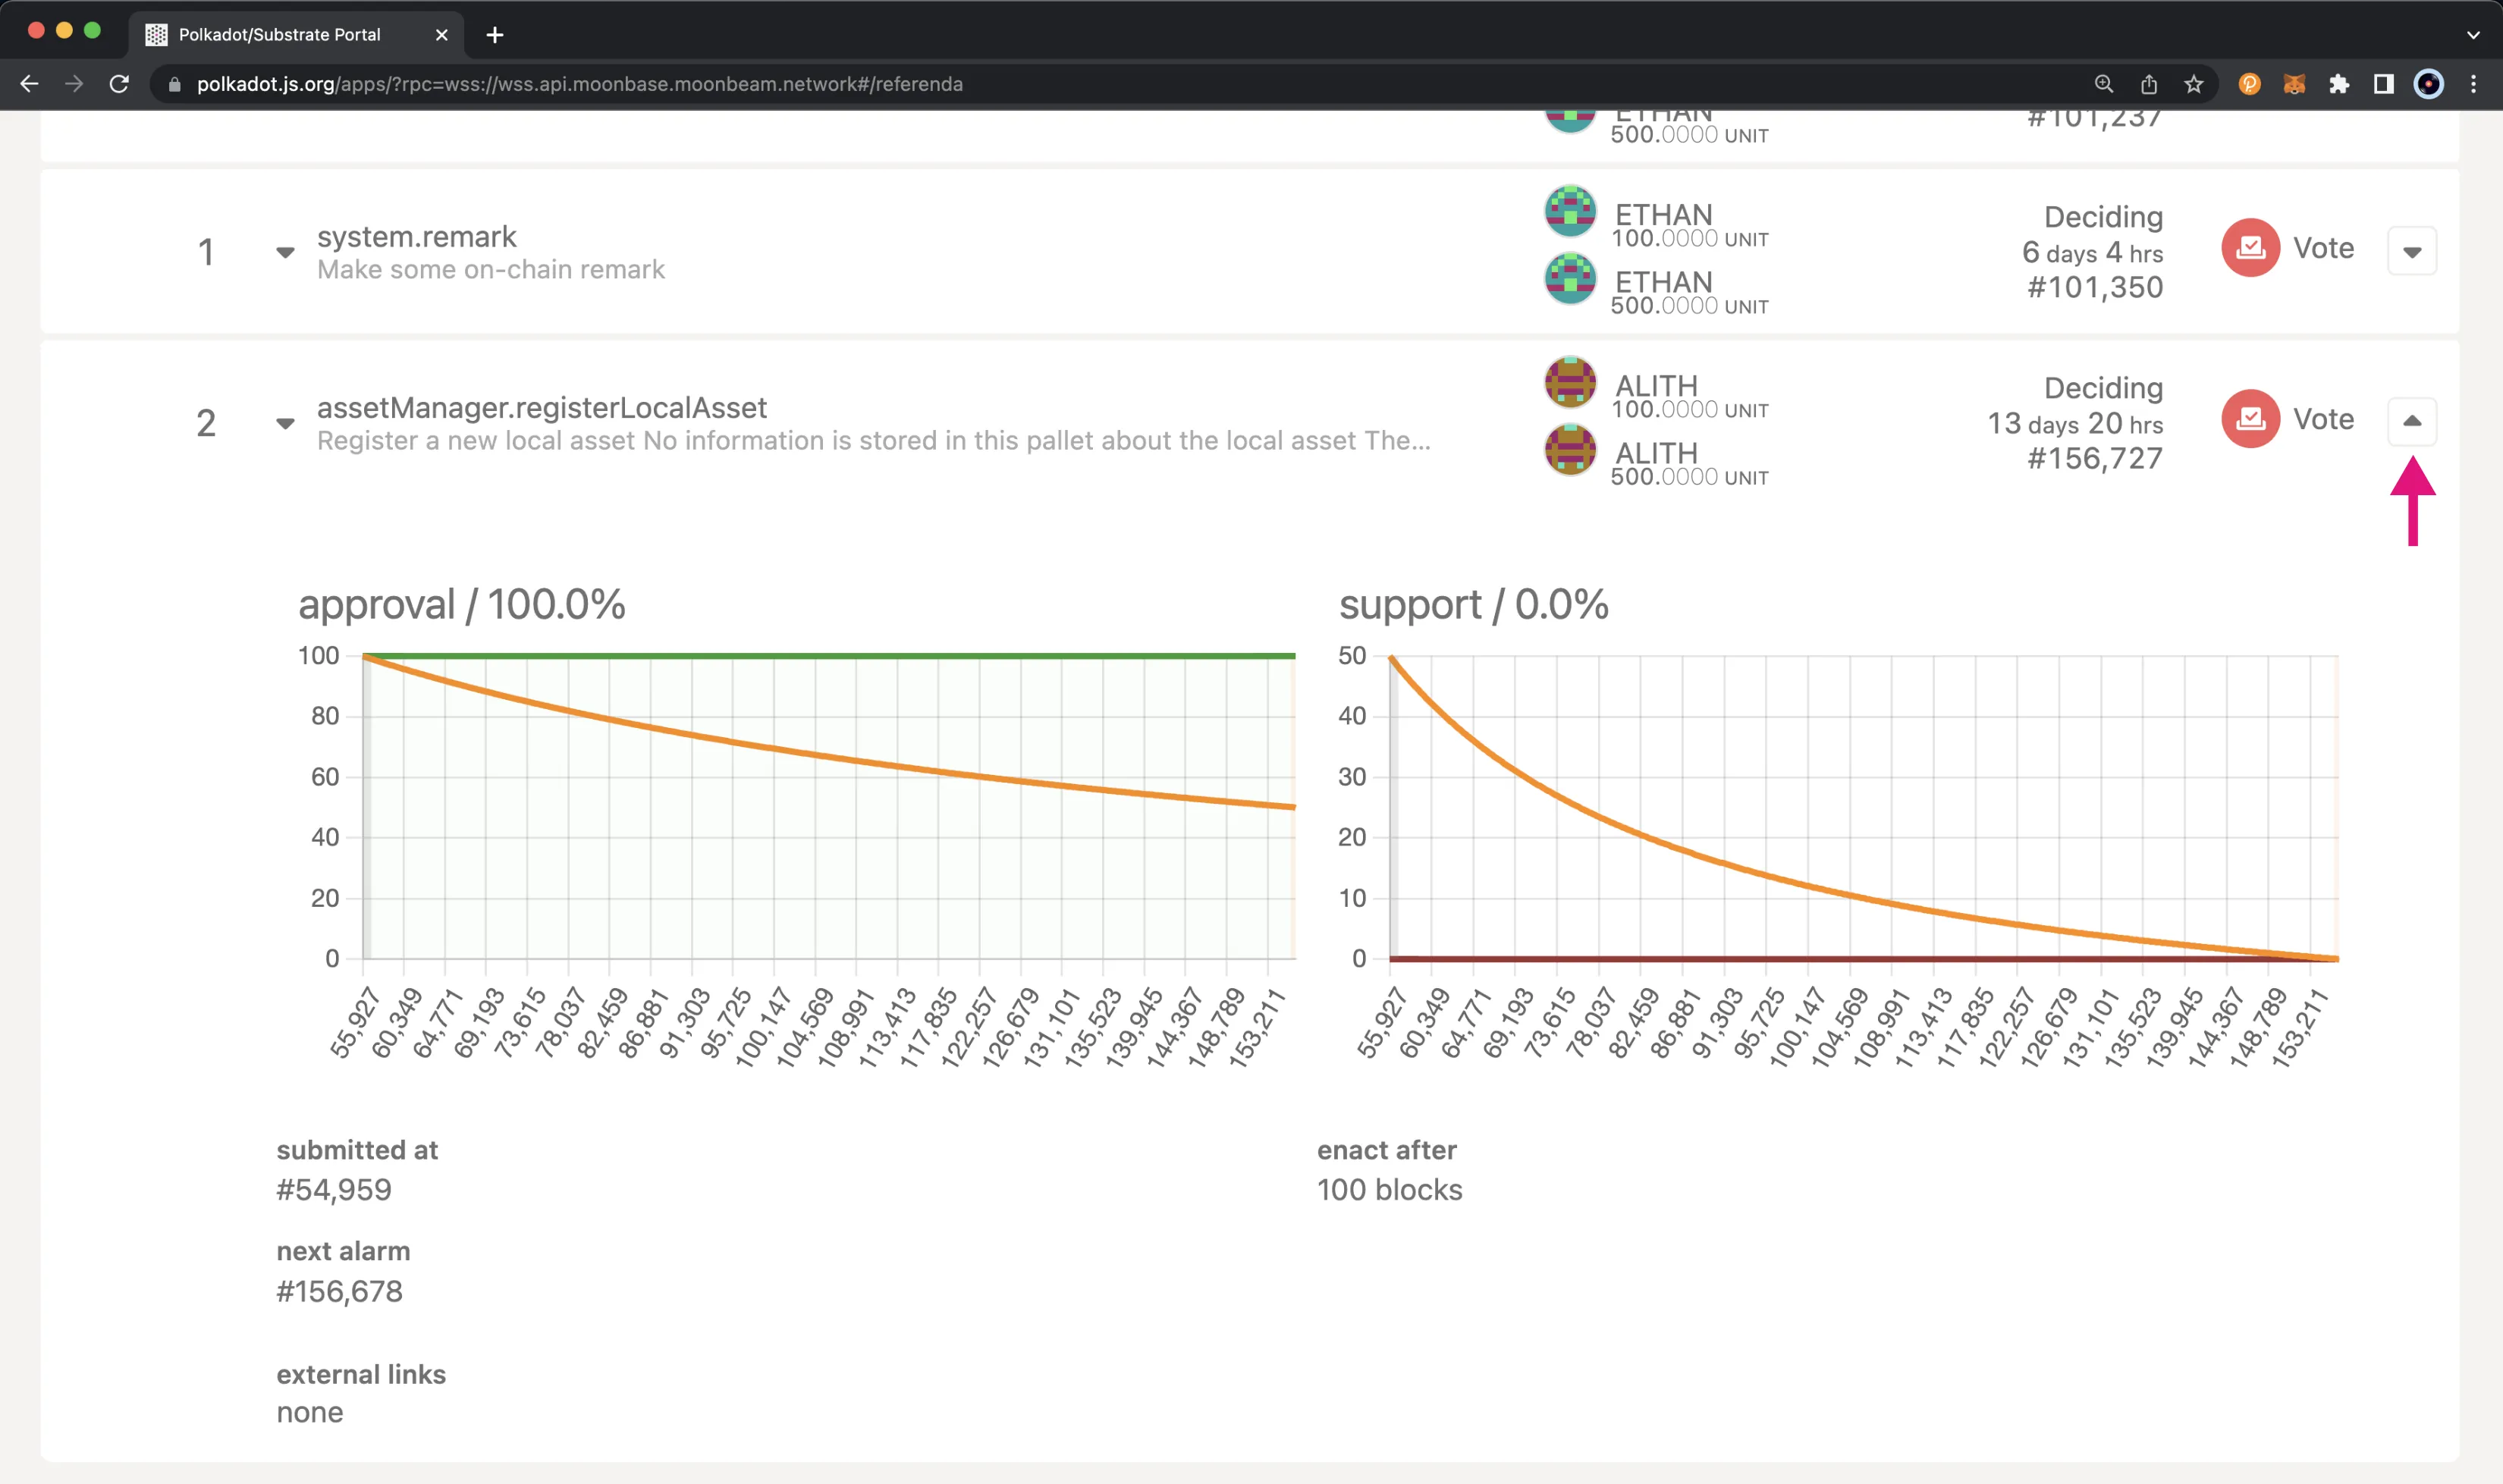
A proposal in the General Admin Track on Moonbase Alpha would have the following characteristics:
- The Approval curve starts at 100% on Day 0 and goes to 80% on Day 4
- The Support curve starts at 50% on Day 0 and goes to 10% on Day 7
- A referendum starts the Decide Period with 0% "Aye" votes (nobody voted in the Lead-in Period)
- Token holders begin to vote, and the Approval increases to a value above 80% by Day 4
- If the Approval and Support thresholds are met for the duration of the Confirm Period (14400 blocks, approximately 1 day), the referendum is approved
- If the Approval and Support thresholds are not met during the Decision Period, the proposal is rejected. Note that the thresholds need to be met for the duration of the Confirm Period. Consequently, if they are met but the Decision Period expires before the completion of the Confirm Period, the proposal is rejected
In the following image, you'll notice enough Approval and Support have been received, so the Confirm Period is underway. If the referendum maintains the Approval and Support levels, at block 124,962, the Confirm Period will end, and then the Enactment Period will begin. You can hover over the charts to find out more information on each of these periods. Assuming this referendum maintains the levels of Approval and Support it has received, the Enactment Period will end at block 132,262, and the proposal action will be dispatched.
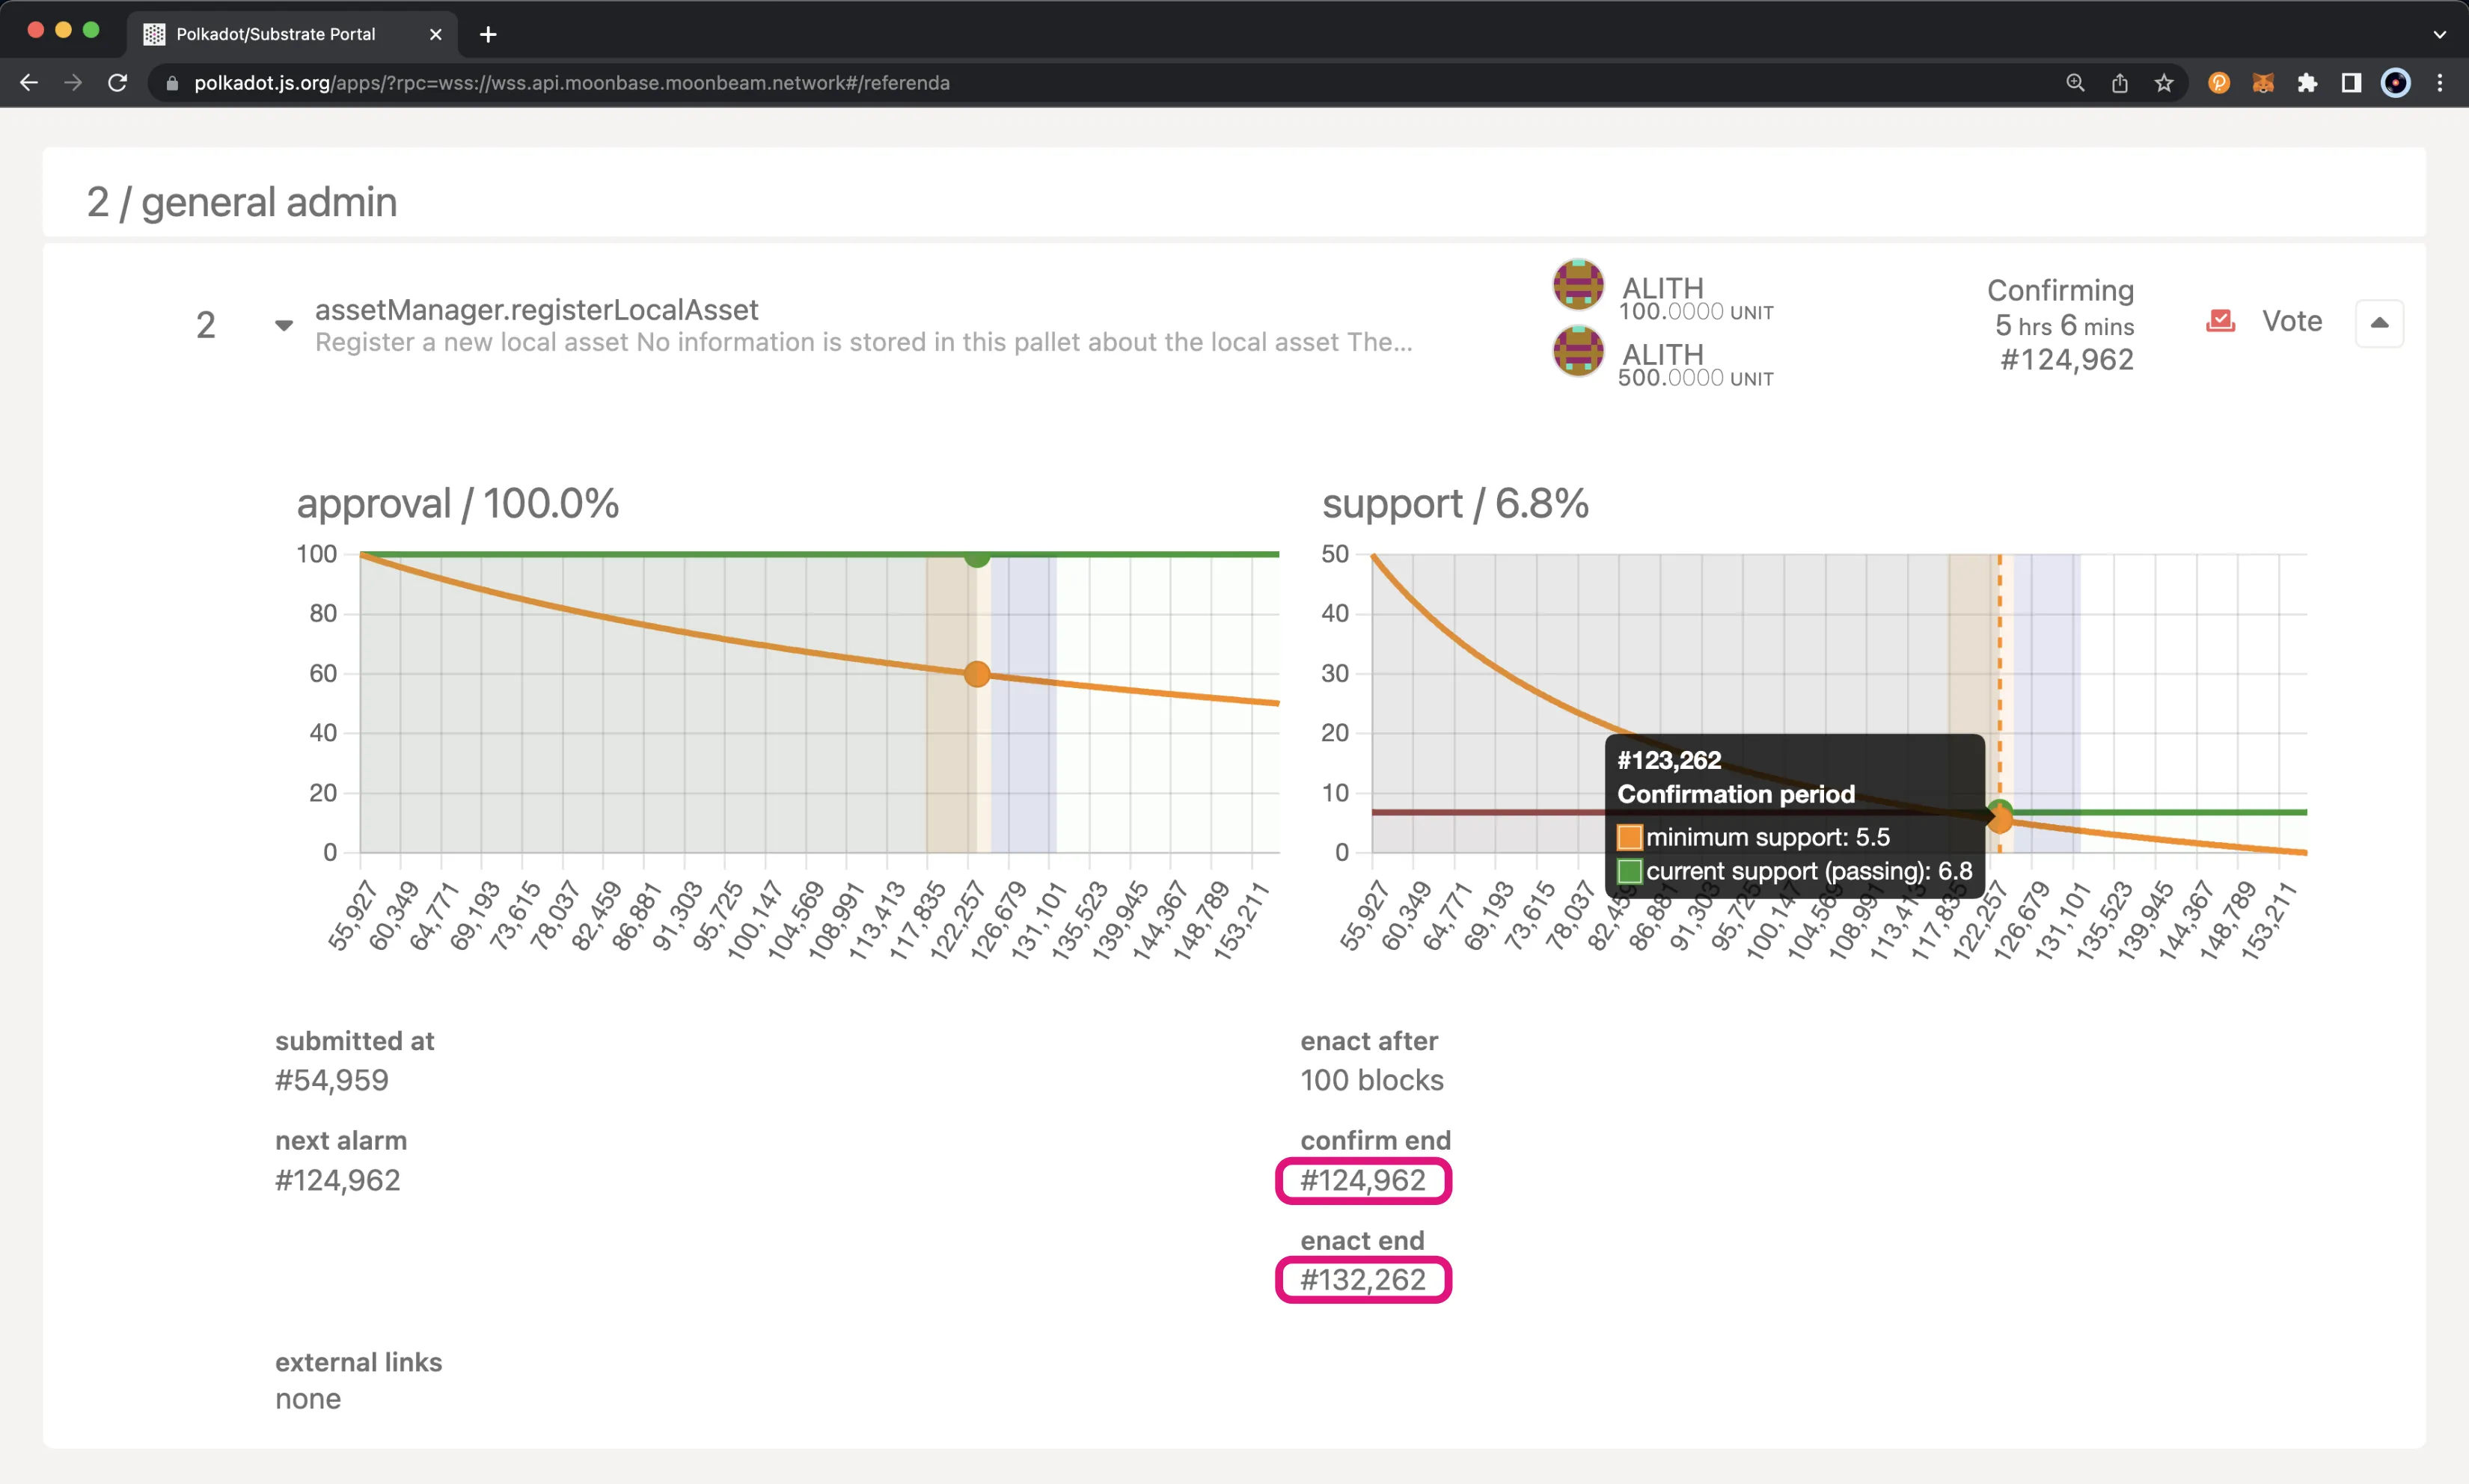
If the referendum doesn't continuously receive enough Approval and Support during the Confirm Period, it still has a chance to pass as long as the Approval and Support requirements are met again and continuously for the duration of the Confirm Period. If a referendum enters the Confirm Period but the Decide Period is set to end before the Confirm Period is over, the Decide Period will actually be extended until the end of the Confirm Period. If the Decide Period ends and the referendum still hasn't received enough Approval and Support, the referendum will be rejected, and the Decision Deposit can be refunded.
The Enactment Period is defined by the author of the proposal at the time it was initially submitted, but it needs to be at least the minimum Enactment Period.
Delegate Voting
Token holders have the option to delegate their vote to another account whose opinion they trust. The account being delegated does not need to take any particular action. When they vote, the vote weight (that is, tokens times the Conviction multiplier chosen by the delegator) is added to their vote.
With the introduction of OpenGov (Governance v2), token holders can even delegate their vote on a Track-by-Track basis and specify different delegates for each Track, which is referred to as Multirole Delegation.
From the referenda page on Polkadot.js Apps, you can click Delegate to get started.
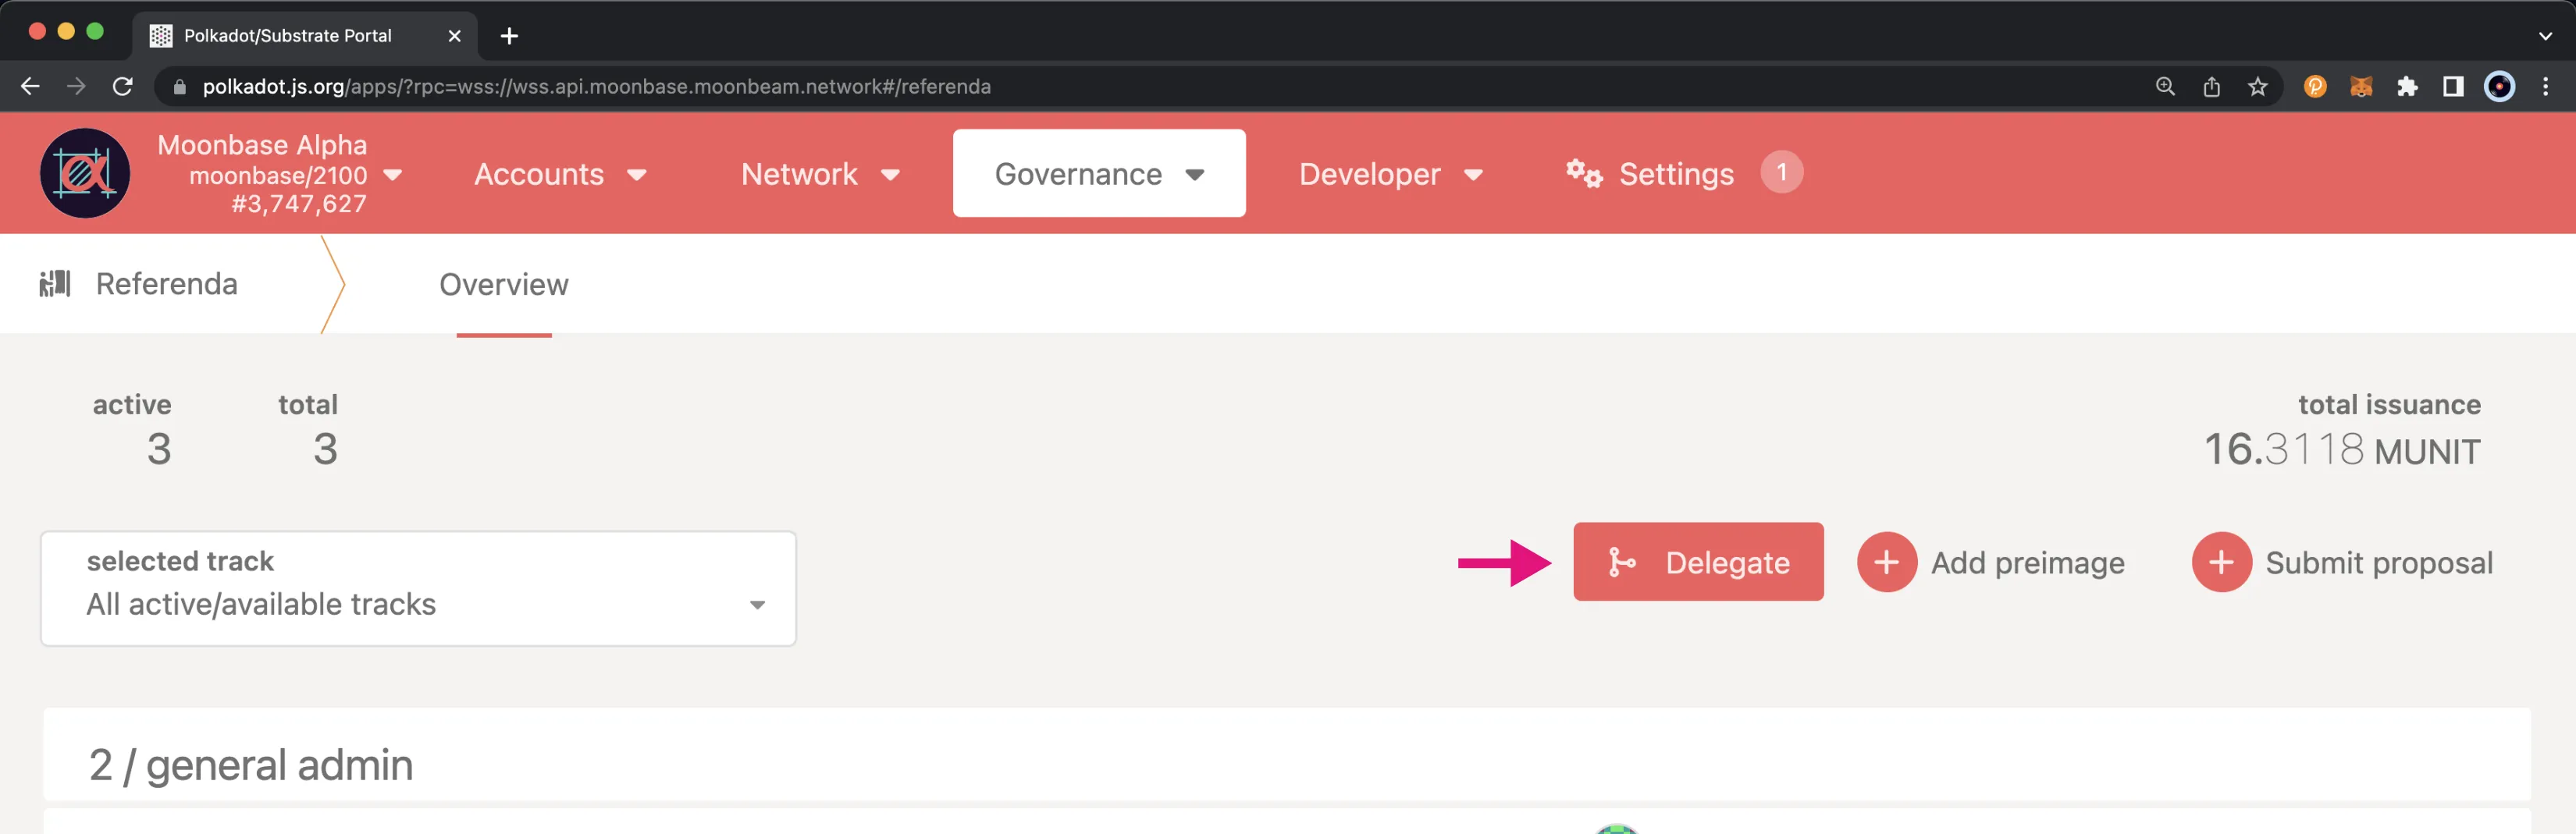
Then you can take the following steps to fill in the details of the delegation:
- Enter the delegate from account, which should be the account that you wish to delegate your vote from
- Select the submission track or switch the apply delegation to all tracks slider to on if you want the other account to vote on your behalf on any of the Tracks
- Enter the delegated vote value
- Set the vote conviction, which determines the weight of your vote (
vote_weight = tokens * conviction_multiplier). Please refer to the Conviction Multiplier docs for more information - Click Next
- On the next screen, select the delegate to address, which should be the account that you wish to delegate your vote to
- Click Delegate and sign the transaction
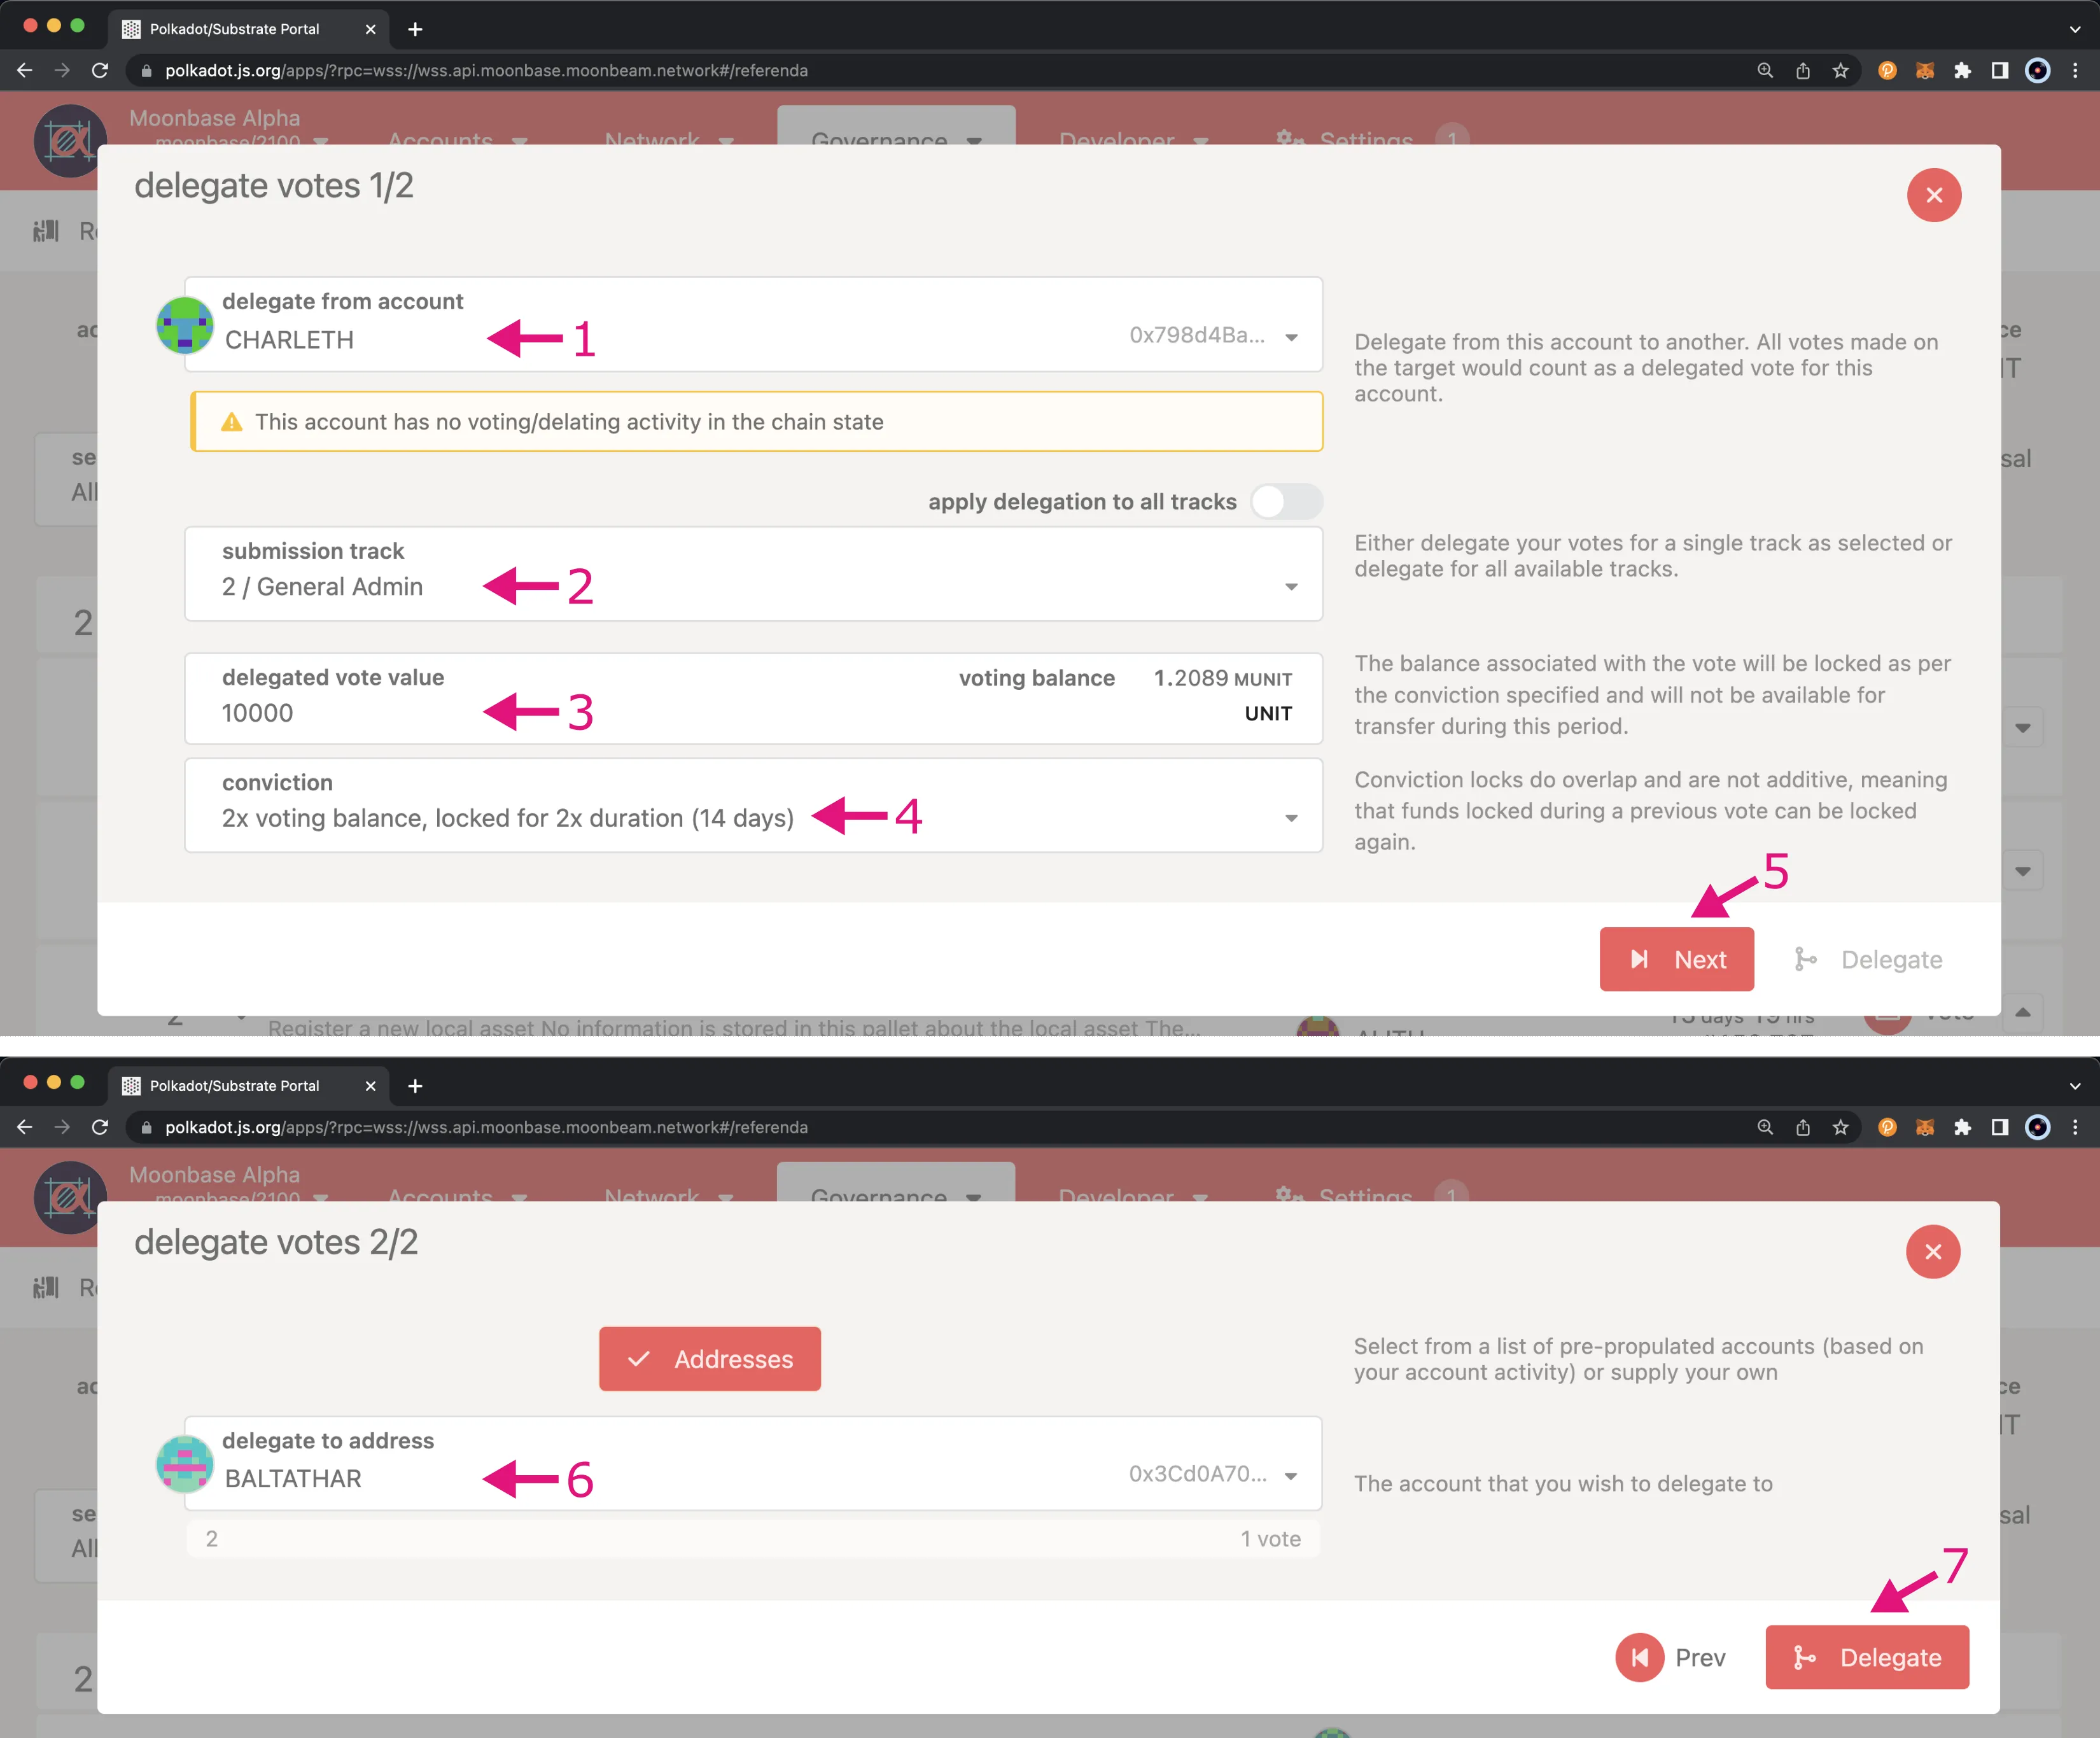
Now the account you selected to delegate your vote to will be able to vote on your behalf. Once this account votes, the total vote weight delegated will be allocated to the option that the account selected. For this example, Baltahar can vote in favor of a referendum with a total weight of 20000 (10000 tokens with an x2 Conviction factor) using the vote weight that Charleth delegated to him.
You can continue the above process for each Track and delegate a different account with varying vote weights.
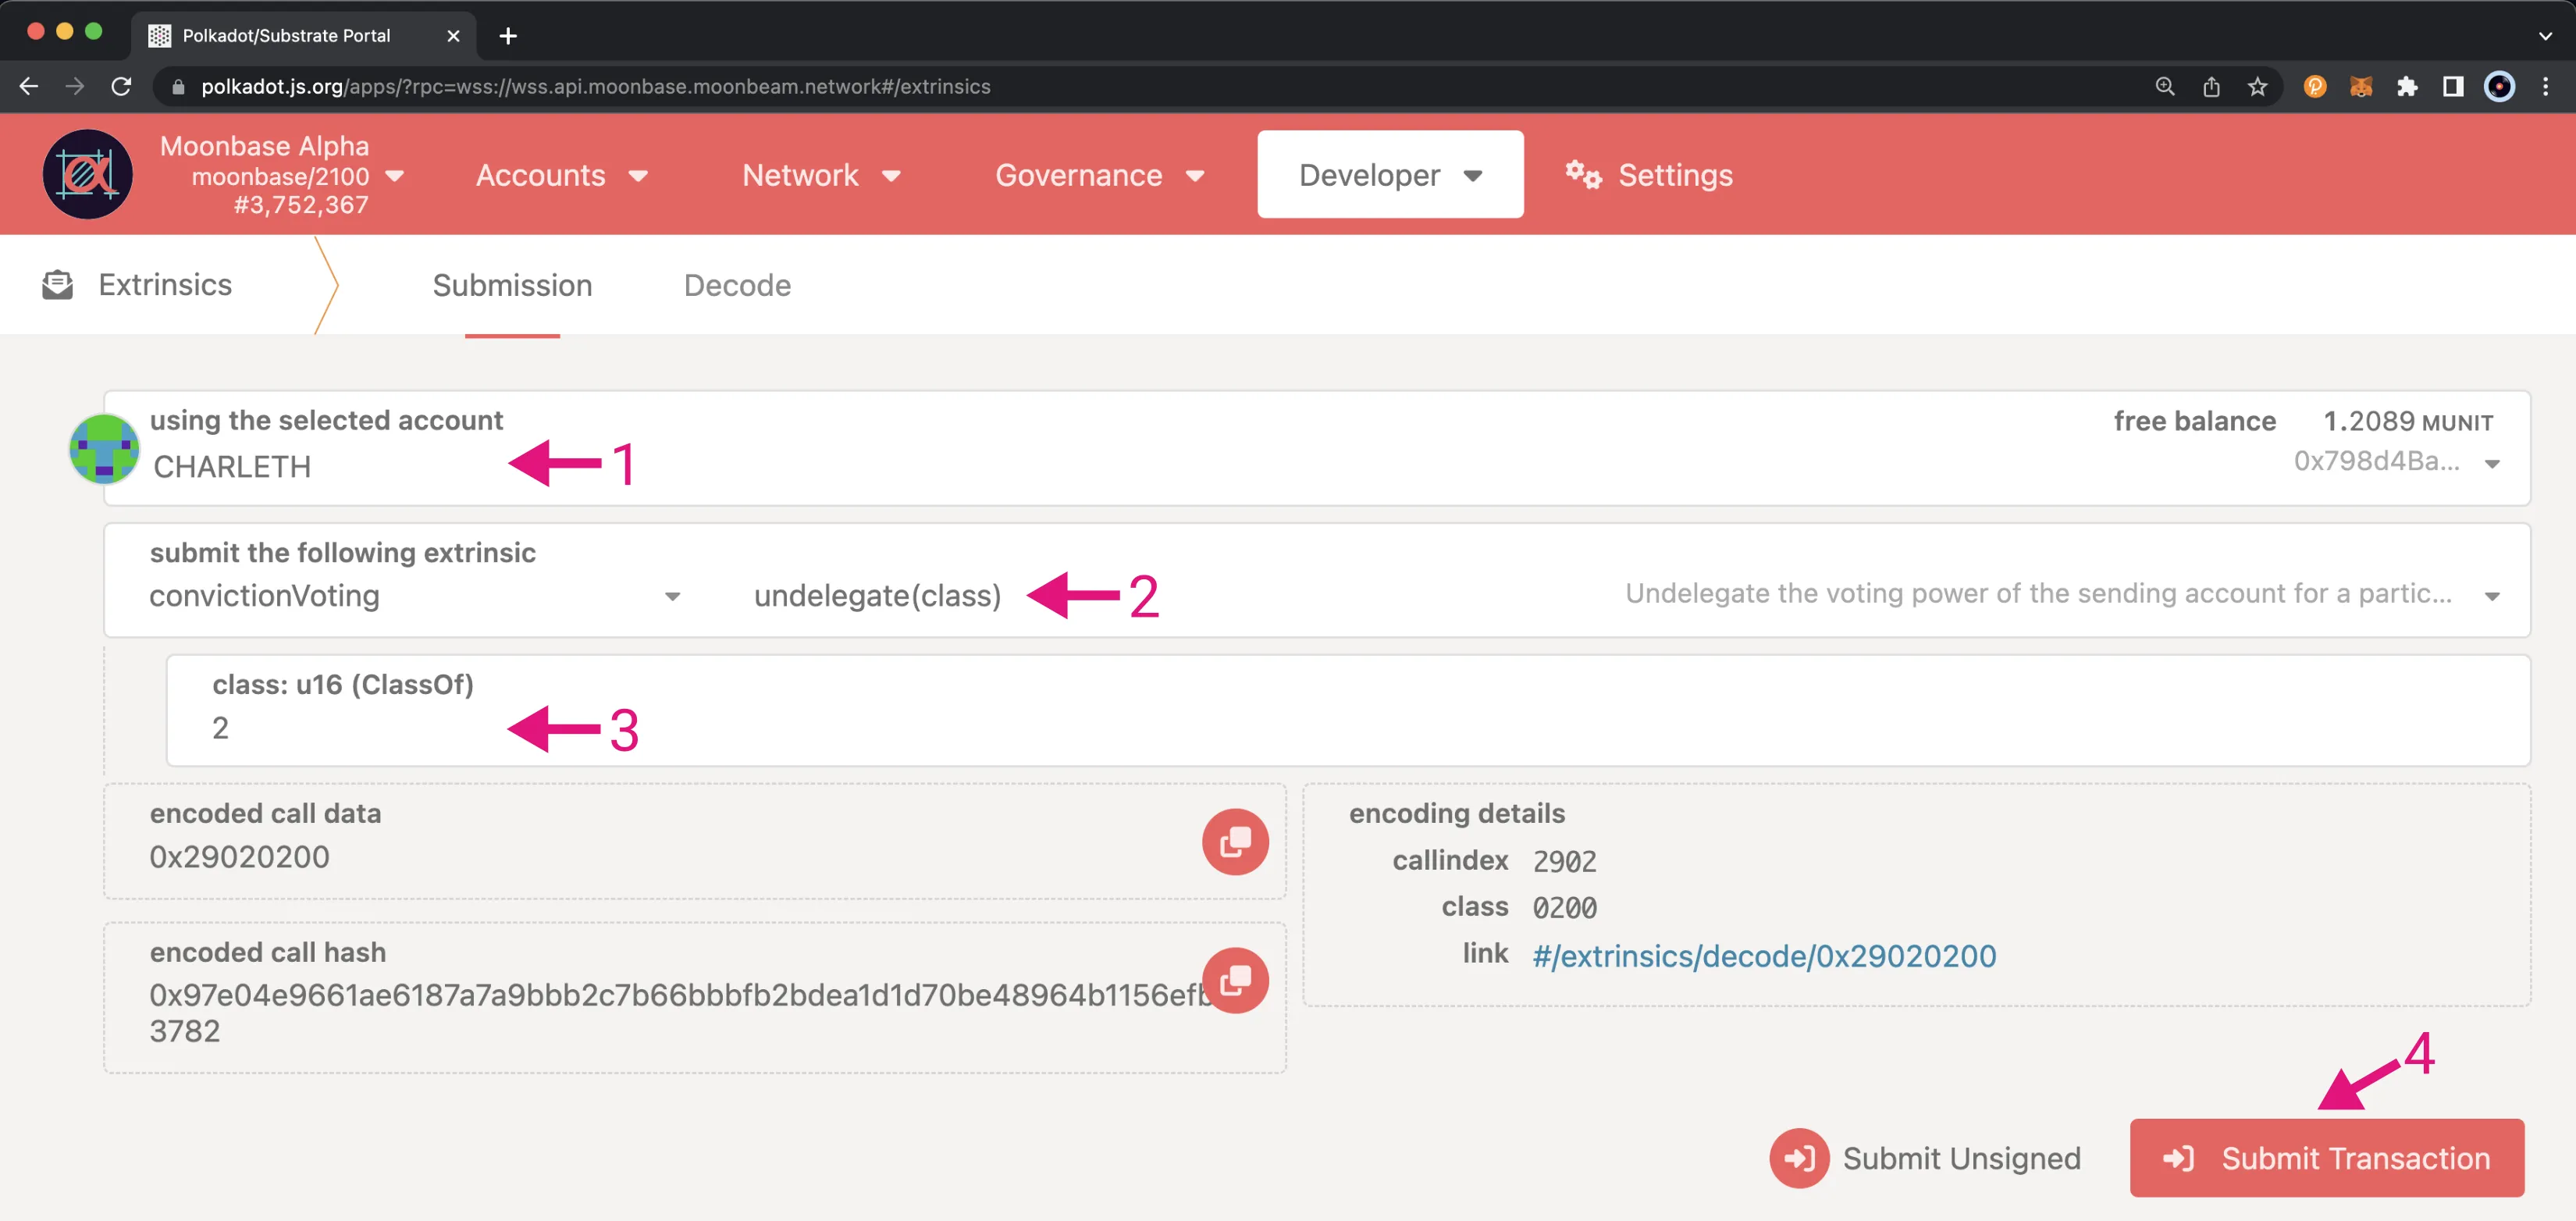
To undelegate a delegation, you'll need to head to the Developer tab and click on Extrinsics. From there, you can take the following steps:
- Select the account you have delegated from
- Choose the convictionVoting pallet and the undelegate extrinsic
- Enter the class of the Origin. For the General Admin Track, it is
2. For a complete list of Track IDs, refer to the OpenGov section of the governance overview page - Click Submit transaction and sign the transaction
Refunding the Decision Deposit
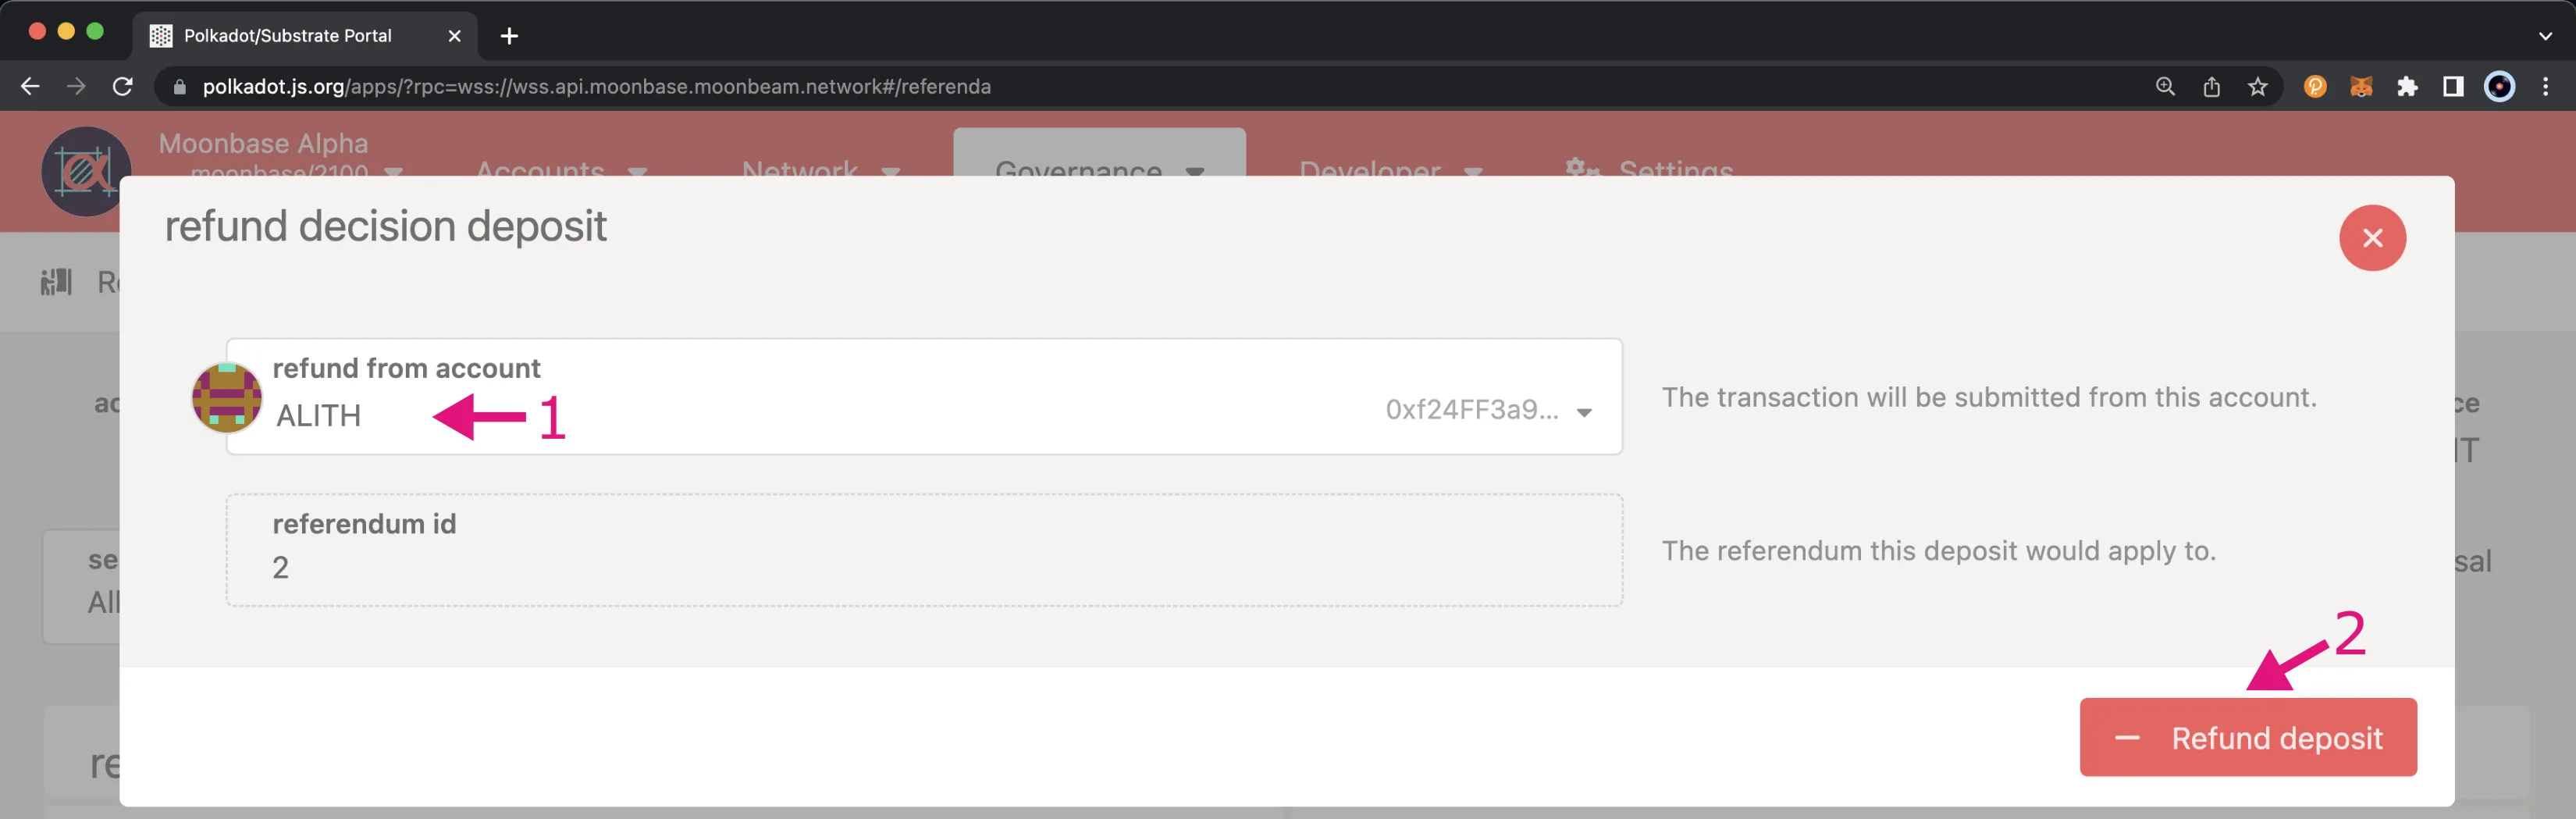
If a referendum has been approved or rejected, the Decision Deposit will be eligible to be refunded, as long as it was not rejected due to it being a malicious proposal. Malicious proposals will result in the Decision Deposit being slashed. Any token holder can trigger the refund of the deposit back to the original account that placed the deposit. To refund the deposit, you can take the following steps on the referenda page on Polkadot.js Apps. If the referendum is eligible and the deposit hasn't already been refunded, you'll see a Refund deposit button. So, you can go ahead and click that button to get started.
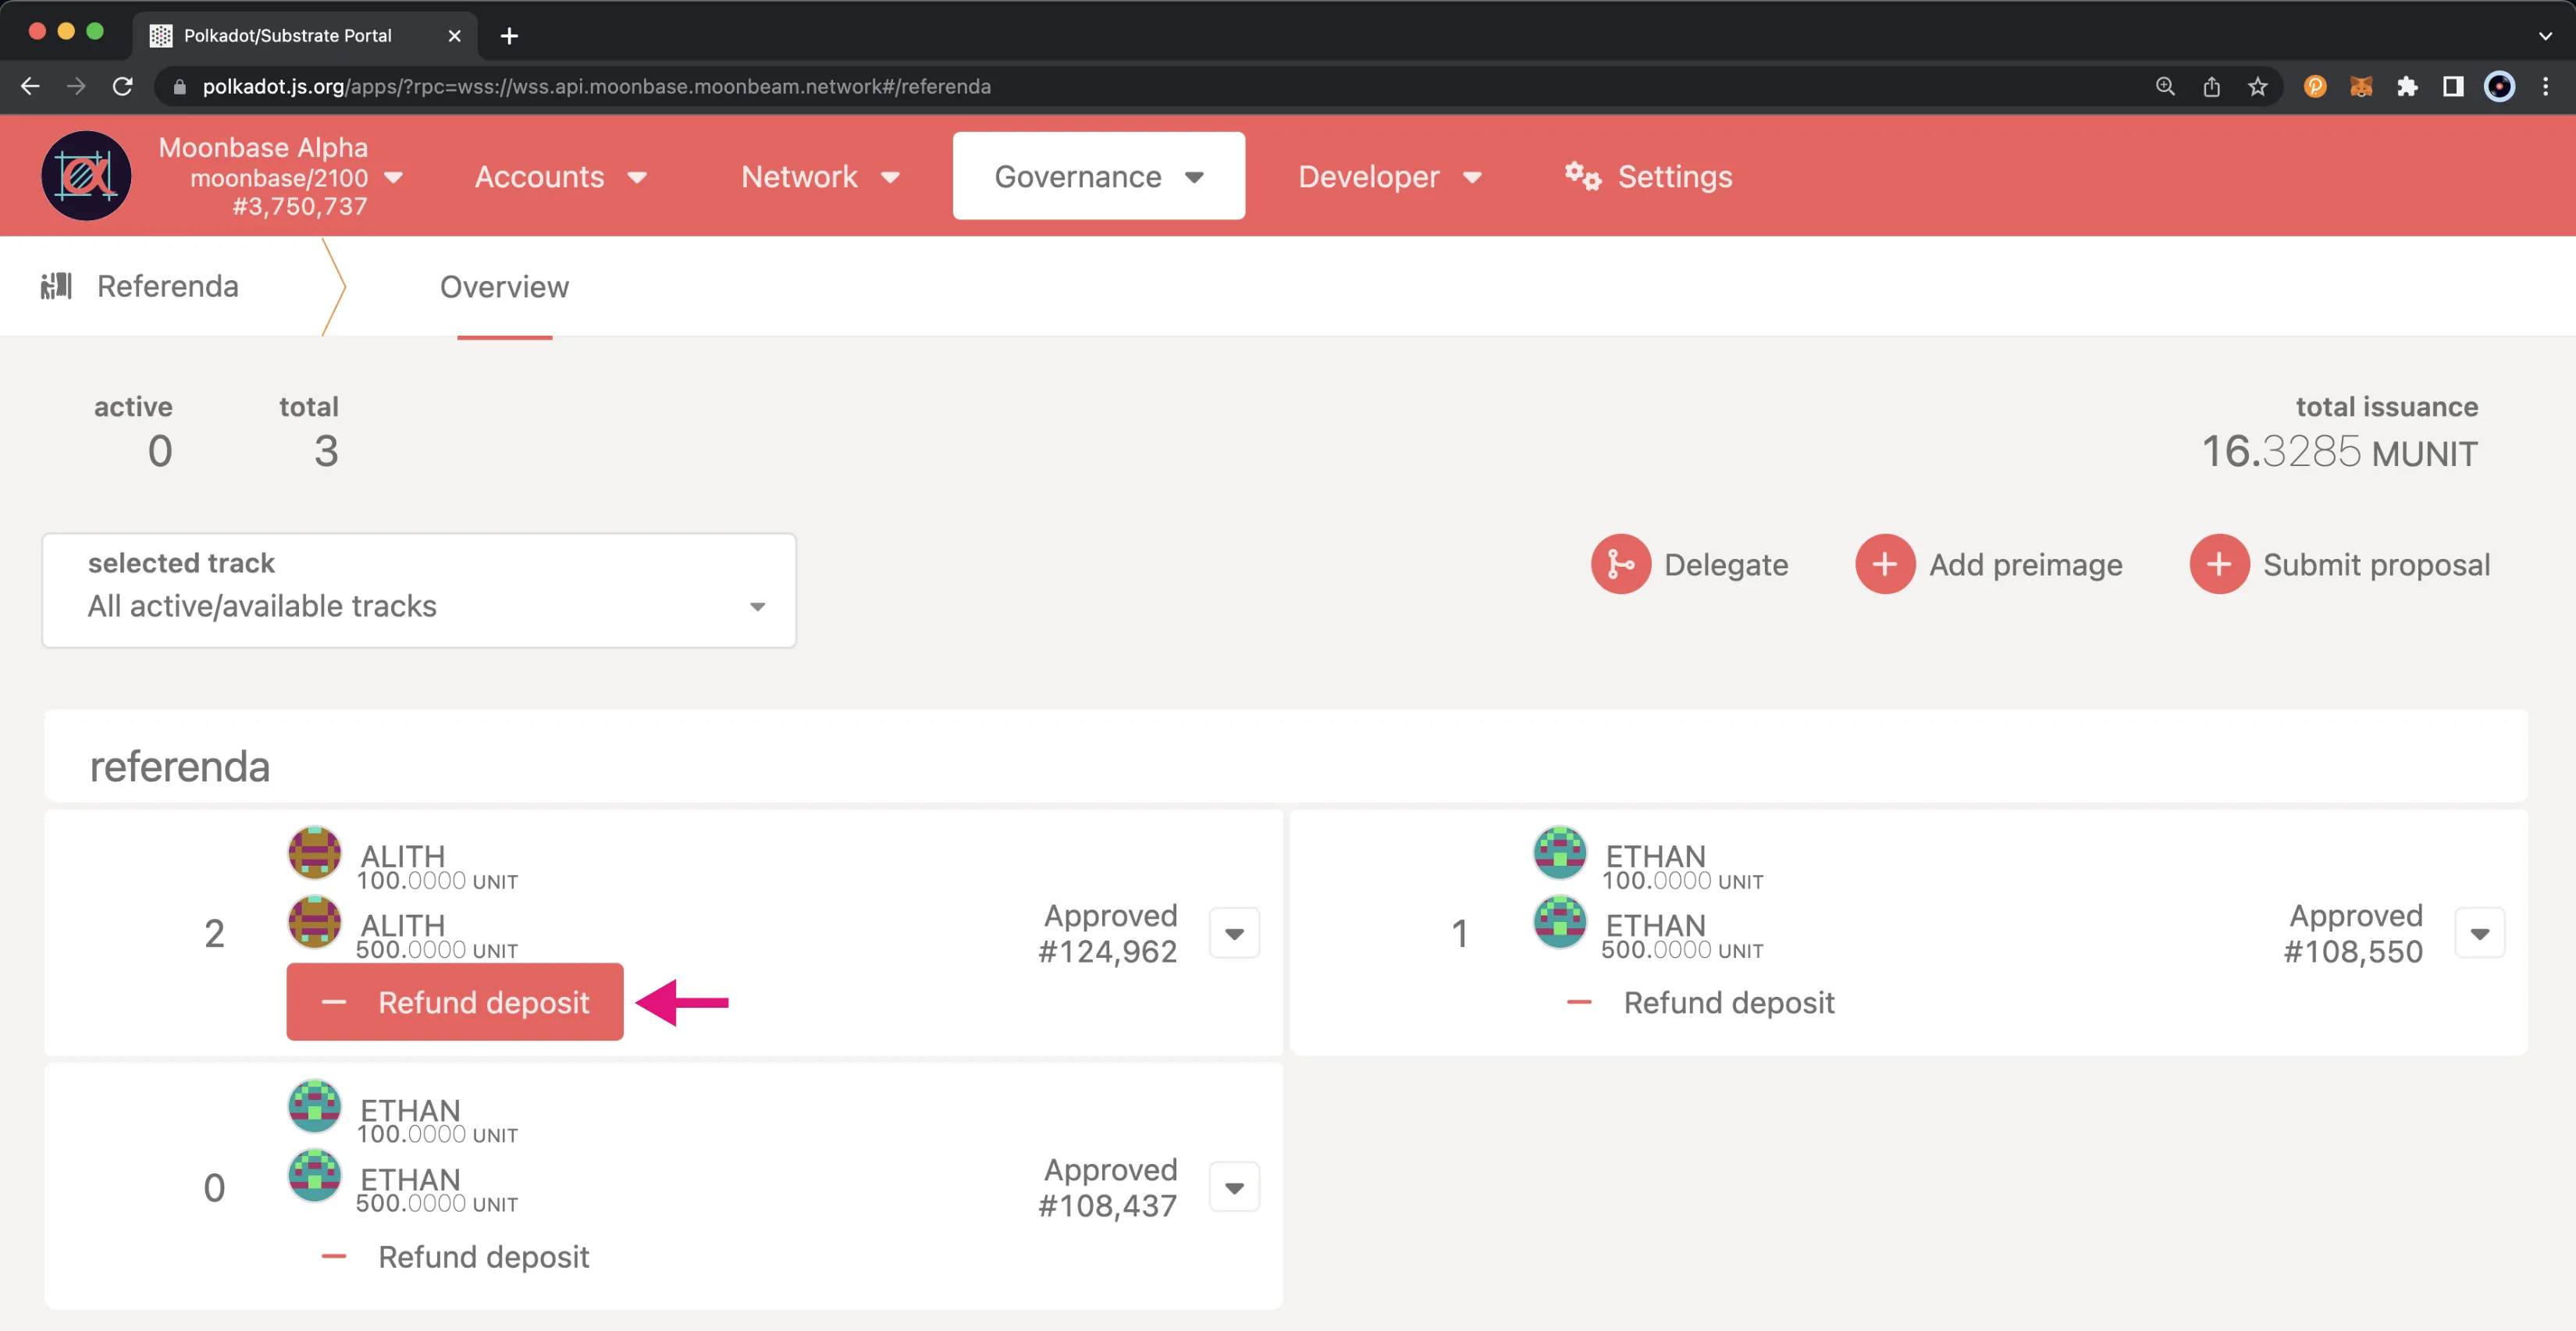
Then, to submit the refund transaction, you can:
- Choose the account for which you want to trigger the refund. This does not need to be the account that initially placed the deposit
- Click Refund deposit and sign the transaction
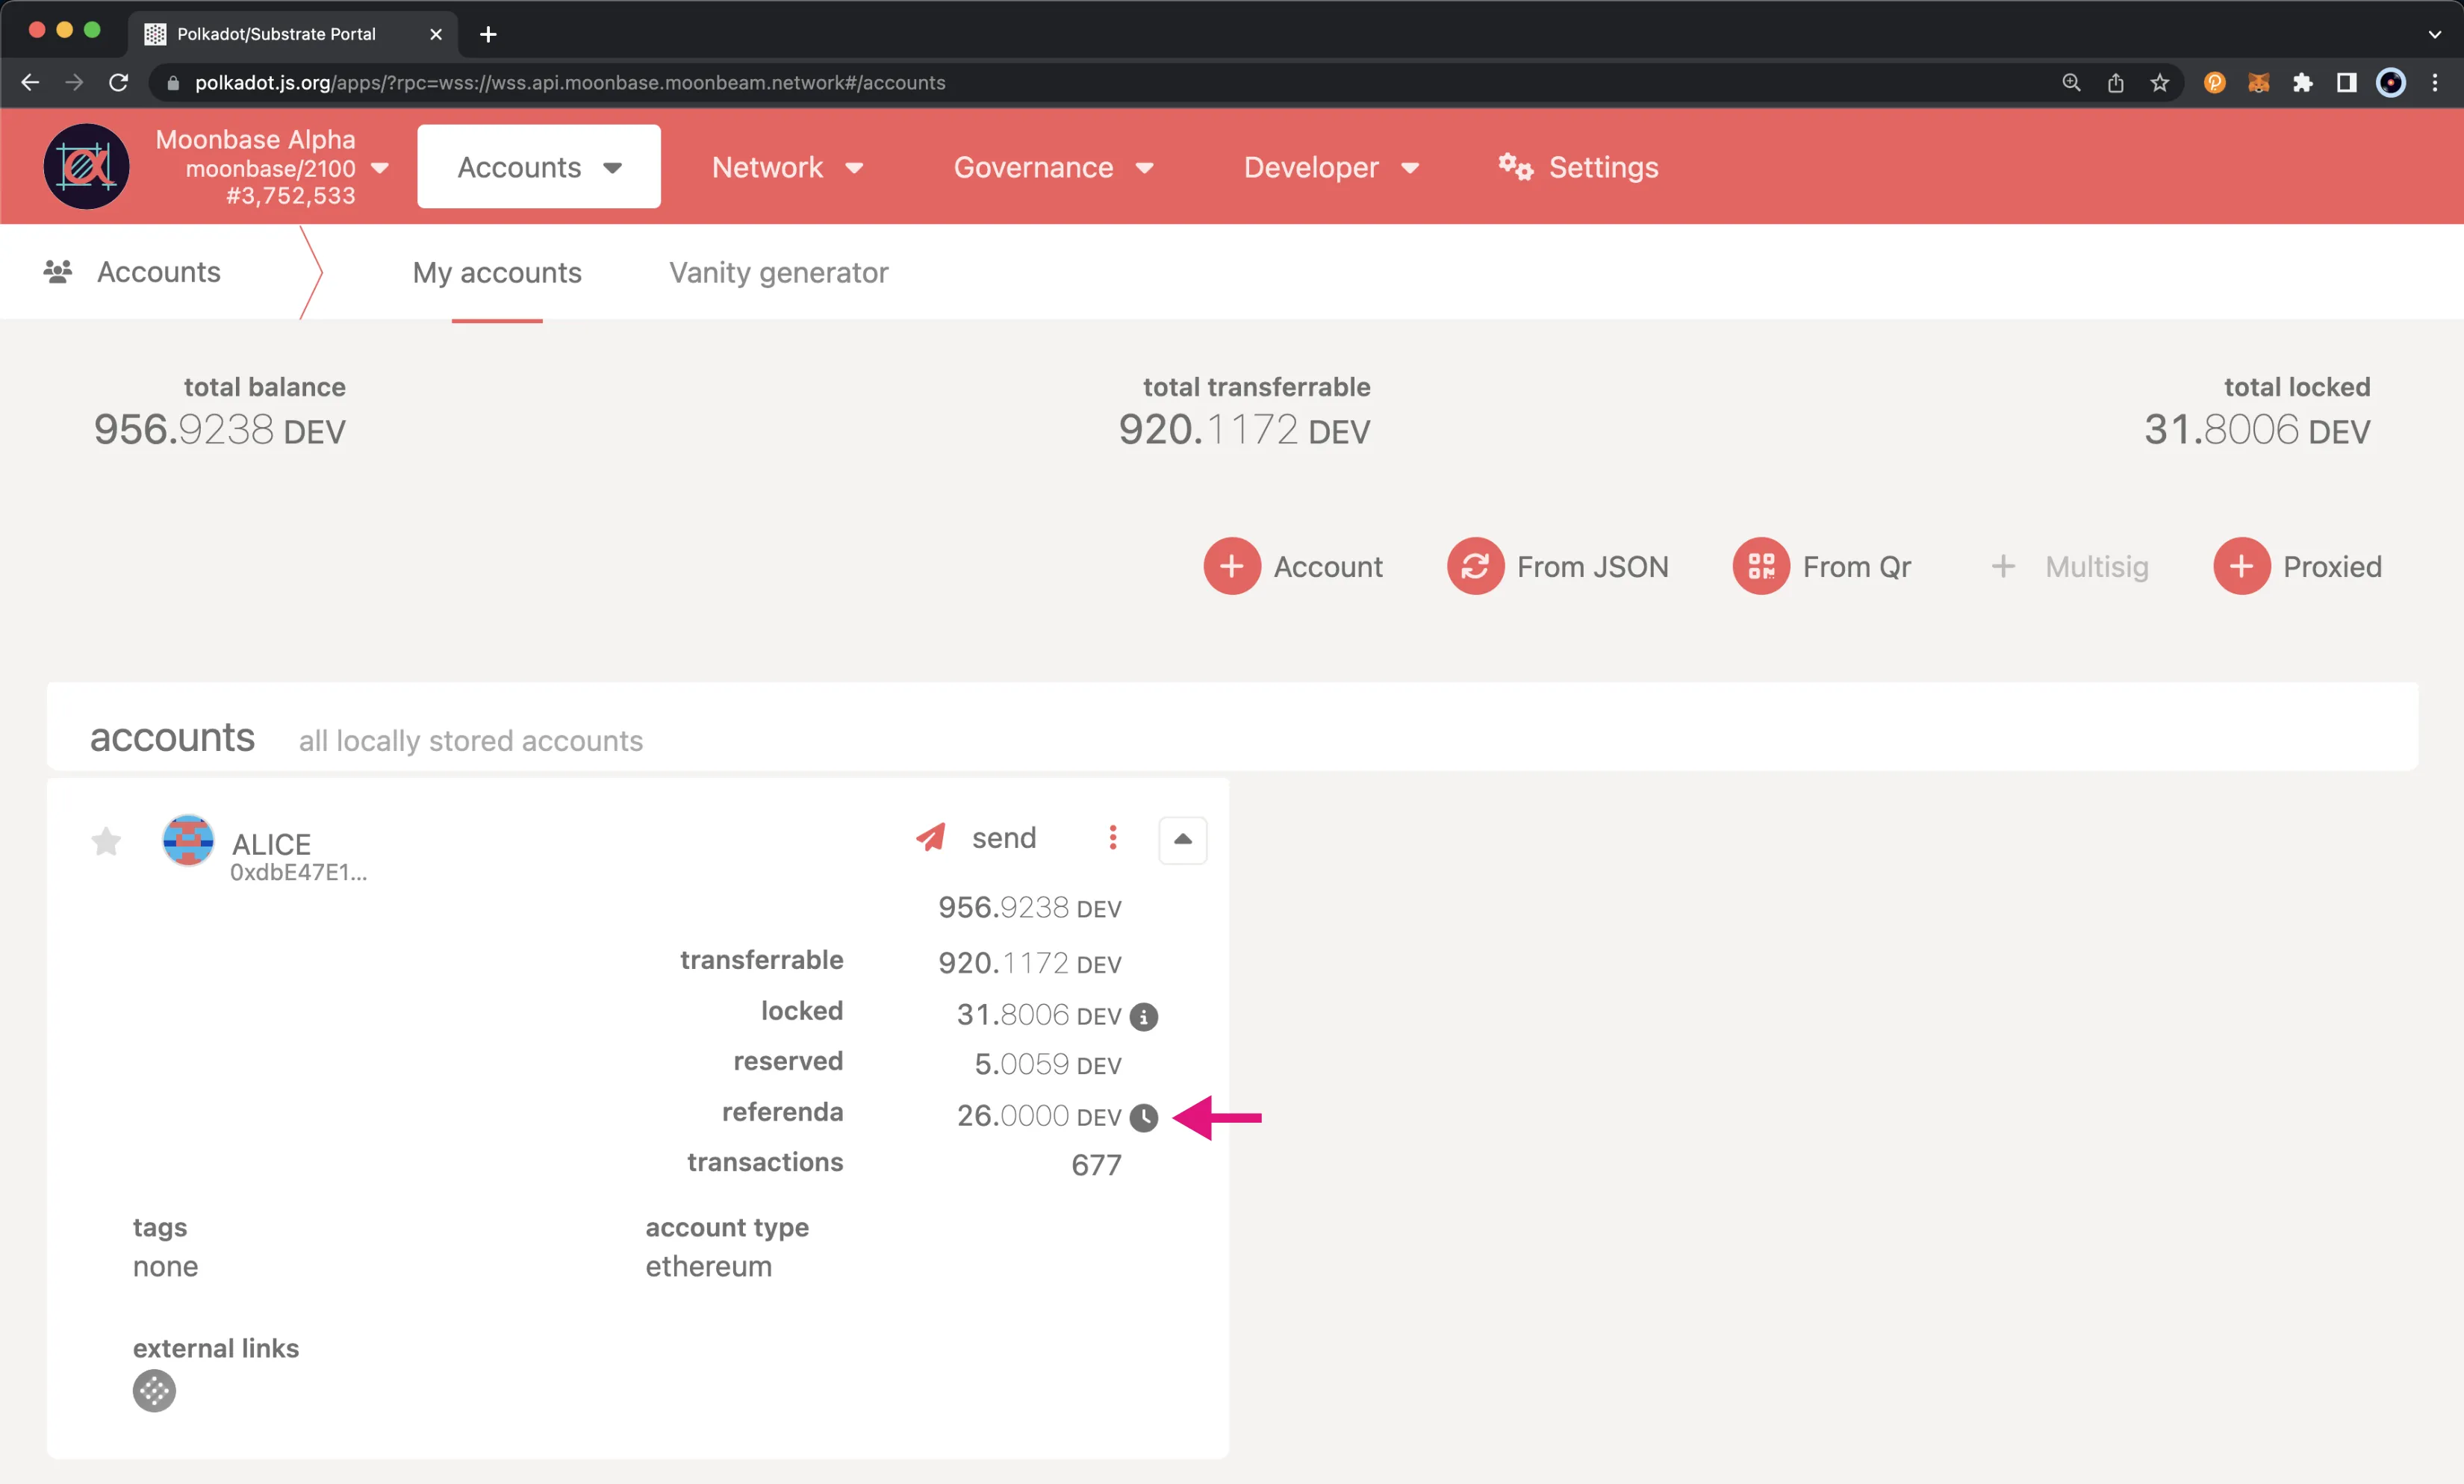
Unlocking Locked Tokens
When token holders vote, the tokens used are locked and cannot be transferred. You can verify if you have any locked tokens in the Accounts tab by expanding the address's account details. There, you will see different types of balances. If you have any tokens locked in referenda, you'll see referenda listed in your balance details, and you can hover over it to find out details about which referendum your tokens are locked for. Different lock statuses include:
- Locked because of an ongoing referendum, meaning that you've used your tokens and have to wait until the referendum finishes, even if you've voted with a no-lock Conviction factor
- Locked because of the Conviction multiplier selected, displaying the number of blocks and time left
- Lock expired, meaning that you can now get your tokens back
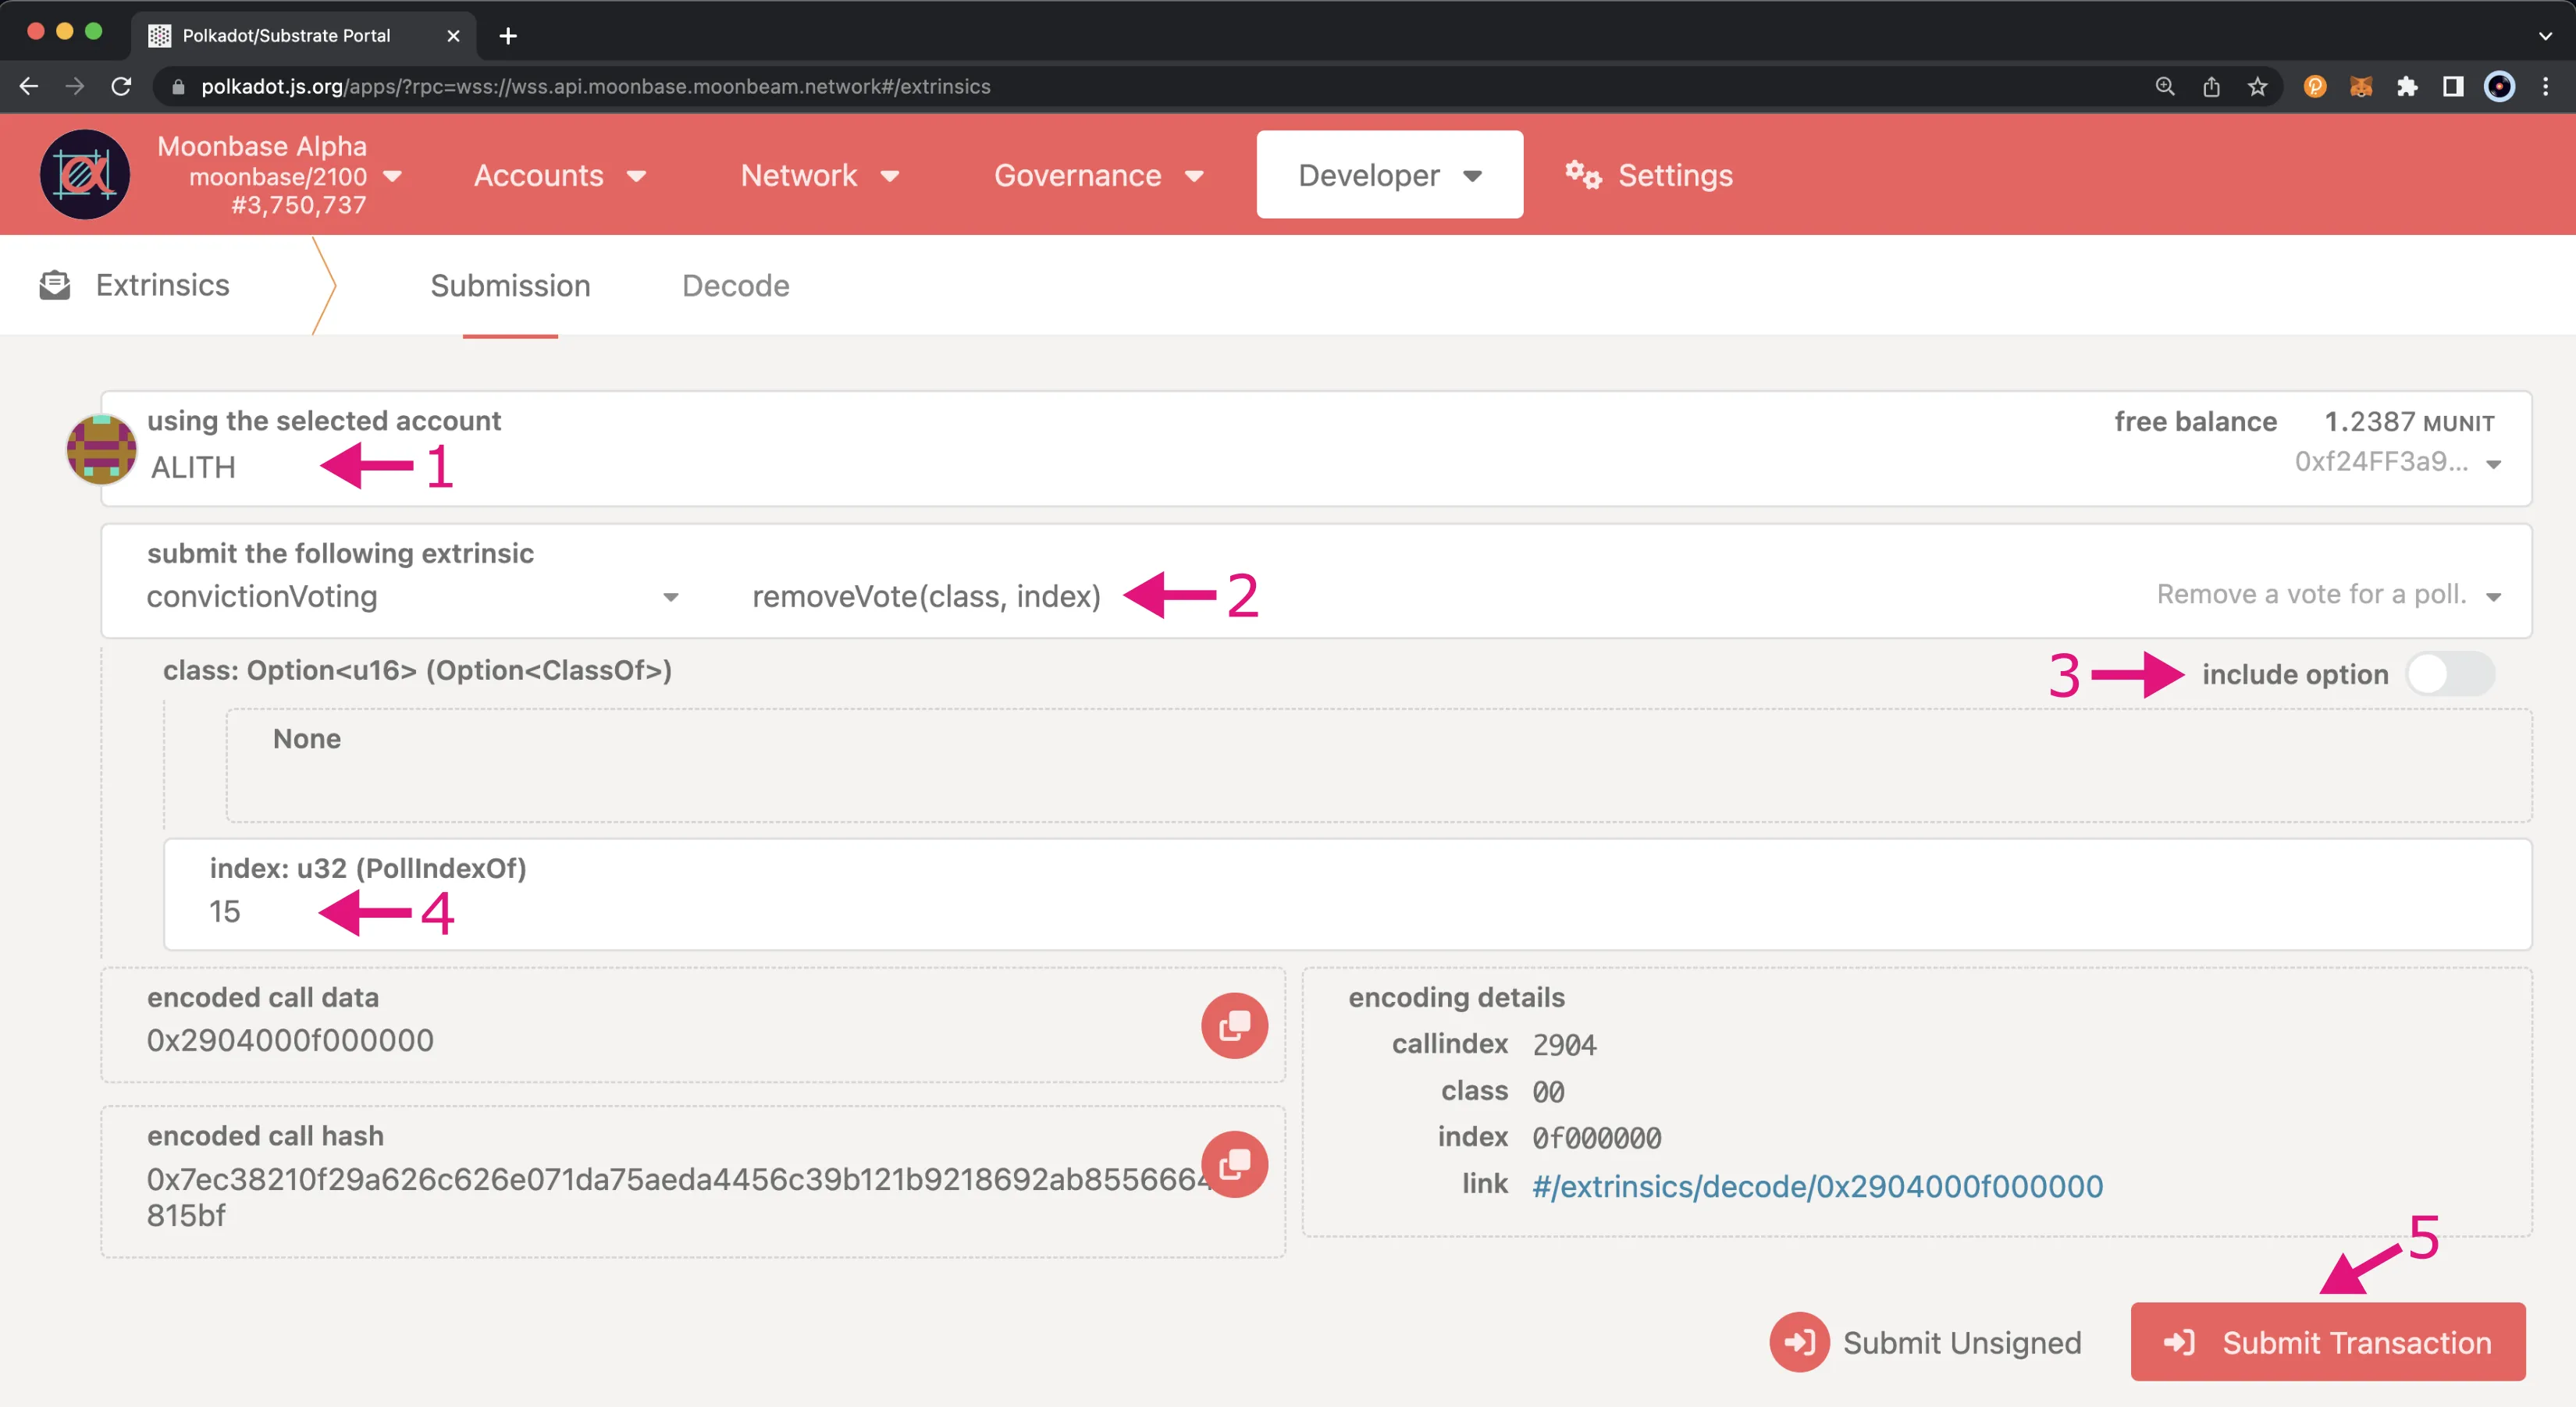
Once the lock has expired, you can request your tokens back. To do so, navigate to the Extrinsics menu under the Developers tab. Here, two different extrinsics need to be sent. First, you need to provide the following information:
- Select the account from which you want to recover your tokens
- Choose the pallet you want to interact with. In this case, it is the
convictionVotingpallet and the extrinsic to use for the transaction. This will determine the fields that you need to fill in the following steps. In this case, it isremoveVoteextrinsic. This step is necessary to unlock the tokens. This extrinsic can also be used to remove your vote from a referendum - Optionally, you can specify the Track ID to remove votes for. To do so, simply toggle the include option slider and enter the Track ID in the class u16 field
- Enter the referendum index. This is the number that appeared on the left-hand side of the Referenda tab
- Click the Submit Transaction button and sign the transaction
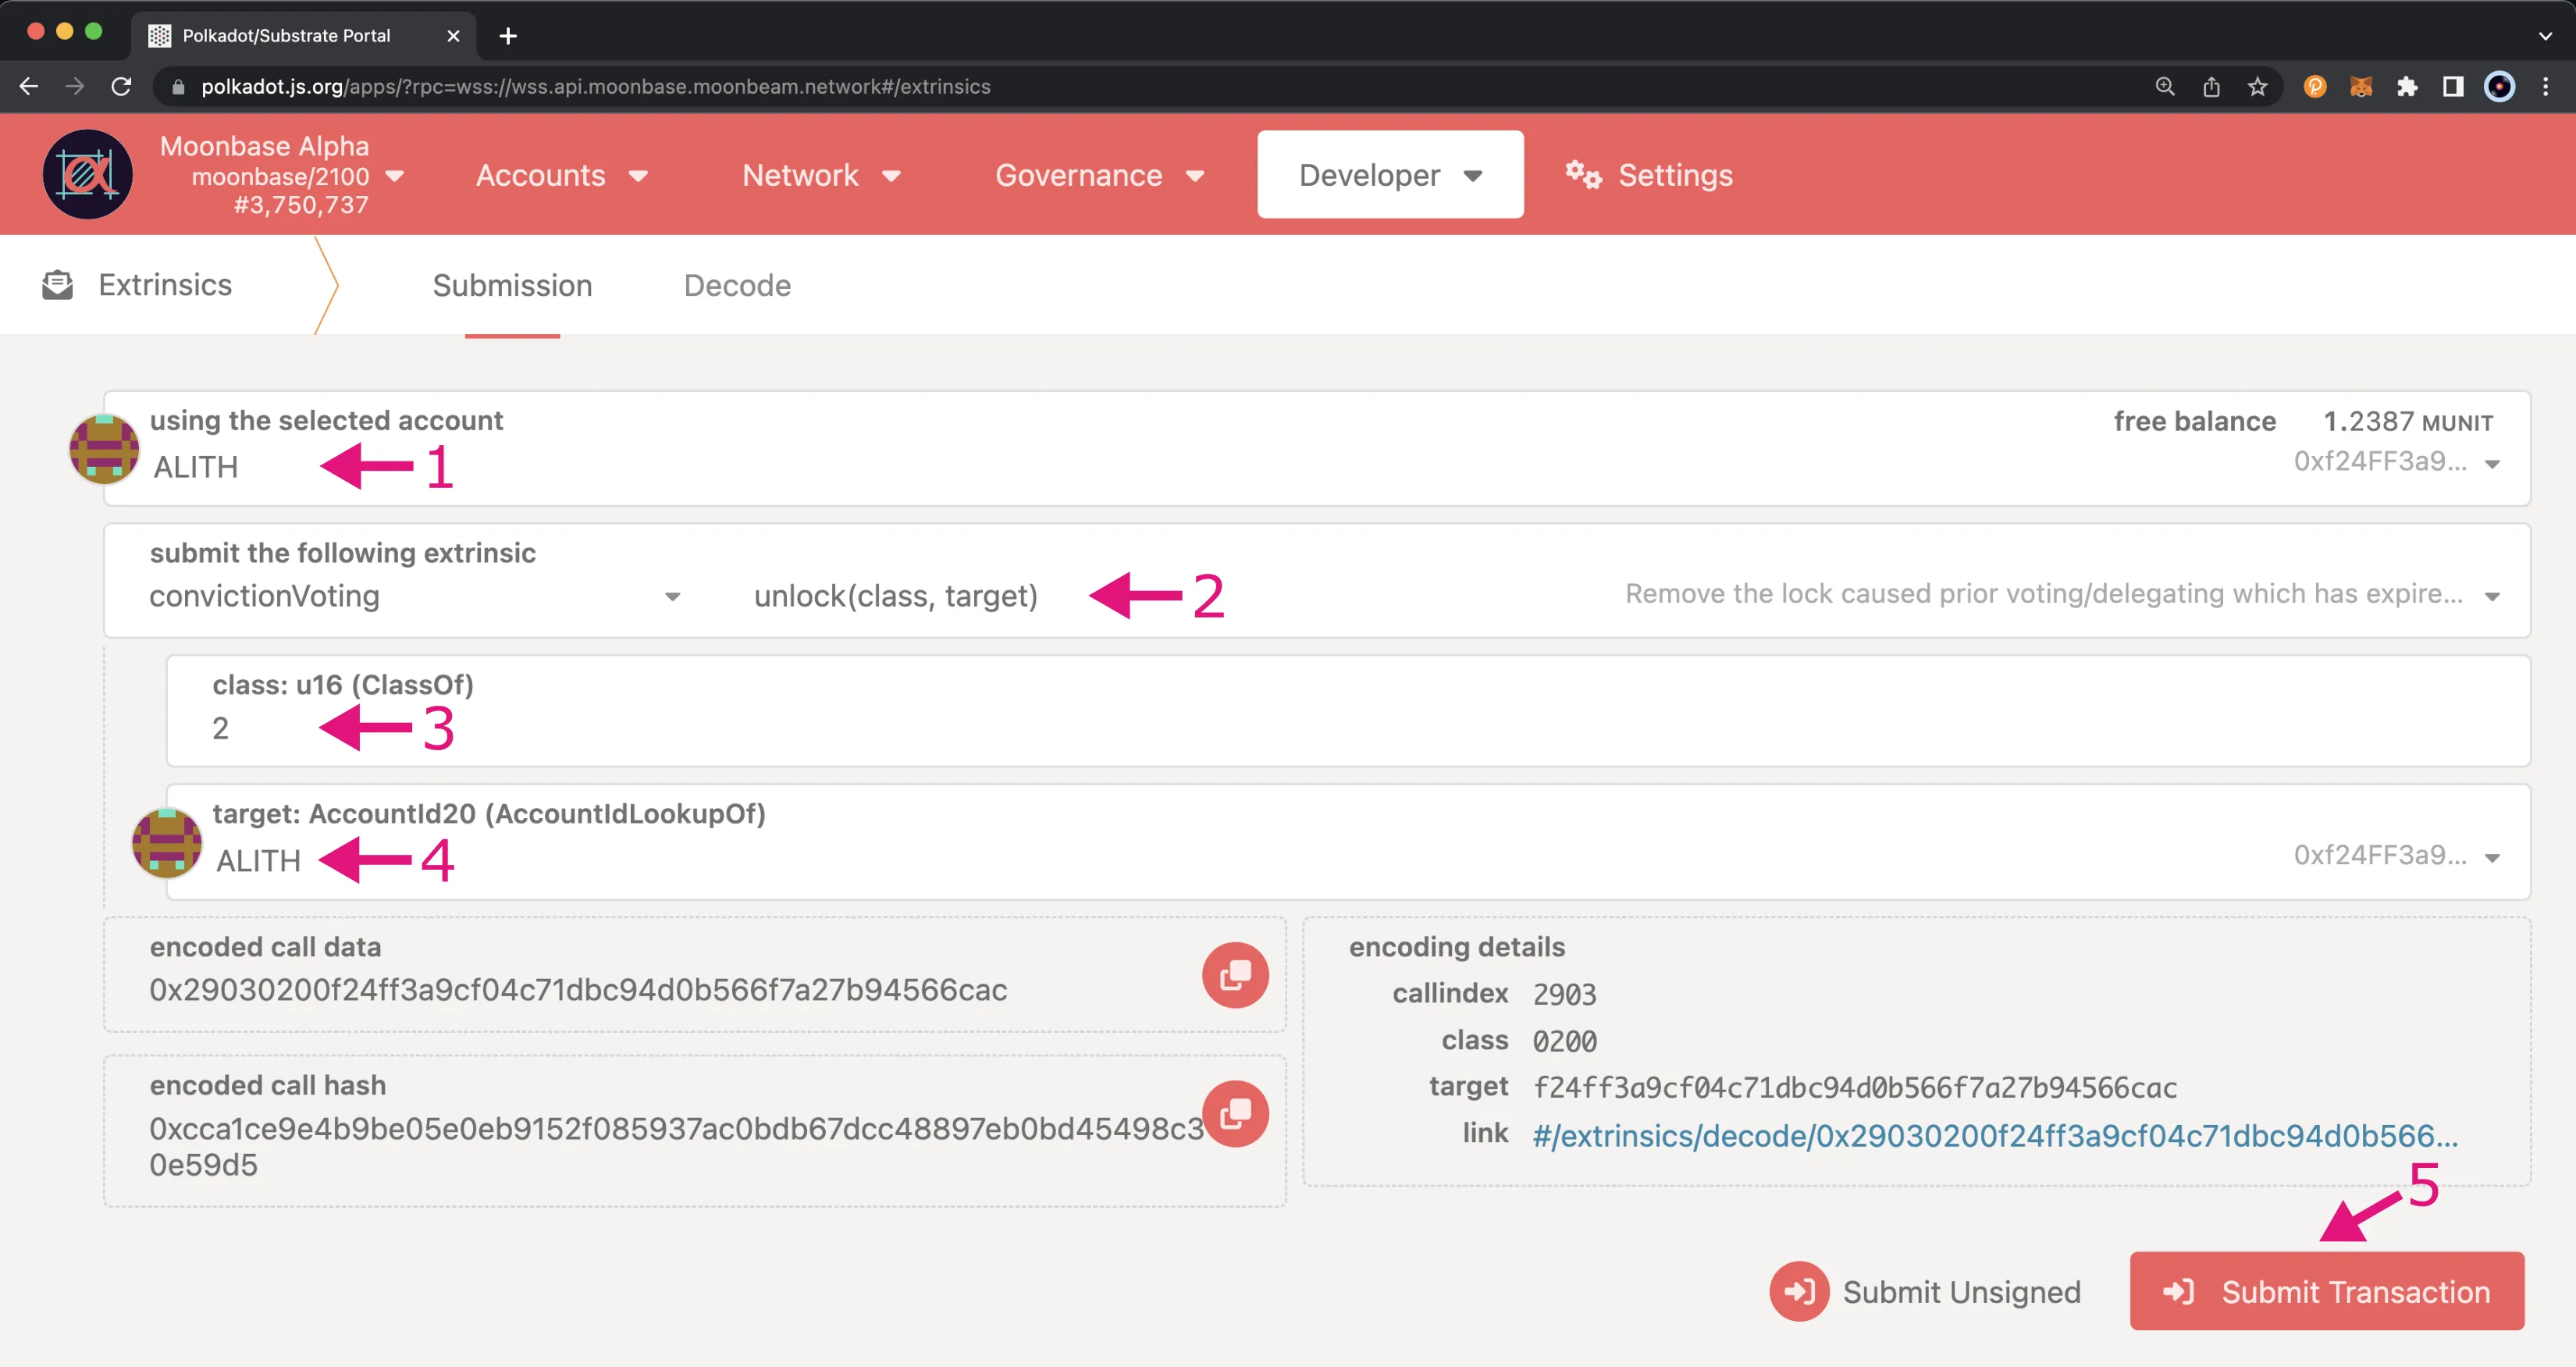
For the next extrinsic, you need to provide the following information:
- Select the account from which you want to recover your tokens
- Choose the pallet you want to interact with. In this case, it is the
convictionVotingpallet - Choose the extrinsic method to use for the transaction. This will determine the fields that need to be filled out in the following steps. In this case, it is the
unlockextrinsic - Enter the Track ID to remove the voting lock for
- Enter the target account that will receive the unlocked tokens. In this case, the tokens will be returned to Alice
- Click the Submit Transaction button and sign the transaction
Once the transaction goes through, the locked tokens should be unlocked. To double-check, you can go back to the Accounts tab and see that your full balance is now transferable.
| Created: February 15, 2023