Interacting with Moonriver Using Ledger and the Moonriver App
Introduction
Hardware wallets provide a safer way to store crypto funds because the private key (used for signing transactions) is stored offline. Ledger offers two hardware wallet solutions at the time of writing: Ledger Nano S and Ledger Nano X.
You can interact with Moonriver using your Ledger hardware wallet through the Moonriver Ledger Live app. With the dedicated Moonriver app, you do not have to worry about setting the chain ID and you know you are connected to the right network. Please note that you can only use the Moonriver app to connect to the Moonriver network, it cannot be used to connect to other Moonbeam-based networks.
You also have the option of using the Ethereum app to connect to Moonriver. The main difference between using the Moonriver and the Ethereum app is that you have to specify the chain ID when you use the Ethereum app, which is 1285 for Moonriver. If you're interested in using the Ethereum app on Moonriver instead, you can check out the Interacting with Moonbeam Using Ledger and the Ethereum App guide.
In this tutorial, you will learn how to get started with your Ledger hardware wallet on Moonriver using the Moonriver app. This guide only illustrates the steps for a Ledger Nano X device, but you can follow along with a Ledger Nano S as well.
Checking Prerequisites
Before you get started, update Ledger Live to the latest version available. Also, make sure you've your Ledger hardware wallet device running the latest firmware. The Ledger support website offers tutorials on how to update the firmware.
At the time of writing, the following versions were used:
In addition, you'll need MetaMask as an intermediary between your Ledger device and Moonbeam. Make sure that your MetaMask is connected to Moonbeam.
As of MetaMask version 10.5.0, connecting your Ledger device with MetaMask on Chrome is easy again. You just need to have the latest version of MetaMask installed.
Install the Moonriver Ledger Live App
The Moonriver app is dependent on the Ethereum app, so first you will need to install the Ethereum app. Once the Ethereum app is installed you will be able to install the Moonriver app without a problem. Please note that the Moonriver app is only for the Moonriver network, it will not work for Moonbeam or Moonbase Alpha.
To get started, open up Ledger Live and:
- Select Manager from the menu
- Connect and unlock your device (this must be done before installation)
- In the App catalog search for Ethereum (ETH) and click Install. Your Ledger device will show Processing and once the installation is complete, the app will appear on your Ledger device
- Search for Moonriver (MOVR) in the App catalog and click Install. Again, your Ledger device will show Processing and once complete, the Moonriver app will appear on your Ledger device
In the Ledger Live app, you should see the Ethereum and Moonriver app listed under the Apps installed tab on the Manager page. After the apps have been successfully installed, you can close out of Ledger Live.

Import your Ledger Account to MetaMask
Now that you've installed the Ledger Live apps, you can connect your Ledger to the computer, unlock it, and open the Moonriver app.
Then import your Ledger account to MetaMask using the following steps:
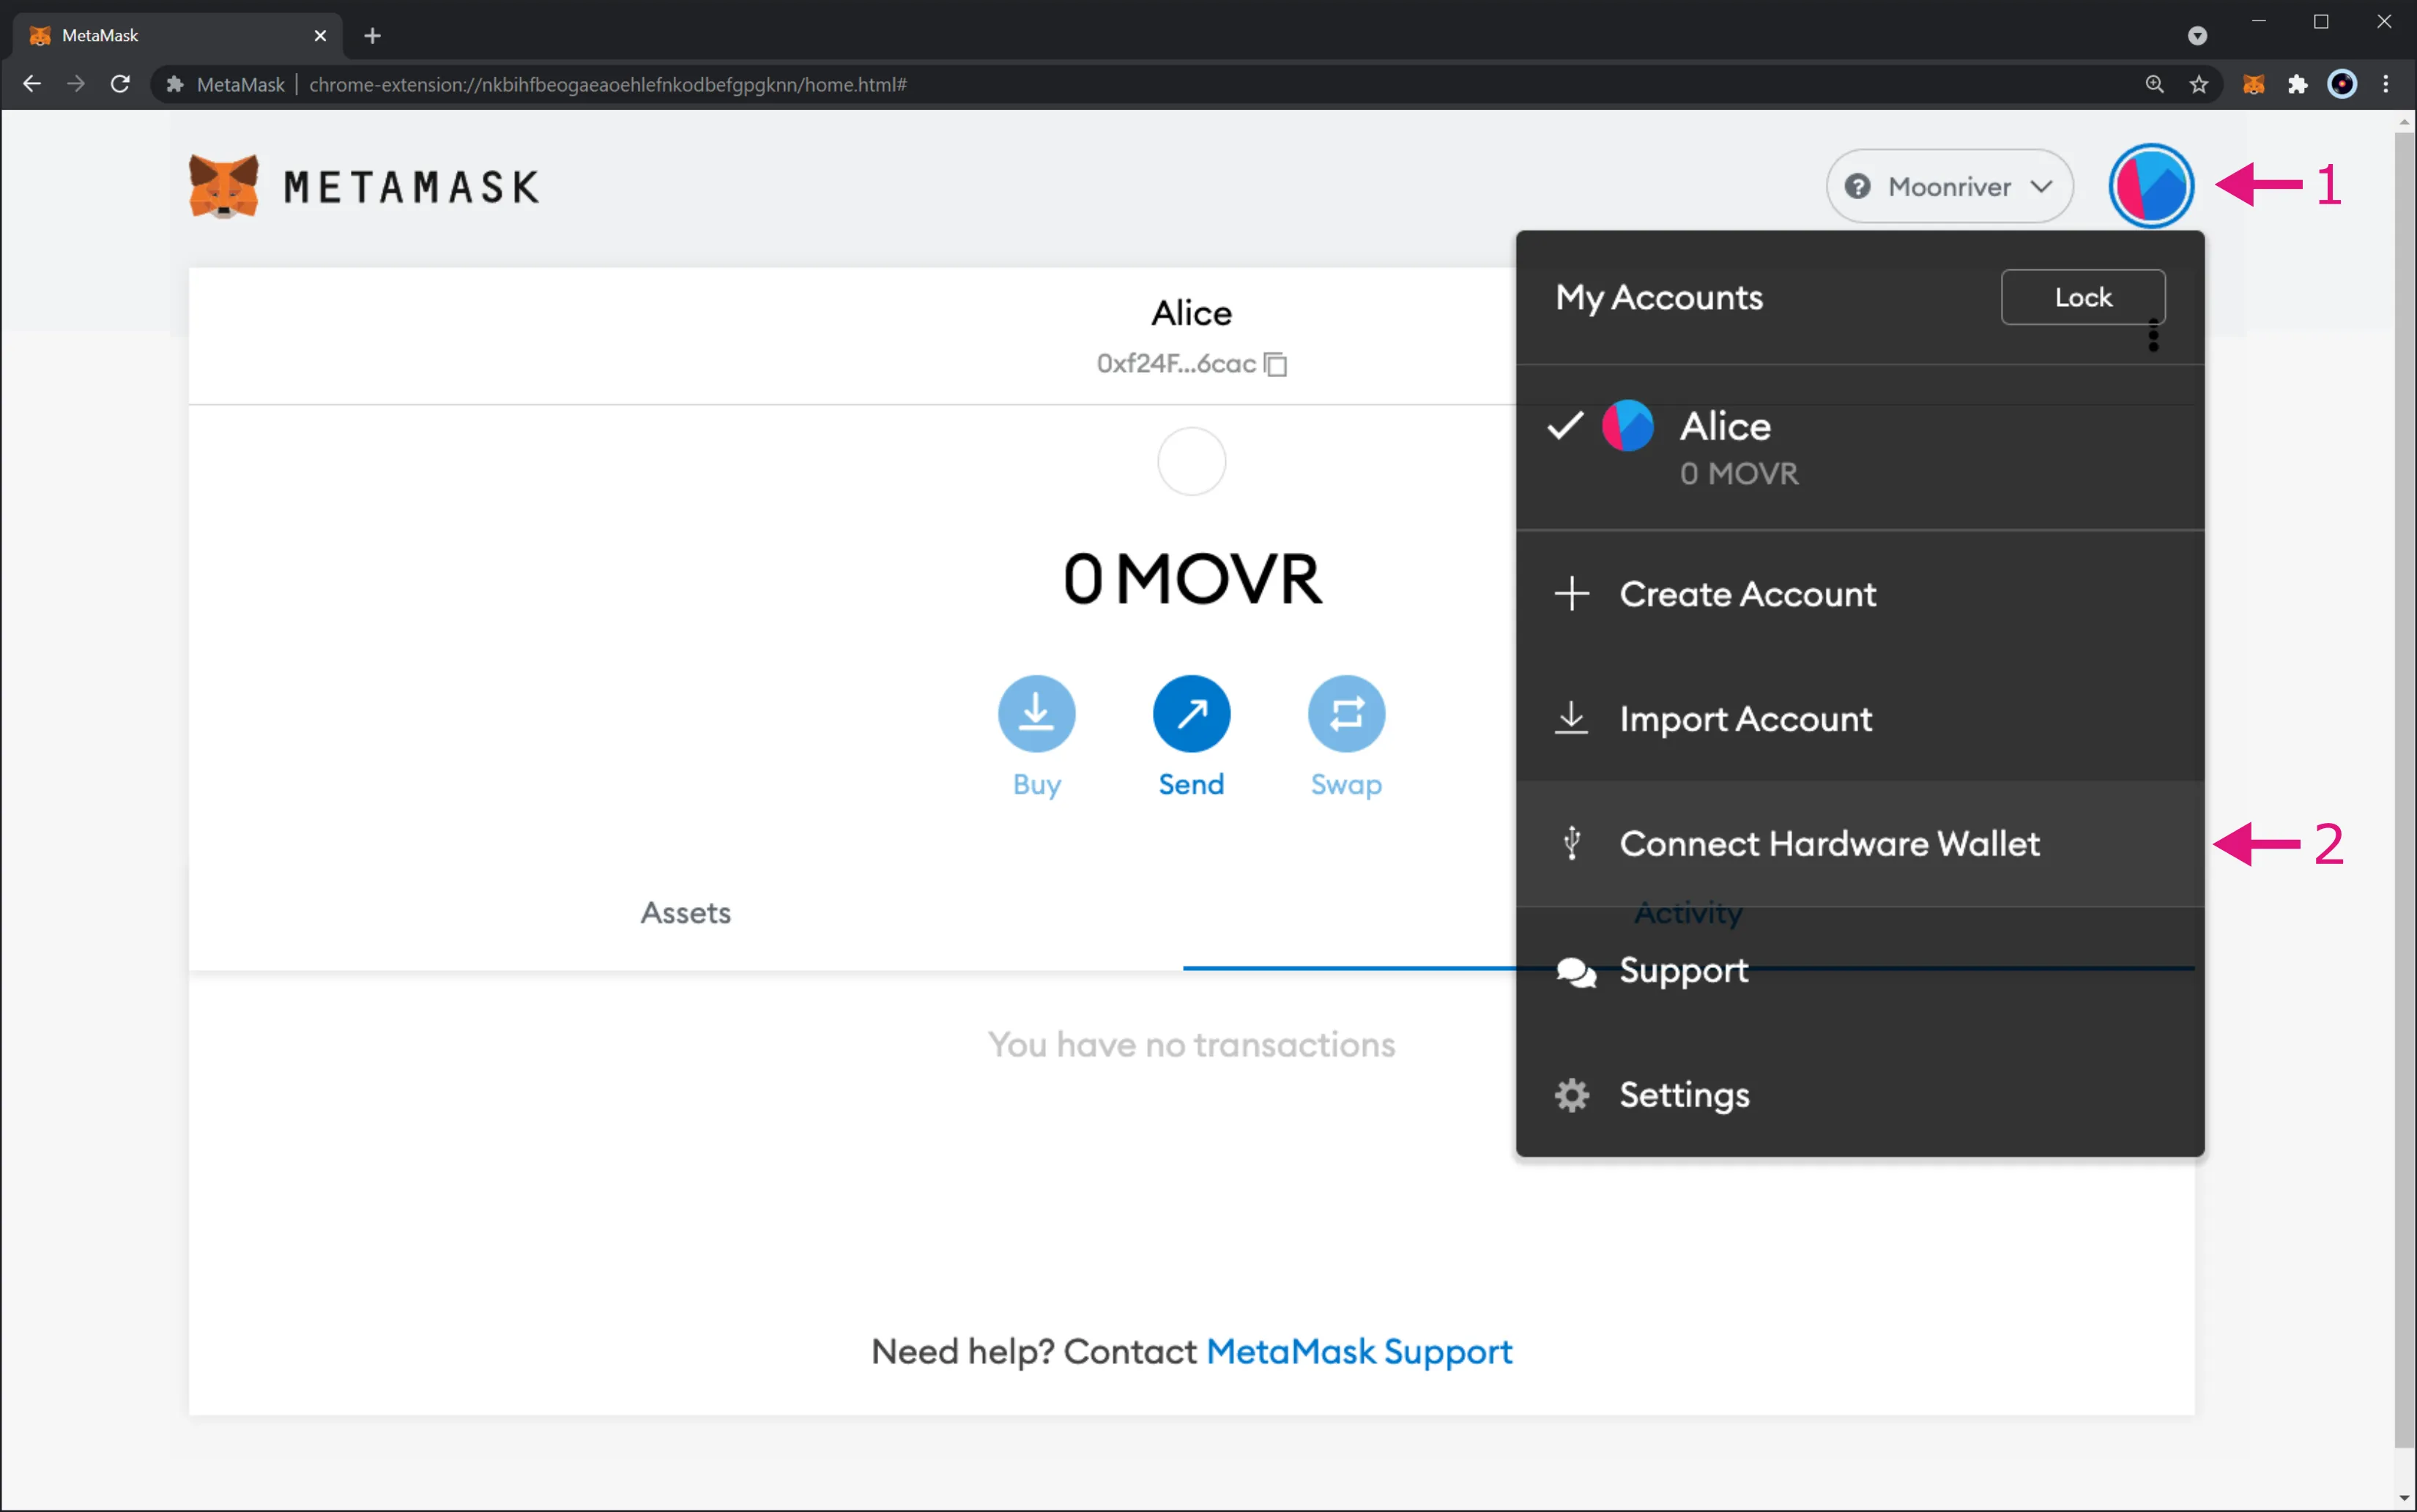
- Click on the top-right logo to expand the menu
- Select Connect Hardware Wallet
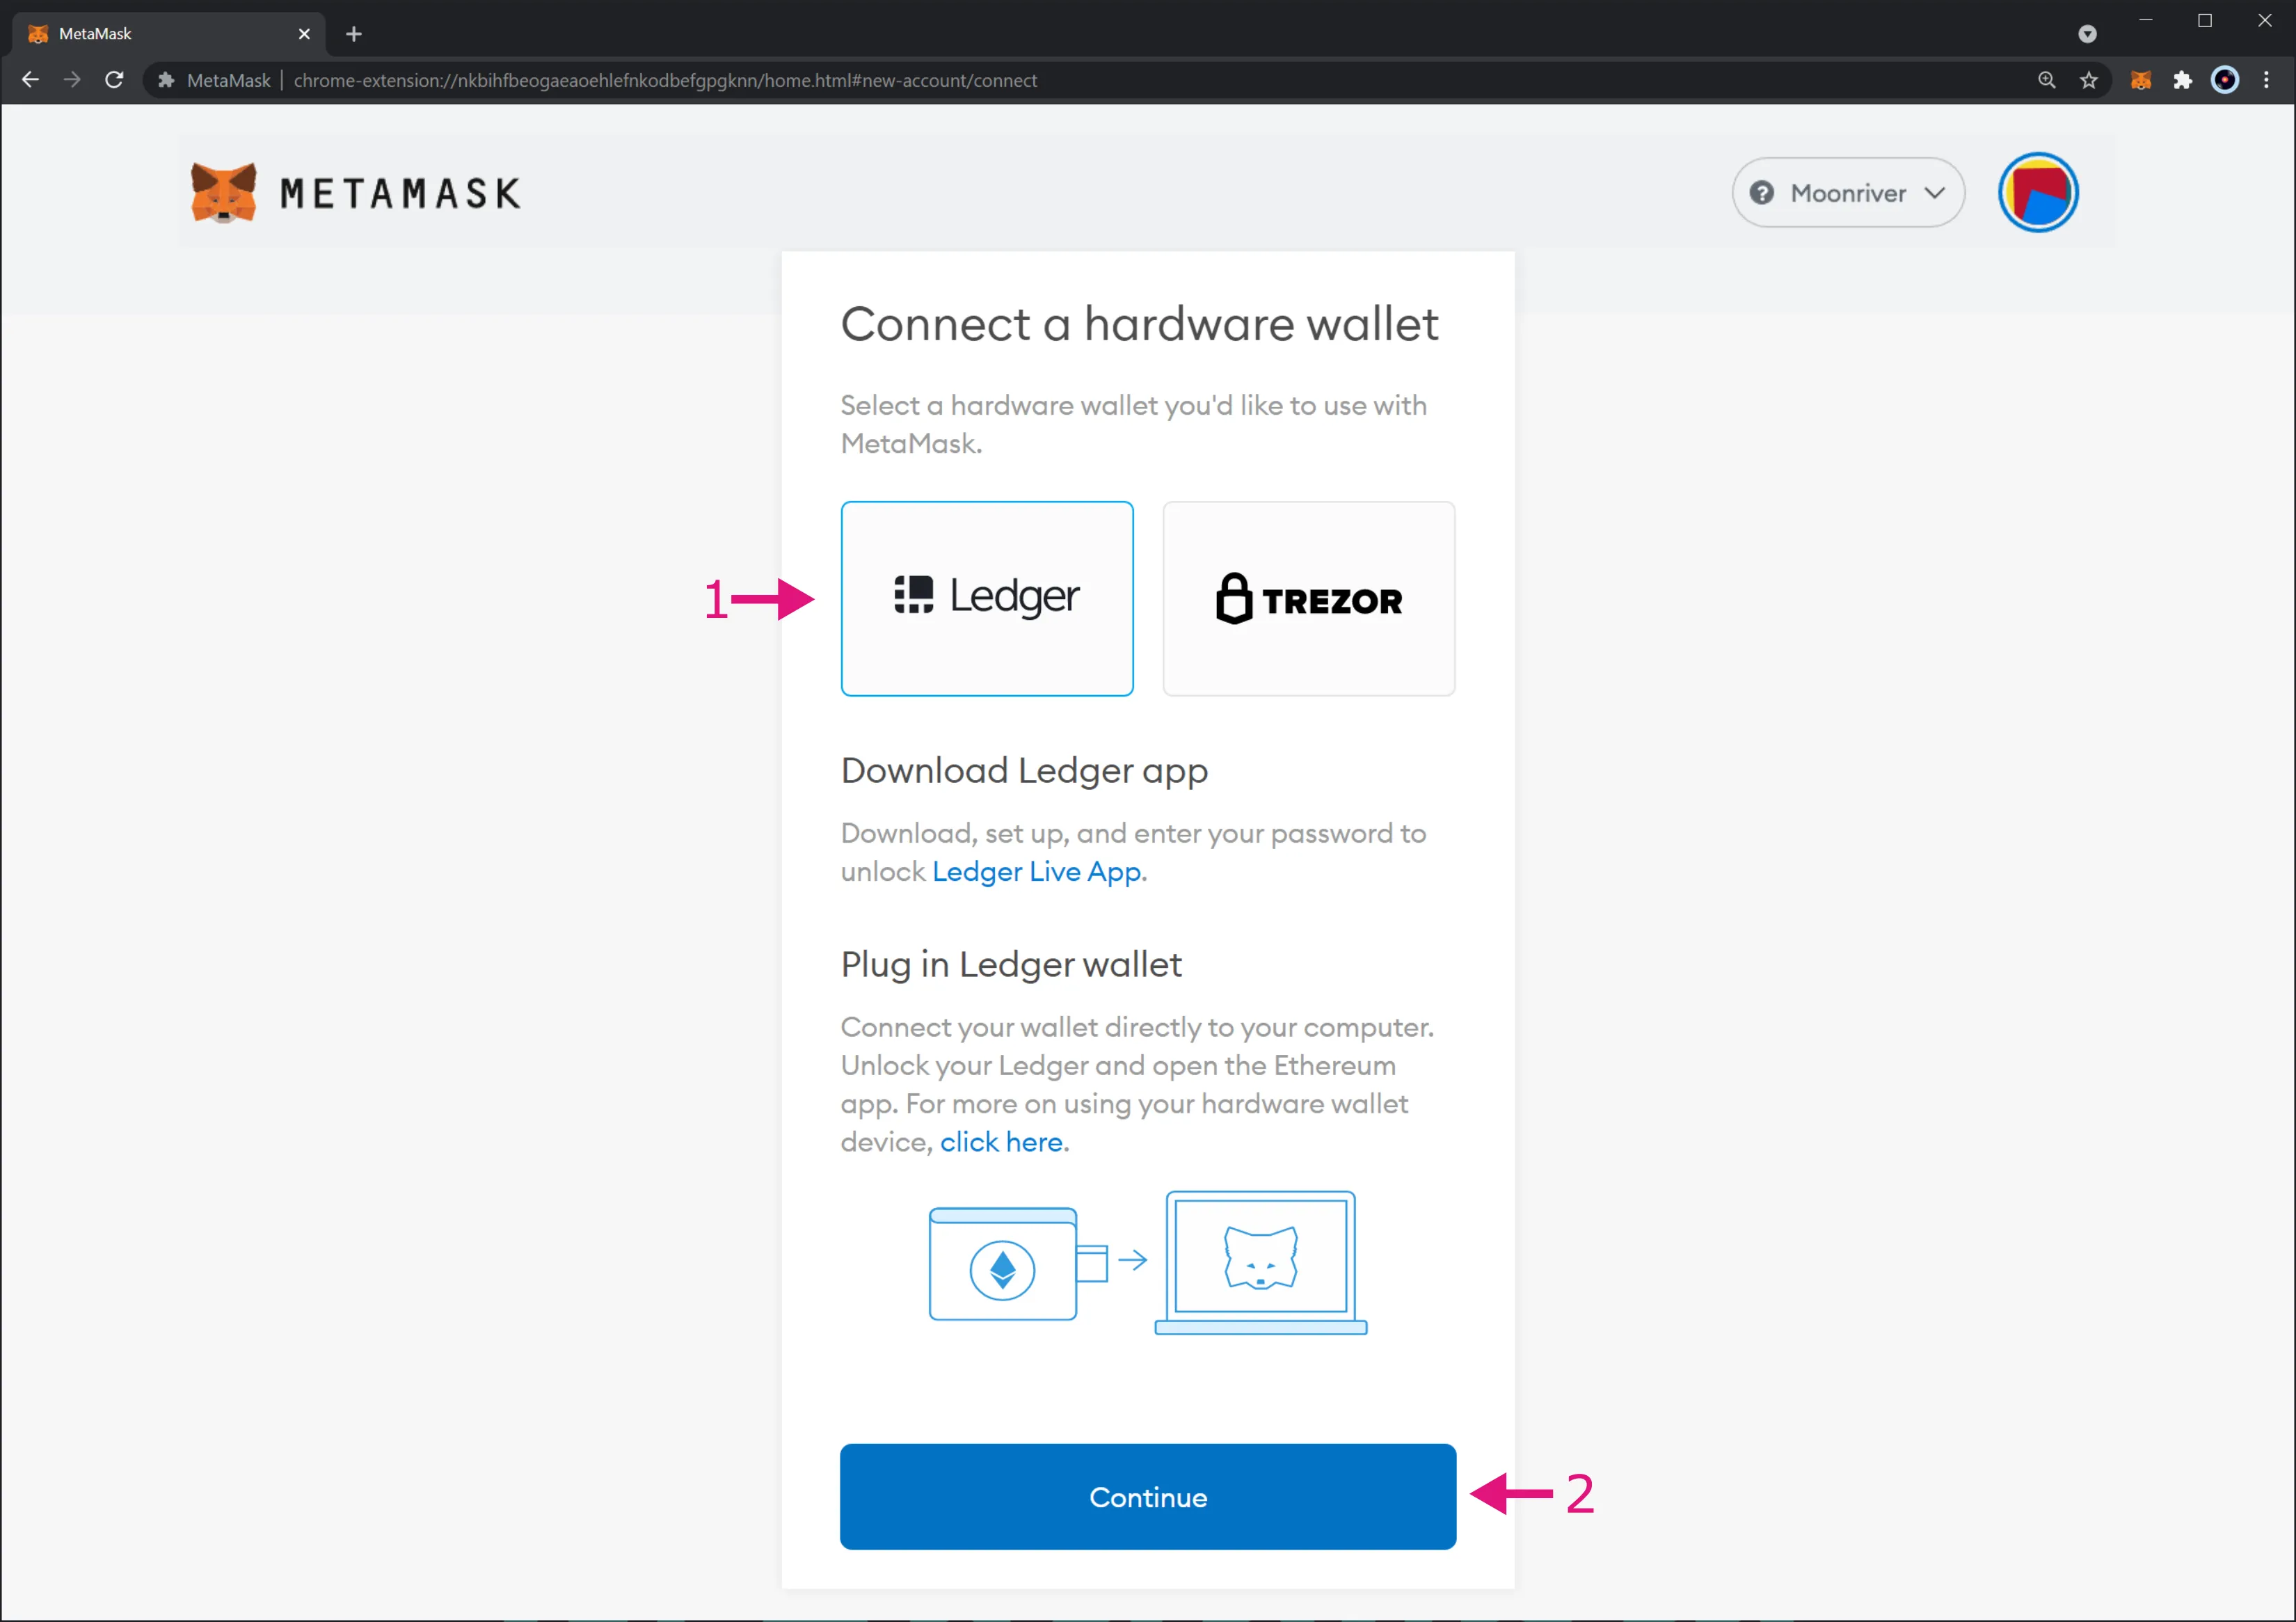
In the next screen, you are prompted to select which hardware wallet you'll like to use in MetaMask. At the moment of writing, only Ledger and Trezor hardware wallets are supported. Here, take the following steps:
- Select the Ledger logo
- Click on Continue
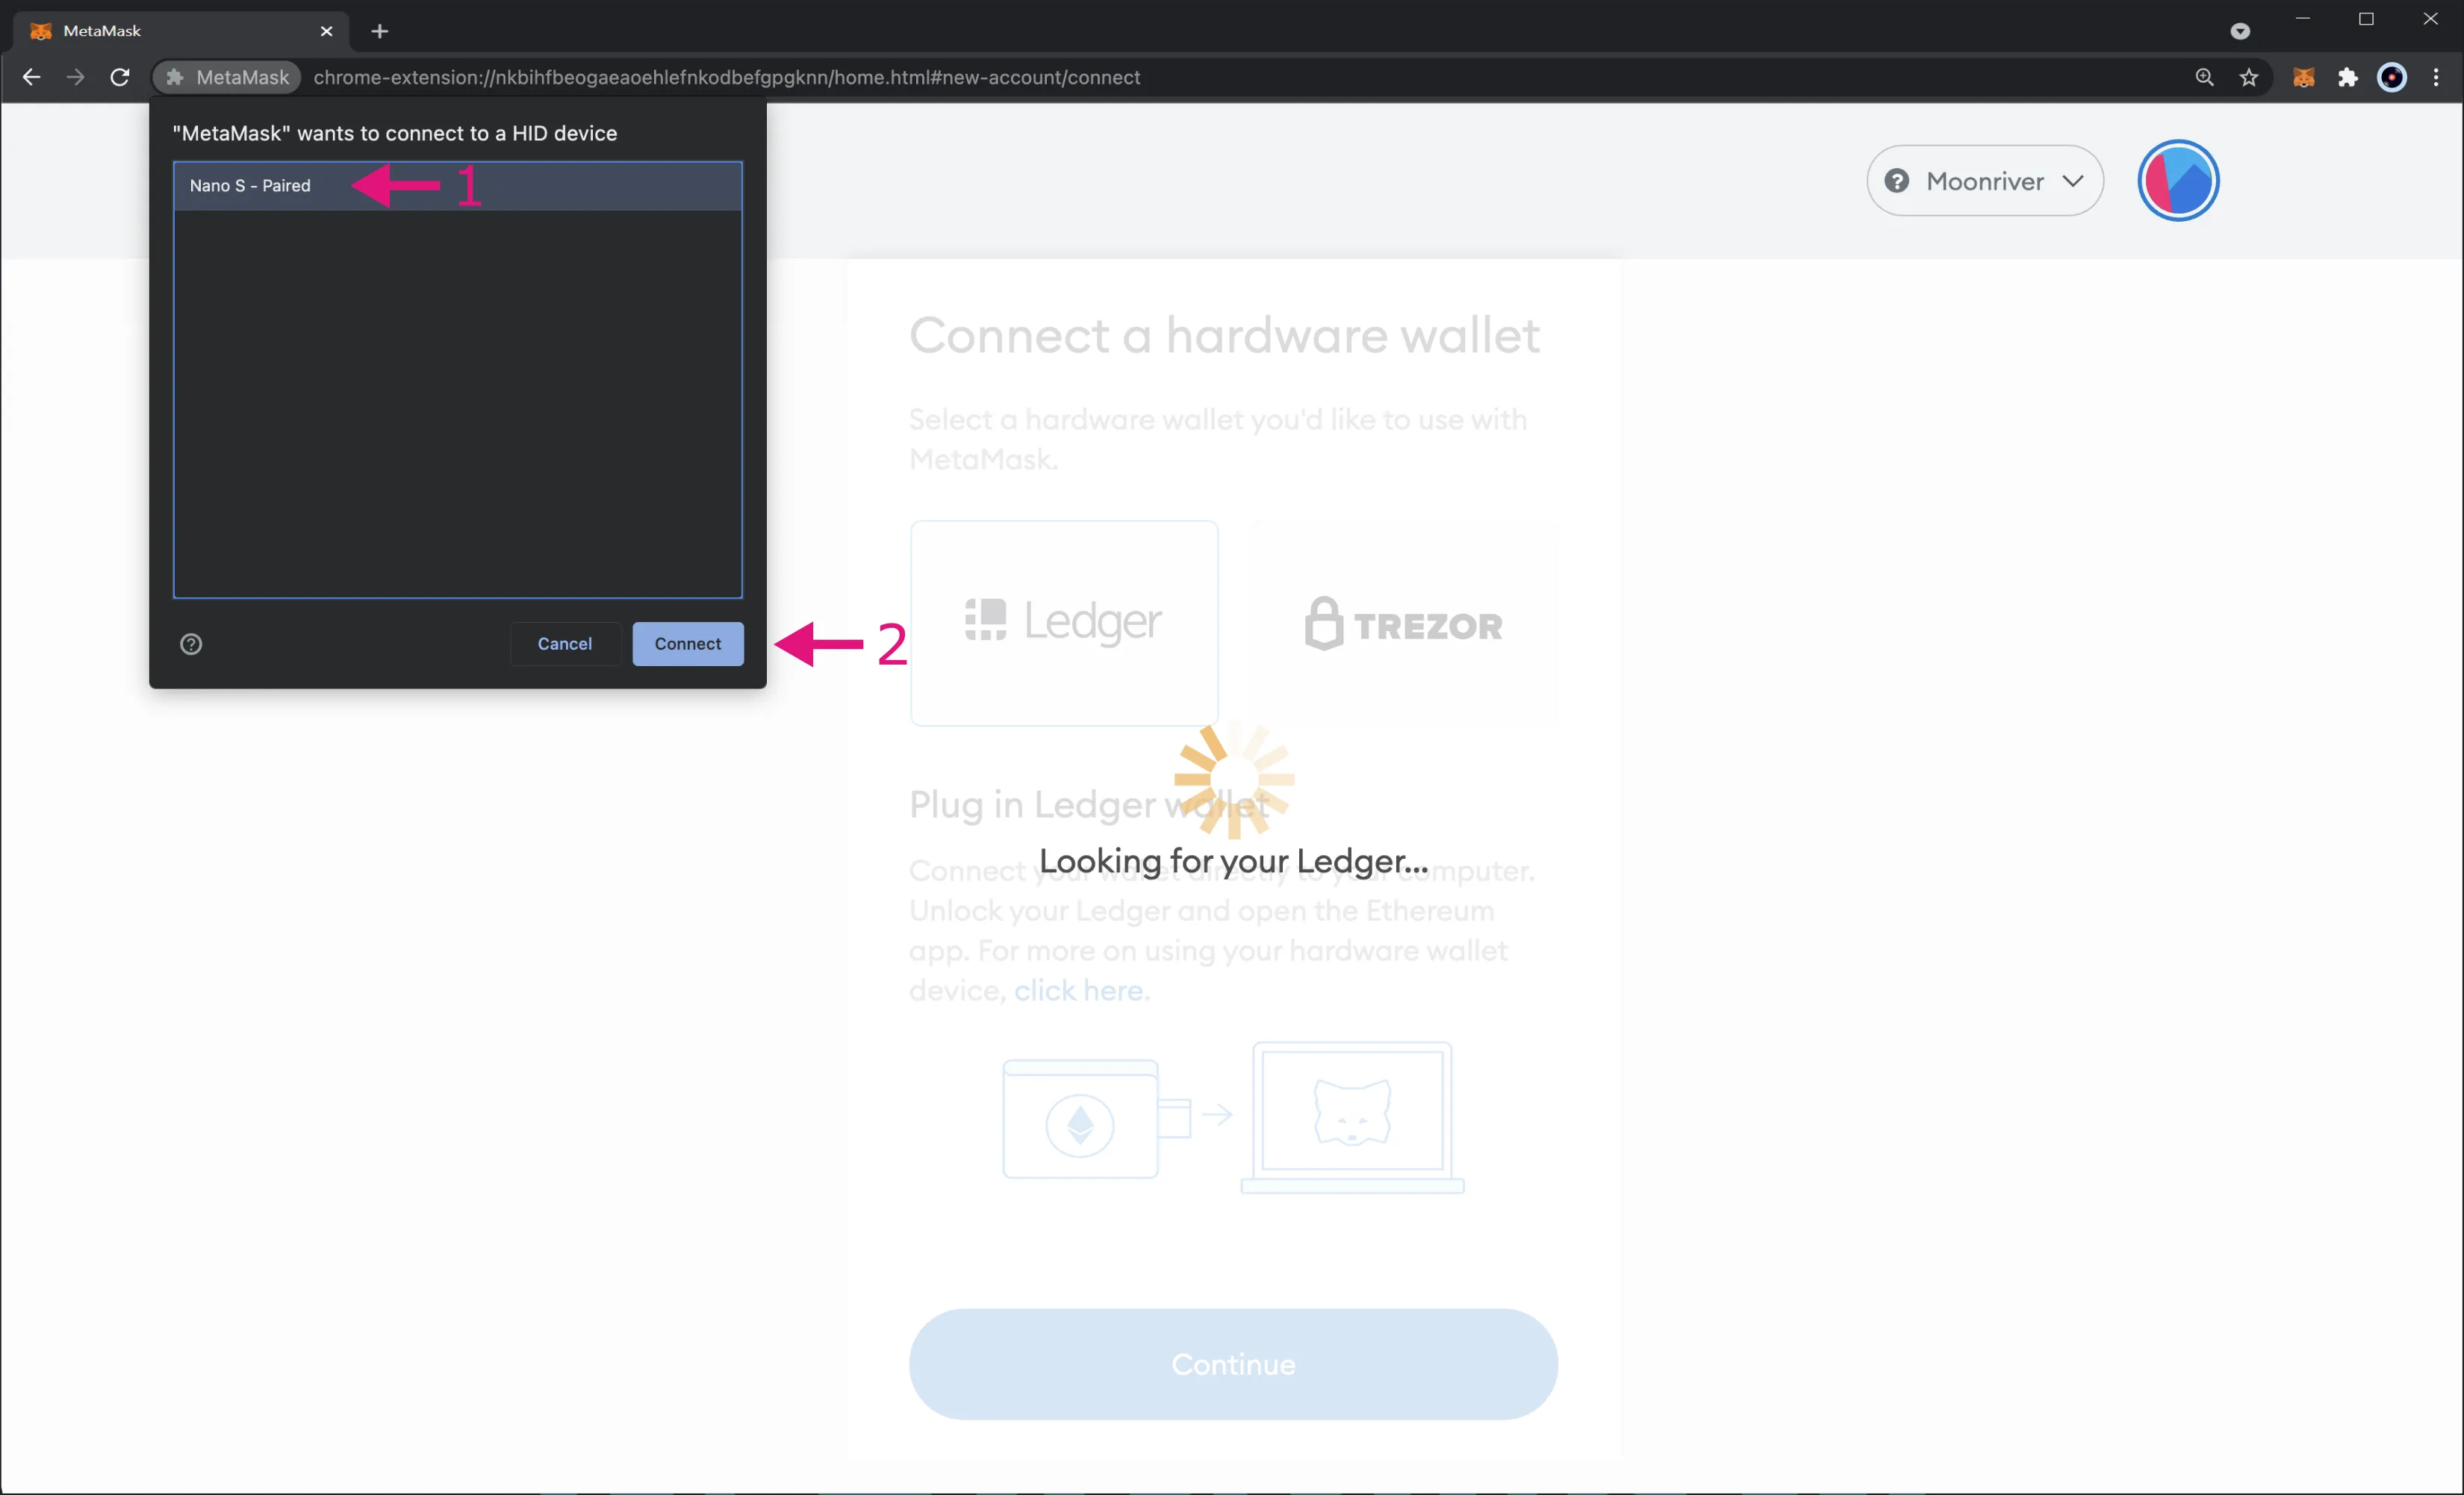
If you're using Chrome or a Chrome-based browser like Brave, you'll be prompted to select your Ledger device to connect via WebHID:
- Select your Ledger device from the pop-up
- Click Connect
If a pop-up doesn't appear, you may need to change your MetaMask settings to enable a WebHID connection. You can check and update your MetaMask settings by following these steps:
- Expand the top-right menu and go to Settings
- Navigate to Advanced
- Scroll down to Preferred Ledger Connection Type and select WebHID from the dropdown
Note
The Preferred Ledger Connection Type setting is only available on Chrome and Chrome-based browsers. This setting doesn't exist on other browsers such as Firefox.
If MetaMask was able to connect successfully to your Ledger device, you should see a list of five Moonriver/Ethereum-styled accounts. If not, double-check that Ledger Live is closed, you've connected your Ledger device to the computer, unlocked it, and have the Moonriver app open.
Import Accounts and View Balances
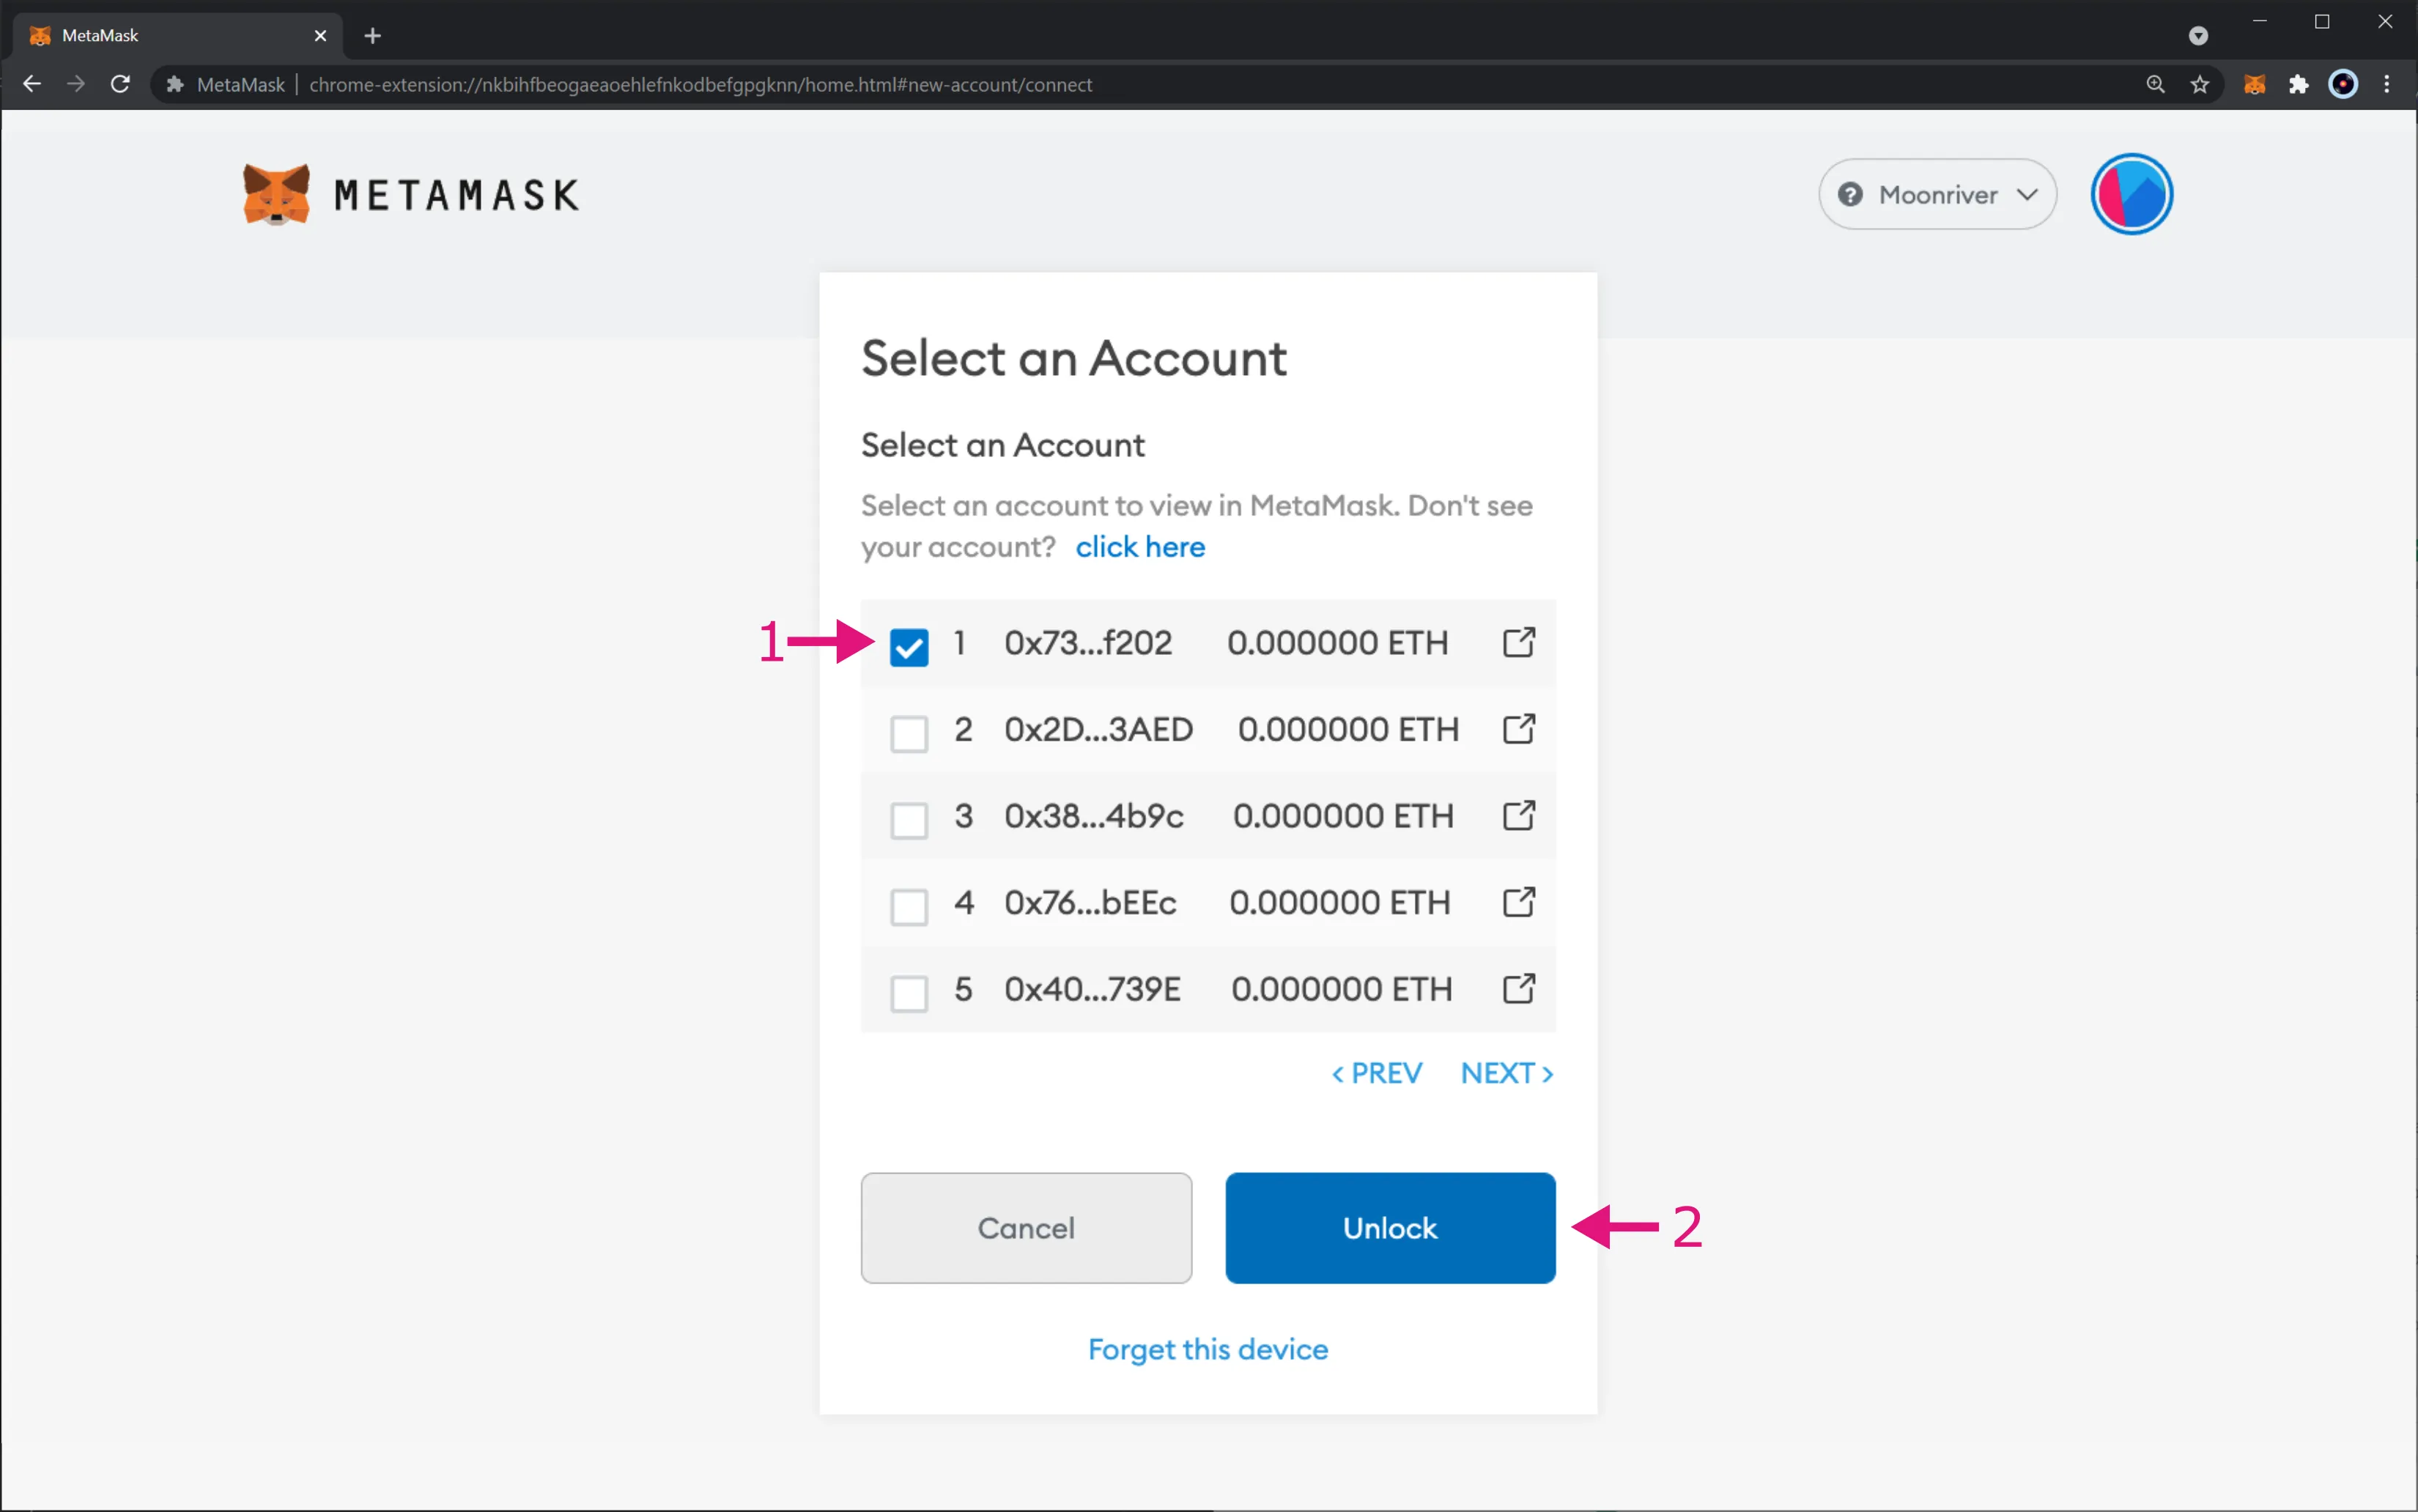
From the list of accounts, take the following steps:
- Select the accounts you would like to import from your Ledger device
- Click on Unlock
If you've imported your Ledger account successfully, you should see your account and balance displayed in the main MetaMask screen like shown in the following image:

You can switch accounts in MetaMask at any time to view the balance of your other imported Ledger accounts.
You've now successfully imported a Moonriver compatible account from your Ledger device and are now ready to start interacting with your Ledger device.
Receive Tokens
To get started interacting with your Ledger device, you will need to send some funds to it. Copy your address from MetaMask by clicking on your account name and address in MetaMask.
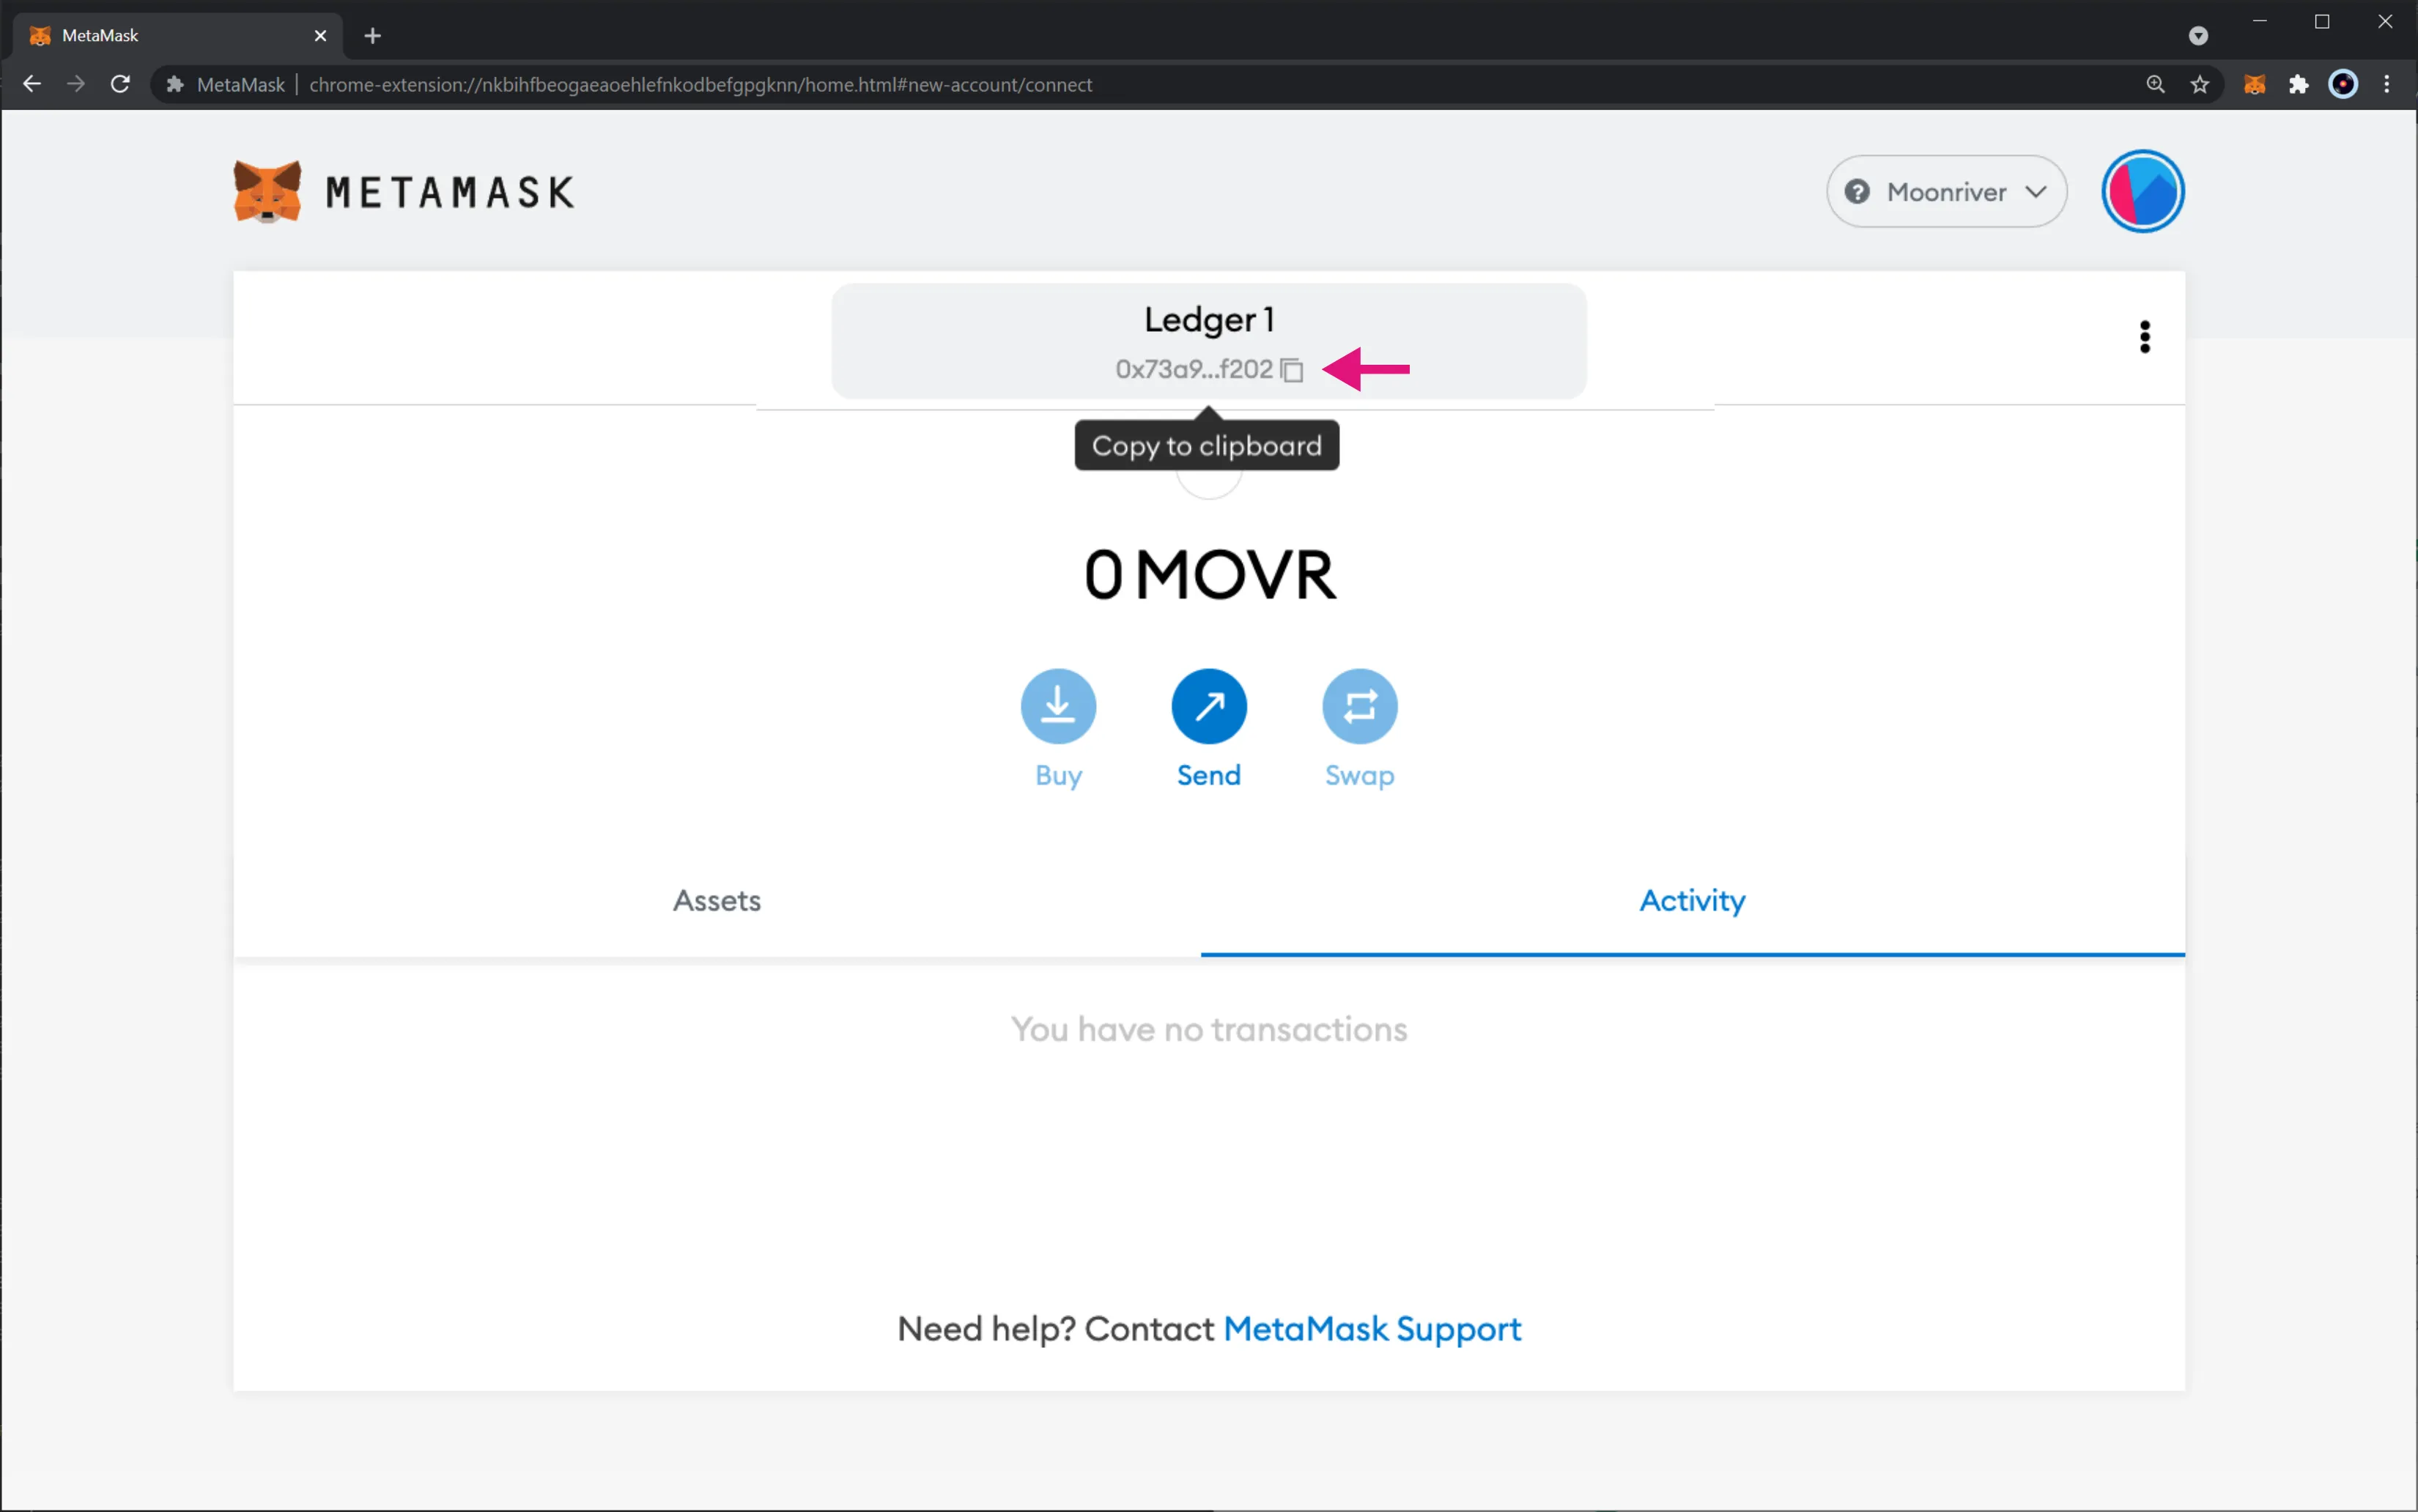
Next, you will need to obtain some MOVR tokens and using the address you just copied, send the tokens to your account. After the transaction has successfully gone through, you will see your balance update.
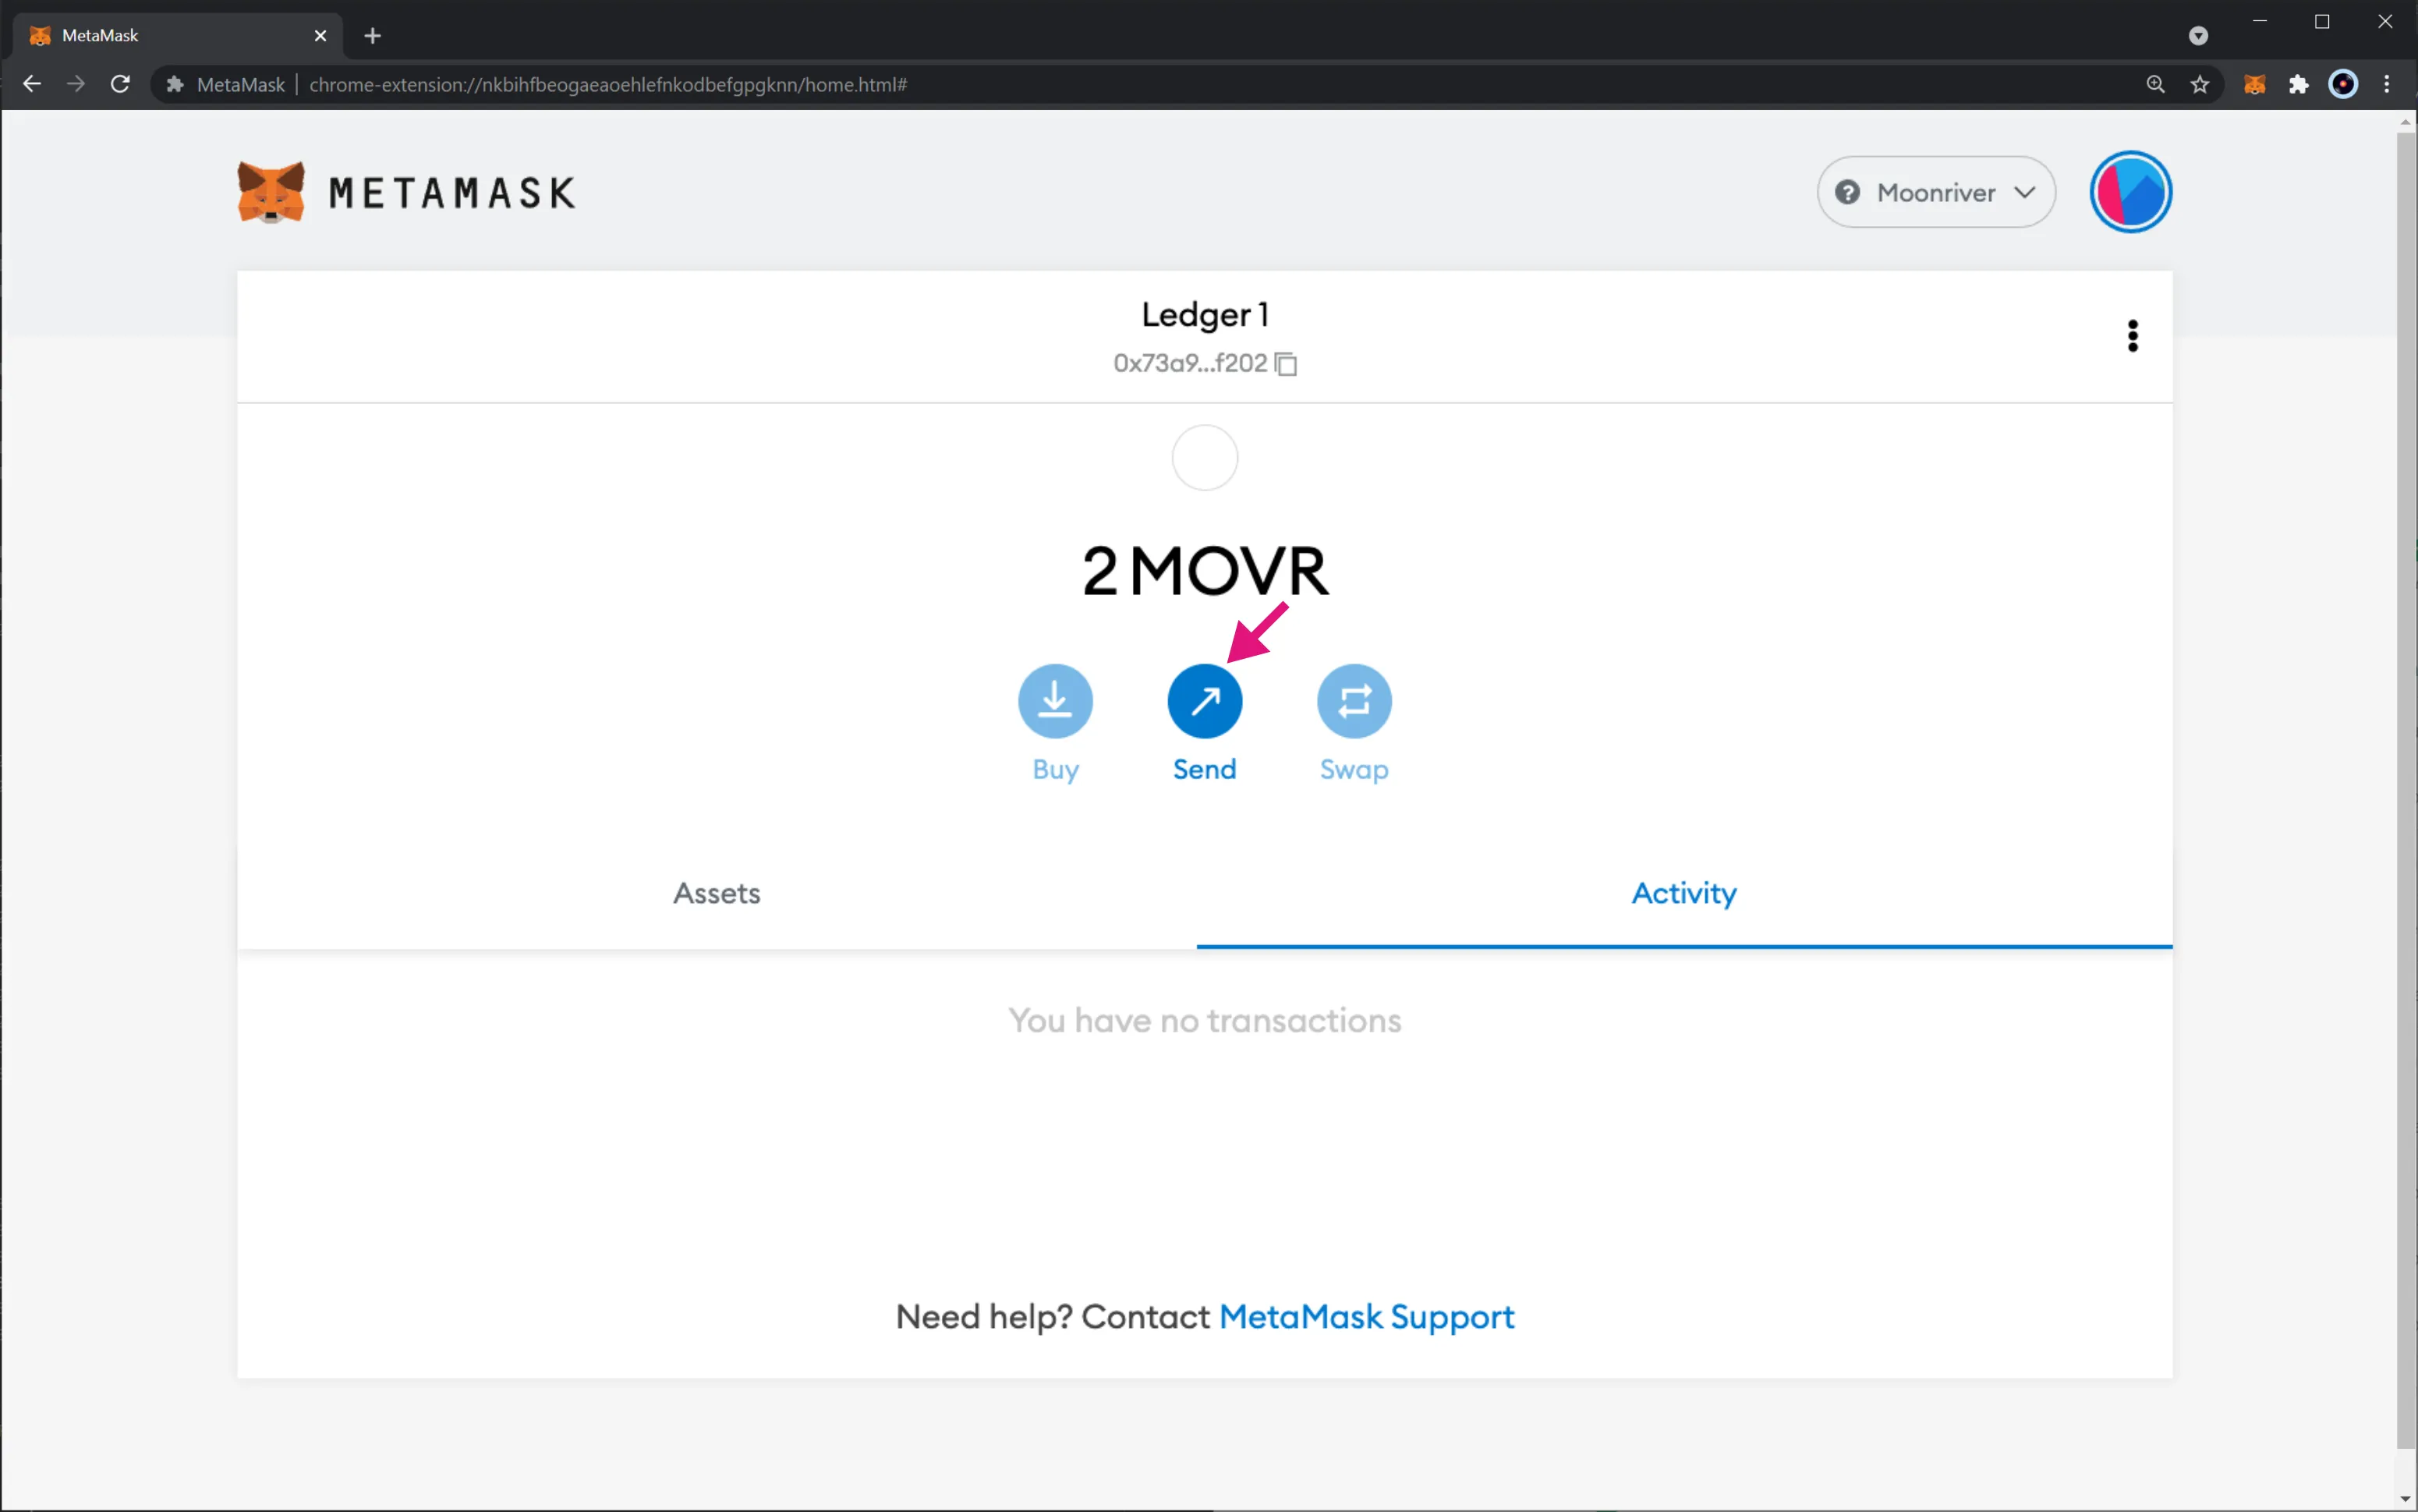
Send Tokens
Next up is sending and signing transactions on Moonriver using your Ledger device. To get started sending a transaction, click on the Send button:
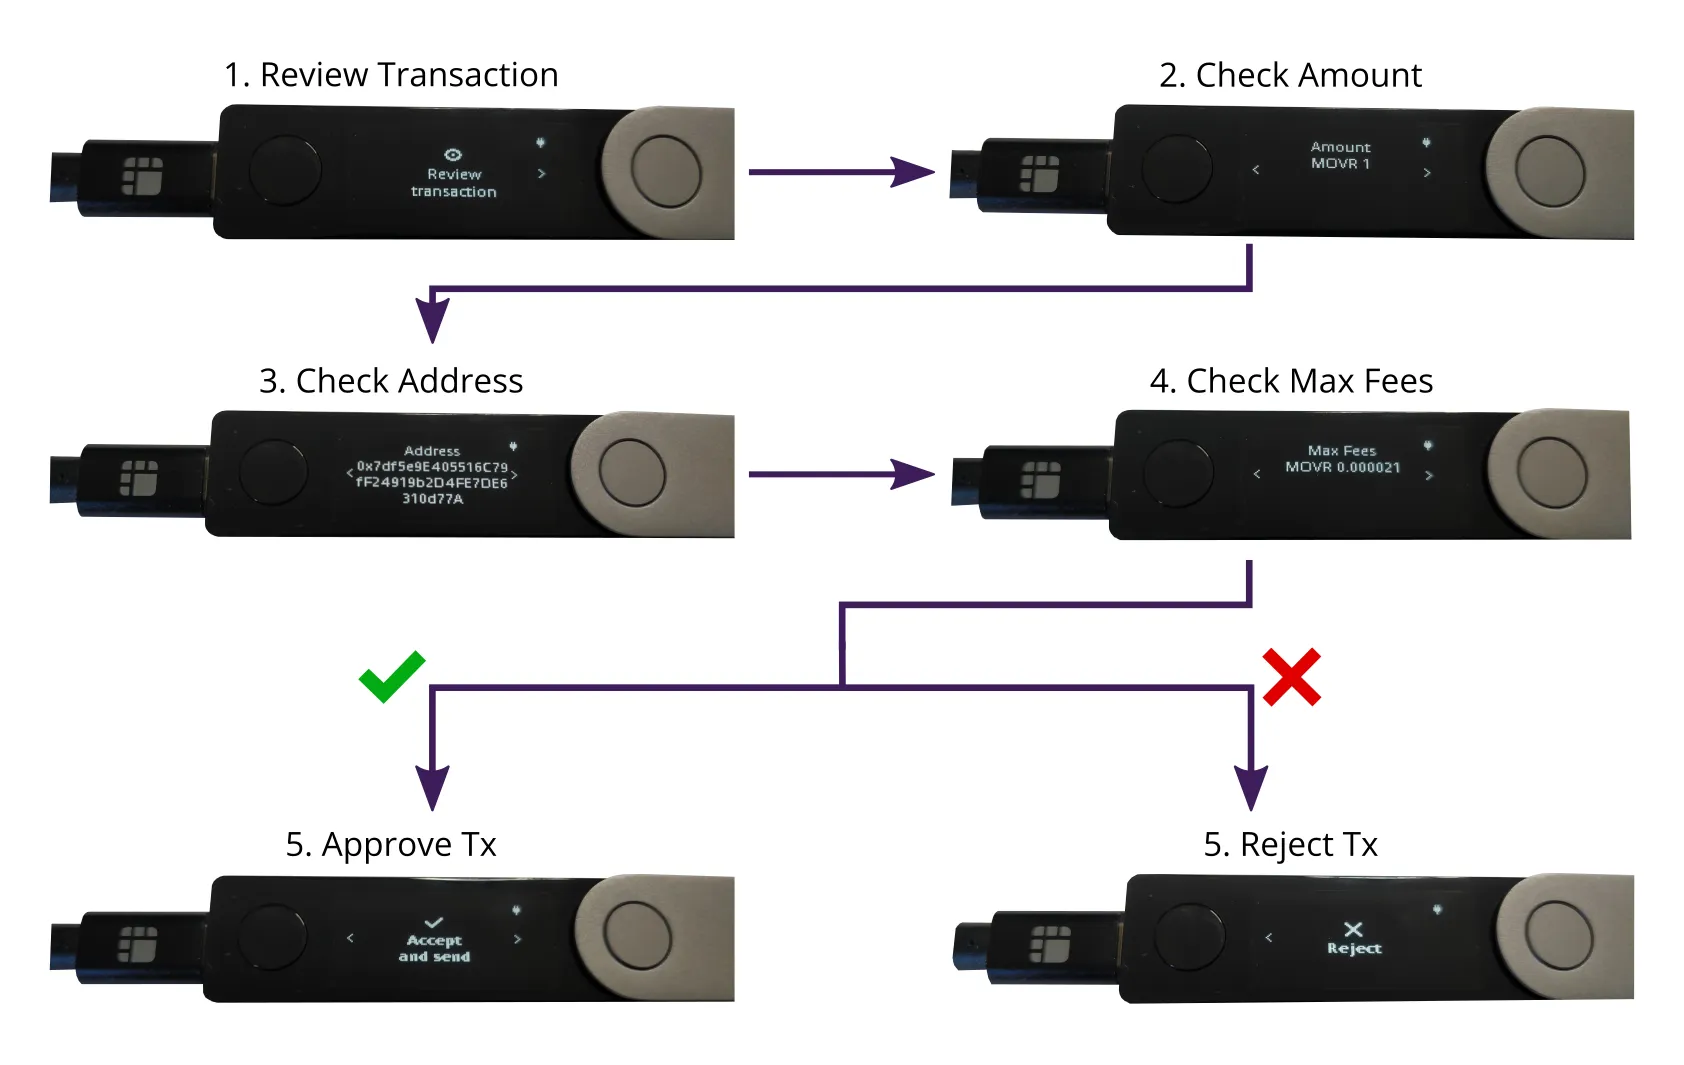
As you would in a standard transaction, set the recipient address, enter the number of tokens to send, review transaction details and confirm it. This will initiate the transaction signature wizard in your Ledger device. Here, take the following steps:
- Click the button to proceed to the next screen. Your Ledger device is only warning you to review the transaction
- Check the number of tokens being sent then proceed to the next screen
- Check the recipient's address and proceed to the next screen
- Check the max fees applicable to this transaction. This is the gas price multiplied by the gas limit you've set on MetaMask. When ready, proceed to the next screen
- If you agree with all the transaction details, approve it. This will sign the transaction and will trigger MetaMask to send it. If you don't agree with all the transaction details, reject it. This will cancel the transaction, and MetaMask will mark it as failed
Right after you've approved the transaction, MetaMask sends it to the network. Once the transaction is confirmed, it will be displayed as Send on the Activity tab in MetaMask.
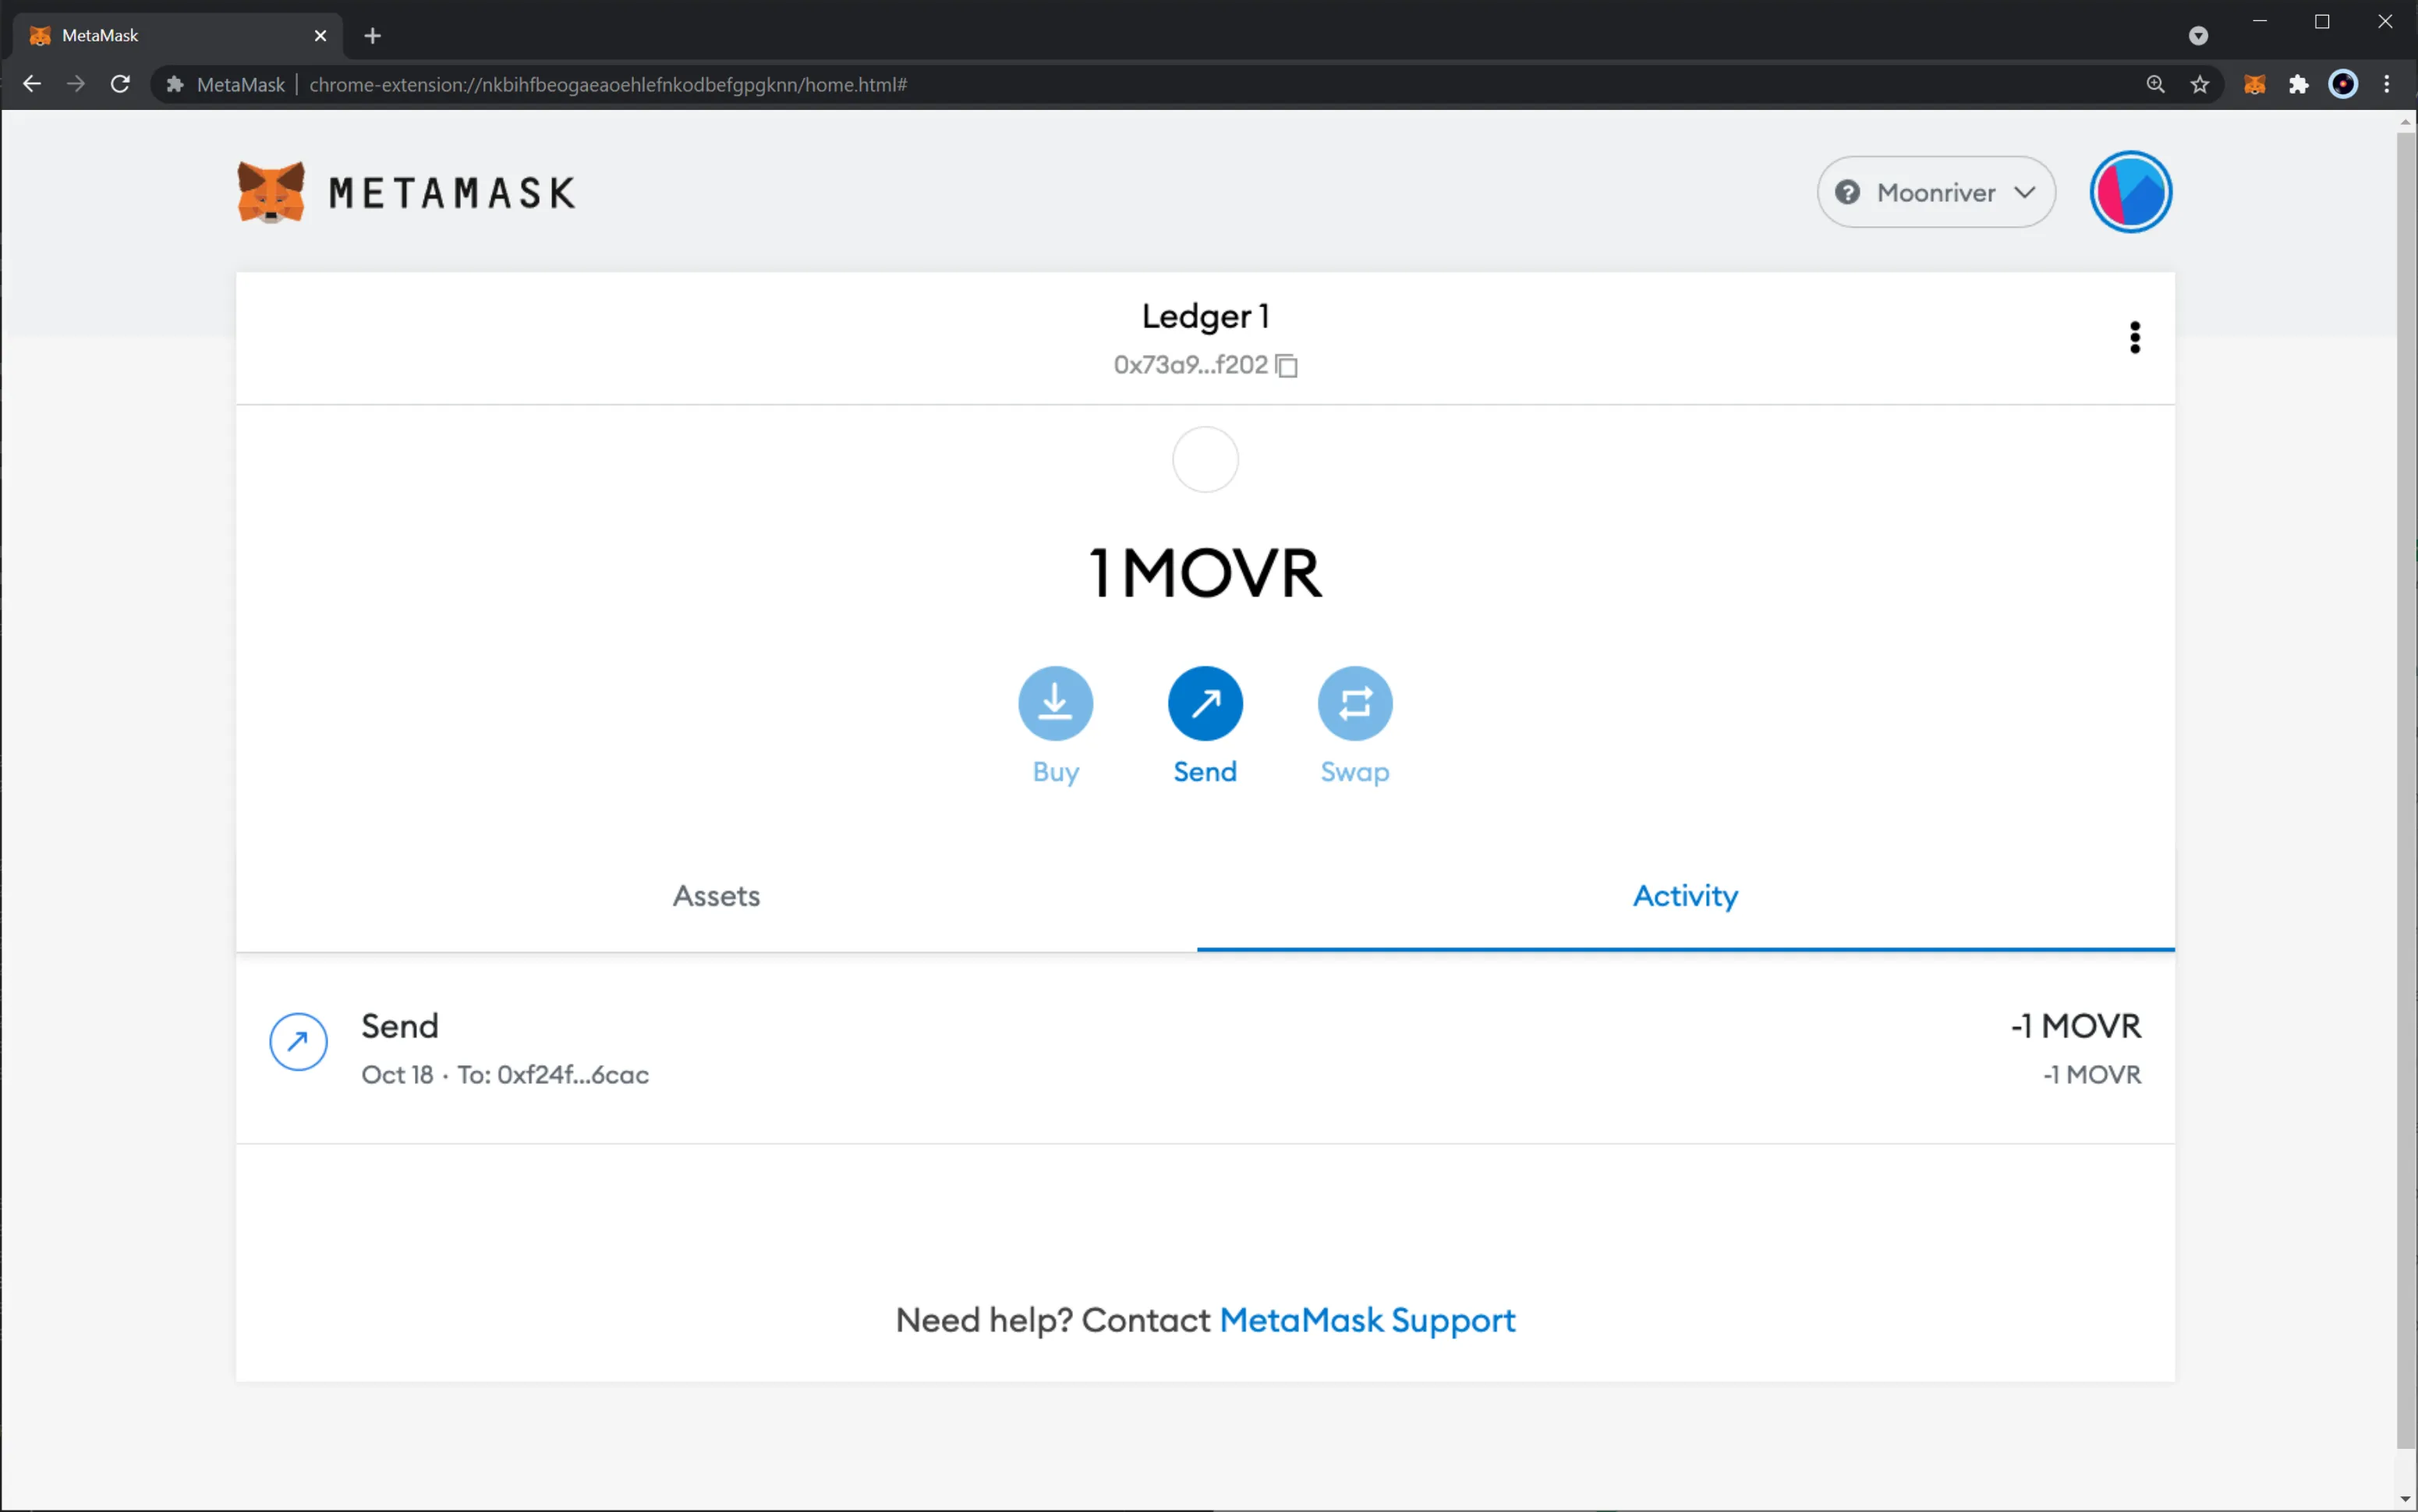
And that is it! You've signed a transaction and sent some MOVR tokens using your Ledger hardware wallet!
Interact with Contracts Using your Ledger
By default, Ledger devices don't admit a data field in the transaction object. Consequently, users can't deploy or interact with smart contracts.
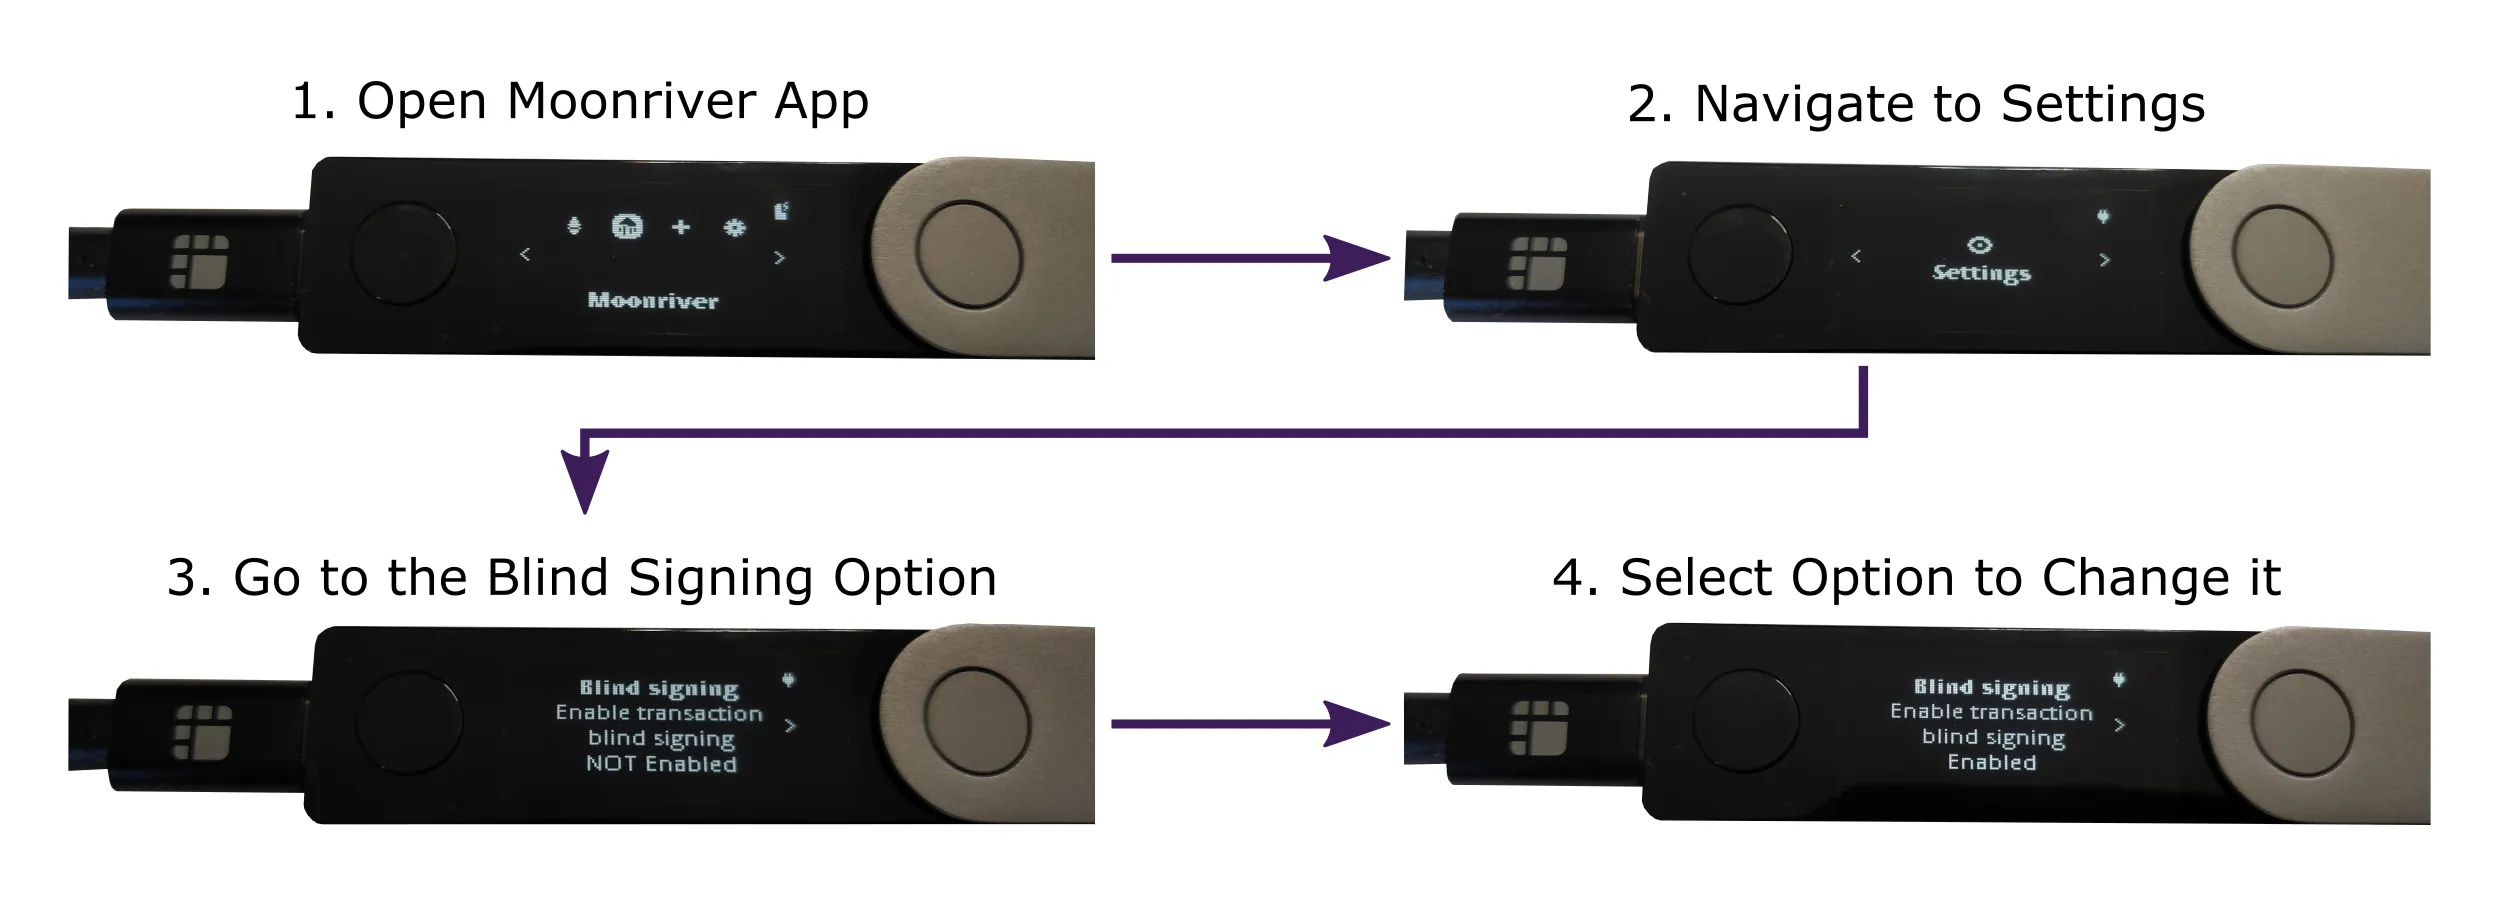
However, if you want to use your Ledger hardware wallet for transactions related to smart contracts, you need to change a configuration parameter inside the app on your device. To do so, take the following steps:
- On your Ledger, open the Moonriver or Ethereum app
- Navigate to Settings
- Find the Blind signing page. It should state NOT Enabled at the bottom
- Select/validate the option to change its value to Enabled
Note
This option is necessary to use your Ledger device to interact with ERC-20 token contracts that might live inside the Moonbeam ecosystem.
| Created: June 22, 2021