Interacting with Moonbeam Using Coinbase Wallet
Introduction
Coinbase Wallet is a self-custody (non-custodial) wallet, like MetaMask, available as a mobile application for iOS and Android and a browser extension. You can use Coinbase Wallet to interact with Moonbeam, Moonriver, and the Moonbase Alpha TestNet after adding them as custom networks.
Please note that Coinbase Wallet is an entirely different product from Coinbase Exchange, a custodial platform for buying and selling cryptocurrency. Holding a token in your Coinbase Wallet does not imply it is supported on Coinbase Exchange. If you send a token from your Coinbase Wallet to Coinbase Exchange that is not supported by the exchange, you will lose those funds forever.
In this guide, you'll go through the process of setting up the Coinbase Wallet mobile application and browser extension and configuring it for the Moonbeam network.
Install Coinbase Wallet
You can download Coinbase Wallet as a mobile app from the iOS App Store or Google Play Store, or as a desktop browser extension from the Chrome Store.
The interfaces for the mobile app and browser extension are quite similar, so you can adapt the following instructions for the browser extension. The one major difference between the two is that when you add Moonbase Alpha as a custom network, you can interact with the network on the browser extension but not from the mobile app. This difference only applies to Moonbase Alpha. If you're connecting to Moonbeam or Moonriver, you'll be able to interact with either network from both the browser extension and mobile app.
Create a Wallet
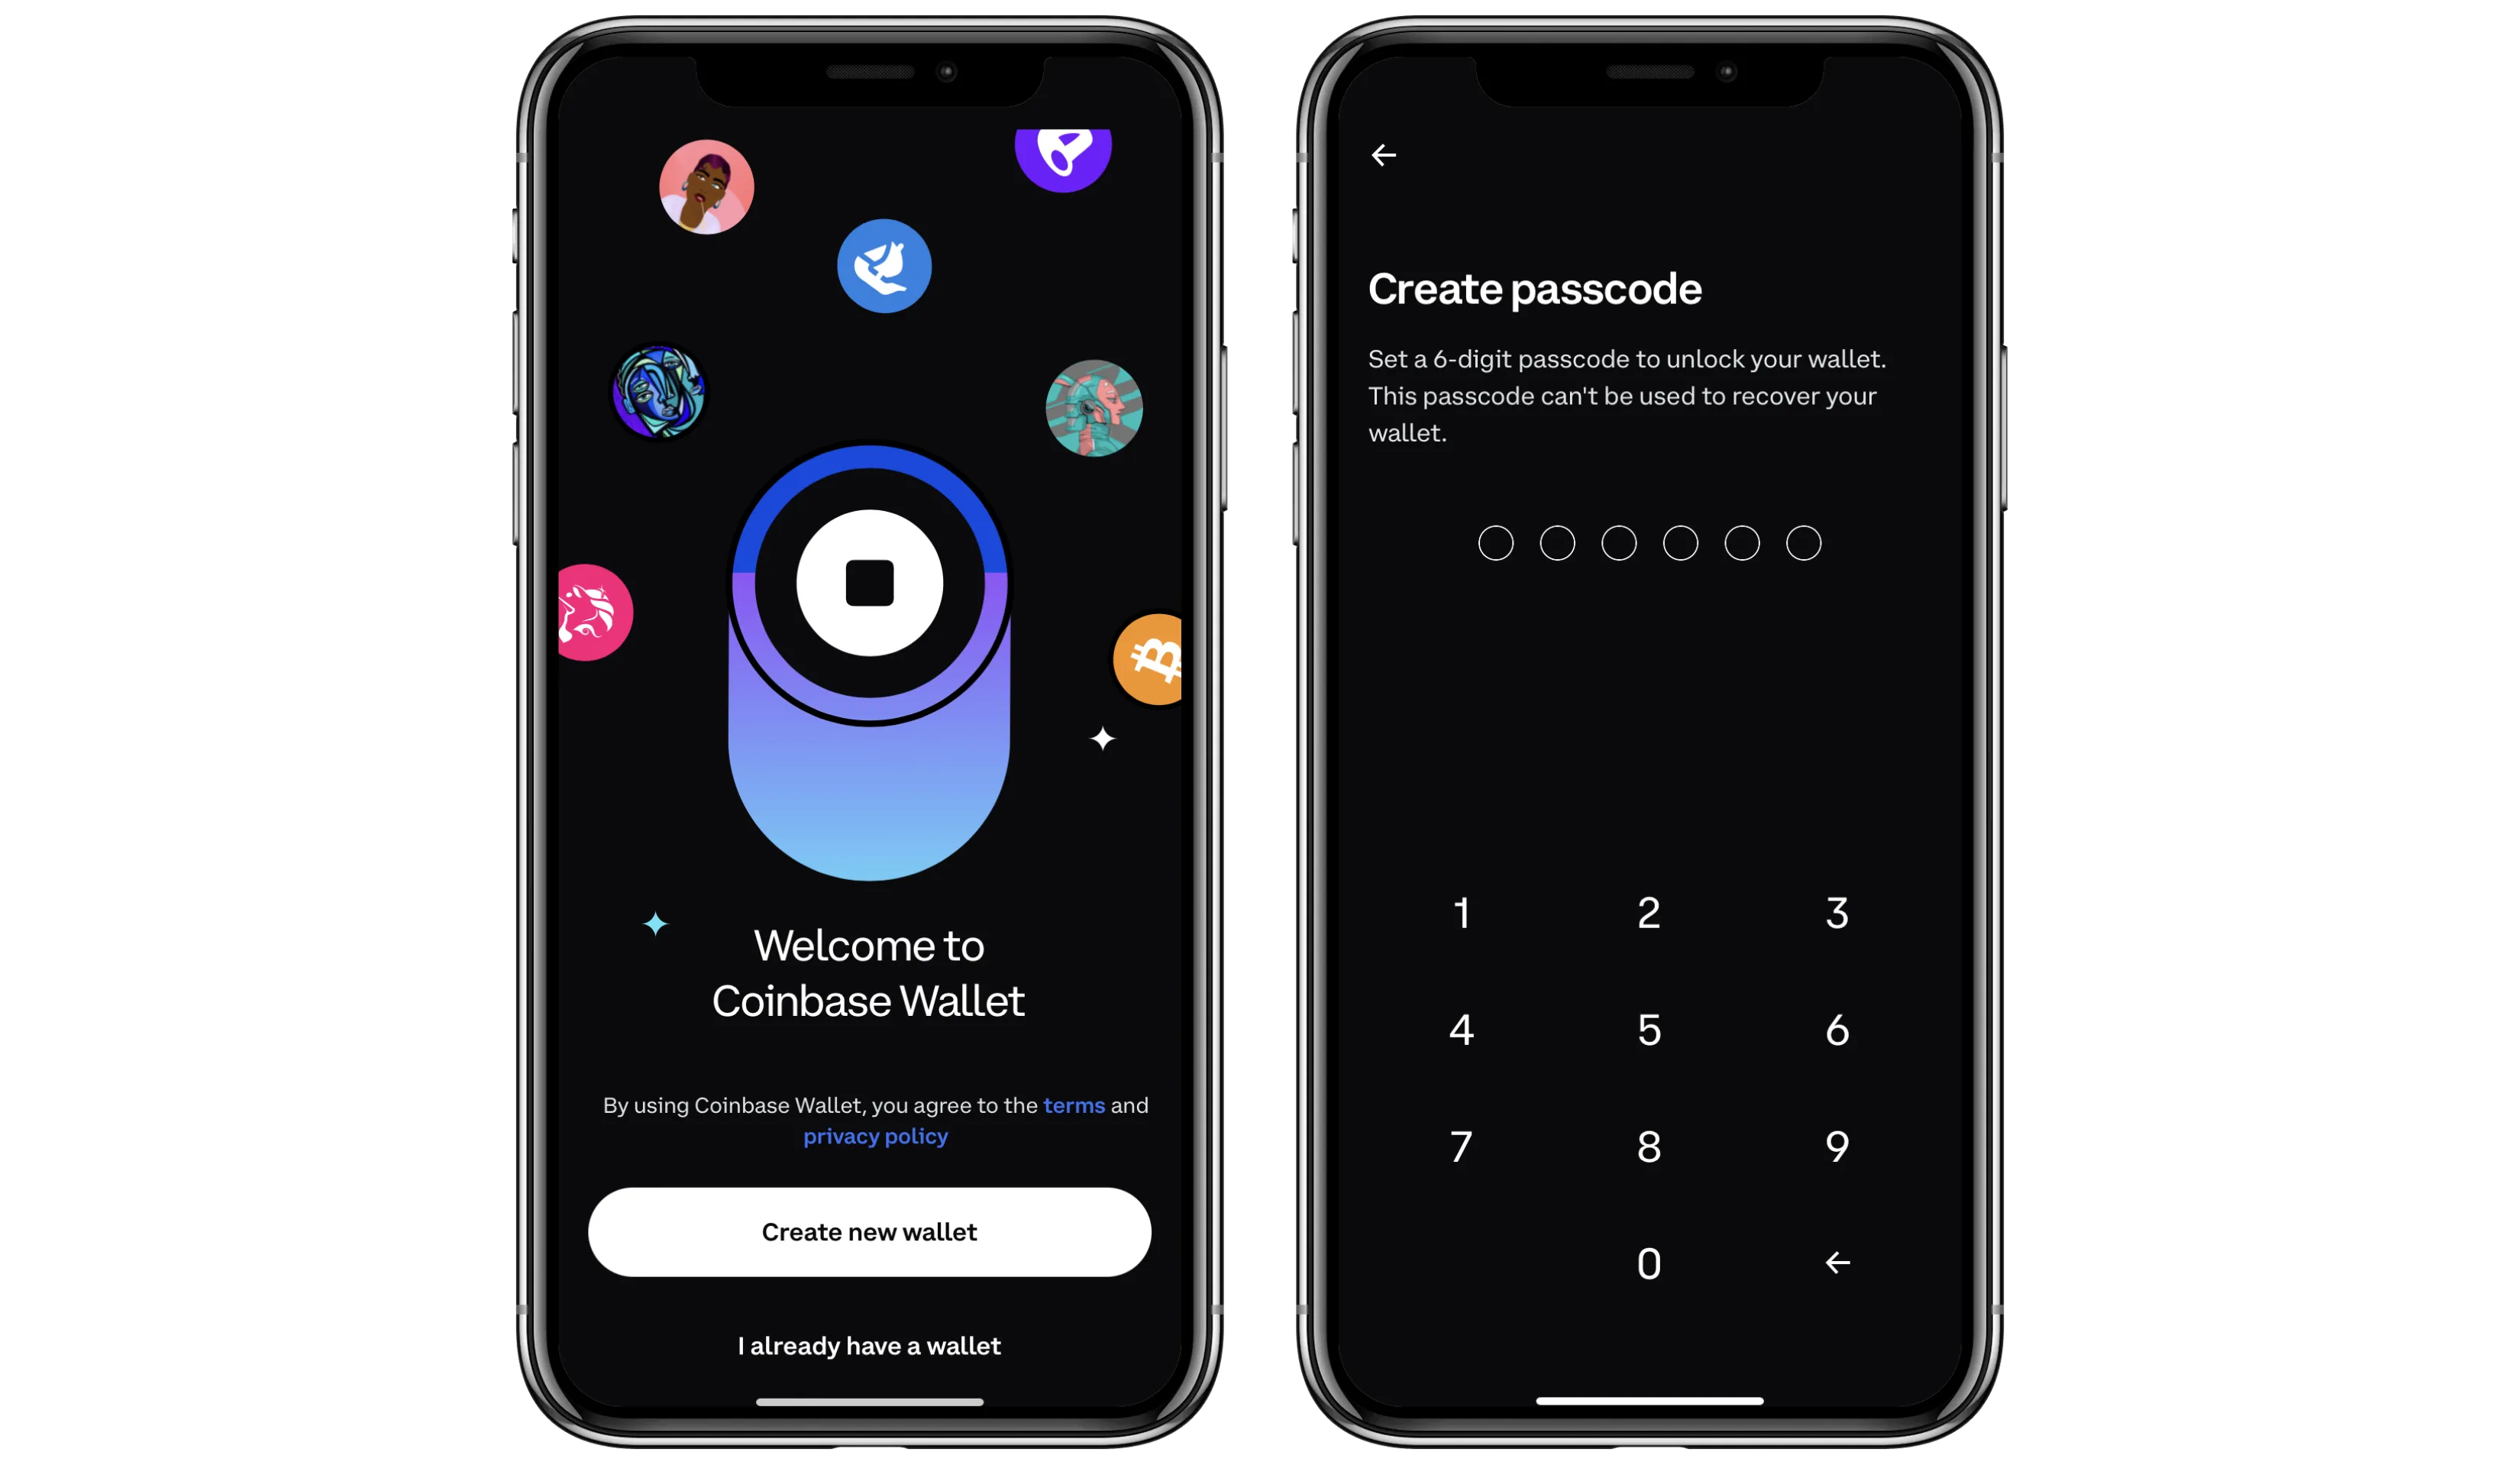
After installing and opening the app, you'll be greeted with the option to create a new wallet or import an existing one. For this exercise, set up a new wallet by tapping Create a new wallet.
You'll be prompted to create a passcode, and once you've entered in your passcode, you'll need to verify it by entering it again a second time.
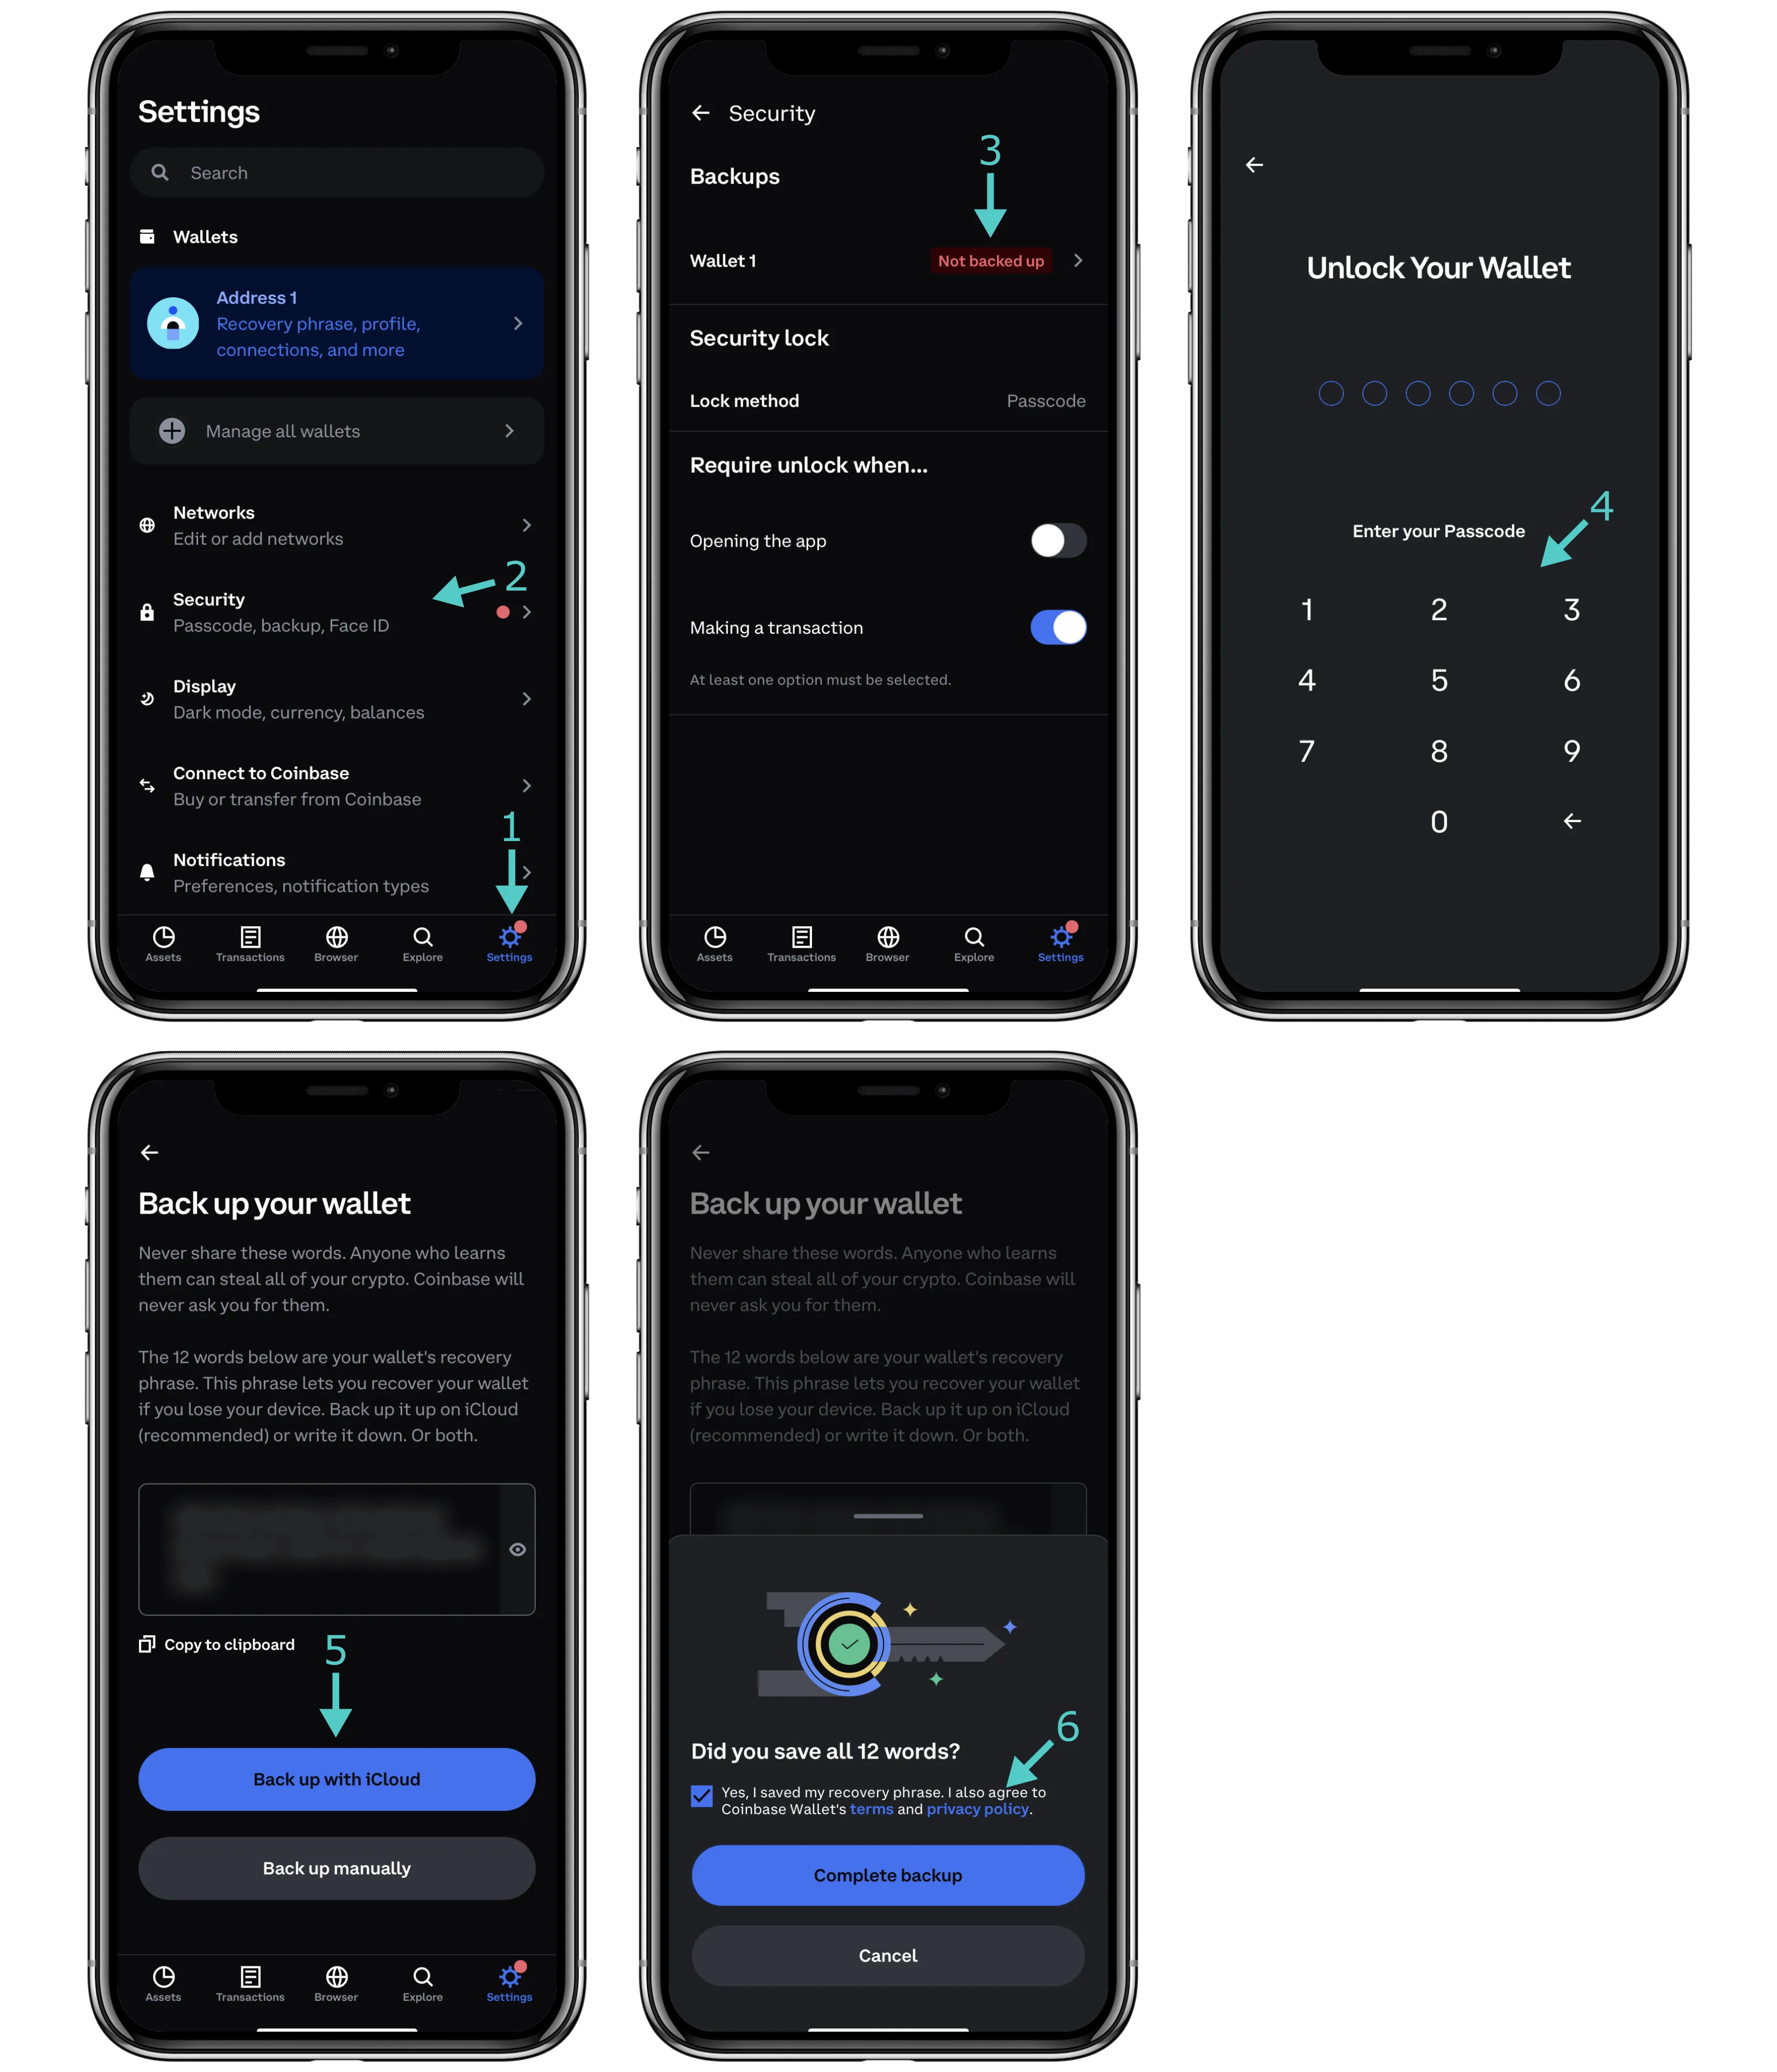
Once you've created your passcode, your wallet will be created. The last step to take is to secure your account by backing up your wallet's recovery phrase. To back up your wallet, you can take the following steps:
- Navigate to the Settings screen
- Choose Security from the menu
- Tap on your wallet that you want to back up; it should say Not backed up next to it
- Enter your passcode
- Select how you want to back up your recovery phrase: make an encrypted backup of the seed phrase to iCloud (iOS) or Google Drive (Android), save the phrase manually, or do both. If you are backing up your phrase to the iCloud or Google Drive, you'll have to create a password that will secure your phrase in the cloud. This password cannot be reset, so you'll need to keep it safe. If you are manually saving your phrase, make sure you store it exactly as displayed and save it in a secure location
- When you're done, click Complete backup
Note
If you're using the browser extension, you'll follow a slightly different flow, as you'll be prompted to back up your wallet right away, and you'll only have the option to manually do this.
Congratulations! You've completed the setup steps, and your wallet is now fully initialized. In the next step, you'll see how you can connect Coinbase Wallet to the Moonbeam network.
Connect Coinbase Wallet to Moonbeam
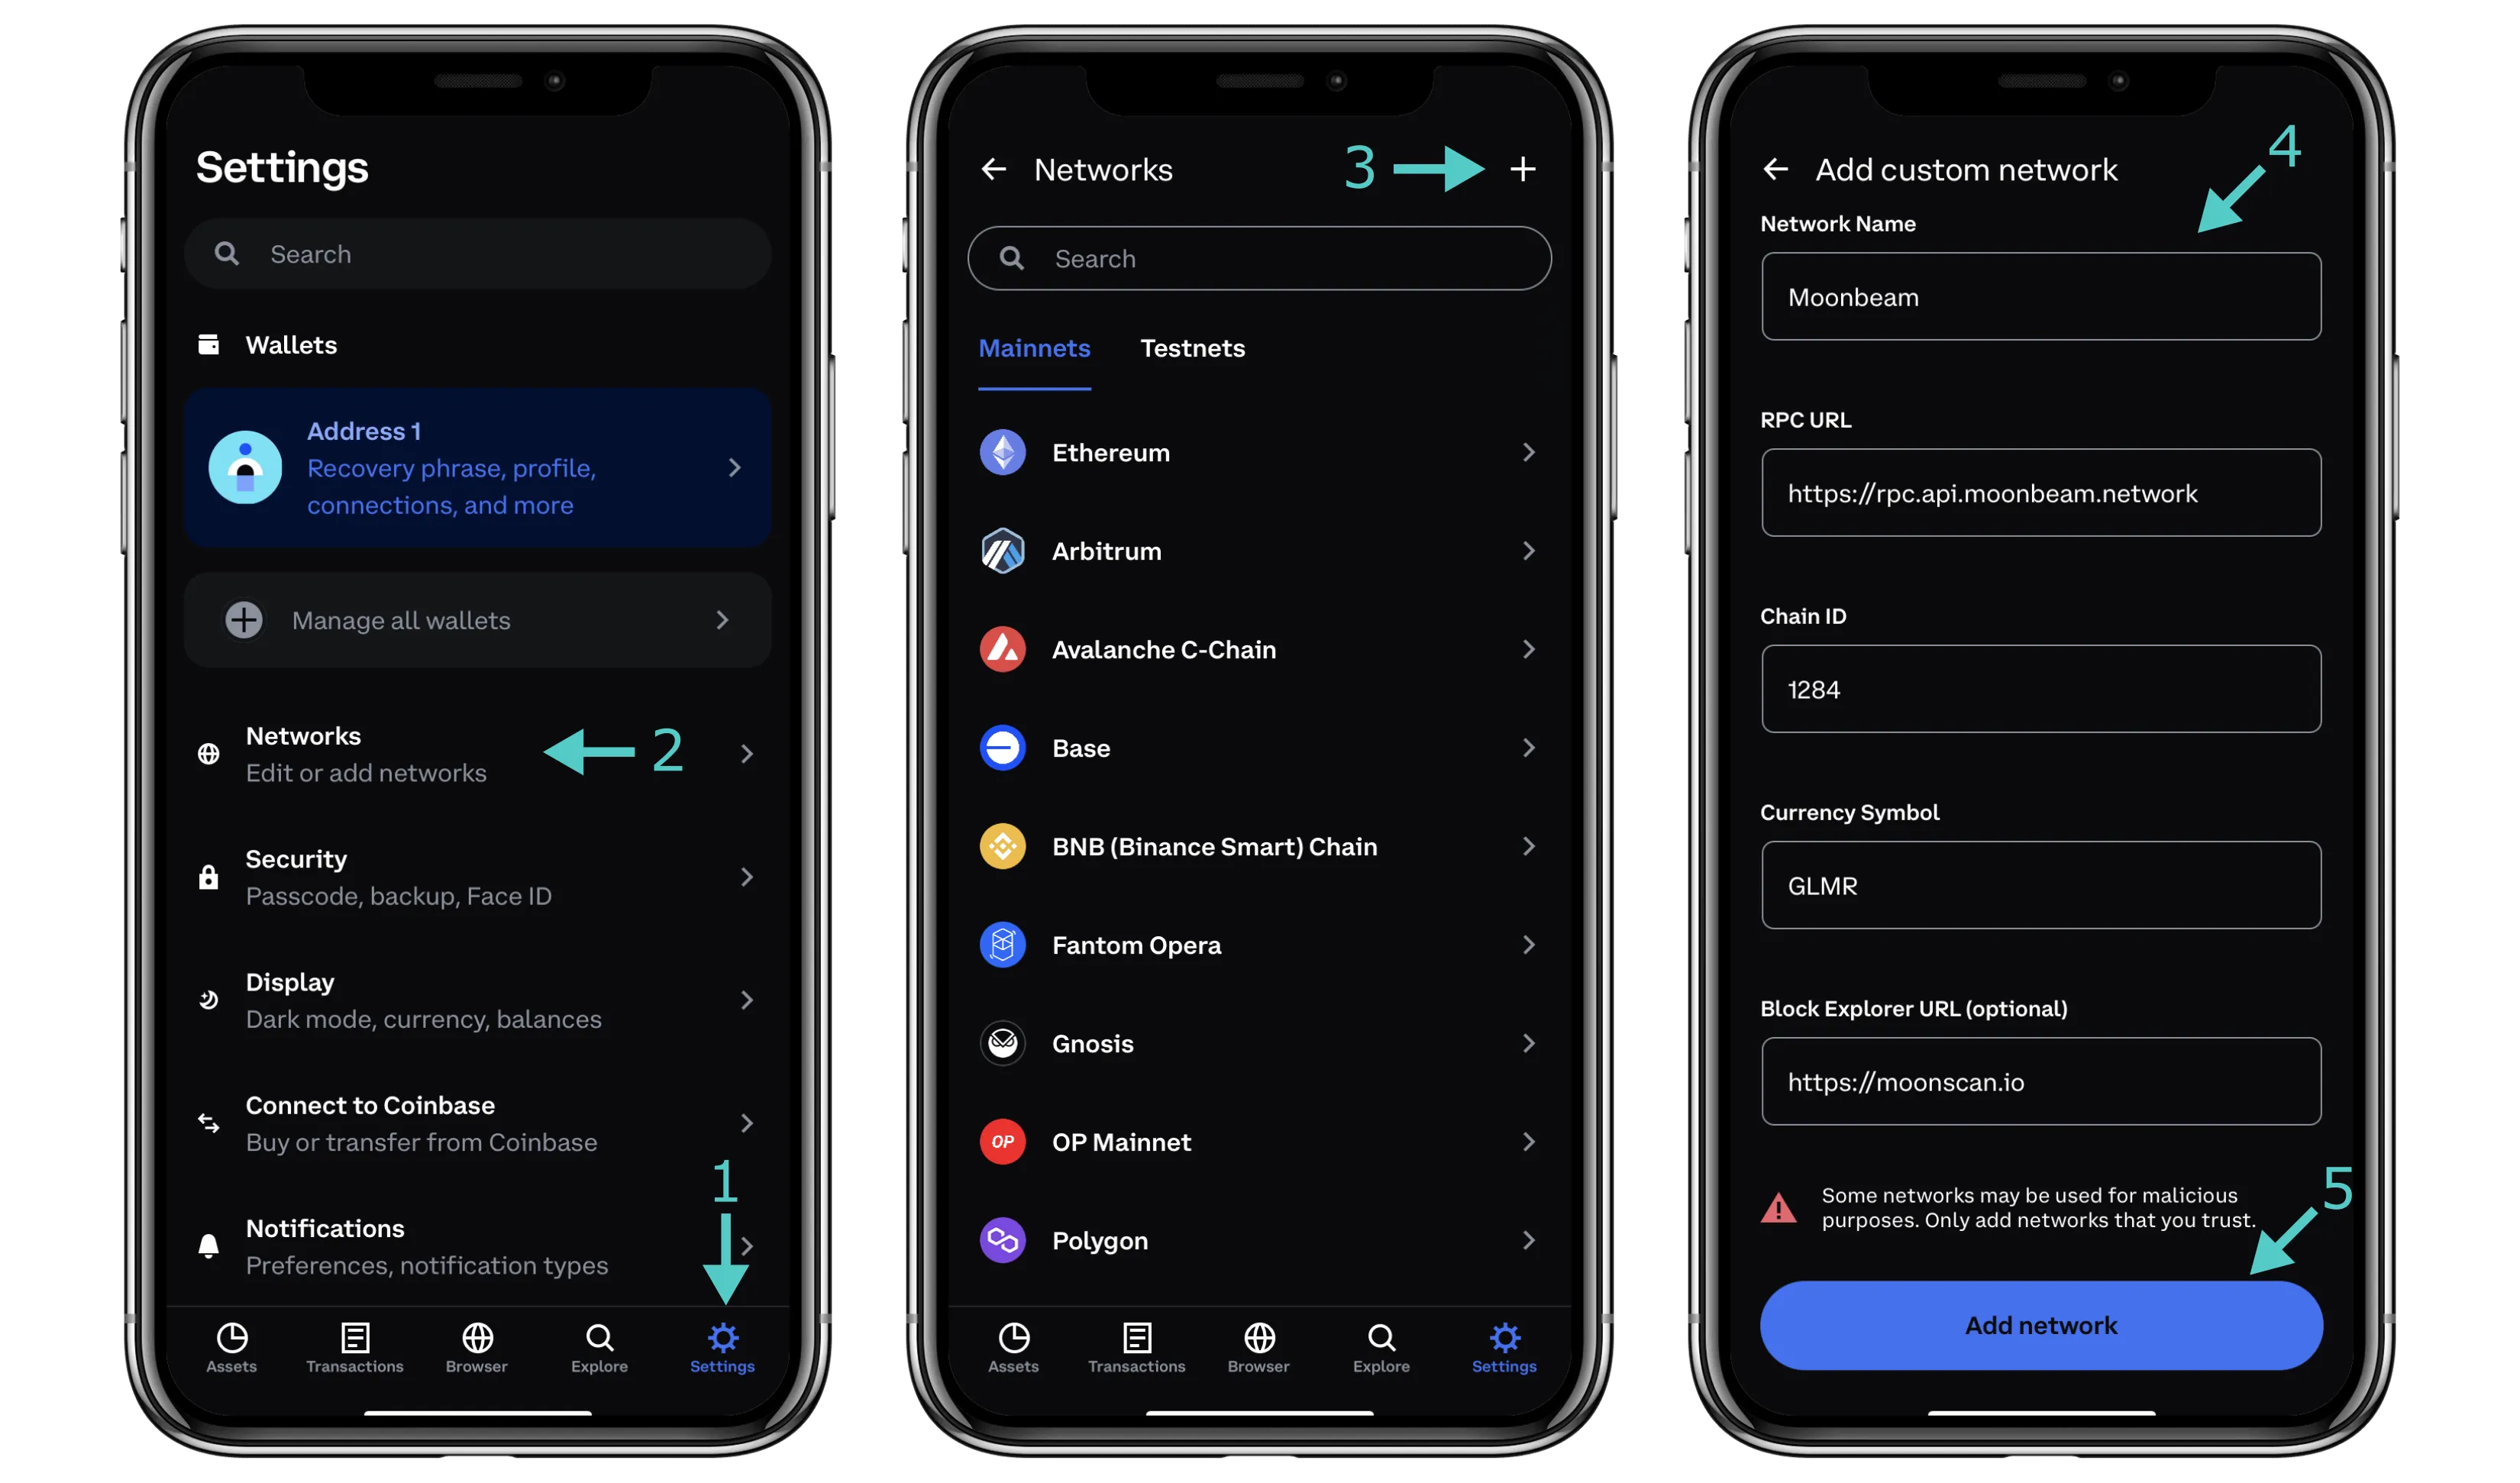
Although Coinbase Wallet has a built-in browser, it doesn't currently support automatically adding custom networks, so you'll have to add the network details manually. To do so, perform the following steps:
- Navigate to the Settings tab
- Tap on Networks
- Tap on the + icon in the upper right corner
-
Here, you can fill in the network details for Moonbeam, Moonriver, or the Moonbase Alpha TestNet
Variable Value Network Name MoonbeamRPC URL https://rpc.api.moonbeam.networkChainID 1284(hex:0x504)Symbol (Optional) GLMRBlock Explorer (Optional) https://moonscan.ioVariable Value Network Name MoonriverRPC URL https://rpc.api.moonriver.moonbeam.networkChainID 1285(hex:0x505)Symbol (Optional) MOVRBlock Explorer (Optional) https://moonriver.moonscan.io/Variable Value Network Name Moonbase AlphaRPC URL https://rpc.api.moonbase.moonbeam.networkChainID 1287(hex:0x507)Symbol (Optional) DEVBlock Explorer (Optional) https://moonbase.moonscan.io/ -
Press Add Network once finished
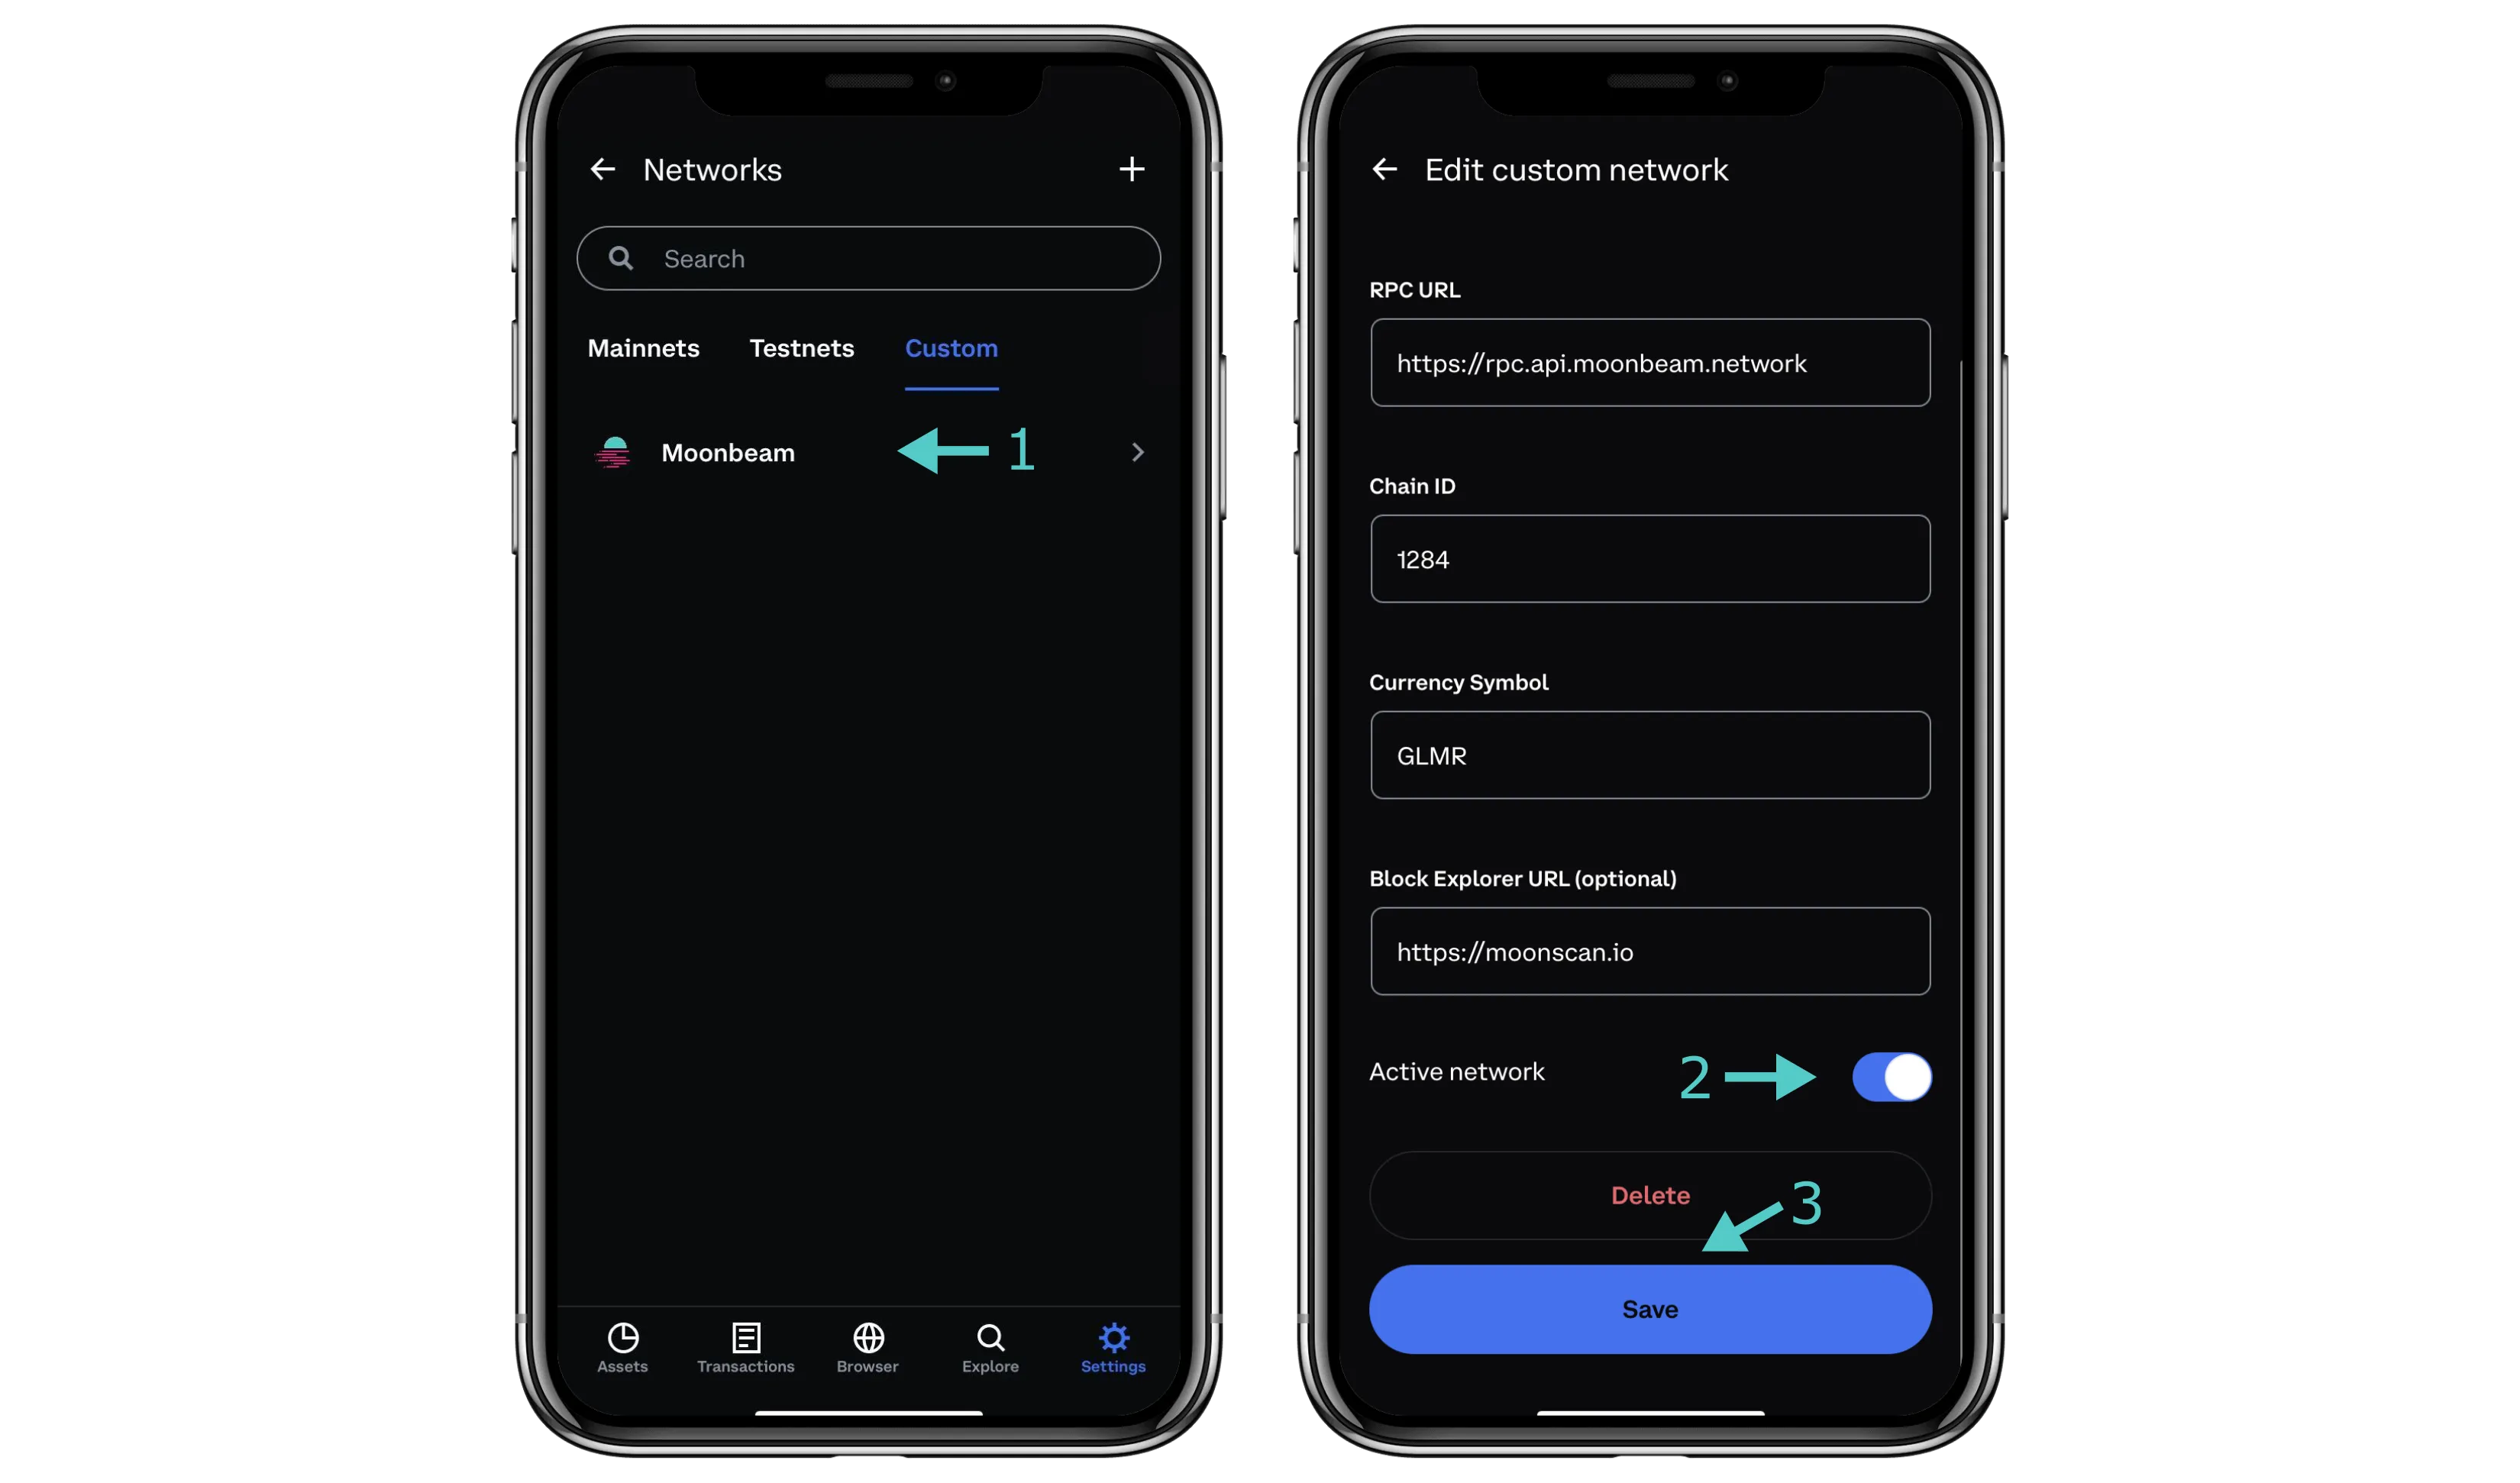
After returning to the Networks screen, you can view the newly added network from the Custom tab. To interact with Moonbeam, you'll need to mark the network as Active by taking the following steps:
- Tap on Moonbeam
- Scroll down to the bottom of the screen and toggle the Active network switch to on
- Tap Save
Receiving Funds
To view and manage your assets, you can click on Assets from the bottom navigation menu.
Since you created a new wallet in this demo, the app displays a balance of $0.00 and doesn't list any assets in the Crypto tab. You can change this by sending some GLMR to this account. To send funds to your Coinbase Wallet account, take the following steps:
- Tap on Receive
- Tap on the QR code icon or the copy icon next to Ethereum address. Since Moonbeam is Ethereum-compatible, you can use the Ethereum account it provides you with on Moonbeam
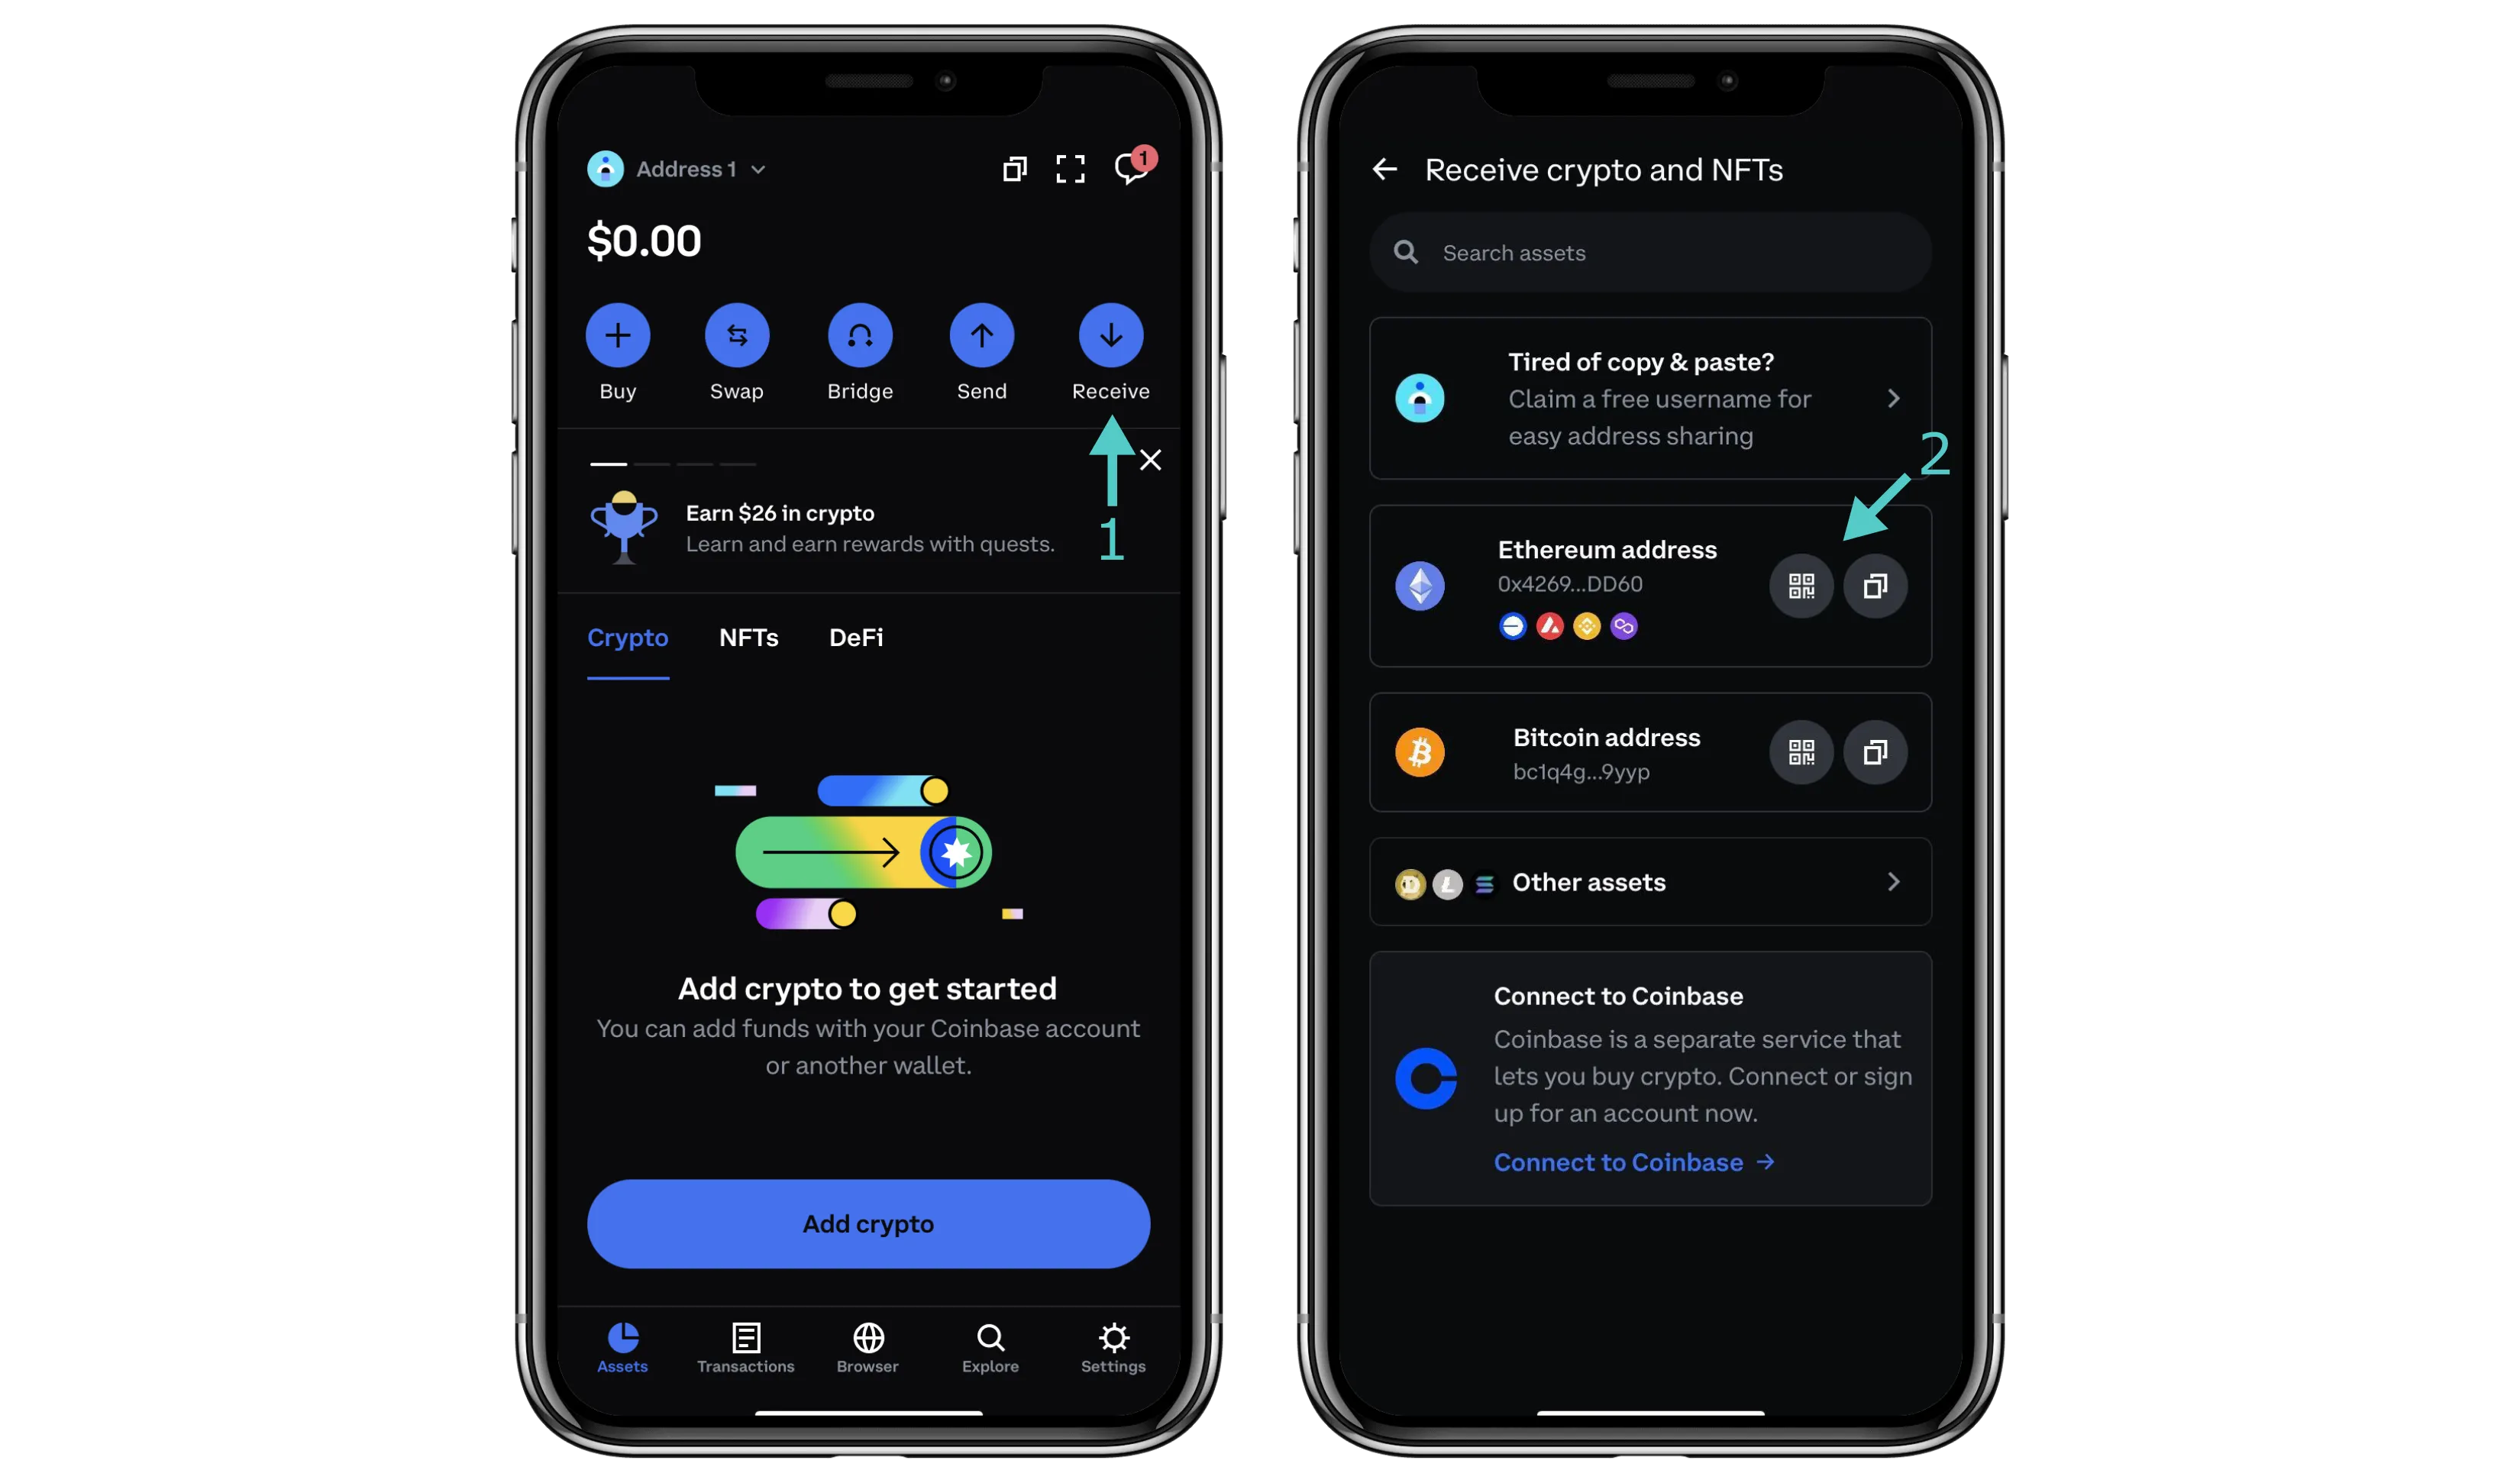
Now that you have your receiving address, you can send assets to it. To view your assets once they arrive, you'll need to make sure that you've activated the correct network from the network's configuration screen in the Networks settings, as outlined in the previous section.
Sending Funds
To send funds from your Coinbase Wallet, navigate to the Assets tab, then take the following steps:
- Tap Send
- On the next screen, enter the amount of the asset you'd like to send
- Tap Next
- Enter the address you'd like to send it to
- Tap Confirm to continue
- Review the transaction details to ensure accuracy, then press Send
- Upon successfully sending the transaction, you can tap Done
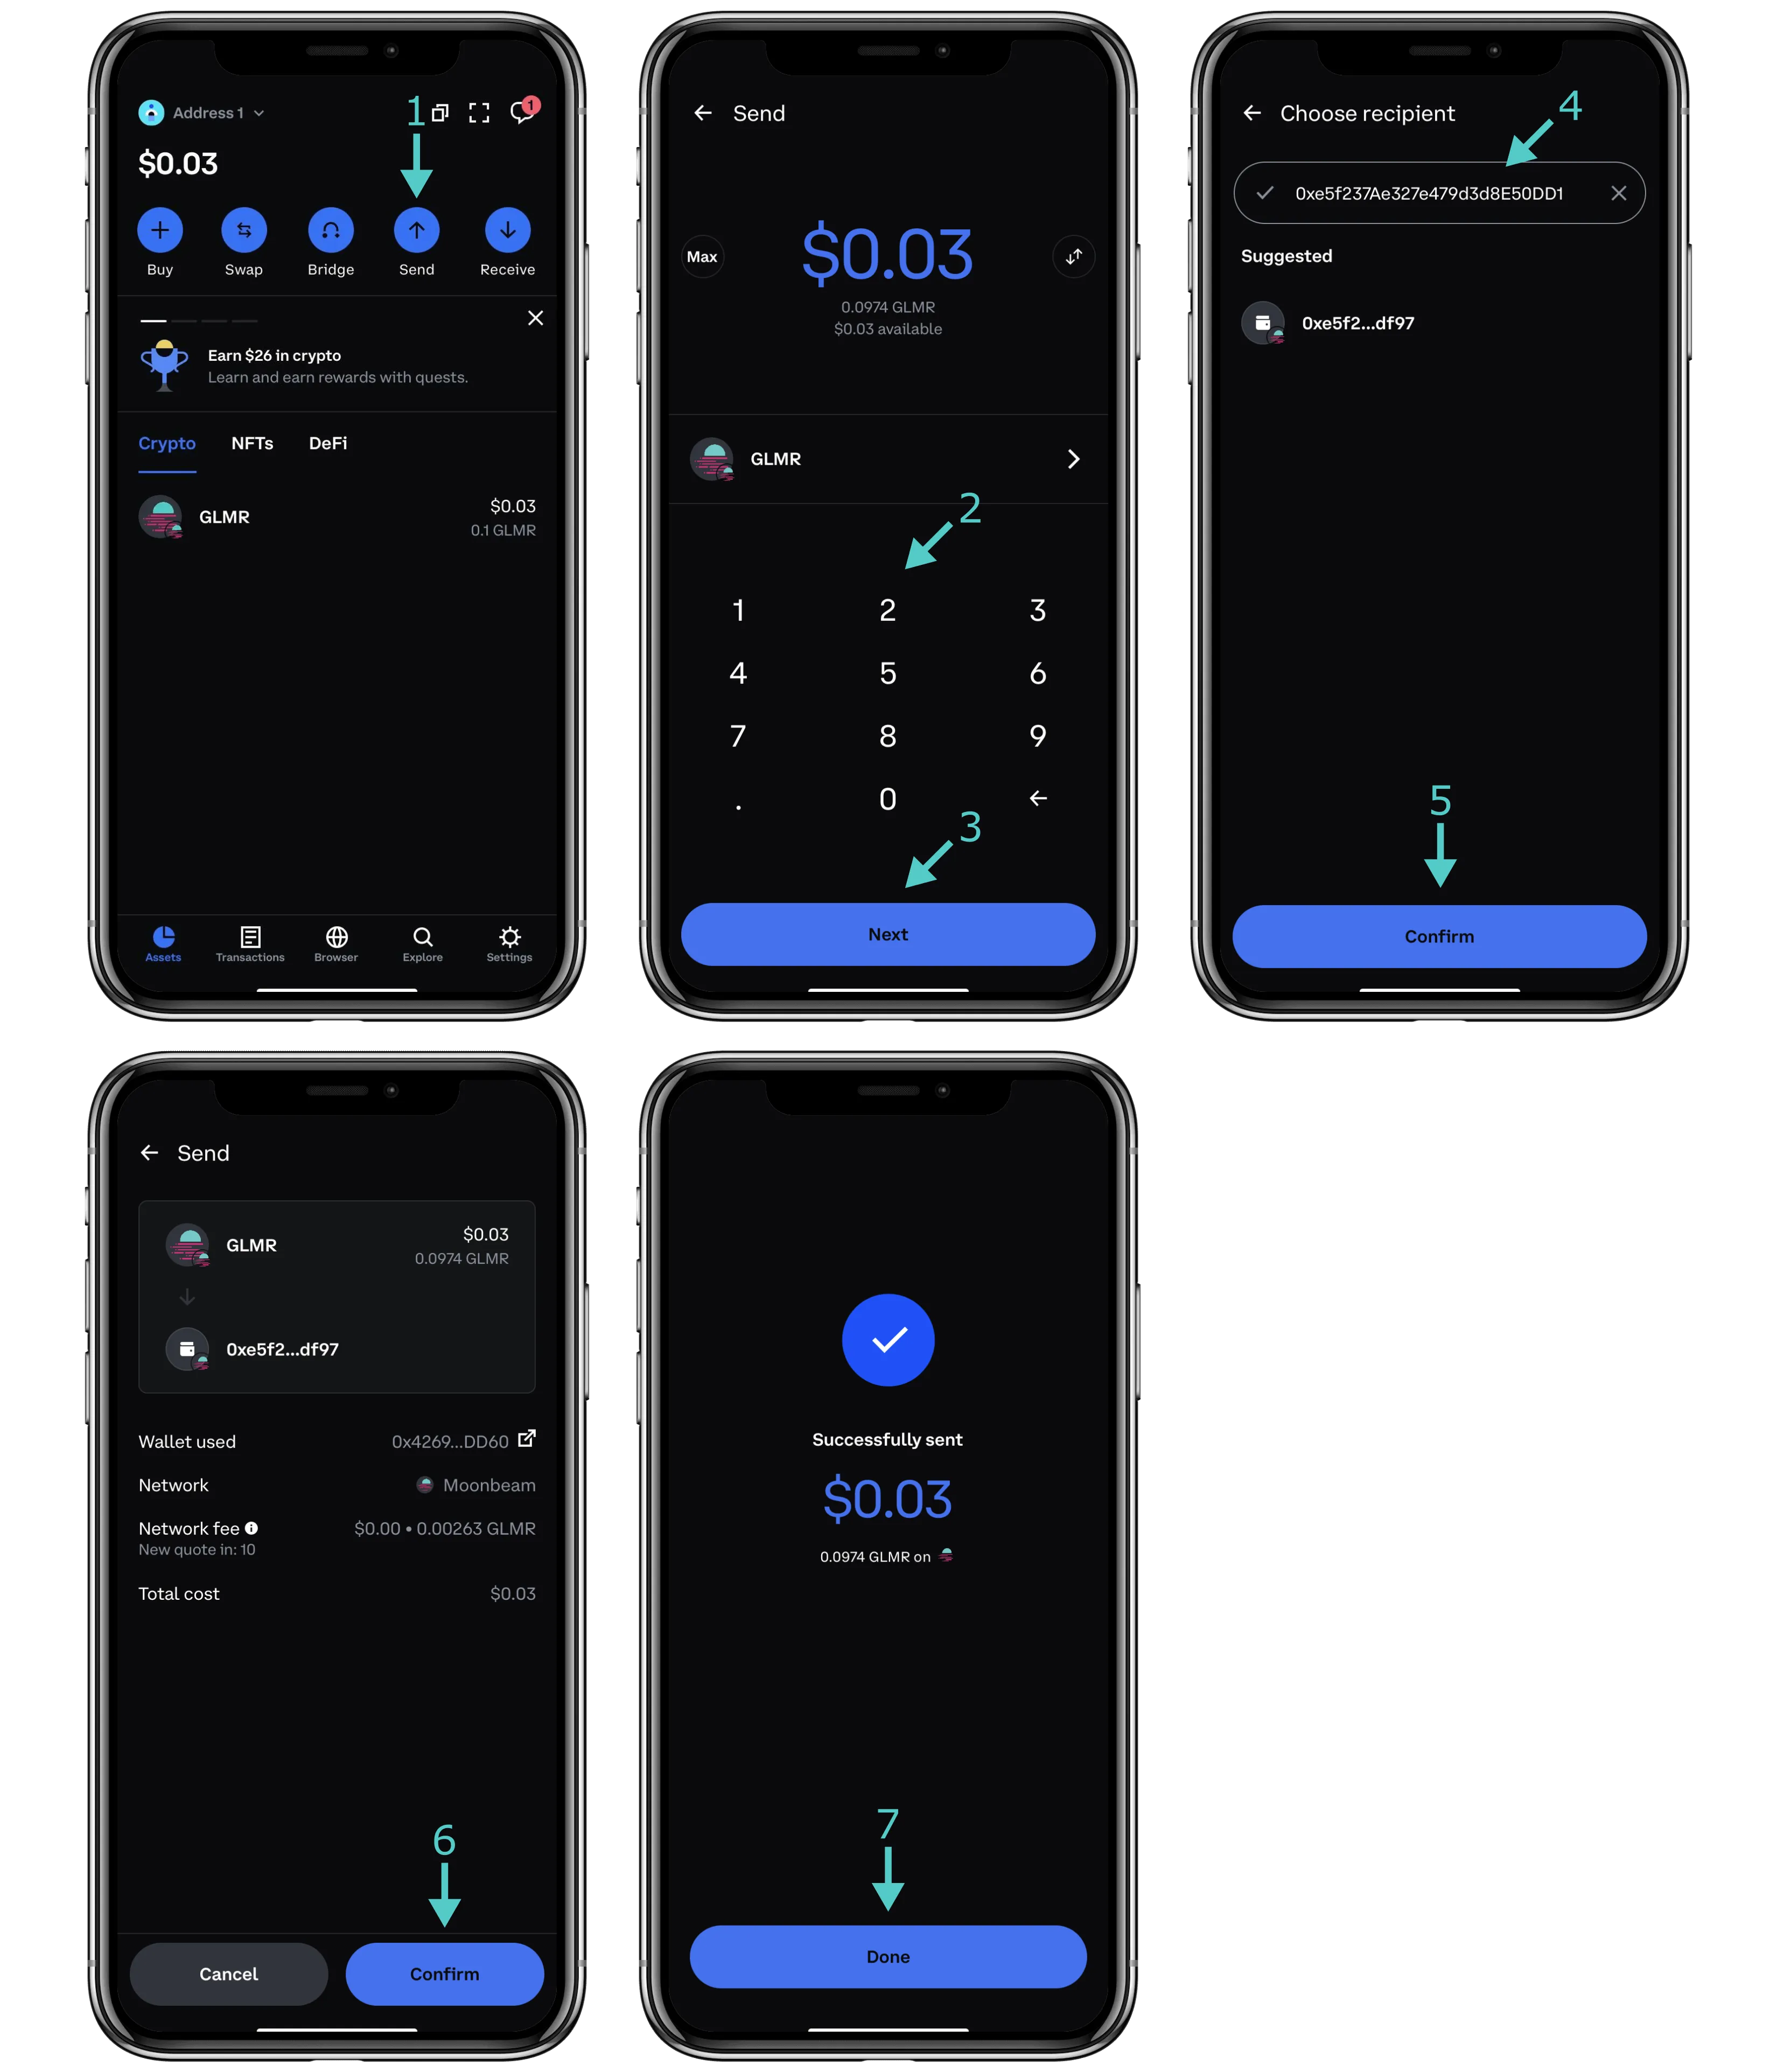
From the Transactions tab, you'll be able to see your outgoing transactions, including the address you sent the transaction to, the status of the transaction, and the amount you sent. You can tap on each transaction to find out more information.

And that's it! You've successfully set up your Coinbase Wallet app, connected it to the Moonbeam network, and learned how to send and receive funds.
Subscribe to Updates from Moonbeam
Coinbase Wallet has a messaging and subscription feature that uses XMTP, an on-chain messaging network designed to deliver fully encrypted messages between wallet addresses. In addition to messaging other Coinbase Wallet users who have enabled this feature, you can subscribe to updates from the Moonbeam Foundation. These updates are designed to provide timely and essential information from the Moonbeam Foundation, such as governance and protocol upgrade notifications.
Setting up Coinbase Wallet on Mobile
To enable XMTP in your Coinbase Wallet App and subscribe to Moonbeam, you must have both the browser extension and the wallet dApp. The Coinbase Wallet download page has links to both. After installation, ensure you have the same seed in both (e.g., don't create separate seed phrases for each). To get started with XMTP, from the first tab of the Coinbase Wallet App (the Assets tab), take the following steps:
- Click the messaging icon in the upper right corner
- Press Start Messaging
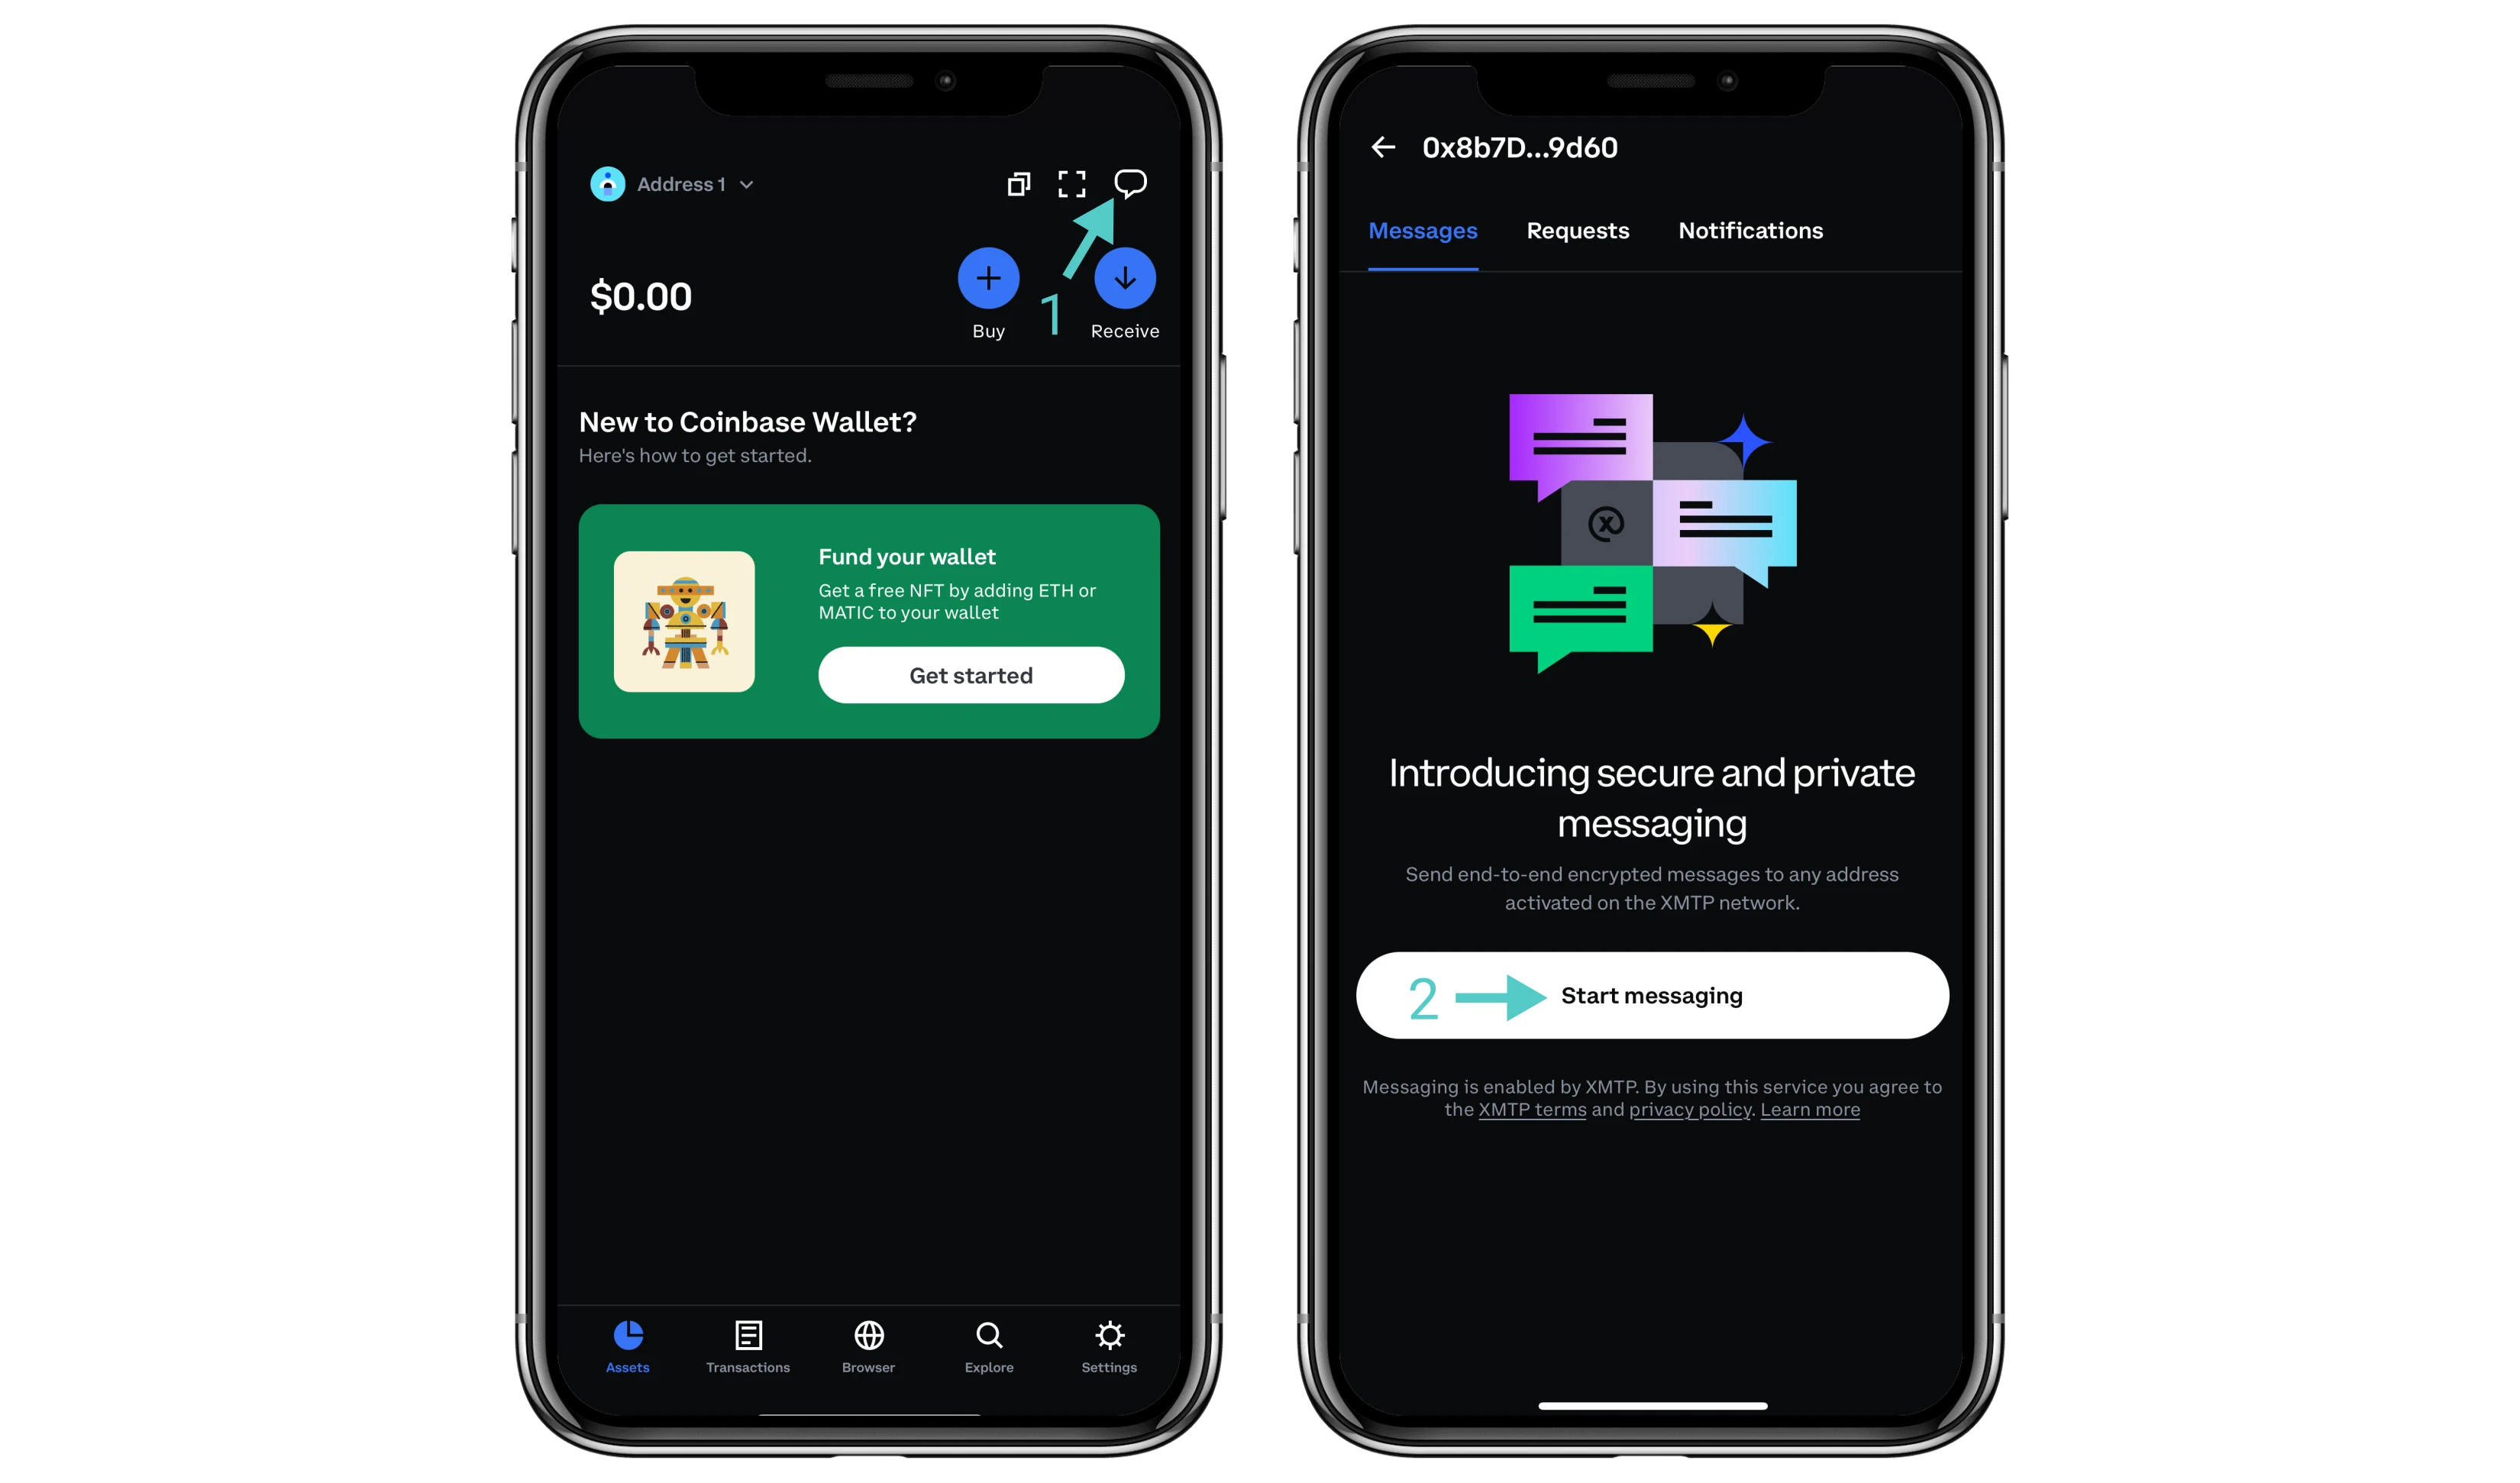
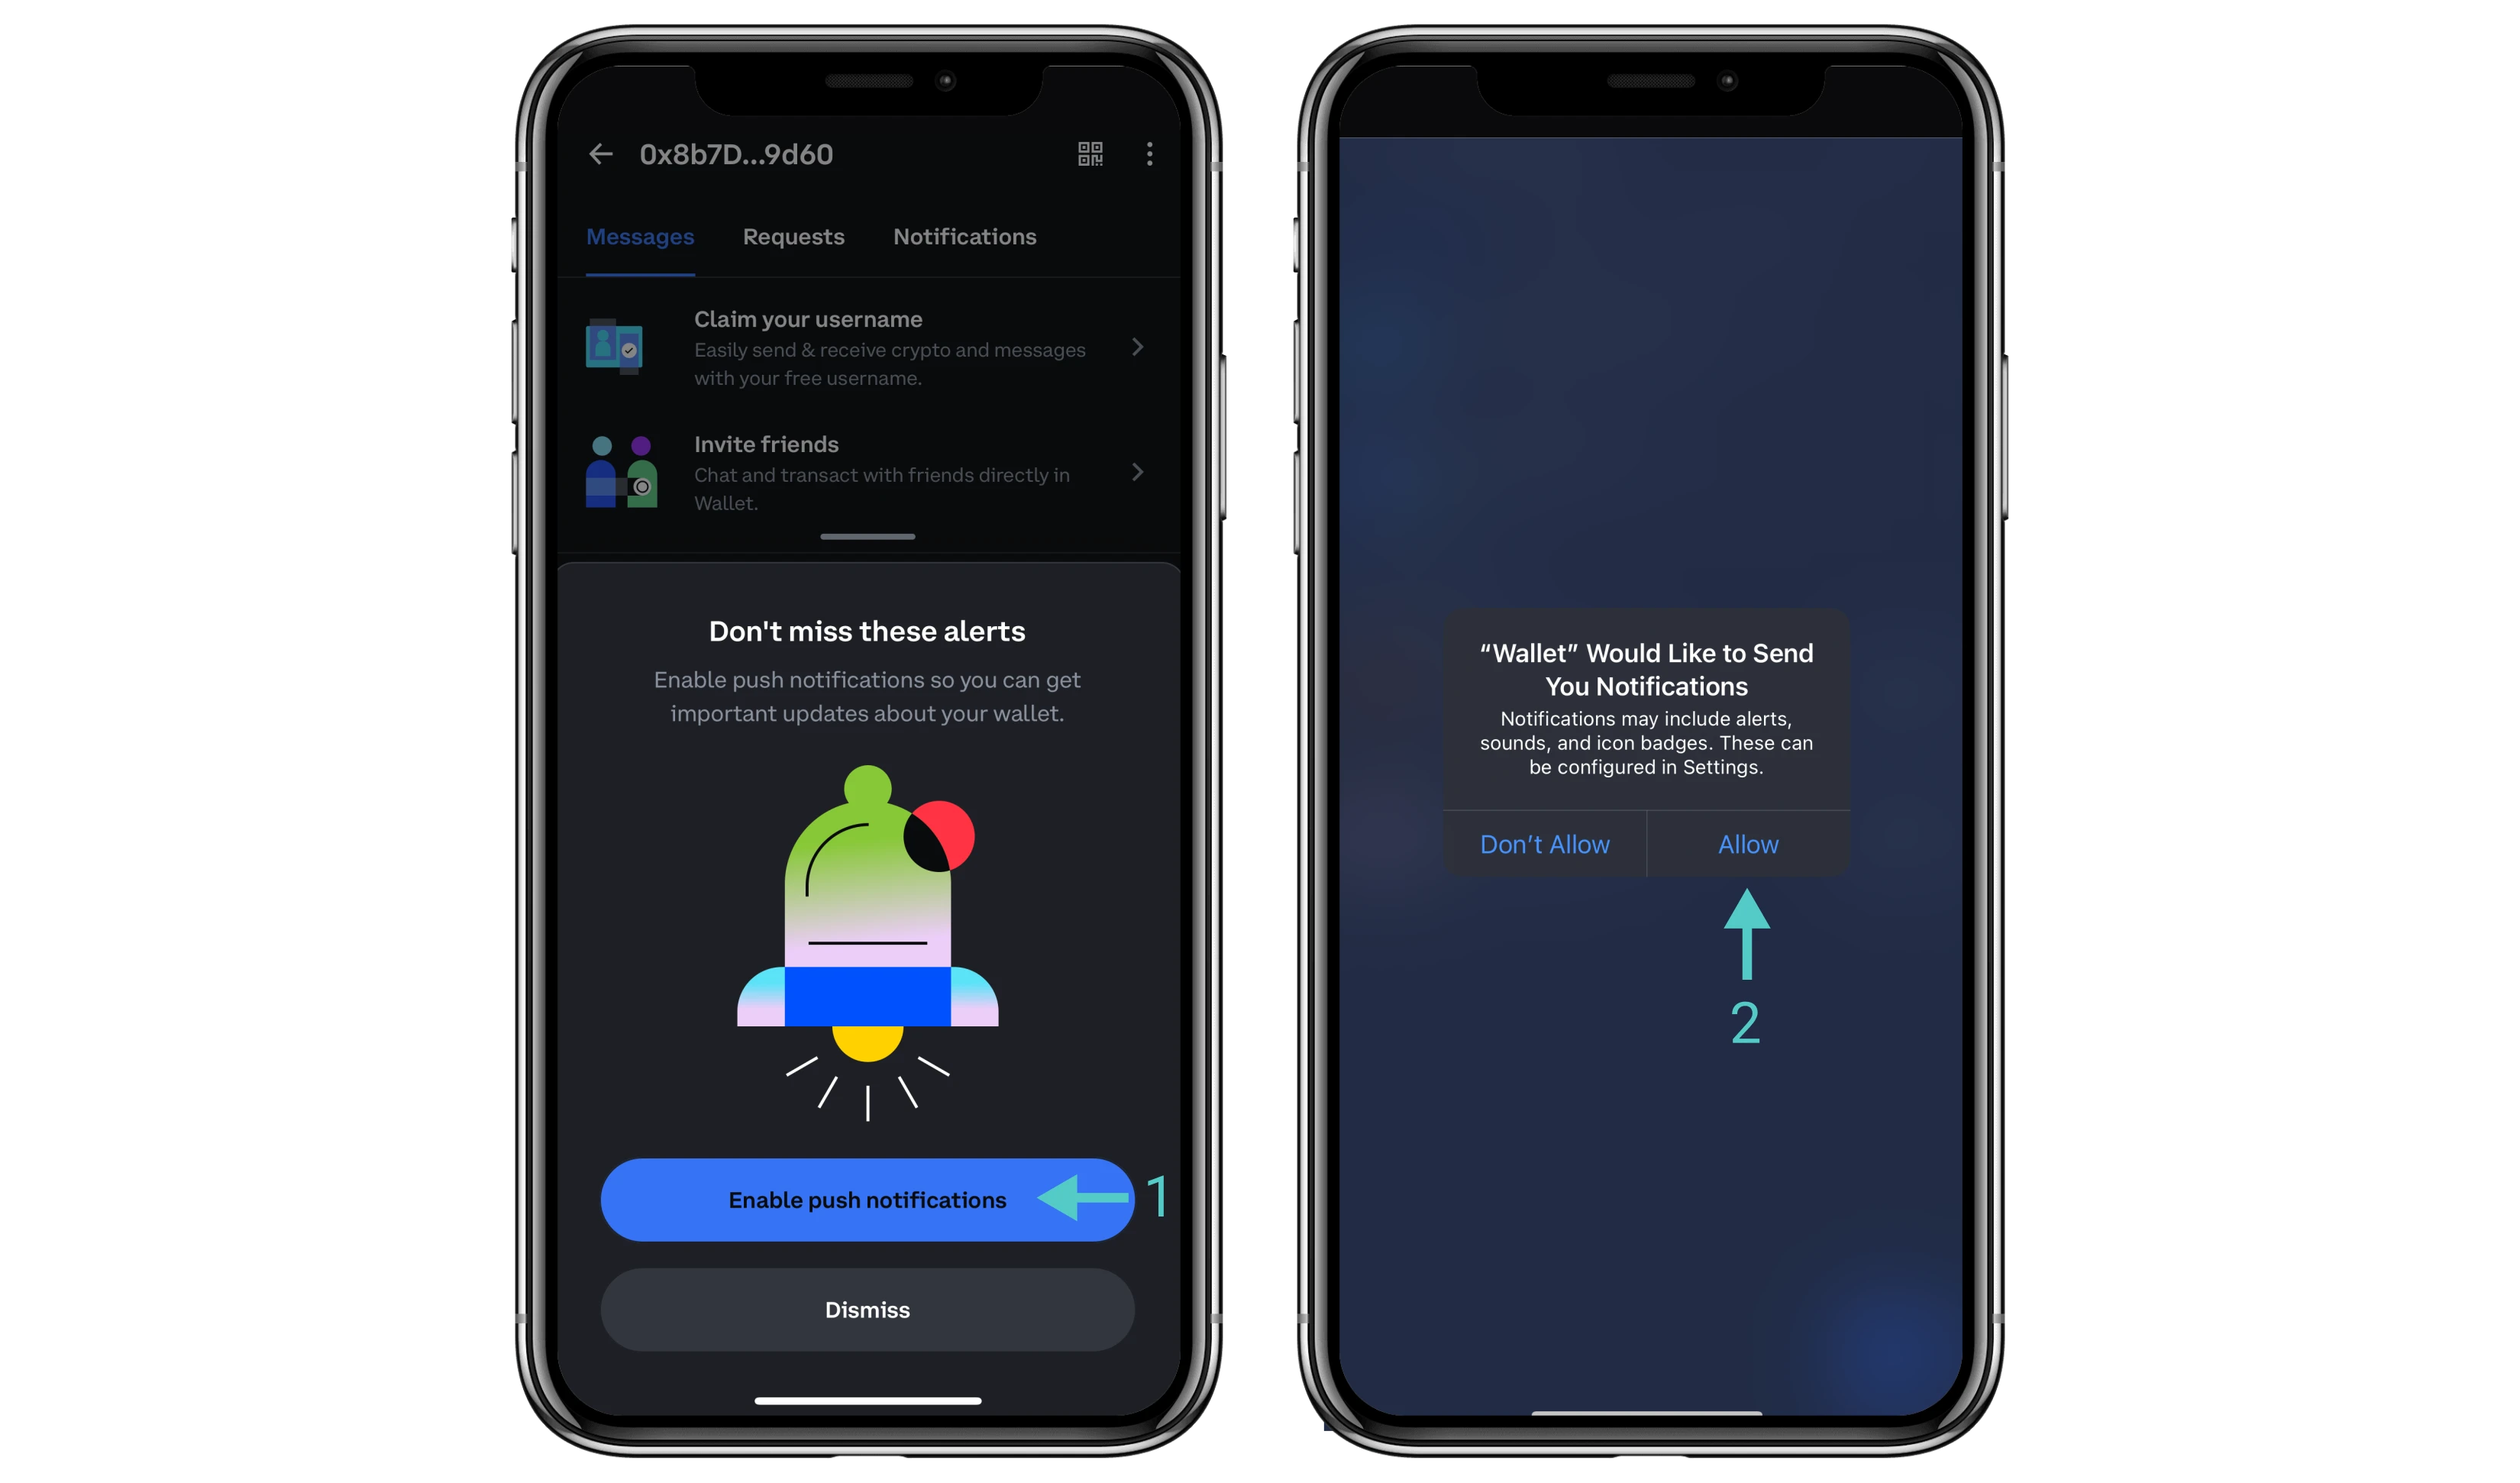
Next, you'll be prompted to configure your notification settings to allow push notifications. Take the following steps:
- Press Enable Push Notifications
- Press Allow in the resulting prompt
Subscribing in the Moonbeam dApp
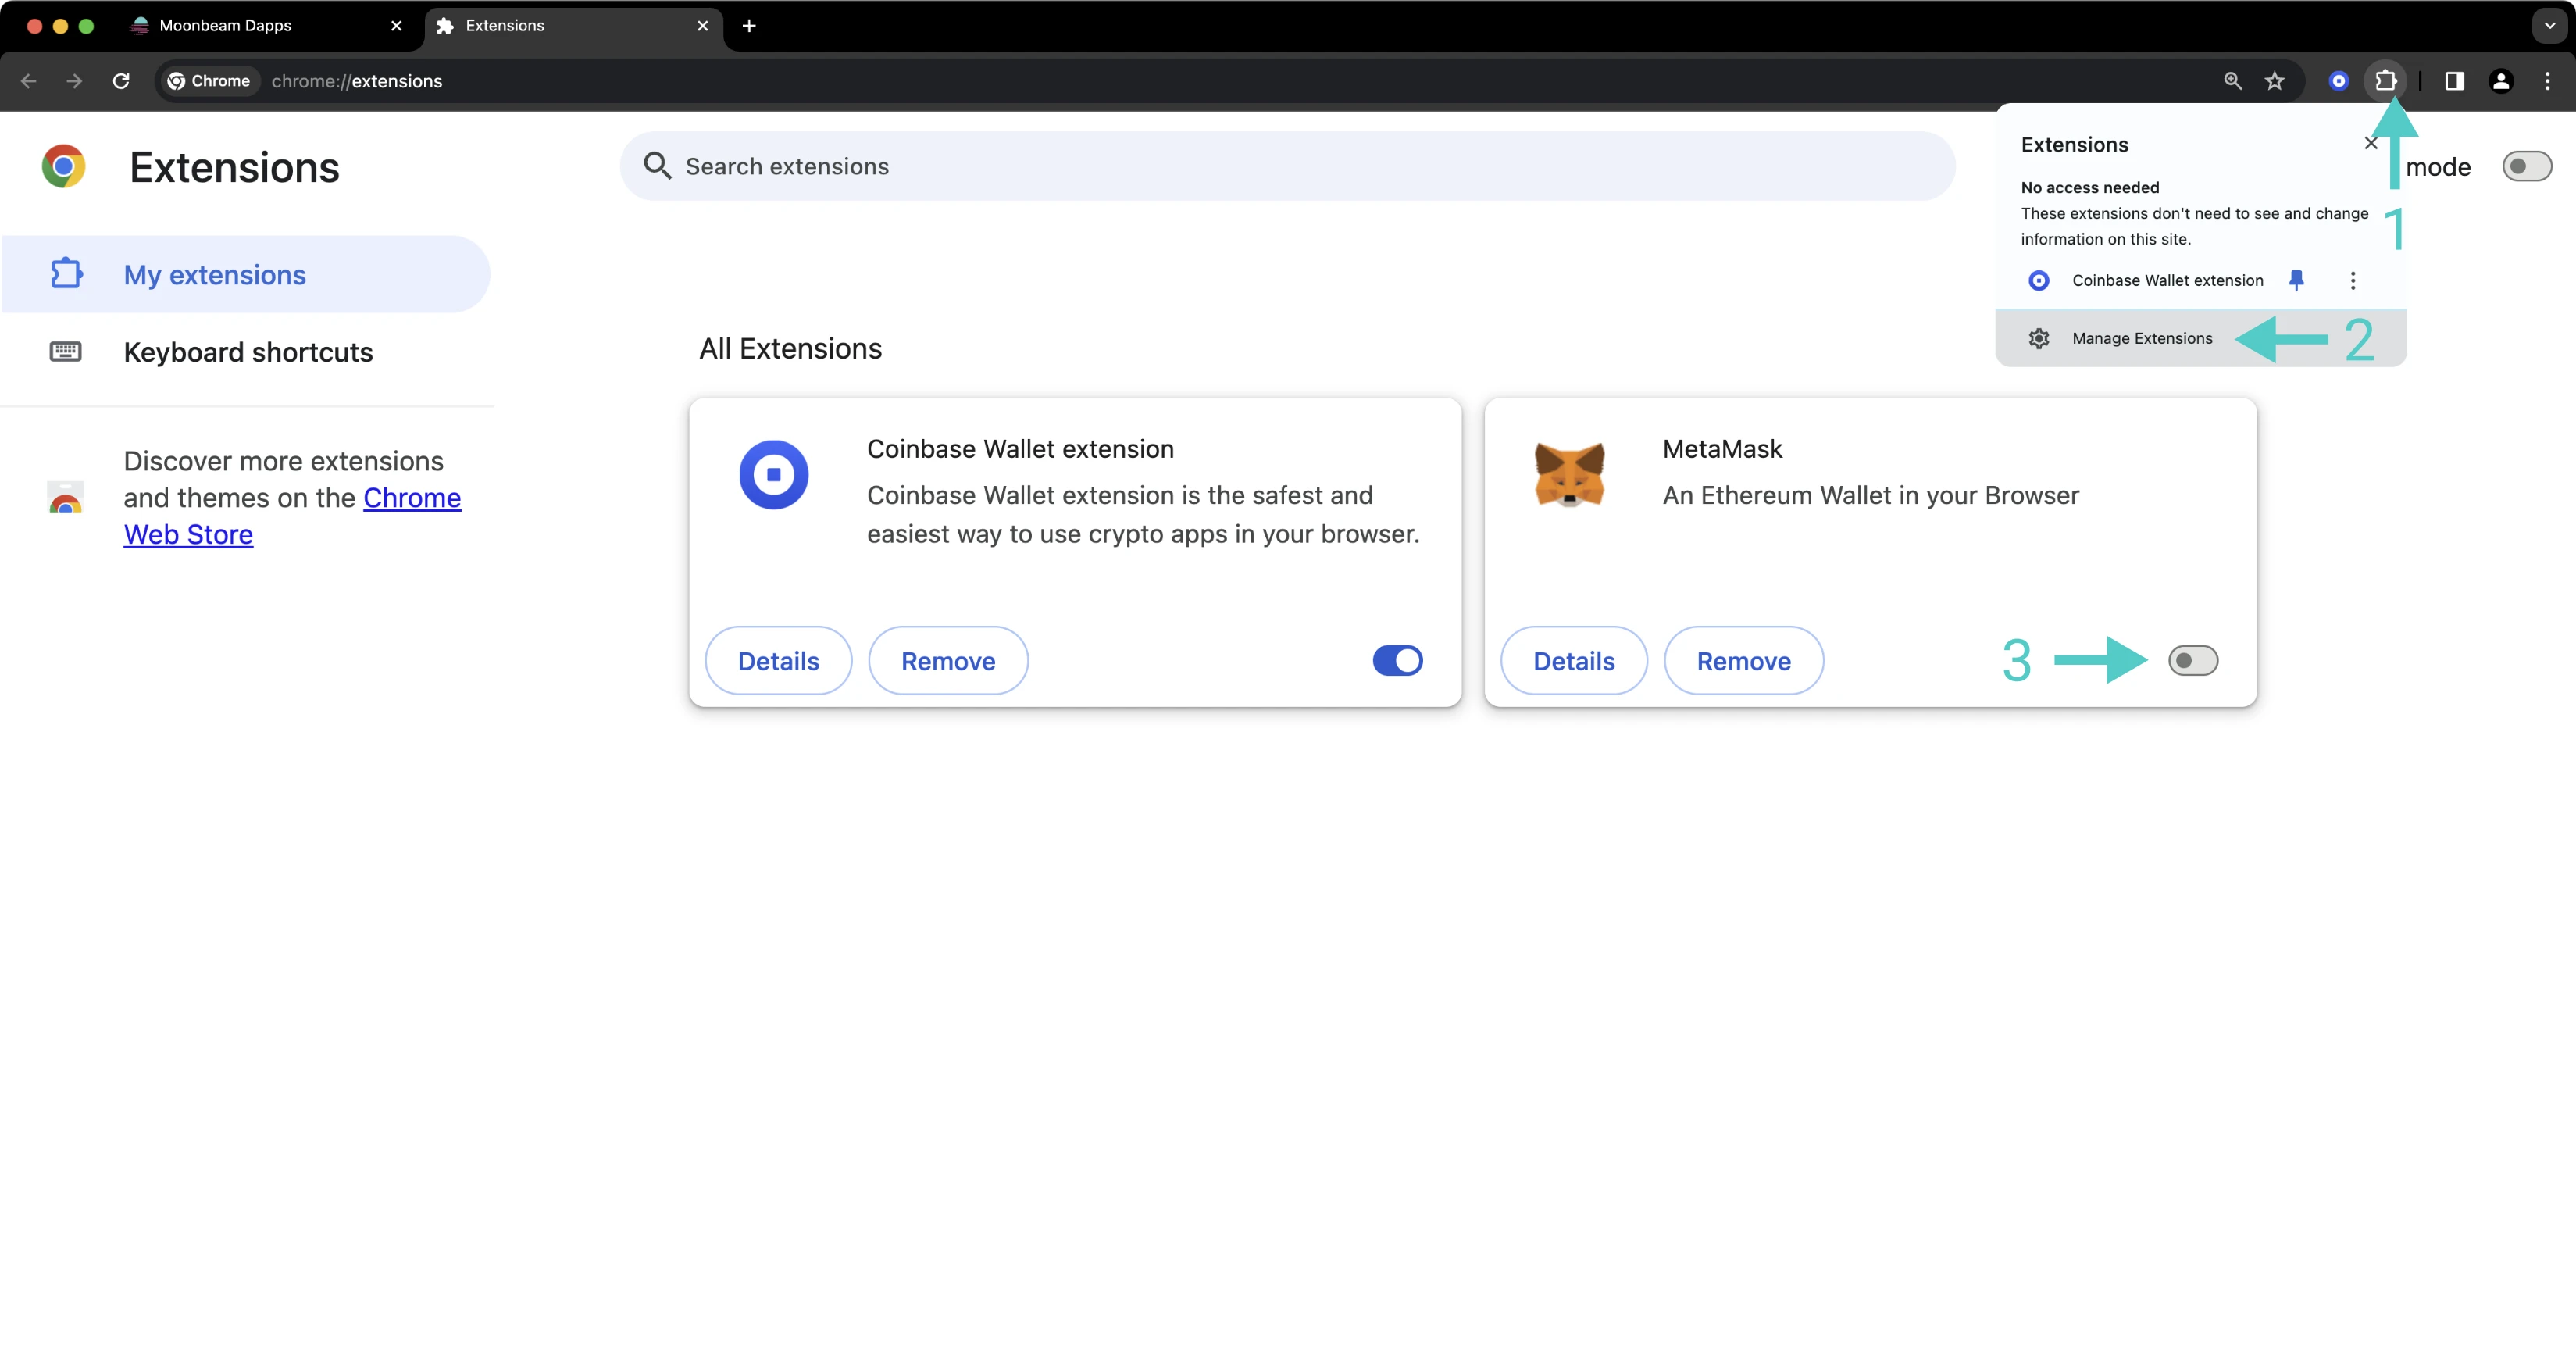
As a quick reminder, you'll need to have the Coinbase Wallet extension installed on your computer's browser loaded with the same seed as the one used on your phone. To minimize the risk of errors, ensure that the Coinbase Wallet extension is the only cryptocurrency wallet extension active in your browser. You can temporarily disable other wallet apps as follows:
- Click the Extensions Icon in the upper right corner
- Click Manage Extensions
- Disable any other active wallet extensions
Note
Disabling MetaMask keeps your keys intact, but removing MetaMask could result in losing your private keys. Be careful not to accidentally remove a wallet entirely.
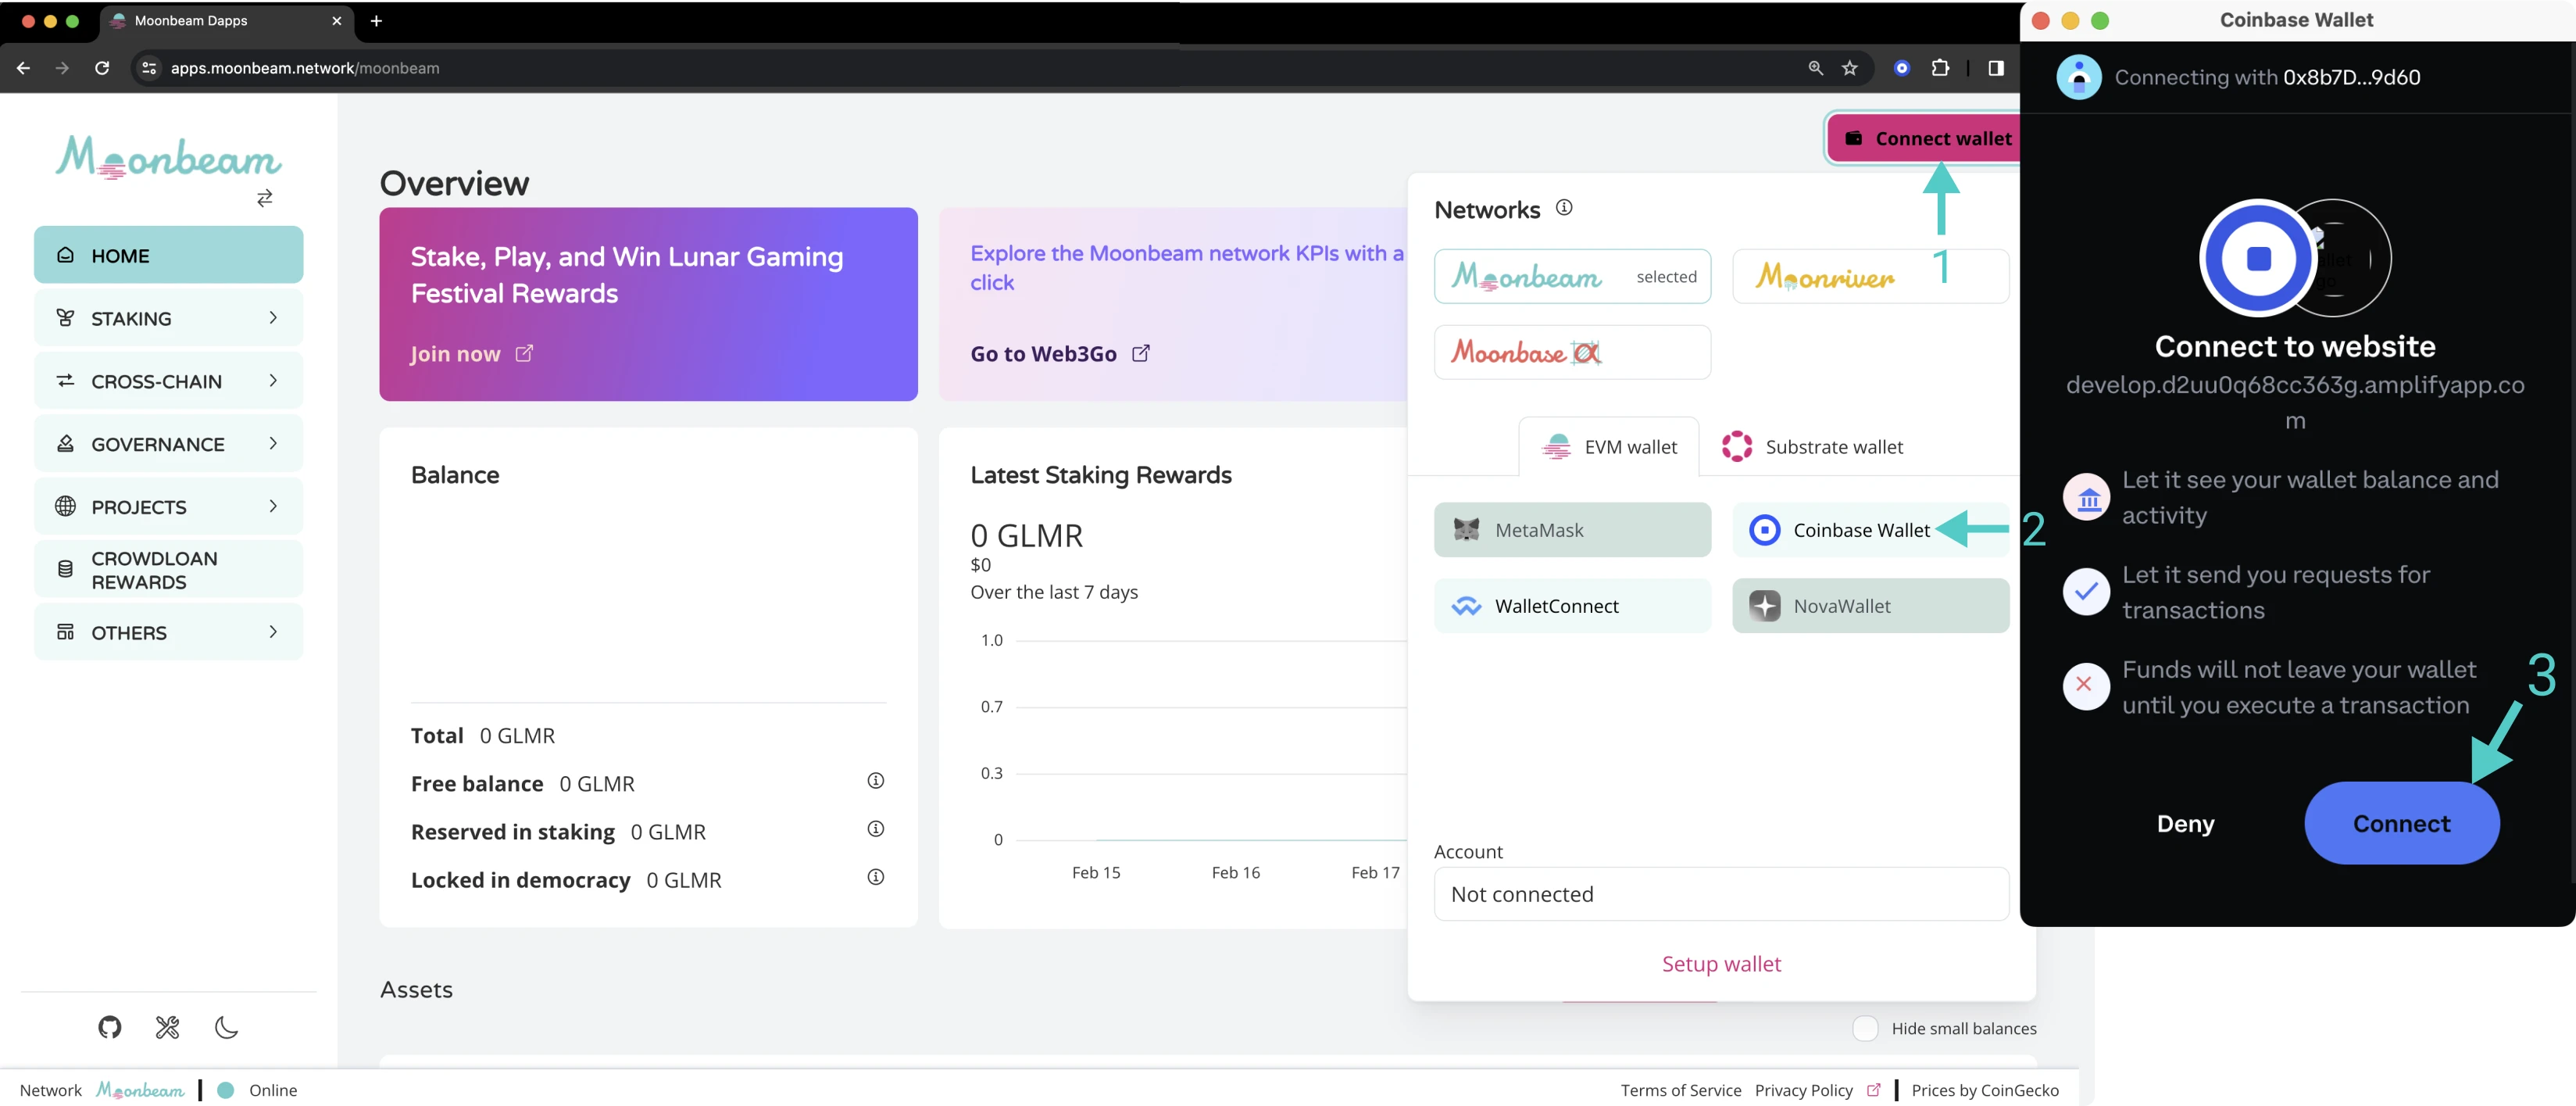
Then, head to the Moonbeam dApp, and take the following steps to connect the Coinbase Wallet extension:
- Press Connect wallet
- Select Coinbase Wallet from the list of options
- Press Connect when Coinbase Wallet pops up
To subscribe, take the following steps:
- Press the Mailbox icon in the upper right
- Press Subscribe in the pop-up
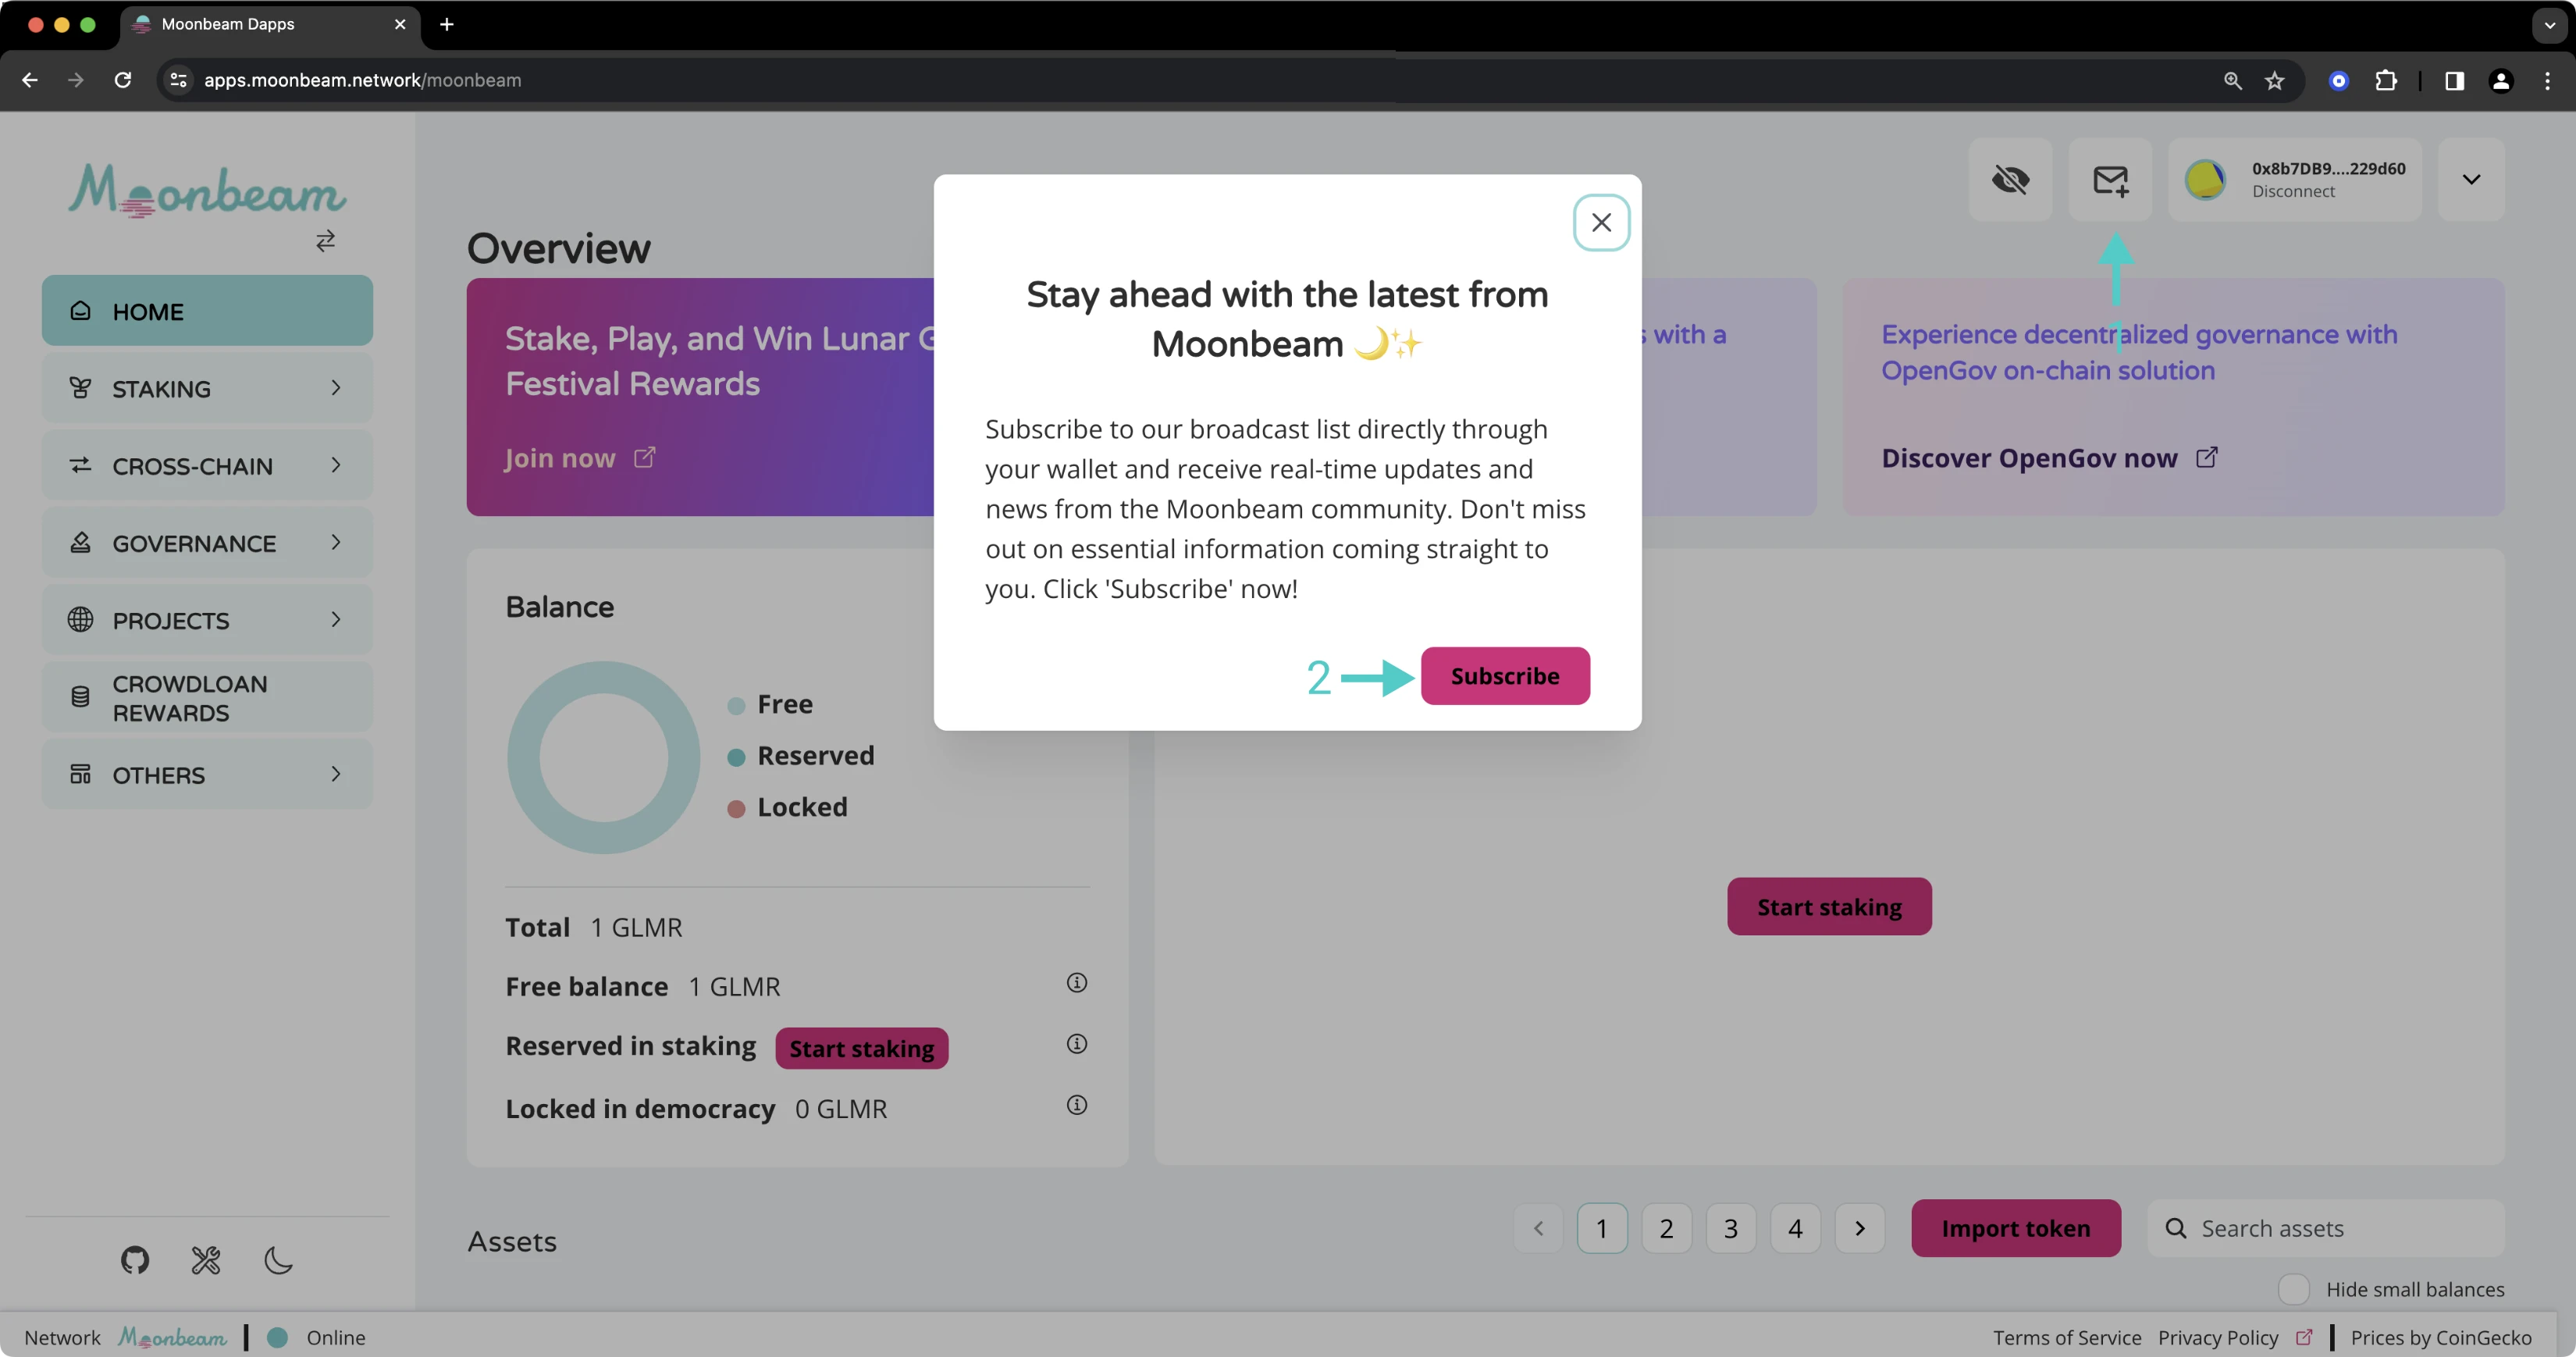
- Press Connect your wallet in the resulting Coinbase pop up
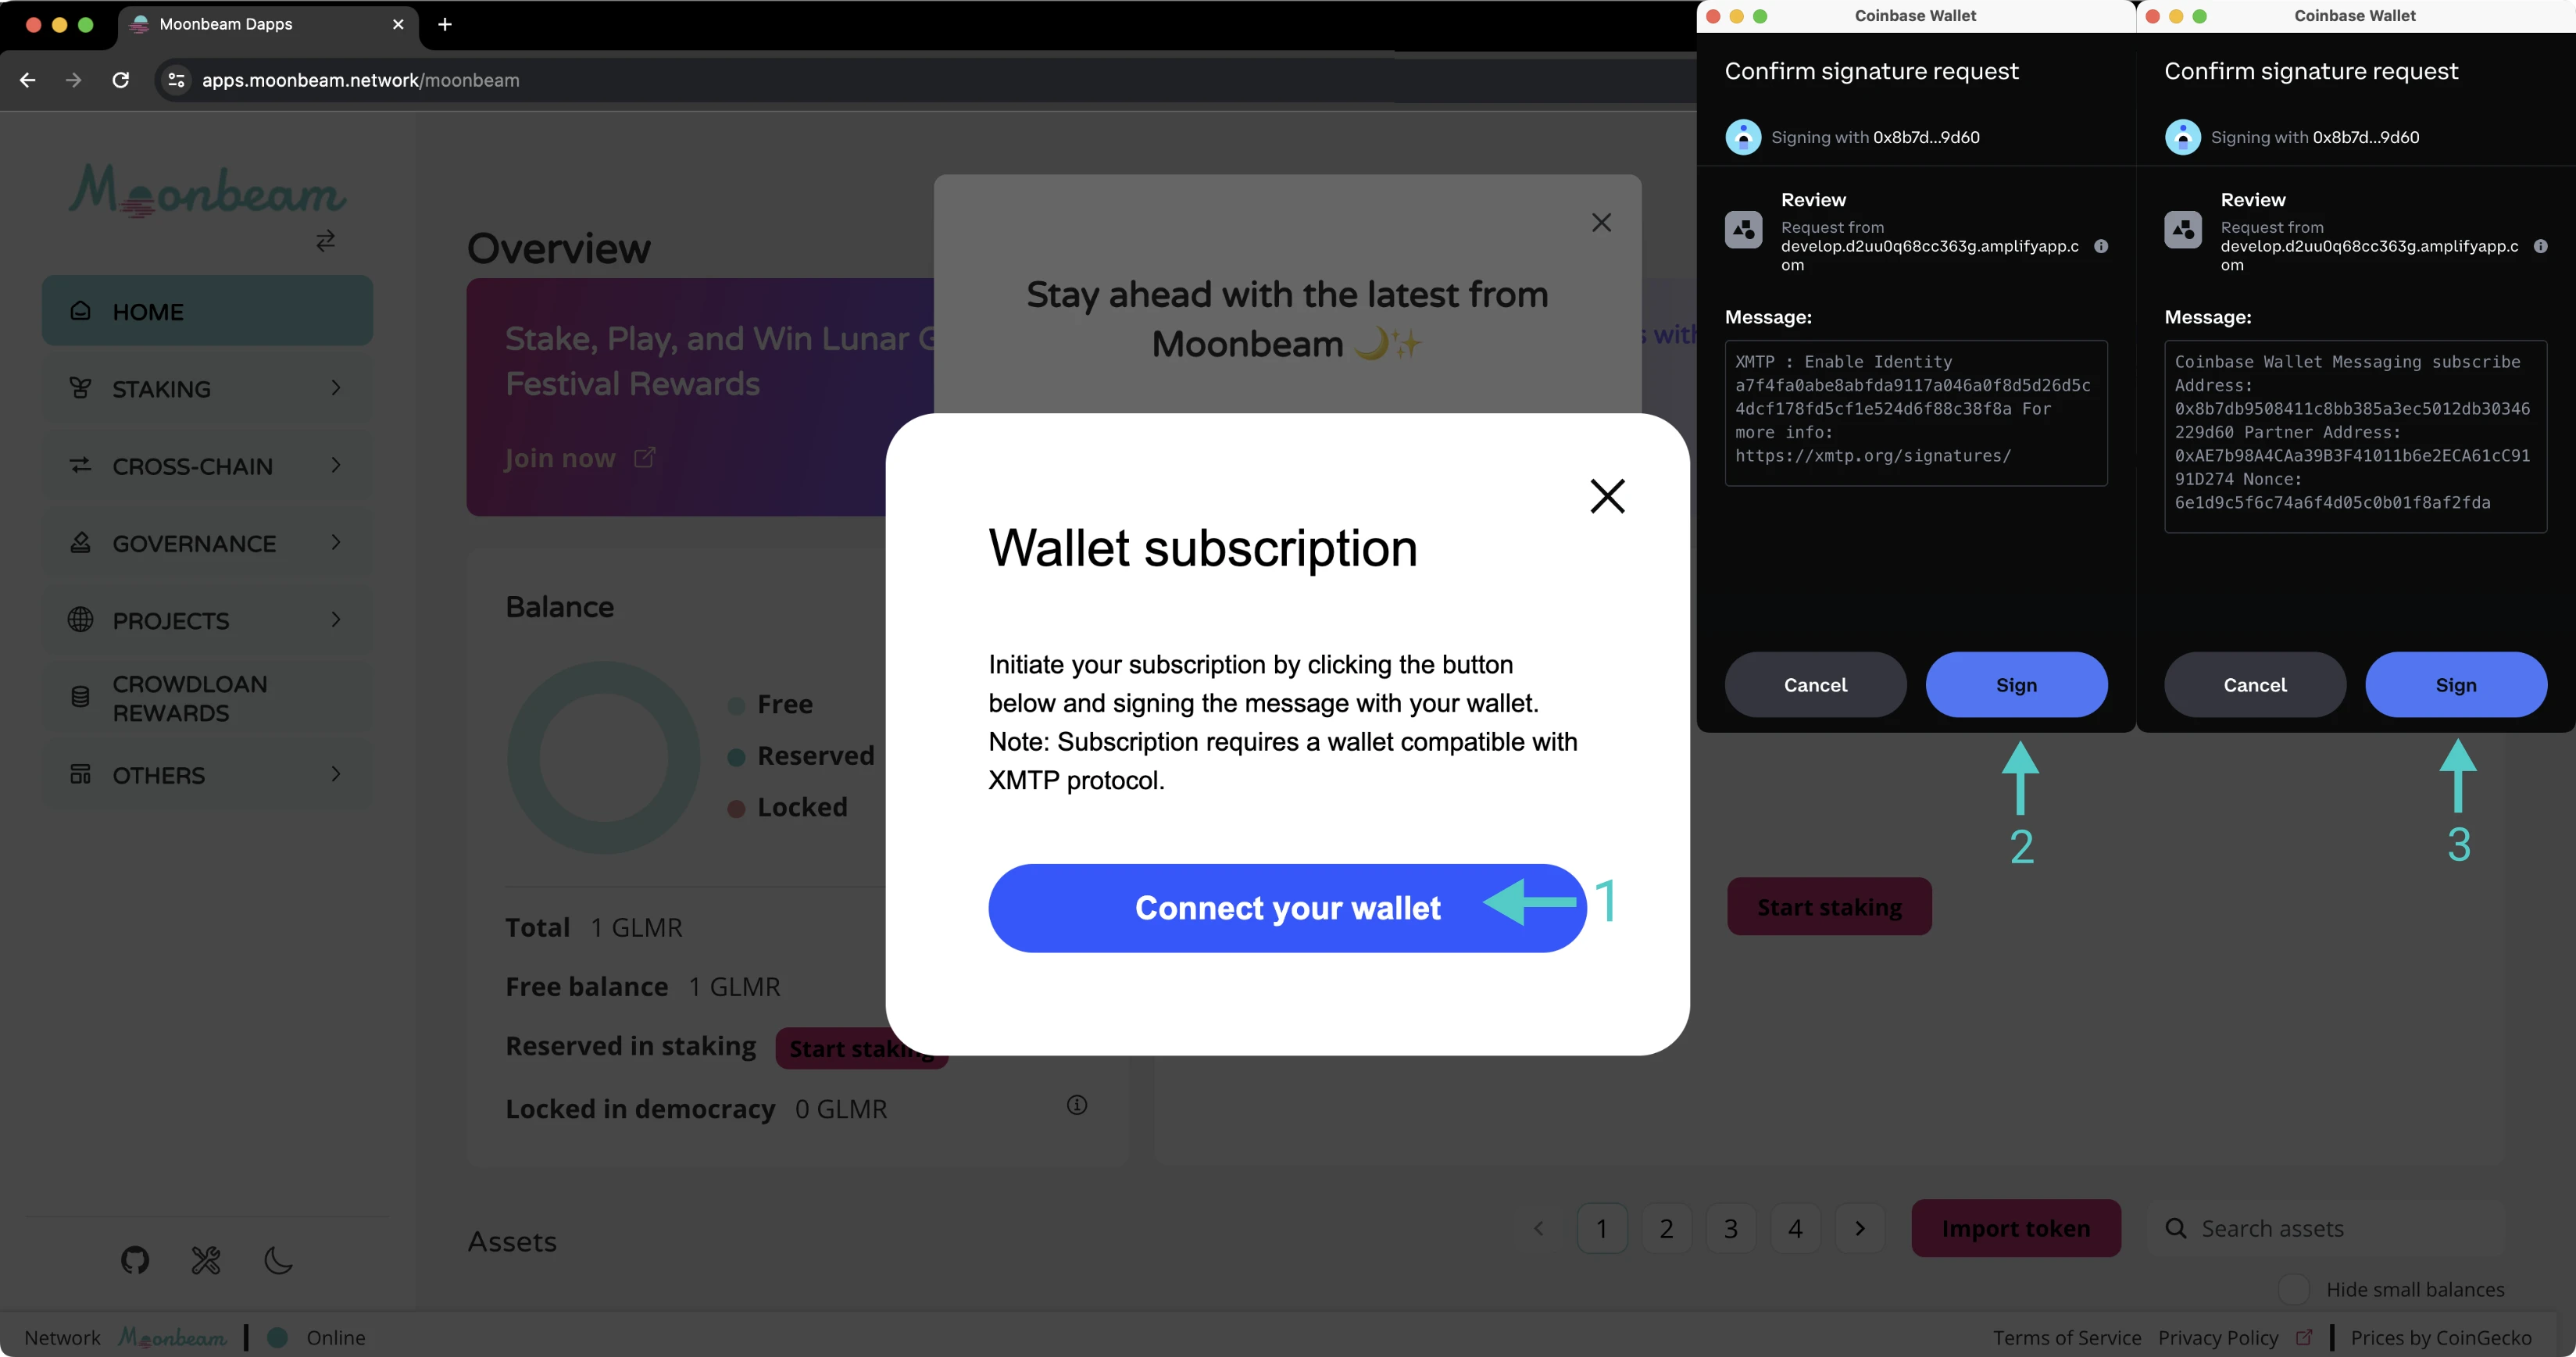
- Next, you'll have two signature requests in your Coinbase Wallet. The first one asks you to enable XTMP Identity. Press Sign
- The next signature request is to enable the subscription to messages from the Moonbeam Foundation. Press Sign
Note
You may receive three signature requests in the prior step if you didn't enable XMTP on your phone. The third signature request will take care of that, however, you may still need to enable notifications for the Coinbase Wallet app on your phone to ensure you receive them.
And that's it! Once done, you'll see the below confirmation screen. For questions about Coinbase Wallet, please refer to the Coinbase Wallet Help.

Limitations
- At this time, Coinbase Wallet displays only outgoing transactions in your transaction history in the app. You can see your full transaction history, including incoming transactions, by looking up your address on a blockchain explorer such as Moonscan
- On the Coinbase Wallet mobile app, you can add Moonbase Alpha as a custom network; however, you won't be able to see your balances or send transactions from the app. You'll need to use the browser extension instead
Additional Resources
| Created: January 18, 2022