Run a Chainlink Oracle Node on Moonbeam
Introduction
As an open, permissionless network, anyone may choose to operate an oracle providing data to smart contracts running on Moonbeam.
This article provides an overview in regards to setting up a Chainlink oracle on Moonbase Alpha.
Note
The examples provided are for demonstration purposes only. Passwords MUST be managed securely and never stored in plaintext. These examples assume an Ubuntu 18.04-based environment, but call-outs for MacOS are included. This guide is for a development setup only, do not use this for a production environment.
Basic Request Model
Before going into fetching the data itself, it is important to understand the basics of the "basic request model." The generic flow for requesting and receiving data from a Chainlink oracle is as follows:
- A client contract creates and makes a request for data to a Chainlink oracle
- The request is sent through the
transferAndCallfunction of the LINK token contract, which is an ERC-677 compliant token, that allows tokens to be transferred and relays the request to the oracle contract - Once the token is transferred the LINK contract calls the oracle contract's
onTokenTransferfunction - The oracle contract is owned by the oracle node operators and is responsible for handling on-chain requests made through the LINK token. Once the request is received by the oracle contract an event is emitted to the node which acts upon it
- After the request has been fulfilled by the oracle node, the node uses the
fulfillOracleRequestfunction of the oracle contract to return the result to the client via the callback function defined in the original request
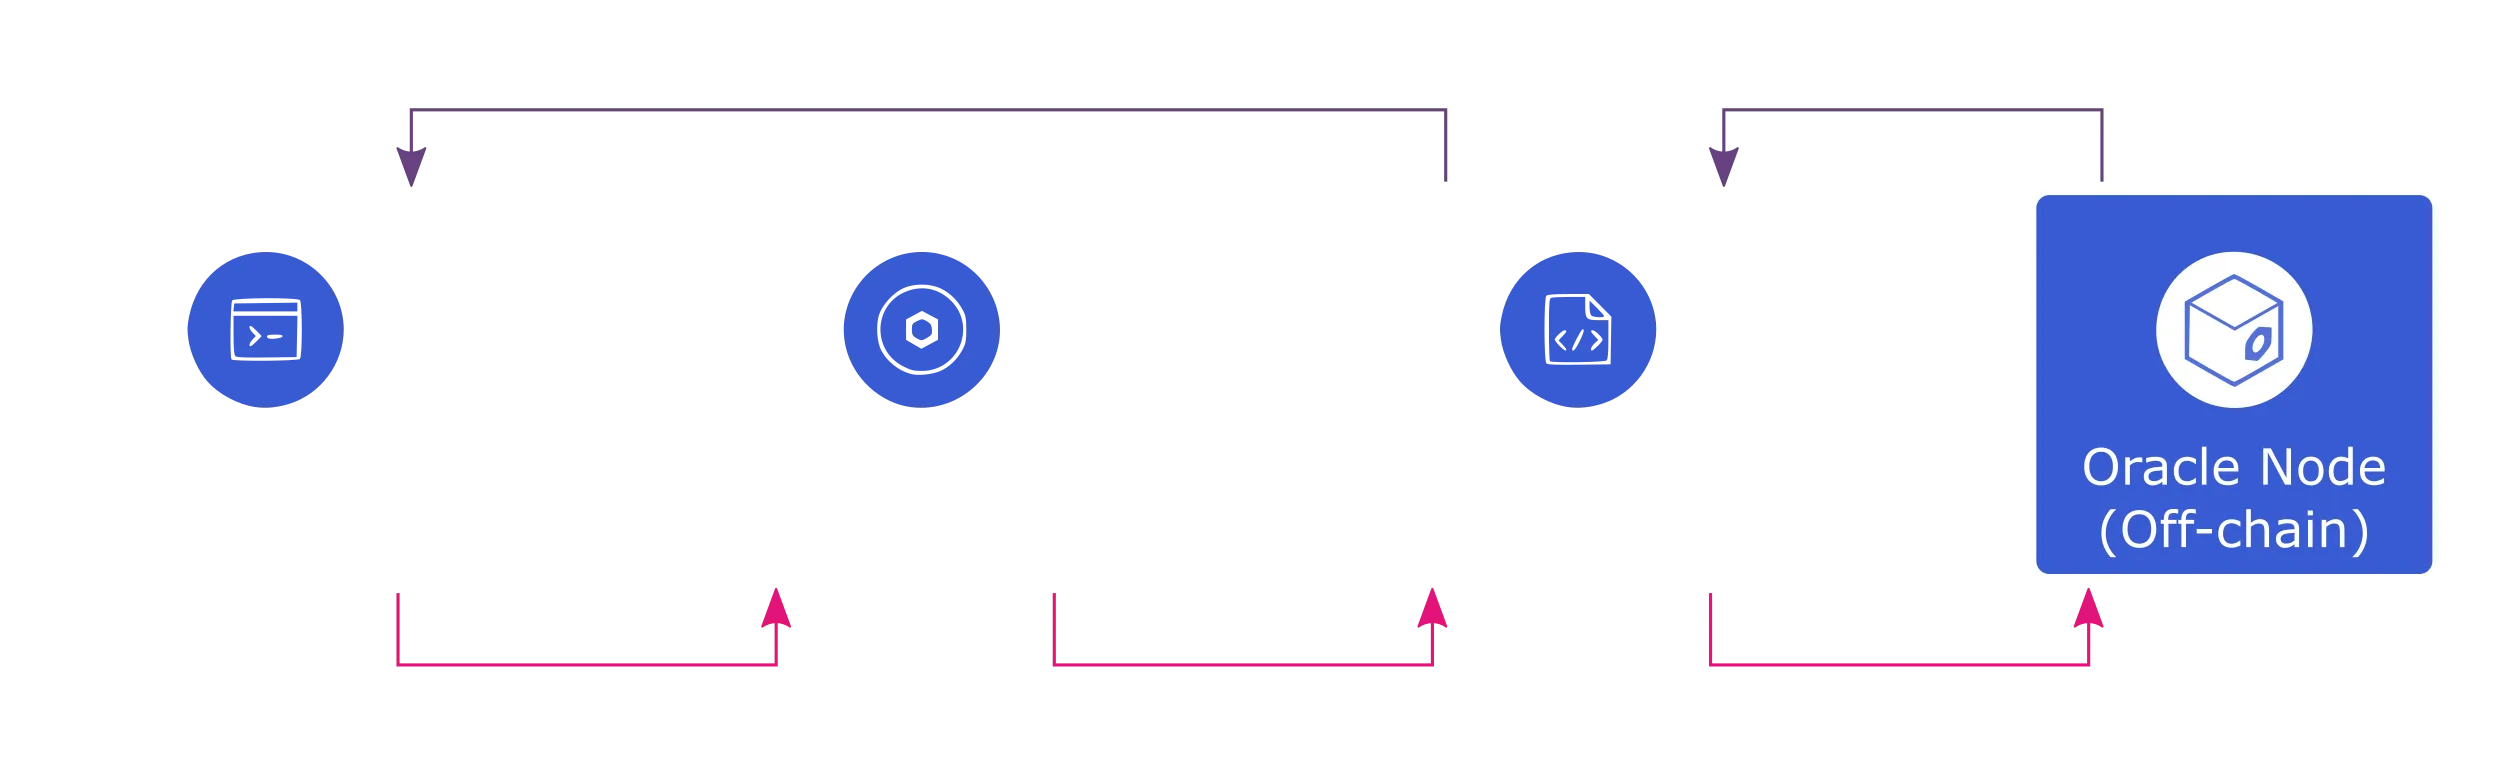
When a request for data is created through the client contract, the following parameters need to be passed in to ensure the transaction will go through and the correct information will be returned:
- Oracle address - address of the contract deployed by the oracle node
- Job ID - the task to be executed. An oracle node has a set of job IDs, where each job corresponds to a task that can be requested by a user, for example, fetching a price feed
- Payment - payment in LINK tokens that the oracle will receive for fulfiling the request
Advanced Users
If you are familiar with running Chainlink oracle nodes, this information will get you started on the Moonbase Alpha TestNet quickly:
- Chainlink documentation on Running a Chainlink Node
- Moonbase Alpha WSS EndPoint:
wss://wss.api.moonbase.moonbeam.network - Moonbase Alpha ChainId:
1287(hex:0x507) - LINK Token on Moonbase Alpha:
0xa36085F69e2889c224210F603D836748e7dC0088 - You can get DEV tokens for testing on Moonbase Alpha once every 24 hours from the Moonbase Alpha Faucet
Checking Prerequisites
To follow along with this guide, you will need to have:
- Docker installed for running Postgres DB and ChainLink node containers
- An account with funds. You can create one with MetaMask. You can get DEV tokens for testing on Moonbase Alpha once every 24 hours from the Moonbase Alpha Faucet
- Access to the Remix IDE in case you want to use it to deploy the oracle contract. For more information you can check out the Using Remix to Deploy to Moonbeam tutorial
Getting Started
This guide will walk through the process of setting up the oracle node, summarized as:
- Setup a Chainlink node connected to Moonbase Alpha
- Fund the node
- Deploy an oracle contract
- Create a job on the node
- Bond the node and oracle
- Test using a client contract
Node Setup
To get the node setup, you can take the following steps:
-
Create a new directory to place all the necessary files
mkdir -p ~/.chainlink-moonbeam && cd ~/.chainlink-moonbeam -
Create a Postgres DB with Docker (MacOS users may replace
--network host \with-p 5432:5432)docker run -d --name chainlink_postgres_db \ --volume chainlink_postgres_data:/var/lib/postgresql/data \ -e 'POSTGRES_PASSWORD={INSERT_PASSWORD}' \ -e 'POSTGRES_USER=chainlink' \ --network host \ -t postgres:11Make sure to replace
{INSERT_PASSWORD}with an actual password. Docker will proceed to download the necessary images if they haven't already been downloaded -
Create an environment file for Chainlink in the
chainlink-moonbeamdirectory. This file is read on the creation of the Chainlink container. MacOS users may replacelocalhostwithhost.docker.internalecho "ROOT=/chainlink LOG_LEVEL=debug ETH_CHAIN_ID=1287 MIN_OUTGOING_CONFIRMATIONS=2 LINK_CONTRACT_ADDRESS={INSERT_LINK_TOKEN_CONTRACT_ADDRESS} CHAINLINK_TLS_PORT=0 SECURE_COOKIES=false GAS_UPDATER_ENABLED=false ALLOW_ORIGINS=* ETH_URL=wss://wss.api.moonbase.moonbeam.network DATABASE_URL=postgresql://chainlink:{INSERT_PASSWORD}@localhost:5432/chainlink?sslmode=disable MINIMUM_CONTRACT_PAYMENT=0" > ~/.chainlink-moonbeam/.envHere, besides the password (
{INSERT_PASSWORD}), you also need to provide the LINK token contract ({INSERT_LINK_TOKEN_CONTRACT_ADDRESS}) -
Create an
.apifile that stores the user and password used to access the node's API, the node's operator UI, and the Chainlink command linetouch .api -
Set both an email address and another password
echo "{INSERT_EMAIL_ADDRESS}" > ~/.chainlink-moonbeam/.api echo "{INSERT_ANOTHER_PASSWORD}" >> ~/.chainlink-moonbeam/.api -
Lastly, you need another file that stores the wallet password for the node's address
touch .password -
Set the third password
echo "{INSERT_THIRD_PASSWORD}" > ~/.chainlink-moonbeam/.password -
Launch the containers (MacOS users may replace
--network host \with-p 6688:6688)docker run -d --name chainlink_oracle_node \ --volume $(pwd):/chainlink \ --env-file=.env \ --network host \ -t smartcontract/chainlink:0.9.2 \ local n \ -p /chainlink/.password \ -a /chainlink/.api
Note
Reminder, do not store any production passwords in a plaintext file. The examples provided are for demonstration purposes only.
To verify everything is running and that the logs are progressing use:
docker ps #Containers Running
docker logs --tail 50 {INSERT_CONTAINER_ID} #Logs progressing

Contract Setup
With the oracle node running, you can start to configure the smart contract side of things. First, you'll need to fund the oracle node by taking the following steps:
-
Retrieve the address that the oracle node will use to send transactions and write data on-chain by logging into the Chainlink node's UI (located at
http://localhost:6688/). You'll need to use the credentials from the.apifile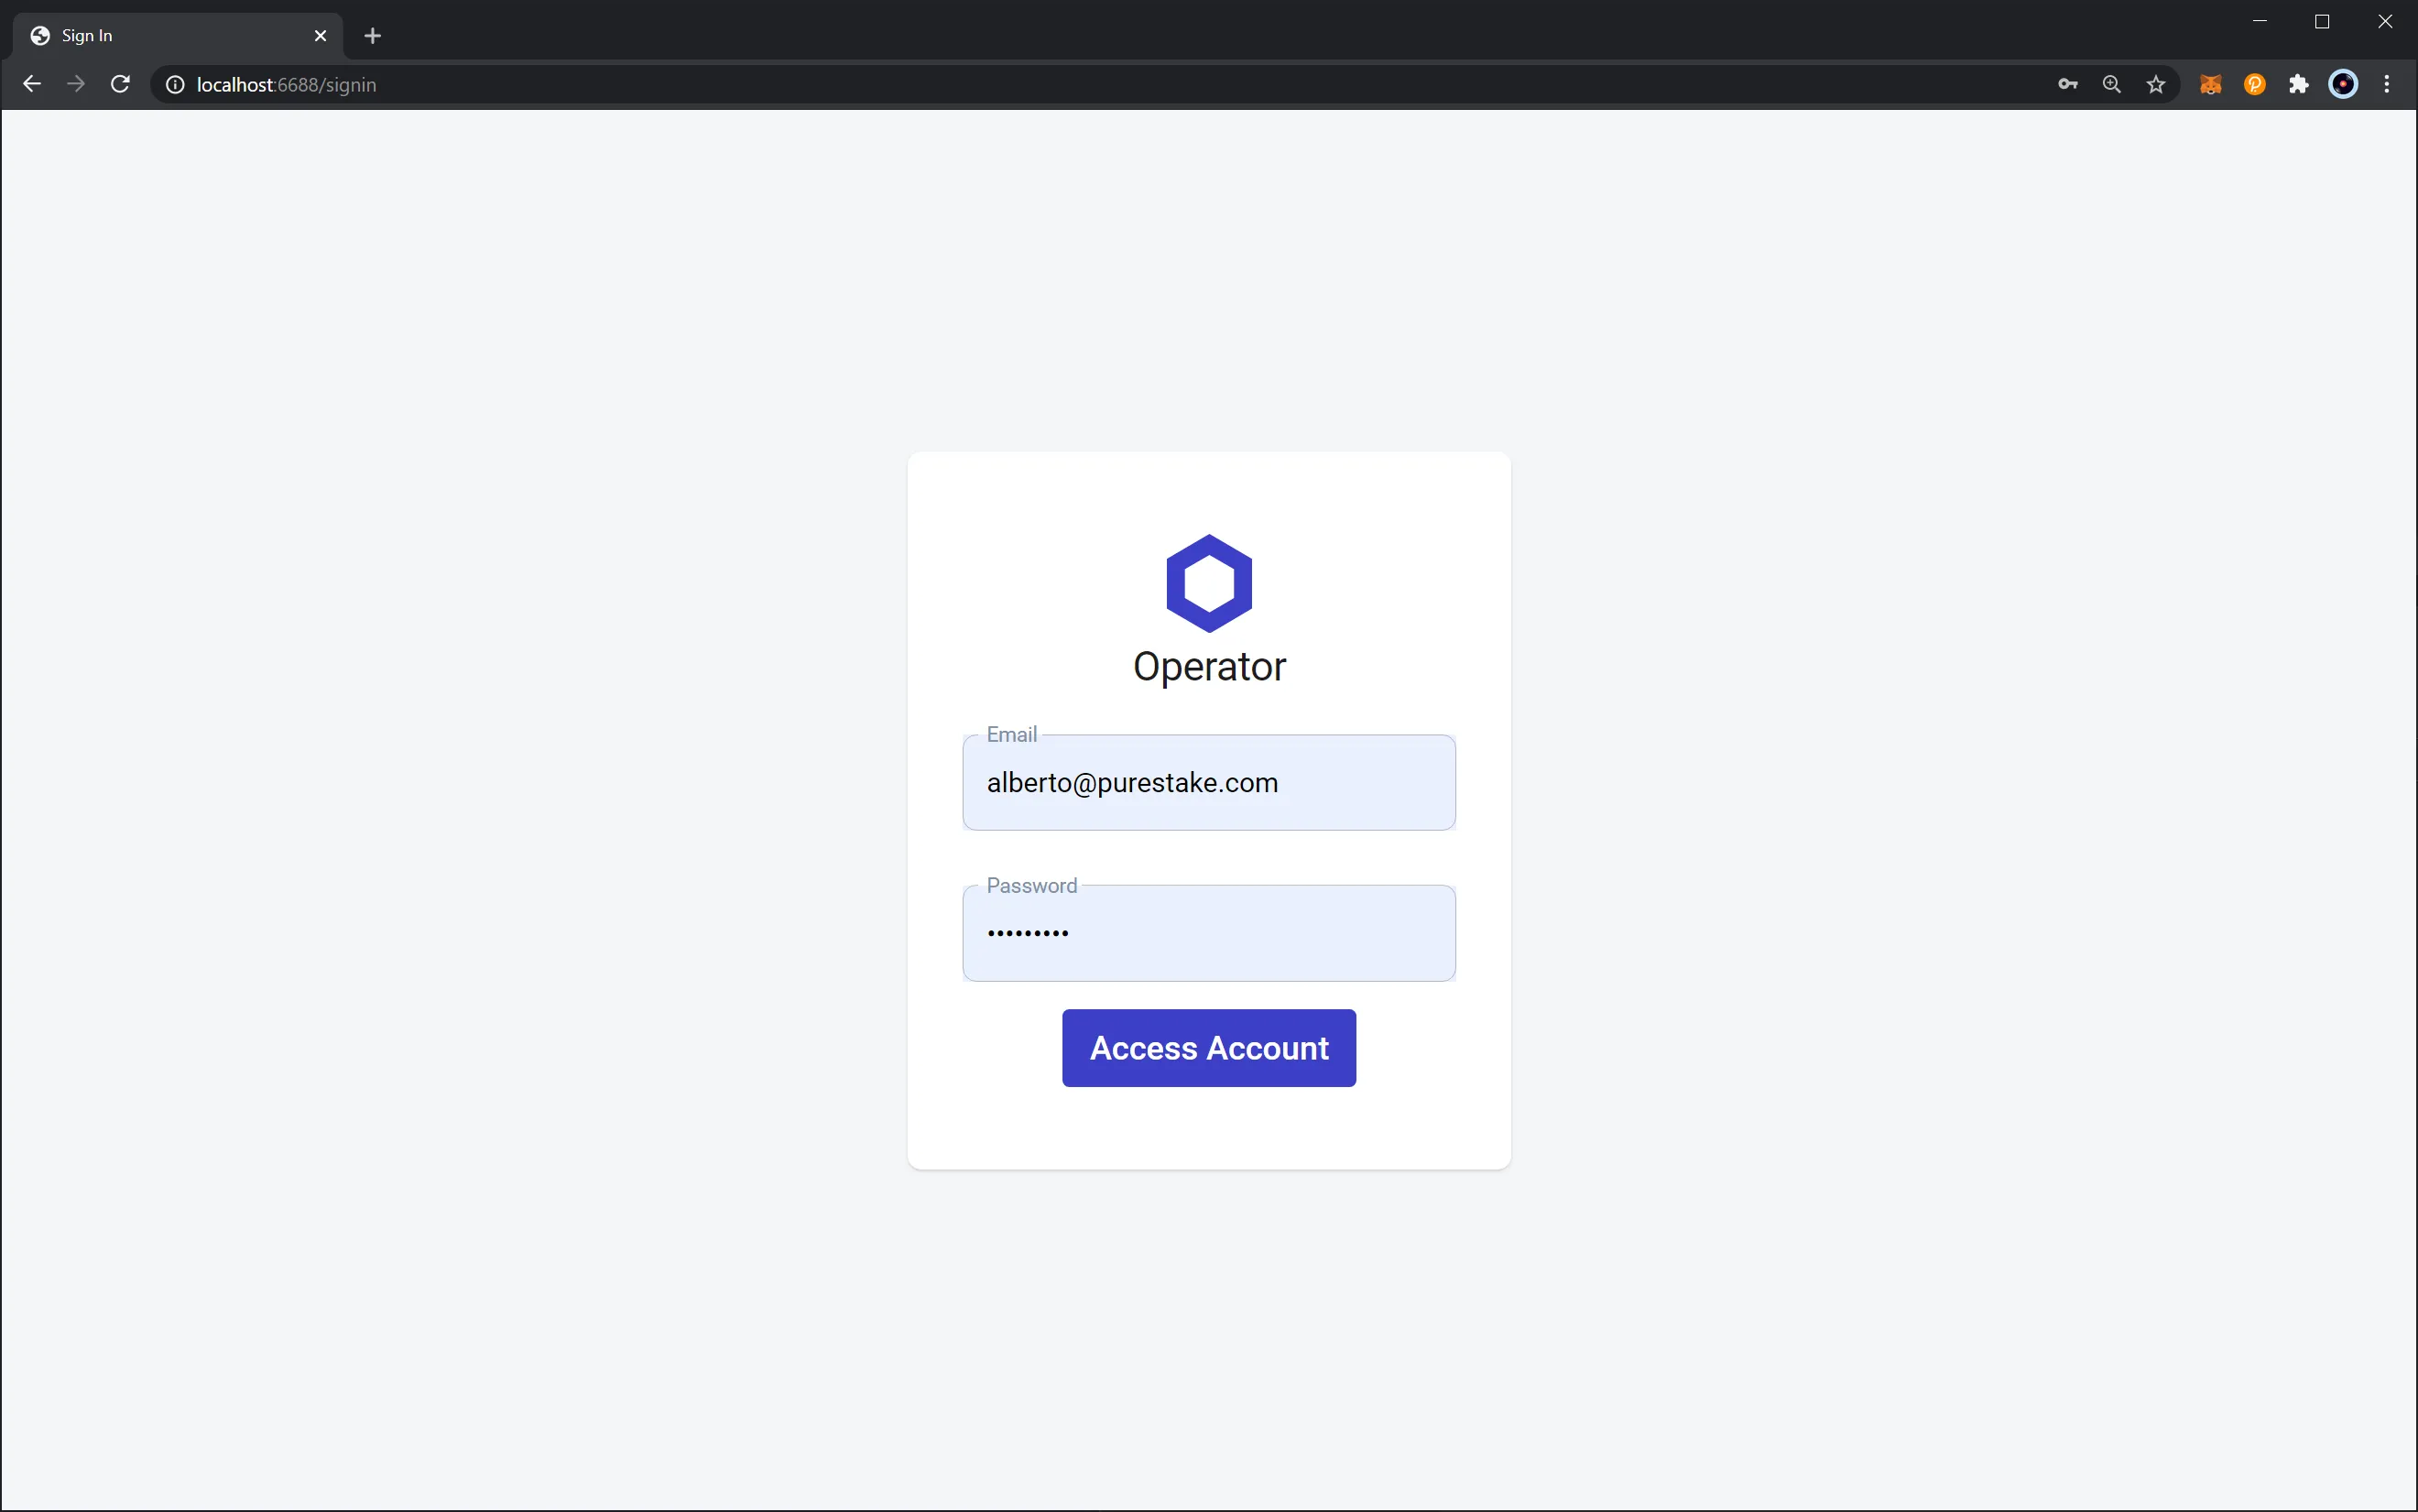
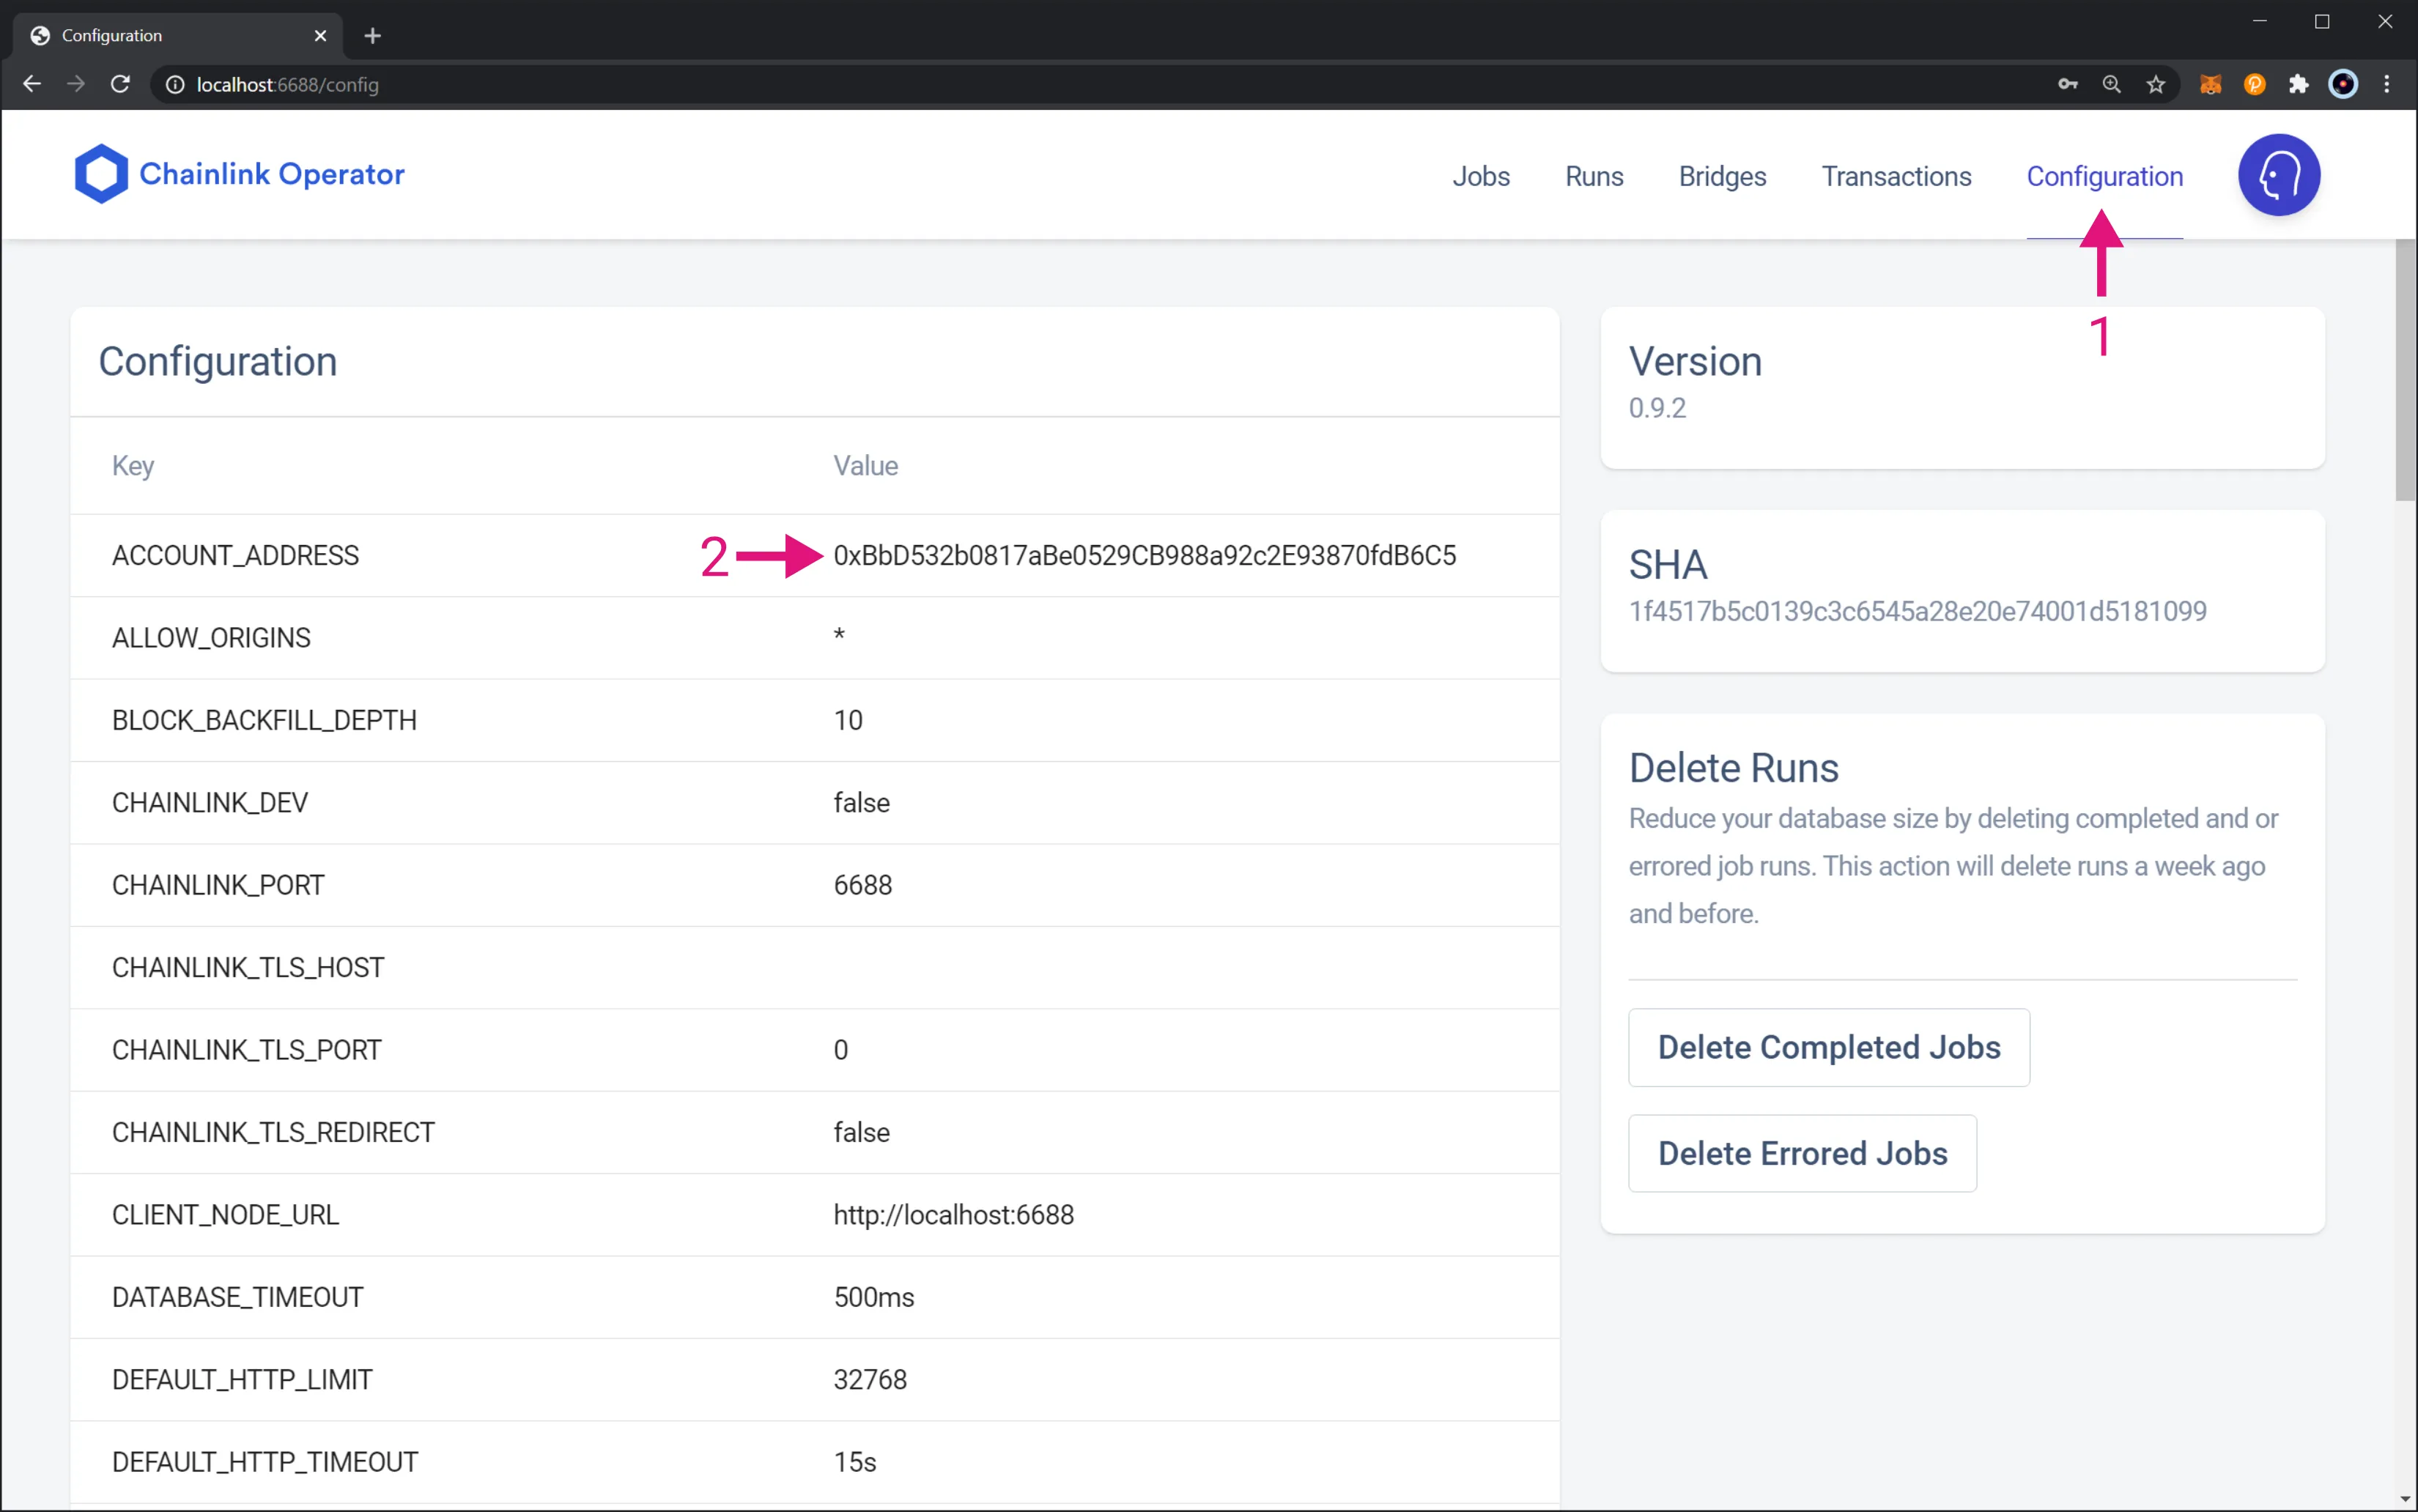
-
Go to the Configuration Page and copy the node address
-
Fund the node. You can get DEV tokens for testing on Moonbase Alpha once every 24 hours from the Moonbase Alpha Faucet
Next, you'll need to deploy the oracle contract, which is the middleware between the chain and the node. The contract emits an event with all the necessary information, which is read by the oracle node. Then, the node fulfills the request and writes the requested data in the caller's contract.
The source code of the oracle contract can be found in Chainlink's official GitHub repository. For this example, you can use Remix to interact with Moonbase Alpha and deploy the contract. In Remix, you can create a new file and copy the following code:
pragma solidity ^0.6.6;

import "@chainlink/contracts/src/v0.6/Oracle.sol";
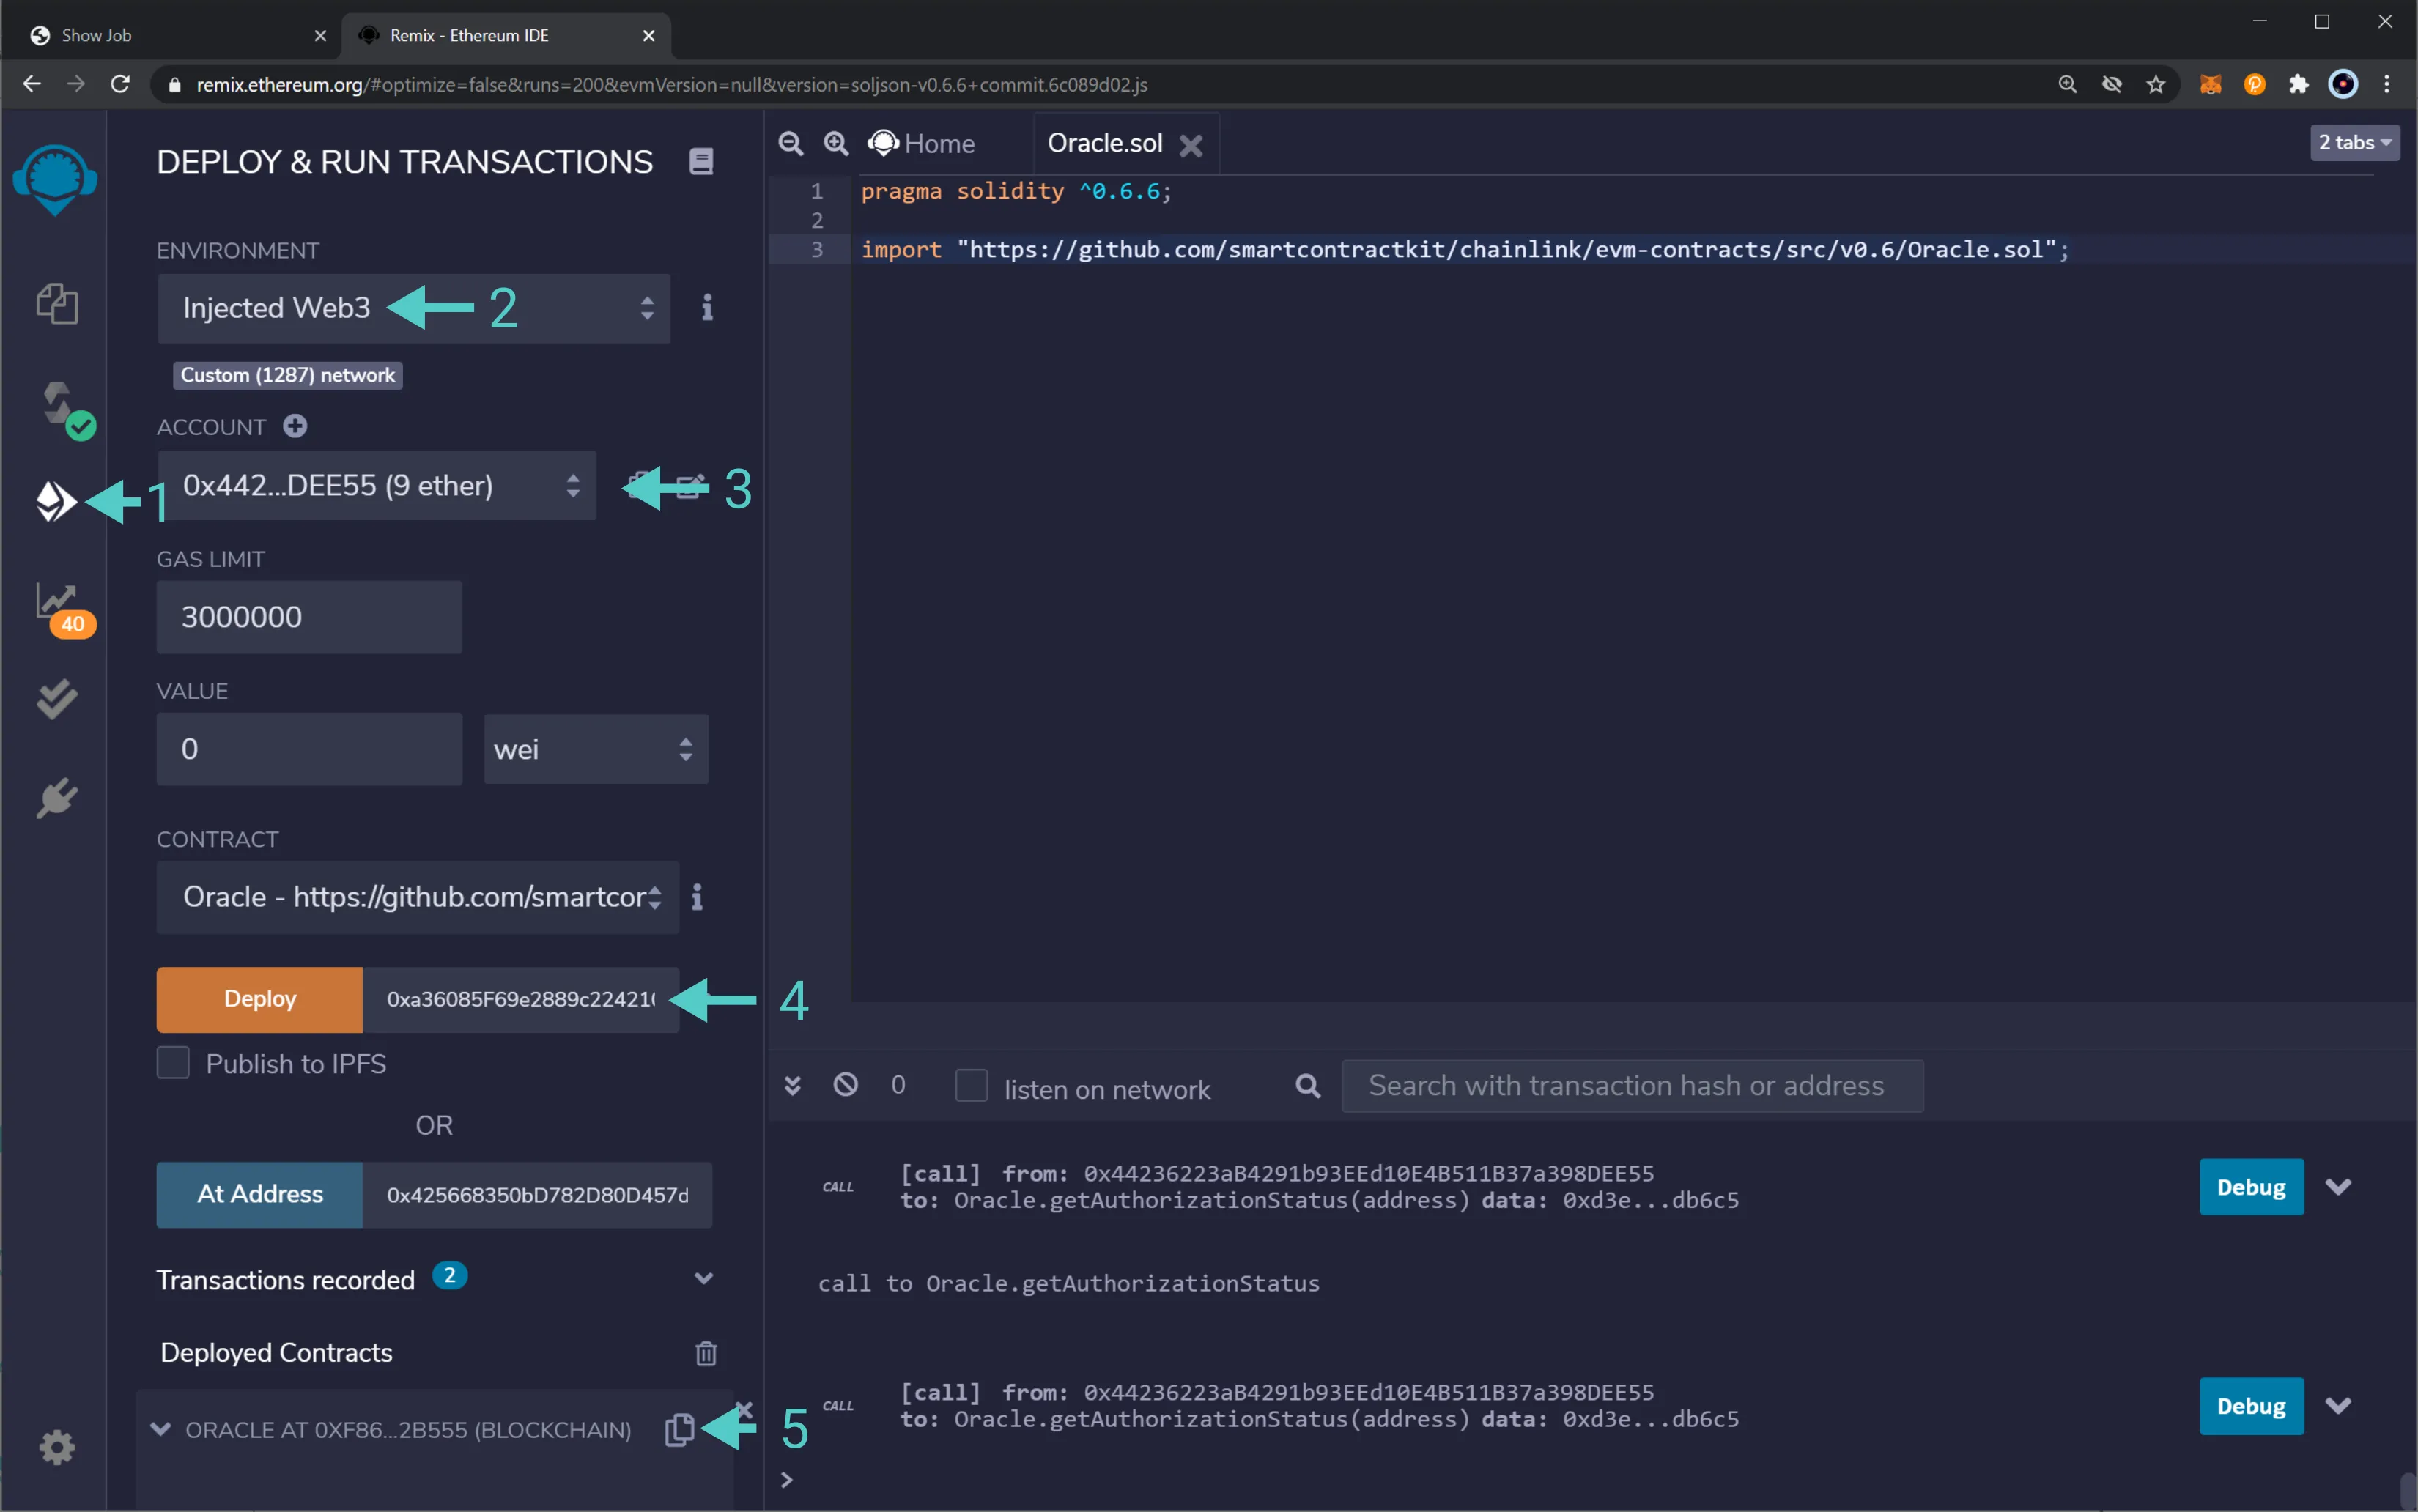
After compiling the contract, you can take the following steps to deploy and interact with the contract:
- Head to the Deploy and Run Transactions tab
- Make sure you've selected Injected Web3 and have MetaMask connected to Moonbase Alpha
- Verify your address is selected
- Enter the LINK token address and click Deploy to deploy the contract. MetaMask will pop-up and you can confirm the transaction
- Once deployed, under the Deployed Contracts section, copy the address of the contract
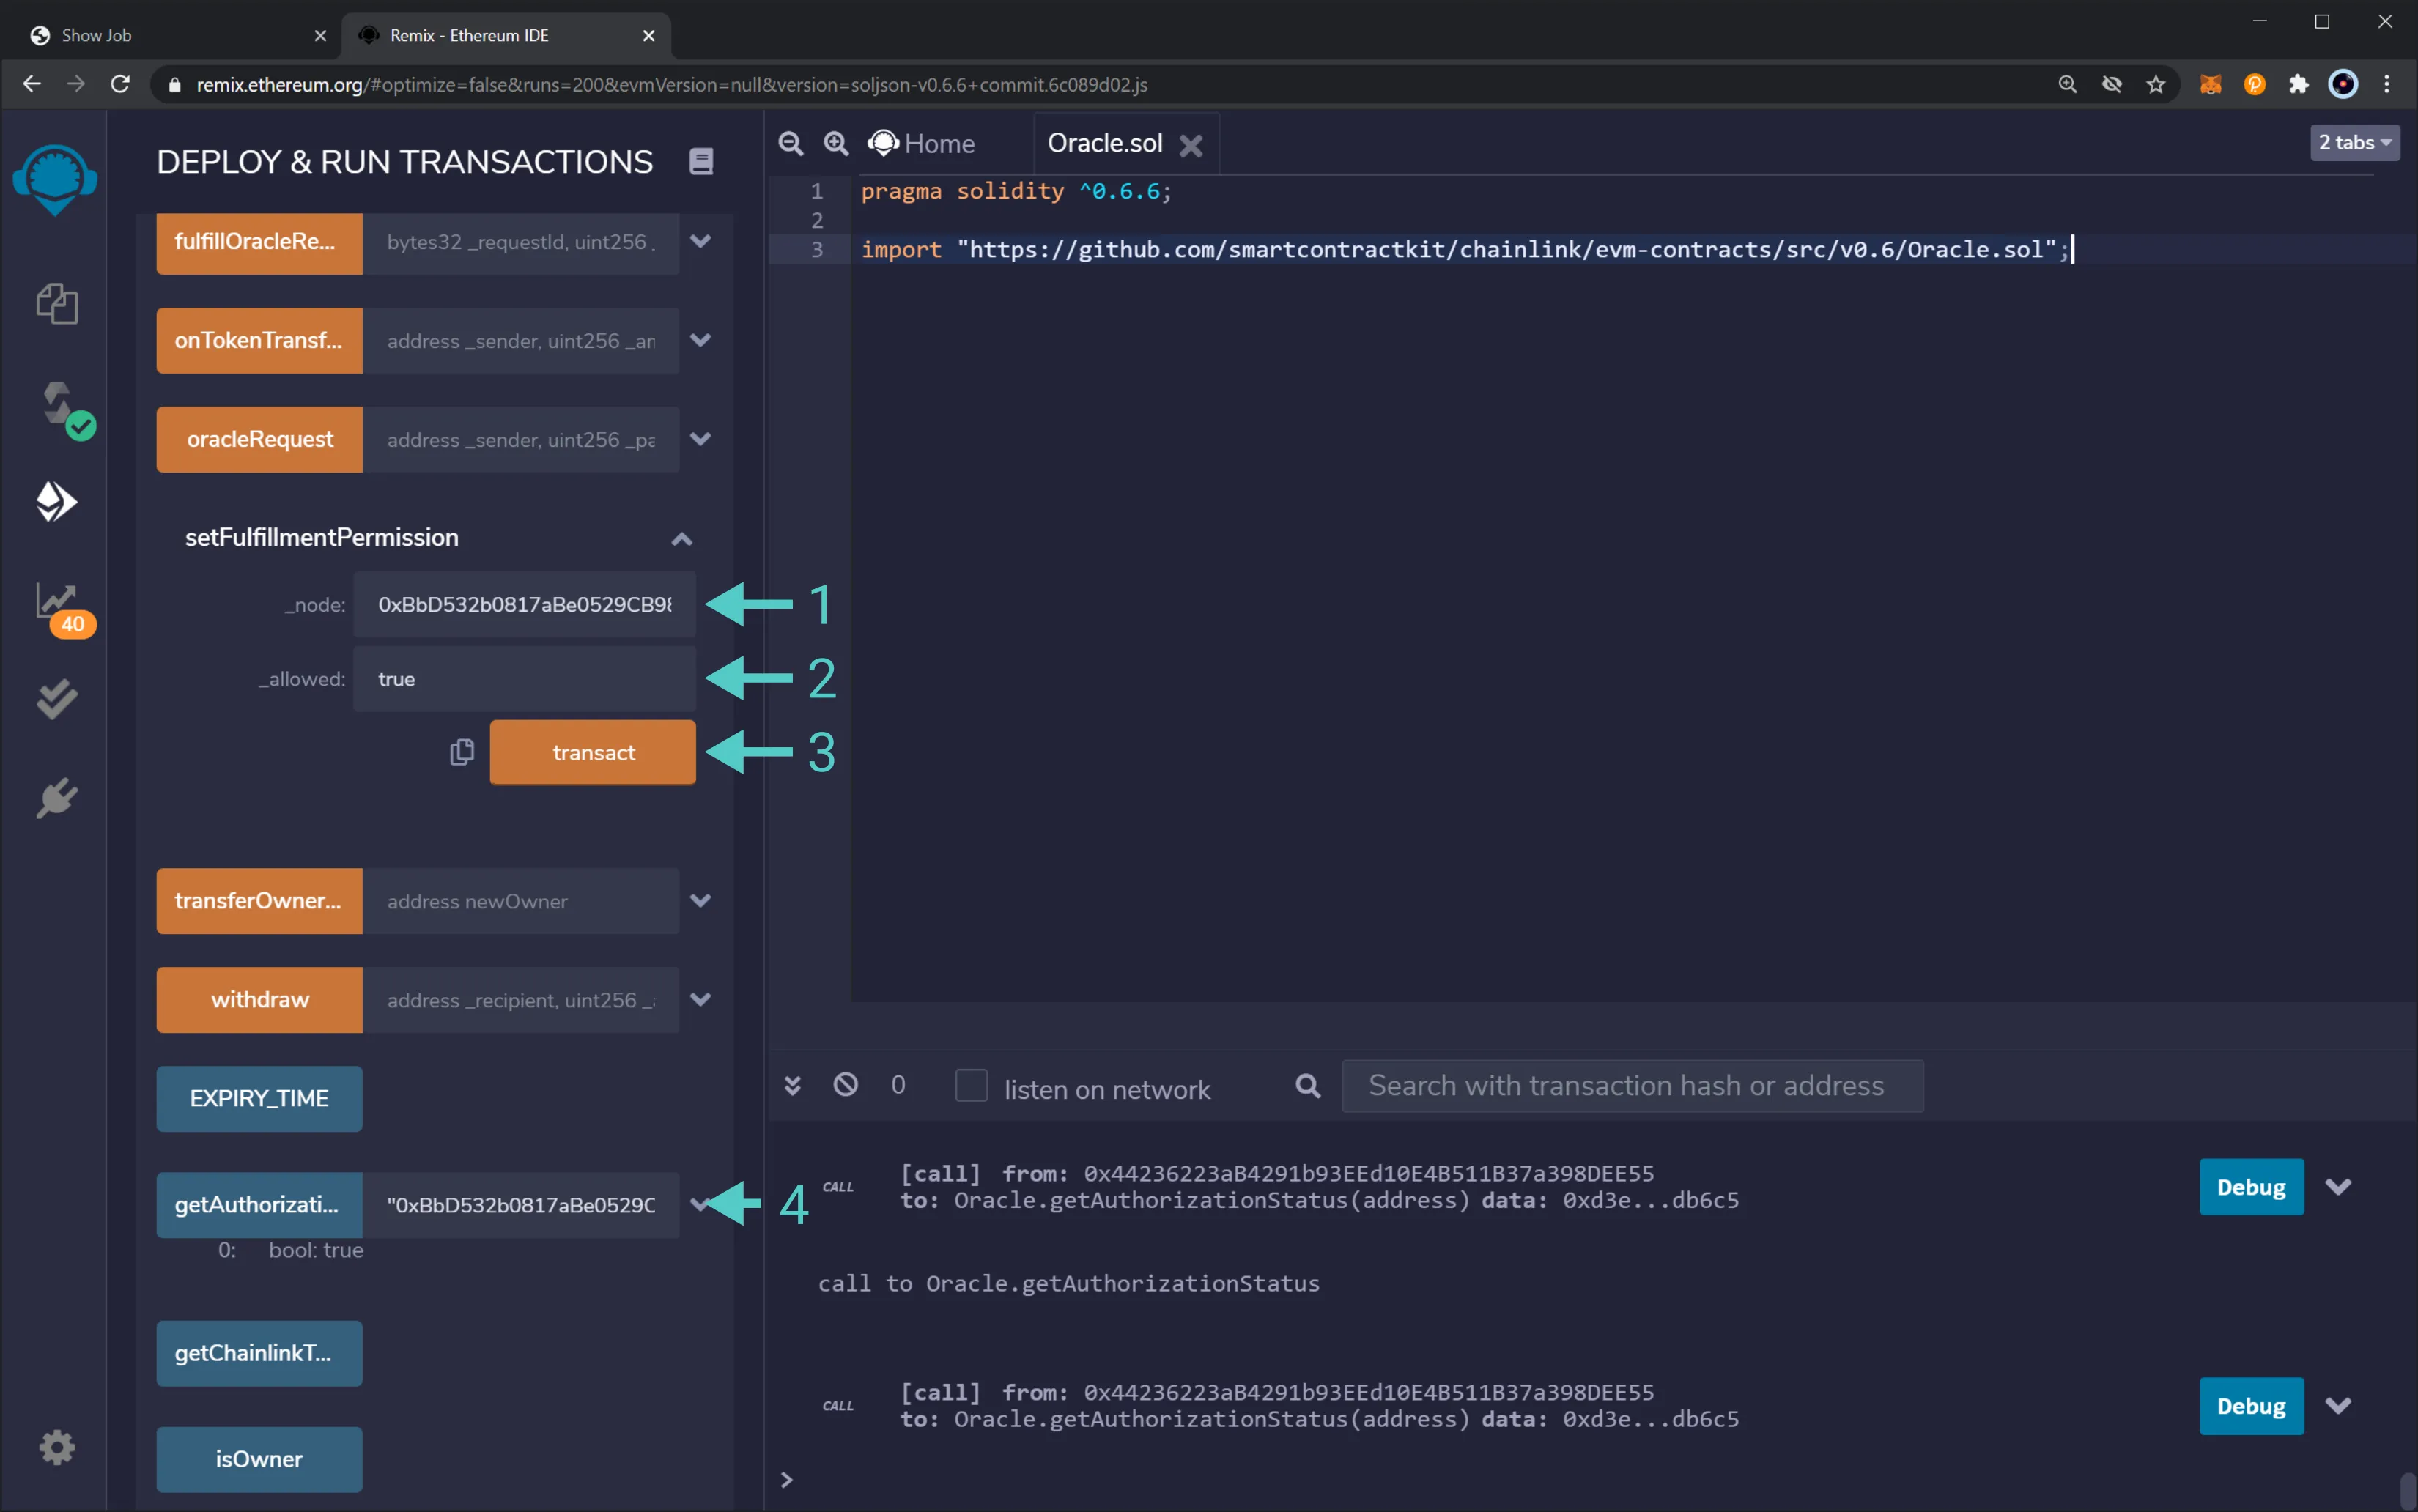
Lastly, you have to bond the oracle node and the oracle smart contract. A node can listen to the requests sent to a certain oracle contract, but only authorized (aka. bonded) nodes can fulfill the request with a result. To bond the oracle node and smart contract, you can take the following steps:
- To set the authorization using the
setFulfillmentPermission()function from the oracle contract, enter the address of the node that you want to bond to the contract - In the
_allowedfield you can set a boolean that indicates the status of the bond, for this example enter intrue - Click transact to send the request. MetaMask will pop-up and you can confirm the transaction
- Check the oracle node is authorized with the
getAuthorizationStatus()view function, passing in the oracle node address
Creating a Job
The last step to have a fully configured Chainlink oracle is to create a job. Referring to Chainlink’s official documentation:
A Job specifications, or specs, contain the sequential tasks that the node must perform to produce a final result. A spec contains at least one initiator and one task, which are discussed in detail below. Specs are defined using standard JSON so that they are human-readable and can be easily parsed by the Chainlink node.
Seeing an oracle as an API service, a job here would be one of the functions that you can call and that will return a result. To get started creating your first job, take the following steps:
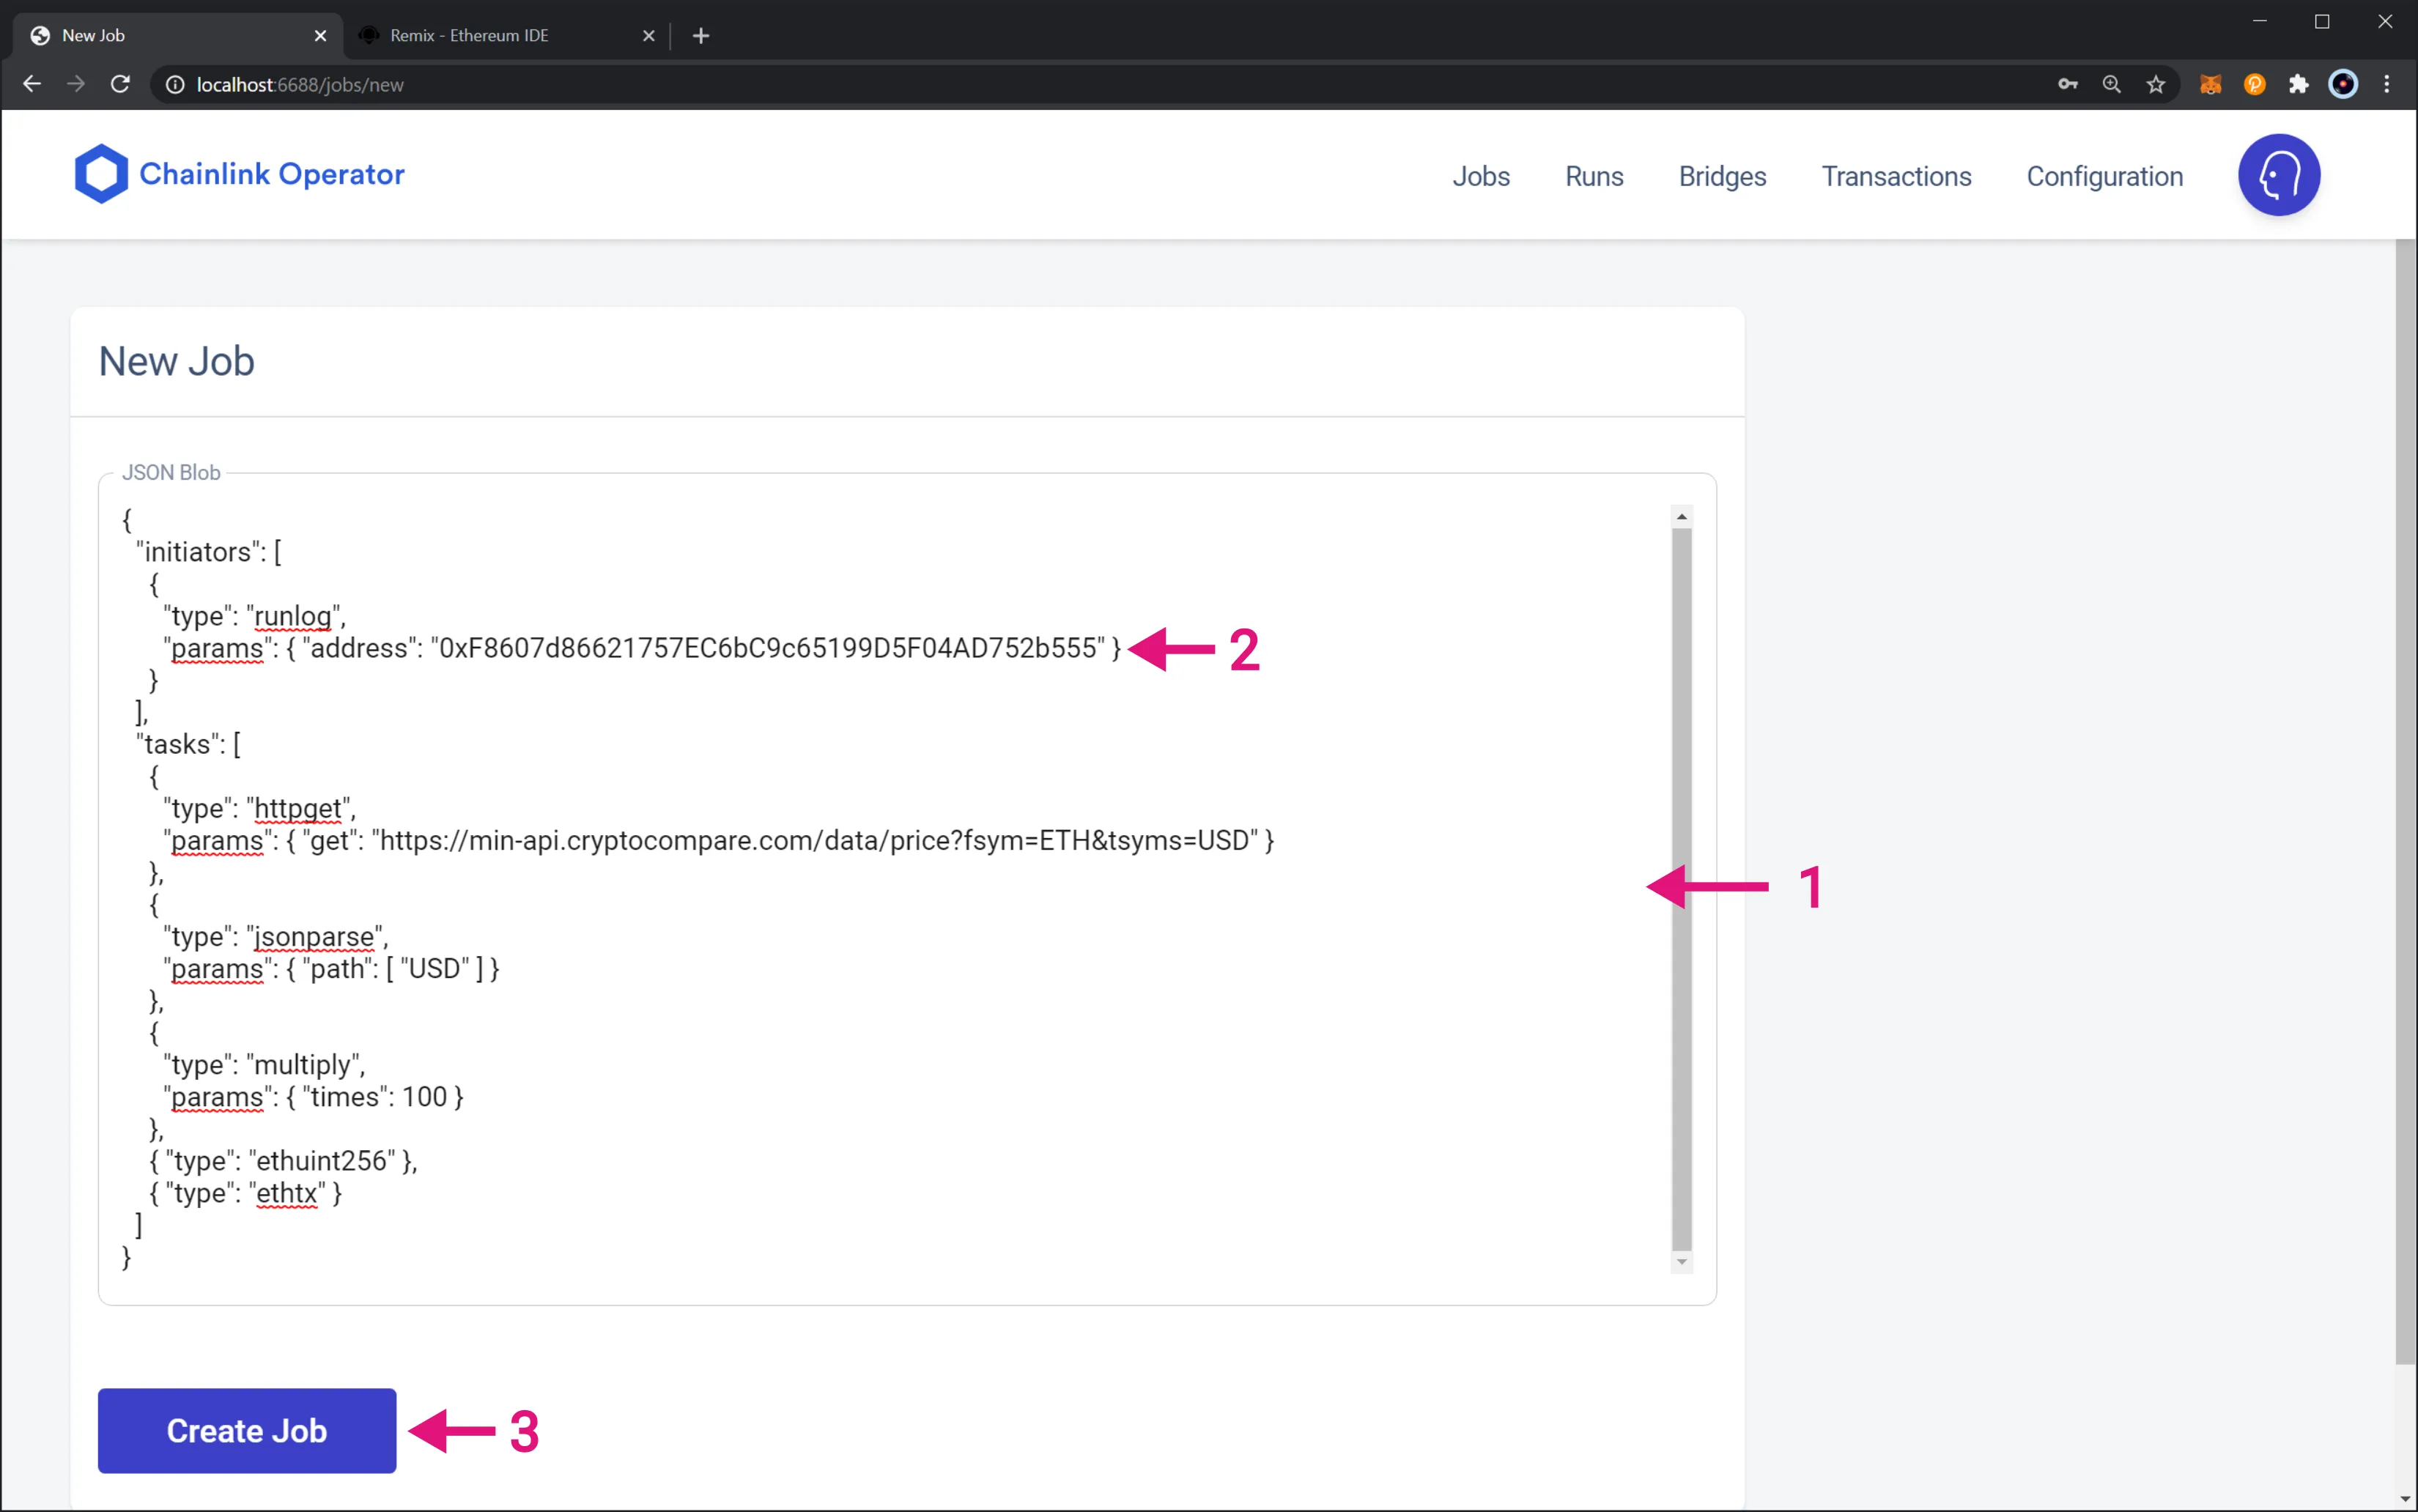
- Go to the Jobs sections of your node at
http://localhost:6688/jobs - Click on New Job

Next, you can create the new job:
-
Paste the following JSON. This will create a job that will request the current ETH price in USD
{ "initiators": [ { "type": "runlog", "params": { "address": "INSERT_YOUR_ORACLE_CONTRACT_ADDRESS" } } ], "tasks": [ { "type": "httpget", "params": { "get": "https://min-api.cryptocompare.com/data/price?fsym=ETH&tsyms=USD" } }, { "type": "jsonparse", "params": { "path": ["USD"] } }, { "type": "multiply", "params": { "times": 100 } }, { "type": "ethuint256" }, { "type": "ethtx" } ] } -
Make sure you enter your oracle contract address (
INSERT_YOUR_ORACLE_CONTRACT_ADDRESS) - Create the job by clicking on Create Job
And that is it! You have fully set up a Chainlink oracle node that is running on Moonbase Alpha.
Using Any API
You can also create and use a job spec to work with any API. You can search for preexisting jobs from an independent listing service such as market.link. Please note that although the jobs might be implemented for other networks, you'll be able to use the job spec to create the job for your oracle node on Moonbase Alpha. Once you find a job that fits your needs, you'll need to copy the job spec JSON and use it to create a new job.
For example, the previous job spec can be altered to be more generic so it can be used for any API:
{
    "initiators": [
        {
            "type": "runlog",
            "params": { "address": "INSERT_YOUR_ORACLE_CONTRACT_ADDRESS" }
        }
    ],
    "tasks": [
        { "type": "httpget" },
        { "type": "jsonparse" },
        { "type": "multiply" },
        { "type": "ethuint256" },
        { "type": "ethtx" }
    ]
}
If you need a more custom solution, you can check out Chainlink's documentation to learn how to build your own External Adapter.
Test the Oracle
To verify the oracle is up and answering requests, follow the using a Chainlink Oracle tutorial. The main idea is to deploy a client contract that makes requests to the oracle, and the oracle writes the requested data into the contract's storage.
| Created: December 7, 2020