Collator Activities
Introduction
Becoming a collator on Moonbeam-based networks requires you to meet bonding requirements and join the candidate pool. Once you're in the candidate pool, you can adjust your self-bond amount or decide to leave the pool at any time.
If you wish to reduce your self-bond amount or leave the candidate pool, it requires you to first schedule a request to leave and then execute upon the request after a delay period has passed.
This guide will take you through important timings to be aware of when leaving or reducing your self-bond amount, how to join and leave the candidate pool, and how to adjust your self-bond.
Collator Timings
Before getting started, it's important to note some of the timing of different actions related to collator activities:
| Variable | Value |
|---|---|
| Round duration | 1800 blocks (6 hours) |
| Leave candidates | 28 rounds (168 hours) |
| Revoke delegation | 28 rounds (168 hours) |
| Reduce self-delegation | 28 rounds (168 hours) |
| Rewards payouts (after current round) | 2 rounds (12 hours) |
| Maximum offline rounds | 1 rounds (6 hours) |
| Variable | Value |
|---|---|
| Round duration | 600 blocks (2 hours) |
| Leave candidates | 24 rounds (48 hours) |
| Revoke delegation | 24 rounds (48 hours) |
| Reduce self-delegation | 24 rounds (48 hours) |
| Rewards payouts (after current round) | 2 rounds (4 hours) |
| Maximum offline rounds | 2 rounds (4 hours) |
| Variable | Value |
|---|---|
| Round duration | 1200 blocks (2 hours) |
| Leave candidates | 2 rounds (4 hours) |
| Revoke delegation | 2 rounds (4 hours) |
| Reduce self-delegation | 2 rounds (4 hours) |
| Rewards payouts (after current round) | 2 rounds (4 hours) |
| Maximum offline rounds | 2 rounds (4 hours) |
Note
The values presented in the previous table are subject to change in future releases.
Note
As of runtime 3000, asynchronous backing has been enabled on all Moonbeam networks. As a result, the target block time was reduced from 12 seconds to 6 seconds, which may break some timing-based assumptions.
Become a Candidate
Get the Size of the Candidate Pool
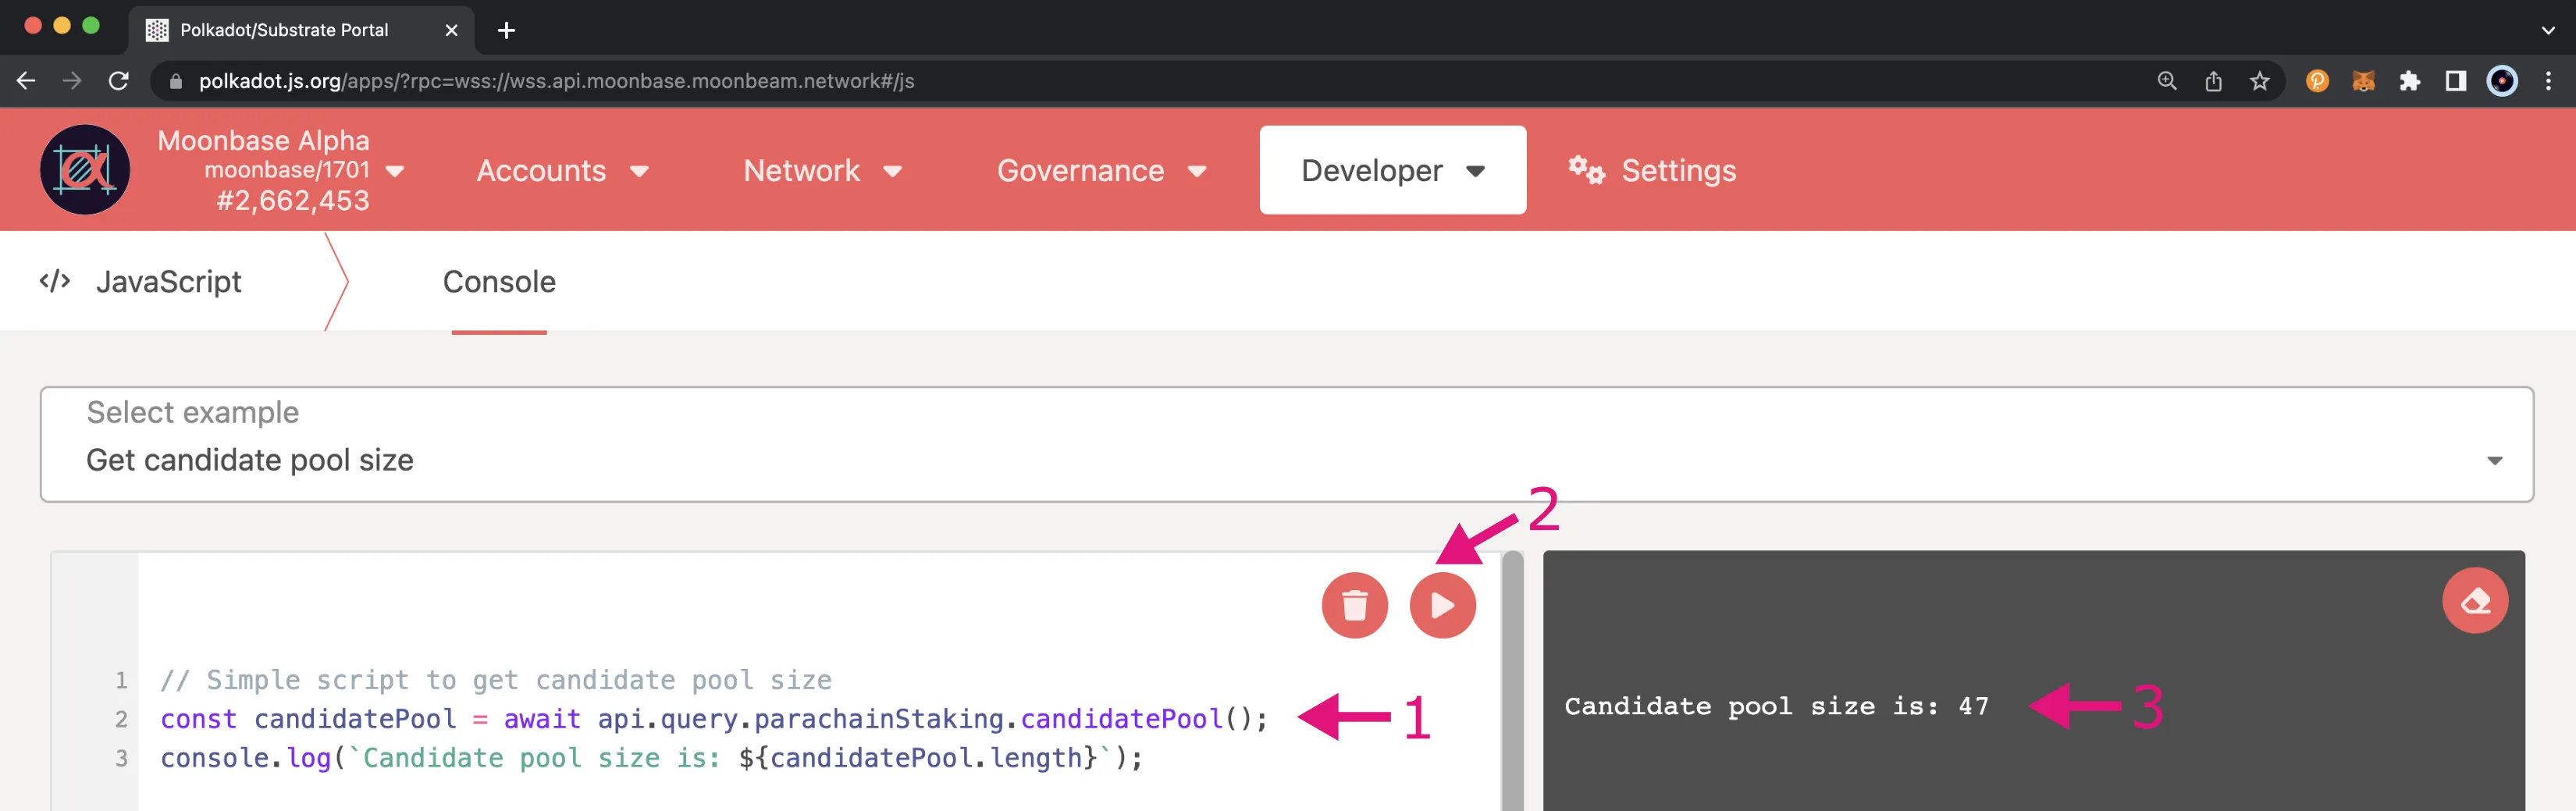
First, you need to get the candidatePool size (this can change through governance), as you'll need to submit this parameter in a later transaction. To do so, you'll have to run the following JavaScript code snippet from within Polkadot.js:
// Simple script to get candidate pool size
const candidatePool = await api.query.parachainStaking.candidatePool();
console.log(`Candidate pool size is: ${candidatePool.length}`);
Head to the Developer tab, select JavaScript from the dropdown, and take the following steps:
- Copy the code from the previous snippet and paste it inside the code editor box. (Optional) Click the save icon and set a name for the code snippet, for example, "Get candidatePool size". This will save the code snippet locally
- To execute the code, click on the run button
- Copy the result, as you'll need it when joining the candidate pool
Join the Candidate Pool
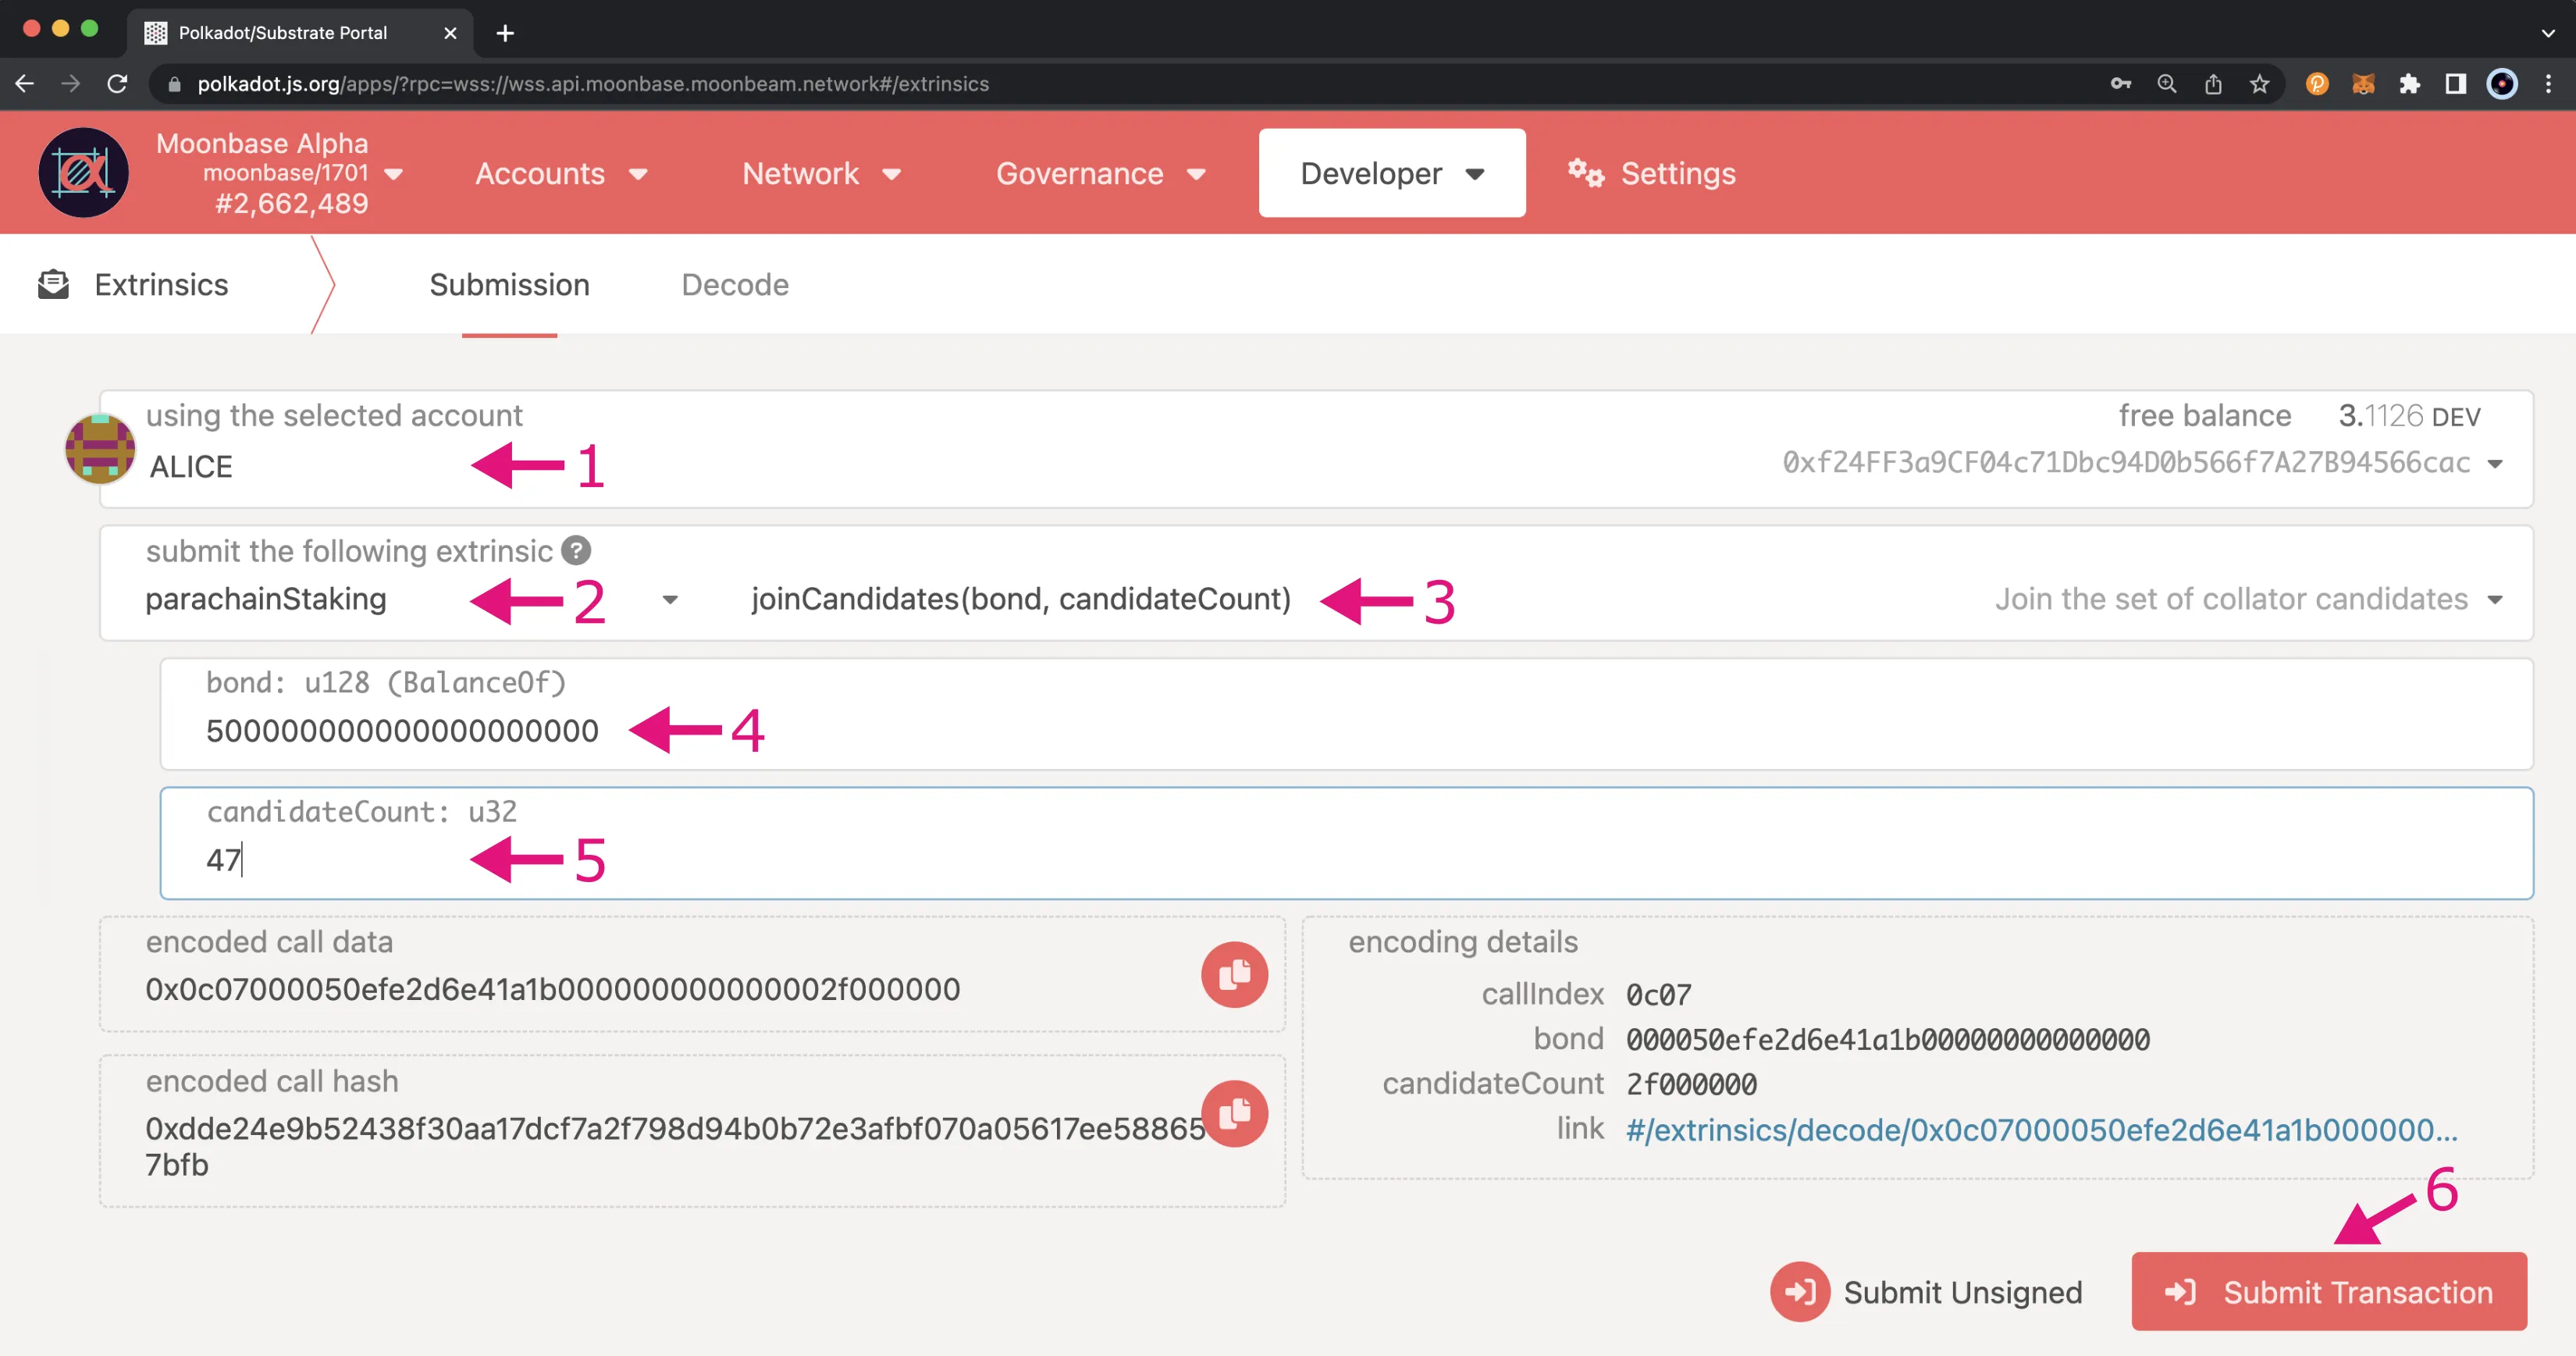
Once your node is running and in sync with the network, you become a candidate and join the candidate pool. Depending on which network you are connected to, head to Polkadot.js, click on the Developer tab, select Extrinsics from the dropdown, and take the following steps:
- Select the account you want to become a collator. Confirm your account is funded with at least the minimum stake required plus some extra for transaction fees
- Select parachainStaking pallet under the submit the following extrinsic menu
- Open the drop-down menu, which lists all the possible extrinsics related to staking, and select the joinCandidates function
- Set the bond to at least the minimum amount to be considered a candidate. You'll need to enter this amount in
Wei. As an example, the minimum bond of 500 DEV on Moonbase Alpha would be500000000000000000000in Wei (500 + 18 extra zeros). Only the candidate bond counts for this check. Additional delegations do not count - Set the candidate count as the candidate pool size. To learn how to retrieve this value, check the Get the Size of the Candidate Pool section
- Submit the transaction. Follow the wizard and sign the transaction using the password you set for the account
Note
Function names and the minimum bond requirement are subject to change in future releases.
As mentioned before, only the top candidates by delegated stake will be in the active set of collators. The exact number of candidates in the top for each network and the minimum bond amount can be found in the Minimum Collator Bond section.
Stop Collating
To stop collating and leave the candidate pool, you must first schedule a request to leave the pool. Scheduling a request automatically removes you from the active set, so you will no longer be eligible to produce blocks or earn rewards. You must wait for the duration of the exit delay before you can execute the request to leave. After the request has been executed, you will be removed from the candidate pool.
Similar to Polkadot's chill() functionality, you can temporarily leave the candidate pool without unbonding your tokens.
Schedule Request to Leave Candidates
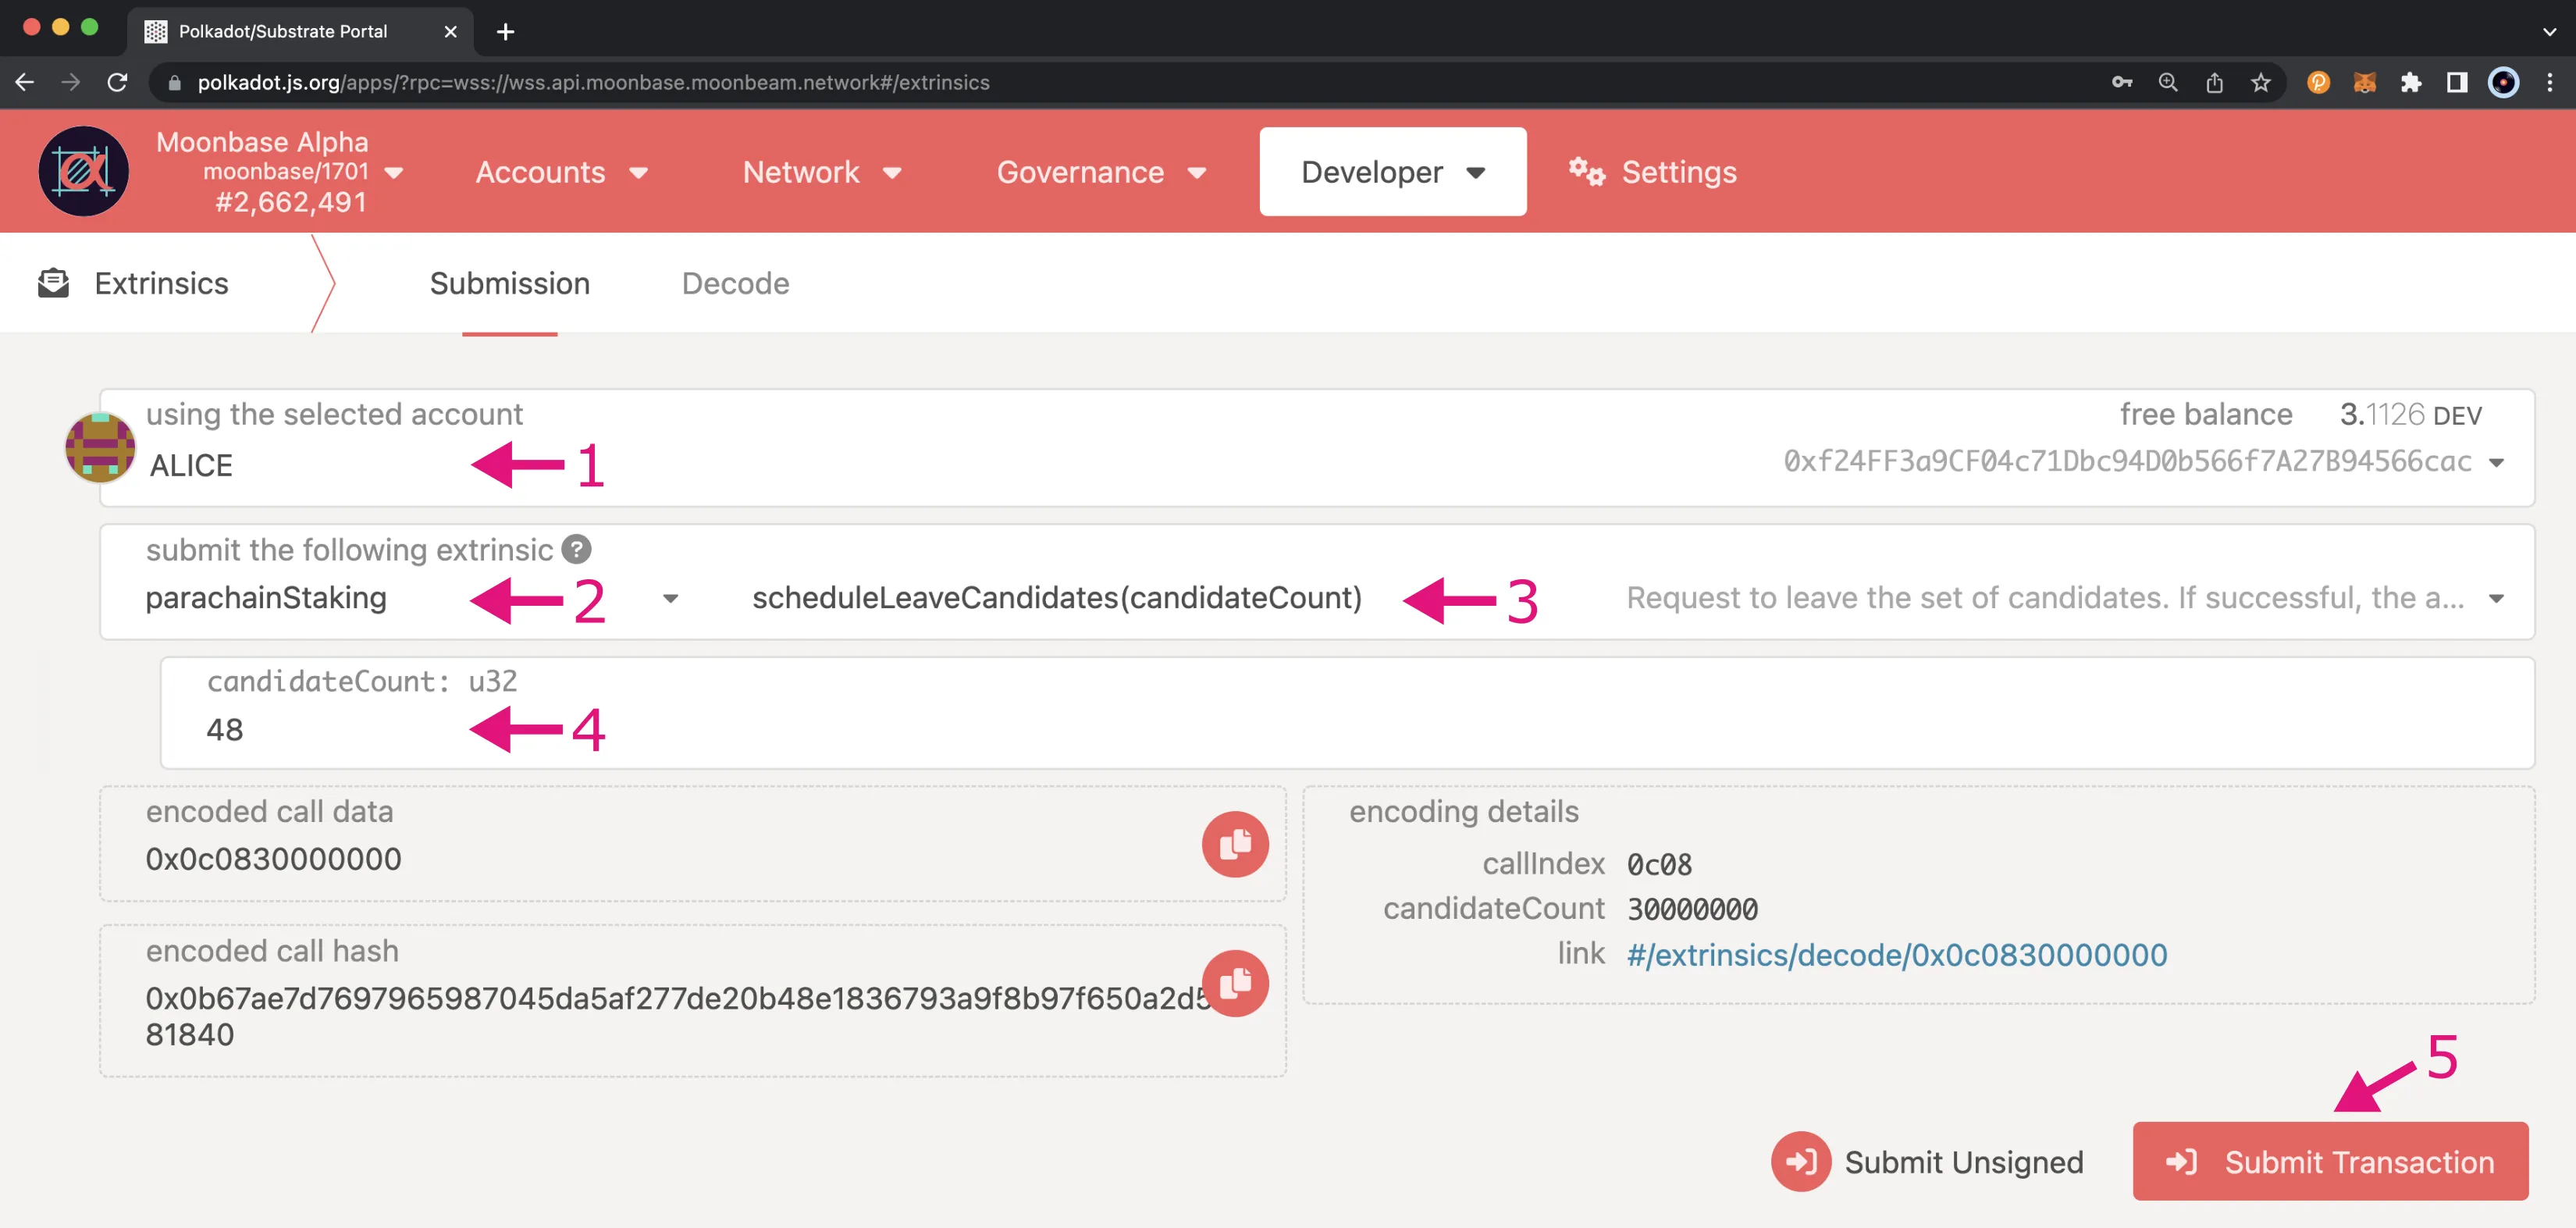
To get started and schedule a request, navigate to the Developer tab, click on Extrinsics, and take the following steps:
- Select your candidate account
- Select parachainStaking pallet under the submit the following extrinsic menu
- Select the scheduleLeaveCandidates extrinsic
- Enter the
candidateCountwhich you should have retrieved in the Get the Size of the Candidate Pool section - Submit the transaction. Follow the wizard and sign the transaction using the password you set for the account
Execute Request to Leave Candidates
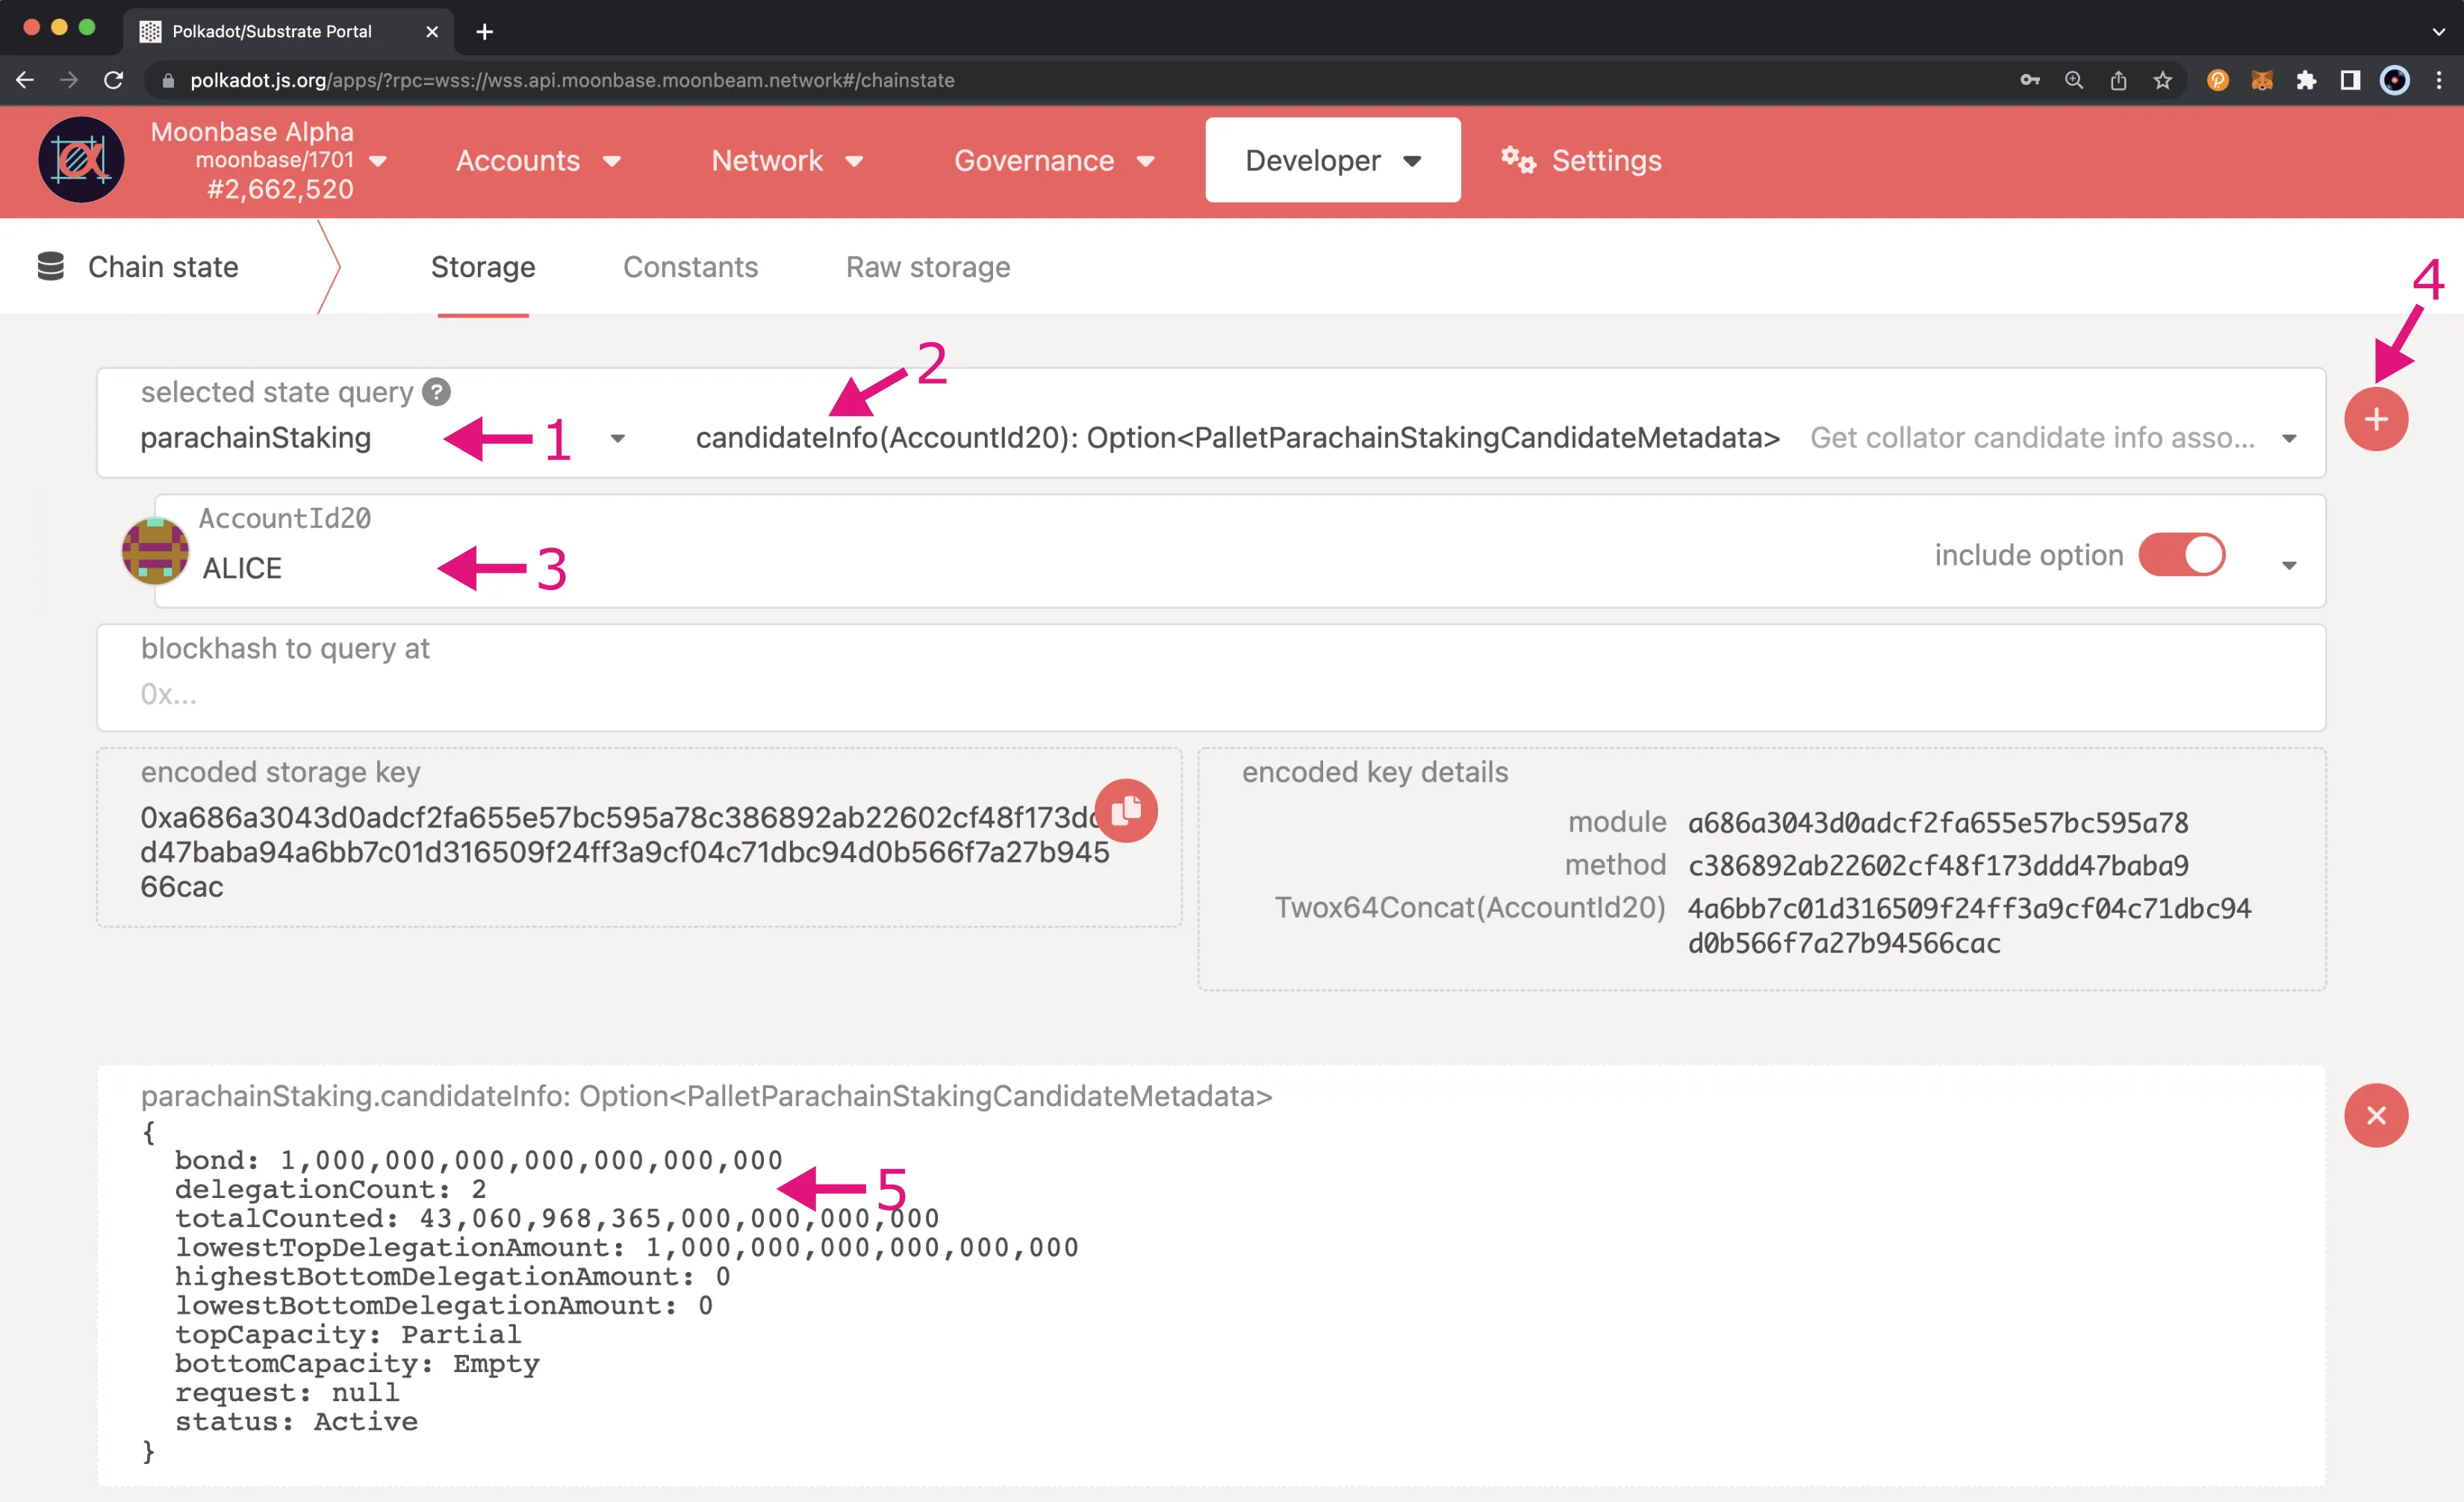
After the waiting period has passed, you'll be able to execute the request. To execute the request to leave the candidate pool, you'll first need to obtain the number of delegations the candidate has. To do so, you can query the candidate information, which will include the delegation count. To get started, click on the Developer tab, select Chain state, and take the following steps:
- From the selected state query dropdown, choose parachainStaking
- Select the candidateInfo extrinsic
- Choose the candidate account to get the information for
- Click the + button to submit the extrinsic
- Copy the
delegationCountto be used for executing the leave candidates request
Now that you have the delegation count, you can execute the request. Switch back to the Extrinsics tab and follow these steps:
- Select your candidate account
- Select parachainStaking pallet under the submit the following extrinsic menu
- Select the executeLeaveCandidates extrinsic
- Select the target candidate account (anyone can execute the request after the exit delay has passed after submitting the
scheduleLeaveCandidatesextrinsic) - Enter the candidate's delegation count
- Submit the transaction. Follow the wizard and sign the transaction using the password you set for the account

Cancel Request to Leave Candidates
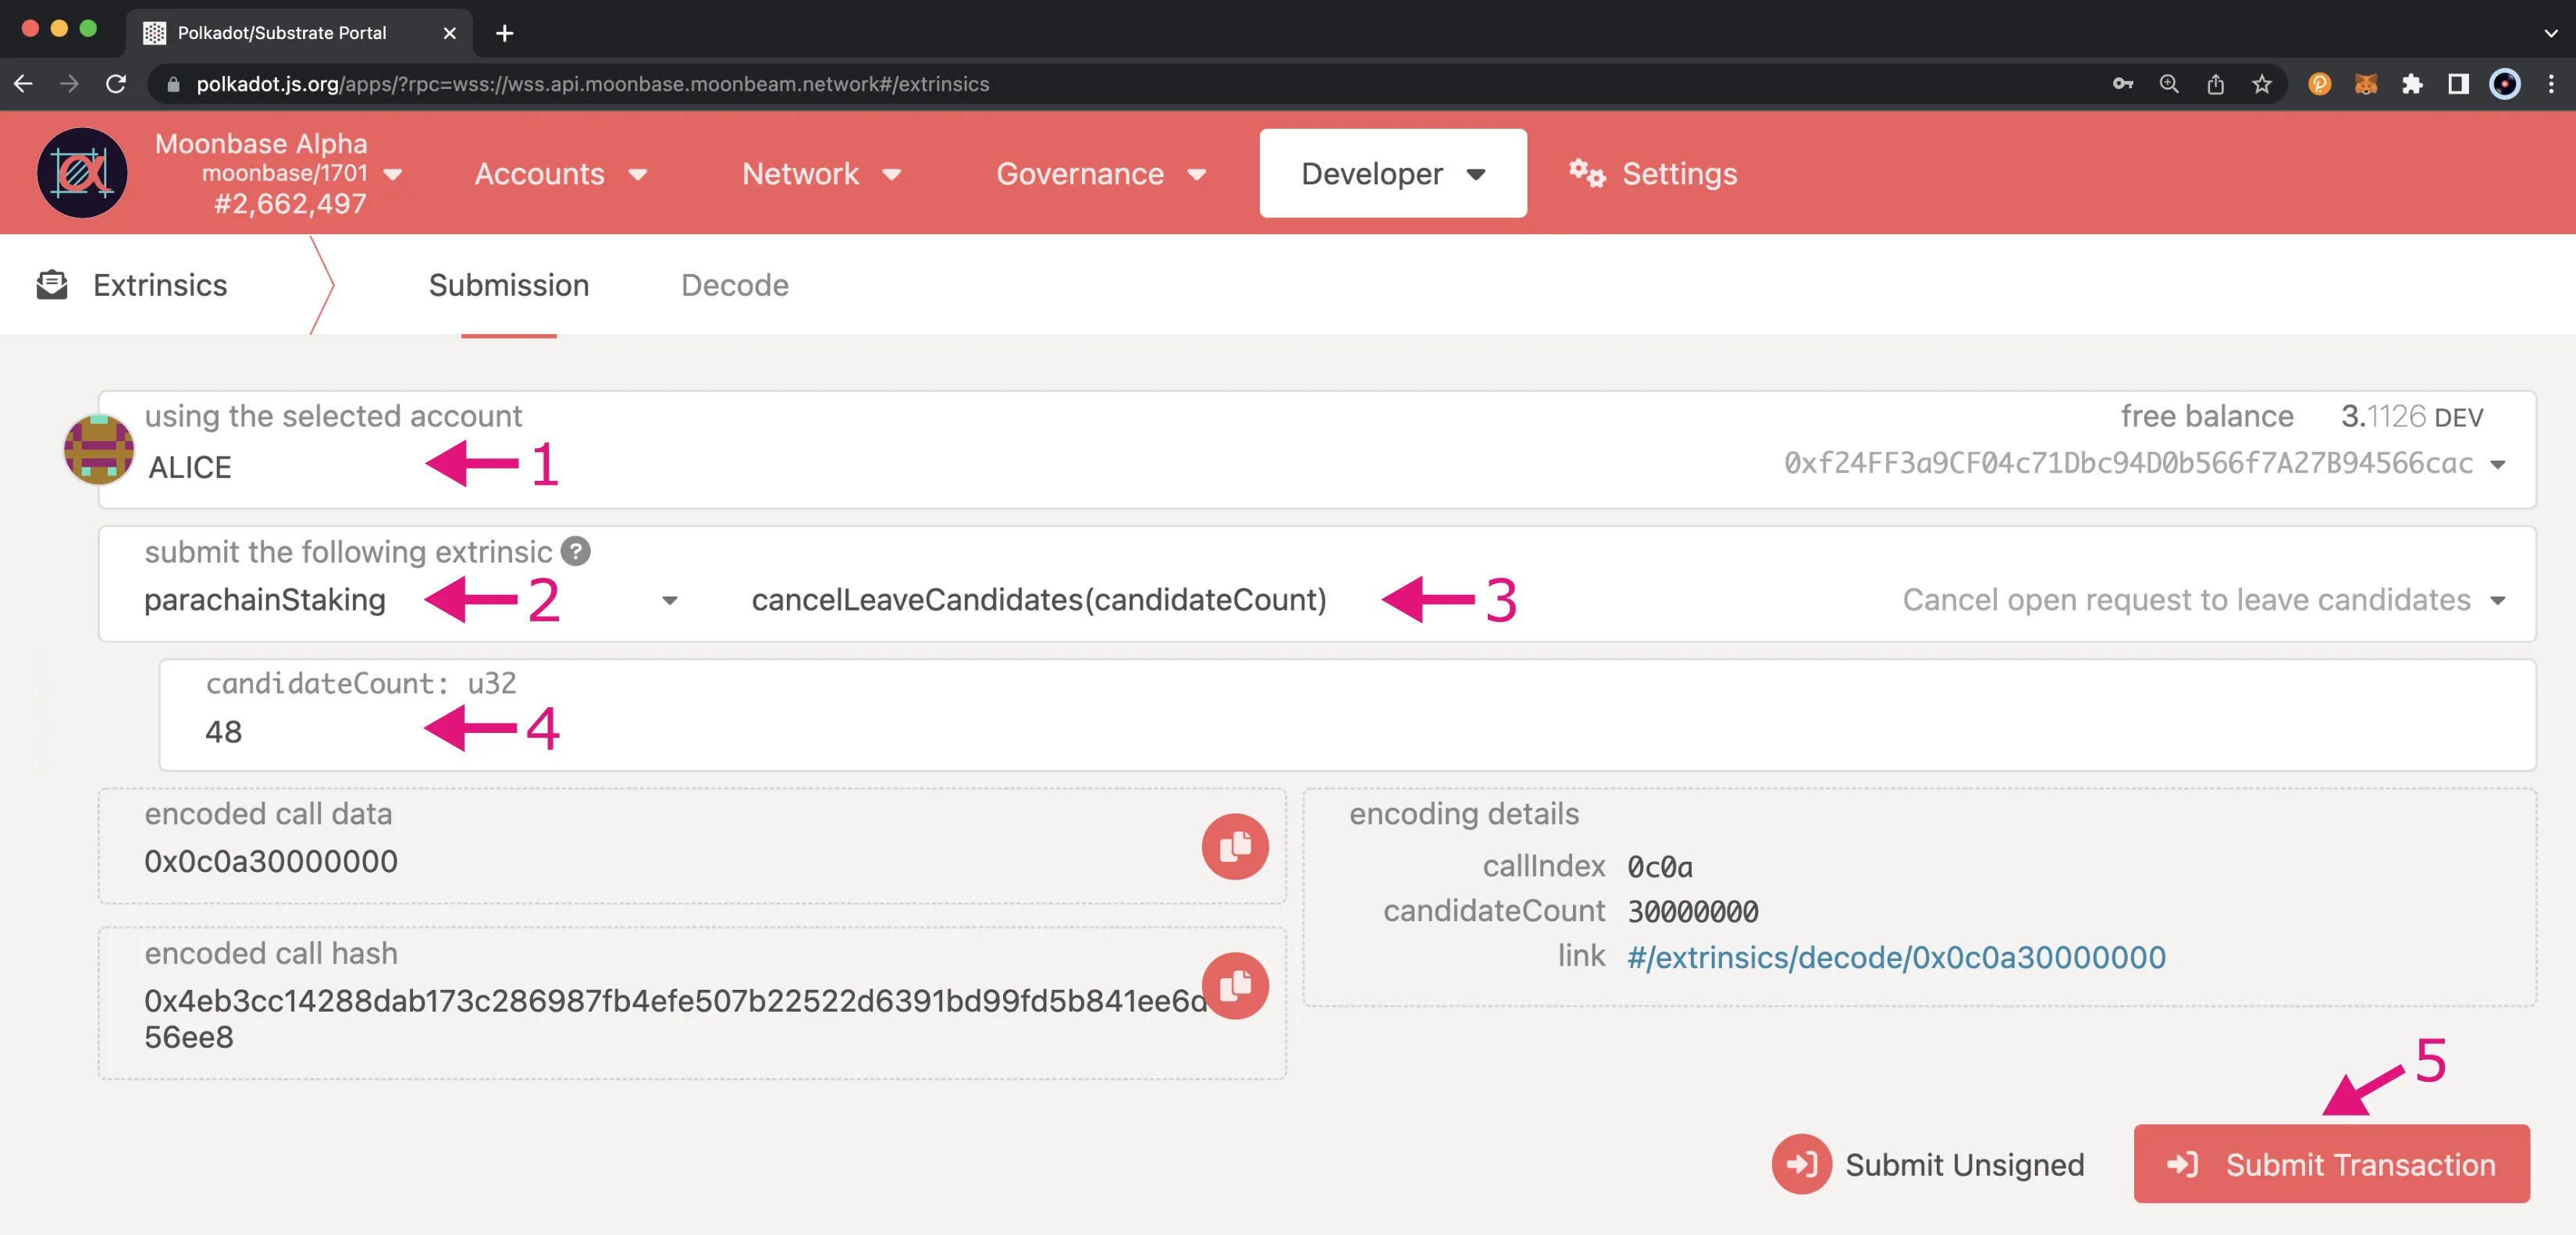
If you scheduled a request to leave the candidate pool but changed your mind, as long as the request has not been executed, you can cancel the request and remain in the candidate pool. To cancel the request, make sure you've clicked on Extrinsics from the Developer tab, and then follow these steps:
- Select your candidate account
- Select parachainStaking pallet under the submit the following extrinsic menu
- Select the cancelLeaveCandidates extrinsic
- Provide the
candidateCountwhich you should have retrieved in the Get the Size of the Candidate Pool section - Submit the transaction. Follow the wizard and sign the transaction using the password you set for the account
Temporarily Leave the Candidate Pool
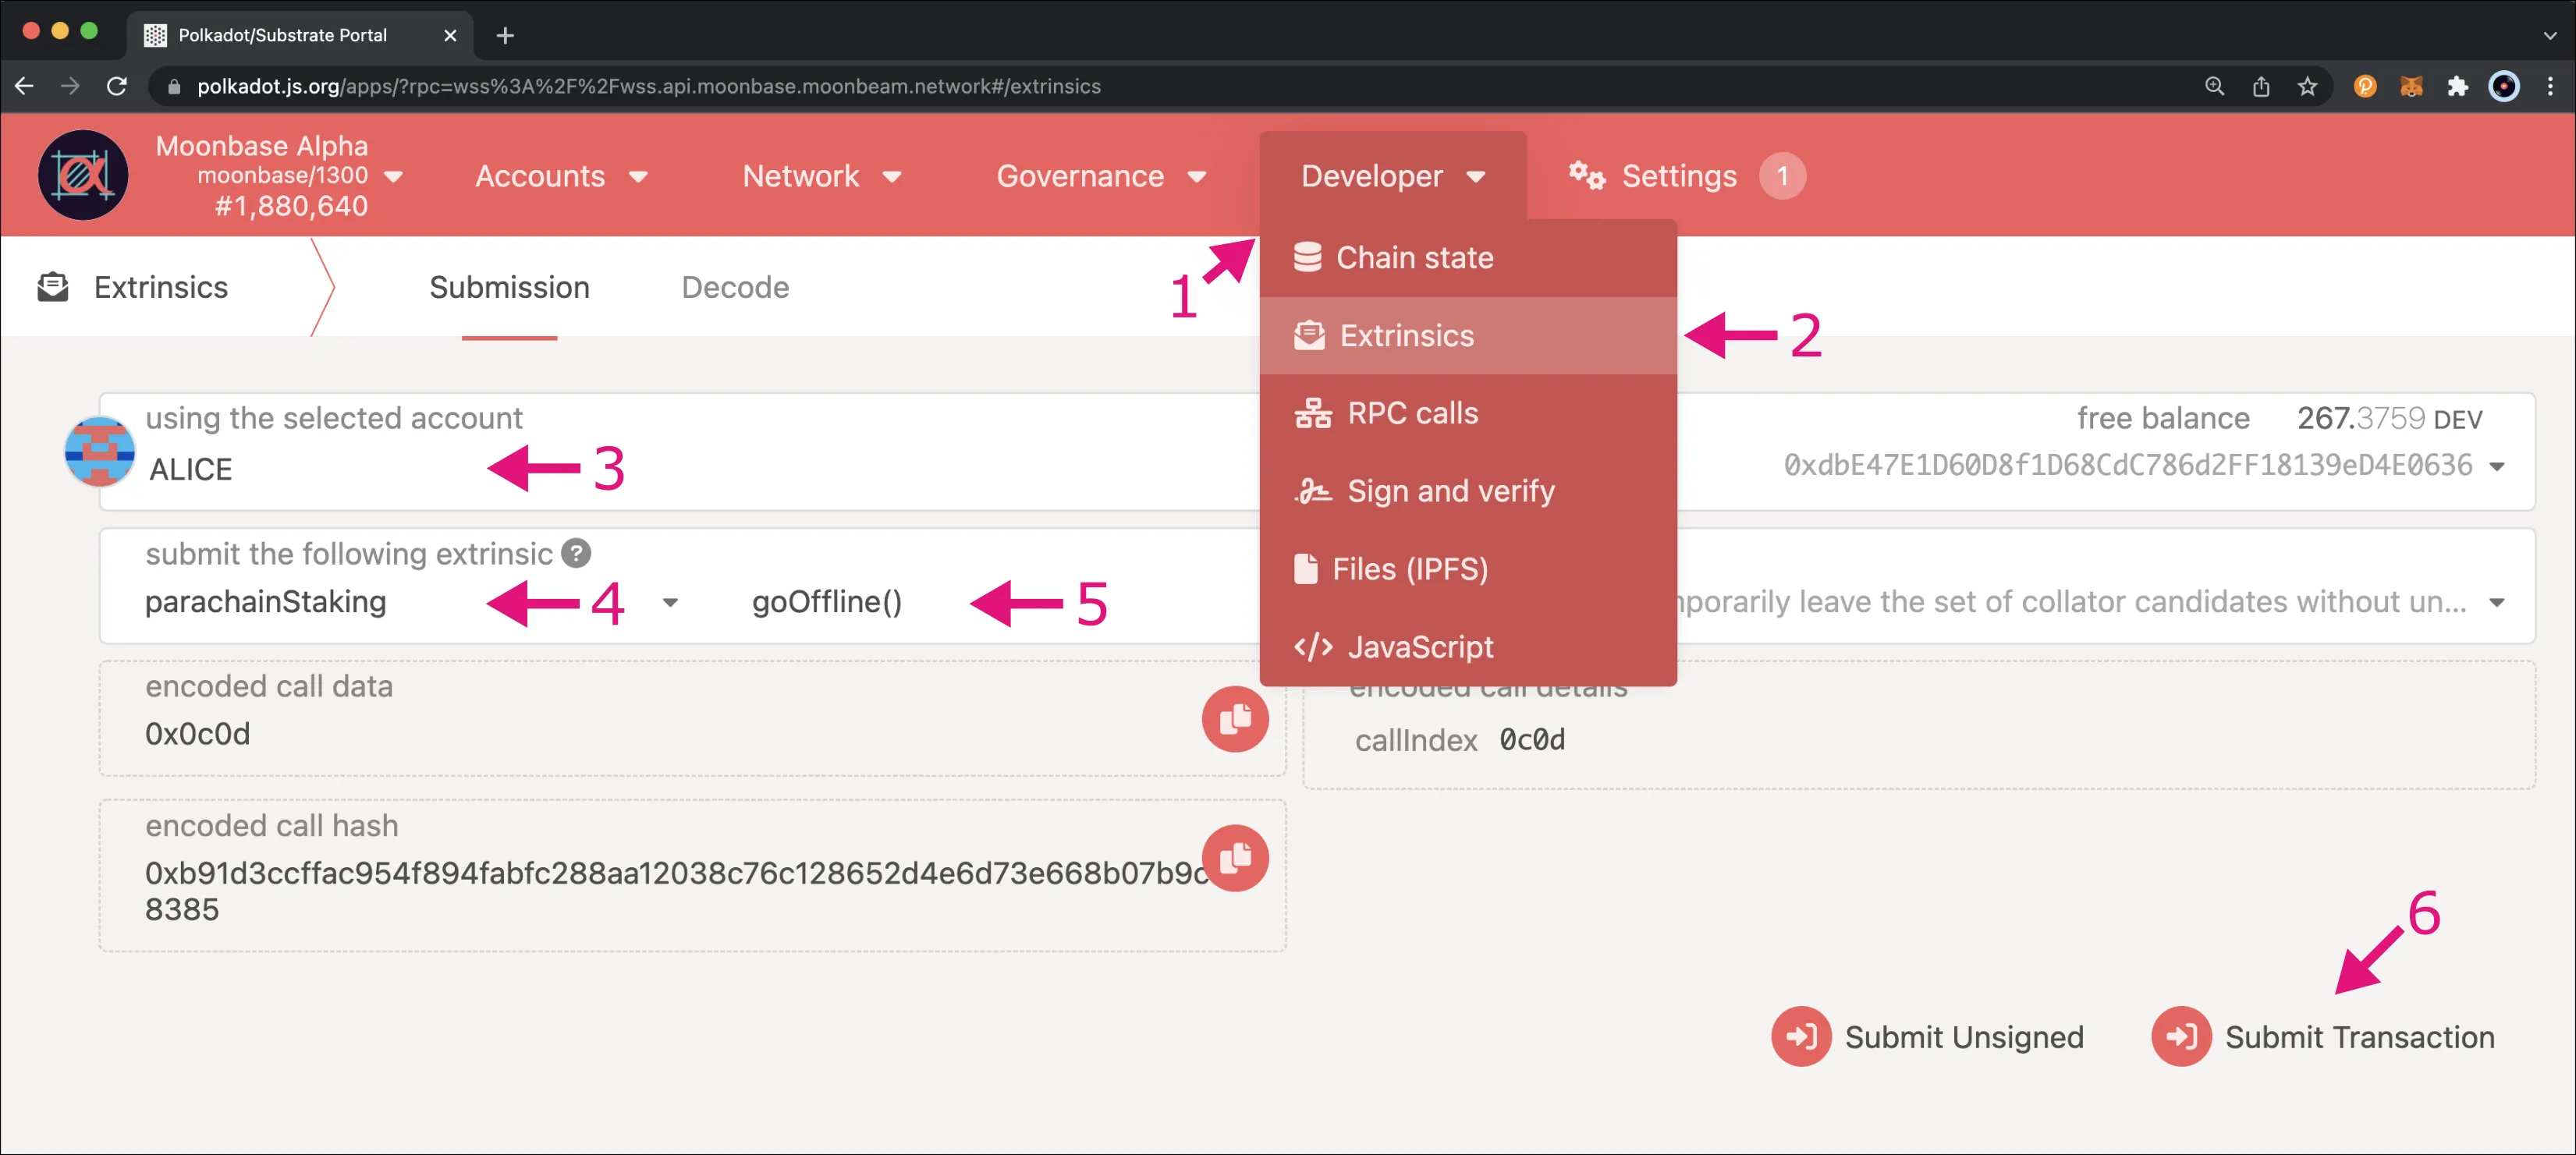
If you want to temporarily leave the candidate pool, you can easily do so using the goOffline method. This can be useful, for example, if you need to temporarily leave to perform maintenance operations. Once you're done, you can then rejoin the pool using the goOnline method.
To temporarily leave, you can take the following steps:
- Navigate to the Developer tab
- Click on Extrinsics
- Select your candidate account
- Select parachainStaking pallet under the submit the following extrinsic menu
- Select the goOffline extrinsic
- Submit the transaction. Follow the wizard and sign the transaction using the password you set for the account
Then, whenever you wish to rejoin, you can use the goOnline method by following the same steps outlined above, and then in step 5, choose the goOnline extrinsic. Please note that you can only call goOnline if you have previously called goOffline.
Change Self-Bond Amount
As a candidate, changing your self-bond amount varies slightly depending on whether you're bonding more or less. If you're bonding more, it is a straightforward process where you can increase your stake via the candidateBondMore() extrinsic. You do not have to wait for any delays, and you do not need to schedule a request and then execute it; instead, your request will be executed instantly and automatically.
If you wish to bond less, you have to schedule a request, wait for an exit delay, and then you will be able to execute the request and get a specified amount of tokens back into your free balance. In other words, scheduling the request doesn't decrease the bond instantly or automatically; it will only decrease once the request has been executed.
Bond More
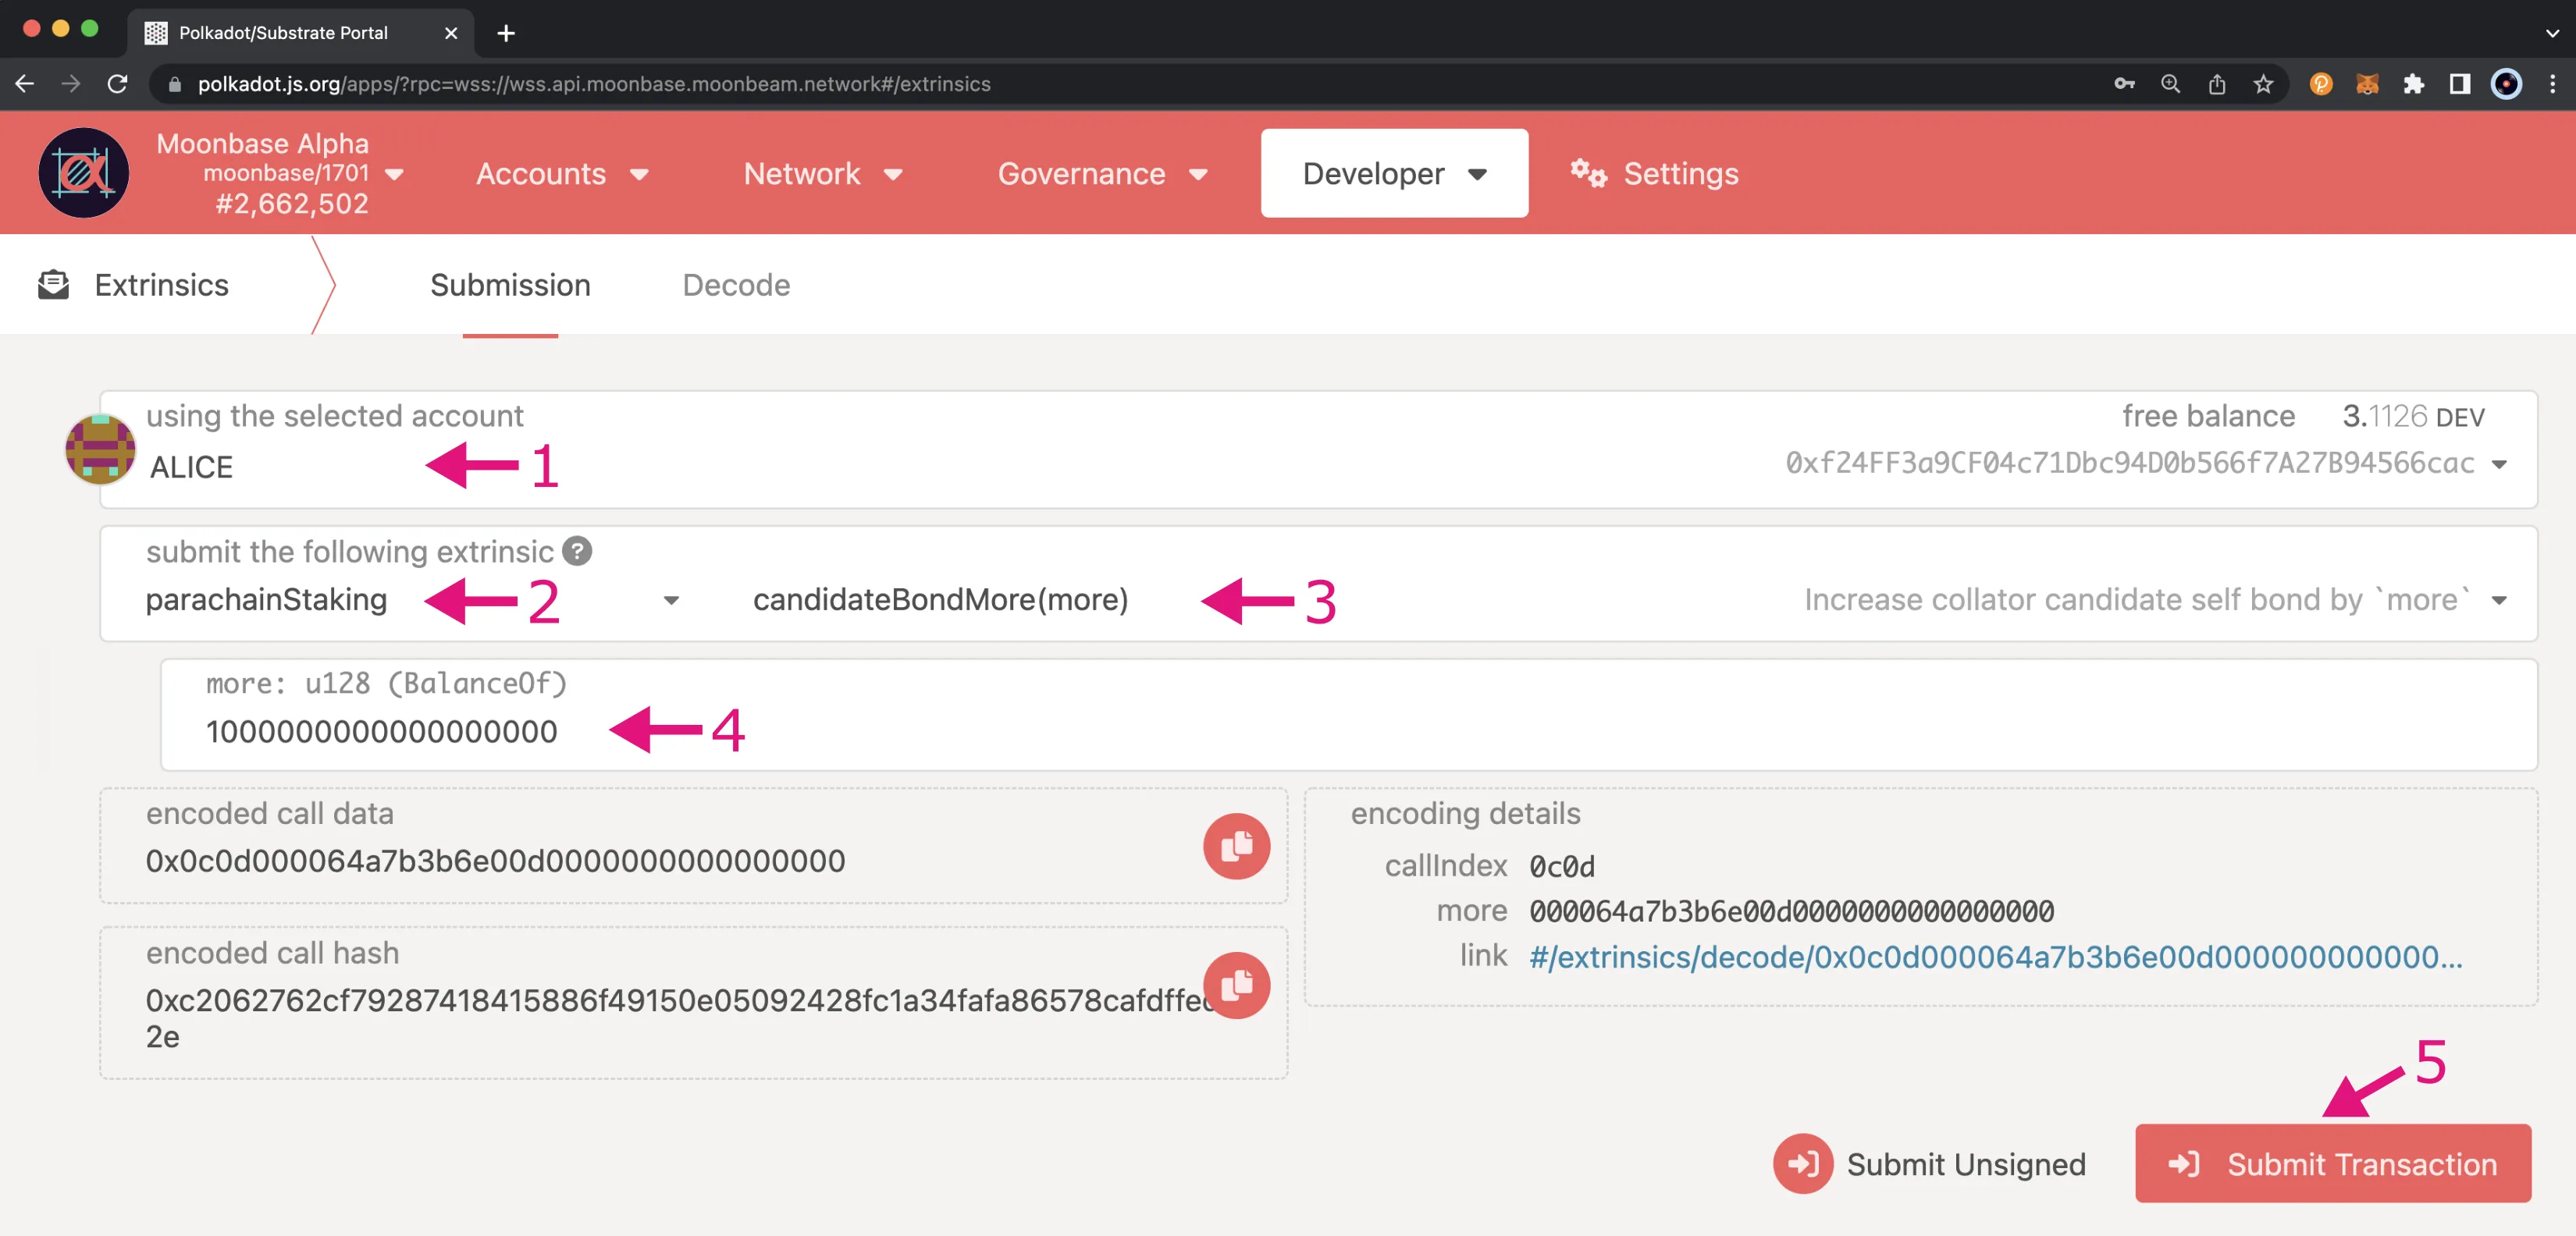
As a candidate, there are two options for increasing one's stake. The first and recommended option is to send the funds to be staked to another owned address and delegate to your collator. Alternatively, collators that already have at least the minimum self-bond amount staked can increase their bond from Polkadot.js Apps. Navigate to the Developer tab, click on Extrinsics, and follow these steps:
- Select your collator account (and verify it contains the additional funds to be bonded)
- Select parachainStaking pallet under the submit the following extrinsic menu
- Open the drop-down menu, which lists all the possible extrinsics related to staking, and select the candidateBondMore function
- Specify the additional amount to be bonded in the more: BalanceOf field
- Submit the transaction. Follow the wizard and sign the transaction using the password you set for the account
Bond Less
As a collator or collator candidate, you may decrease your amount bonded as long as you have more than the minimum self-bond amount after the decrease.
In order to bond less, you have to first schedule a request, wait for the duration of the exit delay, and then execute the request. You can cancel a request at any time, as long as the request hasn't been executed yet.
Schedule Bond Less Request
To schedule a request to bond less, make sure you've clicked on the Developer tab and clicked on Extrinsics, then you can follow these steps:
- Select your candidate account
- Select parachainStaking pallet under the submit the following extrinsic menu
- Open the drop-down menu and select the scheduleCandidateBondLess function
- Specify the amount to decrease the bond by in the less: BalanceOf field
- Submit the transaction. Follow the wizard and sign the transaction using the password you set for the account

Once the transaction is confirmed, you must wait the duration of the exit delay and then you will be able to execute and decrease the bond amount. If you try to execute the request before the exit delay, your extrinsic will fail, and you'll see an error in Polkadot.js for parachainStaking.PendingDelegationRequest.
Execute Bond Less Request
After the exit delay has passed from scheduling a request to decrease your bond, you can execute the request to actually decrease the bond amount. Head to the Developer tab, select Extrinsics, and follow these steps:
- Select an account to execute the request with
- Select parachainStaking pallet under the submit the following extrinsic menu
- Select the executeCandidateBondLess extrinsic
- Select the target candidate account (anyone can execute the request after the exit delay has passed since the
scheduleCandidateBondLesswas submitted) - Submit the transaction. Follow the wizard and sign the transaction using the password you set for the account

Once the transaction has been confirmed, you can check your free and reserved balances from the Accounts tab and notice that, now that the execution has gone through, your balances have been updated.
Cancel Bond Less Request
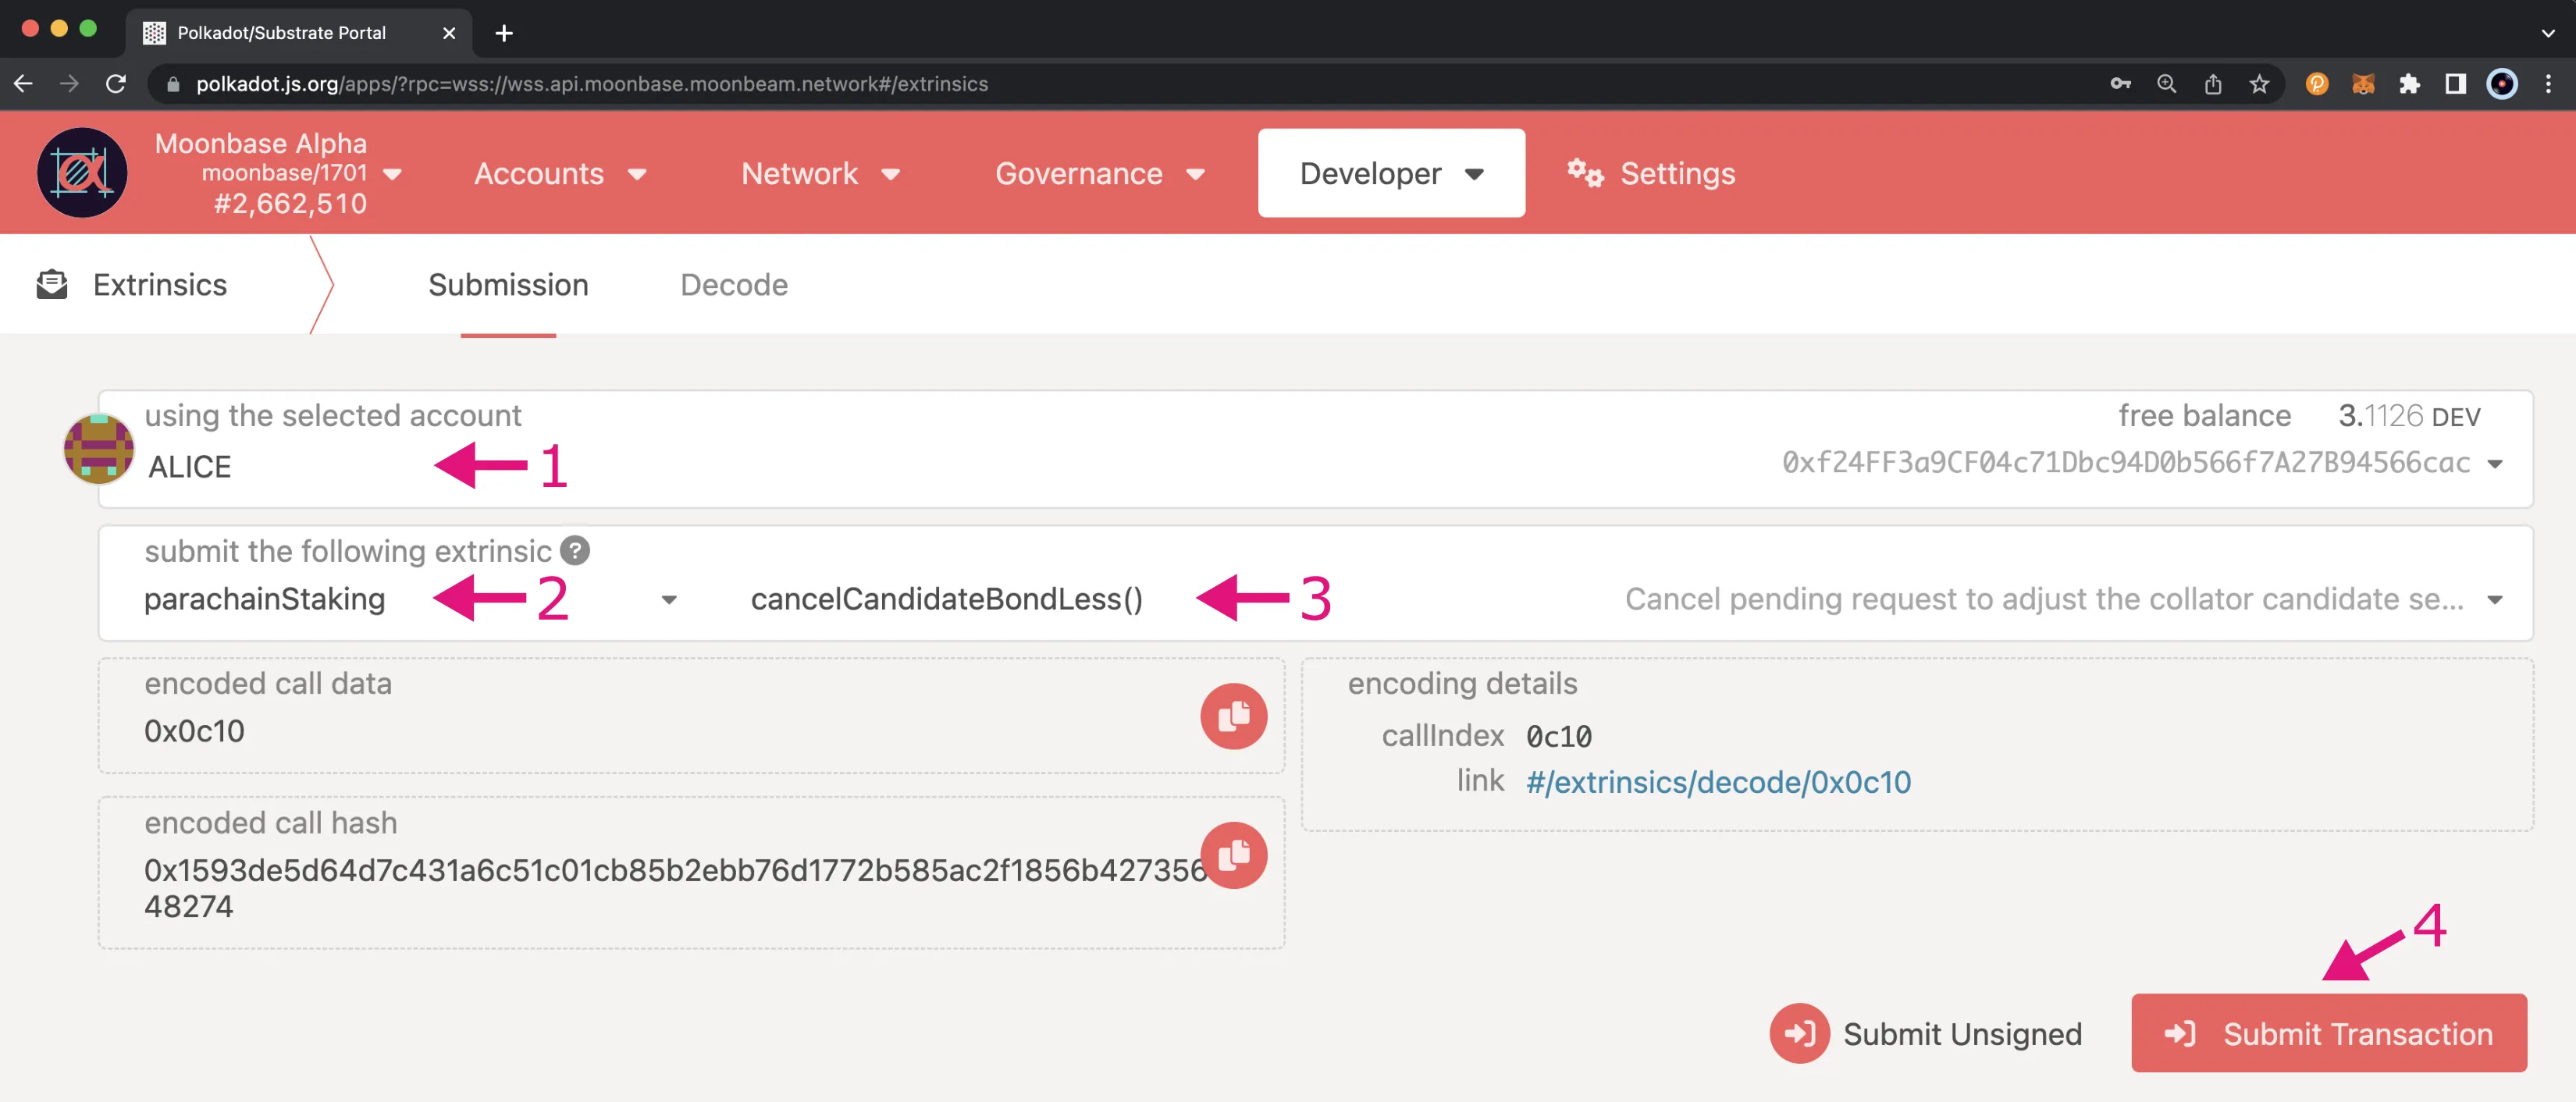
If you scheduled a request to bond more or less but changed your mind, as long as the request has not been executed, you can cancel the request at any time and keep your bond amount as is. To cancel the request, head to the Developer tab, select Extrinsics, and follow these steps:
- Select your candidate account (and verify it contains the additional funds to be bonded)
- Select parachainStaking pallet under the submit the following extrinsic menu
- Select the cancelCandidateBondRequest extrinsic
- Submit the transaction. Follow the wizard and sign the transaction using the password you set for the account
Mark a Collator as Inactive
If there is an inactive collator that has not produced blocks for a consecutive number of rounds, you can mark a collator as inactive. The maximum number of rounds a collator can be offline before they can be marked as inactive is as follows:
1 round (6 hours)
2 rounds (4 hours)
2 rounds (4 hours)
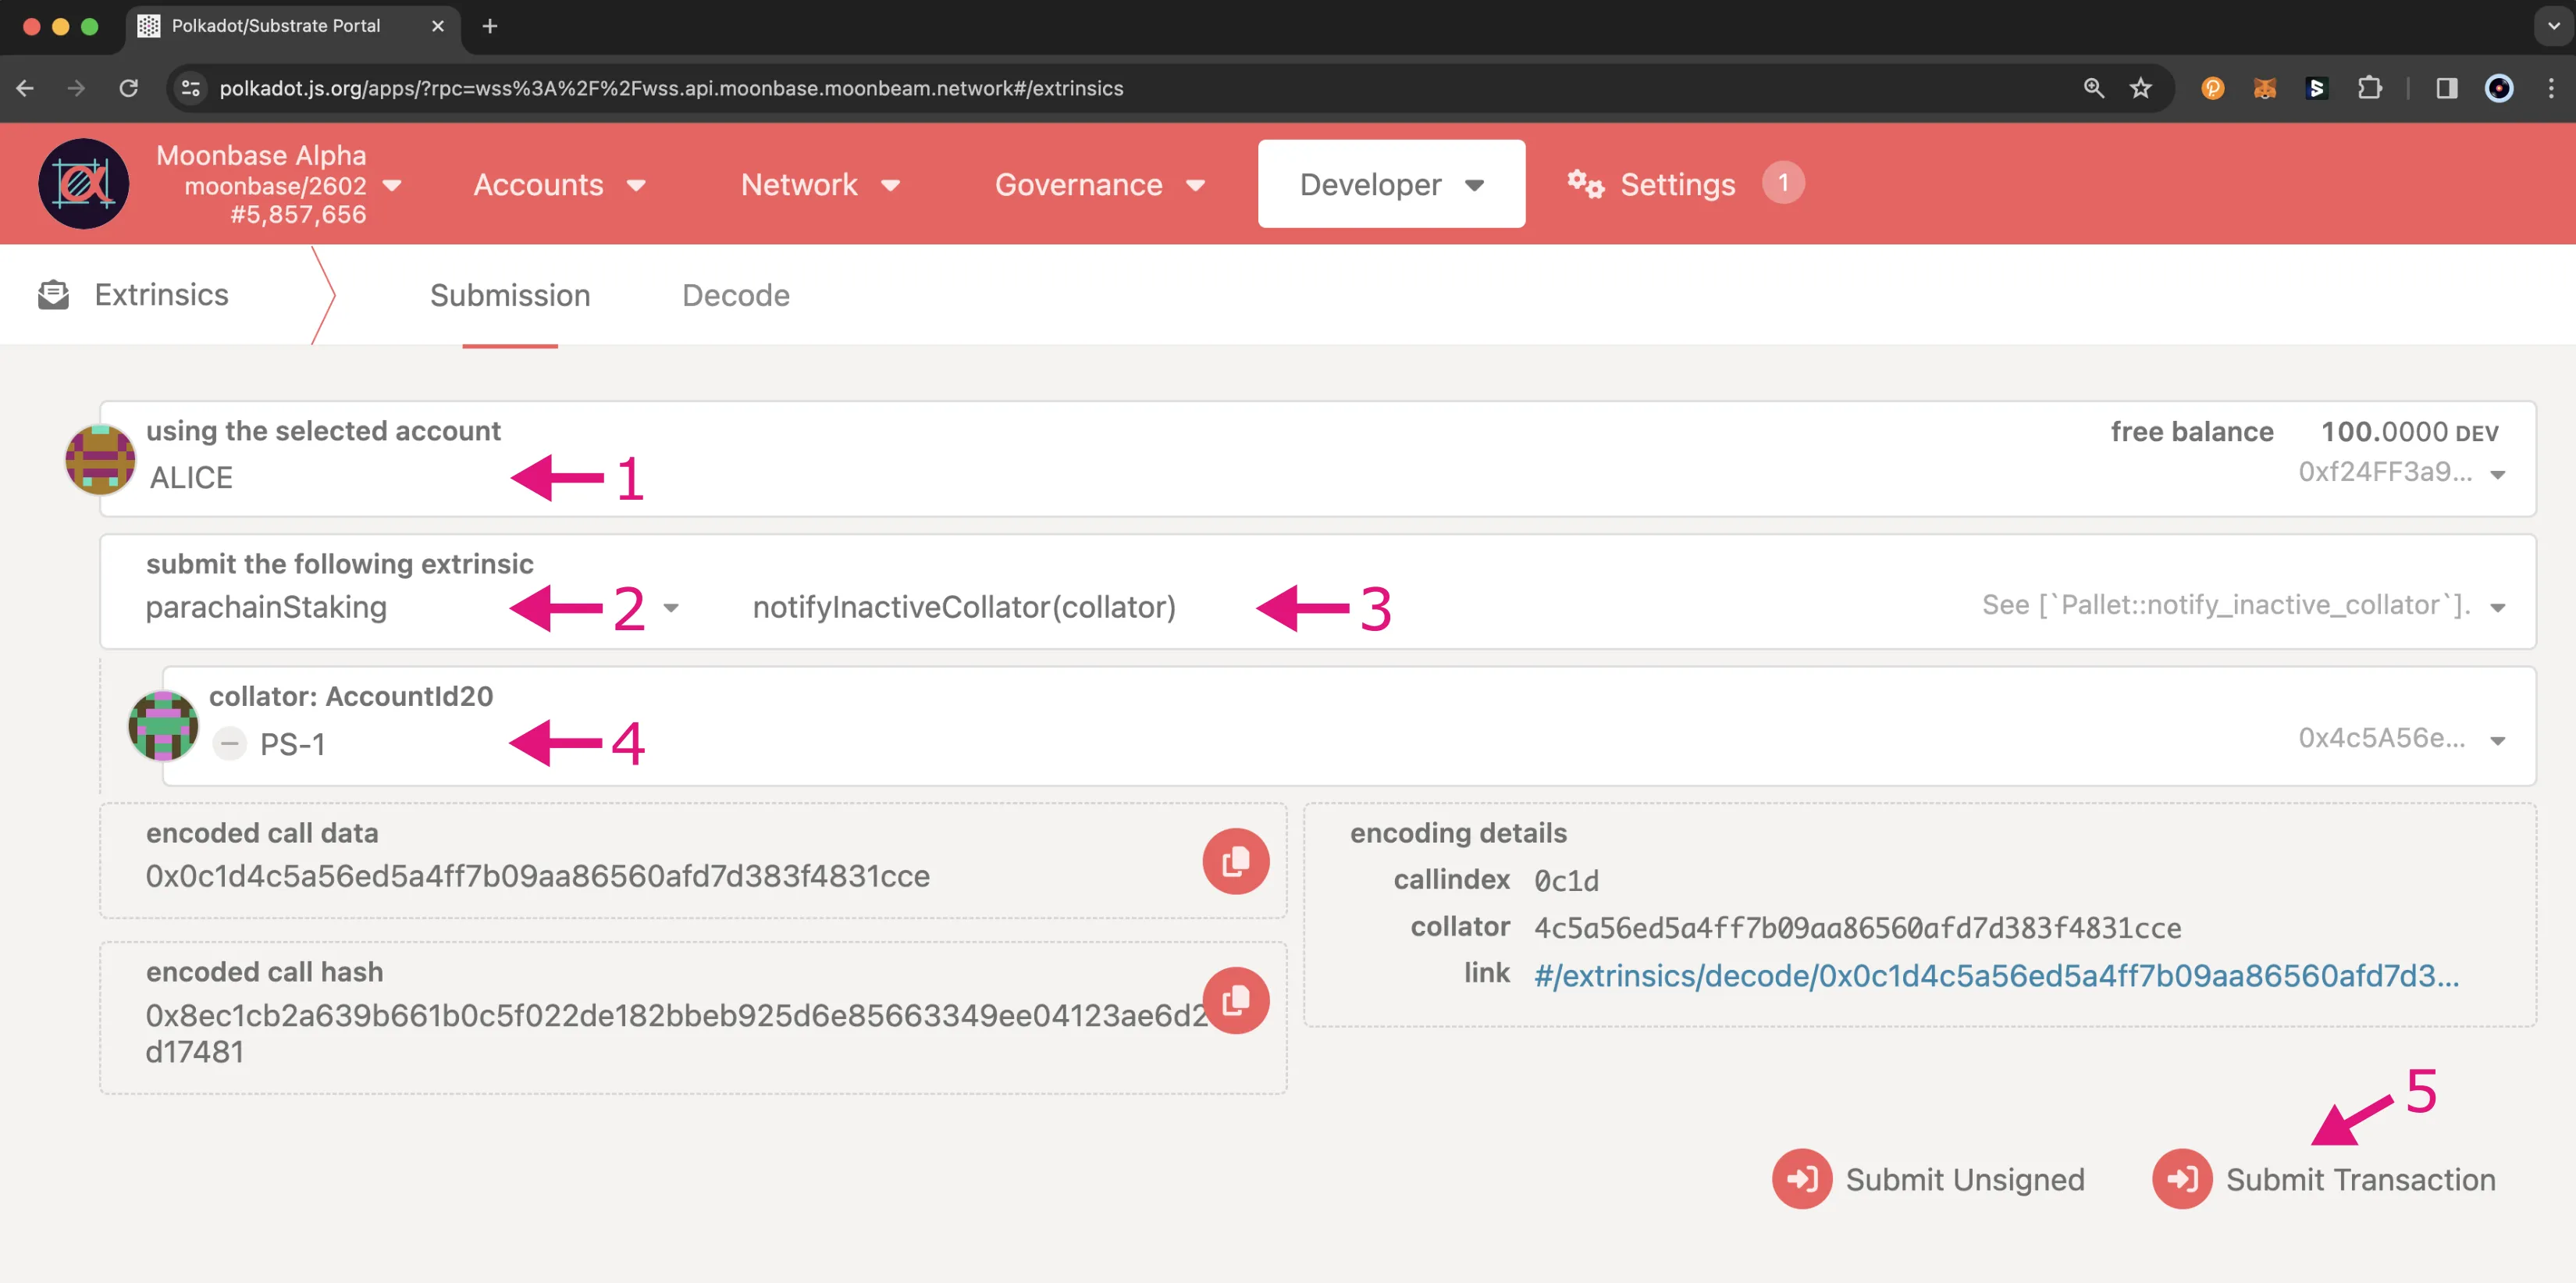
To mark a collator as inactive, you can use the notifyInactiveCollator extrinsic, which will notify the runtime when a collator is inactive and, by default, mark the collator as offline. To do so, you can head to Polkadot.js Apps, make sure that you are connected to the correct network, then click on the Developer tab, select Extrinsics from the dropdown, and take the following steps:
- Select your account
- Select parachainStaking pallet under the submit the following extrinsic menu
- Select the notifyInactiveCollator extrinsic
- Specify the collator to mark as inactive
- Submit the transaction. Follow the wizard and sign the transaction using the password you set for the account
The collator will temporarily be removed from the candidate pool, and they can rejoin at any time by calling the goOnline extrinsic.
| Created: January 20, 2021