Collator Account Management
Introduction
When running a collator node on Moonbeam-based networks, there are some account management activities that you will need to be aware of. First and foremost you will need to create session keys for your primary and backup servers which will be used to determine block production and sign blocks.
In addition, there are some optional account management activities that you can consider such as setting an on-chain identity or setting up proxy accounts.
This guide will cover how to manage your collator account including generating and rotating your session keys, registering and updating your session keys, setting an identity, and creating proxy accounts.
Process to Add and Update Session Keys
The process for adding your session keys for the first time is the same as it would be for rotating your session keys. The process to create/rotate session keys is as follows:
- Generate session keys using the
author_rotateKeysRPC method. The response to calling this method will be a 128 hexadecimal character string containing a Nimbus ID and the public key of a VRF session key - Join the candidate pool if you haven't already
- Map the session keys to your candidate account using the Author Mapping Pallet's
setKeys(keys)extrinsic, which accepts the entire 128 hexadecimal character string as the input. When you callsetKeysfor the first time, you'll be required to submit a mapping bond. If you're rotating your keys and you've previously submitted a mapping bond, no new bond is required
Each step of the process is outlined in the following sections.
Generate Session Keys
To match the Substrate standard, Moonbeam collator's session keys are SR25519. This guide will show you how you can create/rotate your session keys associated with your collator node.
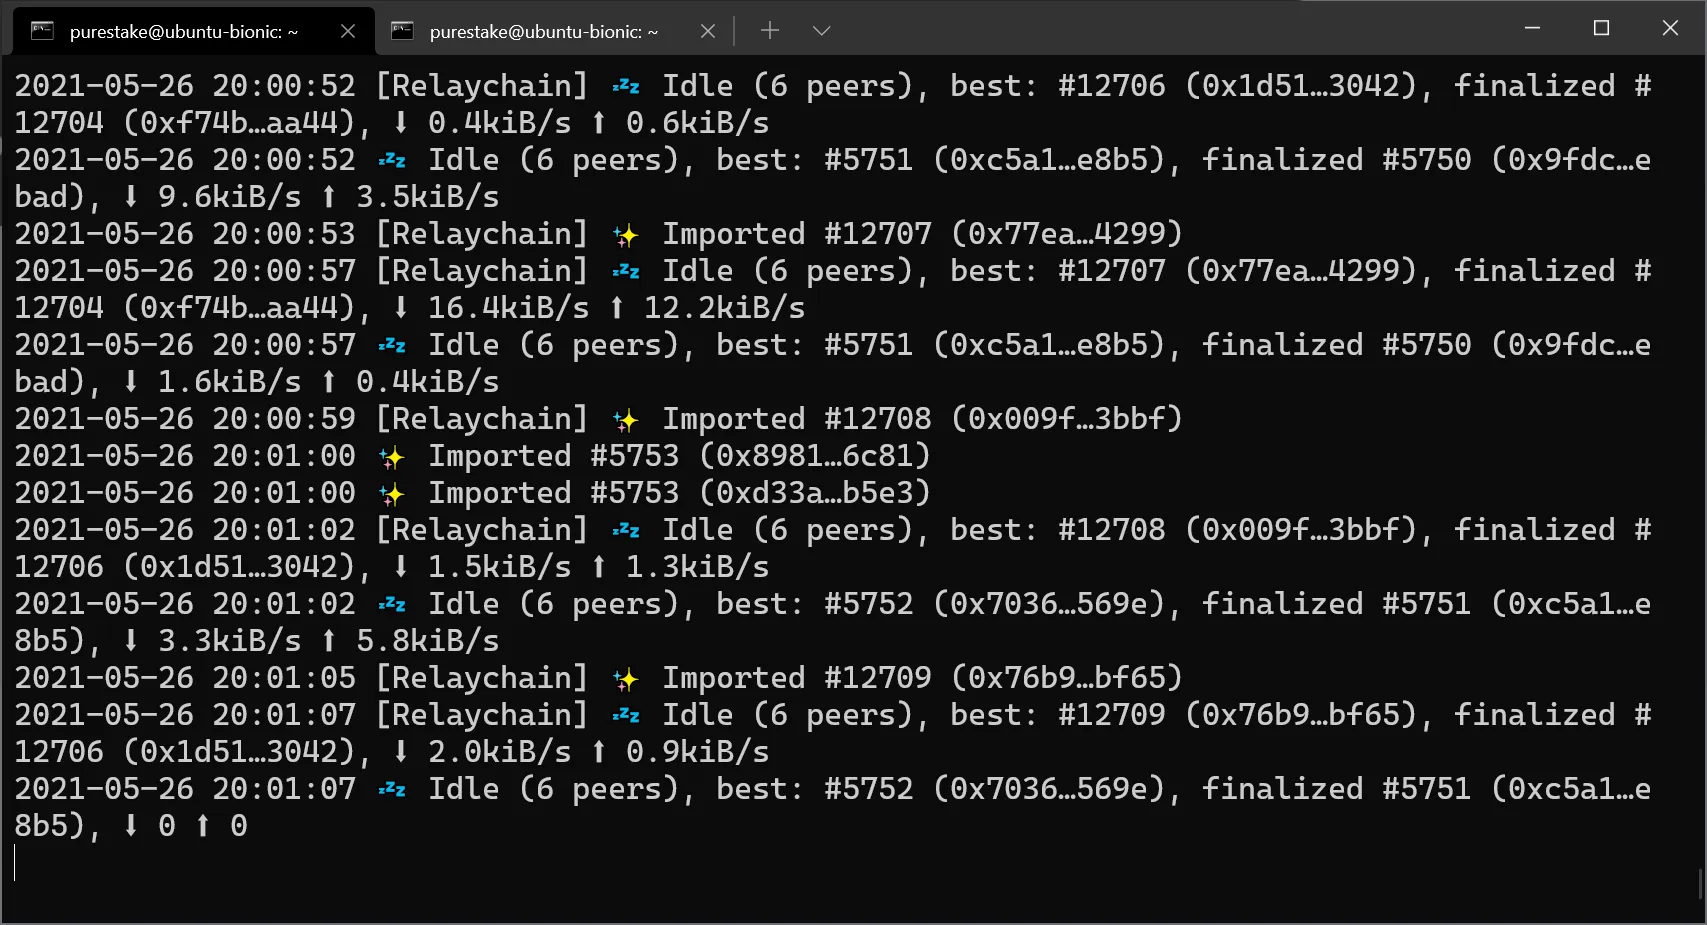
First, make sure you're running a collator node. Once you have your collator node running, your terminal should print similar logs:
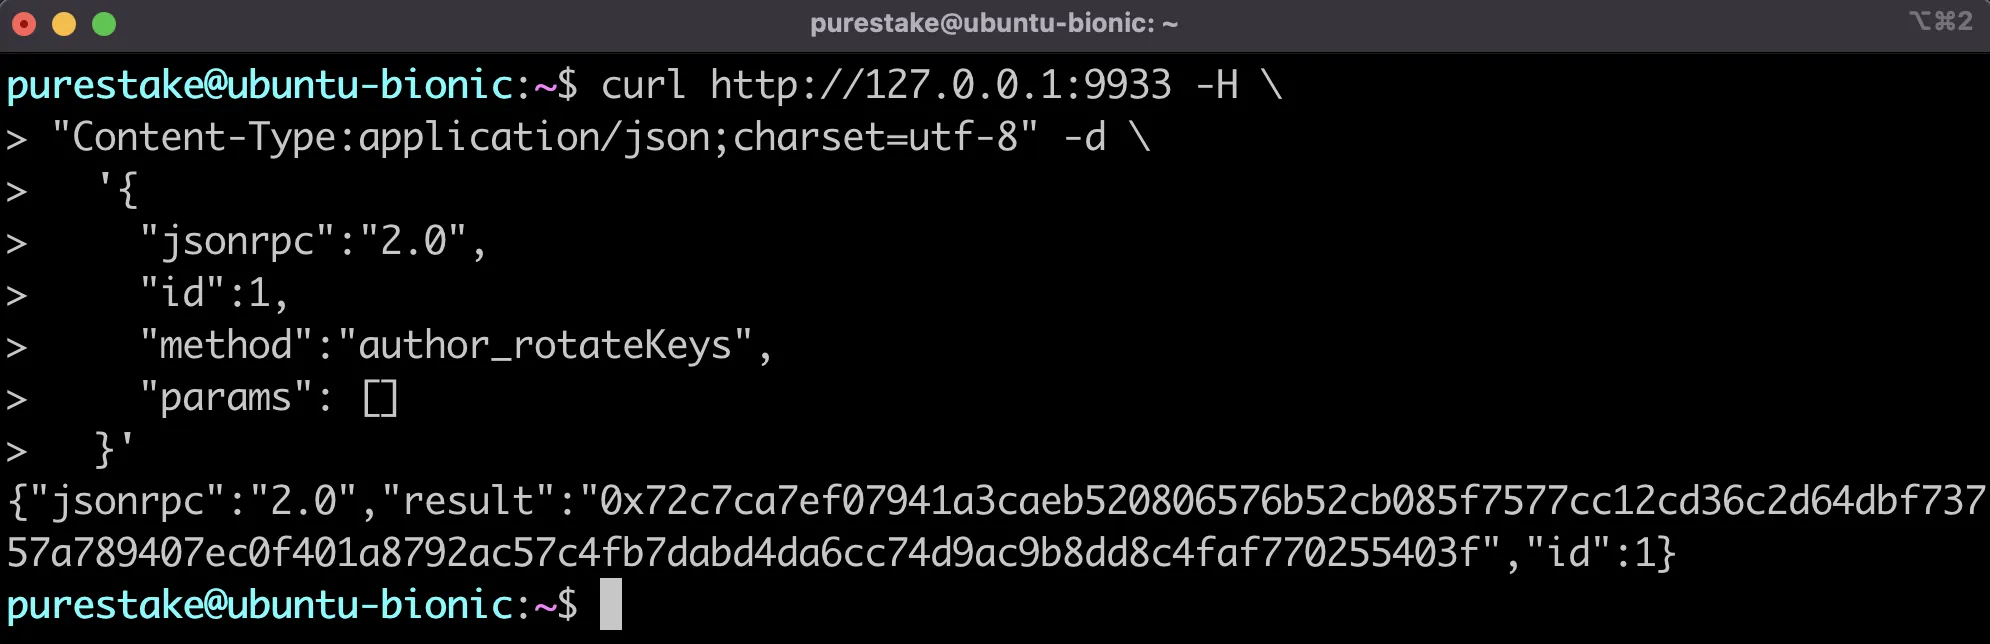
Next, session keys can be created/rotated by sending an RPC call to the HTTP endpoint with the author_rotateKeys method. When you call author_rotateKeys, the result is the size of two keys. The response will contain a concatenated Nimbus ID and VRF key. The Nimbus ID will be used to sign blocks and the VRF key is required for block production. The concatenated keys will be used to create an association to your H160 account for block rewards to be paid out.
For reference, if your collator's HTTP endpoint is at port 9944, the JSON-RPC call might look like this:
curl http://127.0.0.1:9944 -H \
"Content-Type:application/json;charset=utf-8" -d \
  '{
    "jsonrpc":"2.0",
    "id":1,
    "method":"author_rotateKeys",
    "params": []
  }'
The collator node should respond with the concatenated public keys of your new session keys. The first 64 hexadecimal characters after the 0x prefix represent your Nimbus ID and the last 64 hexadecimal characters are the public key of your VRF session key. You'll use the concatenated public keys when mapping your Nimbus ID and setting the session keys in the next section.
Make sure you write down the concatenated public keys. Each of your servers, your primary and backup, should have their own unique keys. Since the keys never leave your servers, you can consider them a unique ID for that server.
Next, you'll need to register your session keys and map them to an H160 Ethereum-styled address to which the block rewards are paid.
Manage Session Keys
Once you've created or rotated your session keys, you'll be able to manage your session keys using the extrinsics in the Author Mapping Pallet. You can map your session keys, verify the on-chain mappings, and remove session keys.
Author Mapping Pallet Interface
The authorMapping module has the following extrinsics:
- setKeys(keys) — accepts the result of calling
author_rotateKeys, which is the concatenated public keys of your Nimbus and VRF keys, and sets the session keys at once. Useful after a key rotation or migration. CallingsetKeysrequires a bond. Replaces the deprecatedaddAssociationandupdateAssociationextrinsics - removeKeys() - removes the session keys. This is only required if you intend to stop collating and leave the candidate pool. Replaces the deprecated
clearAssociationextrinsic
The module also adds the following RPC calls (chain state):
- mappingWithDeposit(NimbusPrimitivesNimbusCryptoPublic | string | Uint8Array) — displays all mappings stored on-chain, or only that related to the Nimbus ID if provided
- nimbusLookup(AccountId20) - displays a reverse mapping of account IDs to Nimbus IDs for all collators or for a given collator address
Map Session Keys
With your newly generated session keys in hand, the next step is to map your session keys to your H160 account (an Ethereum-style address). Make sure you hold the private keys to this account, as this is where the block rewards are paid out to.
To map your session keys to your account, you need to be inside the candidate pool. Once you are a candidate, you need to send a mapping extrinsic, which requires a mapping bond.
Mapping Bonds
The mapping bond is per session keys registered. The bond for mapping your session keys to your account is as follows:
10000 GLMR
100 MOVR
100 DEV
Use Polkadot.js Apps to Map Session Keys
In this section, you'll learn how to map session keys from Polkadot.js Apps. To learn how to create the mapping through the author mapping precompiled contract, you can refer to the page on Interacting with the Author Mapping Precompile.
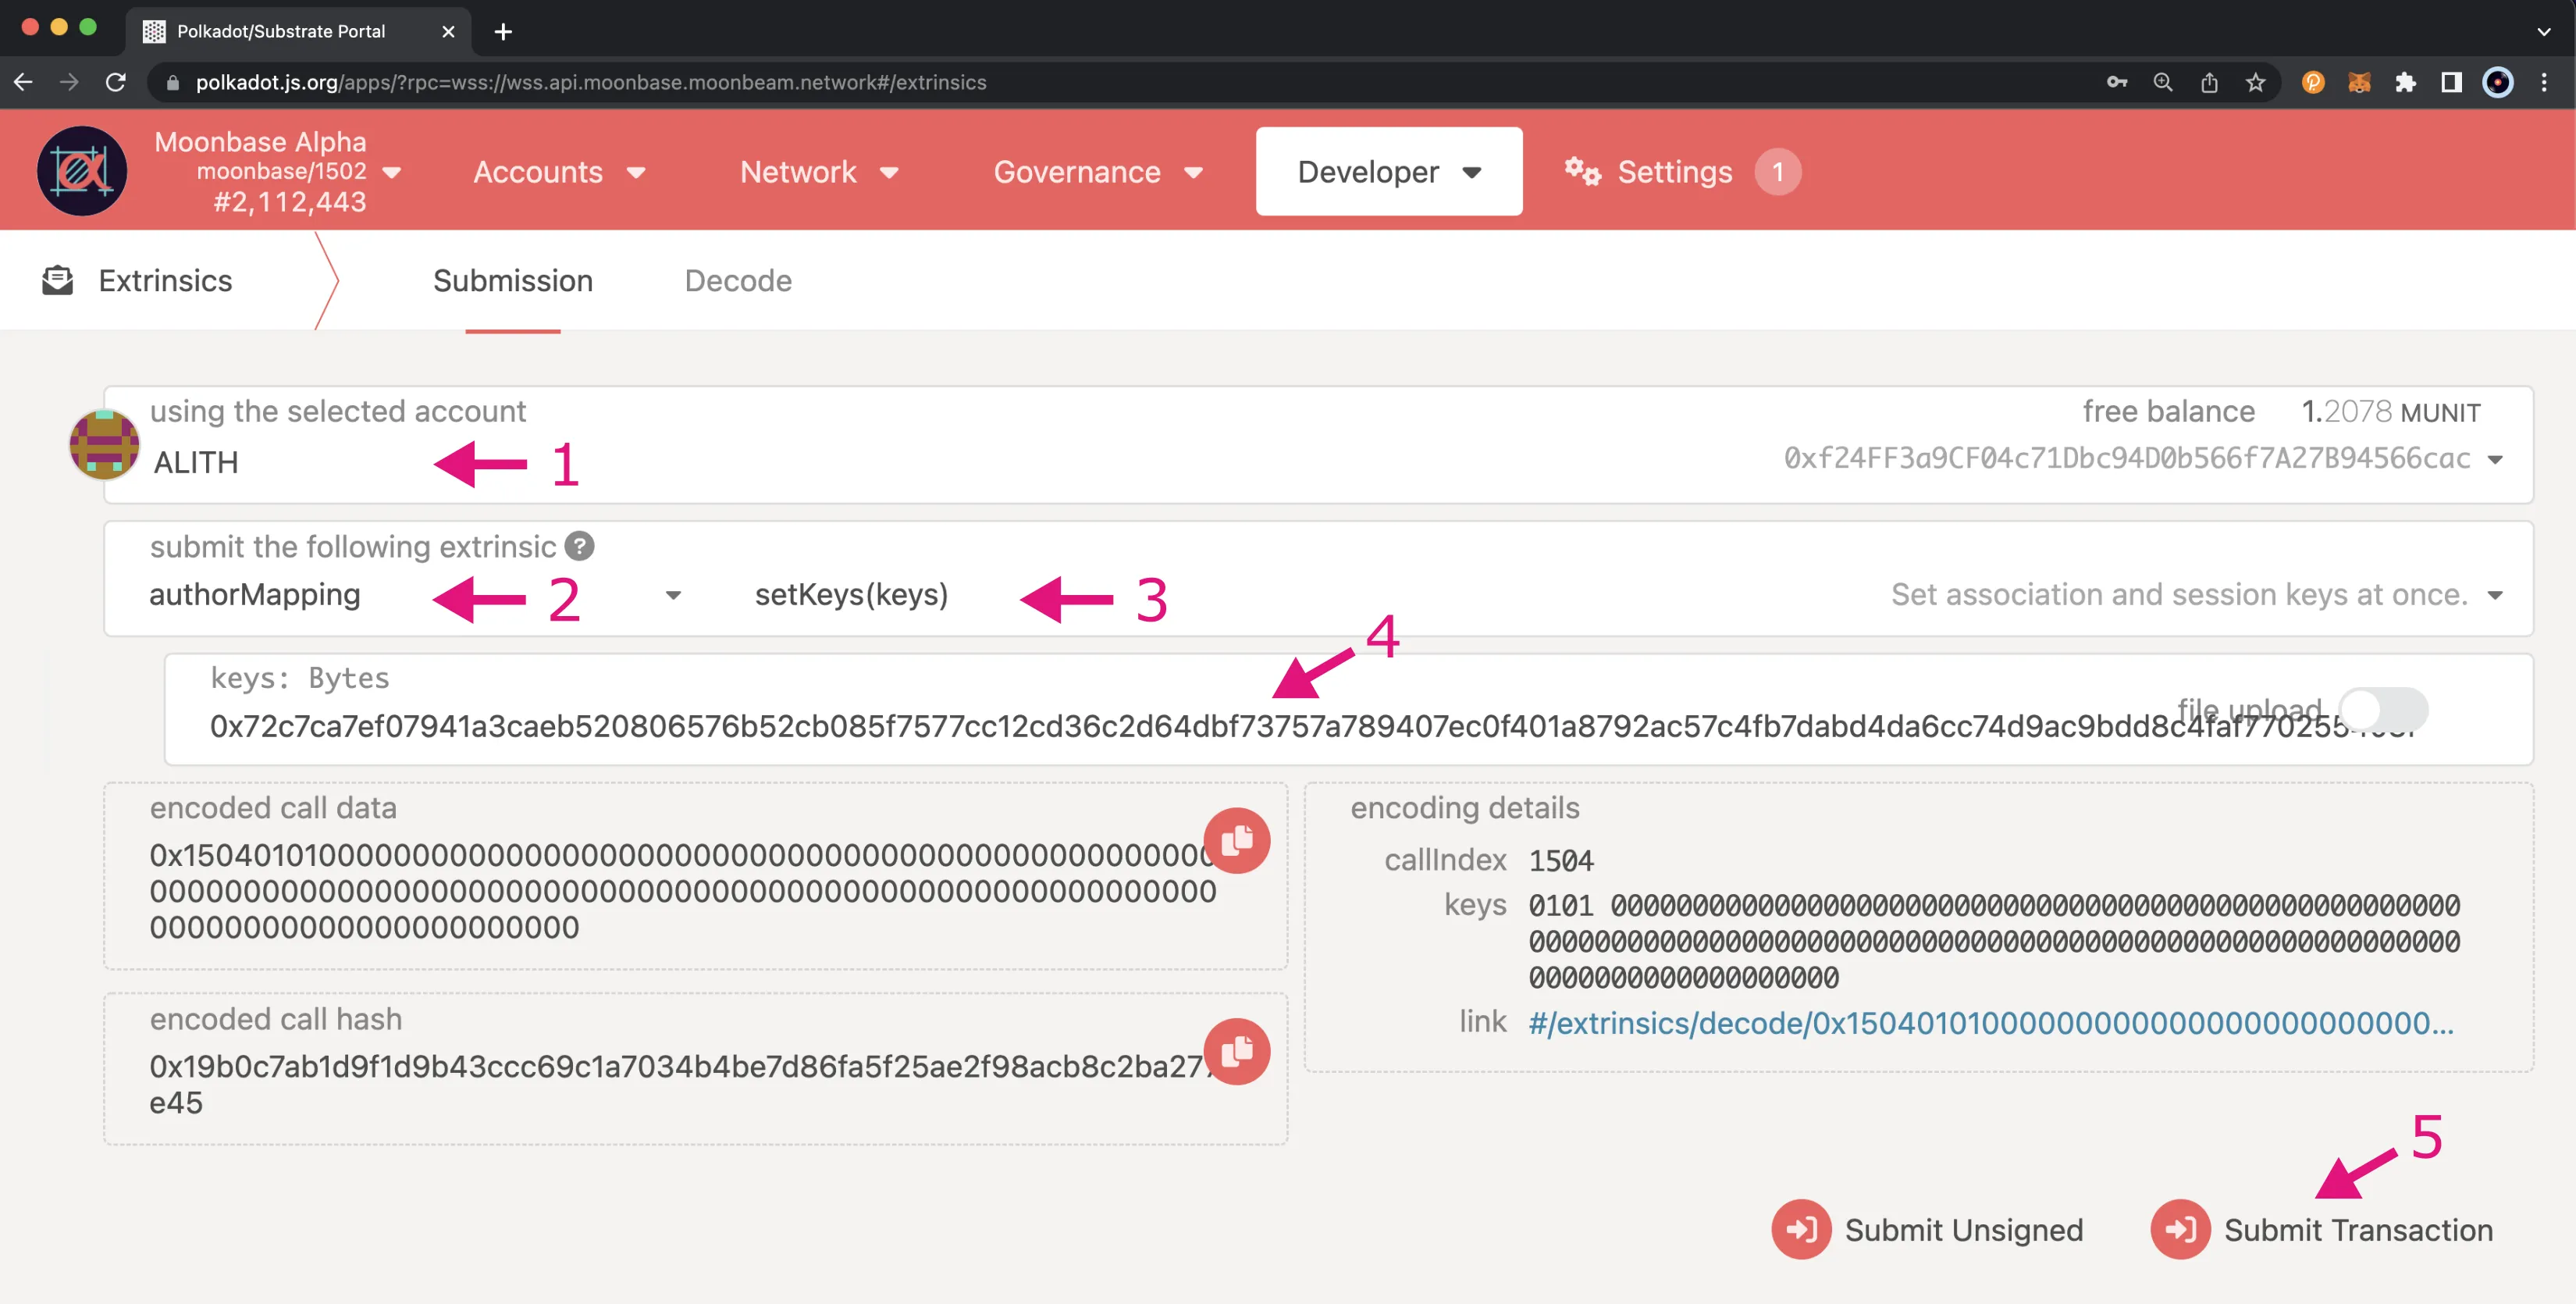
To create the mapping from Polkadot.js Apps (make sure you're connected to the correct network), click on Developer at the top of the page, choose the Extrinsics option from the dropdown, and take the following steps:
- Choose the account that you want to map your author ID to be associated with, from which you'll sign this transaction
- Select the authorMapping extrinsic
- Set the method to setKeys()
- Enter the keys. It is the response obtained via the RPC call
author_rotateKeysin the previous section, which is the concatenated public keys of your Nimbus ID and VRF key - Click on Submit Transaction
Note
If you receive the following error, you may need to try rotating and mapping your keys again: VRF PreDigest was not included in the digests (check rand key is in keystore).
If the transaction is successful, you will see a confirmation notification on your screen. If not, make sure you've joined the candidate pool.
Check Mappings
You can check the current on-chain mappings by verifying the chain state. You can do this one of two ways: via the mappingWithDeposit method or the nimbusLookup method. Both methods can be used to query the on-chain data for all of the collators or for a specific collator.
You can check the current on-chain mappings for a specific collator or you can also check all of the mappings stored on-chain.
Using the Mapping with Deposit Method
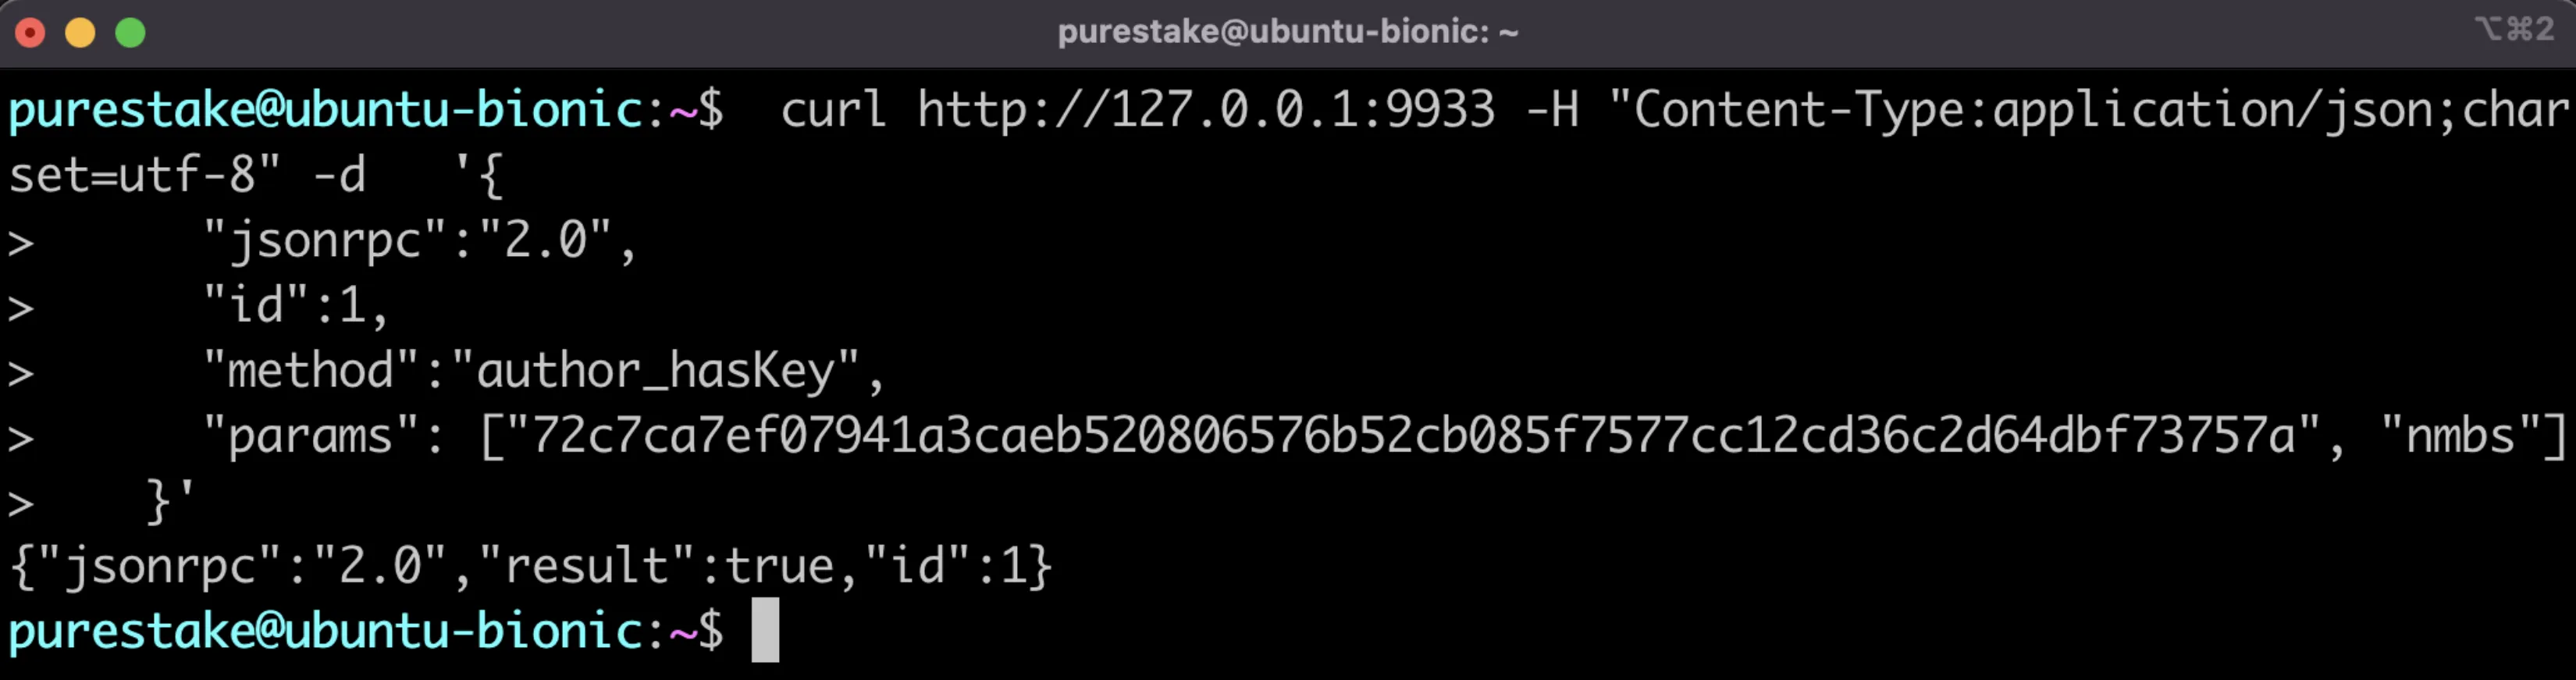
To use the mappingWithDeposit method to check the mapping for a specific collator, you'll need to get the Nimbus ID. To do so, you can take the first 64 hexadecimal characters of the concatenated public keys to get the Nimbus ID. To verify that the Nimbus ID is correct, you can run the following command with the first 64 characters passed into the params array:
curl http://127.0.0.1:9944 -H "Content-Type:application/json;charset=utf-8" -d   '{
  "jsonrpc":"2.0",
  "id":1,
  "method":"author_hasKey",
  "params": ["72c7ca7ef07941a3caeb520806576b52cb085f7577cc12cd36c2d64dbf73757a", "nmbs"]
}'
If it's correct the response should return "result": true.
From Polkadot.js Apps, click on Developer at the top of the page, then choose Chain State from the dropdown, and take the following steps:
- Choose authorMapping as the state to query
- Select the mappingWithDeposit method
- Provide a Nimbus ID to query. Optionally, you can disable the slider to retrieve all mappings
- Click on the + button to send the RPC call
You should be able to see the H160 account associated with the Nimbus ID provided and the deposit paid. If no Nimbus ID was included, this would return all the mappings stored on-chain.
Using the Nimbus Lookup Method
To use the nimbusLookup method to check the mapping for a specific collator, you'll need the collator's address. If you do not pass an argument to the method, you can retrieve all of the on-chain mappings.
From Polkadot.js Apps, click on Developer at the top of the page, then choose Chain State from the dropdown, and take the following steps:
- Choose authorMapping as the state to query
- Select the nimbusLookup method
- Provide a collator's address to query. Optionally, you can disable the slider to retrieve all mappings
- Click on the + button to send the RPC call
You should be able to see the nimbus ID associated with the H160 account provided. If no account was provided, this would return all the mappings stored on-chain.
Remove Session Keys
Before removing your session keys, you'll want to make sure that you've stopped collating and left the candidate pool. To stop collating, you'll need to schedule a request to leave the candidate pool, wait a delay period, and then execute the request. For step-by-step instructions, please refer to the Stop Collating section of the Moonbeam Collator Activities page.
Once you have left the candidate pool, you can remove your session keys. After which, the mapping bond you deposited will be returned to your account.
From Polkadot.js Apps, click on Developer at the top of the page, then choose Extrinsics from the dropdown, and take the following steps:
- Select your account
- Choose the authorMapping pallet and the removeKeys extrinsic
- Click Submit Transaction
Once the transaction goes through, the mapping bond will be returned to you. To make sure that the keys were removed, you can follow the steps in the Check Mappings section.
Setting an Identity
Setting an on-chain identity enables your collator node to be easily identifiable. As opposed to showing your account address, your chosen display name will be displayed instead.
There are a couple of ways you can set your identity, to learn how to set an identity for your collator node please check out the Managing your Account Identity page of our documentation.
Proxy Accounts
Proxy accounts are accounts that can be enabled to perform a limited number of actions on your behalf. Proxies allow users to keep a primary account securely in cold storage while using the proxy to actively participate in the network on behalf of the primary account. You can remove authorization of the proxy account at any time. As an additional layer of security, you can setup your proxy with a delay period. This delay period would provide you time to review the transaction, and cancel if needed, before it automatically gets executed.
To learn how to setup a proxy account, please refer to the Setting up a Proxy Account page of our documentation.
| Created: January 25, 2022