Using Remix to Deploy to Moonbeam
Introduction
Remix is an integrated development environment (IDE) for developing smart contracts on Ethereum and Ethereum-compatible chains. It provides an easy-to-use interface for writing, compiling, and deploying smart contracts. Given Moonbeam’s Ethereum compatibility features, you can use Remix directly with any Moonbeam network.
This guide walks through the process of creating and deploying a Solidity smart contract to a Moonbeam development node using the Remix IDE. This guide can be adapted for Moonbeam, Moonriver, or Moonbase Alpha.
If you're familiar with Remix, you can skip ahead to the Connect Remix to Moonbeam section to learn how to use Remix with Moonbeam.
Checking Prerequisites
For the purposes of this guide, you'll need to have the following:
- A locally running Moonbeam development node
- MetaMask installed and connected to your development node
If you followed the guides above, you should have a local Moonbeam node, which will begin to author blocks as transactions arrive.
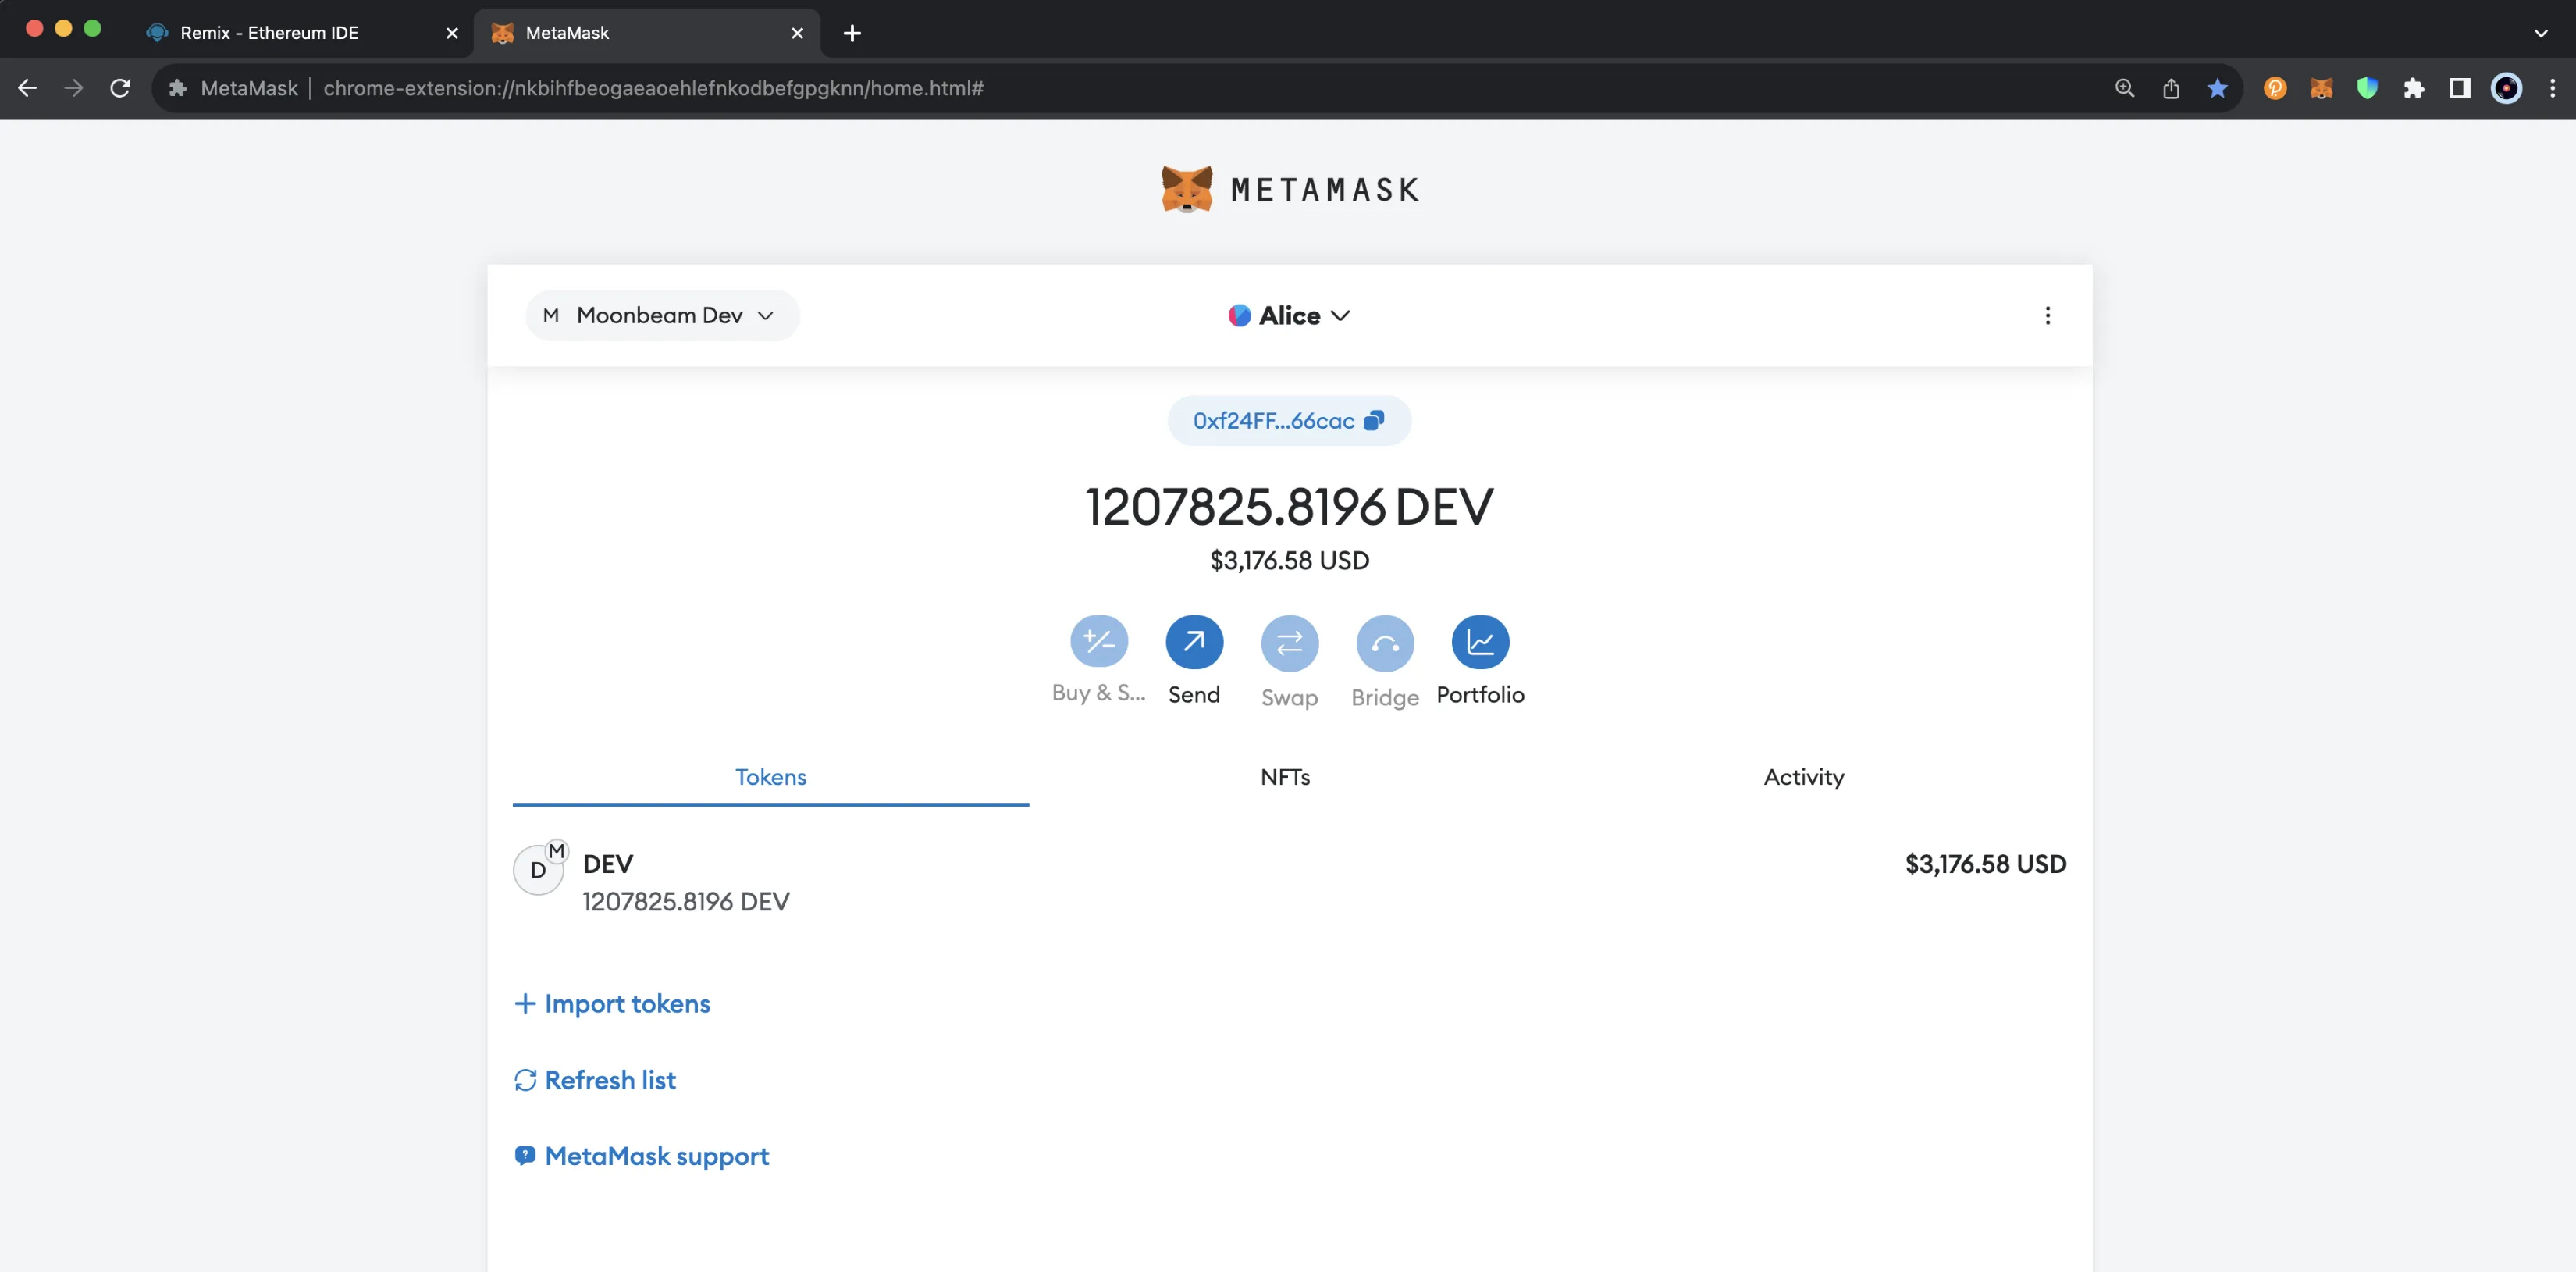
Your development node comes with 10 pre-funded accounts. You should have MetaMask connected to your Moonbeam development node and have imported at least one of the pre-funded accounts. You can refer to the Import Accounts section of the MetaMask docs for step-by-step instructions on how to import a development account.
If you're adapting this guide for Moonbeam, Moonriver, or Moonbase Alpha, make sure you are connected to the correct network and have an account with funds. You can get DEV tokens for testing on Moonbase Alpha once every 24 hours from the Moonbase Alpha Faucet.
Get Familiar with Remix
If you navigate to https://remix.ethereum.org/, you'll see that the layout of Remix is split into four sections:
- The plugin panel
- The side panel
- The main panel
- The terminal
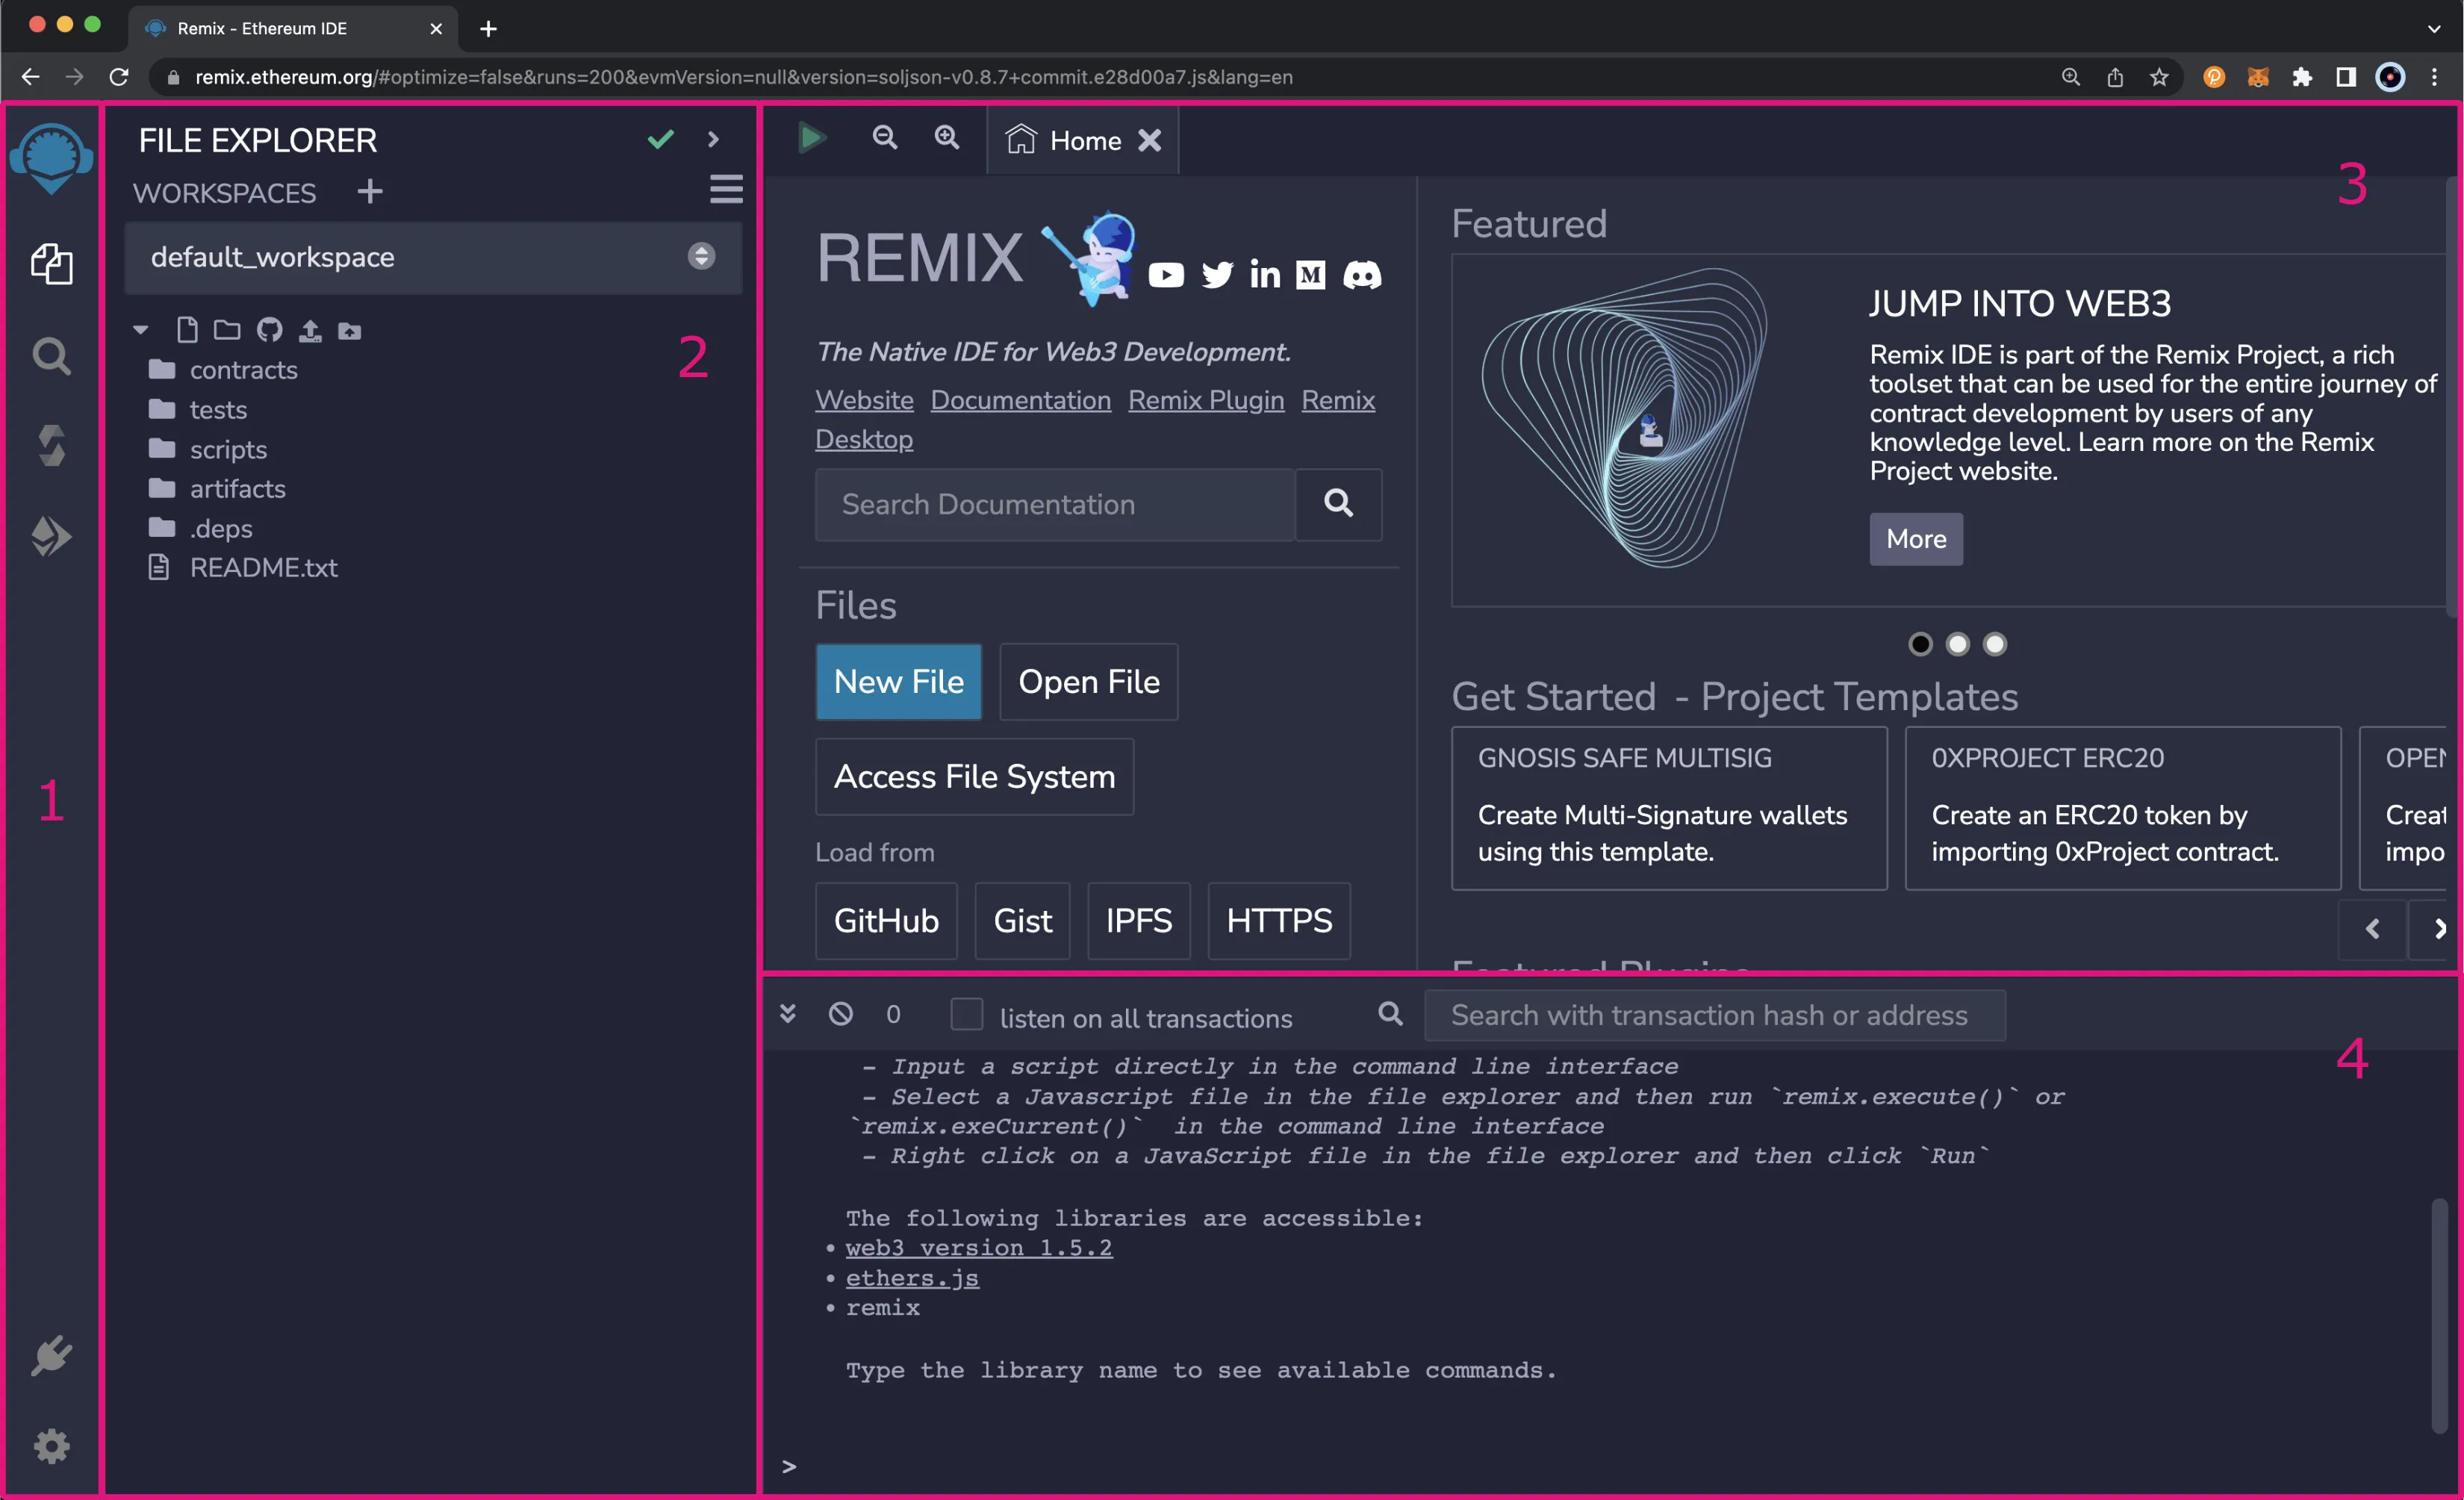
The plugin panel displays icons for each of the preloaded plugins, the plugin manager, and the settings menu. You'll see a few icons there for each of the preloaded plugins, which are the File explorer, Search in files, Solidity compiler, and Deploy and run transactions plugins. As additional plugins are activated, their icons will appear in this panel.
The side panel displays the content of the plugin that is currently being viewed. By default, you'll see the File explorer plugin, which displays the default workspace and some preloaded files and folders. However, if you select one of the other icons from the plugin panel, you'll see the content for the selected plugin.
The main panel is automatically loaded with the Home tab, which contains links to a variety of resources. You can close this tab at any time and reopen it by clicking on the blue Remix icon in the top left corner of the plugin panel. The main panel is where you'll be able to see each of the files you're working with. For example, you can double-click on any file in the File explorer side panel and it will appear as a tab in the main panel.
The terminal panel is similar to a standard terminal that you have on your OS; you can execute scripts from it, and logs are printed to it. All transactions and contract interactions are automatically logged to the terminal. You can also interact with the Ethers and Web3 JavaScript libraries directly from the terminal.
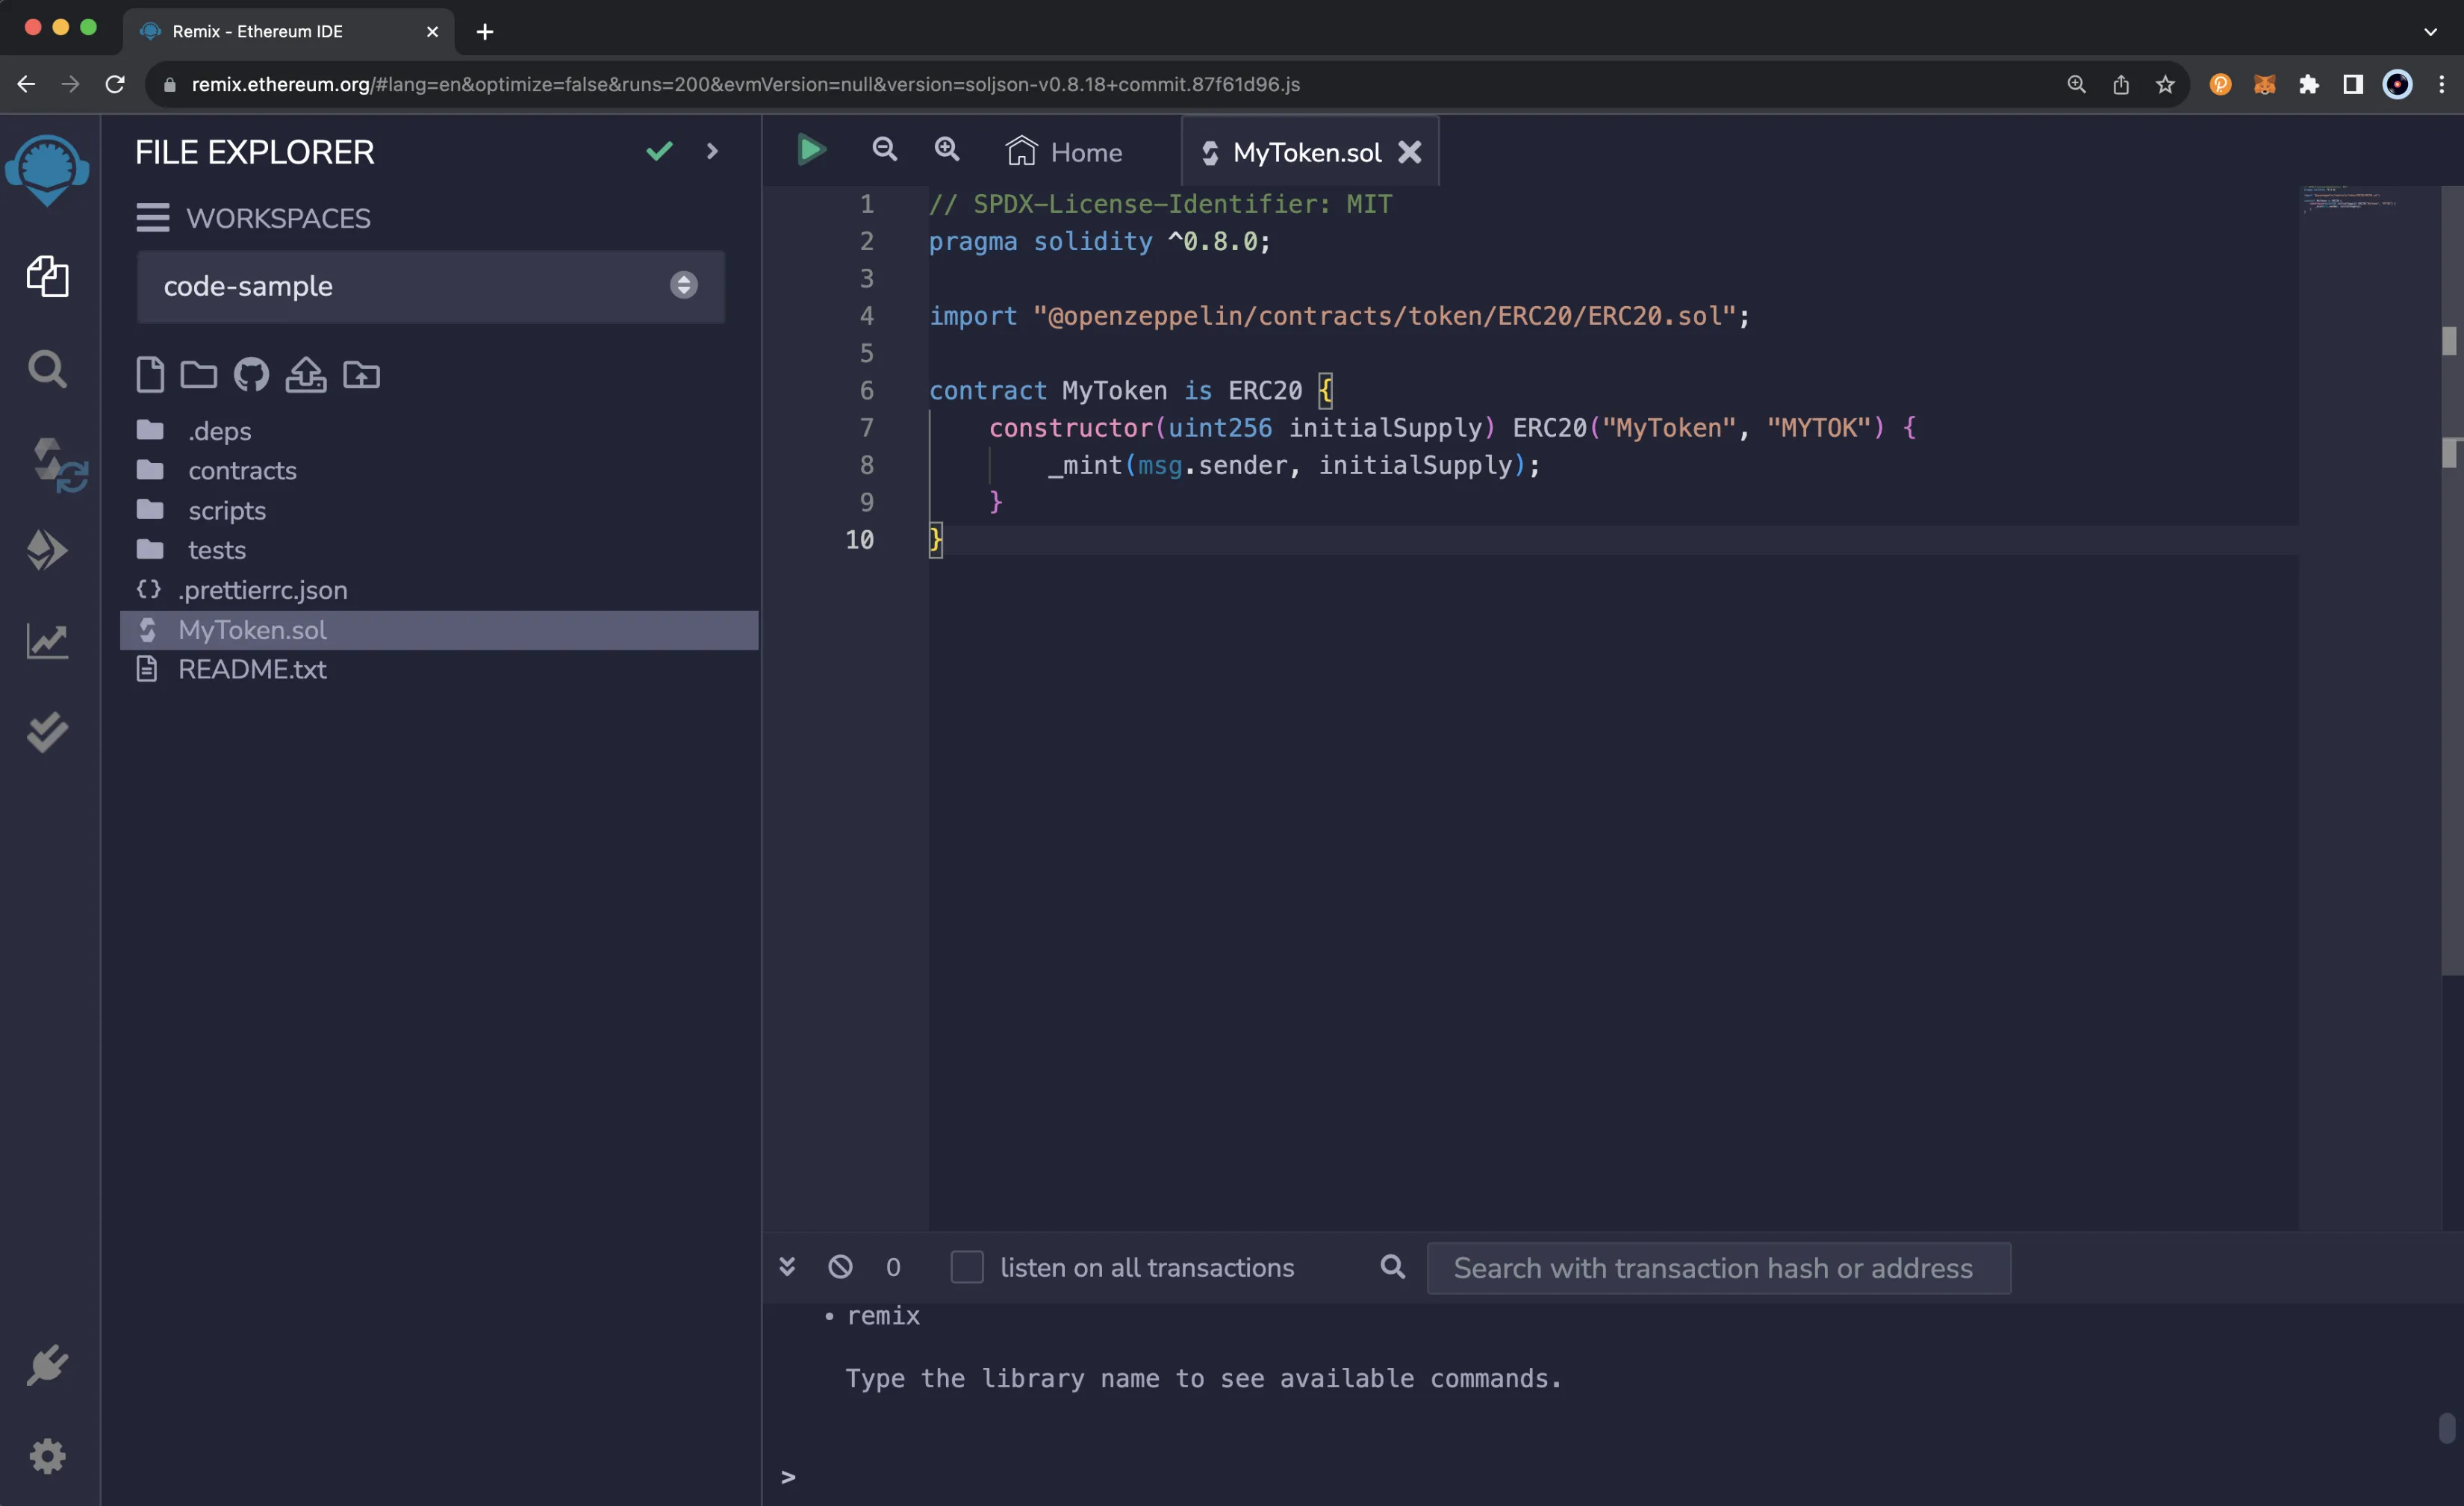
Add a Smart Contract to the File Explorer
For this example, you will create a new file that contains an ERC-20 token contract. This will be a simple ERC-20 contract based on the current OpenZeppelin ERC-20 template. The contract will create a MyToken token with the MYTOK symbol that mints the entirety of the initial supply to the creator of the contract.
From the File explorer tab on the plugin panel, you can create a new file by taking the following steps:
- Click on the file icon
- Enter the name of the contract:
MyToken.sol
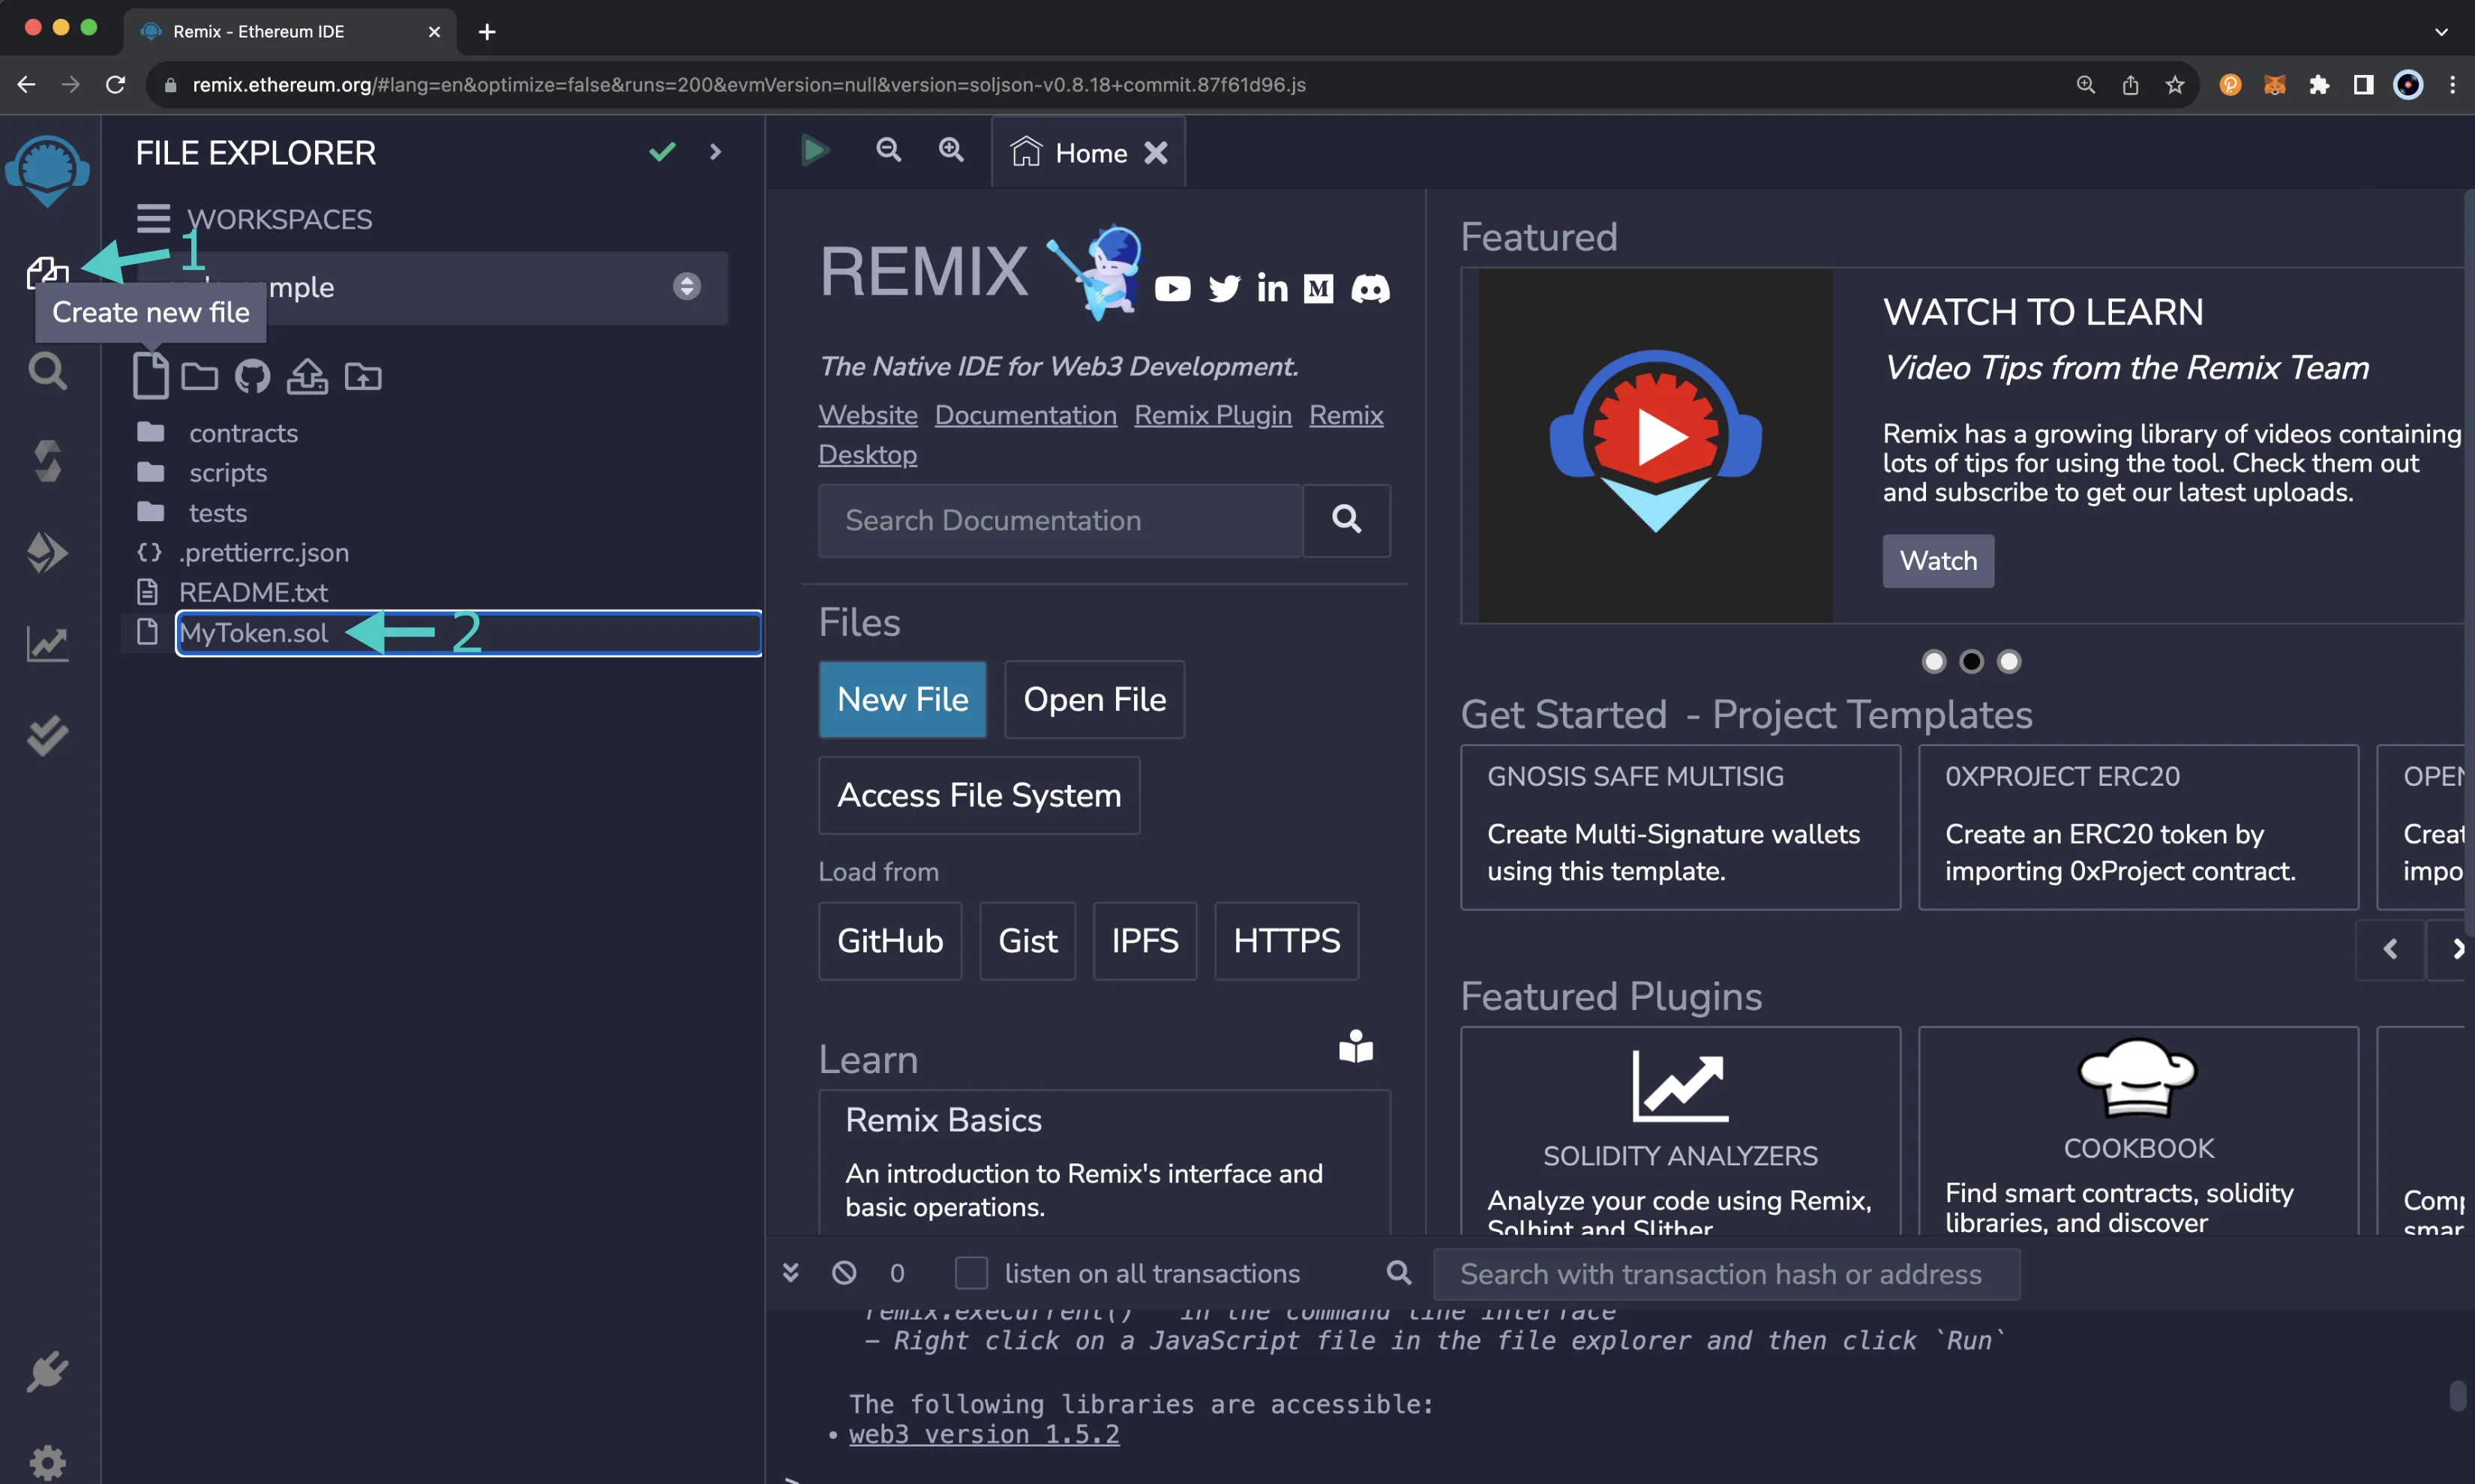
The main panel will switch to an empty file where you can add the Solidity code for the contract. Paste the MyToken.sol smart contract into the new file:
// SPDX-License-Identifier: MIT
pragma solidity ^0.8.0;

import "@openzeppelin/contracts/token/ERC20/ERC20.sol";

contract MyToken is ERC20 {
    constructor(uint256 initialSupply) ERC20("MyToken", "MYTOK") {
        _mint(msg.sender, initialSupply);
    }
}
Compile a Solidity Smart Contract
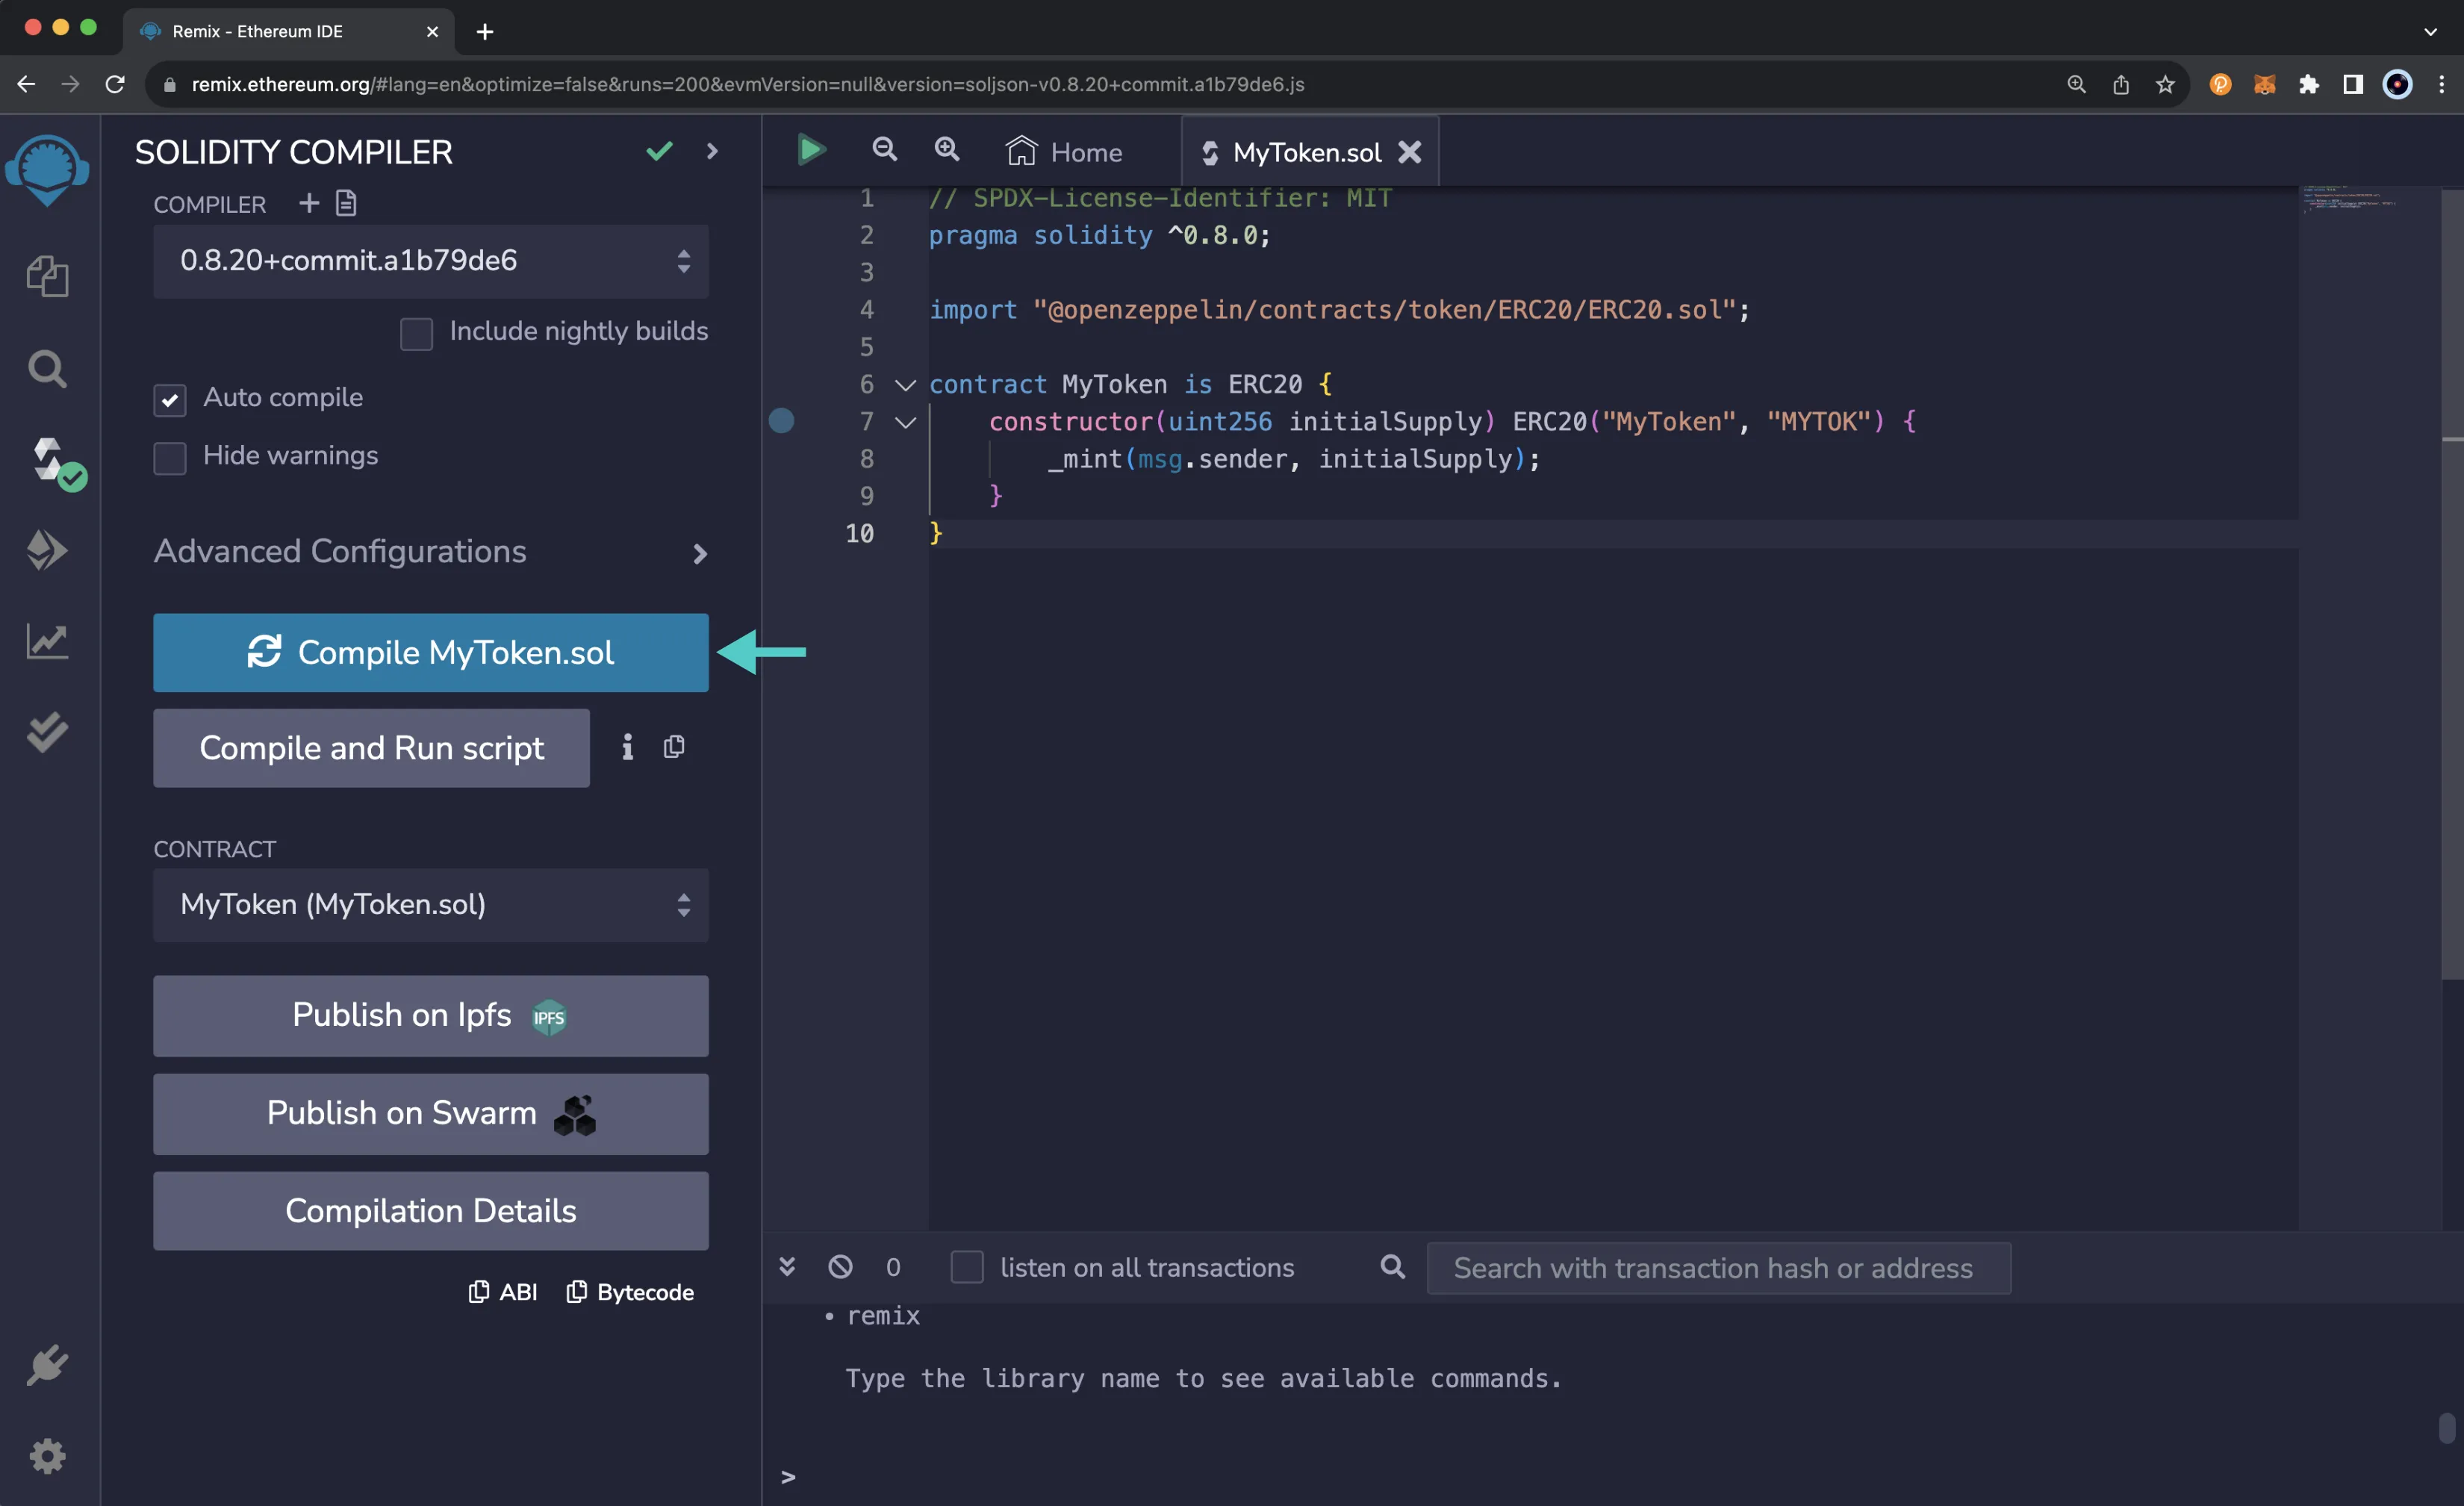
Before you compile a contract, make sure you've selected the file of the contract from the File explorer tab. Then, select the Solidity Compiler option from the plugin panel.
Make sure that the compiler version in the top-left corner meets the version defined in your contract and the version defined in OpenZeppelin's ERC20.sol contract. For example, the MyToken.sol contract requires Solidity ^0.8.0, but at the time of writing, OpenZeppelin's ERC20.sol contract requires ^0.8.20, so the compiler needs to be set to version 0.8.20 or newer.
The Solidity compiler plugin also lets you change some settings and apply advanced configurations for the compiler. If you're planning on iterating over the smart contract, you can check the Auto compile box, and whenever you make a change, the contract will automatically be recompiled.
Additionally, from the Advanced Configurations menu, you can change the EVM version, enable optimizations, and set the number of times the bytecode is expected to be run throughout the contract's lifetime; the default is set to 200 times. For more information on contract optimization, please refer to the Solidity docs on The Optimizer.
For this example, no additional configurations are needed. To compile the MyToken.sol contract, simply click on the Compile MyToken.sol contract. If the compilation was successful, you'll see a green check mark appear on the plugin panel next to the Solidity compiler plugin.
Debug Compilation Errors
If you tried to compile your smart contract but there was an error or warning, you can easily debug the issue with the help of ChatGPT directly from the Solidity compiler plugin in Remix.
For example, if you only provided the token name to the ERC-20 constructor but forgot the token symbol and tried to compile the contract, an error would appear in the side panel. You can scroll down to read the error, and you'll see that there is also an ASK GPT button. To get help debugging the issue, you can click on ASK GPT, and a response will be returned in the Remix terminal that will guide you in the right direction to try and fix the issue. If you need additional help, you can go straight to the source and ask ChatGPT directly.
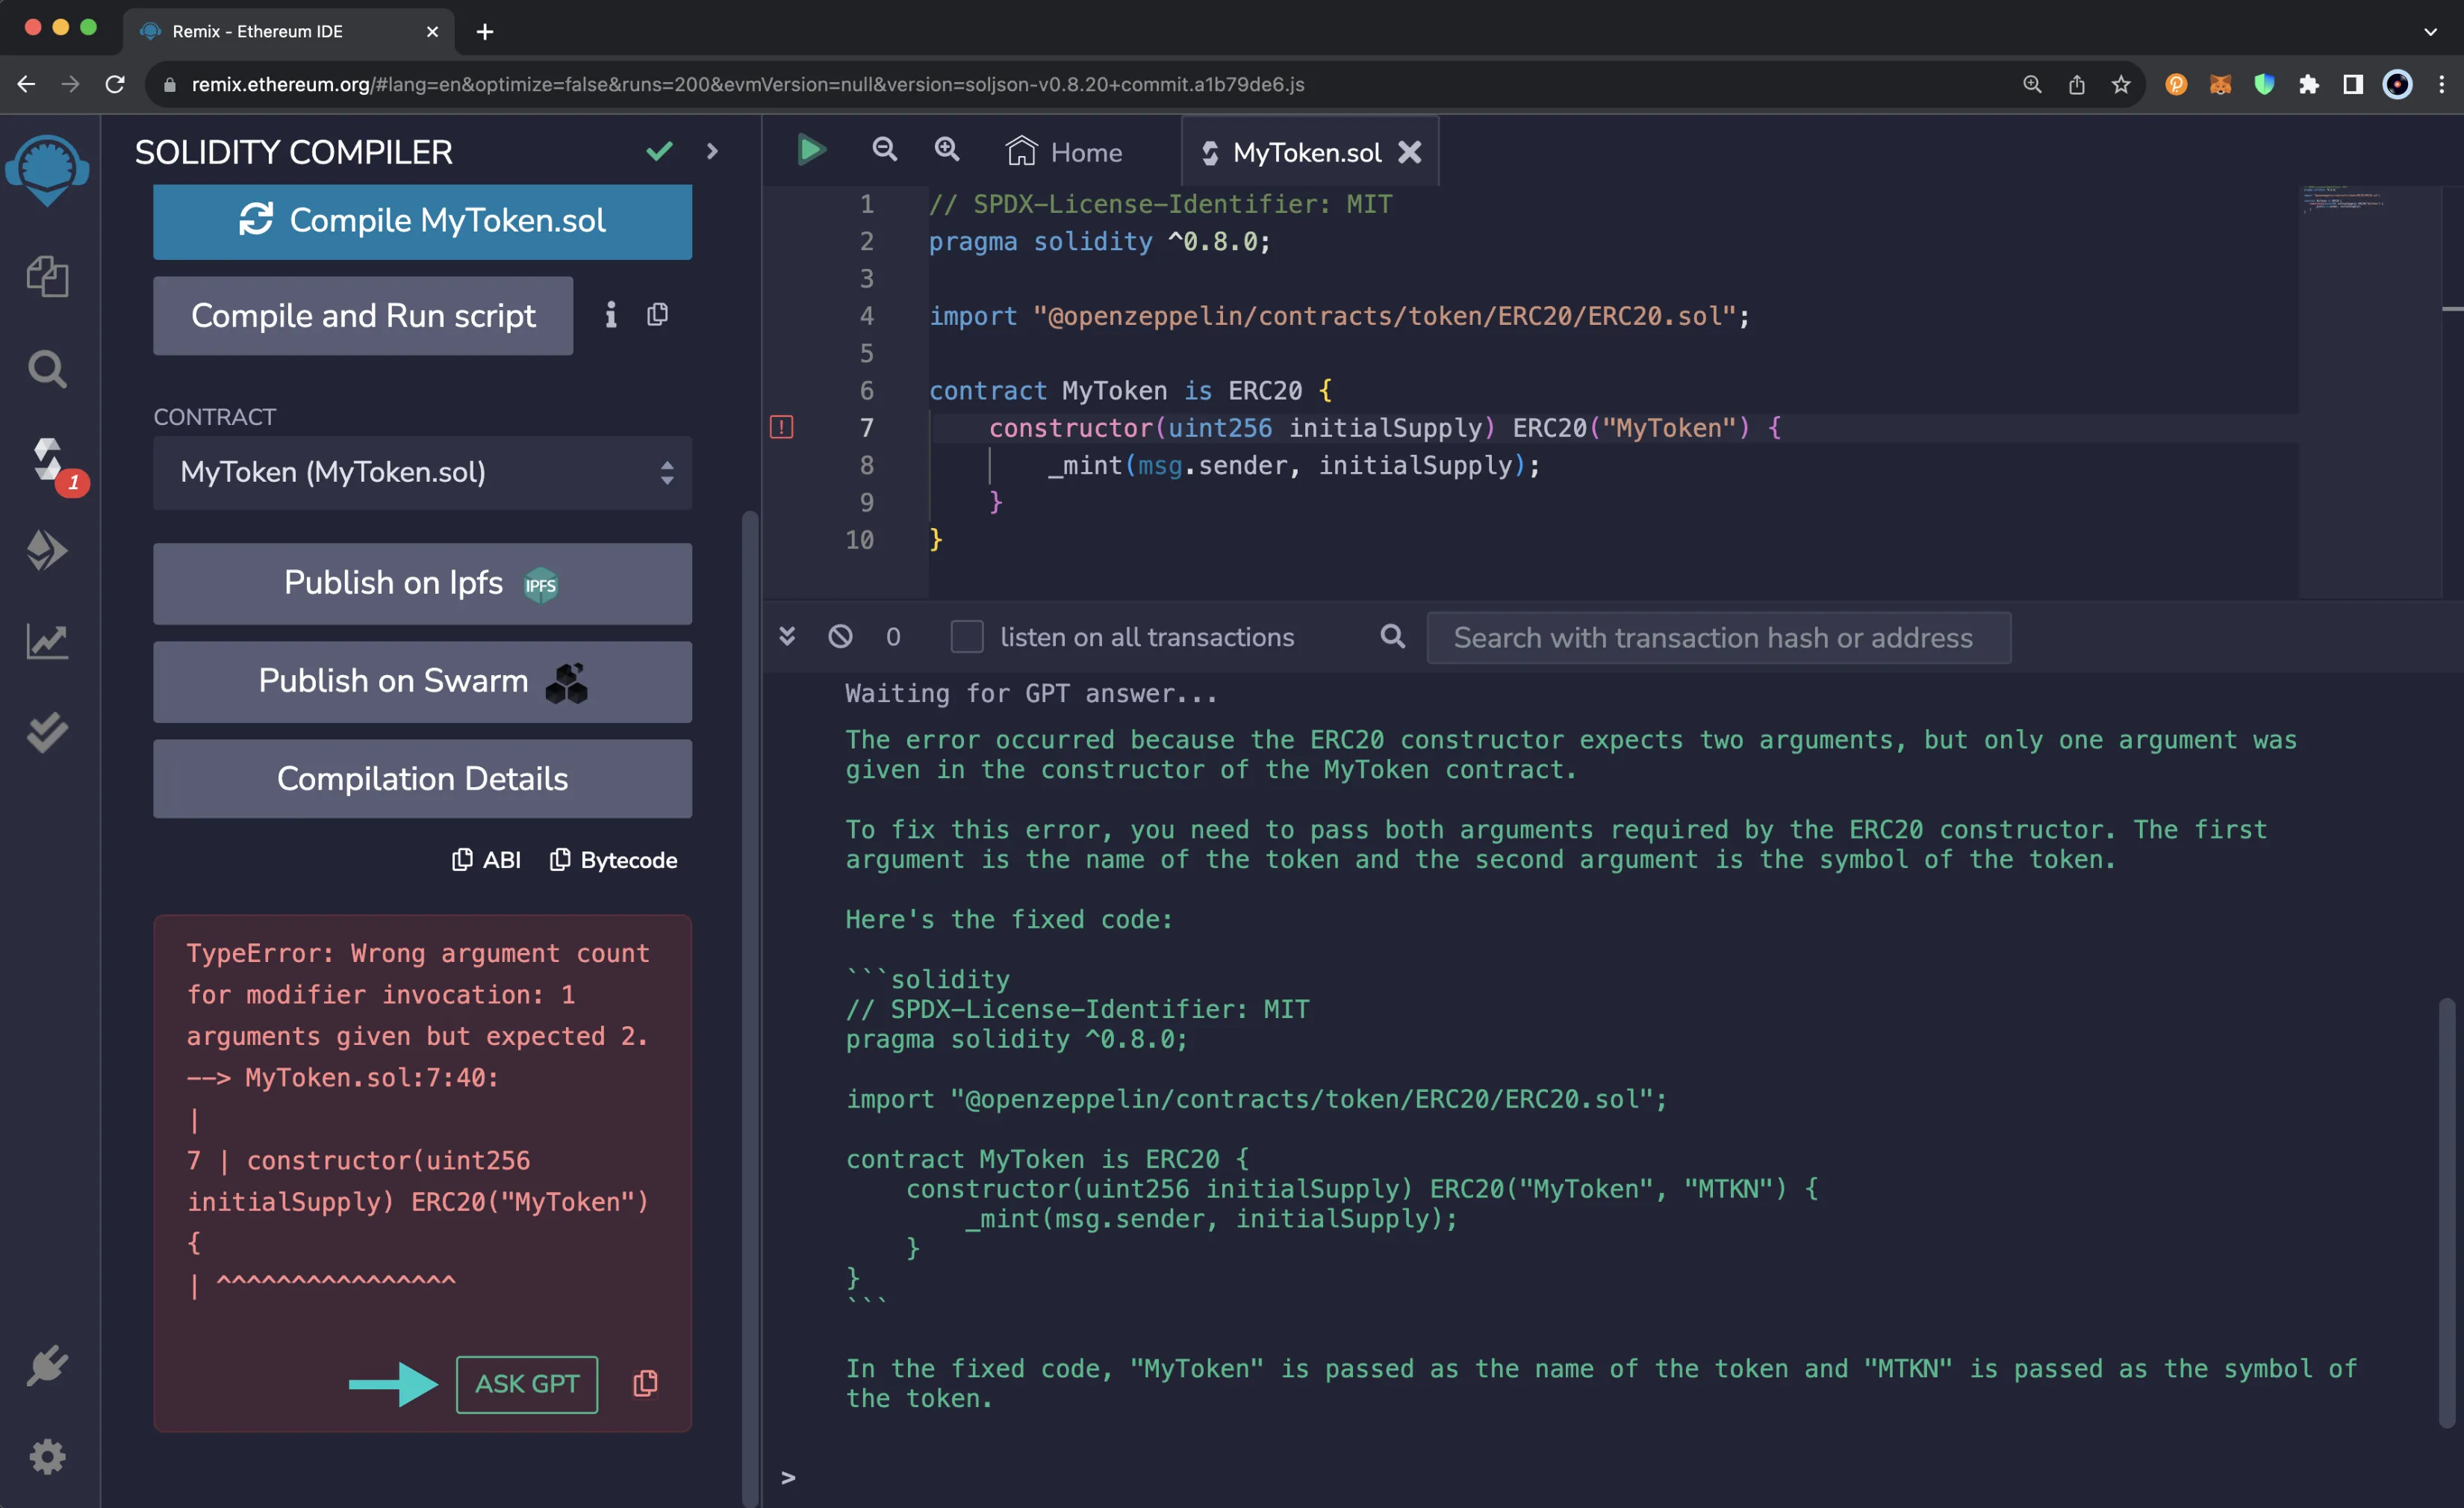
Once you successfully fix the issue and recompile the contract, you'll see a green check mark appear on the plugin panel next to the Solidity compiler plugin.

Deploy a Solidity Smart Contract
The Deploy and run transactions plugin enables you to configure contract deployment options, deploy contracts, and interact with deployed contracts.
The side panel consists of the following deployment options:
- Environment - allows you to choose the execution environment for deployment
- Account - the account from which the deployment transaction will be sent
- Gas Limit - the maximum amount of gas that the deployment transaction can consume
- Value - the amount of the native asset to send along with the deployment transaction
- Contract - the contract to deploy
- Deploy - sends the deployment transaction to the specified environment using the selected account, gas limit, value, and the values for any constructor arguments
- At Address - allows you to interact with an existing contract by specifying its address
The following section will cover how to configure the environment for deployment to be Moonbeam.
Connect Remix to Moonbeam
To deploy the smart contract to Moonbeam, you'll need to make sure that you've connected your wallet to your Moonbeam development node or the Moonbeam network of your choice. Then, from the Deploy and run transactions tab, you can connect Remix to your wallet by selecting your wallet from the ENVIRONMENT dropdown. For example, if you have Trust Wallet installed, you'll see Injected Provider - TrustWallet from the dropdown. Aside from injected providers, you can also connect to Moonbeam via WalletConnect.
For this example, MetaMask will be used. You should already have MetaMask installed and connected to your local Moonbeam development node. If not, please refer to the Interacting with Moonbeam Using MetaMask guide for step-by-step instructions.
From the ENVIRONMENT dropdown, select Injected Provider - MetaMask.
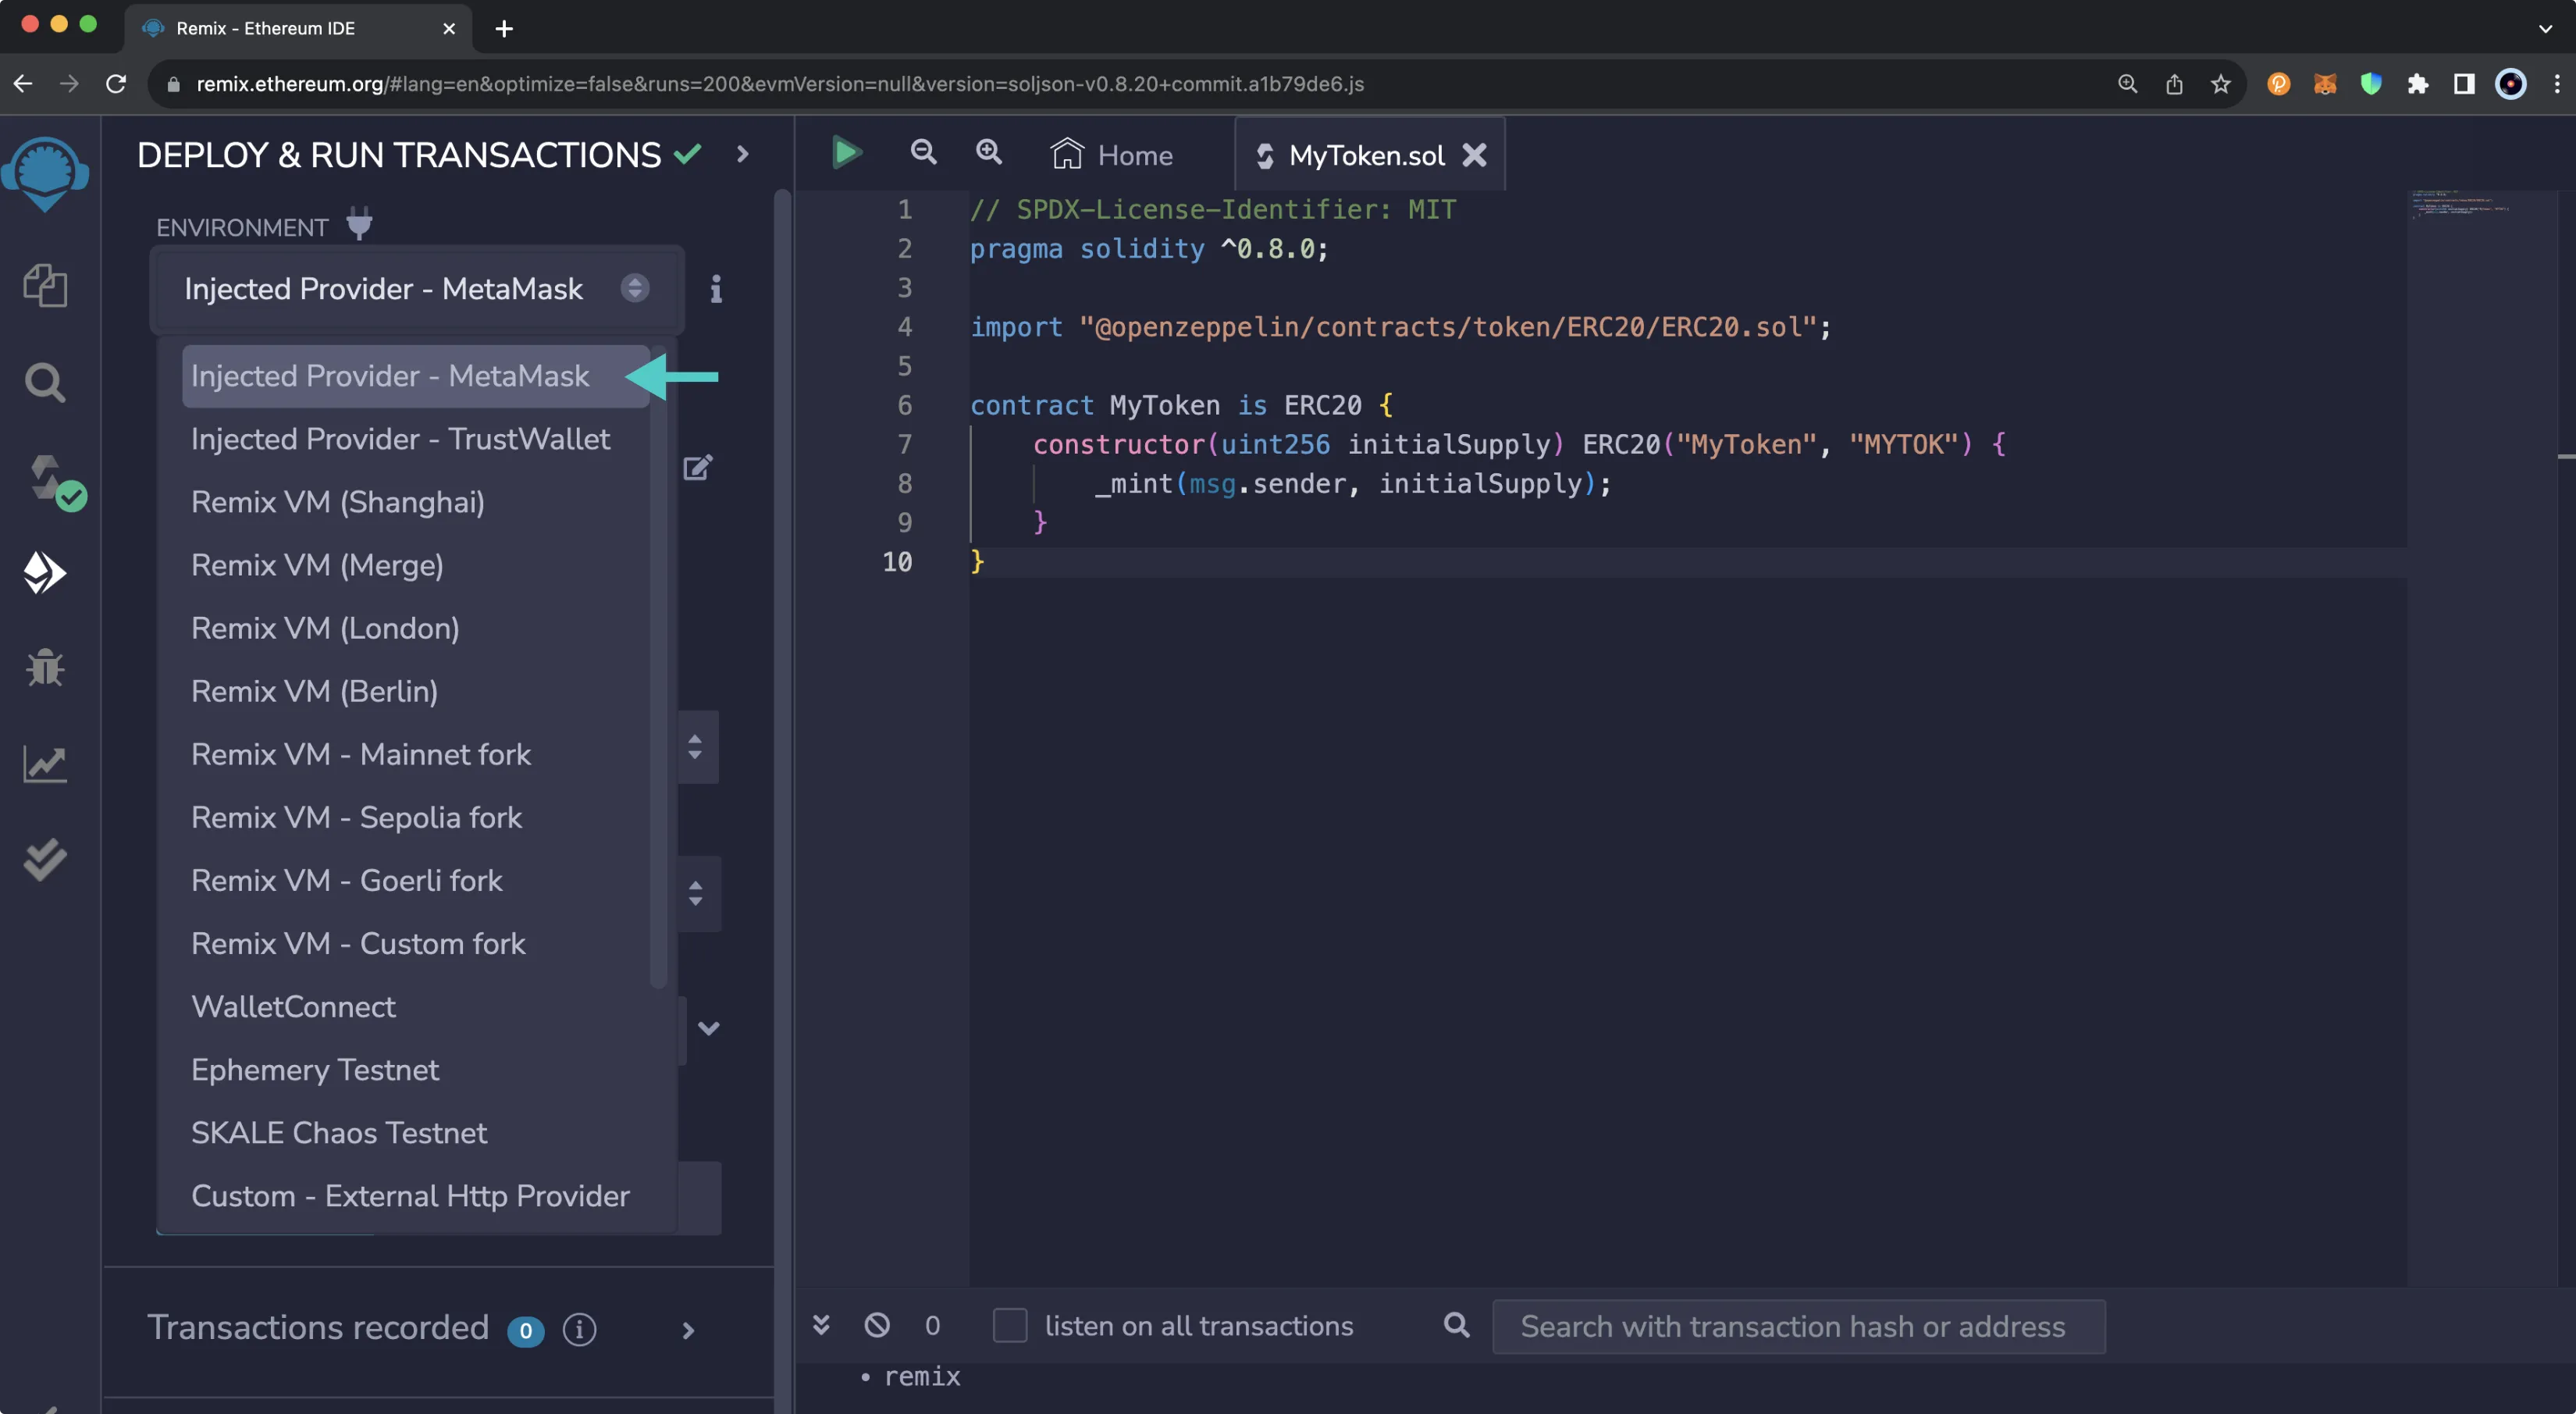
MetaMask will pop up automatically and prompt you to connect to Remix. You'll need to:
- Select the account you want to connect to Remix
- Click Next
- Click Connect to connect your account to Remix
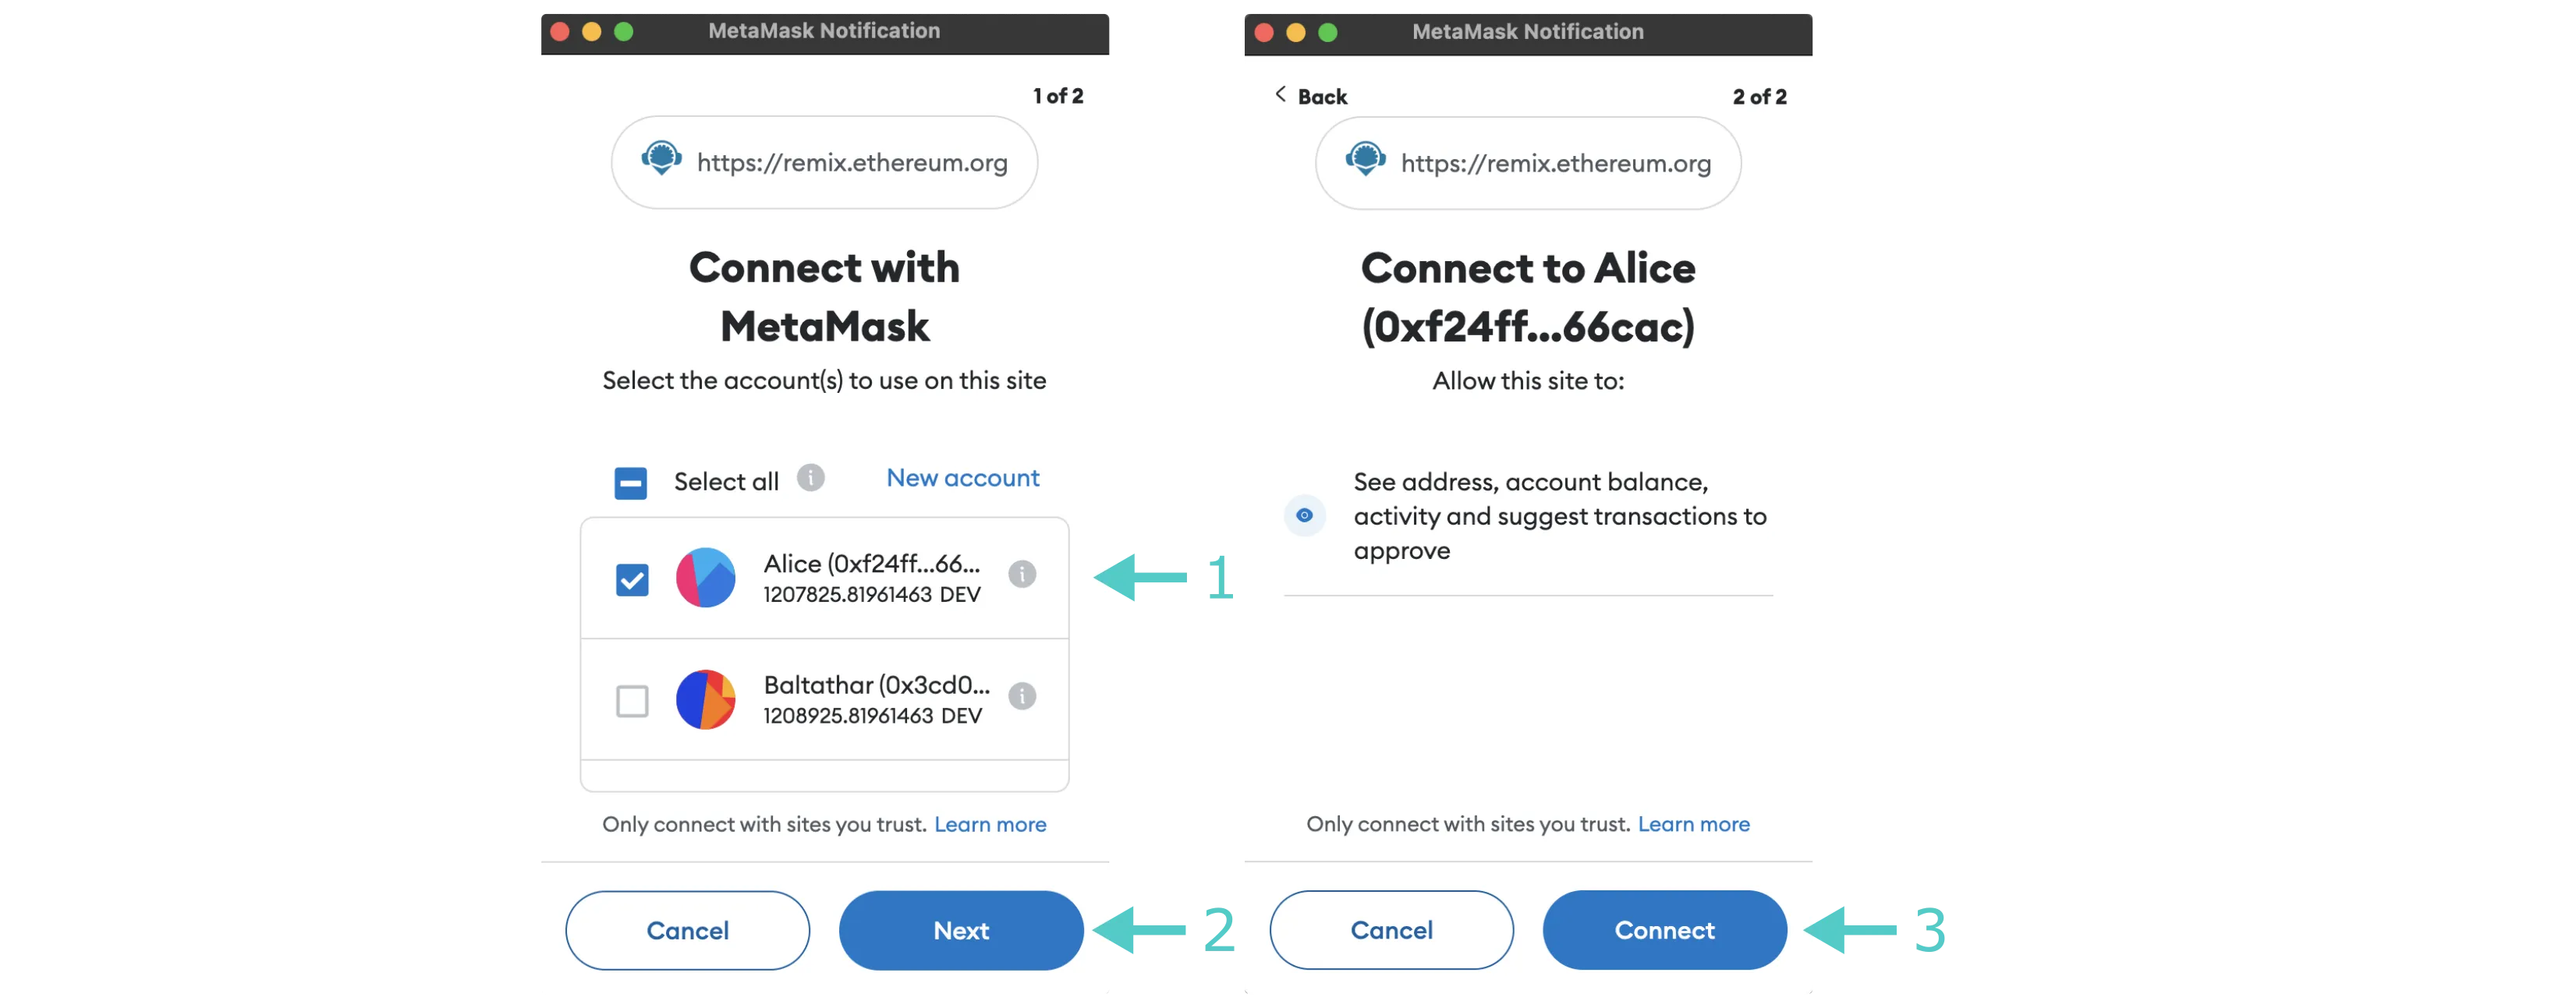
Once you've connected MetaMask to Remix, the side panel will update to reveal the network and account you're connected to. For a Moonbeam development node, you should see Custom (1281) network.

Deploy the Contract to Moonbeam
Now that you've connected your wallet, you're ready to deploy the contract. Since you're deploying a simple ERC-20 token smart contract, the default gas limit set by Remix of 3 million is more than enough, and you don't need to specify a value to send along with the deployment. As such, you can take the following steps to deploy the contract:
- Make sure the ENVIRONMENT is set to Injected Provider - MetaMask
- Make sure the connected account is the one you want to deploy the transaction from
- Use the default GAS LIMIT of
3000000 - Leave the VALUE as
0 - Make sure
MyToken.solis the selected contract - Expand the DEPLOY dropdown
- Specify the initial supply. For this example, you can set it to 8 million tokens. Since this contract uses the default of 18 decimals, the value to put in the box is
8000000000000000000000000 - Click transact to send the deployment transaction
- MetaMask will pop up, and you can click Confirm to deploy the contract
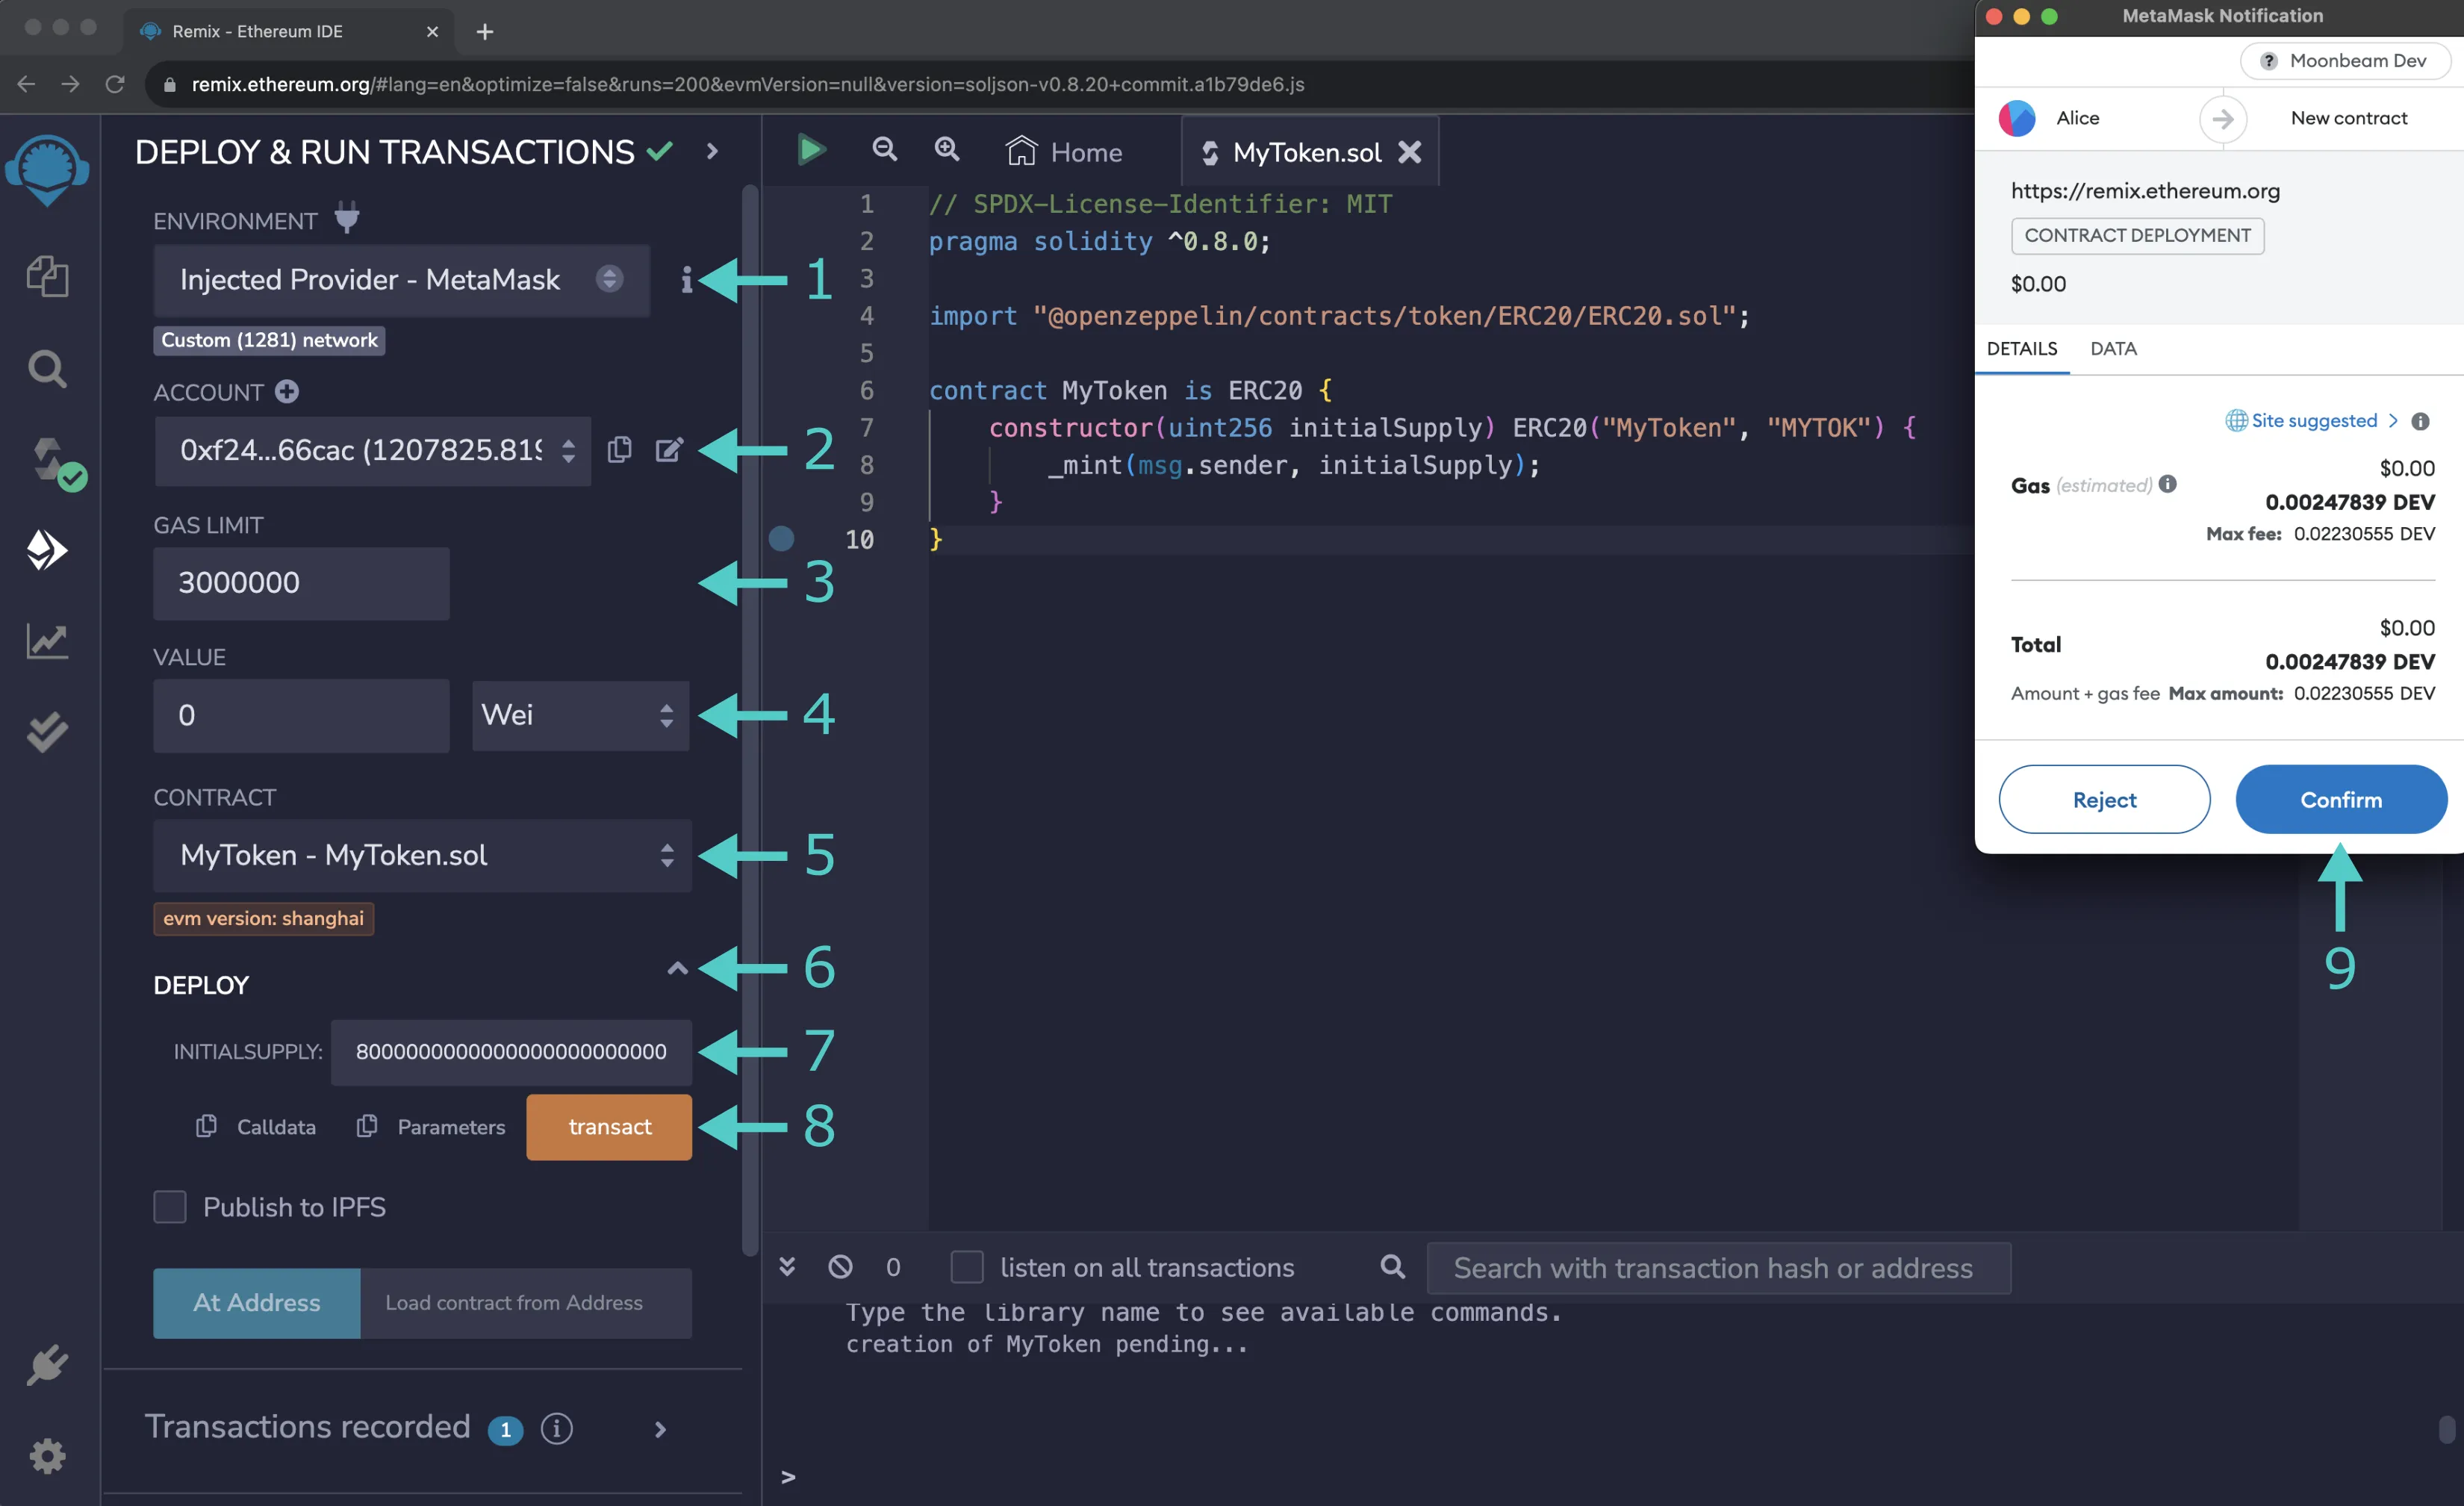
Once the transaction has been deployed, you'll see details about the deployment transaction in the Remix terminal. Additionally, the contract will appear under the Deployed Contracts section of the side panel.
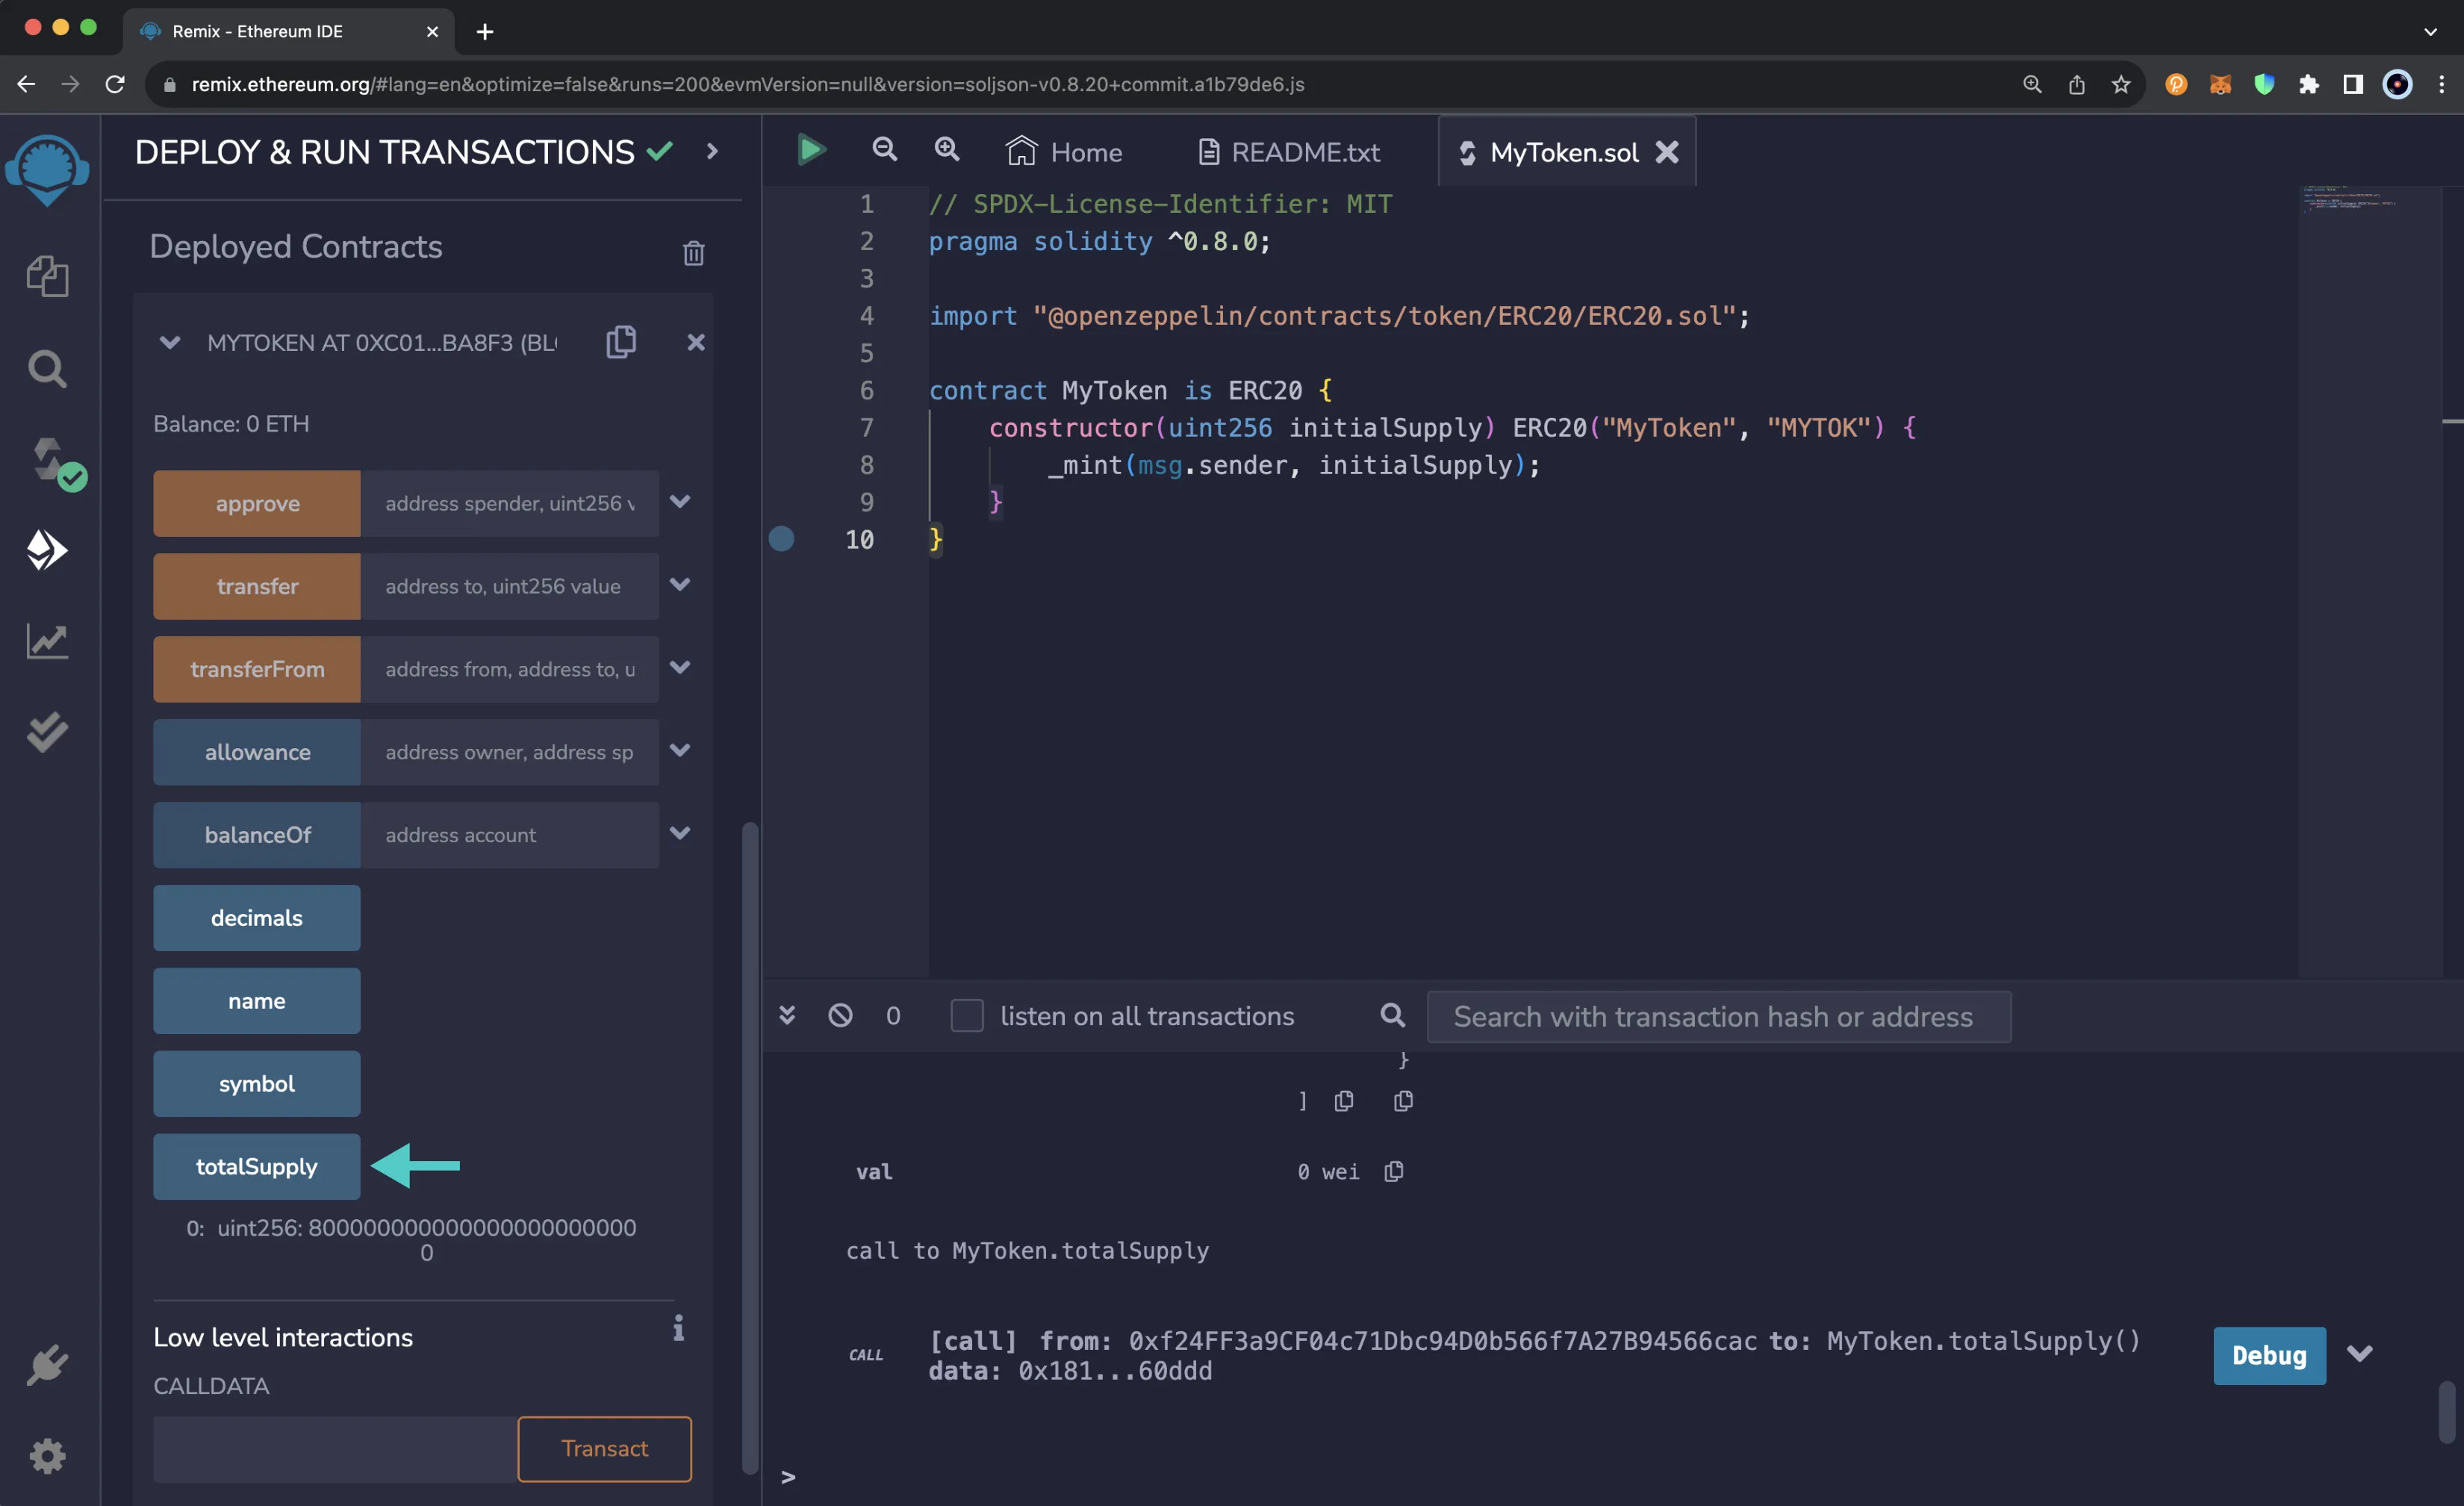
Interact with Deployed Smart Contracts
Once you've deployed a smart contract or accessed an existing contract via the At Address button, the contract will appear under the Deployed Contracts section of the side panel. You can expand the contract to view all of the contract's functions you can interact with.
To interact with a given function, you can click on the function name, which will be contained in an orange, red, or blue button. Orange buttons are for functions that write to the blockchain and are non-payable; red buttons are for functions that write to the blockchain and are payable; and blue buttons are for functions that read data from the blockchain.
Depending on the function you're interacting with, you may need to input parameter values. If the function requires inputs, you'll be able to enter them by expanding the function and entering a value for each of the parameters.
If the function you're interacting with is payable, you'll be able to enter an amount in the VALUE field towards the top of the side panel, in the same value field used for contracts that have payable constructors.
Call the Smart Contract Functions
If you expand the MYTOKEN contract dropdown, you'll be able to see all of the available functions you can interact with. To interact with a given function, you can provide any inputs, if needed, and then click on the button containing the function name you want to interact with.
For example, if you wanted to call the tokenSupply function, you wouldn't need to sign a transaction, as you'd get a response right away.
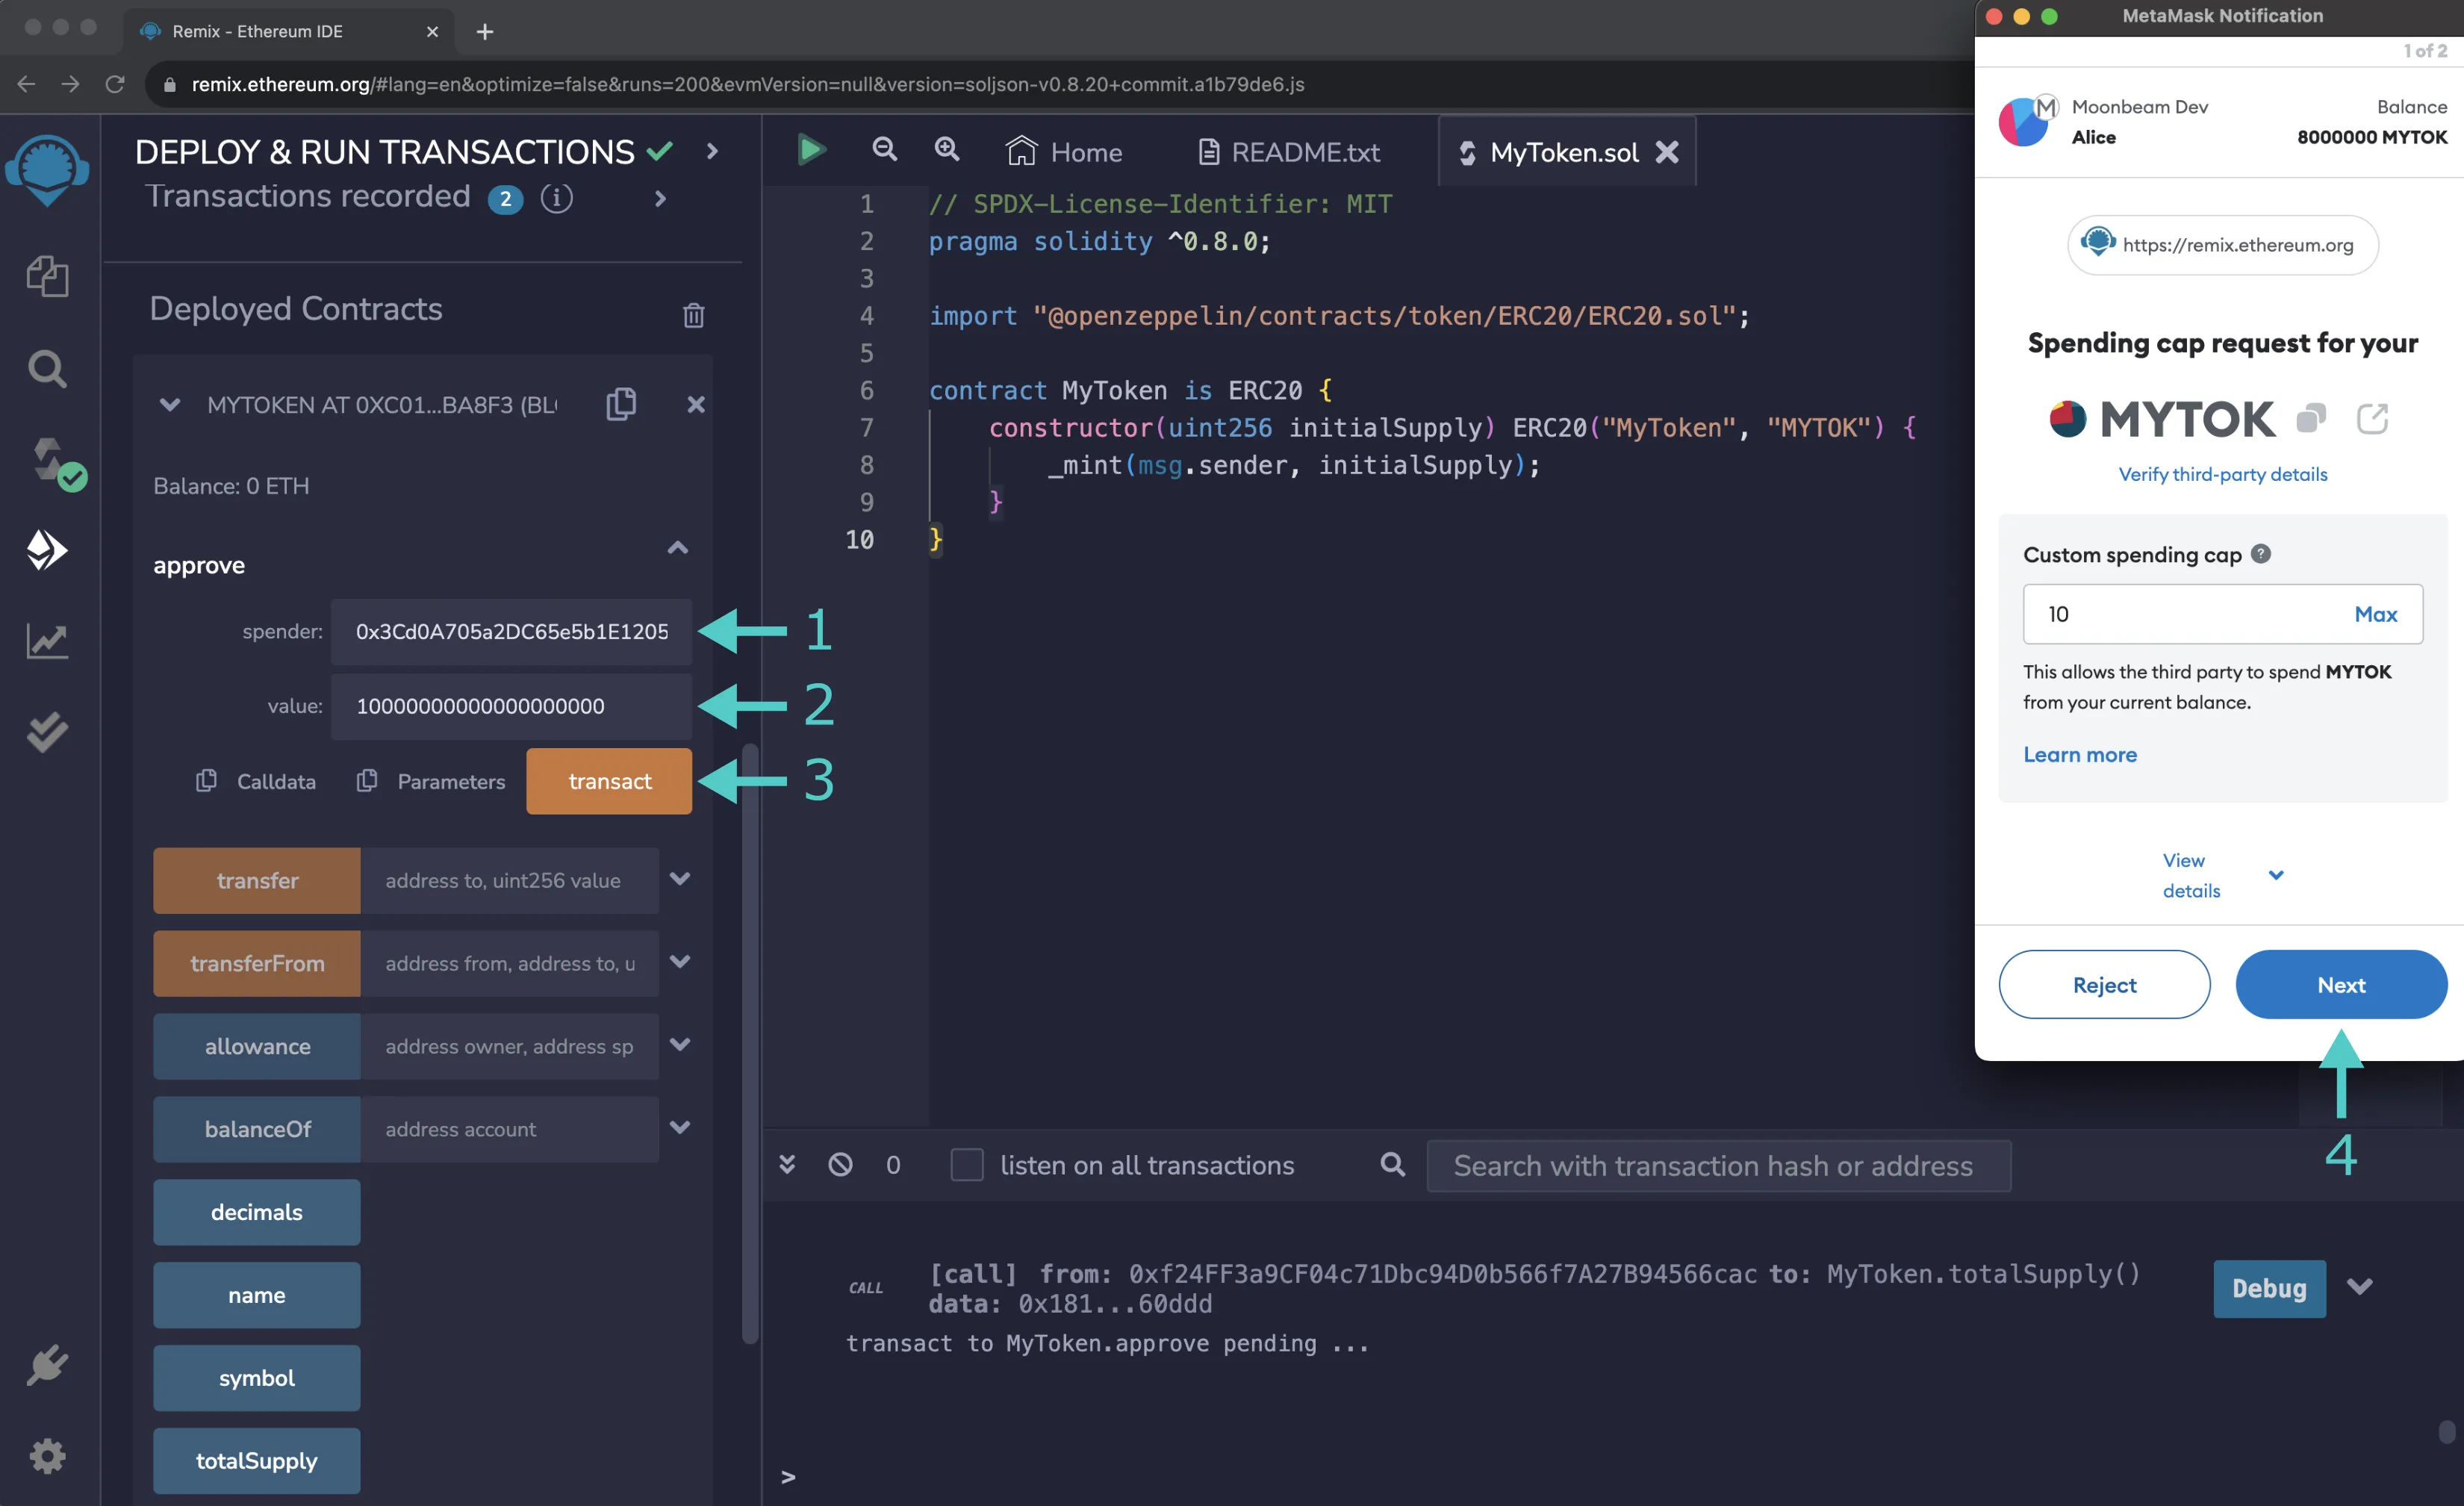
On the other hand, if you call the approve function, which will approve an account as a spender of a given amount of MYTOK tokens, you'll need to submit the approval in MetaMask. To test this out, you can take the following steps:
- Set the spender to an account that you want to be able to spend tokens on your behalf. For this example, you can use Bob's account (one of the pre-funded development accounts):
0x3Cd0A705a2DC65e5b1E1205896BaA2be8A07c6e0 - Enter the amount the spender can spend. For this example, you can approve Bob to spend 10 MYTOK by entering in
10000000000000000000 - Press transact
- MetaMask will pop up and you'll need to review the details of the approval and submit the approval
To view your balance or approvals, or transfer MYTOKs, you can add the MYTOK to your wallet. For information on how to add a token to MetaMask, you can refer to the Add an ERC-20 Token section of our MetaMask documentation.
| Created: March 1, 2022