使用批处理预编译授权和兑换Token
作者:Erin Shaben
概览
Token授权对于安全地与智能合约交互非常重要,能够防止智能合约在无许可的情况下访问用户Token。当智能合约被授权访问用户Token时,能够访问的Token数量通常是无限量的,具体取决于DApp。
许多DApp使用无限量的原因之一是用户无需在每次想要转移Token的时候持续签署授权交易。这是对实际兑换Token所需的第二次交易的附加操作。像以太坊这样的网络,手续费会很昂贵。然而,如果已授权的智能合约存在漏洞,则会被利用且用户的Token可能会在无需进一步的授权情况下随时被转移。此外,如果用户不再想要DApp合约继续访问其Token,则需要撤销Token授权,这需要发送另一笔交易。
作为Moonbeam上的DApp开发者,可以轻松避免此流程,为用户提供更多对资产的掌控。这可以通过批处理预编译将授权和兑换批处理至单个交易中来实现,从而无需通过两个交易流程。这允许授权金额为准确的兑换金额,而不是无限量地访问用户Token。
在本教程中,我们将深入了解使用批处理预编译合约的batchAll函数将授权和兑换批处理至一个交易的操作流程。我们将使用Hardhat和Ethers创建和部署一个ERC-20合约和一个简单的DEX合约,用于在Moonbase Alpha测试网上兑换。
查看先决条件
在本教程中,您将需要准备以下内容:
- 拥有资金的账户 您可以每24小时一次从Moonbase Alpha水龙头上获取DEV代币以在Moonbase Alpha上进行测试
- 为Moonbase Alpha TestNet配置一个空白的Hardhat项目。关于详细教程,请参考Hardhat文档页面的创建Hardhat项目和Hardhat配置文件部分
- 要在Moonbeam或Moonriver网络上测试本指南中的示例,您可以从受支持的网络端点提供商之一获取您自己的端点和API密钥
安装依赖项
当您准备好Hardhat项目后,您可以安装Ethers插件。这将提供一种便捷的方式,以便使用Ethers.js库与网络交互。
您也可以安装OpenZeppelin合约库,因为我们将在我们的合约中导入ERC20.sol合约和IERC20.sol接口。
要安装必要依赖项,请运行以下命令:
npm install @nomicfoundation/hardhat-ethers ethers@6 @openzeppelin/contracts
合约设置
在本教程中,我们将使用以下合约:
Batch.sol- Moonbeam上的其中一个预编译合约,允许您将多个EVM调用结合到一个。您可通过批处理(Batch) Solidity接口文档获取可用函数的更多信息DemoToken.sol-DemoToken(DTOK) token的ERC-20合约,在部署时铸造初始供应量并将其分配给合约所有者。这是一个标准ERC-20 Token,您可以查看IERC20接口获取可用函数的更多信息SimpleDex.sol- DEX的一个简单示例,在部署时部署DemoToken合约,该合约铸造1000个DTOK,并允许您将DEV Token兑换成DTOK,反之亦然。此合约仅供演示使用。SimpleDex合约包含以下函数:- token() - 只读函数,返回
DemoToken合约的地址 - swapDevForDemoToken() - 支付函数,接收DEV Token以兑换DTOK Token。在转账前,此函数会检查以确保合约中有足够的DTOK Token。转账发起后,发出
Bought事件 - swapDemoTokenForDev(uint256 amount) - 接收DTOK Token以兑换DEV Token。在将DTOK兑换回DEV Token之前,此函数会检查以确保函数的调用者已经授权合约来转移他们的DTOK。转账发起后,发出
Sold事件
- token() - 只读函数,返回
如果您的Hardhat项目中还没有contracts目录,您可以创建一个新目录:
mkdir contracts && cd contracts
然后,您可以创建一个用于存储DemoToken和SimpleDex合约代码的文件,和一个用于批处理预编译的文件:
touch SimpleDex.sol Batch.sol
在SimpleDex.sol文件中,您可以为DemoToken和SimpleDex合约粘贴以下代码:
// SPDX-License-Identifier: MIT
pragma solidity ^0.8.20;

import "@openzeppelin/contracts/token/ERC20/IERC20.sol";
import "@openzeppelin/contracts/token/ERC20/ERC20.sol";

contract DemoToken is ERC20 {
    constructor(uint256 initialSupply) ERC20("DemoToken", "DTOK") {
        // Assign 500 DTOK tokens to the SimpleDex contract
        _mint(msg.sender, initialSupply / 2);
        // Assign 500 DTOK tokens to the EOA that deployed the SimpleDex contract
        _mint(tx.origin, initialSupply / 2);
    }
}

contract SimpleDex {
    IERC20 public token;

    event Bought(uint256 amount);
    event Sold(uint256 amount);

    // Make constructor payable so that DEV liquidity exists for the contract
    constructor() payable {
        // Mint 1000 DTOK tokens. Half will be assigned to the SimpleDex contract
        // and the other half will be assigned to the EOA that deployed the
        // SimpleDex contract
        token = new DemoToken(1000000000000000000000);
    }

    // Function to swap DEV for DTOK tokens
    function swapDevForDemoToken() payable public {
        // Verify the contract has enough tokens for the requested amount
        uint256 amountTobuy = msg.value;
        uint256 dexBalance = token.balanceOf(address(this));
        require(amountTobuy > 0, "You need to send some DEV");
        require(amountTobuy <= dexBalance, "Not enough tokens in the reserve");
        // If enough, swap the DEV to DTOKs
        token.transfer(msg.sender, amountTobuy);
        emit Bought(amountTobuy);
    }

    // Function to swap DTOK for DEV tokens
    function swapDemoTokenForDev(uint256 amount) public {
        // Make sure the requested amount is greater than 0 and the caller
        // has approved the requested amount of tokens to be transferred
        require(amount > 0, "You need to sell at least some tokens");
        uint256 allowance = token.allowance(msg.sender, address(this));
        require(allowance >= amount, "Check the token allowance");
        // Transfer the DTOKs to the contract
        token.transferFrom(msg.sender, address(this), amount);
        // Transfer the DEV tokens back to the caller
        payable(msg.sender).transfer(amount);
        emit Sold(amount);
    }
}
在Batch.sol文件中,您可以粘贴批处理预编译合约的内容。
Batch.sol
编译和部署合约
要编译合约,请运行以下Hardhat命令:
npx hardhat compile

编译完成后,将创建一个artifacts目录:其包含合约的字节码和元数据,即.json文件。建议将此目录添加至.gitignore文件中。
接下来,我们可以部署SimpleDex合约,它在部署时会自动部署DemoToken合约并铸造1000枚DTOK,并将其中一半Token分配给SimpleDex合约,剩下一半给发起部署的地址。
我们也将通过在调用deploy时传入value为合约添加一些初始流动性。由于此值需要以Wei为单位,我们可以使用ethers.parseEther来实现,输入值(比如"0.5" DEV)后,此函数会将值转换为以Wei为单位。
在部署合约之前,我们将需要创建部署脚本。我们将先为脚本创建一个新目录,命名为scripts,并添加一个名为deploy.js的新文件:
mkdir scripts && touch scripts/deploy.js
在deploy.js脚本中,您可以粘贴以下代码,该代码将部署SimpleDex合约并在部署成功后将合约地址显示在终端:
async function main() {
  // Liquidity to add in DEV (i.e., '.5') to be converted to Wei
  const value = ethers.parseEther('INSERT_AMOUNT_OF_DEV');

  // Deploy the SimpleDex contract, which will also automatically deploy
  // the DemoToken contract and add liquidity to the contract
  const SimpleDex = await ethers.getContractFactory('SimpleDex',);
  const simpleDex = await SimpleDex.deploy({ value });

  // Wait for the deployment transaction to be included in a block
  await simpleDex.waitForDeployment();

   // Get and print the contract address
  const myContractDeployedAddress = await simpleDex.getAddress();
  console.log(`SimpleDex deployed to ${myContractDeployedAddress}`);
}

main().catch((error) => {
  console.error(error);
  process.exitCode = 1;
});
现在,我们可以使用run命令部署SimpleDex合约并指定moonbase作为网络:
npx hardhat run --network moonbase scripts/deploy.js
注意事项
如果你想要使用node <script>以独立方式运行脚本,您需要在deploy.js文件中使用const hre = require('hardhat');显式要求Hardhat运行环境(Runtime Environment)。

几分钟后,合约将被部署,您会在终端看到地址。我们需要在以下部分与合约交互时用到该地址,请确保您已保存该地址。
兑换Token
合约部署后,现在我们可以创建一个脚本,开始将DEV Token兑换成DTOK Token的操作。当您拥有DTOK后,我们可以授权和兑换Token了。在使用批处理预编译以批处理这些交易前,我们先快速了解一下授权和兑换通常是如何运作的。
简单起见,我们会创建一个名为swap.js的脚本来处理来回兑换DEV和DTOK所需的所有逻辑。我们将此文件添加至scripts目录:
touch scripts/swap.js
创建合约实例
我们需要为每个合约创建合约实例,以便我们可以访问每个合约的函数。为此,我们需要使用Hardhat插件的getContractAt辅助函数。
这一步骤我们需要用到SimpleDex合约的合约地址。然后才能够使用SimpleDex合约实例通过token函数来获取DemoToken合约地址。
我们也需要为批处理预编译添加合约实例,该合约实例位于0x0000000000000000000000000000000000000808。
您可以添加以下代码至swap.js文件:
const simpleDexAddress = 'INSERT_ADDRESS_OF_DEX';

async function main() {
  // Create instance of SimpleDex.sol
  const simpleDex = await ethers.getContractAt(
    'SimpleDex',
    simpleDexAddress
  );

  // Create instance of DemoToken.sol
  const demoTokenAddress = await simpleDex.token();
  const demoToken = await ethers.getContractAt(
    'DemoToken',
    demoTokenAddress
  );

  // Create instance of Batch.sol
  const batchAddress = '0x0000000000000000000000000000000000000808';
  const batch = await ethers.getContractAt('Batch', batchAddress);
}
main();
添加检查余额的辅助函数
接下来,我们要创建一个辅助函数用于检查DEX和签署者账户中所拥有的DTOK余额。这在兑换完成后查看余额变更非常有效。
由于DemoToken合约有一个ERC-20接口,您可以使用balanceOf函数检查账户拥有的DTOK余额。因此,我们将调用balanceOf函数,传入签署者和DEX的地址,然后将转换成DTOK表示的结果显示到终端:
async function checkBalances(demoToken) {
  // Get the signer
  const signers = await ethers.getSigners();
  const signer = signers[0];
  const signerAddress = signer.address;

  // Get the balance of the DEX and print it
  const dexBalance = ethers.formatEther(
    await demoToken.balanceOf(simpleDexAddress)
  );
  console.log(`Dex ${simpleDexAddress} has a balance of: ${dexBalance} DTOKs`);

  // Get the balance of the signer and print it
  const signerBalance = ethers.formatEther(
    await demoToken.balanceOf(signer)
  );
  console.log(
    `Account ${signerAddress} has a balance of: ${signerBalance} DTOKs`
  );
}
使用批处理预编译授权和兑换DEV Token
现在,您应该已经拥有一些DTOK在签署者账户中,SimpleDex合约已经有一些DEV流动性。如果没有的话,您可以使用simpleDex.swapDevForDemoToken函数来获取一些DTOK并添加流动性至DEX。
接下来,我们可以授权DEX代表我们支付一些DTOK Token,以便我们将DTOK兑换成DEV。举例来说,在以太坊上,我们需要发送两笔交易才能将DTOK兑换回DEV,一笔是授权,另一笔是转账。然后,在Moonbeam上,得益于批处理预编译合约,您可以将这两笔交易合并为一笔交易。这允许我们为兑换的准确金额设置授权金额。
因此我们不是直接调用demoToken.approve(spender, amount)和simpleDex.swapDemoTokenForDev(amount)函数,而是为这两笔交易分别获取编码的调用数据并将其传入批处理预编译的batchAll函数中。要获取编码的调用数据,我们将使用Ether的interface.encodeFunctionData函数并传入必要参数。举例而言,我们将把0.2个DTOK兑换成0.2个DEV。在本示例中,为了授权,我们将传入DEX地址作为spender,并设置amount为0.2个DTOK。我们将兑换的amount也设置为0.2个DTOK。同样,我们可以使用ethers.parseEther函数以将DTOK表示的金额转换为以Wei为单位的数值。
获得编码的调用数据后,我们可以用其来调用批处理预编译的batchAll函数。此函数将以原子方式执行多个调用,其中每个数组的相同索引组合成单个子调用所需的信息。如果一个子调用还原(revert),则所有子调用都将还原。batchAll函数需要以下参数:
这些函数中每个都具有以下参数:
- address[] to - 与子调用数组对应的地址数组,每个地址对应一个子调用
- uint256[] value - 与子调用数组对应的原生代币数额组,其中索引对应于to数组中相同索引的子调用。如果此数组比to数组短,则后面所有子调用数额将默认为0
- bytes[] callData - 与子调用数组对应的的callData数组,其中索引对应于to数组中相同索引的子调用。如果此数组比to数组短,则以下所有子事务都将不包含callData
- uint64[] gasLimit - 与子调用数组对应的gas上限数组,其中索引对应于to数组中相同索引的子调用。 0值被默认为无限制,并将转发批量交易的所有剩余给gas。如果此数组比to数组短,则以下所有子调用都将转发所有剩余的gas
因此,每个数组的第一个索引将对应授权调用,第二个将对应兑换调用。
兑换后,我们将使用checkBalances函数检查余额以确保余额会如预期进行变化。
我们将更新main函数以包含以下逻辑:
async function main() {
  // ...

  // Parse the value to swap to Wei
  const amountDtok = ethers.parseEther('INSERT_AMOUNT_OF_DTOK_TO_SWAP');

  // Get the encoded call data for the approval and swap
  const approvalCallData = demoToken.interface.encodeFunctionData('approve', [
    simpleDexAddress,
    amountDtok,
  ]);
  const swapCallData = simpleDex.interface.encodeFunctionData(
    'swapDemoTokenForDev',
    [amountDtok]
  );

  // Assemble and send the batch transaction
  const batchAll = await batch.batchAll(
    [demoTokenAddress, simpleDexAddress], // to address
    [], // value of the native token to send
    [approvalCallData, swapCallData], // call data
    [] // gas limit
  );
  await batchAll.wait();
  console.log(`Approve and swap DTOK tokens for DEV tokens: ${batchAll.hash}`);

  // Check balances after the swap
  await checkBalances(demoToken);
}
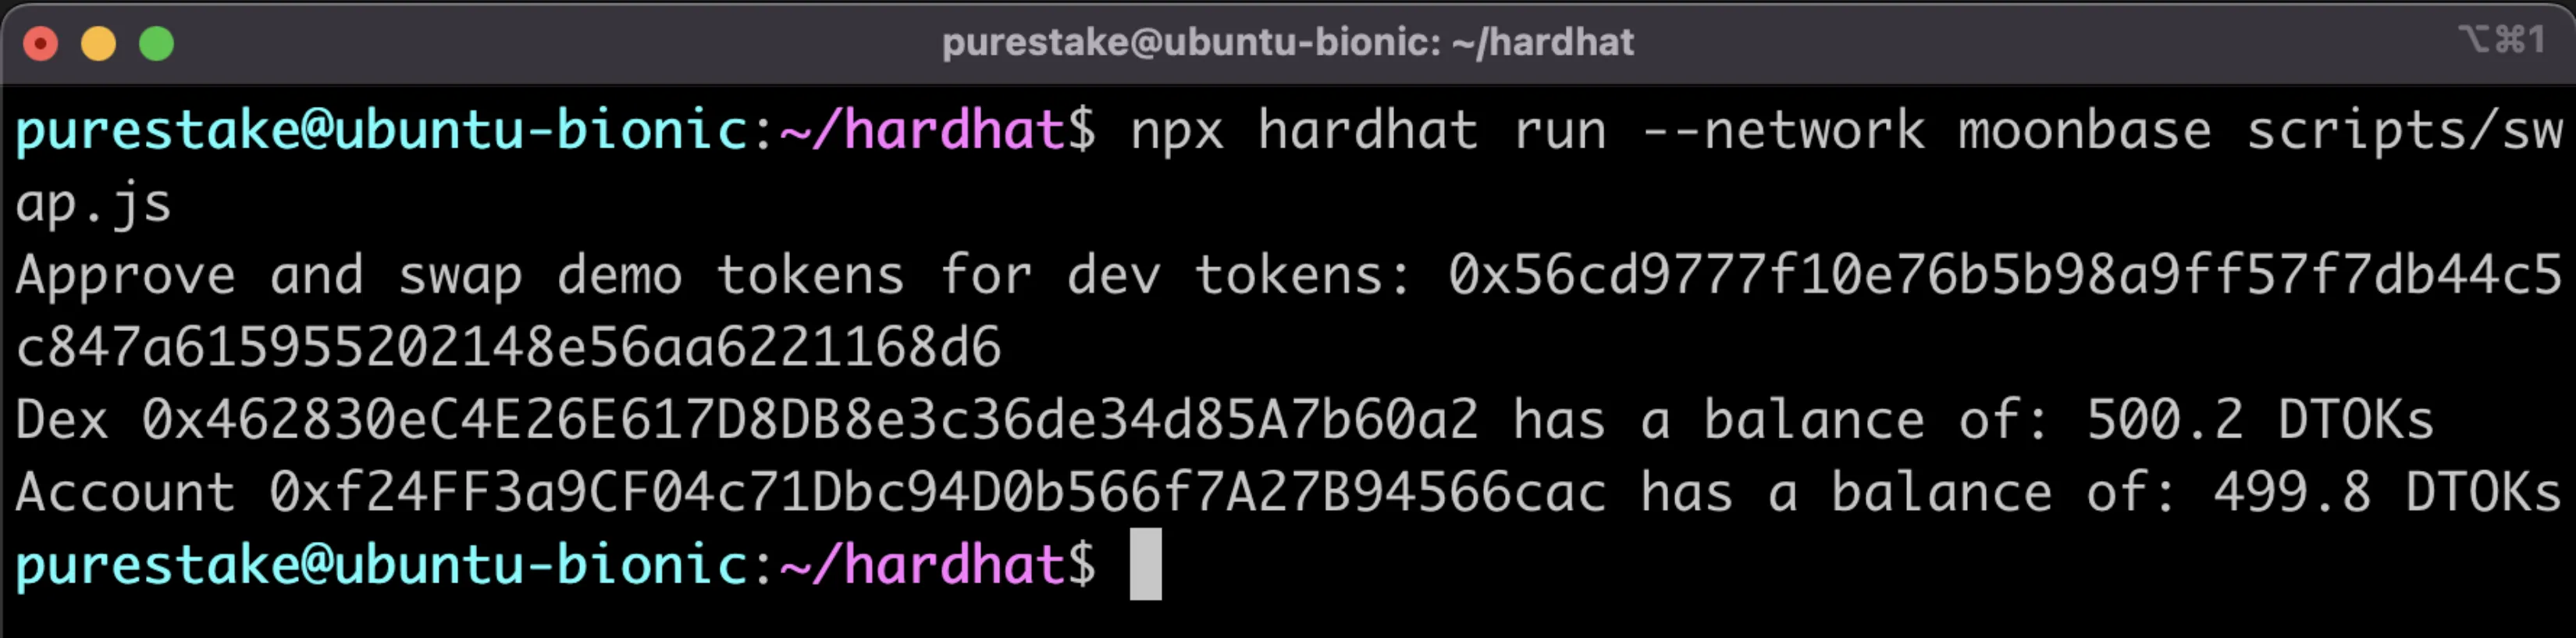
如果您将兑换的金额设置为0.2个DTOK,则DEX余额将会增加0.2个DTOK,并且签署账户的余额将会减少0.2个DTOK。兑换的交易哈希将显示在终端,您可以通过Moonscan查看交易的更多信息。
查看完整脚本
const simpleDexAddress = 'INSERT_ADDRESS_OF_DEX';

async function checkBalances(demoToken) {
  // Get the signer
  const signers = await ethers.getSigners();
  const signer = signers[0];
  const signerAddress = signer.address;

  // Get the balance of the DEX and print it
  const dexBalance = ethers.formatEther(
    await demoToken.balanceOf(simpleDexAddress)
  );
  console.log(`Dex ${simpleDexAddress} has a balance of: ${dexBalance} DTOKs`);

  // Get the balance of the signer and print it
  const signerBalance = ethers.formatEther(
    await demoToken.balanceOf(signer)
  );
  console.log(`Account ${signerAddress} has a balance of: ${signerBalance} DTOKs`);
}

async function main() {
  // Create instance of SimpleDex.sol
  const simpleDex = await ethers.getContractAt('SimpleDex', simpleDexAddress);

  // Create instance of DemoToken.sol
  const demoTokenAddress = await simpleDex.token();
  const demoToken = await ethers.getContractAt('DemoToken', demoTokenAddress);

  // Create instance of Batch.sol
  const batchAddress = '0x0000000000000000000000000000000000000808';
  const batch = await ethers.getContractAt('Batch', batchAddress);

  // Parse the value to swap to Wei
  const amountDtok = ethers.parseEther('INSERT_AMOUNT_OF_DEV_TO_SWAP');

  // Get the encoded call data for the approval and swap
  const approvalCallData = demoToken.interface.encodeFunctionData('approve', [
    simpleDexAddress,
    amountDtok,
  ]);
  const swapCallData = simpleDex.interface.encodeFunctionData(
    'swapDemoTokenForDev',
    [amountDtok]
  );

  const batchAll = await batch.batchAll(
    [demoTokenAddress, simpleDexAddress], // to address
    [], // value of the native token to send
    [approvalCallData, swapCallData], // call data
    [] // gas limit
  );
  await batchAll.wait();
  console.log(`Approve and swap demo tokens for dev tokens: ${batchAll.hash}`);

  // Check balances after the swap
  await checkBalances(demoToken);
}
main();
要运行脚本,您可以使用以下命令:
npx hardhat run --network moonbase scripts/swap.js
在终端,您将看到以下内容:
- 批处理授权和兑换的交易哈希
- 批处理授权和兑换后DEX上的DTOK余额
- 批处理授权和兑换后您账户的DTOK余额
这样就可以了!您已成功使用批处理预编译合约将授权和兑换批处理至单个交易,并允许授权金额为准确的兑换金额。
Uniswap V2实现
如果我们有一个Uniswap V2风格的DEX,基本兑换过程将会涉及路由器,它提供安全兑换资产的函数,包括swapExactTokensForETH函数。此函数可以与上述示例中SimpleDex合约的swapDemoTokenForDev函数进行对比,它可以兑换Token以换取原生资产。
在使用swapExactTokensForETH函数之前,我们要先授权路由器作为支付者并指定要支付的授权金额。然后,当路由器通过授权后,我们可以使用兑换函数转移资产。
如上述示例所述,我们可以修改两个交易的过程,以使用批处理预编译将授权和swapExactTokensForETH函数批处理到单个交易中。
此示例将基于Uniswap V2在Moonbase Alpha上的部署。我们将授权路由器支付ERTH Token,然后将ERTH换成DEV Token。在深入此示例之前,请确保您已在Moonbeam-swap DApp上将一些DEV兑换成ERTH Token,从而您可以将一些ERTH授权并换回 DEV。
同样,我们将使用批处理预编译的batchAll函数。因此,我们需要获取编码的调用数据用于授权和兑换。要获取编码的调用数据,我们将使用Ether的interface.encodeFunctionData函数并传入必要参数。
对于approve(spender, amount)函数,我们需要传入Uniswap V2路由器合约作为spender,以及授权支付的ERTH Token数量作为amount。
对于swapExactTokensForETH(amountIn, amountOutMin, path, to, deadline)函数,我们需要指定要发送的Token数量、必须接收的最小输出Token数量以使交易不会还原、兑换的Token地址、原生资产的接收方以及交易在之后将还原的截止日期。要将ERTH兑换成DEV,路径是从ERTH到WETH,因此路径数组将需要包括ERTH Token地址和WETH Token地址:[0x08B40414525687731C23F430CEBb424b332b3d35, 0xD909178CC99d318e4D46e7E66a972955859670E1]。
除了ERTH和WETH地址,您也需要用到路由器地址创建路由器合约的合约实例,即0x8a1932D6E26433F3037bd6c3A40C816222a6Ccd4。
代码将与下方内容类似:
// Define contract addresses
const erthTokenAddress = '0x08B40414525687731C23F430CEBb424b332b3d35';
const routerAddress = '0x8a1932D6E26433F3037bd6c3A40C816222a6Ccd4';
const wethTokenAddress = '0xD909178CC99d318e4D46e7E66a972955859670E1';

async function main() {
  // Create contract instances for the ERTH token, the Uniswap V2 router contract,
  // and the batch precompile
  // ...

  // Access the interface of the ERTH contract instance to get the encoded
  // call data for the approval
  const amountErth = ethers.parseEther('INSERT_AMOUNT_OF_ERTH_TO_SWAP');
  const approvalCallData = earth.interface.encodeFunctionData('approve', [
    routerAddress,
    amountErth,
  ]);

  // Access the interface of the Uniswap V2 router contract instance to get
  // the encoded call data for the swap
  const swapCallData = router.interface.encodeFunctionData(
    'swapExactTokensForETH',
    [
      amountErth, // amountIn
      'INSERT_AMOUNT_OUT_MIN', // amountOutMin
     [
      erthTokenAddress, // ERTH token address
      wethTokenAddress // WETH token address
      ], // path
     'INSERT_YOUR_ADDRESS', // to
     'INSERT_DEADLINE' // deadline
    ]
  );

  // Assemble and send the batch transaction
  const batchAll = await batch.batchAll(
    [erthTokenAddress, routerAddress], // to address
    [], // value of the native token to send
    [approvalCallData, swapCallData], // call data
    [] // gas limit
  );
  await batchAll.wait();
  console.log(`Approve and swap ERTH tokens for DEV tokens: ${batchAll.hash}`);
}
main();
注意事项
如果您需要ABI为本示例中的任何合约创建合约实例,所有合约都已在Moonscan上进行了验证。因此,您可以在Moonscan上搜索合约地址并前往Contract标签获取Contract ABI。
这将导致授权和交换被批处理到单个交易中,交易哈希将显示在控制台。您现在可以修改此逻辑并应用到Uniswap V2风格的应用程序中!
本教程仅用于教育目的。 因此,不应在生产环境中使用本教程中创建的任何合约或代码。