Native Token ERC-20 Precompile
Introduction
The native token ERC-20 precompiled contract on Moonbeam allows developers to interact with the native protocol token through an ERC-20 interface. Although GLMR and MOVR are not ERC-20 tokens, now you can interact with them as if they were native ERC-20s!
One of the main benefits of this precompile is that it removes the necessity of having a wrapped representation of the protocol token as an ERC-20 smart contract, such as WETH on Ethereum. Furthermore, it prevents having multiple wrapped representations of the same protocol token. Consequently, DApps that need to interact with the protocol token via an ERC-20 interface can do so without needing a separate smart contract.
Under the hood, the ERC-20 precompile executes specific Substrate actions related to the Substrate balances pallet, which is coded in Rust. The balances pallet provides functionality for handling the various types of balances on Moonbeam, setting the free balance, transferring balances, and more.
This guide will show you how to interact with DEV tokens, the native protocol tokens for the Moonbase Alpha TestNet, via the ERC-20 precompile. You can also follow and adapt this guide to learn how to use GLMR or MOVR as an ERC-20 token.
The precompile is located at the following address:
0x0000000000000000000000000000000000000802
0x0000000000000000000000000000000000000802
0x0000000000000000000000000000000000000802
Note
There can be some unintended consequences when using the precompiled contracts on Moonbeam. Please refer to the Security Considerations page for more information.
The ERC-20 Solidity Interface
The ERC20.sol interface on Moonbeam follows the EIP-20 Token Standard which is the standard API interface for tokens within smart contracts. The standard defines the required functions and events that a token contract must implement to be interoperable with different applications.
The interface includes the following functions:
name() - read-only function that returns the name of the token
None.
symbol() - read-only function that returns the symbol of the token
None.
decimals() - read-only function that returns the decimals of the token
None.
totalSupply() - read-only function that returns the total number of tokens in existence
None.
balanceOf(address who) - read-only function that returns the balance of the specified address
who- address of the account to query the balance of
allowance(address owner, address spender) - read-only function that checks and returns the amount of tokens that a spender is allowed to spend on behalf of the owner
owner- address of the account that owns the tokensspender- address of the account allowed to spend the tokens
transfer(address to, uint256 value) - transfers a given amount of tokens to a specified address and returns true if the transfer was successful
to- address of the recipientvalue- uint256 amount of tokens to transfer
approve(address spender, uint256 value) - approves the provided address to spend a specified amount of tokens on behalf of msg.sender. Returns true if successful
spender- address to be approved to spend the tokensvalue- uint256 amount of tokens to be approved for spending
transferFrom(address from, address to, uint256 value) - transfers tokens from one given address to another given address and returns true if successful
from- address to transfer tokens fromto- address to transfer tokens tovalue- uint256 amount of tokens to transfer
Note
The ERC-20 standard does not specify the implications of multiple calls to approve. Changing an allowance with this function numerous times enables a possible attack vector. To avoid incorrect or unintended transaction ordering, you can first reduce the spender allowance to 0 and then set the desired allowance afterward. For more details on the attack vector, you can check out the ERC-20 API: An Attack Vector on Approve/TransferFrom Methods overview.
The interface also includes the following required events:
- Transfer(address indexed from, address indexed to, uint256 value) - emitted when a transfer has been performed
- Approval(address indexed owner, address indexed spender, uint256 value) - emitted when an approval has been registered
Note
The ERC-20 precompile does not include deposit and withdraw functions and subsequent events that are expected from a wrapped token contract, such as WETH.
Interact with the Solidity Interface
Checking Prerequisites
To follow along with this tutorial, you will need to have:
- MetaMask installed and connected to Moonbase Alpha
- Create or have two accounts on Moonbase Alpha to test out the different features in the ERC-20 precompile
- At least one of the accounts will need to be funded with
DEVtokens. You can get DEV tokens for testing on Moonbase Alpha once every 24 hours from the Moonbase Alpha Faucet
Add Token to MetaMask
If you want to interact with Moonbase Alpha DEV tokens like you would with an ERC-20 in MetaMask, you can create a custom token using the precompile address.
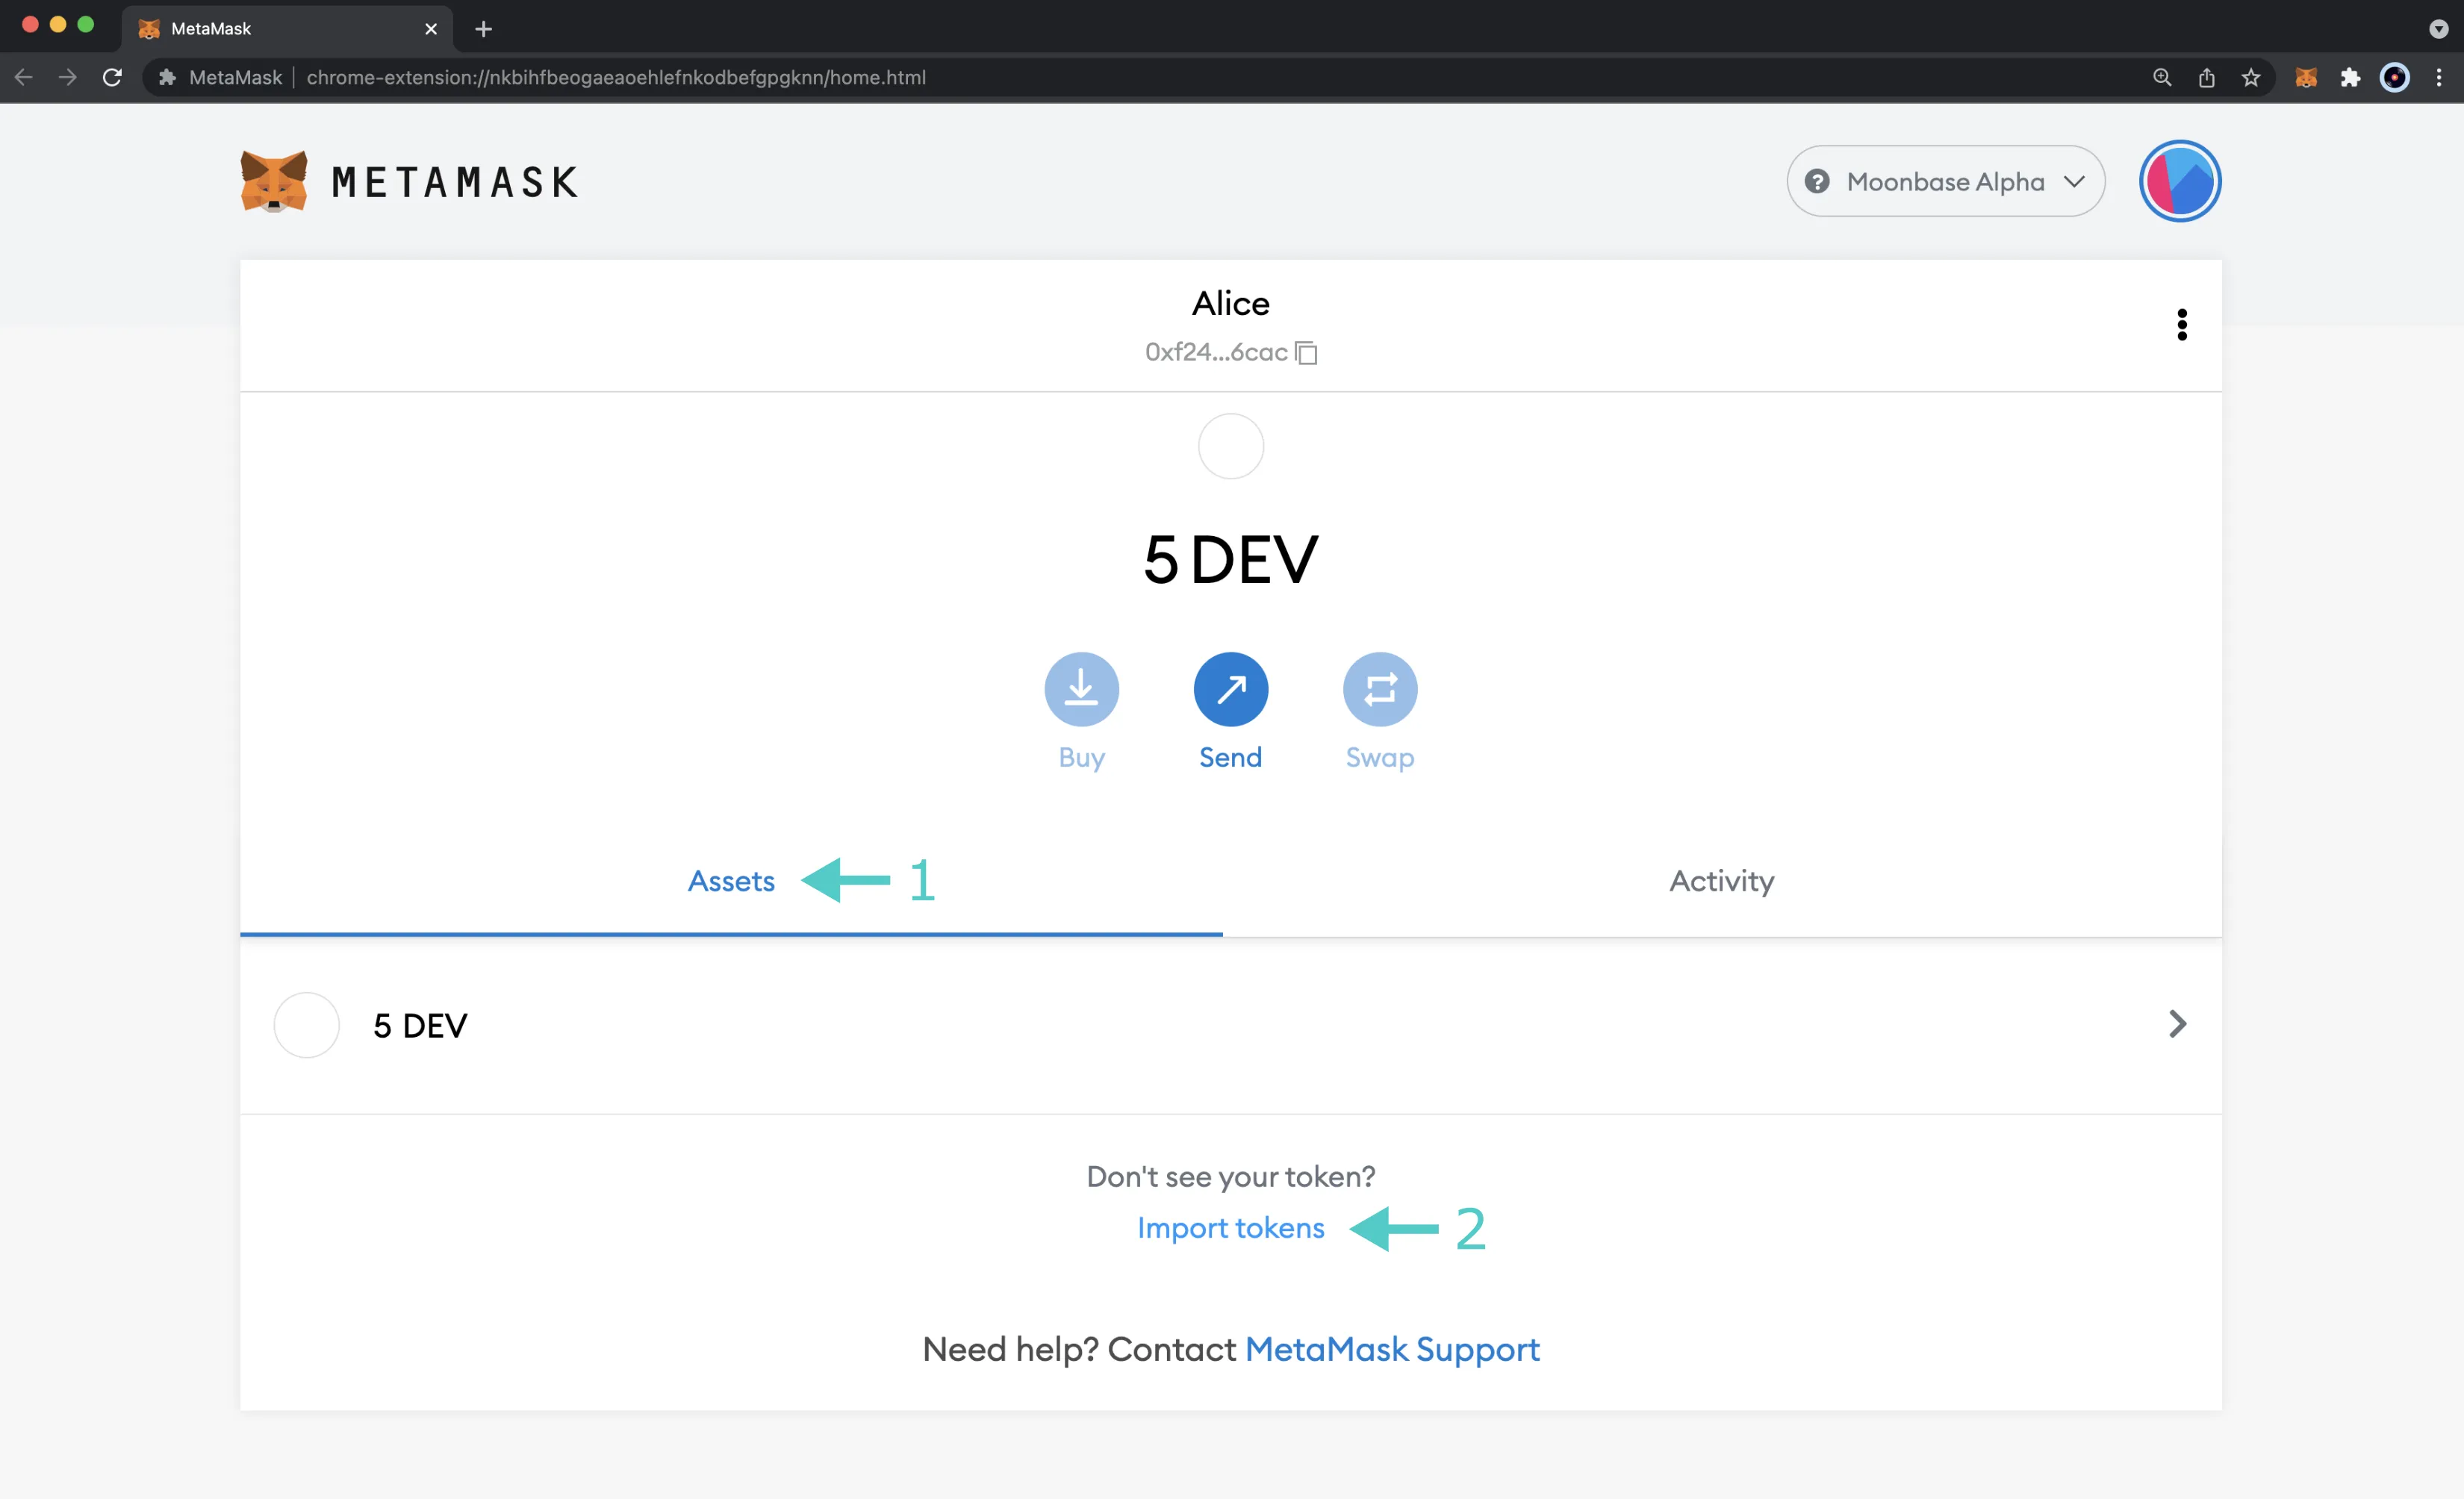
To get started, open up MetaMask and make sure you are connected to Moonbase Alpha and:
- Switch to the Assets tab
- Click on Import tokens
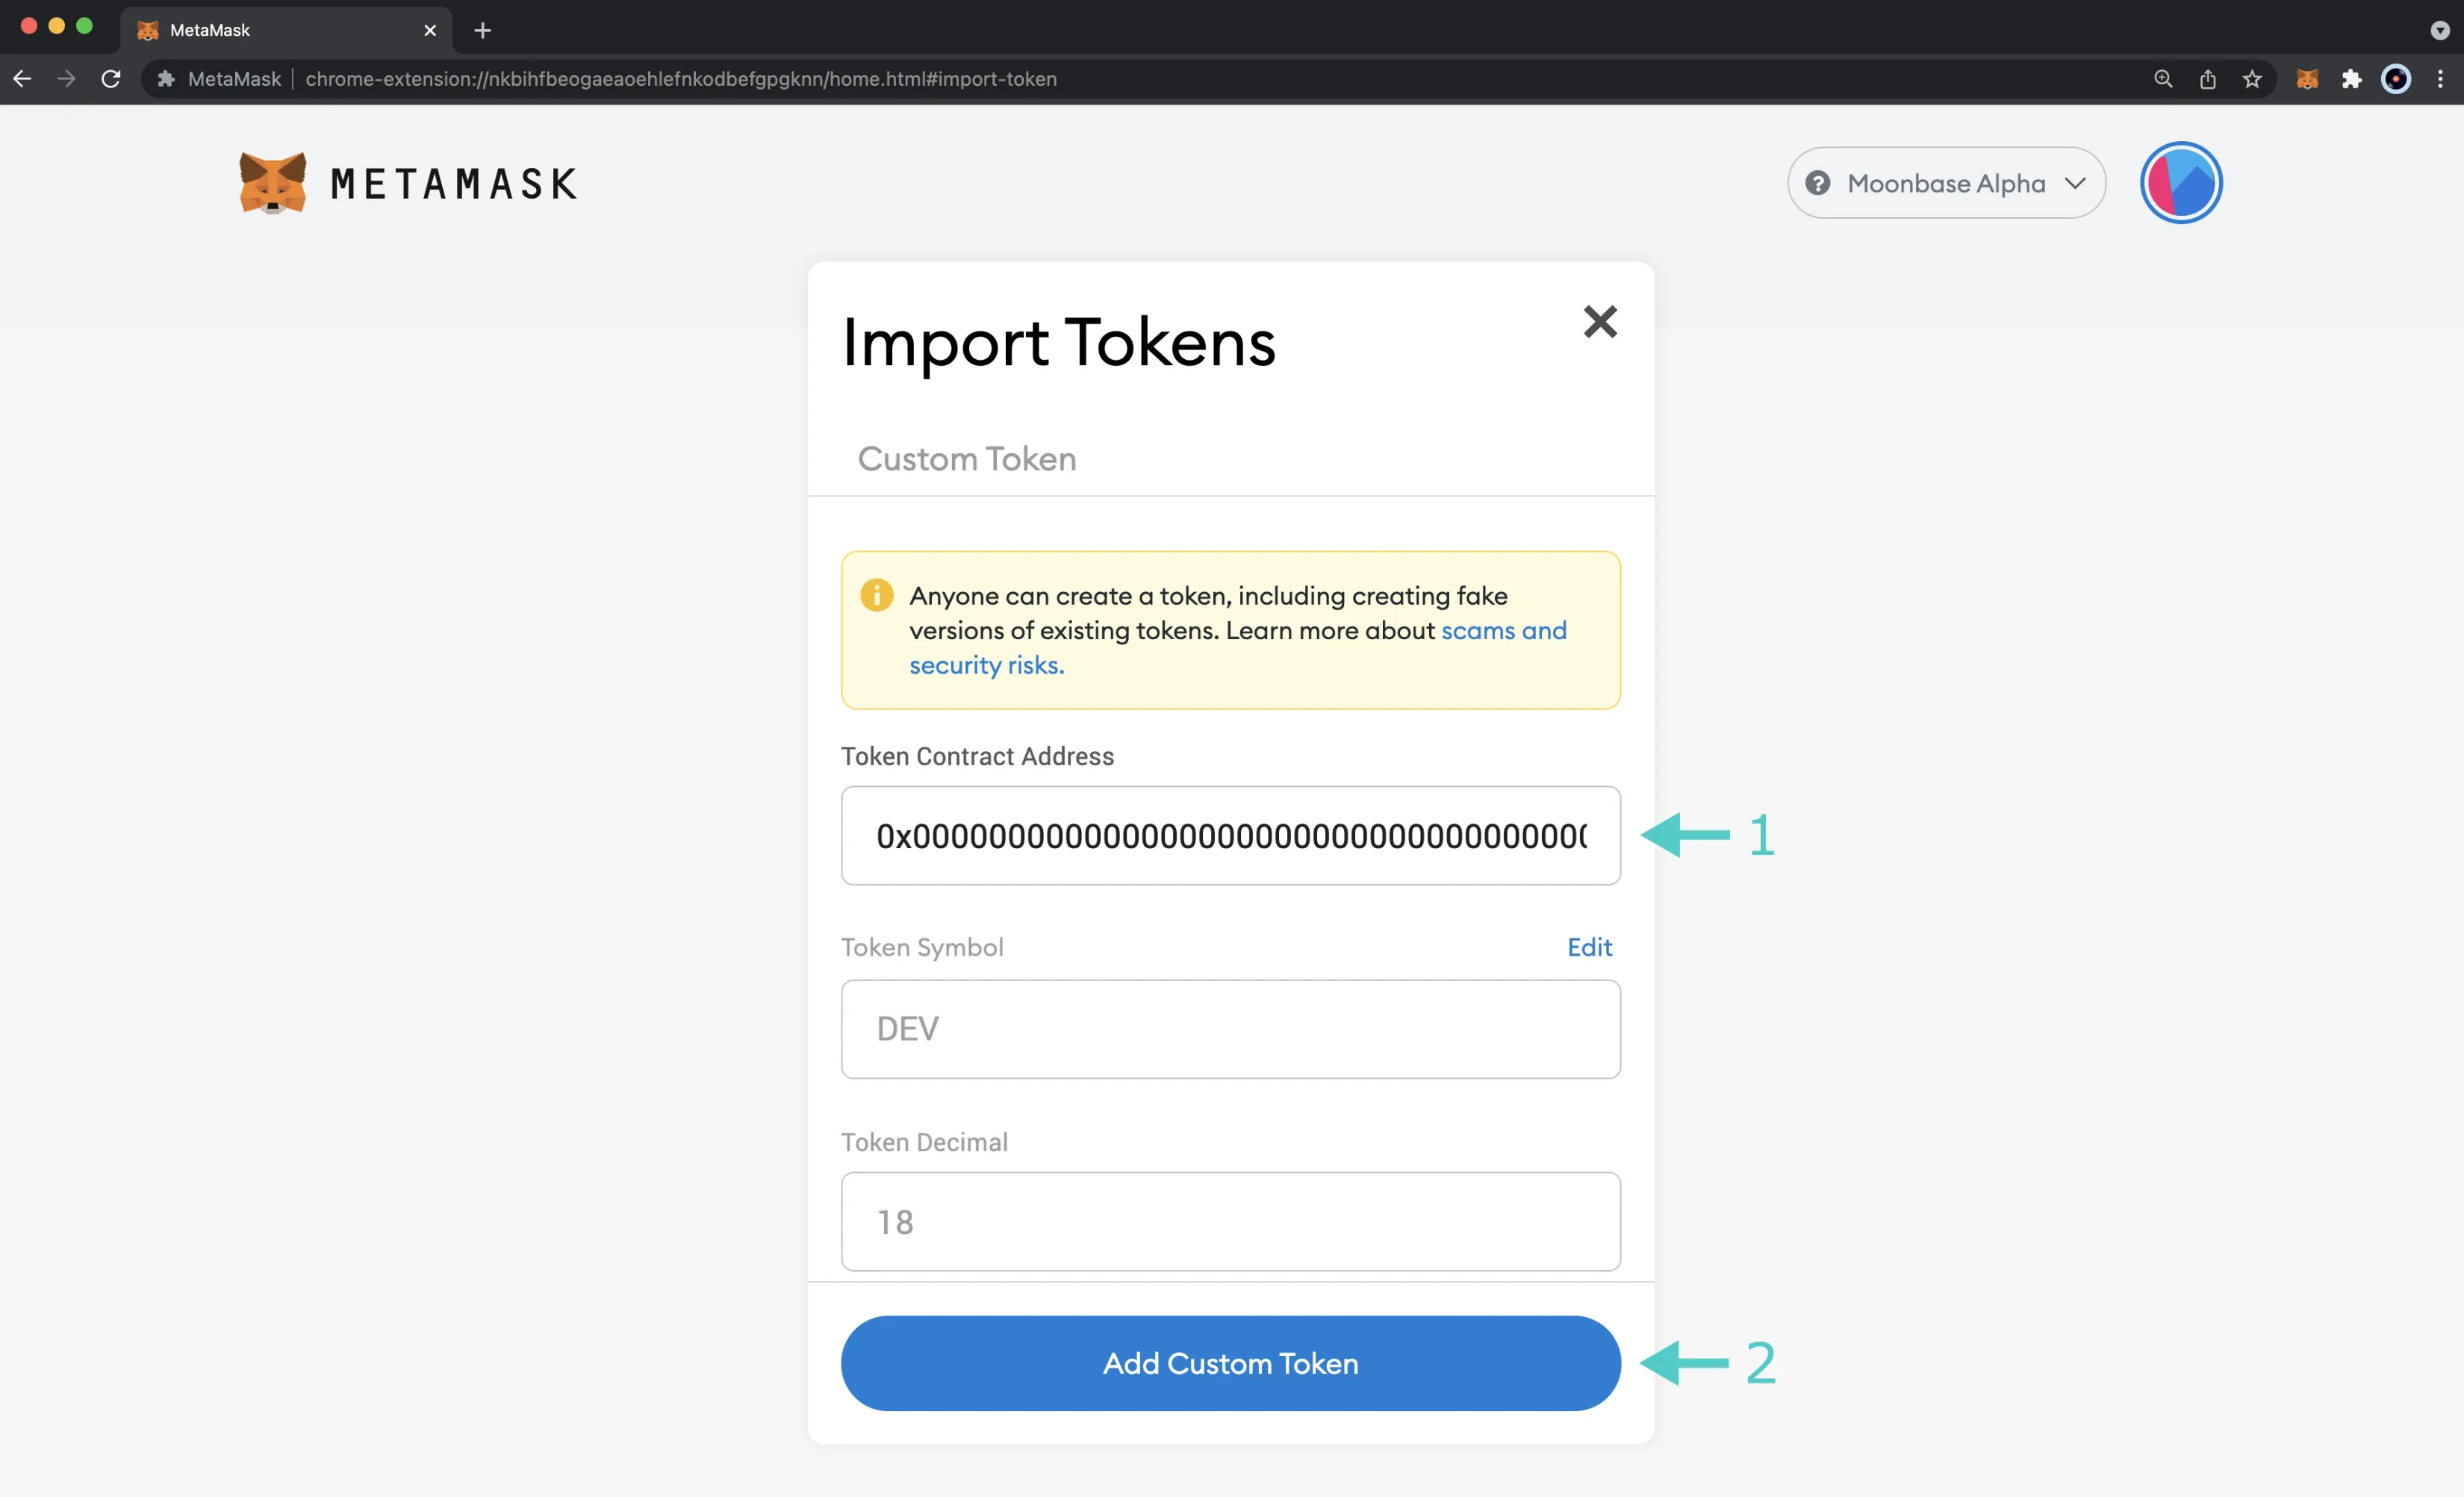
Now, you can create a custom token:
- Enter the precompile address for the token contract address -
0x0000000000000000000000000000000000000802. As soon as you enter the address, the Token Symbol and Token Decimal fields should automatically populate. If they don't you can enterDEVfor the symbol and18for the decimal places - Click Add Custom Token
MetaMask will prompt you to import the tokens. You can review the token details and click Import Tokens to import DEV tokens into your wallet.
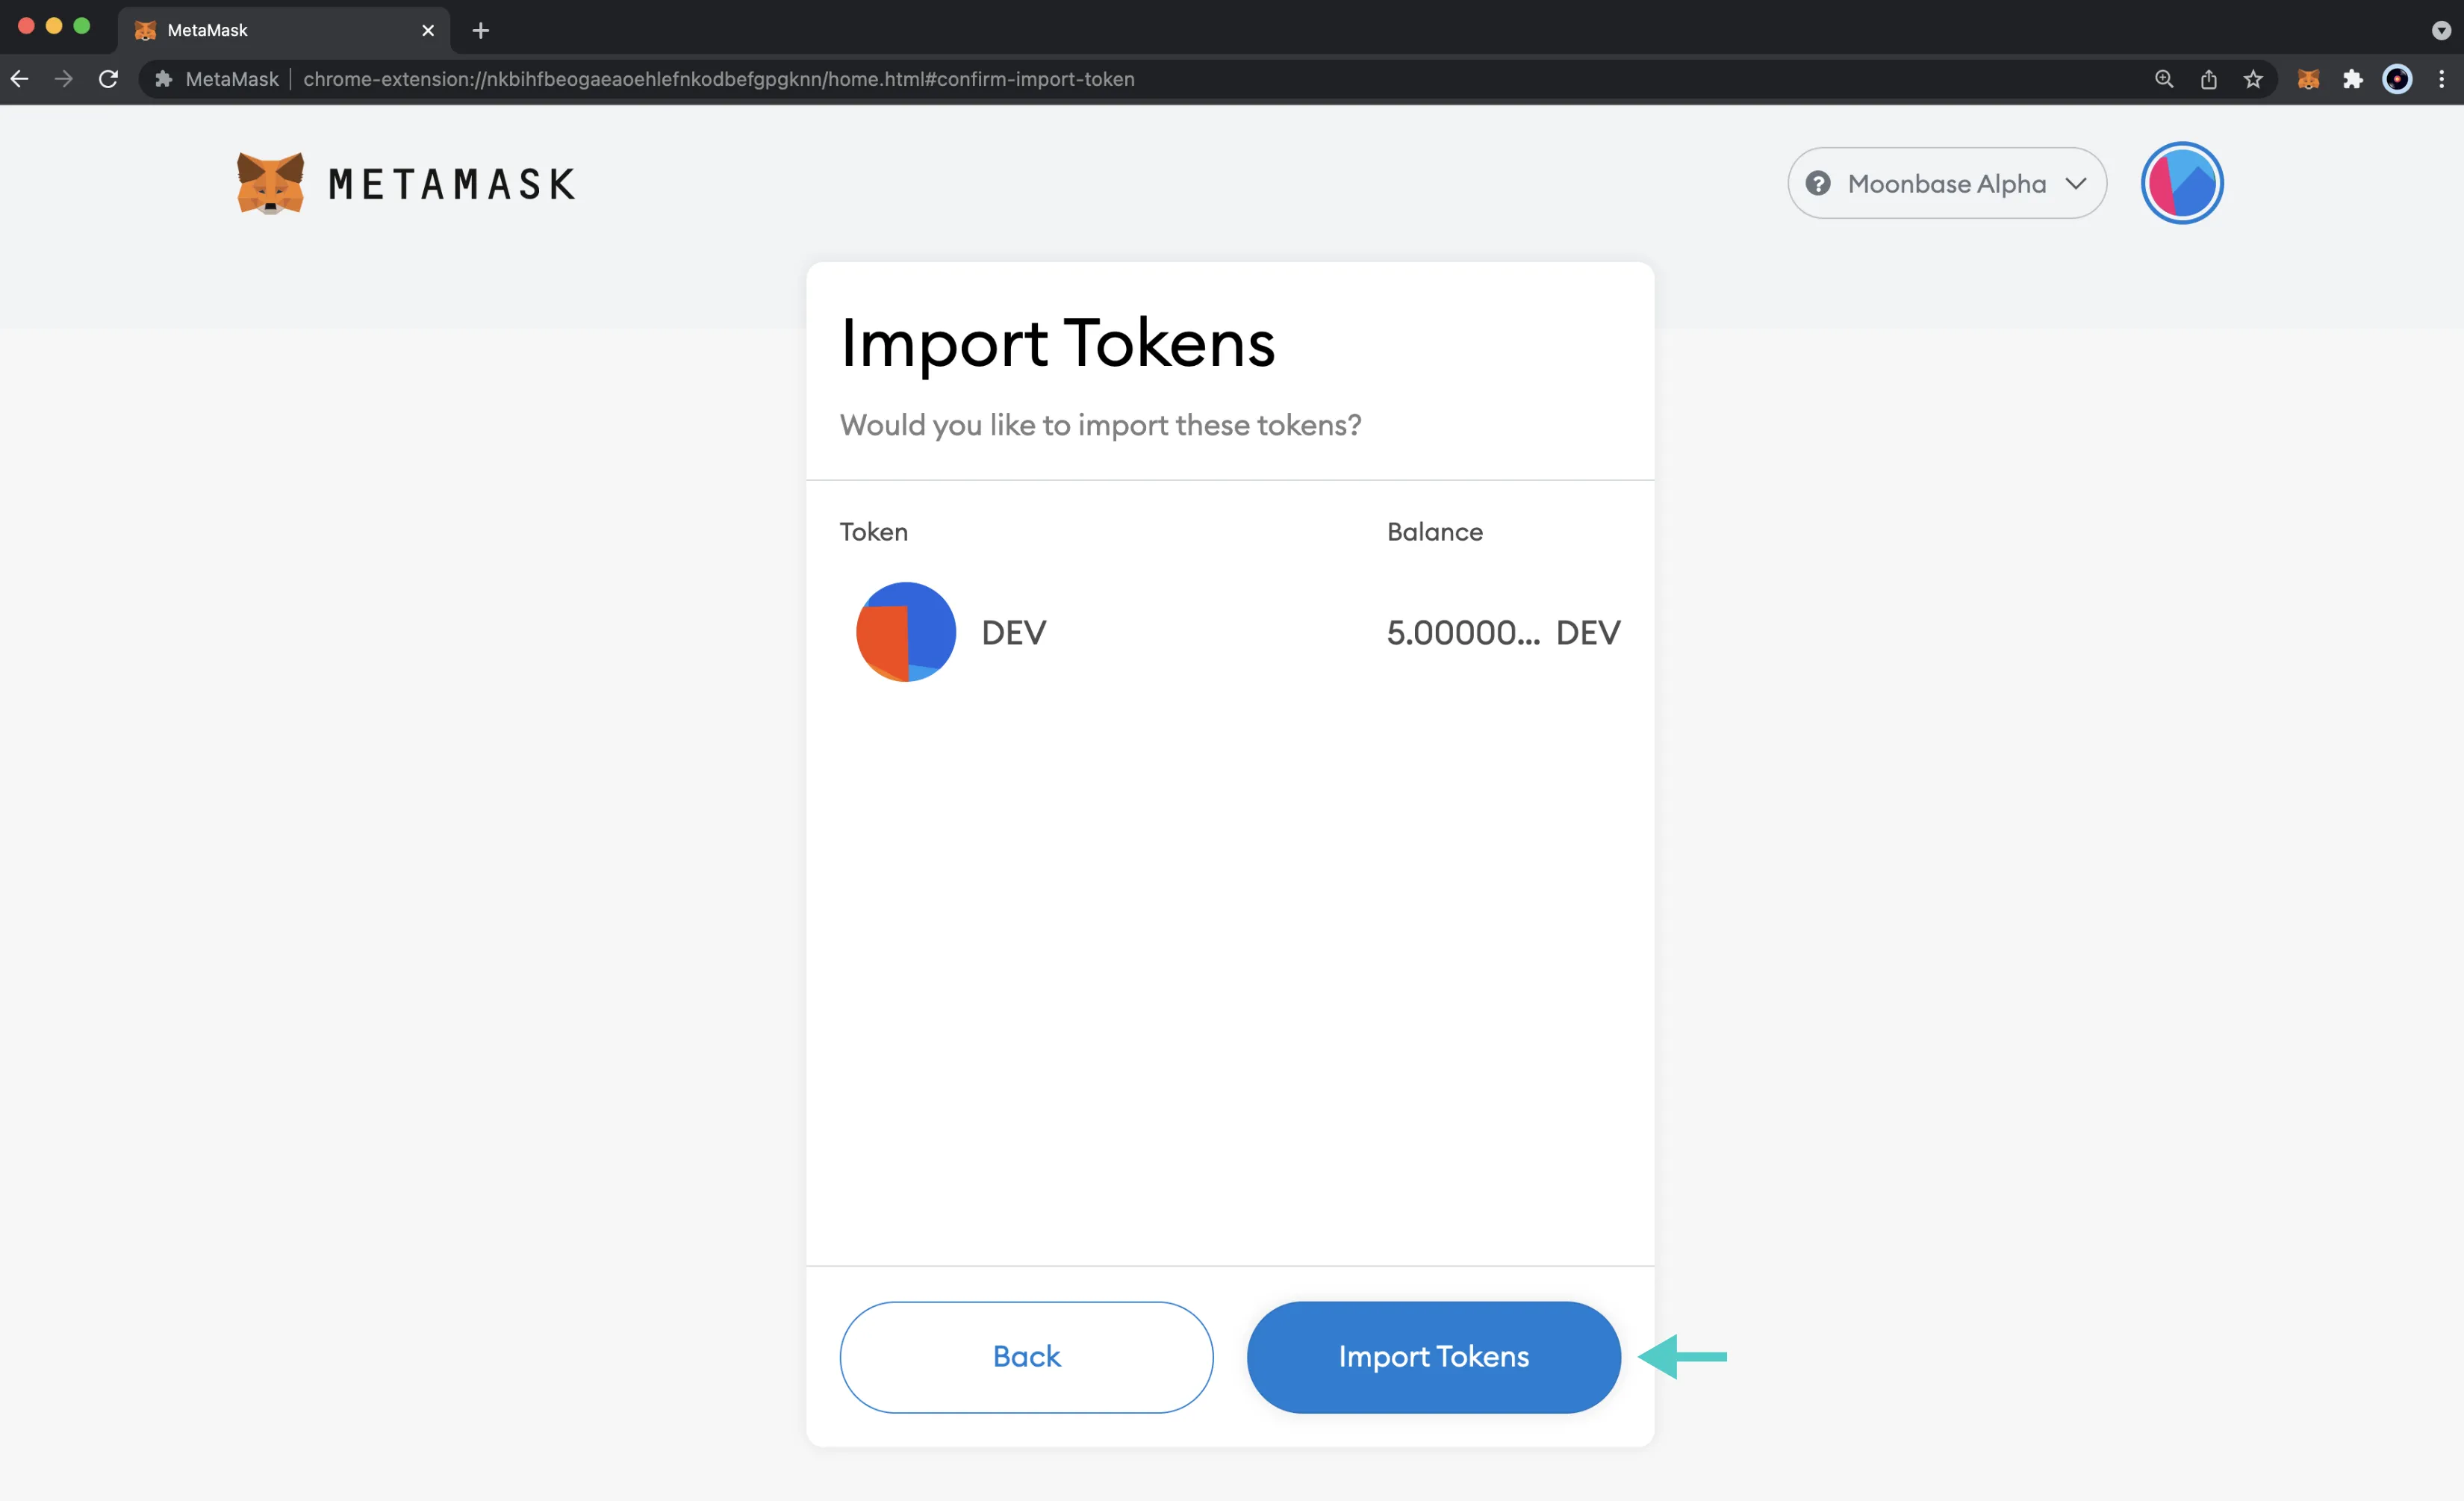
And that's it! You've successfully added the DEV token as a custom ERC-20 token on the Moonbase Alpha TestNet.
Remix Set Up
You can interact with the ERC-20 precompile using Remix. To add the precompile to Remix, you will need to:
- Get a copy of
ERC20.sol - Paste the file contents into a Remix file named
IERC20.sol
Compile the Contract
Next, you will need to compile the interface in Remix:
- Click on the Compile tab, second from top
- Compile the interface by clicking on Compile IERC20.sol
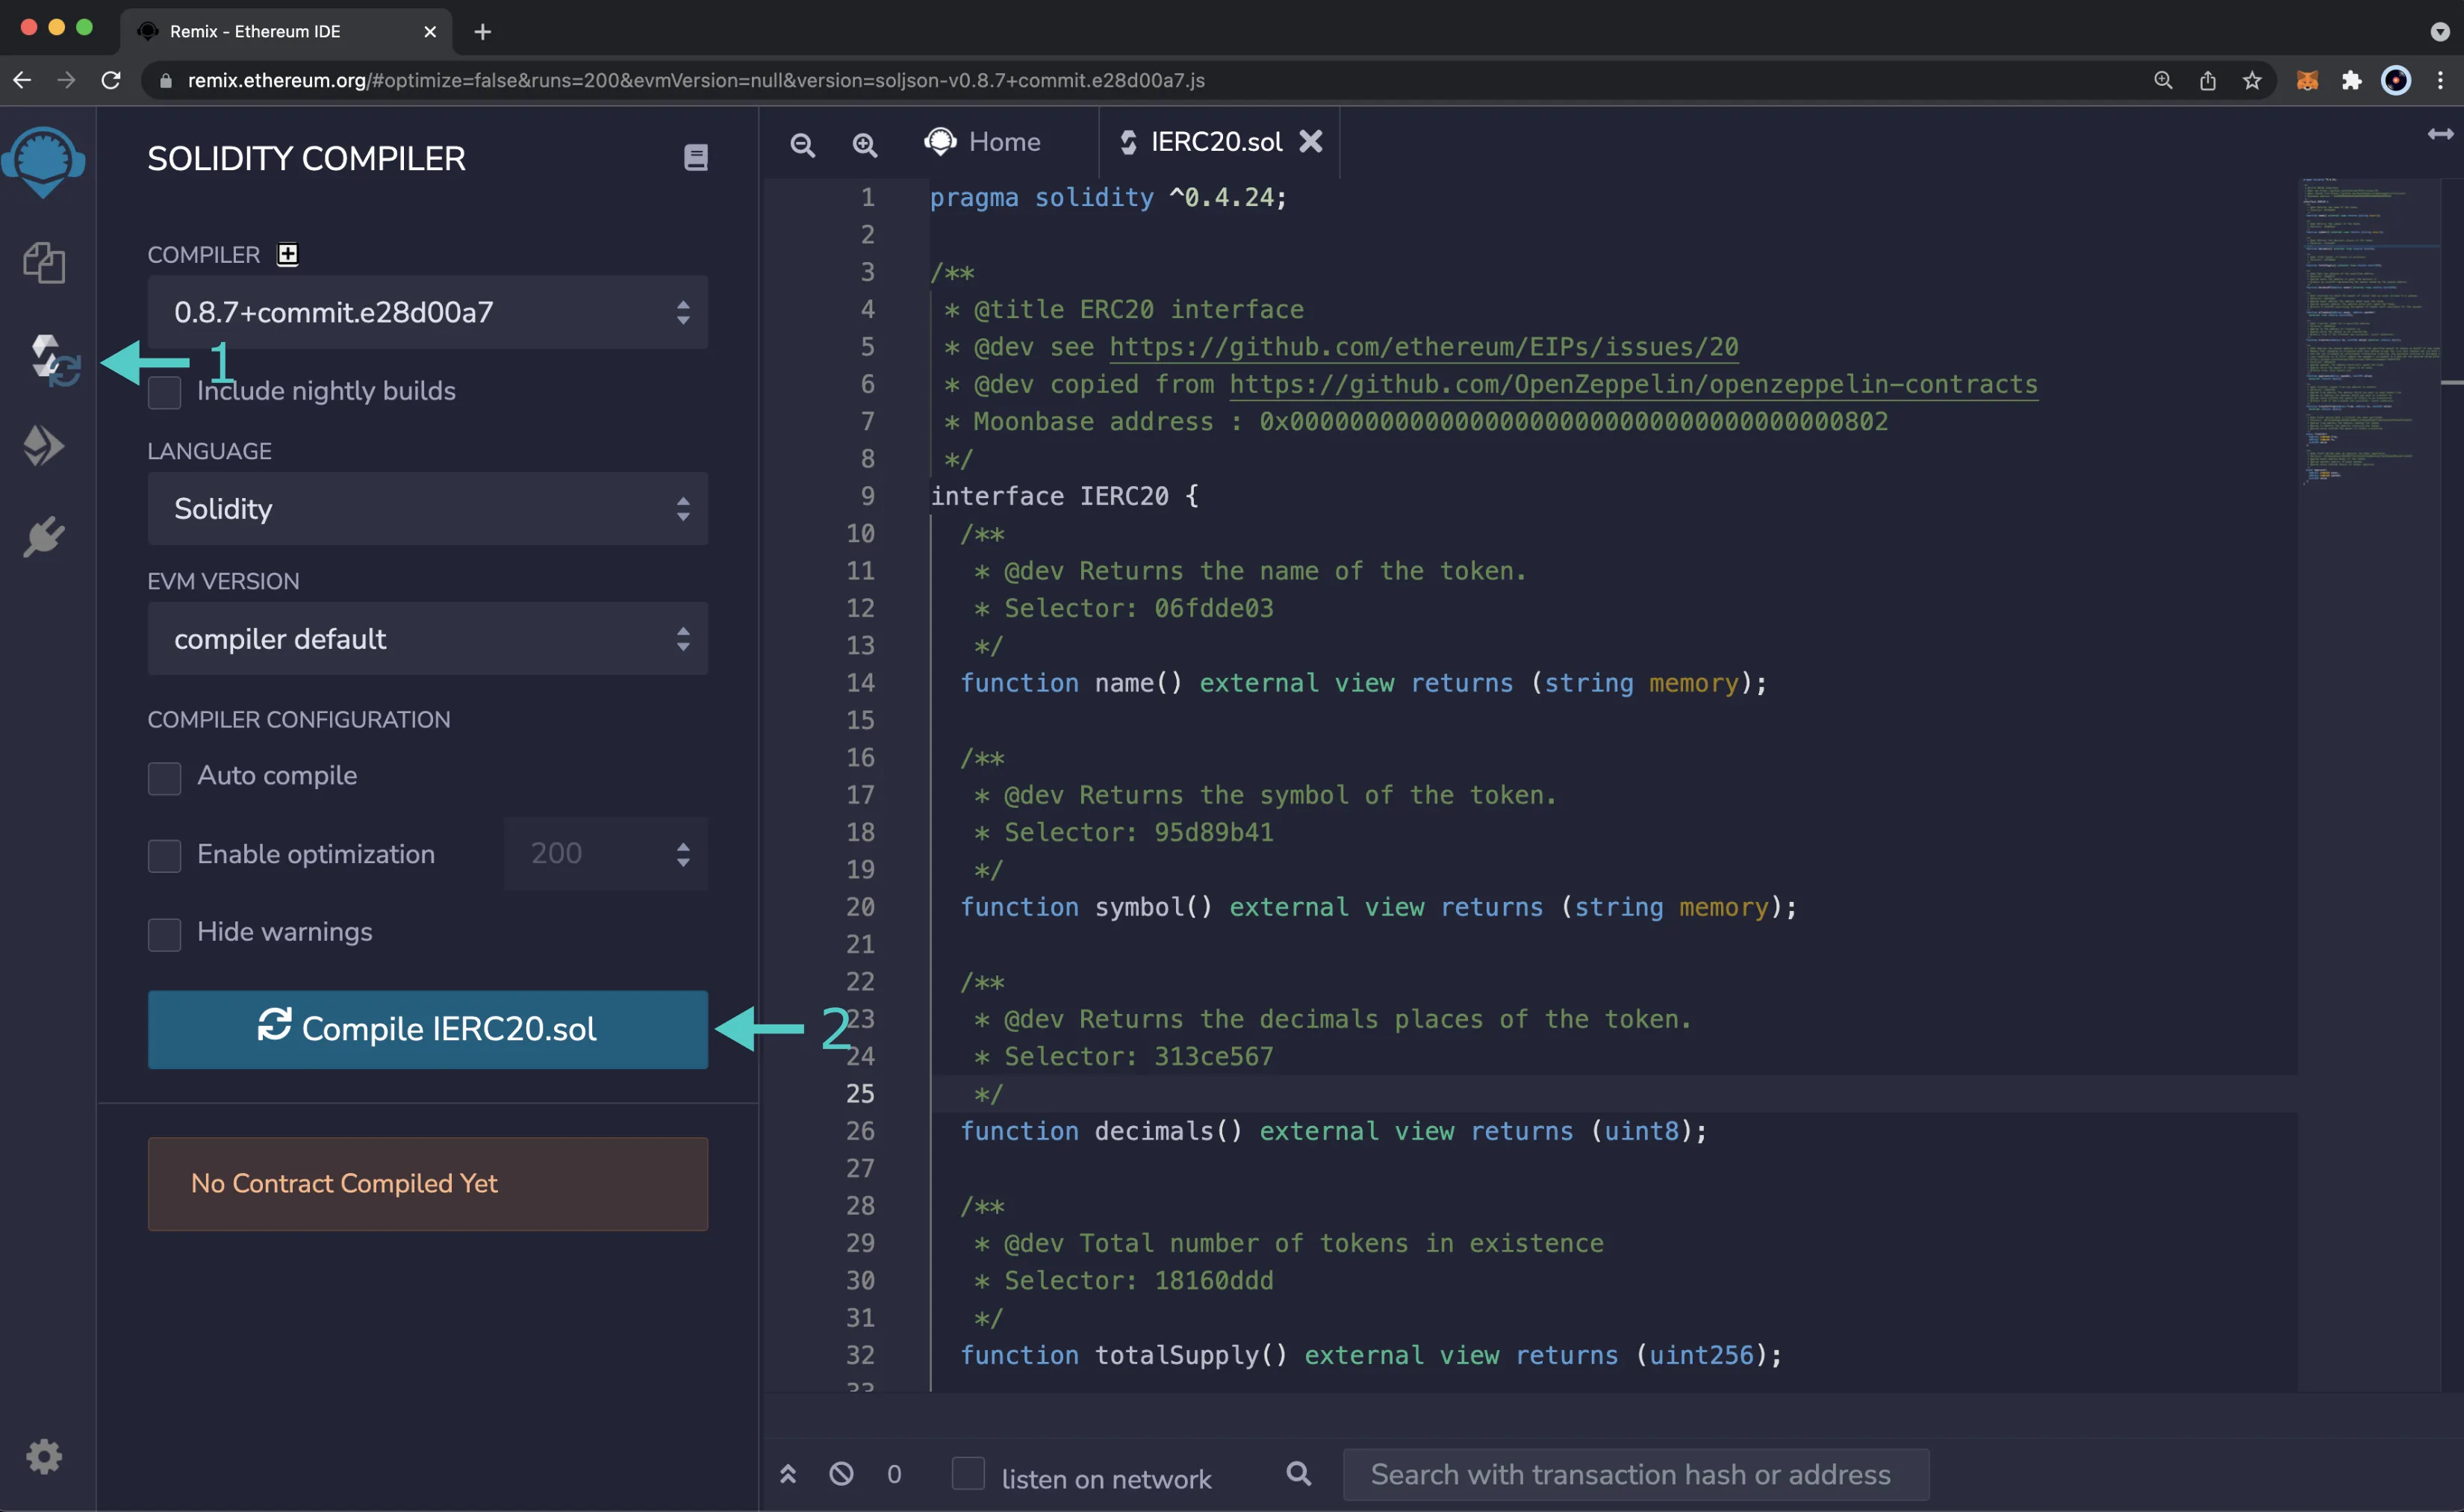
If the interface was compiled successfully, you will see a green checkmark next to the Compile tab.
Access the Contract
Instead of deploying the ERC-20 precompile, you will access the interface given the address of the precompiled contract:
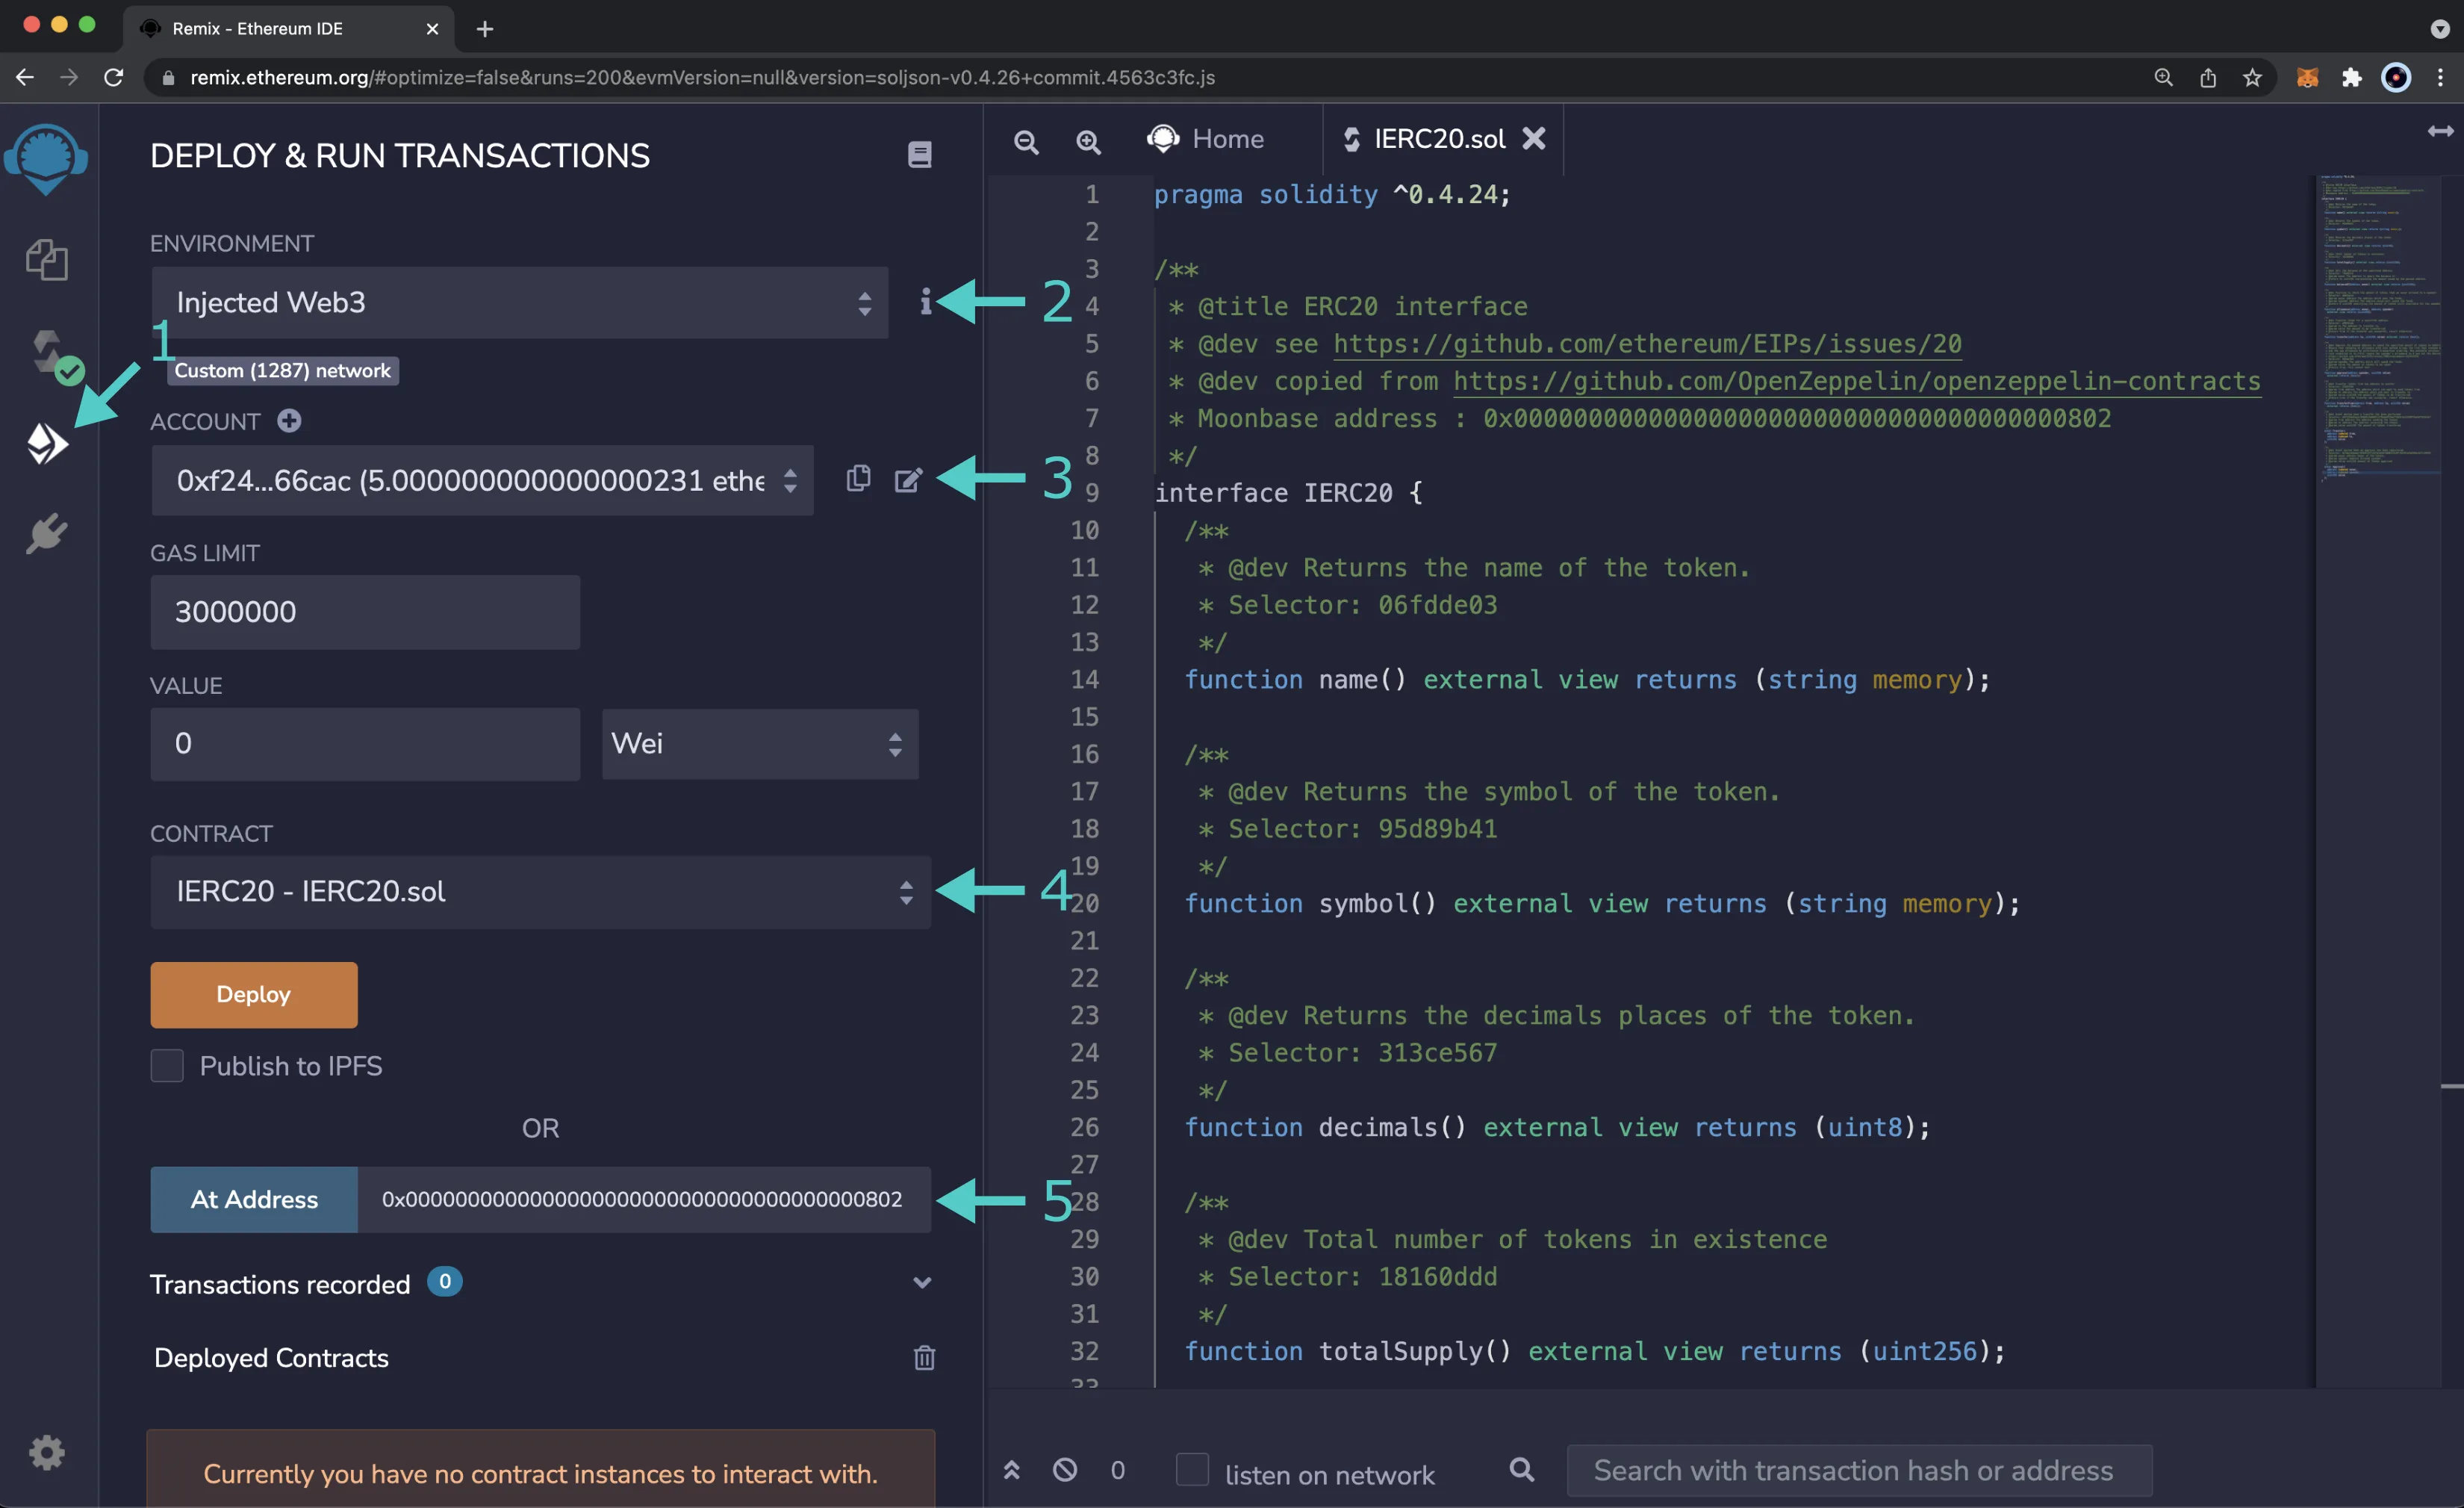
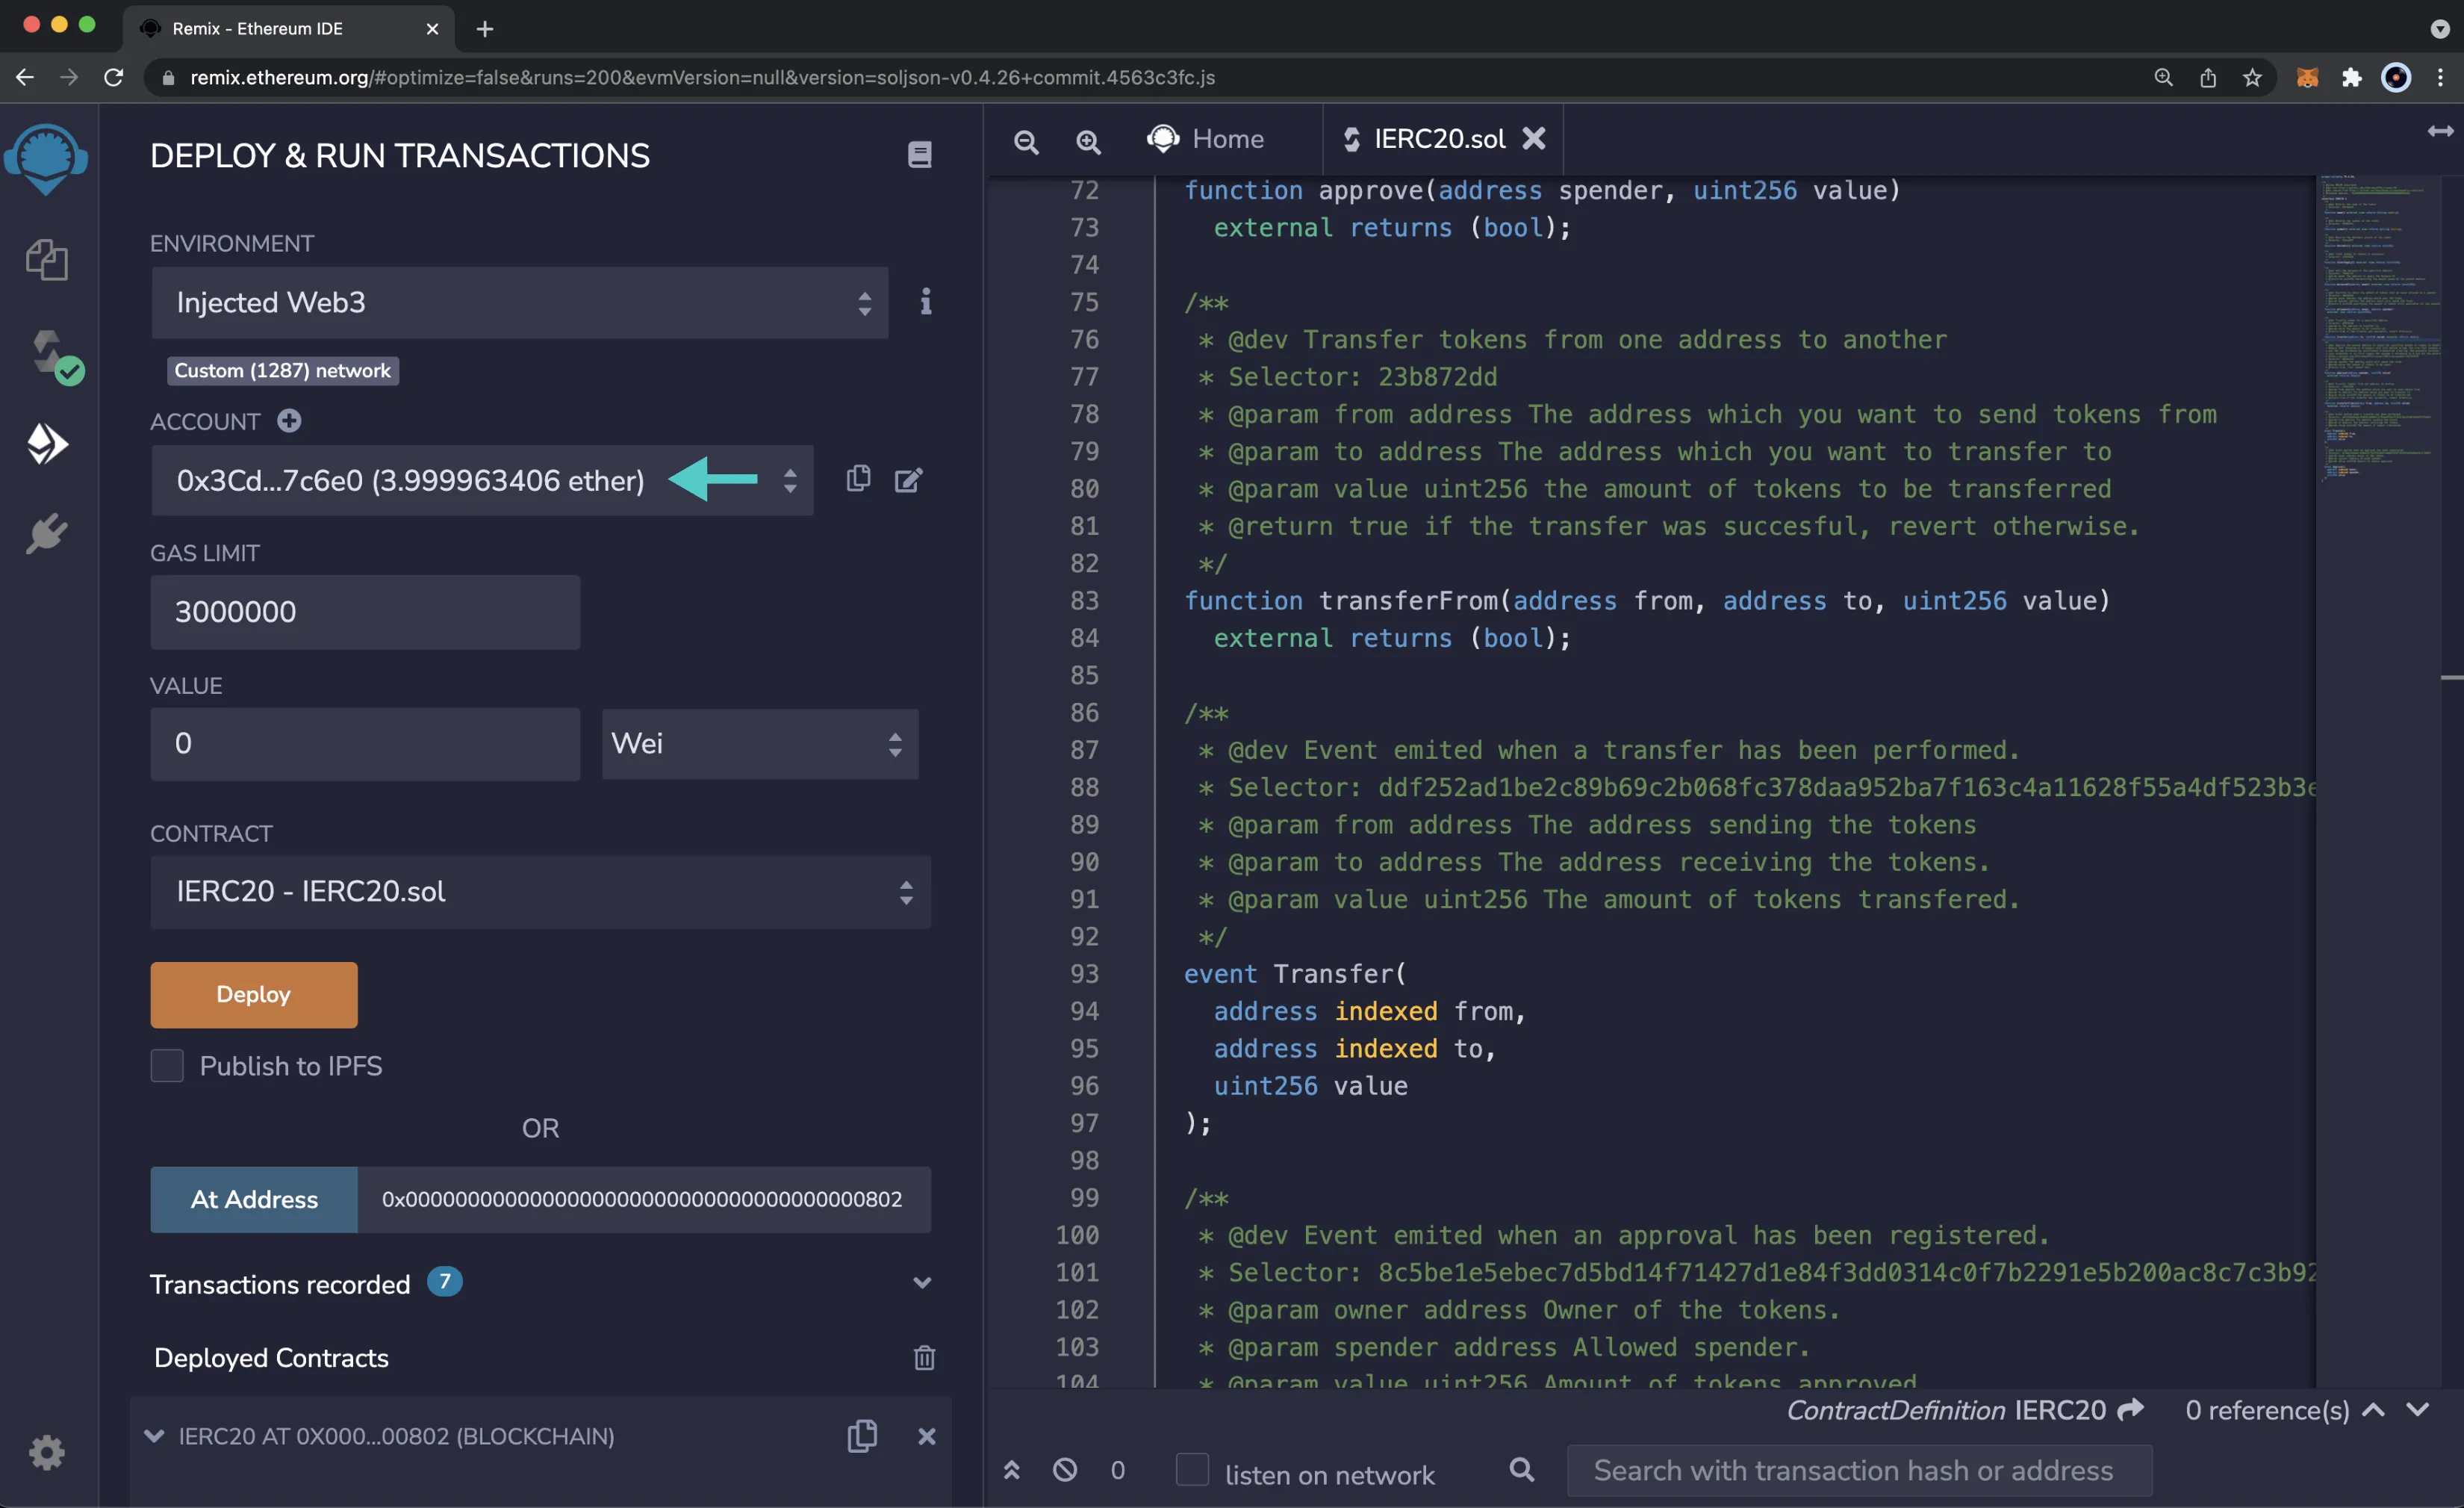
- Click on the Deploy and Run tab directly below the Compile tab in Remix. Please note the precompiled contract is already deployed
- Make sure Injected Web3 is selected in the ENVIRONMENT dropdown. Once you select Injected Web3, you might be prompted by MetaMask to connect your account to Remix
- Make sure the correct account is displayed under ACCOUNT
- Ensure IERC20 - IERC20.sol is selected in the CONTRACT dropdown. Since this is a precompiled contract, there is no need to deploy any code. Instead you are going to provide the address of the precompile in the At Address field
- Provide the address of the ERC-20 precompile:
0x0000000000000000000000000000000000000802and click At Address
The IERC20 precompile will appear in the list of Deployed Contracts.
Get Basic Token Information
The ERC-20 interface allows you to quickly obtain token information, including the token's total supply, name, symbol, and decimal places. You can get this information by following these steps:
- Expand the IERC20 contract under Deployed Contracts
- Click decimals to get the decimal places of the Moonbase Alpha native protocol token
- Click name to get the name of the token
- Click symbol to get the symbol of the token
- Click totalSupply to obtain the total supply of tokens in existence on Moonbase Alpha
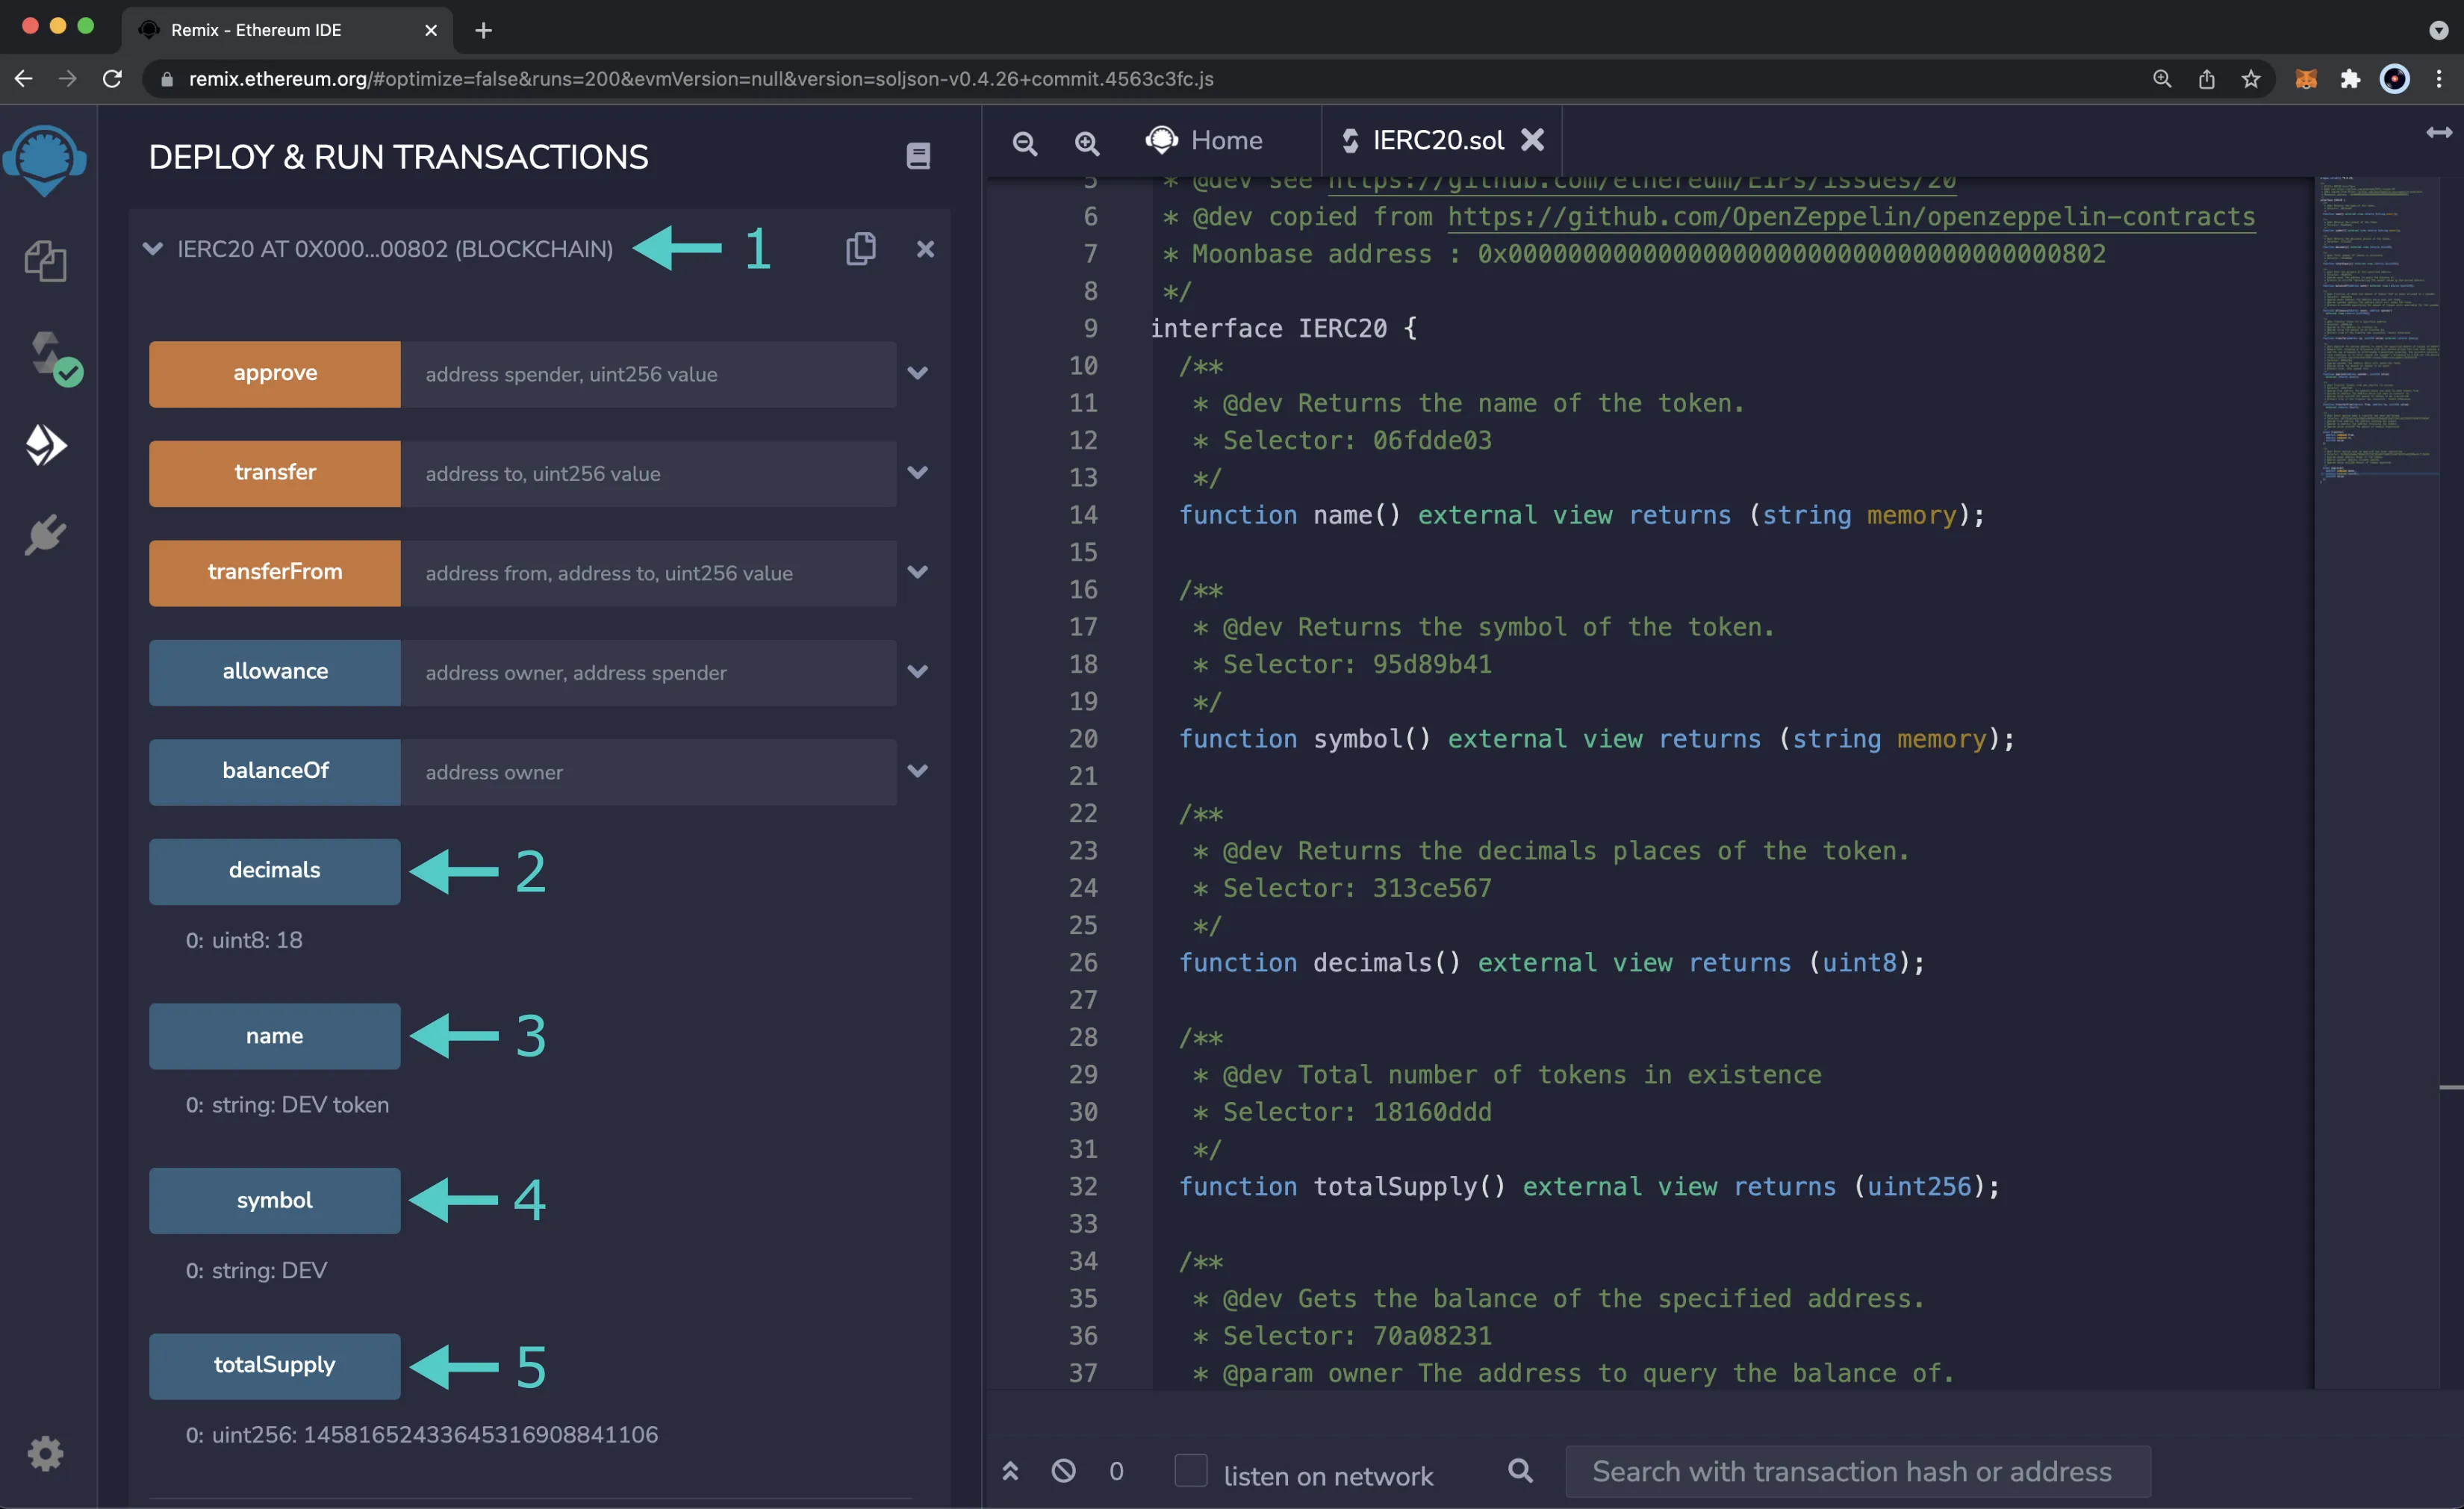
The response for each call will be displayed under the corresponding function.
Get Account Balance
You can check the balance of any address on Moonbase Alpha by calling the balanceOf function and passing in an address:
- Expand the balanceOf function
- Enter an address you would like to check the balance of for the owner
- Click call

Your balance will be displayed under the balanceOf function.
Approve a Spend
To approve a spend, you'll need to provide an address for the spender and the number of tokens that the spender is allowed to spend. The spender can be an externally owned account or a smart contract. For this example, you can approve the spender to spend 1 DEV token. To get started, please follow these steps:
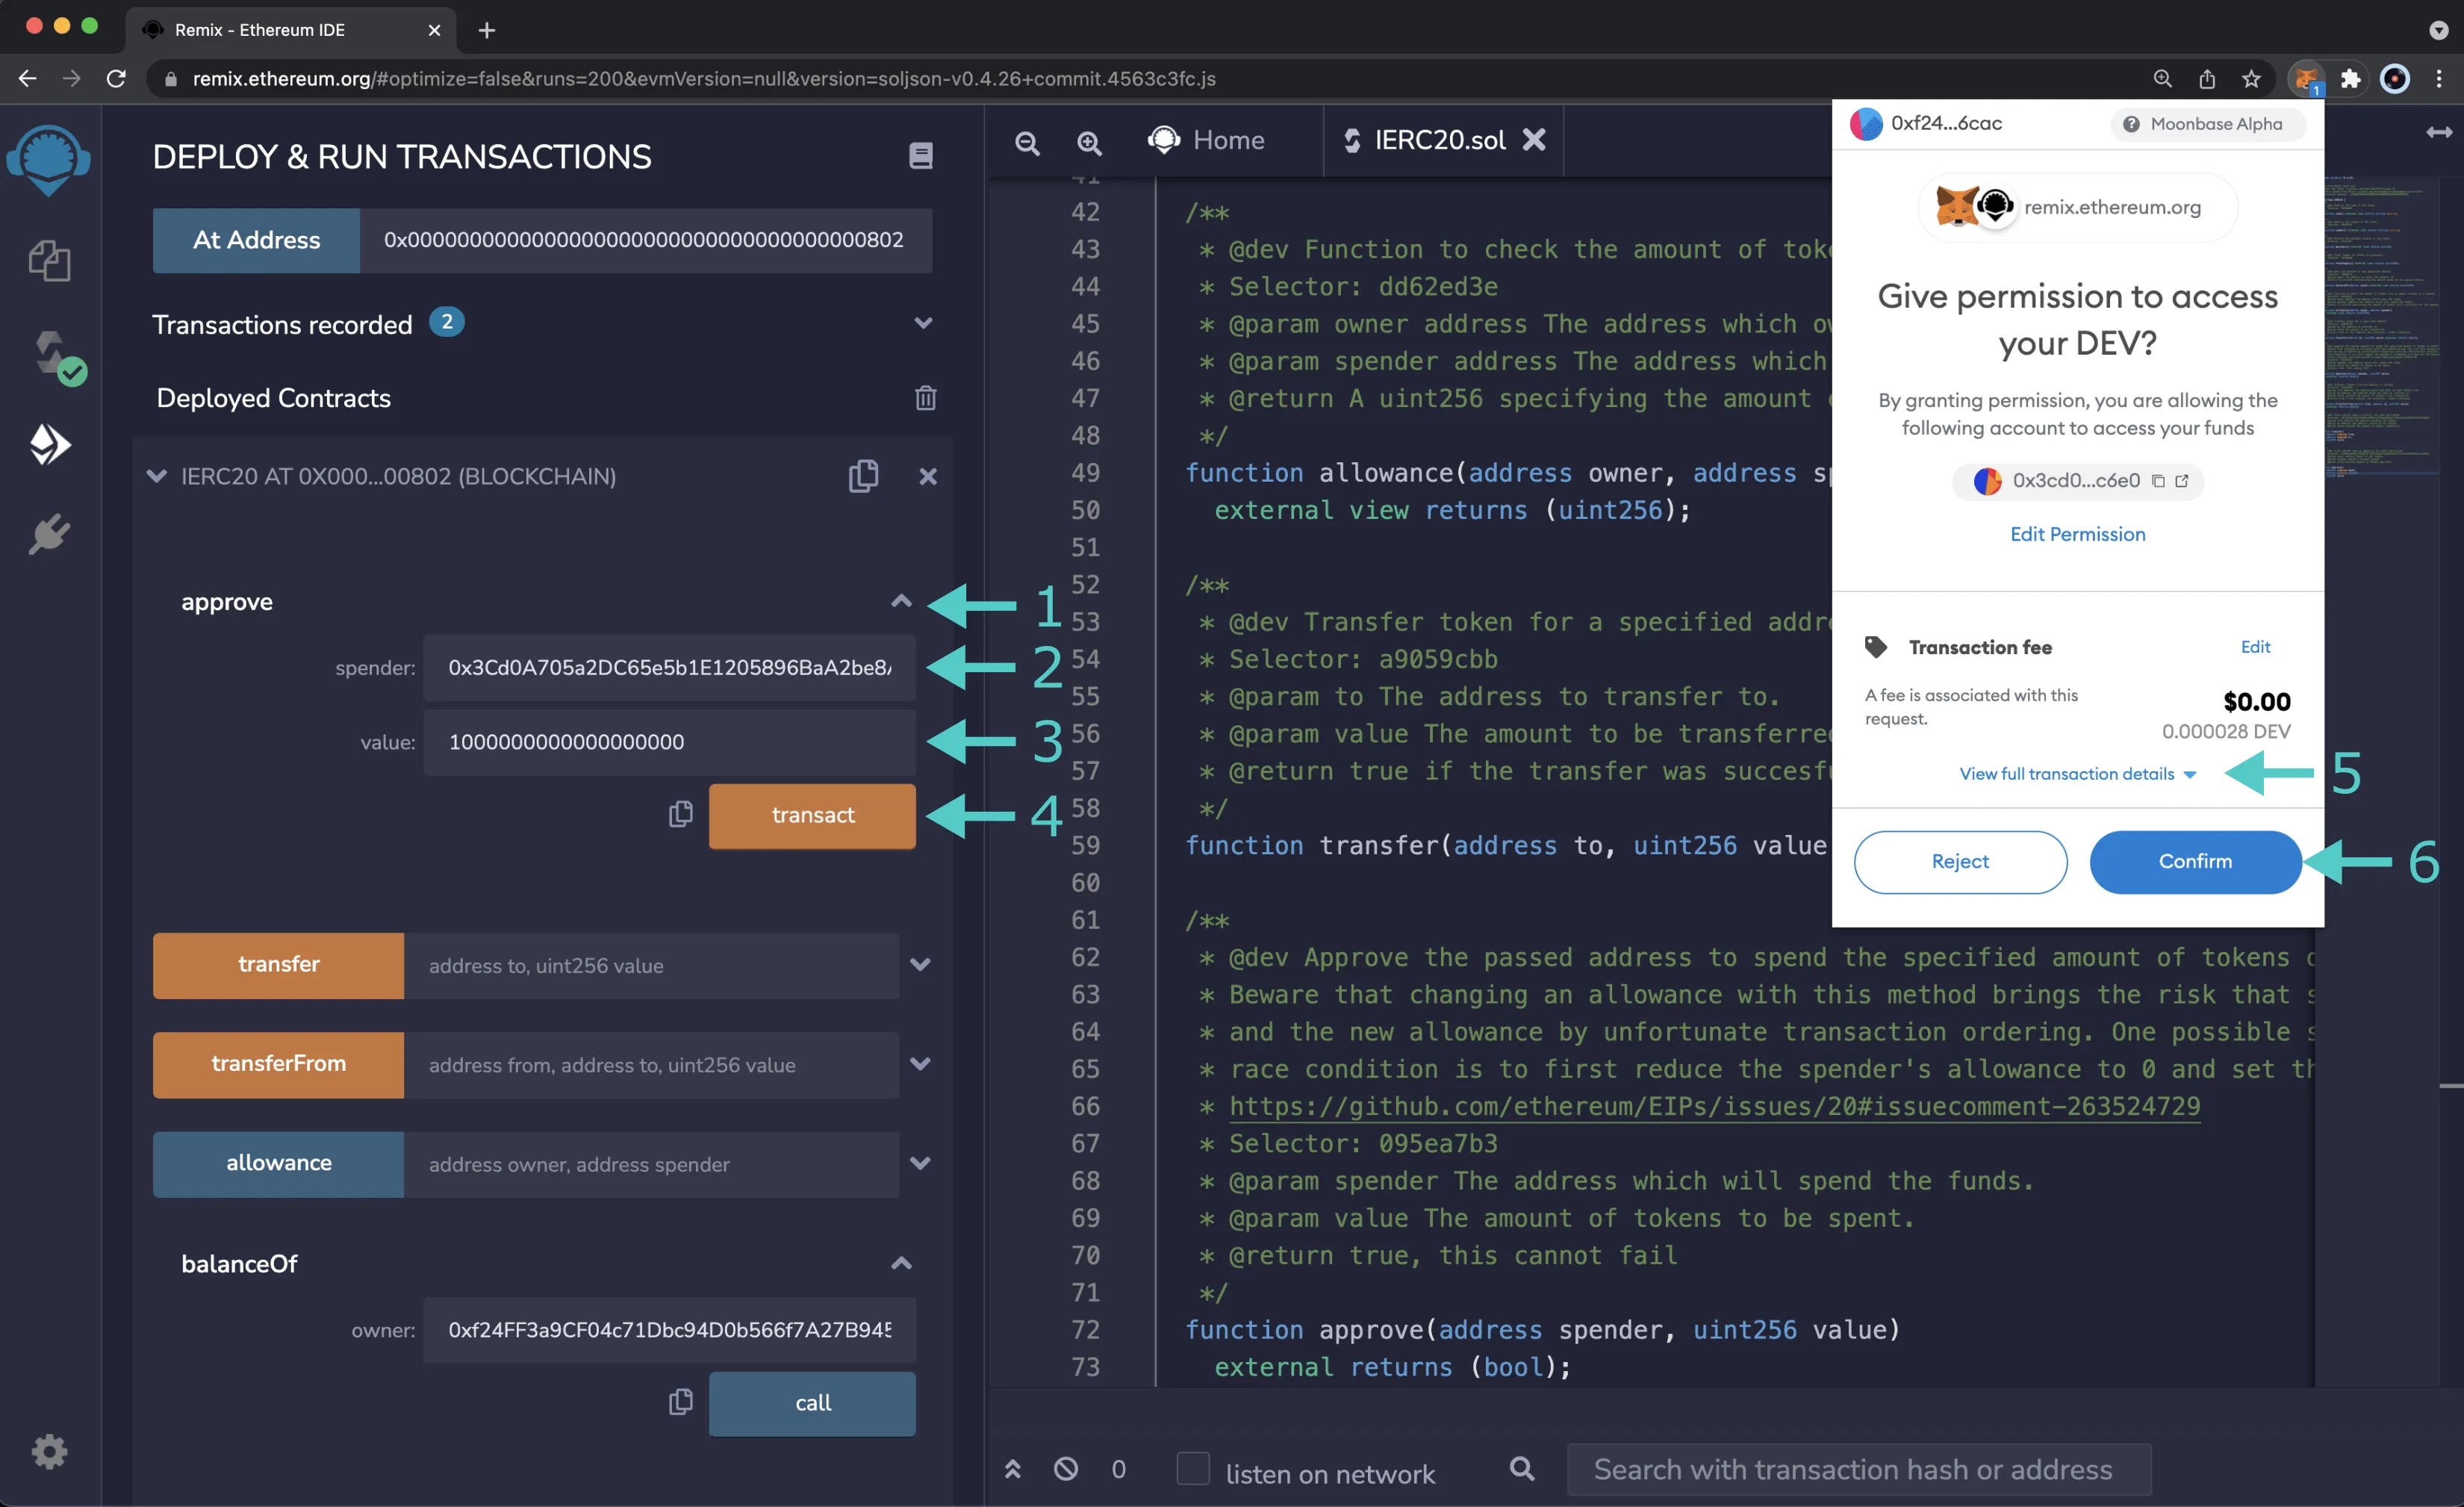
- Expand the approve function
- Enter the address of the spender. You should have created two accounts before starting, so you can use the second account as the spender
- Enter the amount of tokens the spender can spend for the value. For this example, you can allow the spender to spend 1 DEV token in Wei units (
1000000000000000000) - Click transact
- MetaMask will pop up, and you will be prompted to review the transaction details. Click View full transaction details to review the amount to be sent and the address of the spender
- If everything looks ok, you can click Confirm to send the transaction
After the transaction has successfully gone through, you'll notice that the balance of your account hasn't changed. This is because you have only approved the spend for the given amount, and the spender hasn't spent the funds. In the next section, you will use the allowance function to verify that the spender is able to spend 1 DEV token on your behalf.
Get Allowance of Spender
To check that the spender received the allowance approved in the Approve a Spend section, you can:
- Expand the allowance function
- Enter your address for the owner
- Enter the address of the spender that you used in the previous section
- Click call
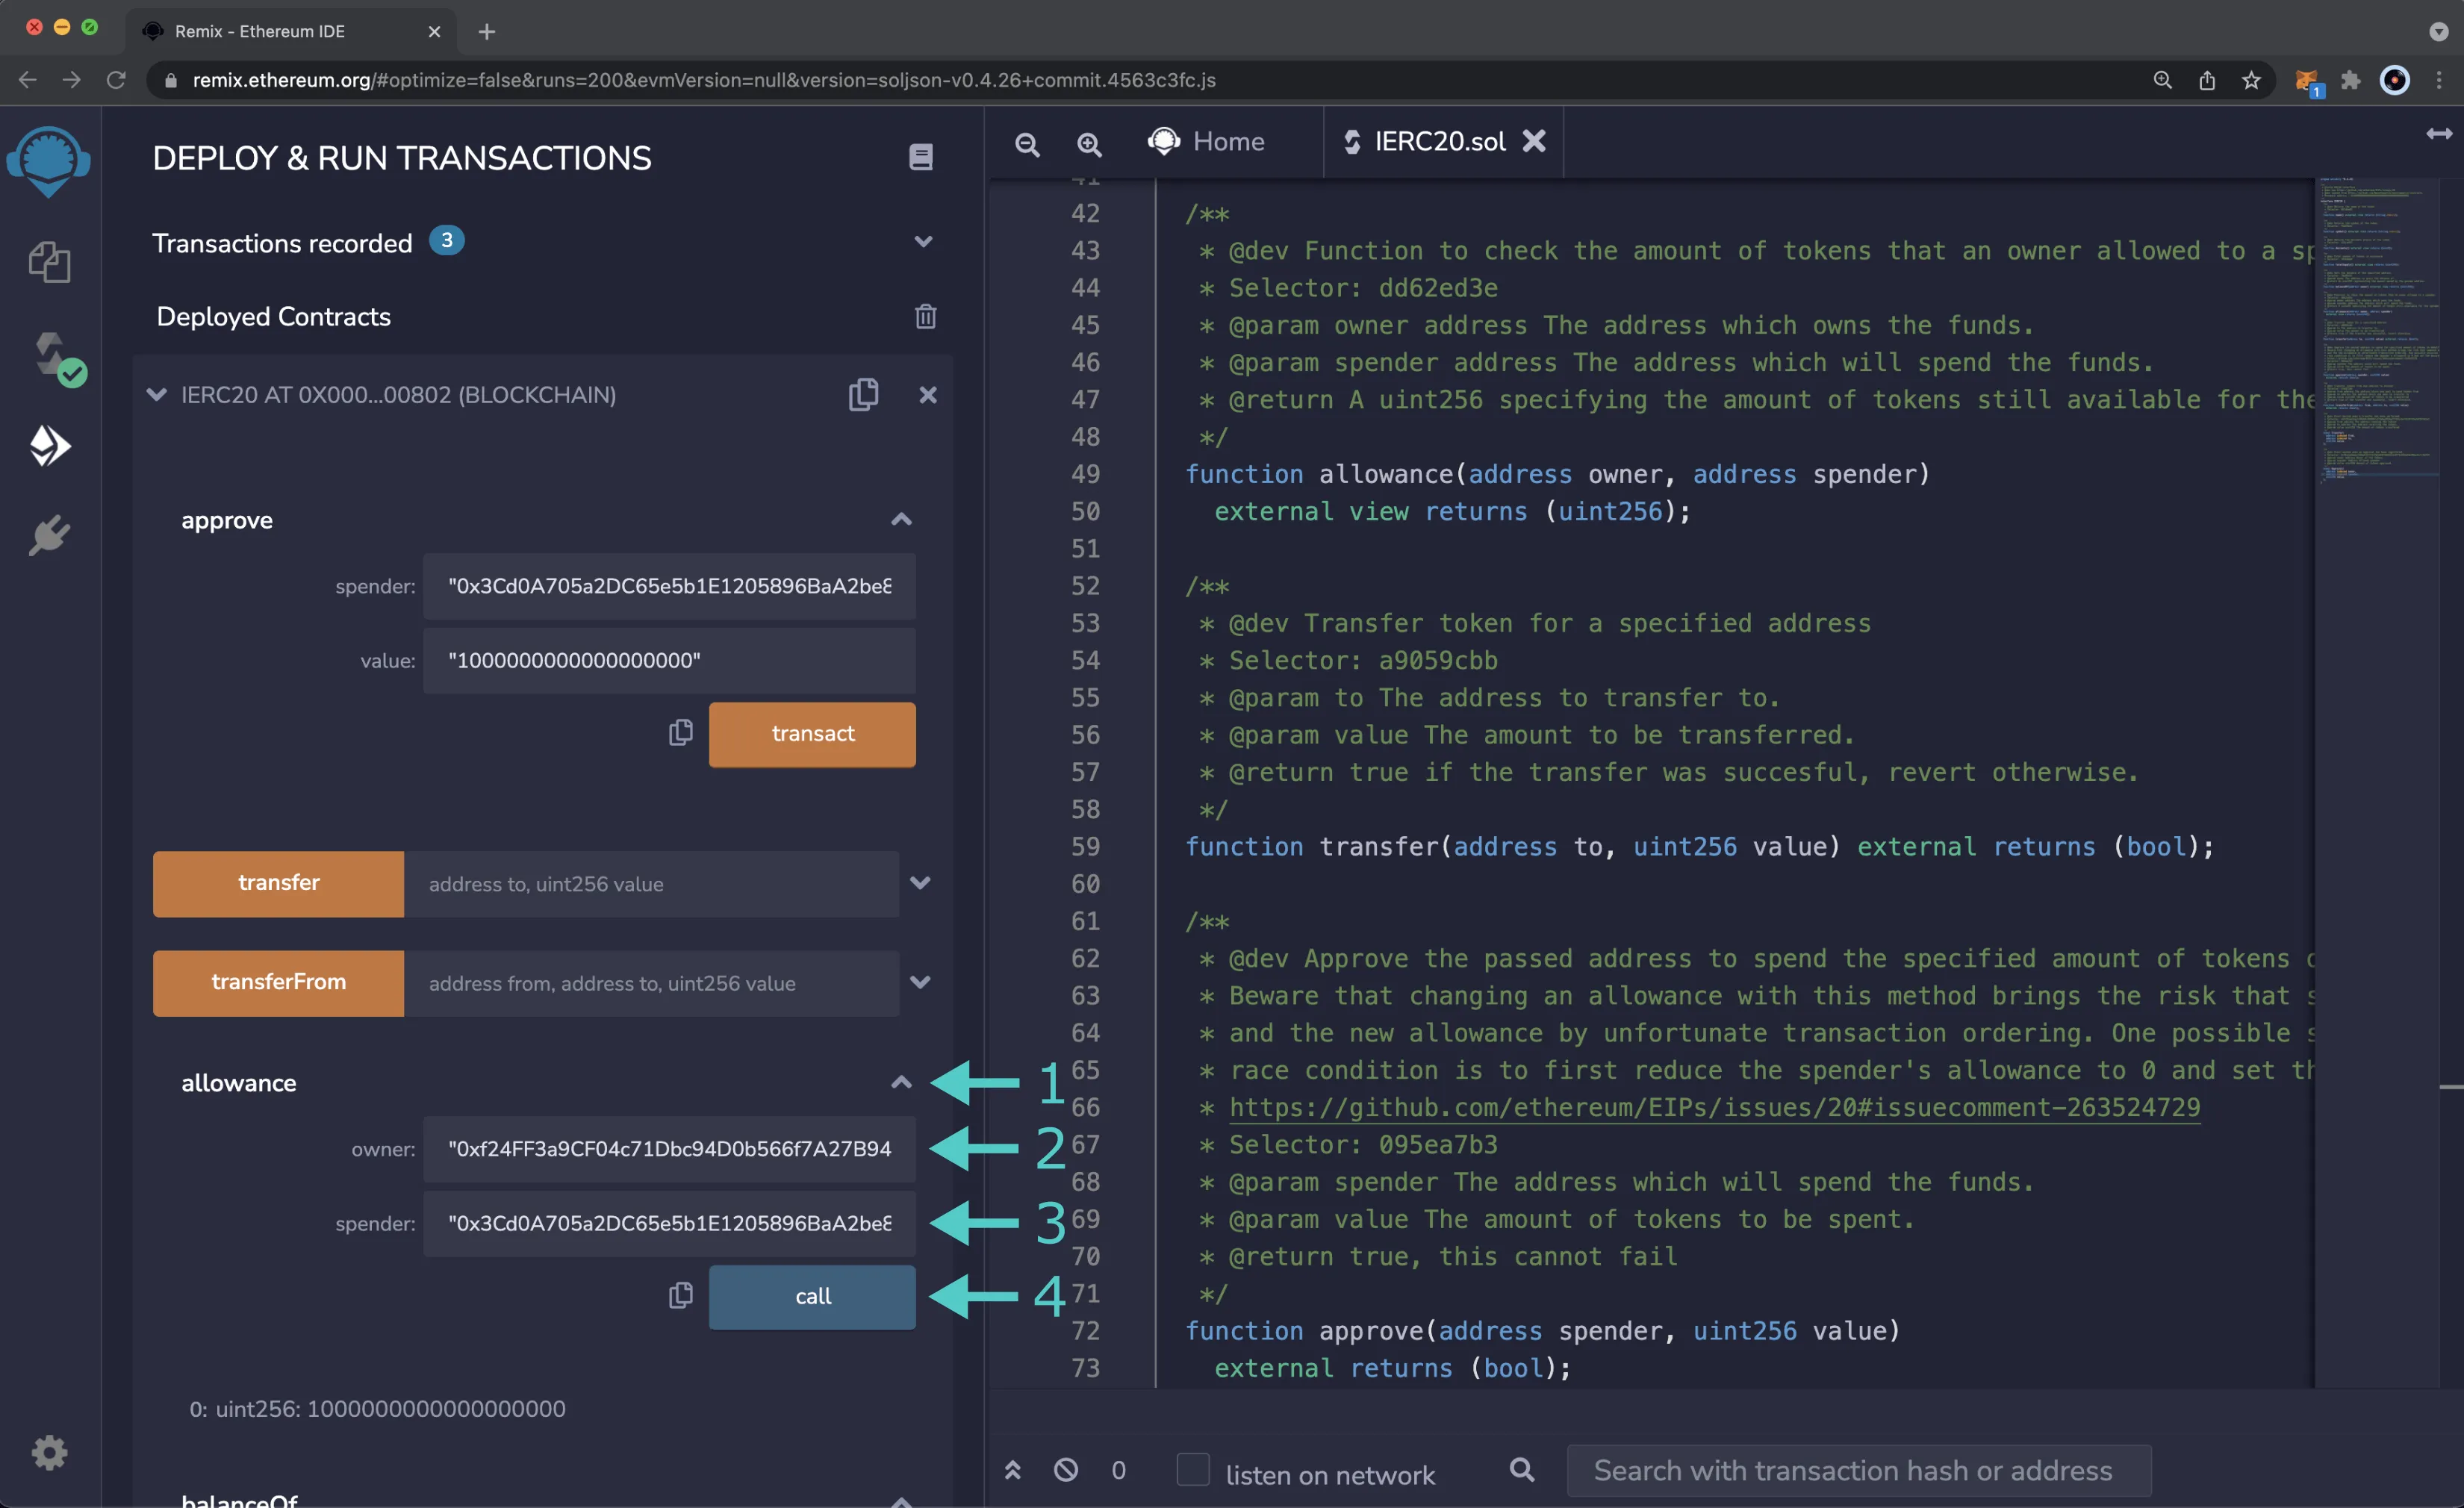
Once the call is complete, the allowance of the spender will be displayed, which should be equivalent to 1 DEV token (1000000000000000000).
Send Transfer
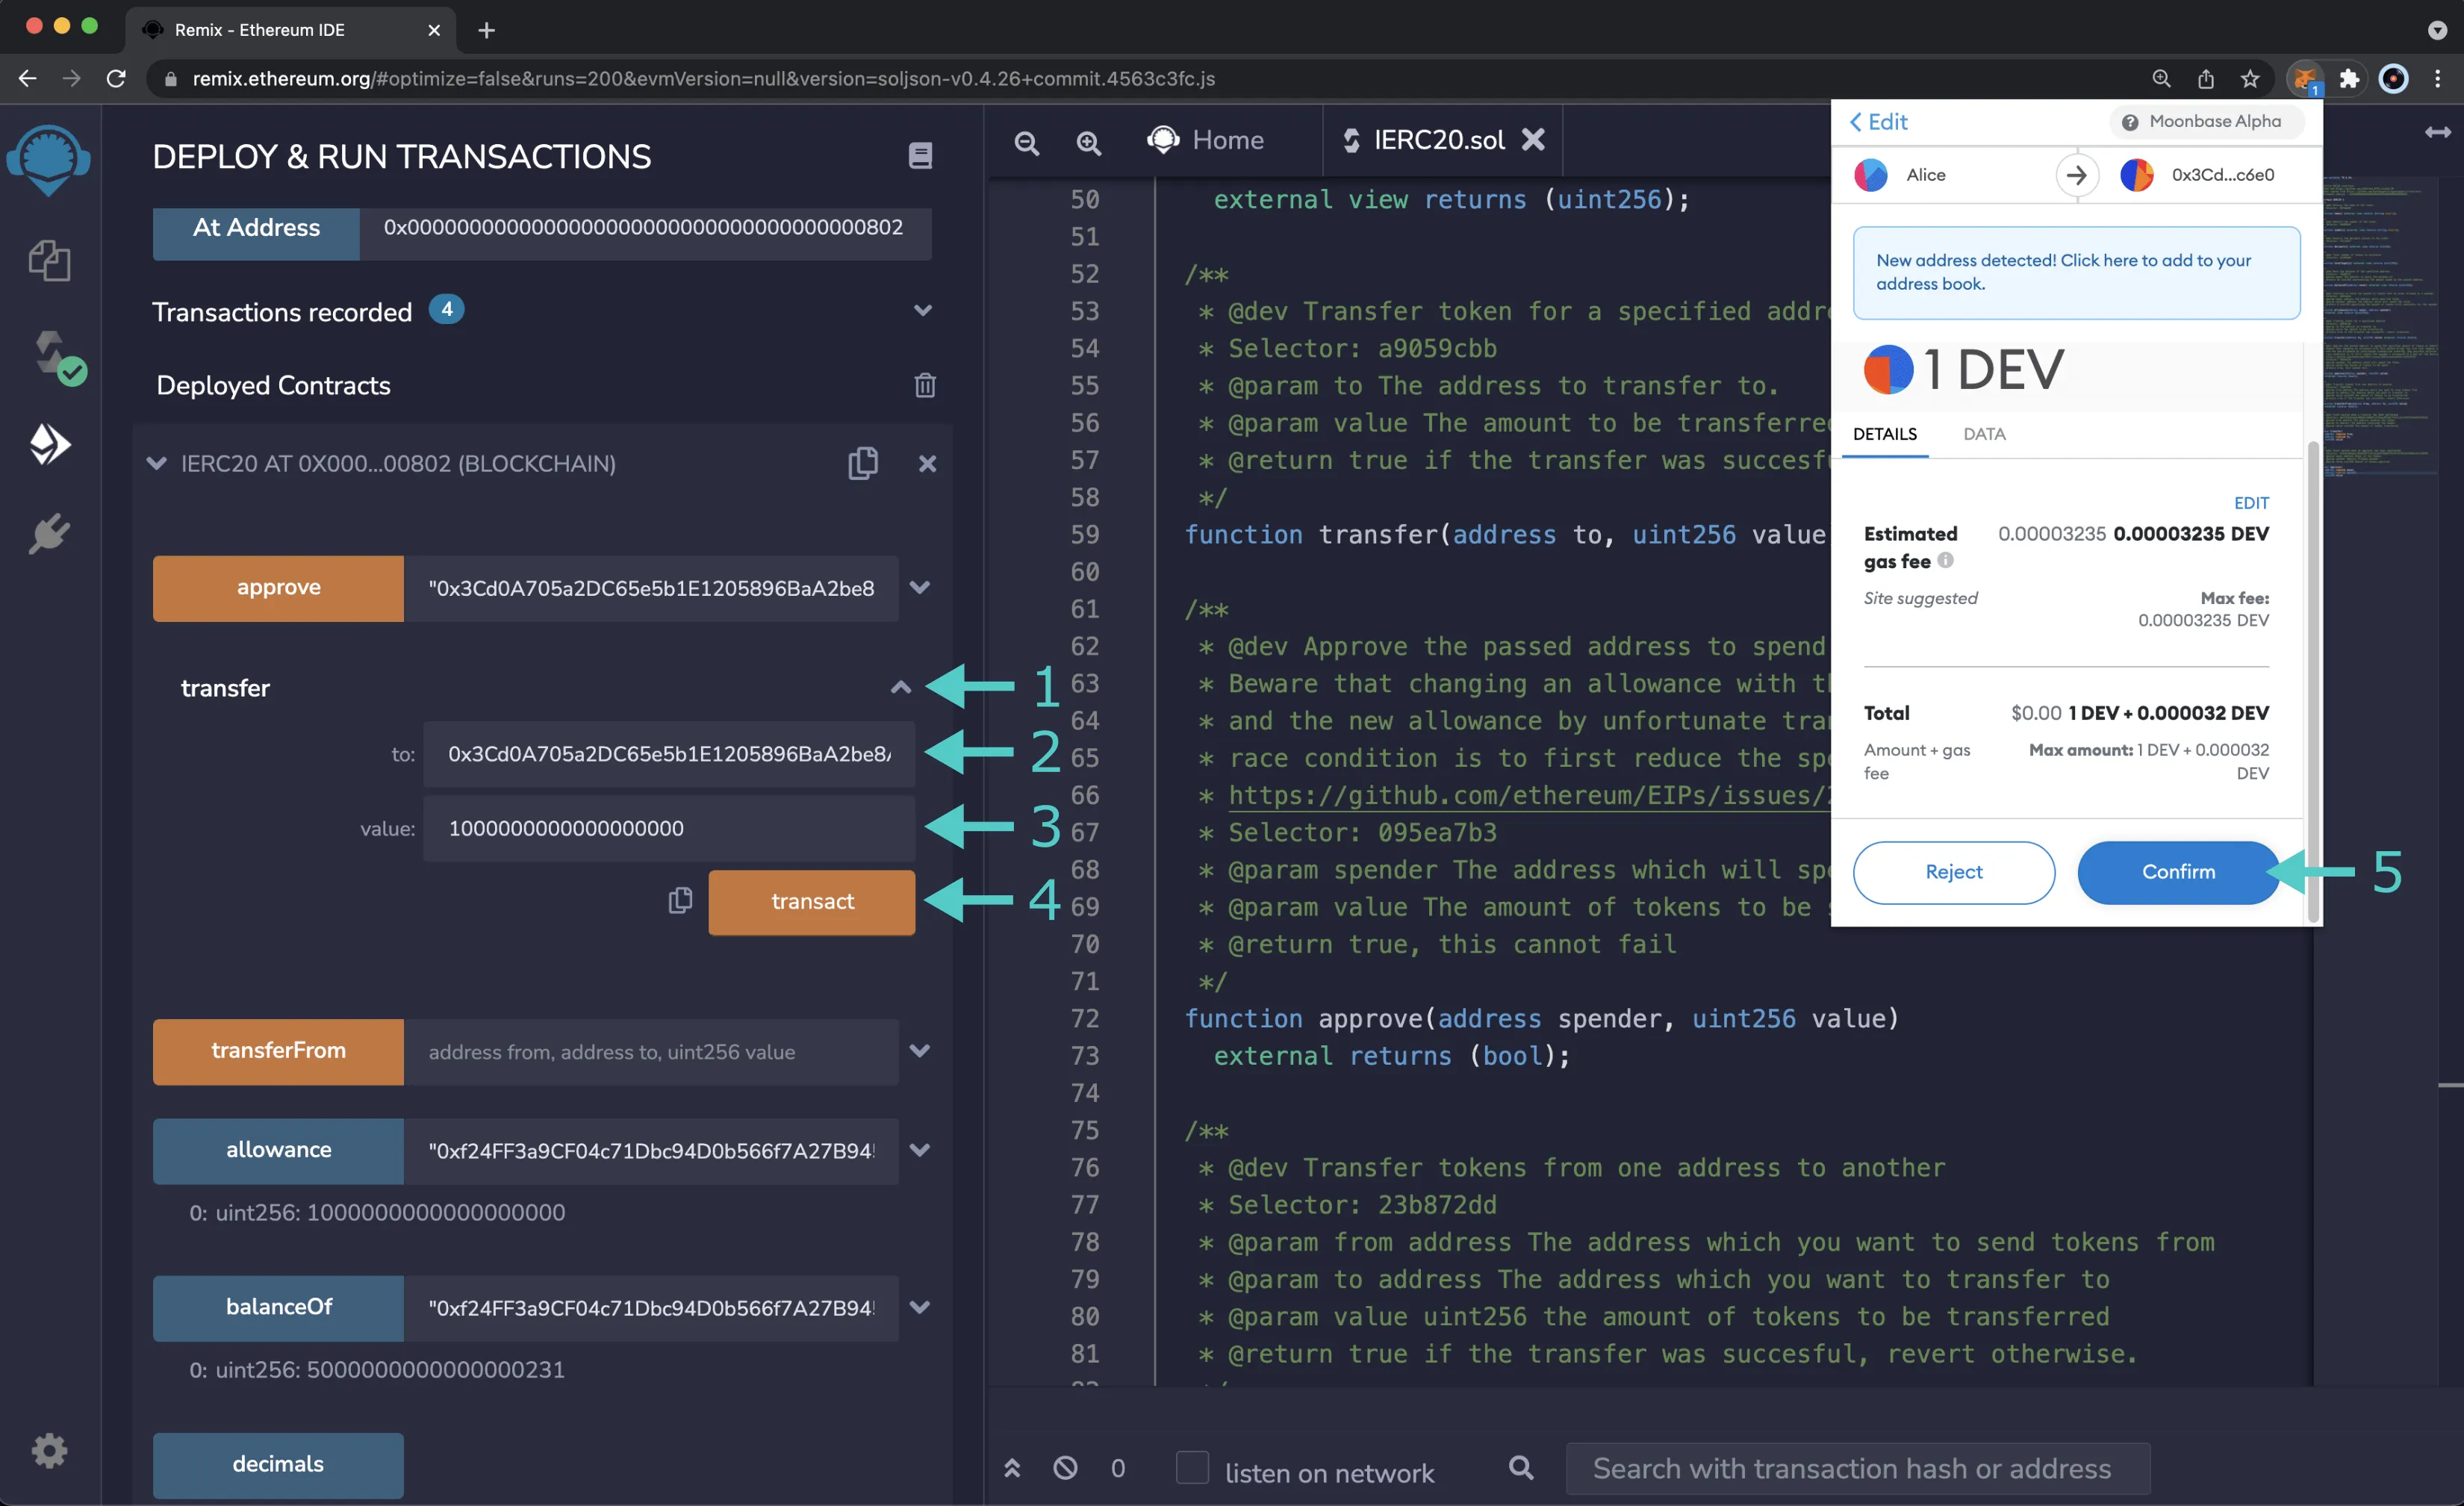
To do a standard transfer and send tokens from your account directly to another account, you can call the transfer function by following these steps:
- Expand the transfer function
- Enter the address to send DEV tokens to. You should have created two accounts before starting, so you can use the second account as the recipient
- Enter the amount of DEV tokens to send. For this example, you can send 1 DEV token (
1000000000000000000) - Click transact
- MetaMask will pop up, you can review the transaction details, and if everything looks good, click Confirm
Once the transaction is complete, you can check your balance using the balanceOf function or by looking at MetaMask, and notice that this time your balance decreased by 1 DEV token. You can also use the balanceOf function to ensure that the recipients balance has increased by 1 DEV token as expected.
Send Transfer From Specific Account
So far, you should have approved an allowance of 1 DEV token for the spender and sent 1 DEV token via the standard transfer function. The transferFrom function varies from the standard transfer function as it allows you to define the address to which you want to send the tokens. So you can specify an address that has an allowance or your address as long as you have funds. For this example, you will use the spender's account to initiate a transfer of the allowed funds from the owner to the spender. The spender can send the funds to any account, but you can send the funds from the owner to the spender for this example.
First, you need to switch to the spender's account in MetaMask. Once you switch to the spender's account, you'll notice that the selected address in Remix under the Accounts tab is now the spender's.
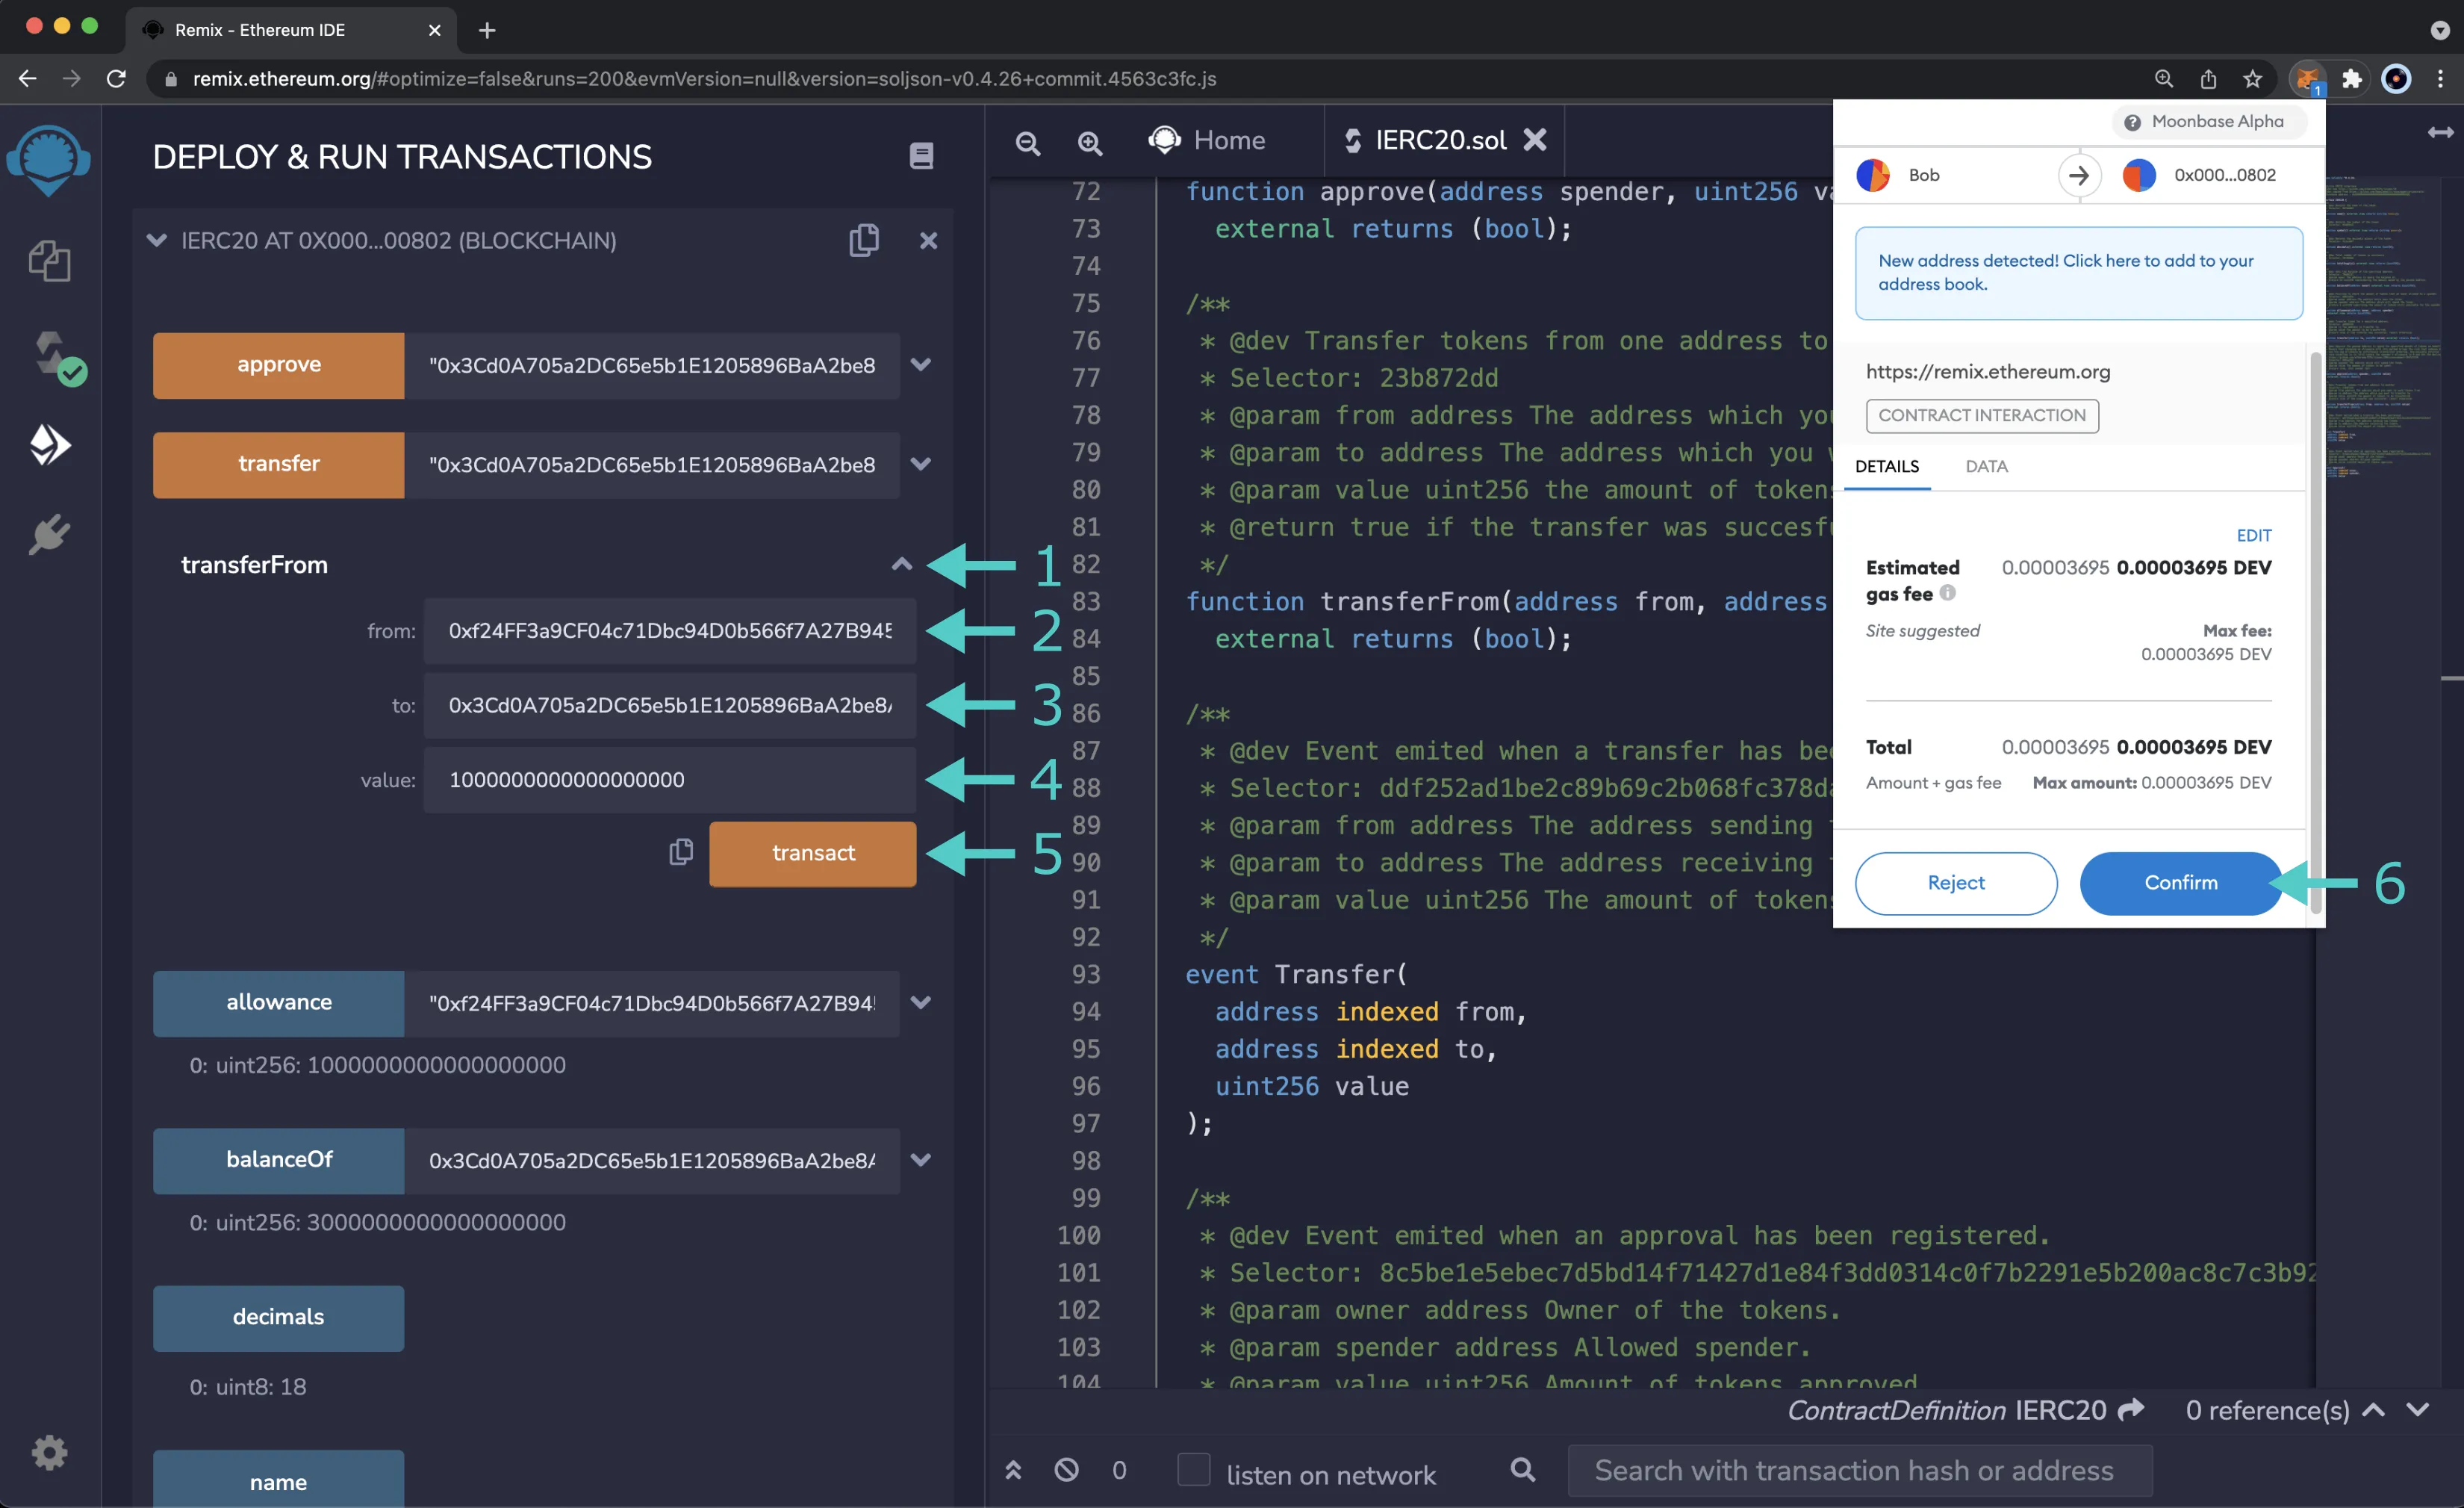
Next, you can initiate and send the transfer, to do so:
- Expand the transferFrom function
- Enter your address as the owner in the from field
- Enter the recipient address, which should be the spender's address, in the to field
- Enter the amount of DEV tokens to send. Again, the spender is currently only allowed to send 1 DEV token, so enter
1000000000000000000 - Click transact
Once the transaction is complete, you can check the balance of the owner and spender using the balanceOf function. The spender's balance should have increased by 1 DEV token, and their allowance should now be depleted. To verify that the spender no longer has an allowance, you can call the allowance function, passing in the owner and spender's addresses. You should receive a result of 0.
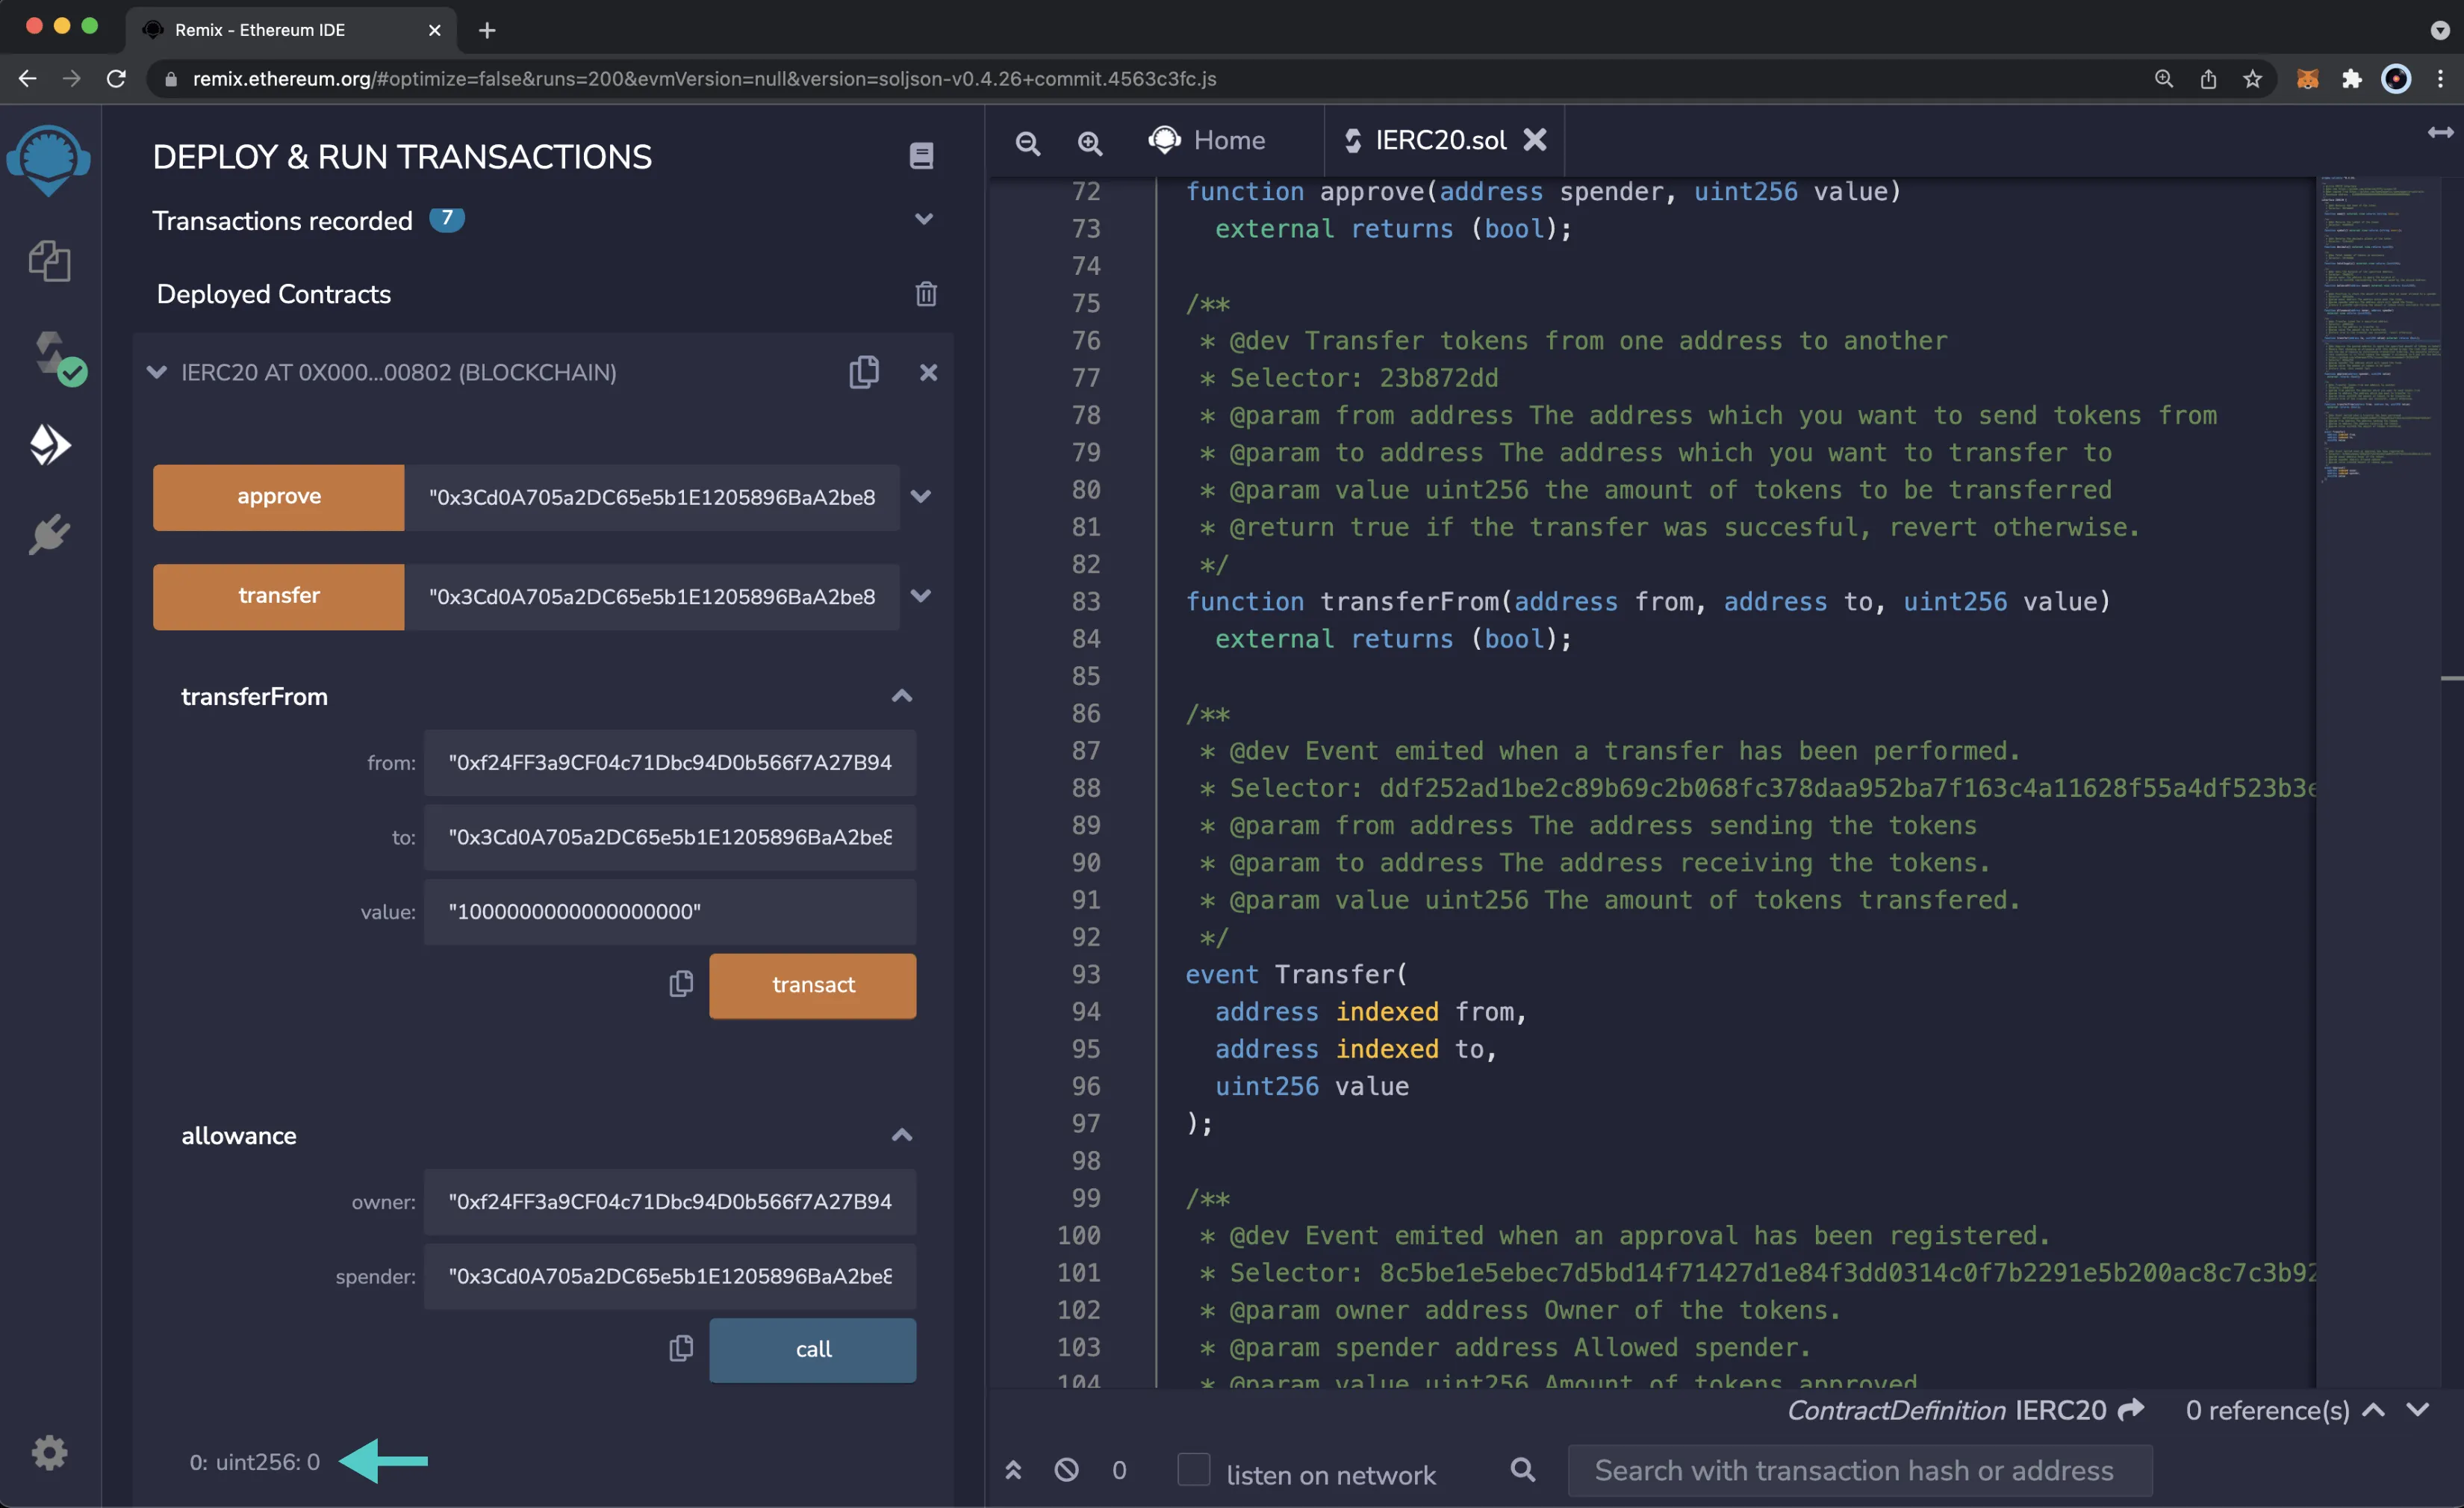
And that's it! You've successfully interacted with the ERC-20 precompile using MetaMask and Remix!
| Created: November 25, 2021