Interacting with the Call Permit Precompile
Introduction
The Call Permit Precompile on Moonbeam allows a user to sign a permit, an EIP-712 signed message, for any EVM call and it can be dispatched by anyone or any smart contract. It is similar to the ERC-20 Permit Solidity Interface, except it applies to any EVM call instead of approvals only.
When the call permit is dispatched, it is done so on behalf of the user who signed the permit and the user or contract that dispatches the permit is responsible for paying transaction fees. As such, the precompile can be used to perform gas-less transactions.
For example, Alice signs a call permit and Bob dispatches it and performs the call on behalf of Alice. Bob pays for the transaction fees and as such, Alice doesn't need to have any of the native currency to pay for the transaction, unless the call includes a transfer.
The Call Permit Precompile is located at the following address:
0x000000000000000000000000000000000000080a
0x000000000000000000000000000000000000080a
0x000000000000000000000000000000000000080a
Note
There can be some unintended consequences when using the precompiled contracts on Moonbeam. Please refer to the Security Considerations page for more information.
The Call Permit Solidity Interface
CallPermit.sol is a Solidity interface that allows developers to interact with the precompile's three methods.
The interface includes the following functions:
dispatch(address from, address to, uint256 value, bytes data, uint64[] gaslimit, uint256 deadline, uint8 v, bytes32 r, bytes32 s) - dispatches a call on the behalf of another user with a EIP-712 permit. This function can be called by anyone or any smart contract. The transaction will revert if the permit is not valid or if the dispatched call reverts or errors (such as out of gas). If successful, the nonce of the signer is increased to prevent this permit to be replayed
from- address of the signer of the permit. The call will be dispatched on behalf of this addressto- address the call is made tovalue- uint256 value being transferred from thefromaccountdata- bytes containing the call data, or action to be executedgasLimit- uint64[] gas limit the dispatched call requires. Providing an argument for this parameter prevents the dispatcher from manipulating the gas limitdeadline- uint256 time in UNIX seconds after which the permit will no longer be valid. In JavaScript, you can get the current time in UNIX seconds by runningconsole.log(Math.floor(Date.now() / 1000))in a JavaScript script or a browser consolev- uint8 recovery ID of the signature. The last one byte of the concatenated signaturer- bytes32 first 32 bytes of the concatenated signatures- bytes32 second 32 bytes of the concatenated signature
nonces(address owner) - returns the current nonce for given owner
owner- address of the account to query the nonce for
DOMAIN_SEPARATOR() - returns the EIP-712 domain separator which is used to avoid replay attacks. It follows the EIP-2612 implementation
None.
The domain separator is defined in the EIP-712 standard and is calculated as:
keccak256(PERMIT_DOMAIN, name, version, chain_id, address)
The parameters of the hash can be broken down as follows:
- PERMIT_DOMAIN - is the
keccak256ofEIP712Domain(string name,string version,uint256 chainId,address verifyingContract) - name - is the name of the signing domain and must be
'Call Permit Precompile'exactly - version - is the version of the signing domain. For this case version is set to
1 - chainId - is the chain ID of the network
- verifyingContract - is the address of the contract that will verify the signature. In this case, the Call Permit Precompile address
When dispatch is called, the permit needs to be verified before the call is dispatched. The first step is to compute the domain separator. The calculation can be seen in Moonbeam's implementation or you can check out a practical example in OpenZeppelin's EIP712 contract.
From there, a hash of the signature and the given arguments is generated which guarantees that the signature can only be used for the call permit. It uses a given nonce to ensure the signature is not subject to a replay attack. It is similar to OpenZeppelin's ERC20Permit contract, except the PERMIT_TYPEHASH is for a call permit, and the arguments match that of the dispatch function plus the nonce.
The domain separator and the hash struct can be used to build the final hash of the fully encoded message. A practical example is shown in OpenZeppelin's EIP712 contract.
With the final hash and the v, r, and s values, the signature can be verified and recovered. If successfully verified, the nonce will increase by one and the call will be dispatched.
Setup the Contracts
For this example, you'll learn how to sign a call permit that updates a message in a simple example contract, SetMessage.sol. Before you can generate the call permit signature, you'll need to deploy the contract and define the dispatch function arguments for the call permit.
Once you've setup the example contract, then you can setup the Call Permit Precompile contract.
Checking Prerequisites
To follow along with this tutorial, you will need to have:
- MetaMask installed and connected to Moonbase Alpha
- Create or have two accounts on Moonbase Alpha to test out the different features in the Call Permit Precompile
- At least one of the accounts will need to be funded with
DEVtokens. You can get DEV tokens for testing on Moonbase Alpha once every 24 hours from the Moonbase Alpha Faucet
Example Contract
The SetMessage.sol contract will be used as an example of using a call permit, but in practice, any contract can be interacted with.
// SPDX-License-Identifier: GPL-3.0
pragma solidity 0.8.7;

contract SetMessage {
    string storedMessage;

    function set(string calldata x) public {
        storedMessage = x;
    }

    function get() public view returns (string memory) {
        return storedMessage;
    }
}
Remix Set Up
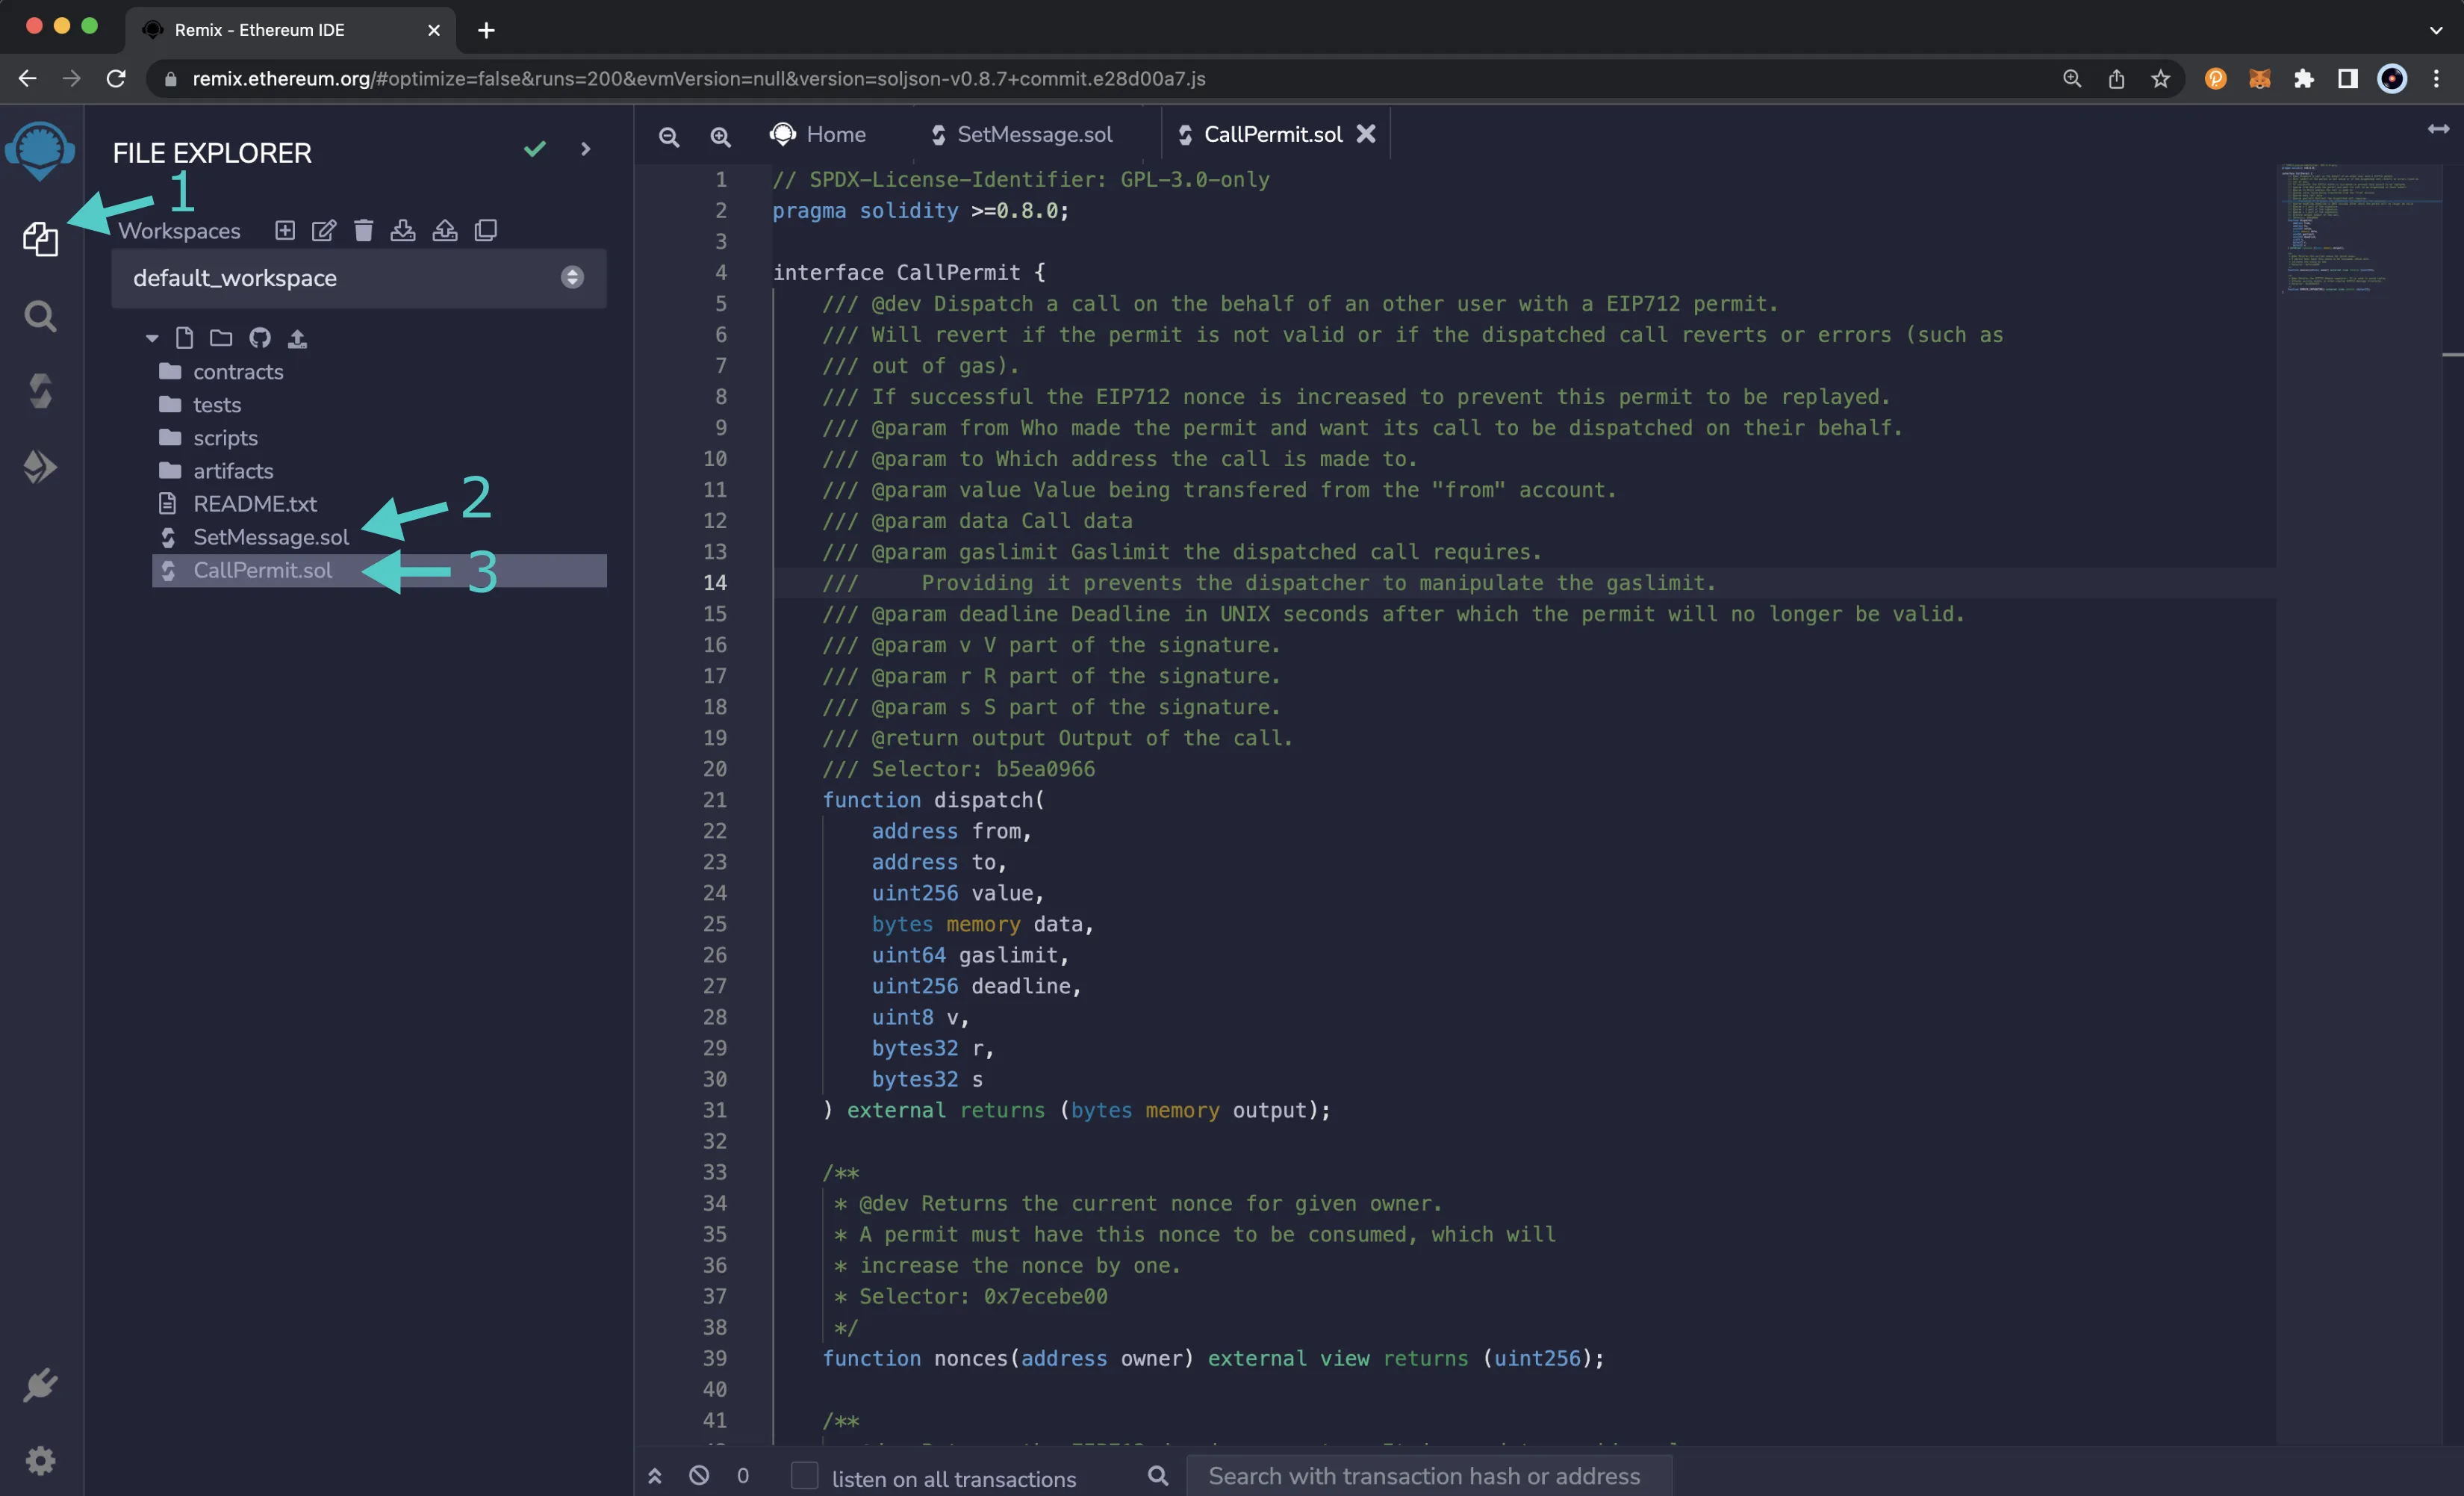
You can use Remix to compile the example contract and deploy it. You'll need a copy of SetMessage.sol and CallPermit.sol. To add the contracts to Remix, you can take the following steps:
- Click on the File explorer tab
- Paste the
SetMessage.solcontract into a Remix file namedSetMessage.sol - Paste the
CallPermit.solcontract into a Remix file namedCallPermit.sol
Compile & Deploy the Example Contract
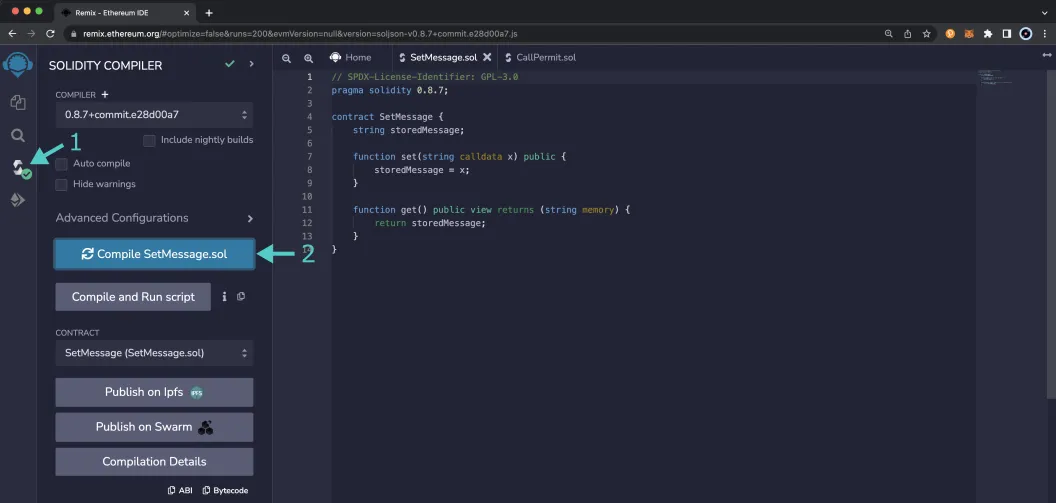
First you'll need to compile the example contract:
- Click on the Compile tab, second from top
- Then to compile the interface, click on Compile SetMessage.sol
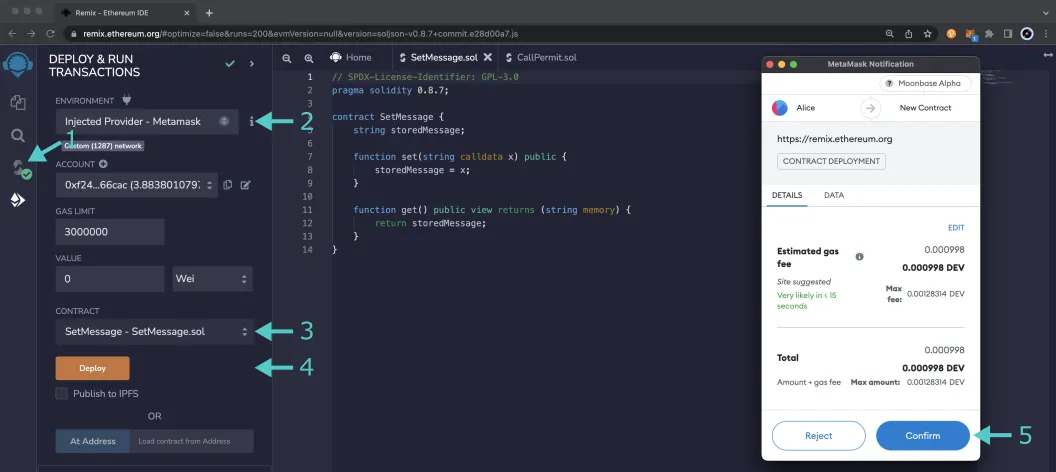
Then you can deploy it:
- Click on the Deploy and Run tab, directly below the Compile tab in Remix. Note: you are not deploying a contract here, instead you are accessing a precompiled contract that is already deployed
- Make sure Injected Provider - Metamask is selected in the ENVIRONMENT drop down
- Ensure SetMessage.sol is selected in the CONTRACT dropdown
- Click Deploy
- MetaMask will pop up and you'll need to Confirm the transaction
The contract will appear under the list of Deployed Contracts on the left side panel. Copy the contract address as you will need to use it to generate the call permit signature in the next section.
Compile & Access the Call Permit Precompile
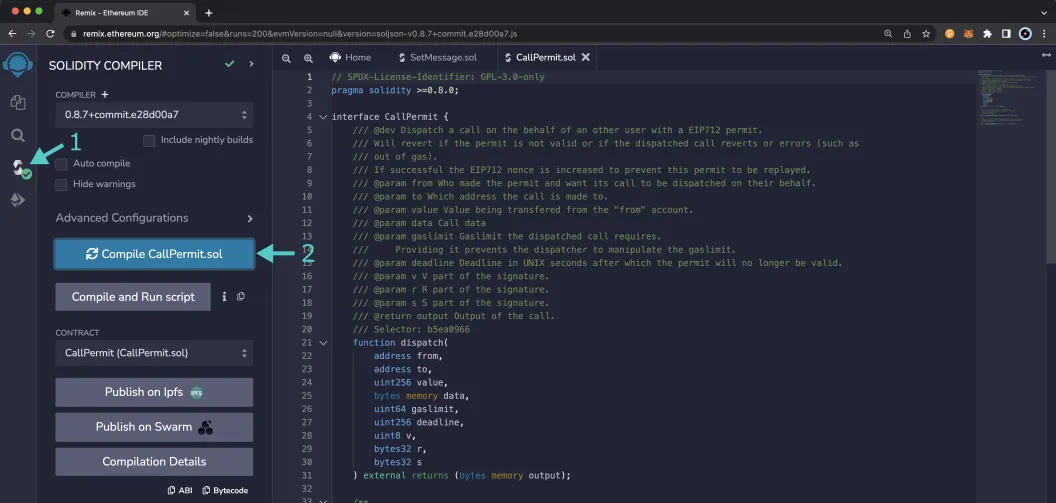
First you'll need to compile the Call Permit Precompile contract:
- Click on the Compile tab, second from top
- Then to compile the interface, click on Compile CallPermit.sol
Then instead of deploying the contract, you'll just need to access it given the address of the precompile:
- Click on the Deploy and Run tab, directly below the Compile tab in Remix. Note: you are not deploying a contract here, instead you are accessing a precompiled contract that is already deployed
- Make sure Injected Provider - Metamask is selected in the ENVIRONMENT drop down
- Ensure CallPermit.sol is selected in the CONTRACT dropdown. Since this is a precompiled contract there is no need to deploy, instead you are going to provide the address of the precompile in the At Address field
- Provide the address of the Call Permit Precompile for Moonbase Alpha:
0x000000000000000000000000000000000000080aand click At Address - The Call Permit Precompile will appear in the list of Deployed Contracts

Generate Call Permit Signature
In order to interact with the Call Permit Precompile, you have to have or generate a signature to dispatch the call permit with. There are several ways you can generate the signature, this guide will show you two different ways to generate it: in the browser using the MetaMask extension and JSFiddle and using MetaMask's @metamask/eth-sig-util npm package.
Regardless of which method you choose to generate the signature, the following steps will be taken:
- The
messagewill be created and includes some of the data that is needed to create the call permit. It includes the arguments that will be passed into thedispatchfunction and the nonce of the signer - A JSON structure of the data the user needs to sign will be assembled for the call permit and include all of the types for the
dispatcharguments and the nonce. This will result in theCallPermittype and will be saved as theprimaryType - The domain separator will be created using
"Call Permit Precompile"exactly for the name, the version of your DApp or platform, the chain ID of the network the signature is to be used on, and the address of the contract that will verify the signature - All of the assembled data, the
types,domain,primaryTypeandmessage, will be signed using MetaMask (either in the browser or through the MetaMask's JavaScript signing library) - The signature will be returned and you can use Ethers.js
Signature.frommethod to return thev,r, andsvalues of the signature
The Call Permit Arguments
As seen in the Call Permit Interface section, the dispatch function takes the following parameters: from, to, value, data, gasLimit, deadline, v, r, and s.
In order to get the signature arguments (v, r, and s), you'll need to sign a message containing the arguments for the remainder of the aforementioned parameters, plus the nonce of the signer.
from- the address of the account you want to sign the call permit withto- the contract address for theSetMessage.solcontractvalue- can be0for this example as you'll just be setting a message instead of transferring any fundsdata- you can send any message you would like, you'll just need the hex representation of the message you want to set using theSetMessage.solcontract. This will contain the function selector of thesetfunction and the string of the message. For this example, you can sendhello world. To do so, you can use this hex representation:0x4ed3885e0000000000000000000000000000000000000000000000000000000000000020000000000000000000000000000000000000000000000000000000000000000b68656c6c6f20776f726c64000000000000000000000000000000000000000000gasLimit-100000will be enough to send the dispatched calldeadline- you can get the current time in UNIX seconds by runningconsole.log(Math.floor(Date.now() / 1000))in a JavaScript script or a browser console. Once you have the current time, you can add additional time in seconds to represent when the call permit will expire
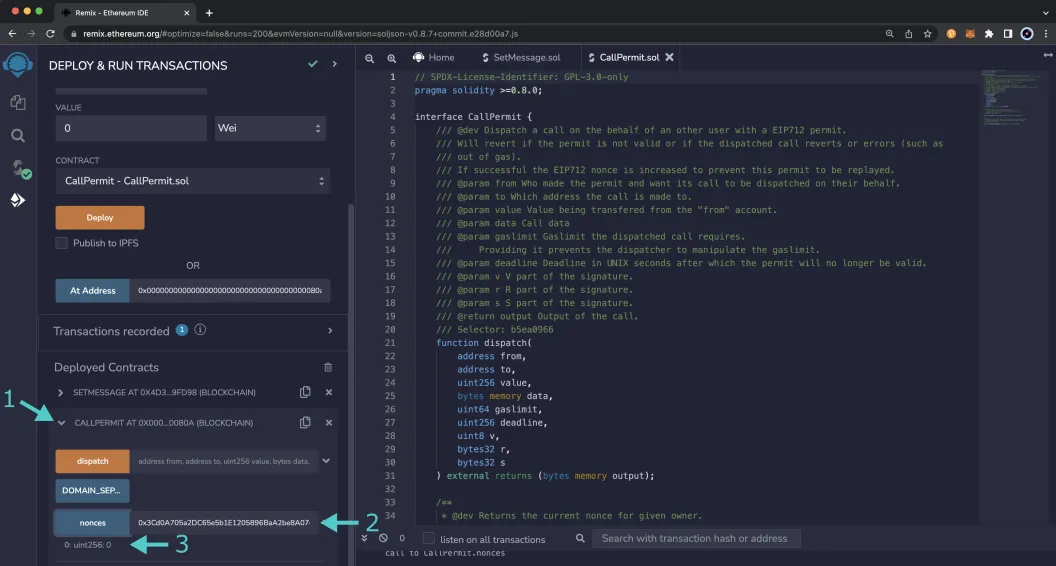
The nonce of the signer will also be needed. If this is your first time signing a call permit the nonce will be 0. You can also check the nonce in Remix:
- Expand the call permit contract
- Next to the nonces function, enter the address of the signer and click on nonces
- The result will be returned directly under the function
Use the Browser
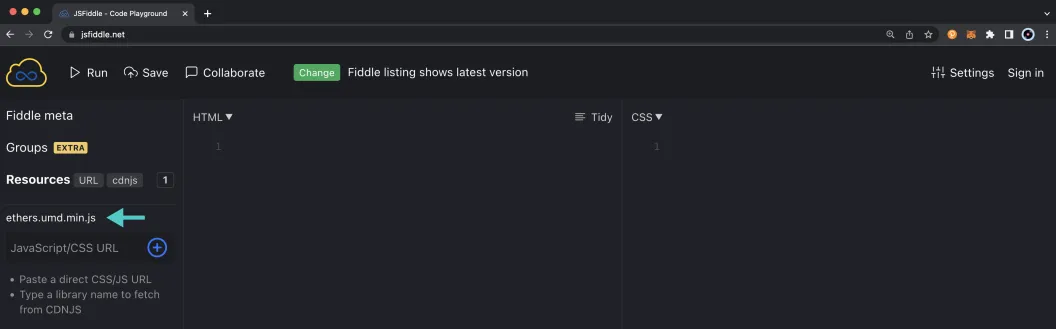
To get started, you can open JSFiddle or another JavaScript playground in the browser. First, you'll need to add Ethers.js as it will be used to get the v, r, and s values of the signature:
- Click on Resources
- Start to type in
ethersand the dropdown should populate matching libraries. Choose ethers - Click on the + button
The CDN for Ethers.js will appear in the list of libraries under Resources.
In the Javascript code box, copy and paste the following JavaScript snippet, making sure to replace the to variables (and any other variables as you see fit):
const main = async () => {
await window.ethereum.enable();
const accounts = await window.ethereum.request({
method: 'eth_requestAccounts',
});
const from = accounts[0];
const to = 'INSERT_TO_ADDRESS';
const value = 0;
const data =
'0x4ed3885e0000000000000000000000000000000000000000000000000000000000000020000000000000000000000000000000000000000000000000000000000000000b68656c6c6f20776f726c64000000000000000000000000000000000000000000';
const gaslimit = 100000;
const nonce = 'INSERT_SIGNERS_NONCE';
const deadline = 'INSERT_DEADLINE';
const createPermitMessageData = function () {
const message = {
from: from,
to: to,
value: value,
data: data,
gaslimit: gaslimit,
nonce: nonce,
deadline: deadline,
};
const typedData = JSON.stringify({
types: {
EIP712Domain: [
{
name: 'name',
type: 'string',
},
{
name: 'version',
type: 'string',
},
{
name: 'chainId',
type: 'uint256',
},
{
name: 'verifyingContract',
type: 'address',
},
],
CallPermit: [
{
name: 'from',
type: 'address',
},
{
name: 'to',
type: 'address',
},
{
name: 'value',
type: 'uint256',
},
{
name: 'data',
type: 'bytes',
},
{
name: 'gaslimit',
type: 'uint64',
},
{
name: 'nonce',
type: 'uint256',
},
{
name: 'deadline',
type: 'uint256',
},
],
},
primaryType: 'CallPermit',
domain: {
name: 'Call Permit Precompile',
version: '1',
chainId: 1287,
verifyingContract: '0x000000000000000000000000000000000000080a',
},
message: message,
});
return {
typedData,
message,
};
};
const method = 'eth_signTypedData_v4';
const messageData = createPermitMessageData();
const params = [from, messageData.typedData];
web3.currentProvider.sendAsync(
{
method,
params,
from,
},
function (err, result) {
if (err) return console.dir(err);
if (result.error) {
alert(result.error.message);
return console.error('ERROR', result);
}
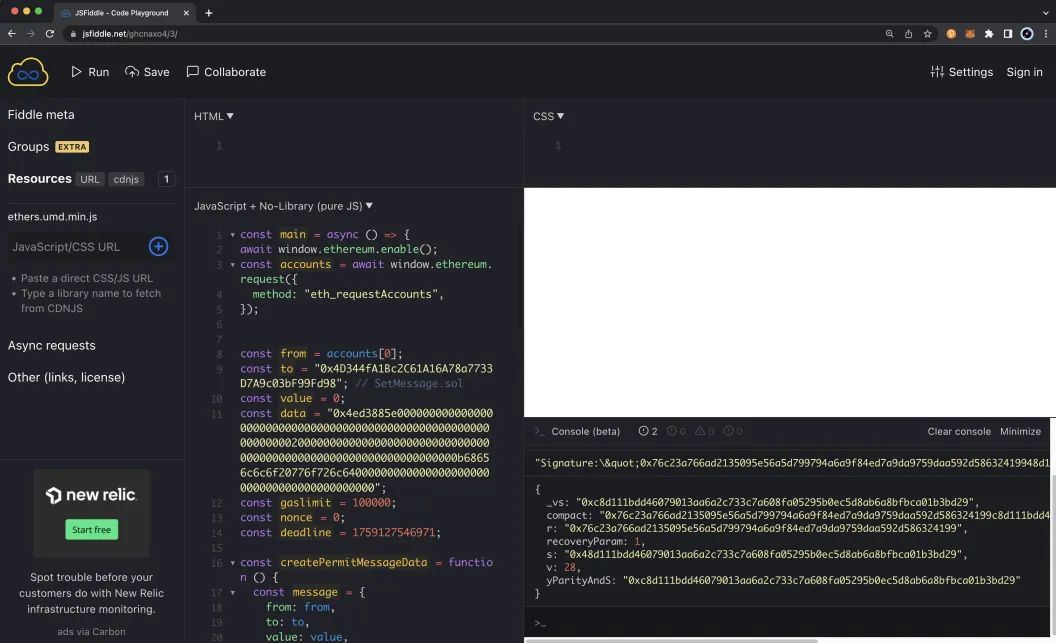
console.log('Signature:' + JSON.stringify(result.result));
const ethersSignature = ethers.Signature.from(result.result);
const formattedSignature = {
r: ethersSignature.r,
s: ethersSignature.s,
v: ethersSignature.v,
};
console.log(formattedSignature);
}
);
};
main();
To run the code, click Run at the top of the page (or you can also use control and s). MetaMask should pop up and prompt you to connect an account. Make sure to choose the account you want to sign the message with. Then go ahead and sign the message.
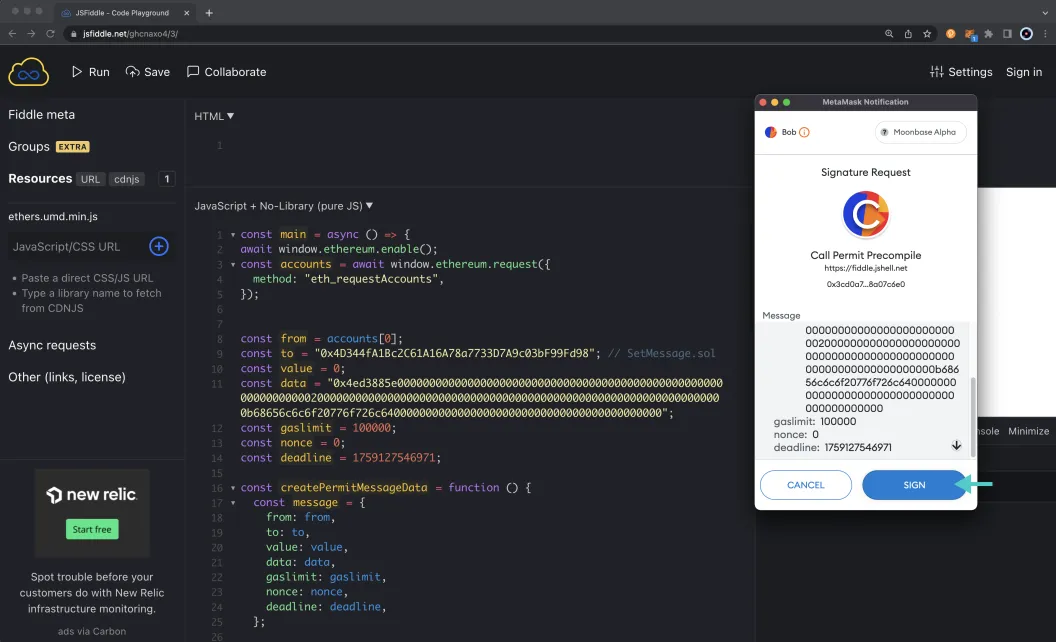
Once you've signed the message, go back to JSFiddle and if the console isn't already open, go ahead and open it to see the signature values include the v, r, and s, values. Copy these values as you'll need them when interacting with the Call Permit Precompile in the following sections.
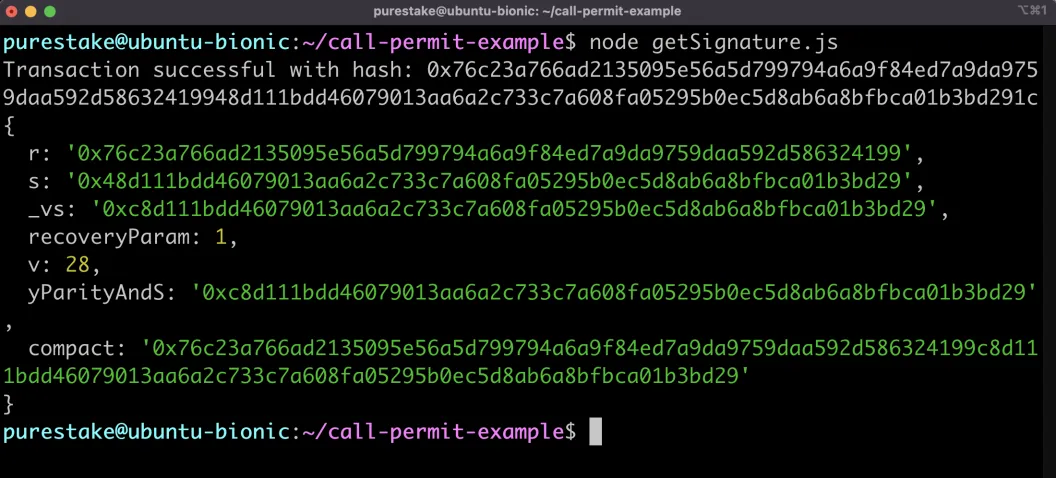
Use MetaMask's JS Signing Library
To generate the call permit signature using JavaScript and MetaMask's @metamask/eth-sig-util npm package, you'll first need to create a project locally. You can do so with the following commands:
mkdir call-permit-example && cd call-permit-example && touch getSignature.js
npm init -y
You should now have a file where you can create the script to get the signature along with a package.json file. Open the package.json file, and below the "dependencies" section, add:
"type": "module"
Next, you can install the MetaMask signing library and Ethers.js:
npm i @metamask/eth-sig-util ethers
Note
Never reveal your private keys as they give direct access to your funds. The following steps are for demonstration purposes only.
In the getSignature.js file, you can copy the following code snippet:
import { ethers } from 'ethers';
import { signTypedData, SignTypedDataVersion } from '@metamask/eth-sig-util';

const from = 'INSERT_FROM_ADDRESS';
const to = 'INSERT_TO_ADDRESS';
const value = 0;
const data =
  '0x4ed3885e0000000000000000000000000000000000000000000000000000000000000020000000000000000000000000000000000000000000000000000000000000000b68656c6c6f20776f726c64000000000000000000000000000000000000000000';
const gaslimit = 100000;
const nonce = 'INSERT_SIGNERS_NONCE';
const deadline = 'INSERT_DEADLINE';

const createPermitMessageData = () => {
  const message = {
    from: from,
    to: to,
    value: value,
    data: data,
    gaslimit: gaslimit,
    nonce: nonce,
    deadline: deadline,
  };

  const typedData = {
    types: {
      EIP712Domain: [
        { name: 'name', type: 'string' },
        { name: 'version', type: 'string' },
        { name: 'chainId', type: 'uint256' },
        { name: 'verifyingContract', type: 'address' },
      ],
      CallPermit: [
        { name: 'from', type: 'address' },
        { name: 'to', type: 'address' },
        { name: 'value', type: 'uint256' },
        { name: 'data', type: 'bytes' },
        { name: 'gaslimit', type: 'uint64' },
        { name: 'nonce', type: 'uint256' },
        { name: 'deadline', type: 'uint256' },
      ],
    },
    primaryType: 'CallPermit',
    domain: {
      name: 'Call Permit Precompile',
      version: '1',
      chainId: 1287,
      verifyingContract: '0x000000000000000000000000000000000000080a',
    },
    message: message,
  };

  return {
    typedData,
    message,
  };
};

const messageData = createPermitMessageData();

// For demo purposes only. Never store your private key in a JavaScript/TypeScript file
const signature = signTypedData({
  privateKey: Buffer.from('INSERT_FROM_ACCOUNT_PRIVATE_KEY', 'hex'),
  data: messageData.typedData,
  version: SignTypedDataVersion.V4,
});

console.log(`Transaction successful with hash: ${signature}`);

const ethersSignature = ethers.Signature.from(signature);
const formattedSignature = {
  r: ethersSignature.r,
  s: ethersSignature.s,
  v: ethersSignature.v,
};
console.log(formattedSignature);
To run the script, use the following command:
node getSignature.js
In the console, you should see the concatenated signature along with the values for the signature including the v, r, and s values. Copy these values as you'll need them when interacting with the Call Permit Precompile in the following sections.
Interact with the Solidity Interface
Now that you have generated the call permit signature you will be able to test out calling the dispatch function of the Call Permit Precompile.
Dispatch a Call
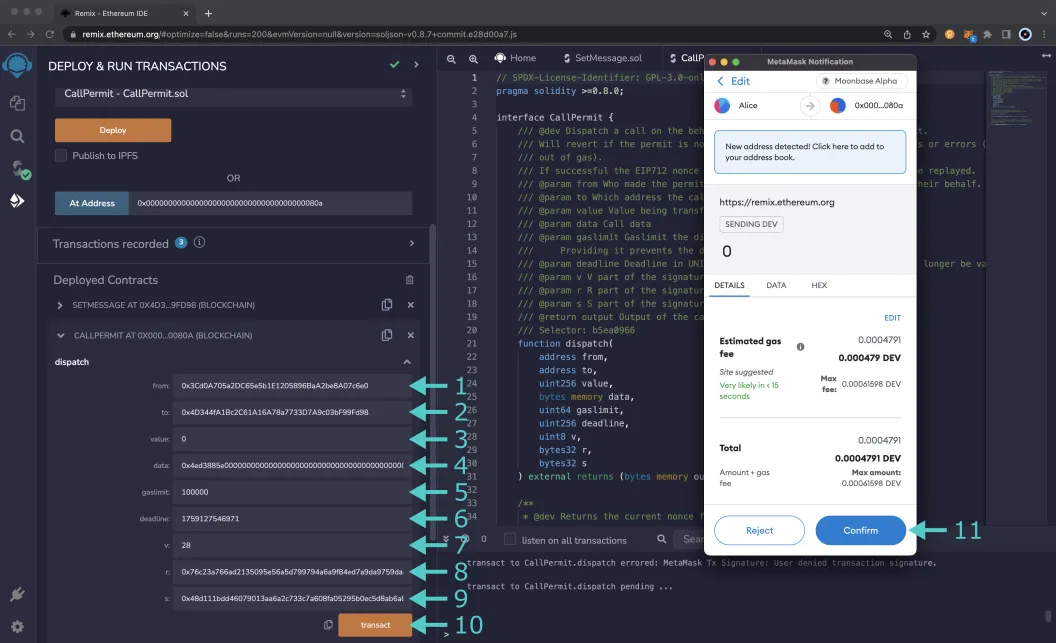
When you send the dispatch function, you'll need the same arguments as you used to sign the call permit. To get started, go back to the Deploy and Run tab in Remix and under the Deployed Contracts section expand the call permit contract. Make sure that you're connected to the account that you want to consume the call permit and pay the transaction fees with. Then take the following steps:
- For the from field, enter the account address you used to sign the call permit with
- Copy and paste the contract address of
SetMessage.sol - Enter
0for the value field - Enter the hex representation of the function selector for the
setfunction and the string you want to set as the message for theSetMessage.solcontract. For this example,hello worldcan be used:0x4ed3885e0000000000000000000000000000000000000000000000000000000000000020000000000000000000000000000000000000000000000000000000000000000b68656c6c6f20776f726c64000000000000000000000000000000000000000000 - Enter
100000for the gasLimit field - Enter the
deadlineyou used when signing the call permit - Copy the
vvalue you should have retrieved while generating the call permit signature and paste it into the v field - Copy the
rvalue you should have retrieved while generating the call permit signature and paste it into the r field - Copy the
svalue you should have retrieved while generating the call permit signature and paste it into the s field - Click transact to send the transaction
- MetaMask should pop-up and you can confirm the transaction
Once the transaction goes through, you can verify that the message was updated to hello world. To do so, you can:
- Expand the
SetMessage.solcontract - Click on get
- The result will appear below the function, and it should show
hello world
Congratulations! You've successfully generated a call permit signature and used it to dispatch a call on behalf of the call permit signer.
| Created: August 1, 2022