Interacting with the Batch Precompile
Introduction
The batch precompiled contract on Moonbeam allows developers to combine multiple EVM calls into one.
Currently, having users interact with multiple contracts would require multiple transaction confirmations in the user's wallet. An example would be approving a smart contract's access to a token, then transferring it. With the batch precompile, developers can enhance user experience with batched transactions as it minimizes the number of transactions a user is required to confirm to one. Additionally, gas fees can be reduced since batching avoids multiple base gas fees (the initial 21000 units of gas spent to begin a transaction).
The precompile interacts directly with Substrate's EVM pallet. The caller of the batch function will have their address act as the msg.sender for all subtransactions, but unlike delegate calls, the target contract will still affect its own storage. It is effectively the same as if the user signed multiple transactions, but with only one confirmation.
The precompile is located at the following address:
0x0000000000000000000000000000000000000808
0x0000000000000000000000000000000000000808
0x0000000000000000000000000000000000000808
Note
There can be some unintended consequences when using the precompiled contracts on Moonbeam. Please refer to the Security Considerations page for more information.
The Batch Solidity Interface
Batch.sol is a Solidity interface that allows developers to interact with the precompile's three methods.
The interface includes the following functions:
batchSome(address[] to, uint256[] value, bytes[] callData, uint64[] gasLimit) - performs multiple calls, where the same index of each array combine into the information required for a single subcall. If a subcall reverts, following subcalls will still be attempted
to- address[] array of addresses to direct subtransactions to, where each entry is a subtransactionvalue- uint256[] array of native currency values to send in the subtransactions, where the index corresponds to the subtransaction of the same index in the to array. If this array is shorter than the to array, all the following subtransactions will default to a value of 0callData- bytes[] array of call data to include in the subtransactions, where the index corresponds to the subtransaction of the same index in the to array. If this array is shorter than the to array, all of the following subtransactions will include no call datagasLimit- uint64[] array of gas limits in the subtransactions, where the index corresponds to the subtransaction of the same index in the to array. Values of 0 are interpreted as unlimited and will have all remaining gas of the batch transaction forwarded. If this array is shorter than the to array, all of the following subtransactions will have all remaining gas forwarded
batchSomeUntilFailure(address[] to, uint256[] value, bytes[] callData, uint64[] gasLimit) - performs multiple calls, where the same index of each array combine into the information required for a single subcall. If a subcall reverts, no following subcalls will be executed
to- address[] array of addresses to direct subtransactions to, where each entry is a subtransactionvalue- uint256[] array of native currency values to send in the subtransactions, where the index corresponds to the subtransaction of the same index in the to array. If this array is shorter than the to array, all the following subtransactions will default to a value of 0callData- bytes[] array of call data to include in the subtransactions, where the index corresponds to the subtransaction of the same index in the to array. If this array is shorter than the to array, all of the following subtransactions will include no call datagasLimit- uint64[] array of gas limits in the subtransactions, where the index corresponds to the subtransaction of the same index in the to array. Values of 0 are interpreted as unlimited and will have all remaining gas of the batch transaction forwarded. If this array is shorter than the to array, all of the following subtransactions will have all remaining gas forwarded
batchAll(address[] to, uint256[] value, bytes[] callData, uint64[] gasLimit) - performs multiple calls atomically, where the same index of each array combine into the information required for a single subcall. If a subcall reverts, all subcalls will revert
to- address[] array of addresses to direct subtransactions to, where each entry is a subtransactionvalue- uint256[] array of native currency values to send in the subtransactions, where the index corresponds to the subtransaction of the same index in the to array. If this array is shorter than the to array, all the following subtransactions will default to a value of 0callData- bytes[] array of call data to include in the subtransactions, where the index corresponds to the subtransaction of the same index in the to array. If this array is shorter than the to array, all of the following subtransactions will include no call datagasLimit- uint64[] array of gas limits in the subtransactions, where the index corresponds to the subtransaction of the same index in the to array. Values of 0 are interpreted as unlimited and will have all remaining gas of the batch transaction forwarded. If this array is shorter than the to array, all of the following subtransactions will have all remaining gas forwarded
The interface also includes the following required events:
- SubcallSucceeded(uint256 index) - emitted when subcall of the given index succeeds
- SubcallFailed(uint256 index) - emitted when a subcall of the given index fails
Interact with the Solidity Interface
Checking Prerequisites
To follow along with this tutorial, you will need to have:
- MetaMask installed and connected to Moonbase Alpha
- Create or have two accounts on Moonbase Alpha to test out the different features in the batch precompile
- At least one of the accounts will need to be funded with
DEVtokens. You can get DEV tokens for testing on Moonbase Alpha once every 24 hours from the Moonbase Alpha Faucet
Example Contract
The contract SimpleContract.sol will be used as an example of batching contract interactions, but in practice, any contract can be interacted with.
// SPDX-License-Identifier: GPL-3.0-only
pragma solidity ^0.8.30;

contract SimpleContract {
    mapping(uint256 => string) public messages;

    function setMessage(uint256 id, string calldata message) external {
        messages[id] = message;
    }
}
Remix Set Up
You can interact with the batch precompile using Remix. You'll need a copy of Batch.sol and SimpleContract.sol. To add the precompile to Remix and follow along with the tutorial, you will need to:
- Click on the File explorer tab
- Paste the
Batch.solcontract into a Remix file named Batch.sol - Paste the
SimpleContract.solcontract into a Remix file named SimpleContract.sol
Compile the Contract
Next, you will need to compile both files in Remix:
- Make sure that you have the Batch.sol file open
- Click on the Compile tab, second from top
- To compile the contract, click on Compile Batch.sol
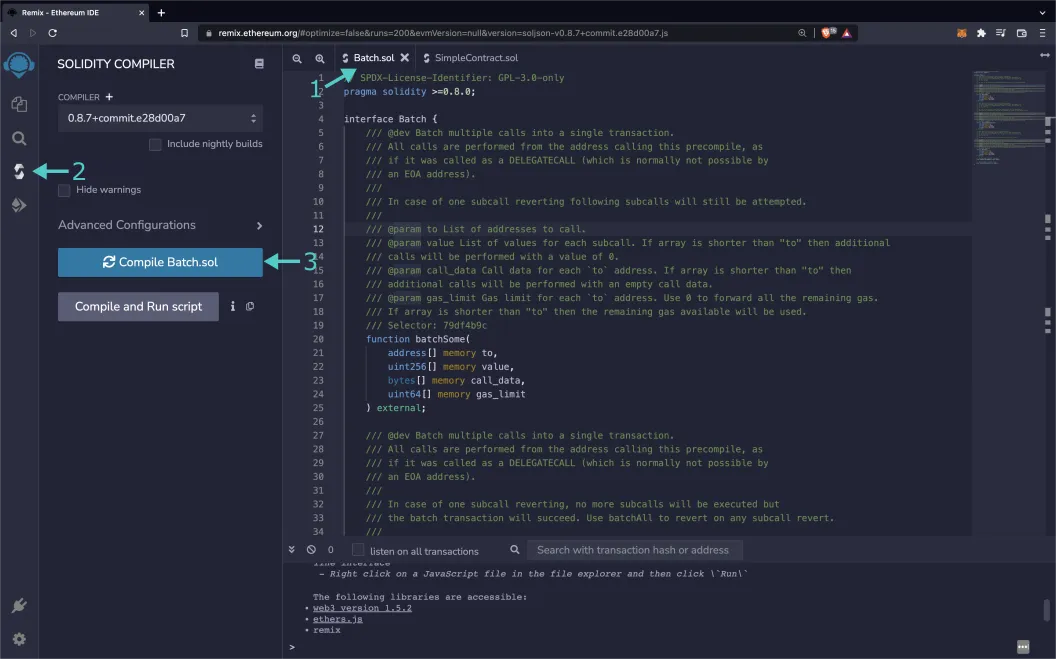
If the interface was compiled successfully, you will see a green checkmark next to the Compile tab.
Access the Precompile
Instead of deploying the batch precompile, you will access the interface given the address of the precompiled contract:
- Click on the Deploy and Run tab directly below the Compile tab in Remix. Please note the precompiled contract is already deployed
- Make sure Injected Provider - Metamask is selected in the ENVIRONMENT dropdown. Once you select Injected Provider - Metamask, you might be prompted by MetaMask to connect your account to Remix
- Make sure the correct account is displayed under ACCOUNT
- Ensure Batch - Batch.sol is selected in the CONTRACT dropdown. Since this is a precompiled contract, there is no need to deploy any code. Instead we are going to provide the address of the precompile in the At Address field
- Provide the address of the batch precompile:
0x0000000000000000000000000000000000000808and click At Address
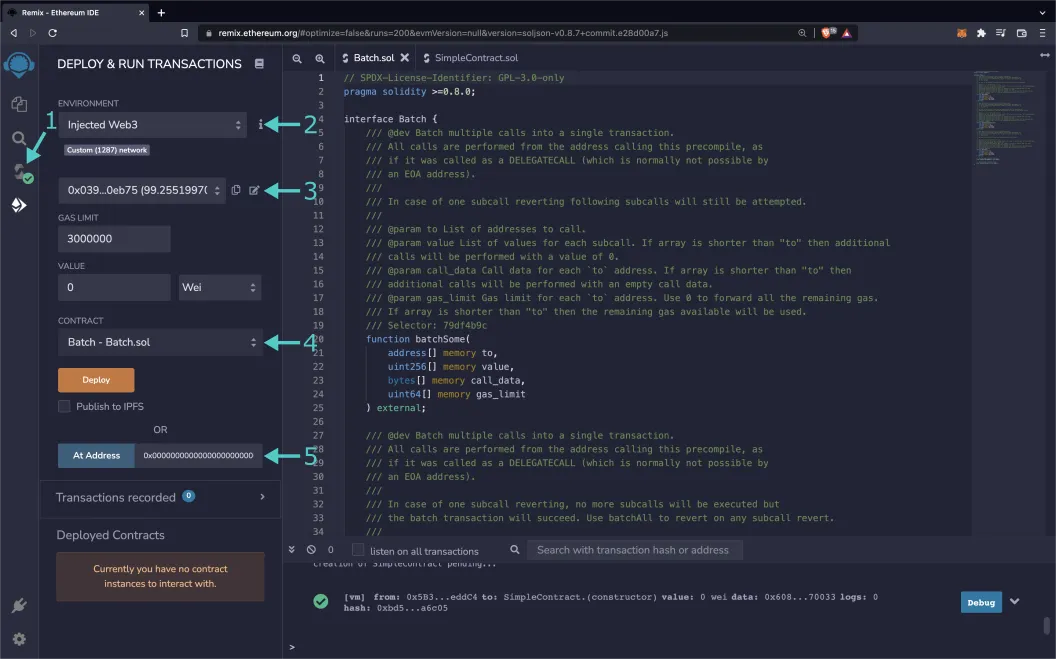
The BATCH precompile will appear in the list of Deployed Contracts.
Deploy Example Contract
On the other hand, SimpleContract.sol will be deployed as a new contract. Before starting this section, repeat the compilation step with the SimpleContract.sol file.
- Click on the Deploy and Run tab directly below the Compile tab in Remix
- Make sure Injected Provider - Metamask is selected in the ENVIRONMENT dropdown. Once you select Injected Provider - Metamask, you might be prompted by MetaMask to connect your account to Remix
- Make sure the correct account is displayed under ACCOUNT
- Ensure SimpleContract - SimpleContract.sol is selected in the CONTRACT dropdown
- Click Deploy
- Confirm the MetaMask transaction that appears by clicking Confirm

The SIMPLECONTRACT contract will appear in the list of Deployed Contracts.
Send Native Currency via Precompile
Sending native currency with the batch precompile is more involved than pressing a few buttons in Remix or MetaMask. For this example, you will be using the batchAll function to send native currency atomically.
Transactions have a value field to specify the amount of native currency being sent with it. In Remix, this is represented by the VALUE input in the DEPLOY & RUN TRANSACTIONS tab. However, for the batch precompile, this data is provided within the value array input of the batch functions.
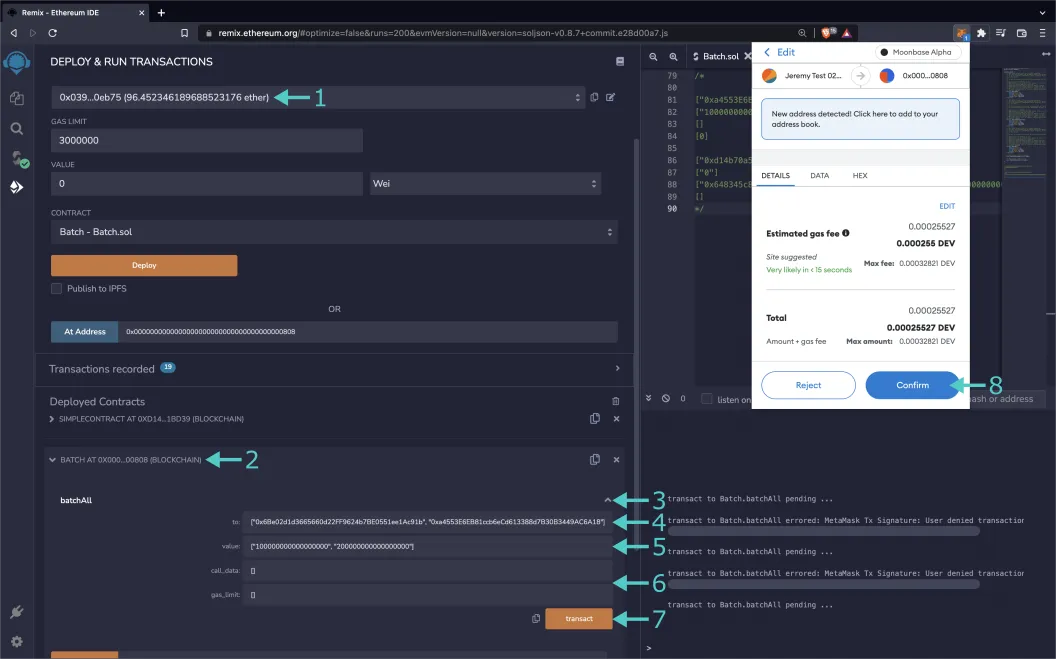
Try transferring native currency to two wallets of your choice via the batch precompile on Moonbase Alpha:
- Make sure that you have at least 0.5 DEV in your connected wallet
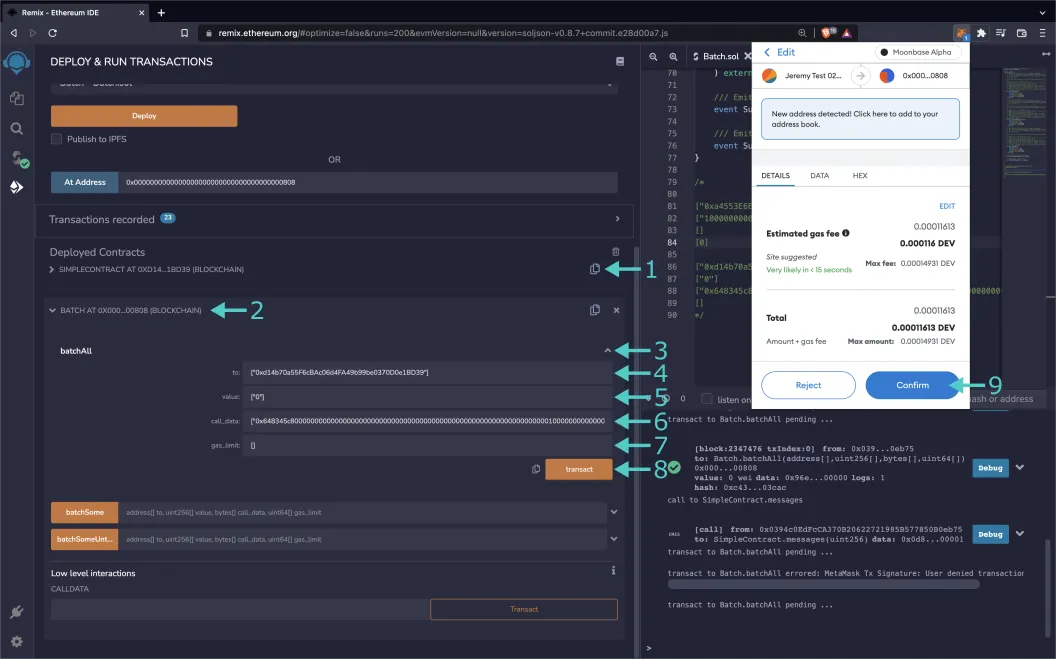
- Expand the batch contract under Deployed Contracts
- Expand the batchAll function
- For the to input, insert your addresses in the following format:
["INSERT_ADDRESS_1", "INSERT_ADDRESS_2"], where the first address corresponds to the first wallet of your choice and the second address corresponds to the second wallet of your choice - For the value input, insert the amount you wish to transfer in Wei for each address. For example,
["100000000000000000", "200000000000000000"]will transfer 0.1 DEV to the first address and 0.2 DEV to the second address - For both of the remaining callData and gasLimit inputs, insert
[]. Call data and gas limit are not a concern for transferring native currency - Press transact
- Press Confirm in the MetaMask extension to confirm the transaction
Once the transaction is complete, be sure to check both of the accounts' balances, either in MetaMask or in a block explorer. Congratulations! You've now sent a batched transfer via the batch precompile.
Note
Typically if you wanted to send the native currency to or through a contract, you would have to set the value within the overall transaction object and interact with a payable function. However, since the batch precompile interacts directly with Substrate code, this is not a typical Ethereum transaction and is thus not necessary.
Find a Contract Interaction's Call Data
Visual interfaces like Remix and handy libraries like Ethers.js hide the way that Ethereum transactions interact with Solidity smart contracts. The name and input types of a function are hashed into a function selector and the input data is encoded. These two pieces are then combined and sent as the transaction's call data. To send a subtransaction within a batch transaction, the sender needs to know its call data beforehand.
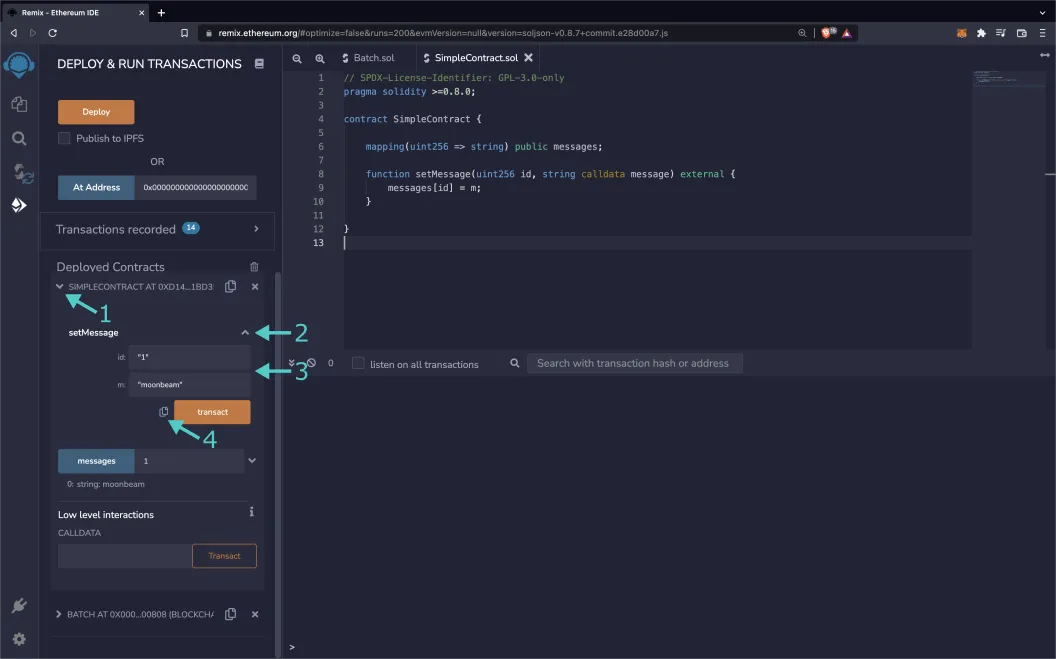
Try finding a transaction's call data using Remix:
- Expand the
SimpleContract.solcontract under Deployed Contracts - Expand the setMessage function
- Enter the input of the function. For this example, id will be
1and message will be"moonbeam" - Instead of sending the transaction, click the copy button next to the transact button to copy the call data
Now you have the transaction's call data! Considering the example values of 1 and "moonbeam", we can keep an eye out for their encoded values in the call data:
0x648345c8                                                        // function selector
0000000000000000000000000000000000000000000000000000000000000001  // 1 id
0000000000000000000000000000000000000000000000000000000000000040  // 64 string offset
0000000000000000000000000000000000000000000000000000000000000008  // 8 length in bytes
6d6f6f6e6265616d000000000000000000000000000000000000000000000000  // "moonbeam" in bytes
The call data can be broken into five lines, where:
- The first line is the function selector
- The second line is equal to 1, which is the id that was provided
- What's left has to do with the message input. These last three lines are tricky, since strings are a dynamic type with a dynamic length. The third line refers to an offset to define where the string's data starts. The fourth line refers to the string's length, in this case 8 because "moonbeam" is 8 bytes long . Finally, the fifth line is "moonbeam" in hexadecimal format (8 ASCII characters are 16 hexadecimal characters) left aligned and with zeros for padding
Function Interaction via Precompile
This section's example will be using the batchAll function that will ensure the transactions are resolved atomically. Keep in mind that there are also two other batch functions that can either continue subtransactions despite errors or halt subsequent subtransactions but not revert previous ones.
Interacting with a function is very similar to sending a native currency, since they are both transactions. However, call data is required to properly provide input to functions and a sender may desire to limit the amount of gas spent in each subtransaction.
The callData and gasLimit fields are more relevant for subtransactions that interact with contracts. For each function in the batch interface, the callData input is an array where each index corresponds to the call data for each recipient of the subtransaction, that is, each to input. If the size of the callData array is less than the to array, the remaining subtransactions will have no call data (functions with no inputs). The gasLimit input is an array that corresponds to the amount of gas that each can spend for each subtransaction. If its value at an index is 0 or the index is the size of the array or greater (and smaller than the to array's size), all of the remaining gas from the previous subtransaction is forwarded.
To use the precompile to send an atomic batch transaction, take the following steps:
- Copy the
SimpleContract.solcontract's address with the copy button on the right side of its header. Be sure to also have the call data from the previous section - Expand the batch contract under Deployed Contracts
- Expand the batchAll function
- For the to input, insert the address of the
SimpleContract.solcontract that you previously copied in the following format:["INSERT_SIMPLE_CONTRACT_ADDRESS"] - For the value input, since
SimpleContract.soldoes not require any native currency to be paid to it, insert["0"]for 0 Wei - For the callData input, insert your call data from the previous section in the following format:
["INSERT_CALL_DATA"] - For the gasLimit input, insert
[]. You can put in a gas limit value, but it is optional - Press transact
- Press Confirm in the MetaMask extension to confirm the transaction
If you used the same call data as the tutorial, check to make sure that the transaction has been successful:
- Expand the
SimpleContract.solcontract under Deployed Contracts - To the right of the messages button, insert
1 - Press the blue messages button
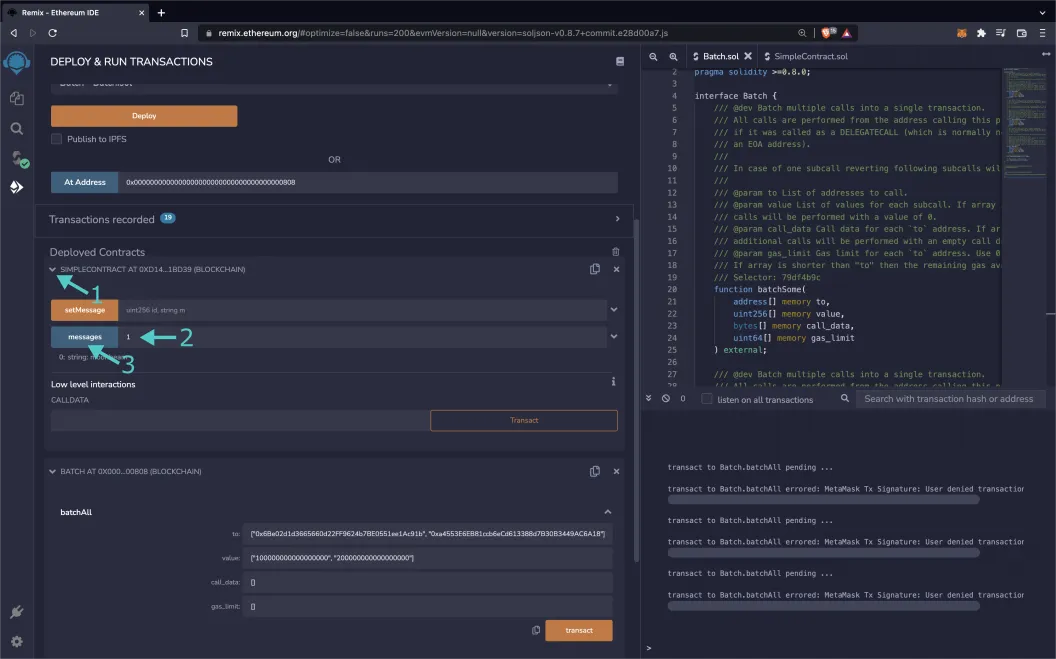
The phrase "moonbeam" should appear underneath it. Congratulations! You have interacted with a function with the batch precompile.
Combining Subtransactions
So far, transferring native currency and interacting with functions have been separate, but they can be intertwined.
The following four strings can be combined as inputs for a batch transaction. They will transact 1 DEV to the public Gerald (0x6Be02d1d3665660d22FF9624b7BE0551ee1Ac91b) account, and interact with a predeployed SimpleContract.sol contract twice. Here is a break-down:
There are three subtransactions, so there are three addresses in the to input array. The first is the public Gerald account, the next two are a predeployed SimpleContract.sol contract. You can replace the last two with your own instance of SimpleContract.sol if you wish. Or, replace only one: you can interact with multiple contracts in a single message.
[
  "0x6Be02d1d3665660d22FF9624b7BE0551ee1Ac91b",
  "0xd14b70a55F6cBAc06d4FA49b99be0370D0e1BD39",
  "0xd14b70a55F6cBAc06d4FA49b99be0370D0e1BD39"
]
There will also be three values for the value array. The first address in the to input array has to do with sending 1 DEV, so 1 DEV in Wei is within the array. The following two values are 0 because the function that their subtransactions are interacting with do not accept or require native currency.
["1000000000000000000", "0", "0"]
You will need three values for the callData array. Since transferring native currency does not require call data, the string is simply blank. The second and third values in the array correspond to invocations of setMessage that set messages to ids 5 and 6.
[
  "0x",
  "0x648345c8000000000000000000000000000000000000000000000000000000000000000500000000000000000000000000000000000000000000000000000000000000400000000000000000000000000000000000000000000000000000000000000009796f752061726520610000000000000000000000000000000000000000000000",
  "0x648345c800000000000000000000000000000000000000000000000000000000000000060000000000000000000000000000000000000000000000000000000000000040000000000000000000000000000000000000000000000000000000000000000e61206d6f6f6e6265616d2070726f000000000000000000000000000000000000"
]
The final input is for gas_input. This array will be left empty to forward all remaining gas to each subtransaction.
[]
Try sending a batched transaction with these inputs in Remix the same way you batched a function call.
And that's it! You've successfully interacted with the ERC-20 precompile using MetaMask and Remix!
Ethereum Development Libraries
If you have followed the Ethers.js tutorial on Moonbeam, you may find it difficult to find the call data for a function. The answer is hidden within Ether's Interface object, where the encodeFunctionData function allows you to input your function name and inputs to receive the resultant call data.
Note
The code snippets presented in the following sections are not meant for production environments. Please make sure you adapt it for each use-case.
// Import the contract ABI
const { abi } = require('./INSERT_ABI_PATH');

// Use ABI to create an interface
const yourContractInterface = new ethers.Interface(abi);

// Find call data for the setMessage function
const callData = yourContractInterface.encodeFunctionData(
  'INSERT_FUNCTION_NAME',
  [
    'INSERT_INPUT_1',
    'INSERT_INPUT_2',
    // ...
  ]
);
// Import the contract ABI
const { abi } = require('./INSERT_ABI_PATH');

// Find call data for the setMessage function
const callData = web3.eth.abi.encodeFunctionCall(abi, [
  'INSERT_INPUT_1',
  'INSERT_INPUT_2',
  // ...
]);
# Import the ABI and bytecode
from compile import abi, bytecode

# Create contract instance
your_contract = web3.eth.contract(abi=abi, bytecode=bytecode)

# Encode the contract call
call_data = your_contract.encodeABI(
    fn_name="INSERT_FUNCTION_NAME", args=["INSERT_INPUT_1", "INSERT_INPUT_2", ...]
)
Afterwards, you should be all set to interact with the batch precompile as one typically would with a contract in Ethers.
| Created: July 9, 2022