The Multisig Pallet
Introduction
Multisig wallets are a special type of wallet that requires multiple signatures in order to execute transactions, as the name implies. A multisig has a set of signers and defines a threshold for the number of signatures required to approve a transaction. This type of wallet provides an additional layer of security and decentralization.
The Multisig Pallet on Moonbeam taps into Substrate functionality to allow for the ability to natively approve and dispatch calls from a multisig. With the Multisig Pallet, multiple signers, also referred to as signatories in Substrate, approve and dispatch transactions from an origin that is derivable deterministically from the set of signers' account IDs and the threshold for the number of accounts from the set that must approve calls before they can be dispatched.
This page will provide an overview of the extrinsics, storage methods, and getters for the pallet constants available in the Multisig Pallet on Moonbeam. It will also include a brief demo on how to create a multisig account and send a transaction that requires two of three signers to approve and dispatch the transaction.
Multisig Pallet Interface
Extrinsics
The Multisig Pallet provides the following extrinsics (functions):
asMulti(threshold, otherSignatories, maybeTimepoint, call, maxWeight) - approves and if possible dispatches a call from a composite origin formed from a number of signed origins (a multisig). If the call has been approved by enough of the other signatories, the call will be dispatched. The depositBase will be reserved if this is the first approval plus the threshold times the depositFactor. The total reserved amount will be returned once the call is dispatched or cancelled. This function should be used if it is the final approval, otherwise you'll want to use approveAsMulti instead since it only requires a hash of the call
threshold- The total number of approvals required for the dispatch to be executedotherSignatories- The accounts (other than the sender) who can approve the dispatchmaybeTimepoint- The timepoint (block number and transaction index) of the first approval transaction. Must beNoneif this is the first approvalcall- The actual call to be executed once approvedmaxWeight- The maximum weight allowed for the dispatch
import { ApiPromise, WsProvider } from '@polkadot/api';
import { Keyring } from '@polkadot/keyring';
import { bnToHex, stringToHex } from '@polkadot/util';

const main = async () => {
  // Initialize API connection
  const api = await ApiPromise.create({
    provider: new WsProvider('wss://moonbase-alpha.public.blastapi.io'),
  });
  const keyring = new Keyring({ type: 'ethereum' });

  try {
    // Configuration
    const PRIVATE_KEY = 'INSERT_PRIVATE_KEY';
    const MULTISIG_ADDRESS = 'INSERT_ADDRESS_MULTISIG';

    // Multisig parameters
    const threshold = 2;
    const otherSignatories = ['INSERT_SIGNER_1', 'INSERT_SIGNER_2'].sort(); // Addresses must be sorted

    // Create an EVM transaction
    const TARGET_ADDRESS = 'INSERT_DESTINATION_ADDRESS';
    const VALUE = '1000000000000000000'; // 1 TOKEN in Wei

    // Construct the EVM call data
    const call = api.tx.evm.call(
      MULTISIG_ADDRESS, // source address
      TARGET_ADDRESS, // target address
      VALUE, // value in Wei
      '0x', // input data (empty for simple transfer)
      '2100000', // gas limit
      '1000000000', // max fee per gas (1 GWei)
      '1000000000', // max priority fee per gas (1 GWei)
      null, // nonce (optional)
      [] // access list (optional)
    );

    // Weight limits for the dispatch
    const maxWeight = {
      refTime: '806342022',
      proofSize: '211174',
    };

    const account = keyring.addFromUri(PRIVATE_KEY);

    // Check for existing timepoint
    const callHash = call.method.hash.toHex();
    const multisigs = await api.query.multisig.multisigs(
      MULTISIG_ADDRESS,
      callHash
    );

    let maybeTimepoint = null;
    if (multisigs.isSome) {
      const multisigInfo = multisigs.unwrap();
      maybeTimepoint = {
        height: multisigInfo.when.height.toNumber(),
        index: multisigInfo.when.index.toNumber(),
      };
    }

    console.log('Validation checks:');
    console.log('Account address:', account.address);
    console.log('Multisig address:', MULTISIG_ADDRESS);
    console.log('Other signatories:', otherSignatories);
    console.log('Threshold:', threshold);
    console.log('Call hash:', callHash);
    console.log('Max weight:', maxWeight);
    console.log('Timepoint:', maybeTimepoint);

    // Create and send the asMulti transaction
    const tx = api.tx.multisig.asMulti(
      threshold,
      otherSignatories,
      maybeTimepoint,
      call,
      maxWeight
    );

    // Sign and send the transaction
    await tx.signAndSend(account, ({ status, events }) => {
      if (status.isInBlock) {
        console.log(`Transaction included in block hash: ${status.asInBlock}`);

        // Process events
        events.forEach(({ event }) => {
          const { section, method, data } = event;
          console.log(`\t${section}.${method}:`, data.toString());

          // Handle any failures
          if (section === 'system' && method === 'ExtrinsicFailed') {
            const [dispatchError] = data;
            let errorInfo;

            if (dispatchError.isModule) {
              const decoded = api.registry.findMetaError(
                dispatchError.asModule
              );
              errorInfo = `${decoded.section}.${decoded.name}: ${decoded.docs}`;
            } else {
              errorInfo = dispatchError.toString();
            }

            console.error('Failure reason:', errorInfo);
          }
        });

        // Check for specific multisig events
        const multisigEvent = events.find(
          ({ event }) =>
            event.section === 'multisig' &&
            (event.method === 'MultisigExecuted' ||
              event.method === 'NewMultisig')
        );

        if (multisigEvent) {
          console.log('Multisig event:', multisigEvent.event.method);
        }

        process.exit(0);
      }
    });
  } catch (error) {
    console.error('Error in multisig execution:', error);
    process.exit(1);
  }
};

// Execute the script
main().catch((error) => {
  console.error('Script error:', error);
  process.exit(1);
});
Validation checks:
Account address: 0x3B939FeaD1557C741Ff06492FD0127bd287A421e
Multisig address: 0x2c6a9d09E7C01f3D4154000193BDDcC597523221
Other signatories: [
  '0x253b05C595222a1e3E7Bcf1611cA1307194a030F',
  '0x4B718e1CCeb83bfE87FD5f79cb98FFc2d4600C7E'
]
Threshold: 2
Call hash: 0xdbbc67f35ca518976f4d392fb32745786e6b58fc526fab0dafb6eda44d9850a3
Max weight: { refTime: '806342022', proofSize: '211174' }
Timepoint: null
Transaction included in block hash: 0x0050f1b137e5814dc4eb16390d10287d9234de1d5827dd64ba85c878d4c53849
    balances.Withdraw: ["0x3B939FeaD1557C741Ff06492FD0127bd287A421e",4858229333763]
    balances.Reserved: ["0x3B939FeaD1557C741Ff06492FD0127bd287A421e","0x00000000000000000e1107d468560000"]
    multisig.NewMultisig: ["0x3B939FeaD1557C741Ff06492FD0127bd287A421e","0x2c6a9d09E7C01f3D4154000193BDDcC597523221","0xdbbc67f35ca518976f4d392fb32745786e6b58fc526fab0dafb6eda44d9850a3"]
    balances.Deposit: ["0x3B939FeaD1557C741Ff06492FD0127bd287A421e",1222550823750]
    balances.Deposit: ["0x6d6F646c70632f74727372790000000000000000",727135702003]
    transactionPayment.TransactionFeePaid: ["0x3B939FeaD1557C741Ff06492FD0127bd287A421e",3635678510013,0]
    system.ExtrinsicSuccess: [{"weight":{"refTime":404917324,"proofSize":5587},"class":"Normal","paysFee":"Yes"}]
Multisig event: NewMultisig
approveAsMulti(threshold, otherSignatories, maybeTimepoint, callHash, maxWeight) - approves a call from a composite origin. For the final approval, you'll want to use asMulti instead
threshold- The total number of approvals required for the dispatch to be executedotherSignatories- The accounts (other than the sender) who can approve the dispatchmaybeTimepoint- The timepoint (block number and transaction index) of the first approval transaction. Must beNoneif this is the first approvalcallHash- The hash of the call to be executedmaxWeight- The maximum weight allowed for the dispatch
import { ApiPromise, WsProvider } from '@polkadot/api';
import { Keyring } from '@polkadot/keyring';

const main = async () => {
  const api = await ApiPromise.create({
    provider: new WsProvider('wss://moonbase-alpha.public.blastapi.io'),
  });

  const keyring = new Keyring({ type: 'ethereum' });

  try {
    const PRIVATE_KEY = 'INSERT_PRIVATE_KEY';

    const threshold = 2;
    const otherSignatories = ['INSERT_SIGNER_1', 'INSERT_SIGNER_2'].sort();

    const callHash = 'INSERT_CALL_HASH';

    const maxWeight = {
      refTime: '806342022',
      proofSize: '211174',
    };

    // Query the multisig address instead of the signer's address
    const MULTISIG_ADDRESS = 'INSERT_ADDRESS_MULTISIG';
    const multisigs = await api.query.multisig.multisigs(
      MULTISIG_ADDRESS,
      callHash
    );

    if (!multisigs.isSome) {
      console.error('No existing multisig found for this call hash');
      process.exit(1);
    }

    const multisigInfo = multisigs.unwrap();
    const timepoint = {
      height: multisigInfo.when.height.toNumber(),
      index: multisigInfo.when.index.toNumber(),
    };

    const account = keyring.addFromUri(PRIVATE_KEY);

    console.log('Found timepoint:', timepoint);
    console.log('Validation checks:');
    console.log('Account address:', account.address);
    console.log('Multisig address:', MULTISIG_ADDRESS);
    console.log('Other signatories:', otherSignatories);
    console.log('Threshold:', threshold);
    console.log('Call hash:', callHash);
    console.log('Max weight:', maxWeight);
    console.log('Timepoint:', timepoint);

    const tx = api.tx.multisig.approveAsMulti(
      threshold,
      otherSignatories,
      timepoint,
      callHash,
      maxWeight
    );

    await tx.signAndSend(account, ({ status, events }) => {
      if (status.isInBlock) {
        console.log(`Transaction included in block hash: ${status.asInBlock}`);

        events.forEach(({ event }) => {
          const { section, method, data } = event;
          console.log(`\t${section}.${method}:`, data.toString());

          if (section === 'system' && method === 'ExtrinsicFailed') {
            const [dispatchError] = data;
            let errorInfo;

            if (dispatchError.isModule) {
              const decoded = api.registry.findMetaError(
                dispatchError.asModule
              );
              errorInfo = `${decoded.section}.${decoded.name}: ${decoded.docs}`;
            } else {
              errorInfo = dispatchError.toString();
            }

            console.error('Failure reason:', errorInfo);
          }
        });
        process.exit(0);
      }
    });
  } catch (error) {
    console.error('Error in multisig approval:', error);
    process.exit(1);
  }
};

main().catch((error) => {
  console.error('Script error:', error);
  process.exit(1);
});
Found timepoint: { height: 9174086, index: 5 }
Validation checks:
Account address: 0x3B939FeaD1557C741Ff06492FD0127bd287A421e
Multisig address: 0x2c6a9d09E7C01f3D4154000193BDDcC597523221
Other signatories: [
  '0x253b05C595222a1e3E7Bcf1611cA1307194a030F',
  '0x4B718e1CCeb83bfE87FD5f79cb98FFc2d4600C7E'
]
Threshold: 2
Call hash: 0xa2902805948bdd92fcaf661965215efd6a5980d0092c065e7470859c1b37b6a9
Max weight: { refTime: '806342022', proofSize: '211174' }
Timepoint: { height: 9174086, index: 5 }
Transaction included in block hash: 0xb7b0f712dc7aa3d471e1db89e0d182b59e1febf8bb1df73a03f36417fe19b506
    balances.Withdraw: ["0x3B939FeaD1557C741Ff06492FD0127bd287A421e",4512391685922]
    multisig.MultisigApproval: ["0x3B939FeaD1557C741Ff06492FD0127bd287A421e",{"height":9174086,"index":5},"0x2c6a9d09E7C01f3D4154000193BDDcC597523221","0xa2902805948bdd92fcaf661965215efd6a5980d0092c065e7470859c1b37b6a9"]
    balances.Deposit: ["0x3B939FeaD1557C741Ff06492FD0127bd287A421e",1025179732500]
    balances.Deposit: ["0x6d6F646c70632f74727372790000000000000000",697442390685]
    transactionPayment.TransactionFeePaid: ["0x3B939FeaD1557C741Ff06492FD0127bd287A421e",3487211953422,0]
    system.ExtrinsicSuccess: [{"weight":{"refTime":389364247,"proofSize":5587},"class":"Normal","paysFee":"Yes"}]
asMultiThreshold(otherSignatories, call) - immediately dispatches a multisig call using a single approval from the caller
otherSignatories- The accounts (other than the sender) who can approve the dispatchcall- The actual call to be executed once approved
import { ApiPromise, WsProvider } from '@polkadot/api';
import { Keyring } from '@polkadot/keyring';

const main = async () => {
  const api = await ApiPromise.create({
    provider: new WsProvider('wss://moonbase-alpha.public.blastapi.io'),
  });
  const keyring = new Keyring({ type: 'ethereum' });

  try {
    const PRIVATE_KEY = 'INSERT_PRIVATE_KEY';

    const threshold = 2;
    const otherSignatories = ['INSERT_SIGNER_1', 'INSERT_SIGNER_2'].sort();

    const callHash = 'INSERT_CALL_HASH';

    const maxWeight = {
      refTime: '806342022',
      proofSize: '211174',
    };

    const MULTISIG_ADDRESS = 'INSERT_ADDRESS_MULTISIG';
    const multisigs = await api.query.multisig.multisigs(
      MULTISIG_ADDRESS,
      callHash
    );

    if (!multisigs.isSome) {
      console.error('No existing multisig found for this call hash');
      process.exit(1);
    }

    const multisigInfo = multisigs.unwrap();
    const timepoint = {
      height: multisigInfo.when.height.toNumber(),
      index: multisigInfo.when.index.toNumber(),
    };

    const account = keyring.addFromUri(PRIVATE_KEY);

    console.log('Found timepoint:', timepoint);
    console.log('Validation checks:');
    console.log('Account address:', account.address);
    console.log('Multisig address:', MULTISIG_ADDRESS);
    console.log('Other signatories:', otherSignatories);
    console.log('Threshold:', threshold);
    console.log('Call hash:', callHash);
    console.log('Max weight:', maxWeight);
    console.log('Timepoint:', timepoint);

    const tx = api.tx.multisig.approveAsMulti(
      threshold,
      otherSignatories,
      timepoint,
      callHash,
      maxWeight
    );

    await tx.signAndSend(account, ({ status, events }) => {
      if (status.isInBlock) {
        console.log(`Transaction included in block hash: ${status.asInBlock}`);

        events.forEach(({ event }) => {
          const { section, method, data } = event;
          console.log(`\t${section}.${method}:`, data.toString());

          if (section === 'system' && method === 'ExtrinsicFailed') {
            const [dispatchError] = data;
            let errorInfo;

            if (dispatchError.isModule) {
              const decoded = api.registry.findMetaError(
                dispatchError.asModule
              );
              errorInfo = `${decoded.section}.${decoded.name}: ${decoded.docs}`;
            } else {
              errorInfo = dispatchError.toString();
            }

            console.error('Failure reason:', errorInfo);
          }
        });
        process.exit(0);
      }
    });
  } catch (error) {
    console.error('Error in multisig approval:', error);
    process.exit(1);
  }
};

main().catch((error) => {
  console.error('Script error:', error);
  process.exit(1);
});
Found timepoint: { height: 9174086, index: 5 }
Validation checks:
Account address: 0x3B939FeaD1557C741Ff06492FD0127bd287A421e
Multisig address: 0x2c6a9d09E7C01f3D4154000193BDDcC597523221
Other signatories: [
  '0x253b05C595222a1e3E7Bcf1611cA1307194a030F',
  '0x4B718e1CCeb83bfE87FD5f79cb98FFc2d4600C7E'
]
Threshold: 2
Call hash: 0xa2902805948bdd92fcaf661965215efd6a5980d0092c065e7470859c1b37b6a9
Max weight: { refTime: '806342022', proofSize: '211174' }
Timepoint: { height: 9174086, index: 5 }
Transaction included in block hash: 0xb7b0f712dc7aa3d471e1db89e0d182b59e1febf8bb1df73a03f36417fe19b506
    balances.Withdraw: ["0x3B939FeaD1557C741Ff06492FD0127bd287A421e",4512391685922]
    multisig.MultisigApproval: ["0x3B939FeaD1557C741Ff06492FD0127bd287A421e",{"height":9174086,"index":5},"0x2c6a9d09E7C01f3D4154000193BDDcC597523221","0xa2902805948bdd92fcaf661965215efd6a5980d0092c065e7470859c1b37b6a9"]
    balances.Deposit: ["0x3B939FeaD1557C741Ff06492FD0127bd287A421e",1025179732500]
    balances.Deposit: ["0x6d6F646c70632f74727372790000000000000000",697442390685]
    transactionPayment.TransactionFeePaid: ["0x3B939FeaD1557C741Ff06492FD0127bd287A421e",3487211953422,0]
    system.ExtrinsicSuccess: [{"weight":{"refTime":389364247,"proofSize":5587},"class":"Normal","paysFee":"Yes"}]
cancelAsMulti(threshold, otherSignatories, maybeTimepoint, callHash) - cancels a preexisting, ongoing call from a composite origin. Any reserved deposit will be returned upon successful cancellation
threshold- The total number of approvals required for the dispatch to be executedotherSignatories- The accounts (other than the sender) who can approve the dispatchmaybeTimepoint- The timepoint (block number and transaction index) of the first approval transaction. Must beNoneif this is the first approvalcallHash- The hash of the call to be executed
import { ApiPromise, WsProvider } from '@polkadot/api';
import { Keyring } from '@polkadot/keyring';

const main = async () => {
  const api = await ApiPromise.create({
    provider: new WsProvider('wss://moonbase-alpha.public.blastapi.io'),
  });

  const keyring = new Keyring({ type: 'ethereum' });

  try {
    const PRIVATE_KEY = 'INSERT_PRIVATE_KEY';

    const threshold = 2;
    const otherSignatories = ['INSERT_SIGNER_1', 'INSERT_SIGNER_2'].sort();

    const callHash = 'INSERT_CALL_HASH';

    // Query the multisig address for the timepoint
    const MULTISIG_ADDRESS = 'INSERT_ADDRESS_MULTISIG';
    const multisigs = await api.query.multisig.multisigs(
      MULTISIG_ADDRESS,
      callHash
    );

    if (!multisigs.isSome) {
      console.error('No existing multisig found for this call hash');
      process.exit(1);
    }

    const multisigInfo = multisigs.unwrap();
    const timepoint = {
      height: multisigInfo.when.height.toNumber(),
      index: multisigInfo.when.index.toNumber(),
    };

    const account = keyring.addFromUri(PRIVATE_KEY);

    console.log('Found timepoint:', timepoint);
    console.log('Validation checks:');
    console.log('Account address:', account.address);
    console.log('Multisig address:', MULTISIG_ADDRESS);
    console.log('Other signatories:', otherSignatories);
    console.log('Threshold:', threshold);
    console.log('Call hash:', callHash);
    console.log('Timepoint:', timepoint);

    const tx = api.tx.multisig.cancelAsMulti(
      threshold,
      otherSignatories,
      timepoint,
      callHash
    );

    await tx.signAndSend(account, ({ status, events }) => {
      if (status.isInBlock) {
        console.log(`Transaction included in block hash: ${status.asInBlock}`);

        events.forEach(({ event }) => {
          const { section, method, data } = event;
          console.log(`\t${section}.${method}:`, data.toString());

          if (section === 'system' && method === 'ExtrinsicFailed') {
            const [dispatchError] = data;
            let errorInfo;

            if (dispatchError.isModule) {
              const decoded = api.registry.findMetaError(
                dispatchError.asModule
              );
              errorInfo = `${decoded.section}.${decoded.name}: ${decoded.docs}`;
            } else {
              errorInfo = dispatchError.toString();
            }

            console.error('Failure reason:', errorInfo);
          }
        });
        process.exit(0);
      }
    });
  } catch (error) {
    console.error('Error in multisig cancellation:', error);
    process.exit(1);
  }
};

main().catch((error) => {
  console.error('Script error:', error);
  process.exit(1);
});
Found timepoint: { height: 9174086, index: 5 }
Validation checks:
Account address: 0x3B939FeaD1557C741Ff06492FD0127bd287A421e
Multisig address: 0x2c6a9d09E7C01f3D4154000193BDDcC597523221
Other signatories: [
  '0x253b05C595222a1e3E7Bcf1611cA1307194a030F',
  '0x4B718e1CCeb83bfE87FD5f79cb98FFc2d4600C7E'
]
Threshold: 2
Call hash: 0xa2902805948bdd92fcaf661965215efd6a5980d0092c065e7470859c1b37b6a9
Max weight: { refTime: '806342022', proofSize: '211174' }
Timepoint: { height: 9174086, index: 5 }
Transaction included in block hash: 0xb7b0f712dc7aa3d471e1db89e0d182b59e1febf8bb1df73a03f36417fe19b506
    balances.Withdraw: ["0x3B939FeaD1557C741Ff06492FD0127bd287A421e",4512391685922]
    multisig.MultisigApproval: ["0x3B939FeaD1557C741Ff06492FD0127bd287A421e",{"height":9174086,"index":5},"0x2c6a9d09E7C01f3D4154000193BDDcC597523221","0xa2902805948bdd92fcaf661965215efd6a5980d0092c065e7470859c1b37b6a9"]
    balances.Deposit: ["0x3B939FeaD1557C741Ff06492FD0127bd287A421e",1025179732500]
    balances.Deposit: ["0x6d6F646c70632f74727372790000000000000000",697442390685]
    transactionPayment.TransactionFeePaid: ["0x3B939FeaD1557C741Ff06492FD0127bd287A421e",3487211953422,0]
    system.ExtrinsicSuccess: [{"weight":{"refTime":389364247,"proofSize":5587},"class":"Normal","paysFee":"Yes"}]
Storage Methods
The Multisig Pallet includes the following read-only storage methods to obtain chain state data:
multisigs() - returns the set of open multisig operations for a given account.
account- The address of the multisigcallHash- (Optional) The hash of the multisig call
import { ApiPromise, WsProvider } from '@polkadot/api';

const main = async () => {
  const api = await ApiPromise.create({
    provider: new WsProvider('wss://moonbase-alpha.public.blastapi.io'),
  });

  try {
    // The account to query multisigs for
    const account = 'INSERT_ACCOUNT';

    // Get all storage keys and values for this account's multisigs
    const entries = await api.query.multisig.multisigs.entries(account);

    if (entries.length === 0) {
      console.log('No multisigs found for this account');
    } else {
      console.log(`Found ${entries.length} multisig(s):`);

      entries.forEach(([key, value]) => {
        // The key contains the call hash in its final 32 bytes
        const callHash = key.args[1].toHex();
        console.log('\nCall Hash:', callHash);
        console.log('Details:', value.unwrap().toHuman());
      });
    }
  } catch (error) {
    console.error('Error querying multisigs:', error);
  } finally {
    await api.disconnect();
  }
};

main().catch((error) => {
  console.error('Script error:', error);
  process.exit(1);
});
[
  [
    [
      0x2c6a9d09E7C01f3D4154000193BDDcC597523221
      0xa2902805948bdd92fcaf661965215efd6a5980d0092c065e7470859c1b37b6a9
    ]
    {
      when: {
        height: 9,174,086
        index: 5
      }
      deposit: 1,013,600,000,000,000,000
      depositor: 0x253b05C595222a1e3E7Bcf1611cA1307194a030F
      approvals: [
        0x253b05C595222a1e3E7Bcf1611cA1307194a030F
      ]
    }
  ]
]
palletVersion() - returns the current pallet version
None
import { ApiPromise, WsProvider } from '@polkadot/api';

const main = async () => {
  // Create the API instance
  const api = await ApiPromise.create({
    provider: new WsProvider('wss://moonbase-alpha.public.blastapi.io'),
  });

  // Query the identity pallet version
  const version = await api.query.multisig.palletVersion();

  // Log the version to console
  console.log('Identity Pallet Version:', version.toString());

  // Disconnect from the API
  await api.disconnect();
};

main().catch(console.error);
1
Pallet Constants
The Multisig Pallet includes the following read-only functions to obtain pallet constants:
depositBase() - returns the base amount of currency needed to reserve for creating a multisig execution or to store a dispatch call for later. This is held for an additional storage item whose key size is 32 + sizeof(AccountId) bytes, which is 32 + 20 on Moonbeam, and whose value size is 4 + sizeof((BlockNumber, Balance, AccountId)) bytes, which is 4 + 4 + 16 +20 bytes on Moonbeam
None
import { ApiPromise, WsProvider } from '@polkadot/api';

const main = async () => {
  const api = await ApiPromise.create({
    provider: new WsProvider('wss://moonbase-alpha.public.blastapi.io'),
  });

  try {
    const depositBase = api.consts.multisig.depositBase;
    console.log('Multisig Deposit Base:', depositBase.toHuman());
  } catch (error) {
    console.error('Error querying deposit base:', error);
  } finally {
    await api.disconnect();
  }
};

main().catch((error) => {
  console.error('Script error:', error);
  process.exit(1);
});
Multisig Deposit Base: 1,009,600,000,000,000,000
depositFactor() - returns the amount of currency needed per unit threshold when creating a multisig execution. This is held for adding 20 bytes more into a preexisting storage value
None
import { ApiPromise, WsProvider } from '@polkadot/api';

const main = async () => {
  const api = await ApiPromise.create({
    provider: new WsProvider('wss://moonbase-alpha.public.blastapi.io'),
  });

  try {
    const depositFactor = api.consts.multisig.depositFactor;
    console.log('Multisig Deposit Factor:', depositFactor.toHuman());
  } catch (error) {
    console.error('Error querying deposit factor:', error);
  } finally {
    await api.disconnect();
  }
};

main().catch((error) => {
  console.error('Script error:', error);
  process.exit(1);
});
Multisig Deposit Factor: 2,000,000,000,000,000
maxSignatories() - returns the maximum amount of signatories allowed in the multisig
None
import { ApiPromise, WsProvider } from '@polkadot/api';

const main = async () => {
  const api = await ApiPromise.create({
    provider: new WsProvider('wss://moonbase-alpha.public.blastapi.io'),
  });

  try {
    const maxSignatories = api.consts.multisig.maxSignatories;
    console.log('Multisig Max Signatories:', maxSignatories.toHuman());
  } catch (error) {
    console.error('Error querying max signatories:', error);
  } finally {
    await api.disconnect();
  }
};

main().catch((error) => {
  console.error('Script error:', error);
  process.exit(1);
});
Multisig Max Signatories: 100
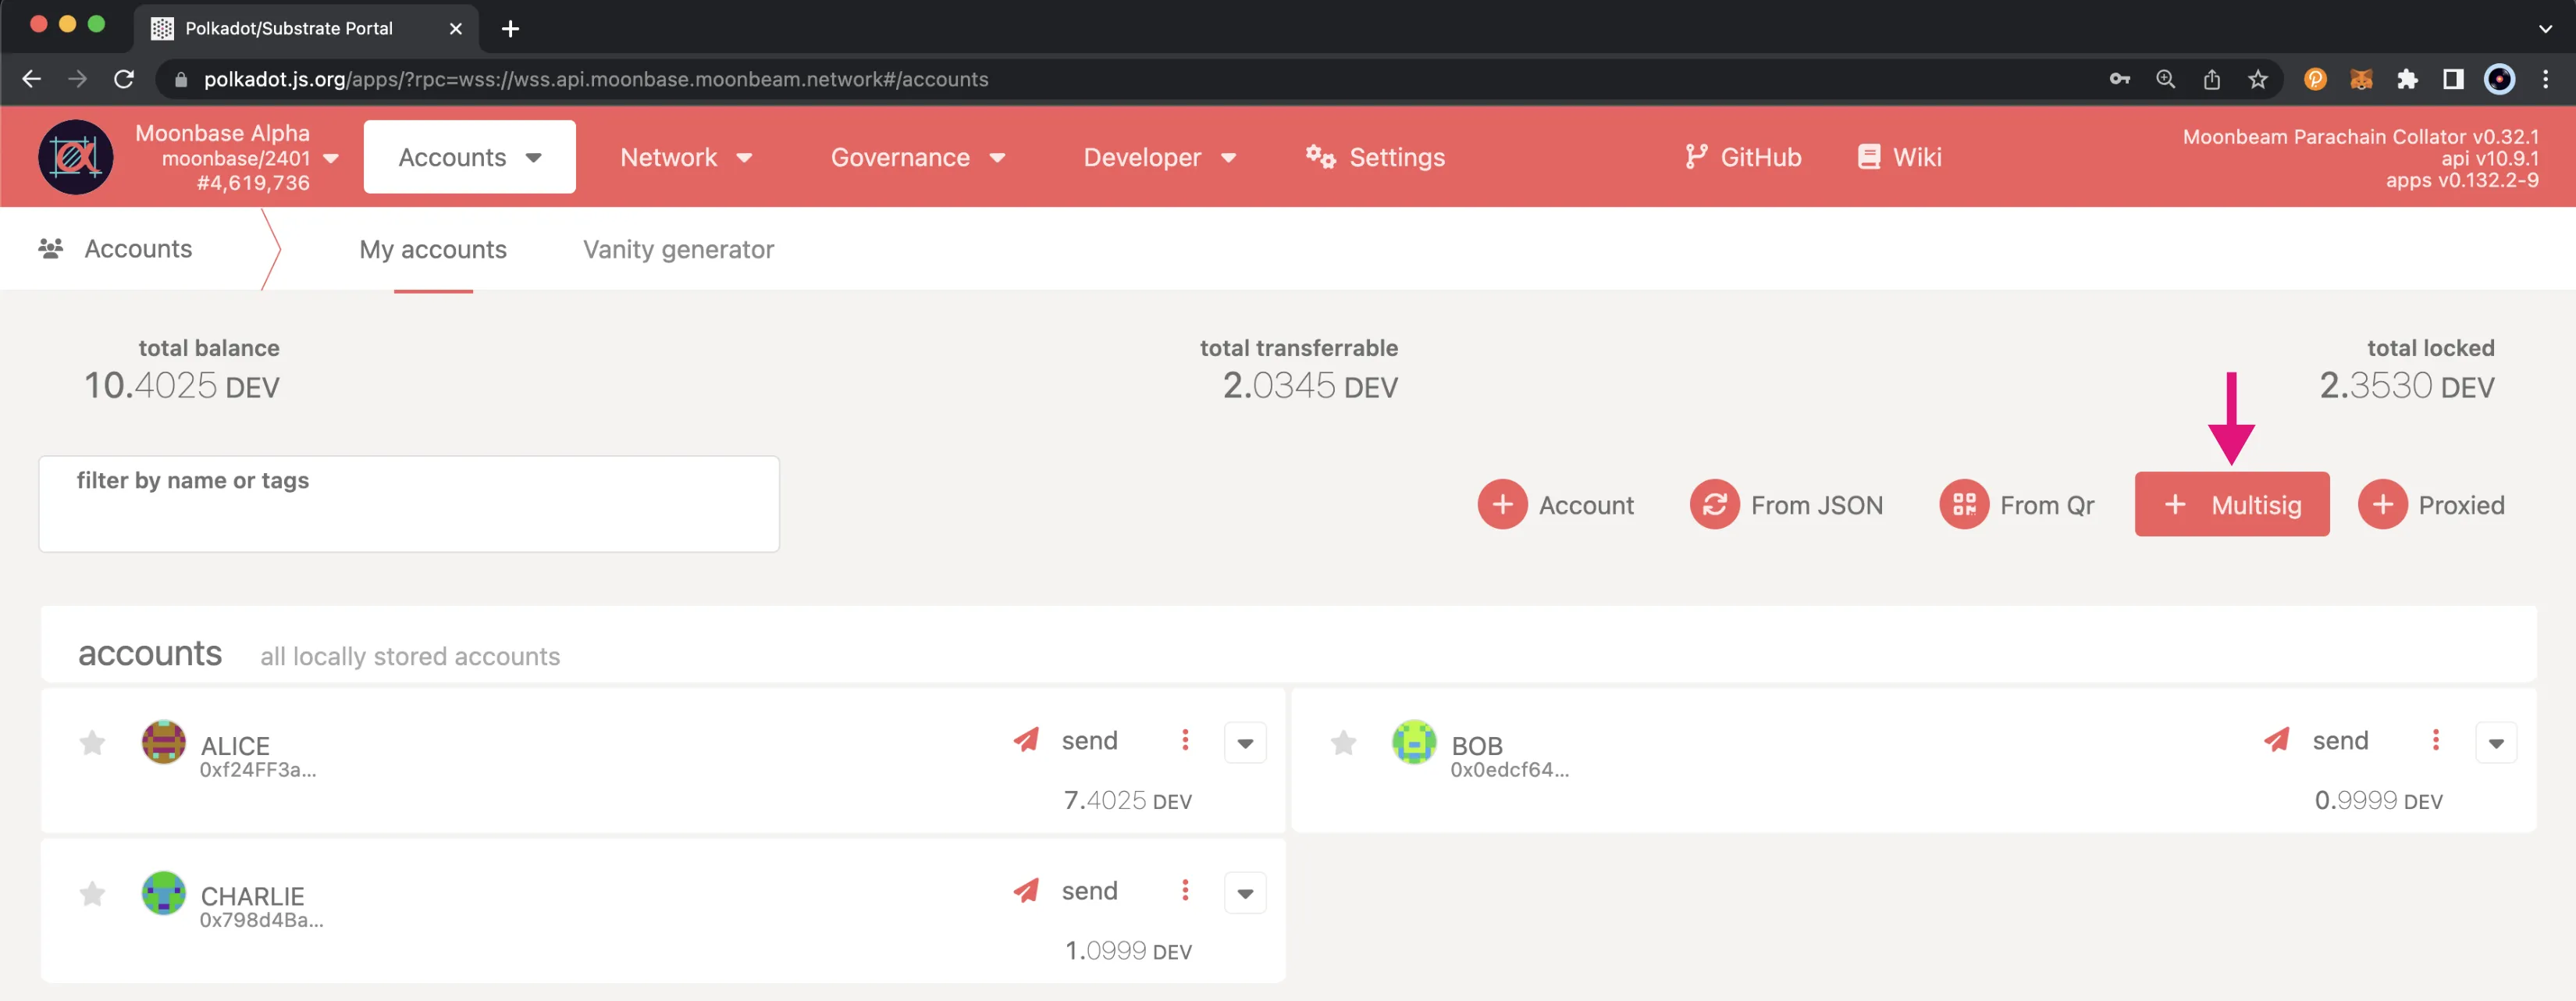
How to Create a Multisig Account
You can easily create a multisig account from the Polkadot.js Apps interface. The easiest way to do so is from the Accounts page.
To get started, go ahead and click on Multisig.
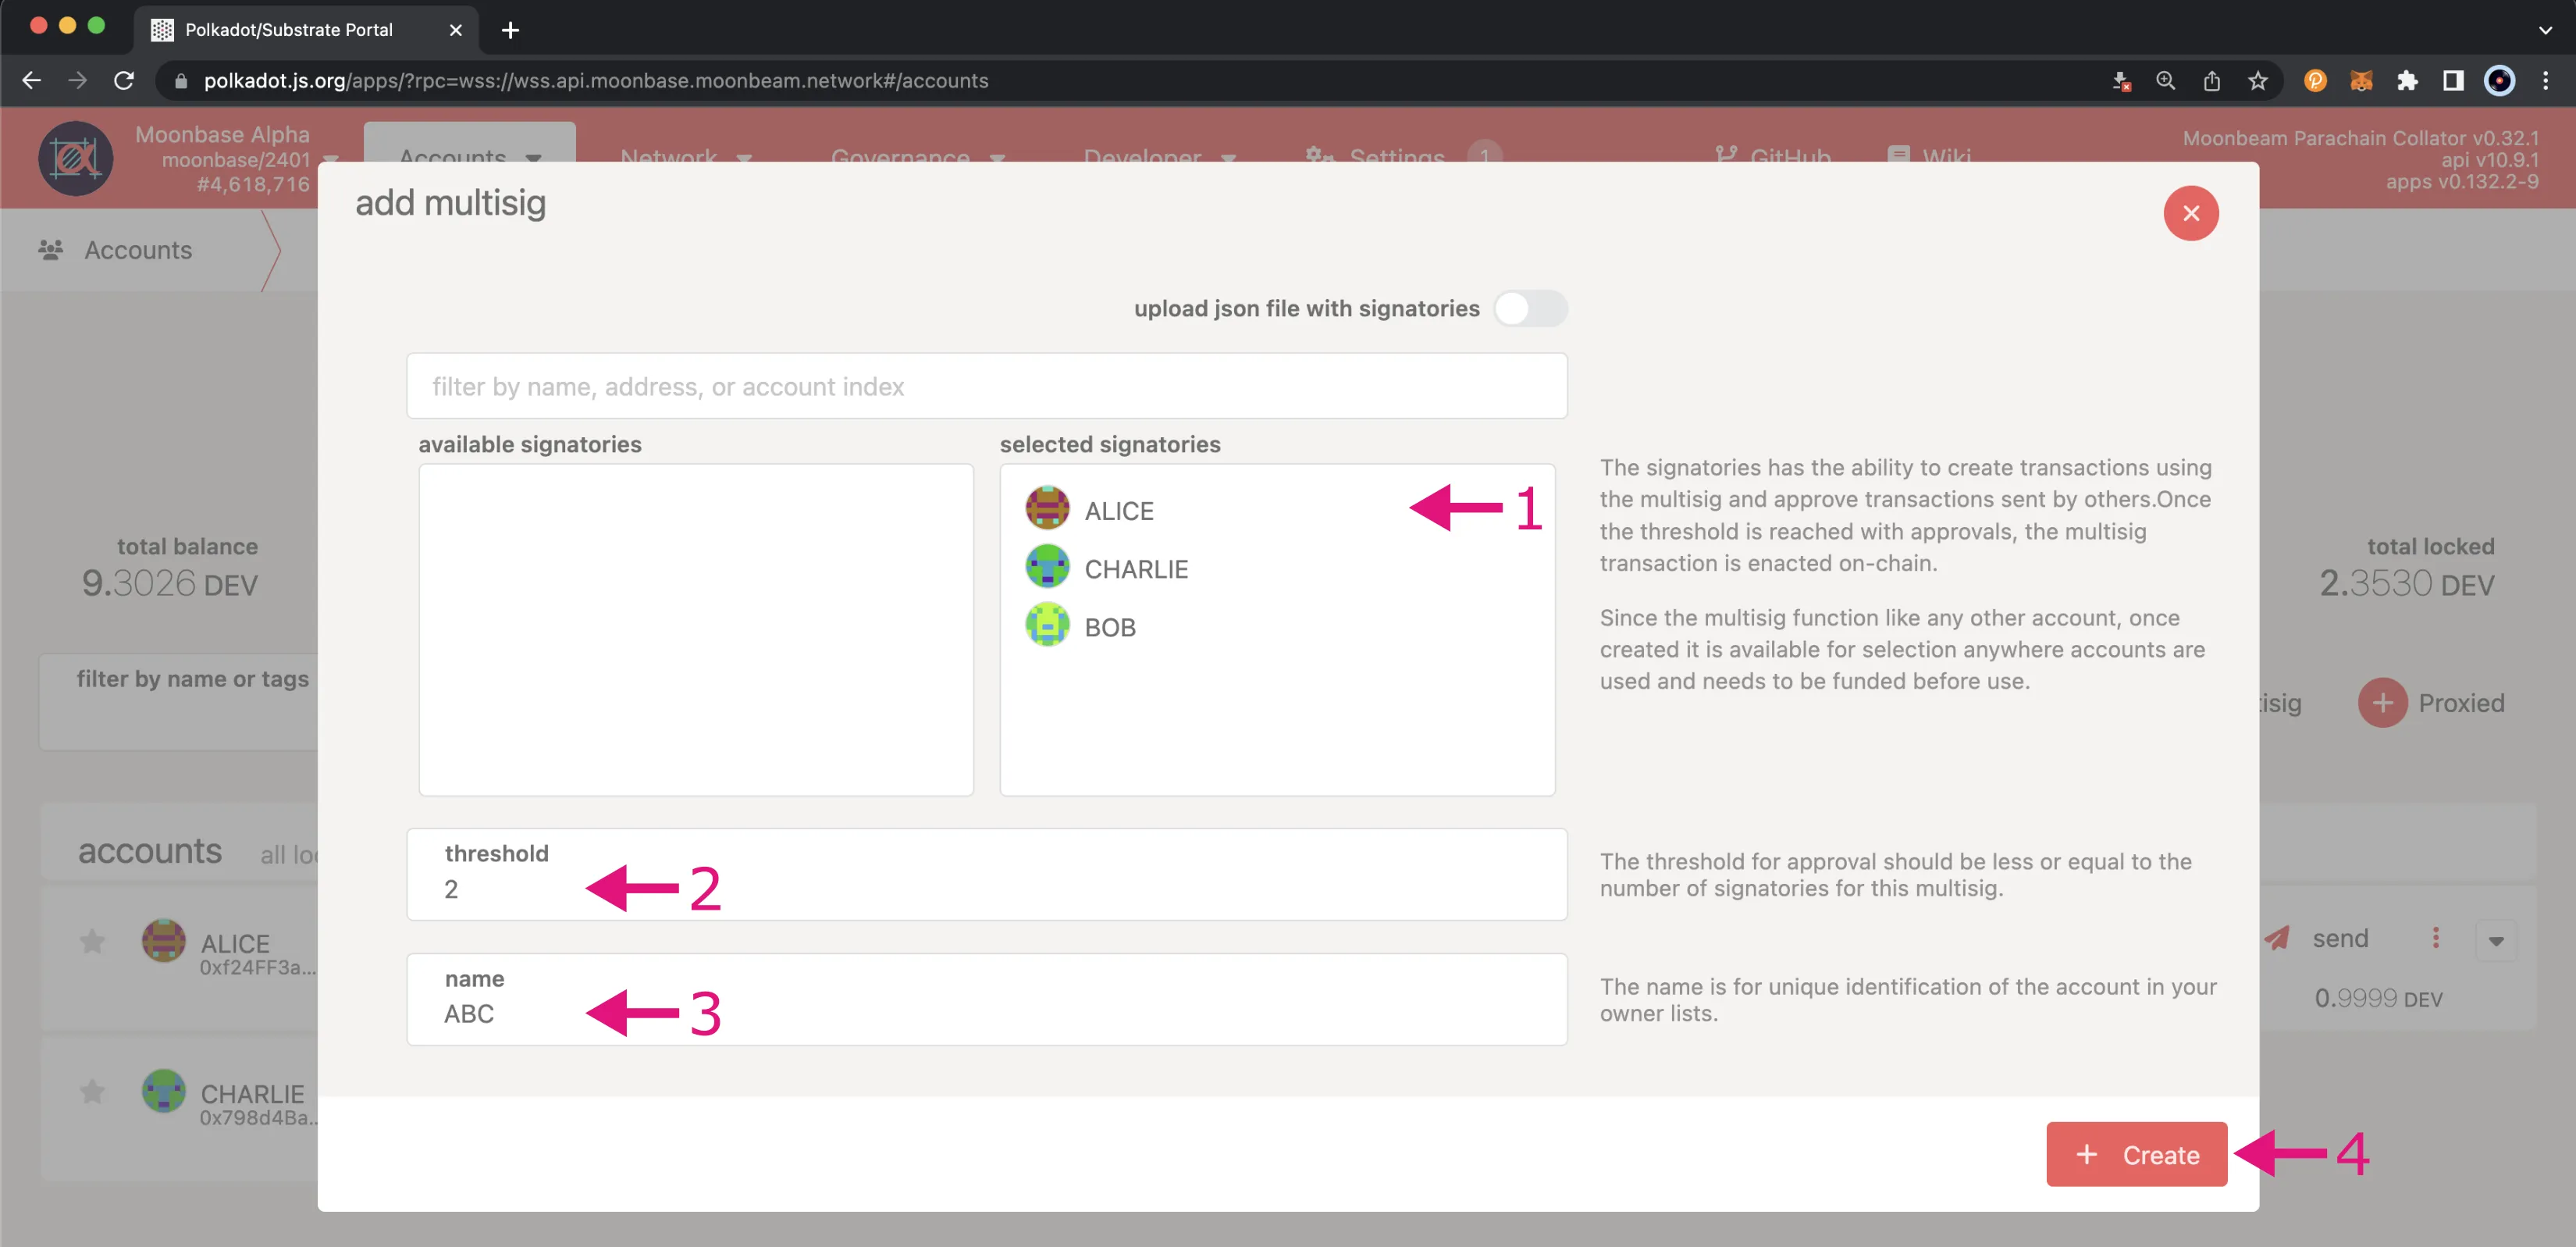
Next, you can take the following steps:
- Choose which accounts you want to add to the multisig. For this example, three accounts will be chosen: Alice, Bob, and Charlie
- Enter a number for threshold. This example will use
2 - Add a name for the multisig. This example uses
ABCfor Alice, Bob, and Charlie - Click Create
Now, the ABC multisig account will appear under the multisig section on the Accounts page.
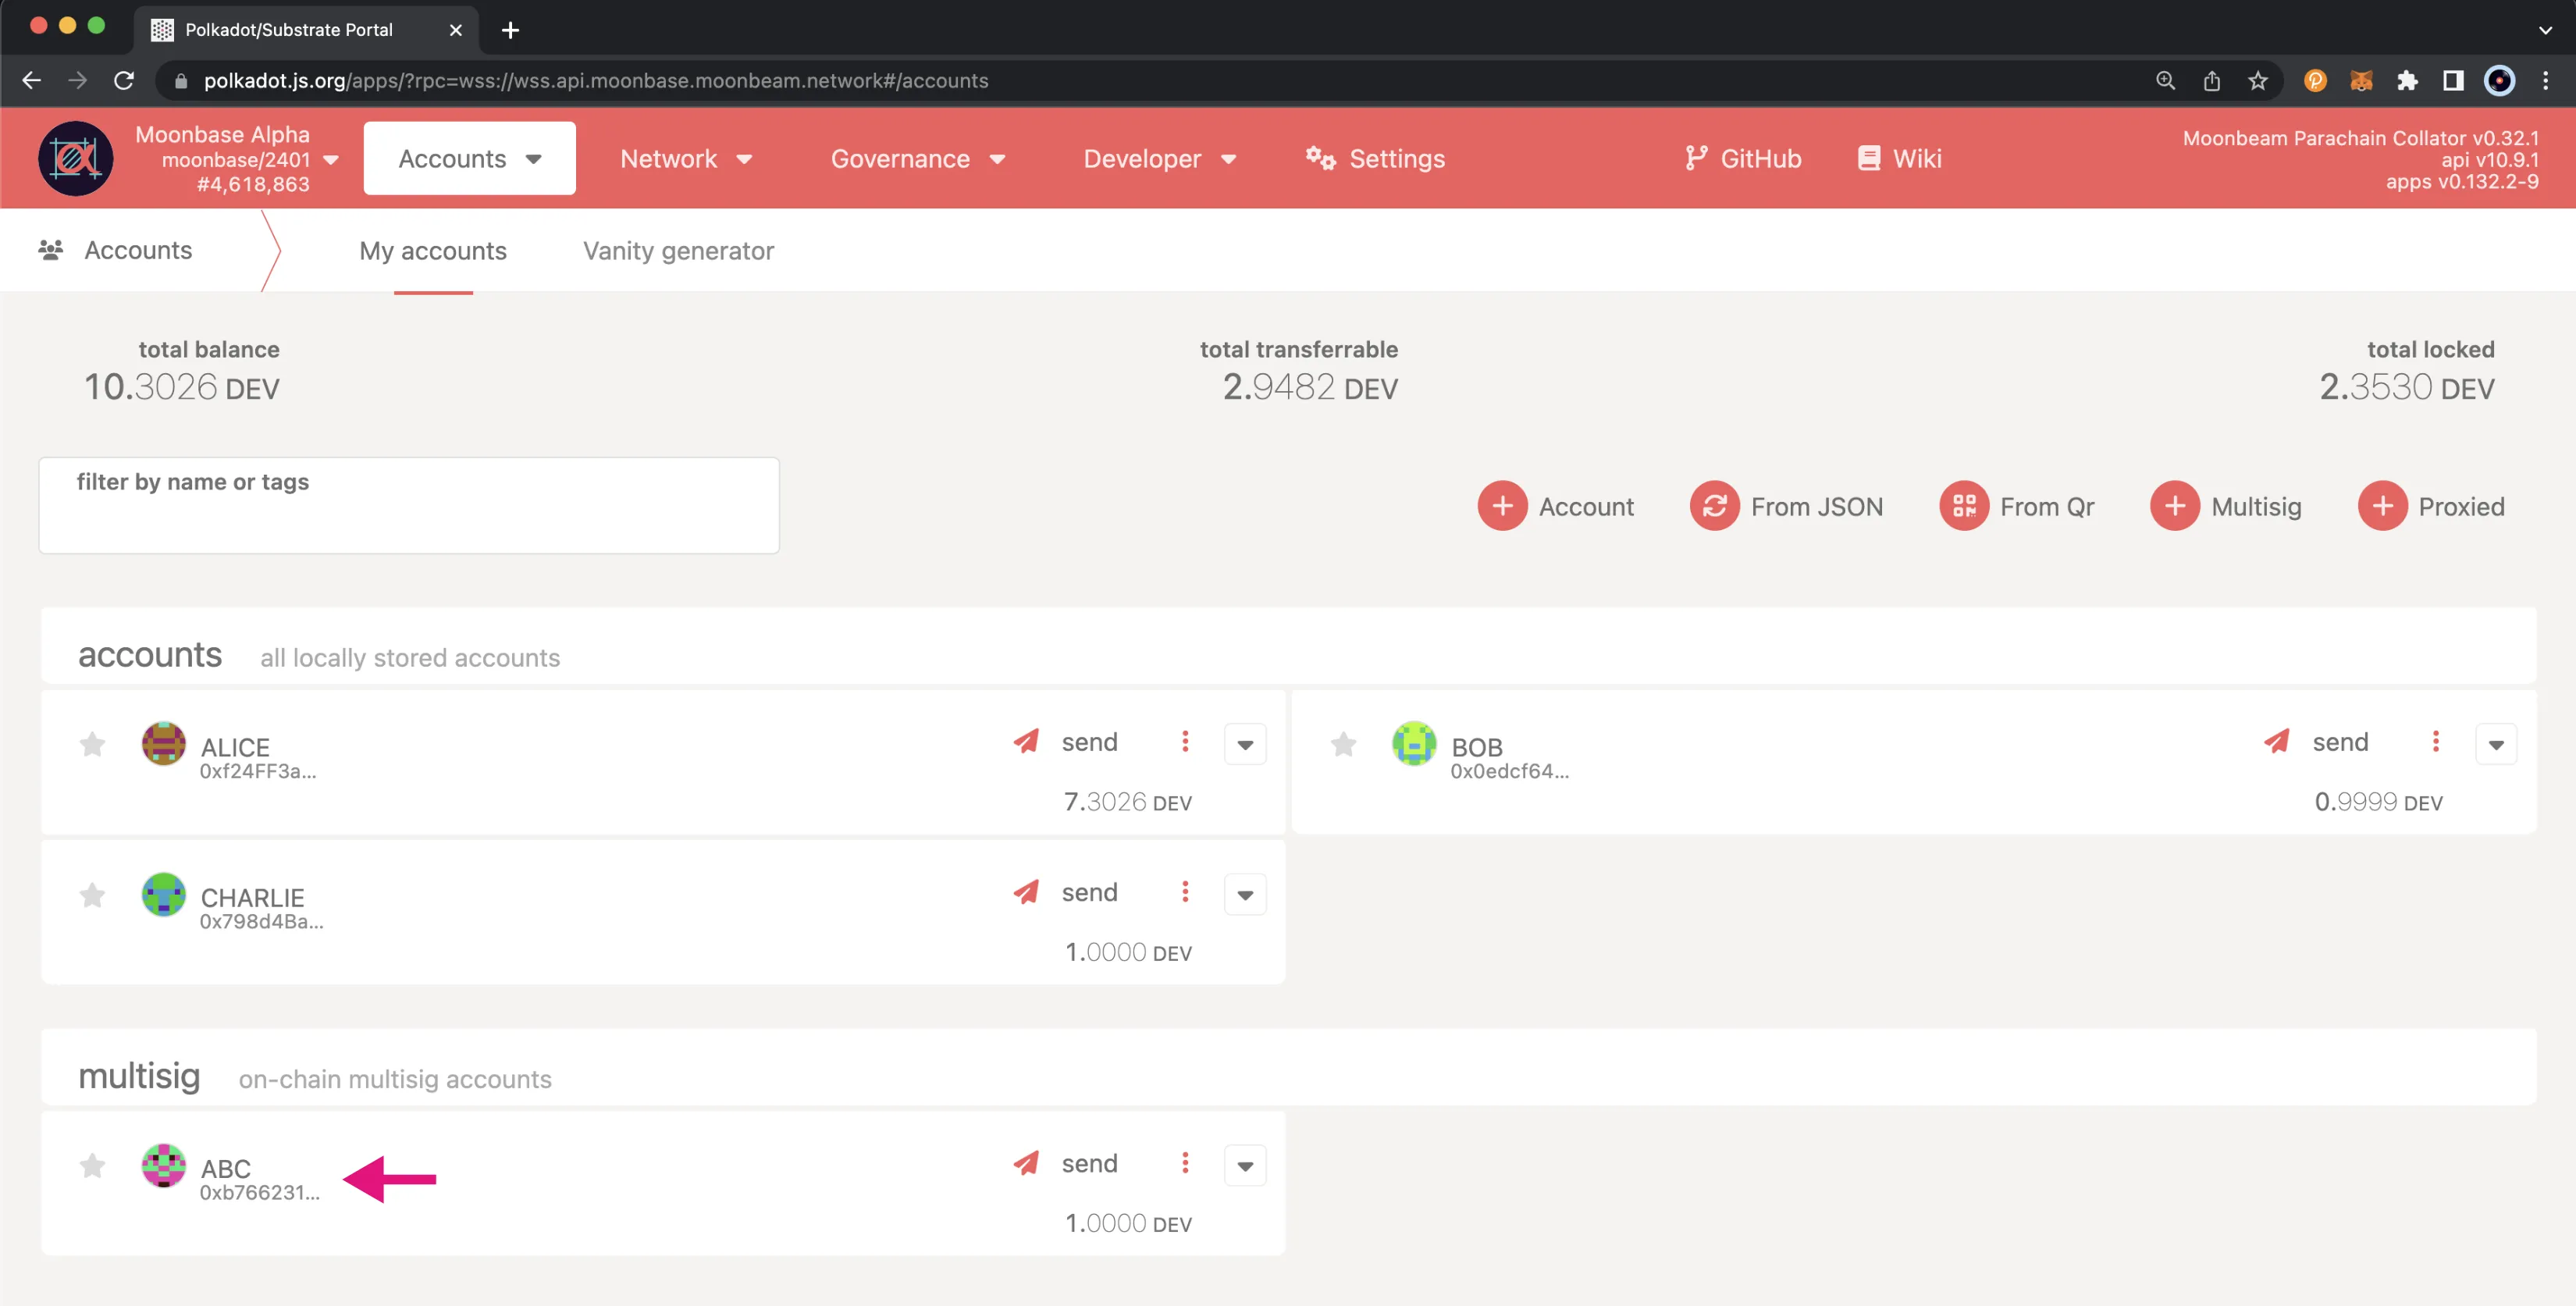
You can click on the colored icon next to the multisig account to copy the address and fund it with DEV tokens. You can get DEV tokens for testing on Moonbase Alpha once every 24 hours from the Moonbase Alpha Faucet.
How to Create a Multisig Transaction
Now that you've created a multisig account, you can create a multisig call from one of the accounts that make up the multisig. This example will create the call from Alice's account. As such, Alice will need to submit a deposit. The deposit is calculated as follows:
Deposit = depositBase + threshold * depositFactor
You can retrieve the depositBase and depositFactor using the getter functions for the Pallet Constants.
Once the call is approved and dispatched or cancelled the deposit will be returned to Alice.
Since there is a threshold of two for this multisig, at least Bob or Charlie will need to approve the call if not both of them. The last account to approve the call will also need to dispatch the call. Dispatching the call is done automatically when the asMulti function is used to approve the call.
With the basics out of the way, you can begin to create a multisig call. For this example, you can create a call that will transfer 0.1 DEV from the ABC multisig account to Charlie's account. First, you'll need to get the encoded call data for the transfer. Go ahead and navigate to the Extrinsics page on Polkadot.js Apps and take the following steps:
- Make sure an account is selected. It doesn't have to be the ABC multisig account, as the selected account is not included in the encoded call data
- Select the balances pallet and the transfer extrinsic
- Set Charlie as the dest account
- Enter the amount to transfer, which is
0.1DEV for this example - Click the copy button next to the encoded call data
- Click the copy button next to the encoded call hash. Please note that you do not have to submit the extrinsic, you only need the encoded call data and the encoded call hash
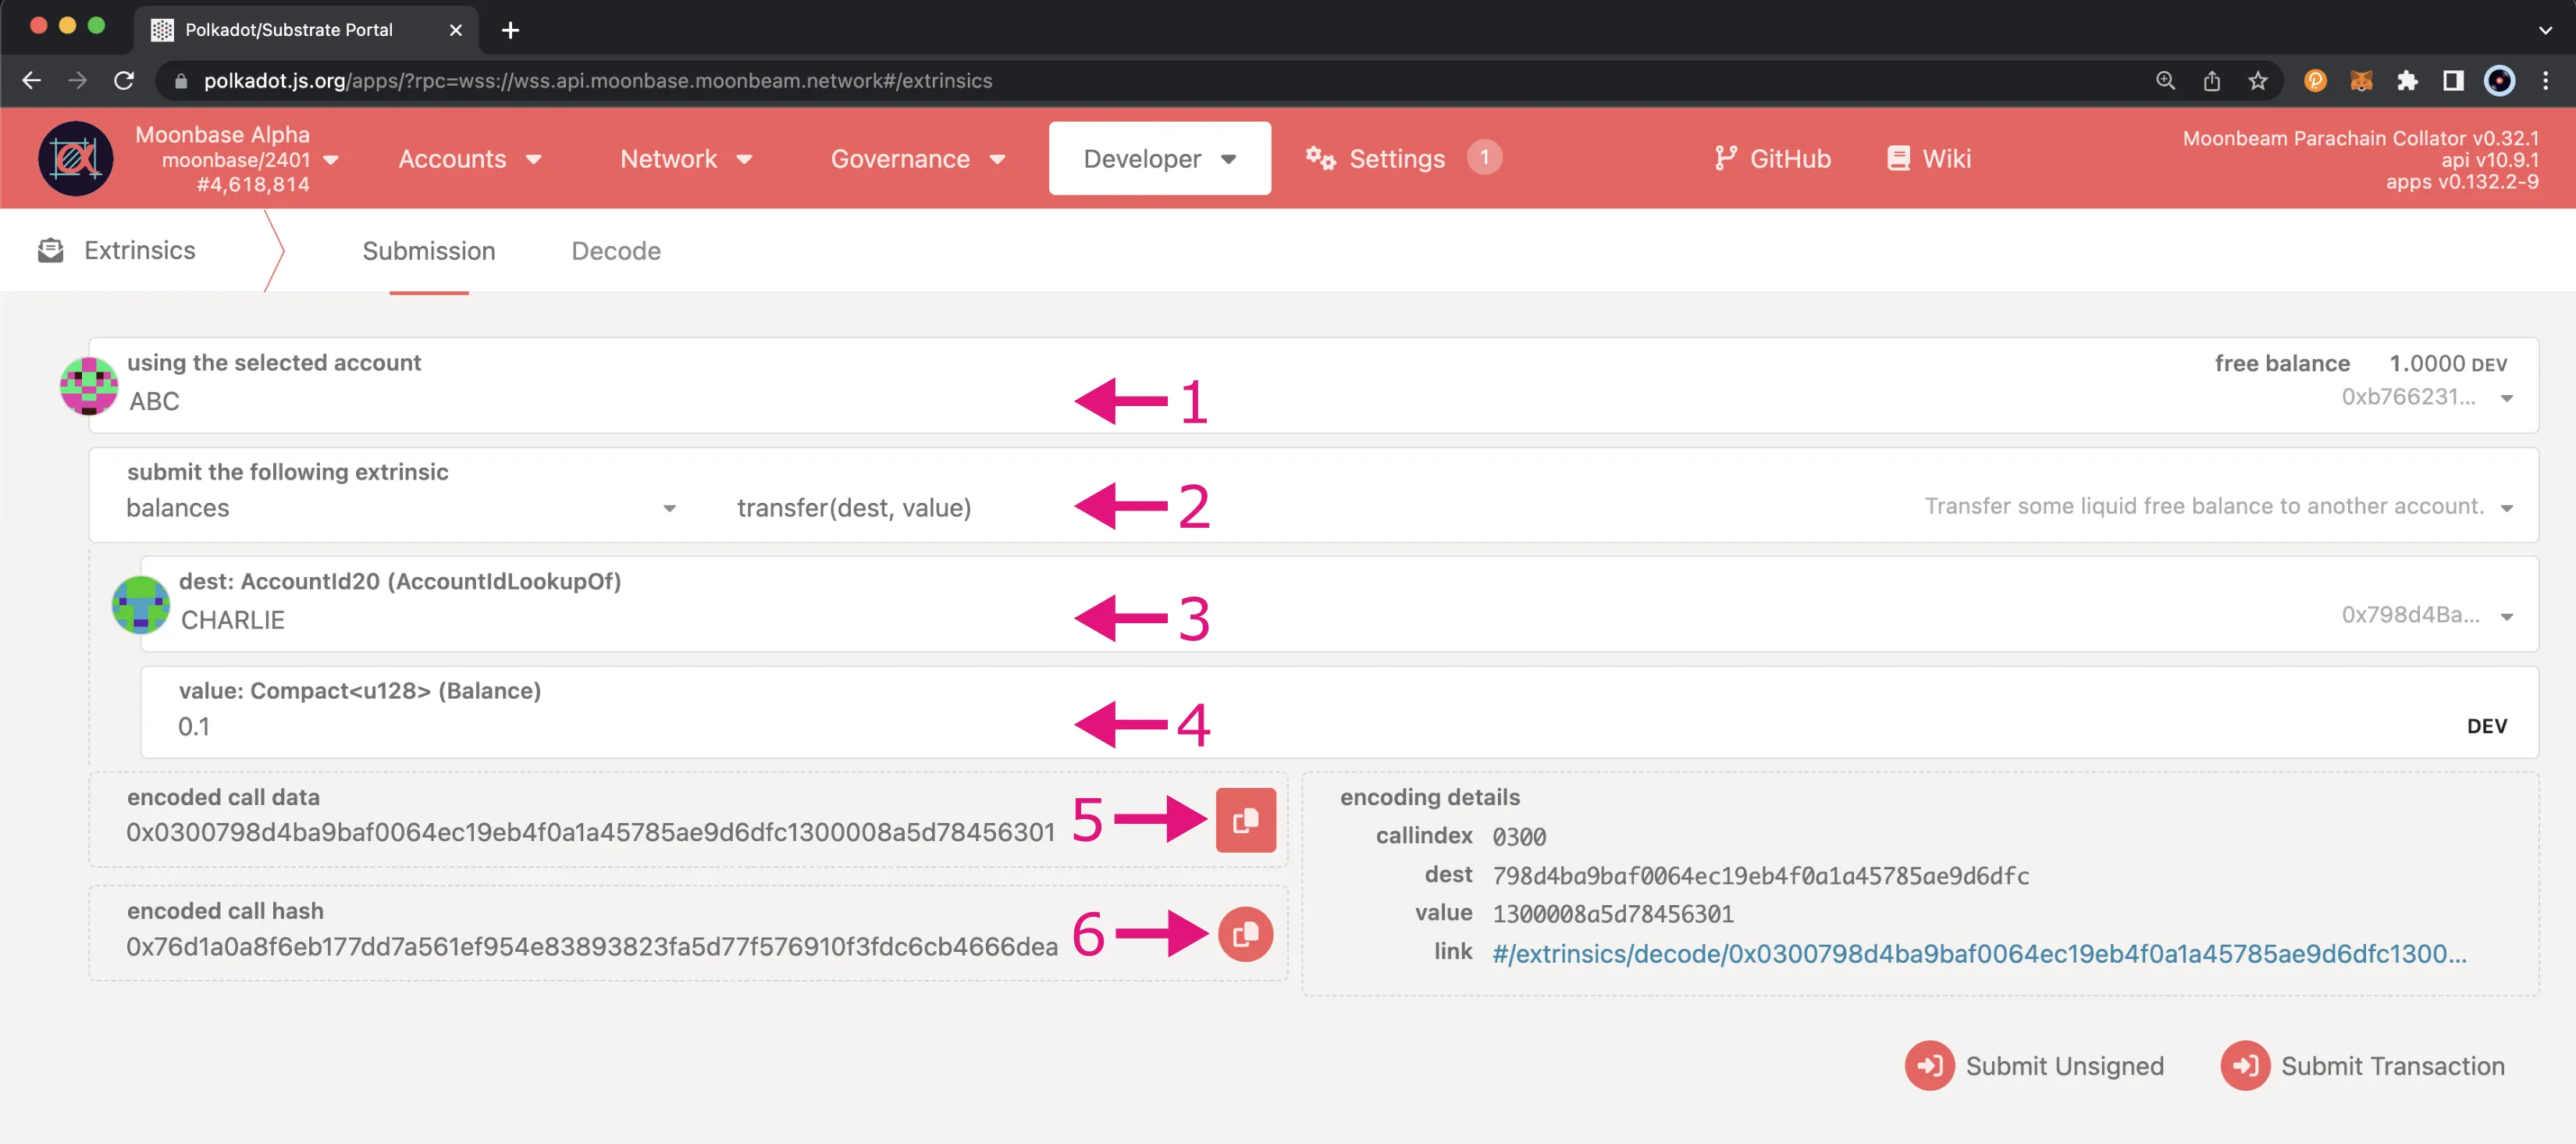
Make sure you've copied and saved the encoded call data and the encoded call hash as you'll need them both to approve the multisig call later on in the tutorial. For this example, the encoded call data and hash are as follows:
0x0300798d4ba9baf0064ec19eb4f0a1a45785ae9d6dfc1300008a5d78456301
0x76d1a0a8f6eb177dd7a561ef954e83893823fa5d77f576910f3fdc6cb4666dea
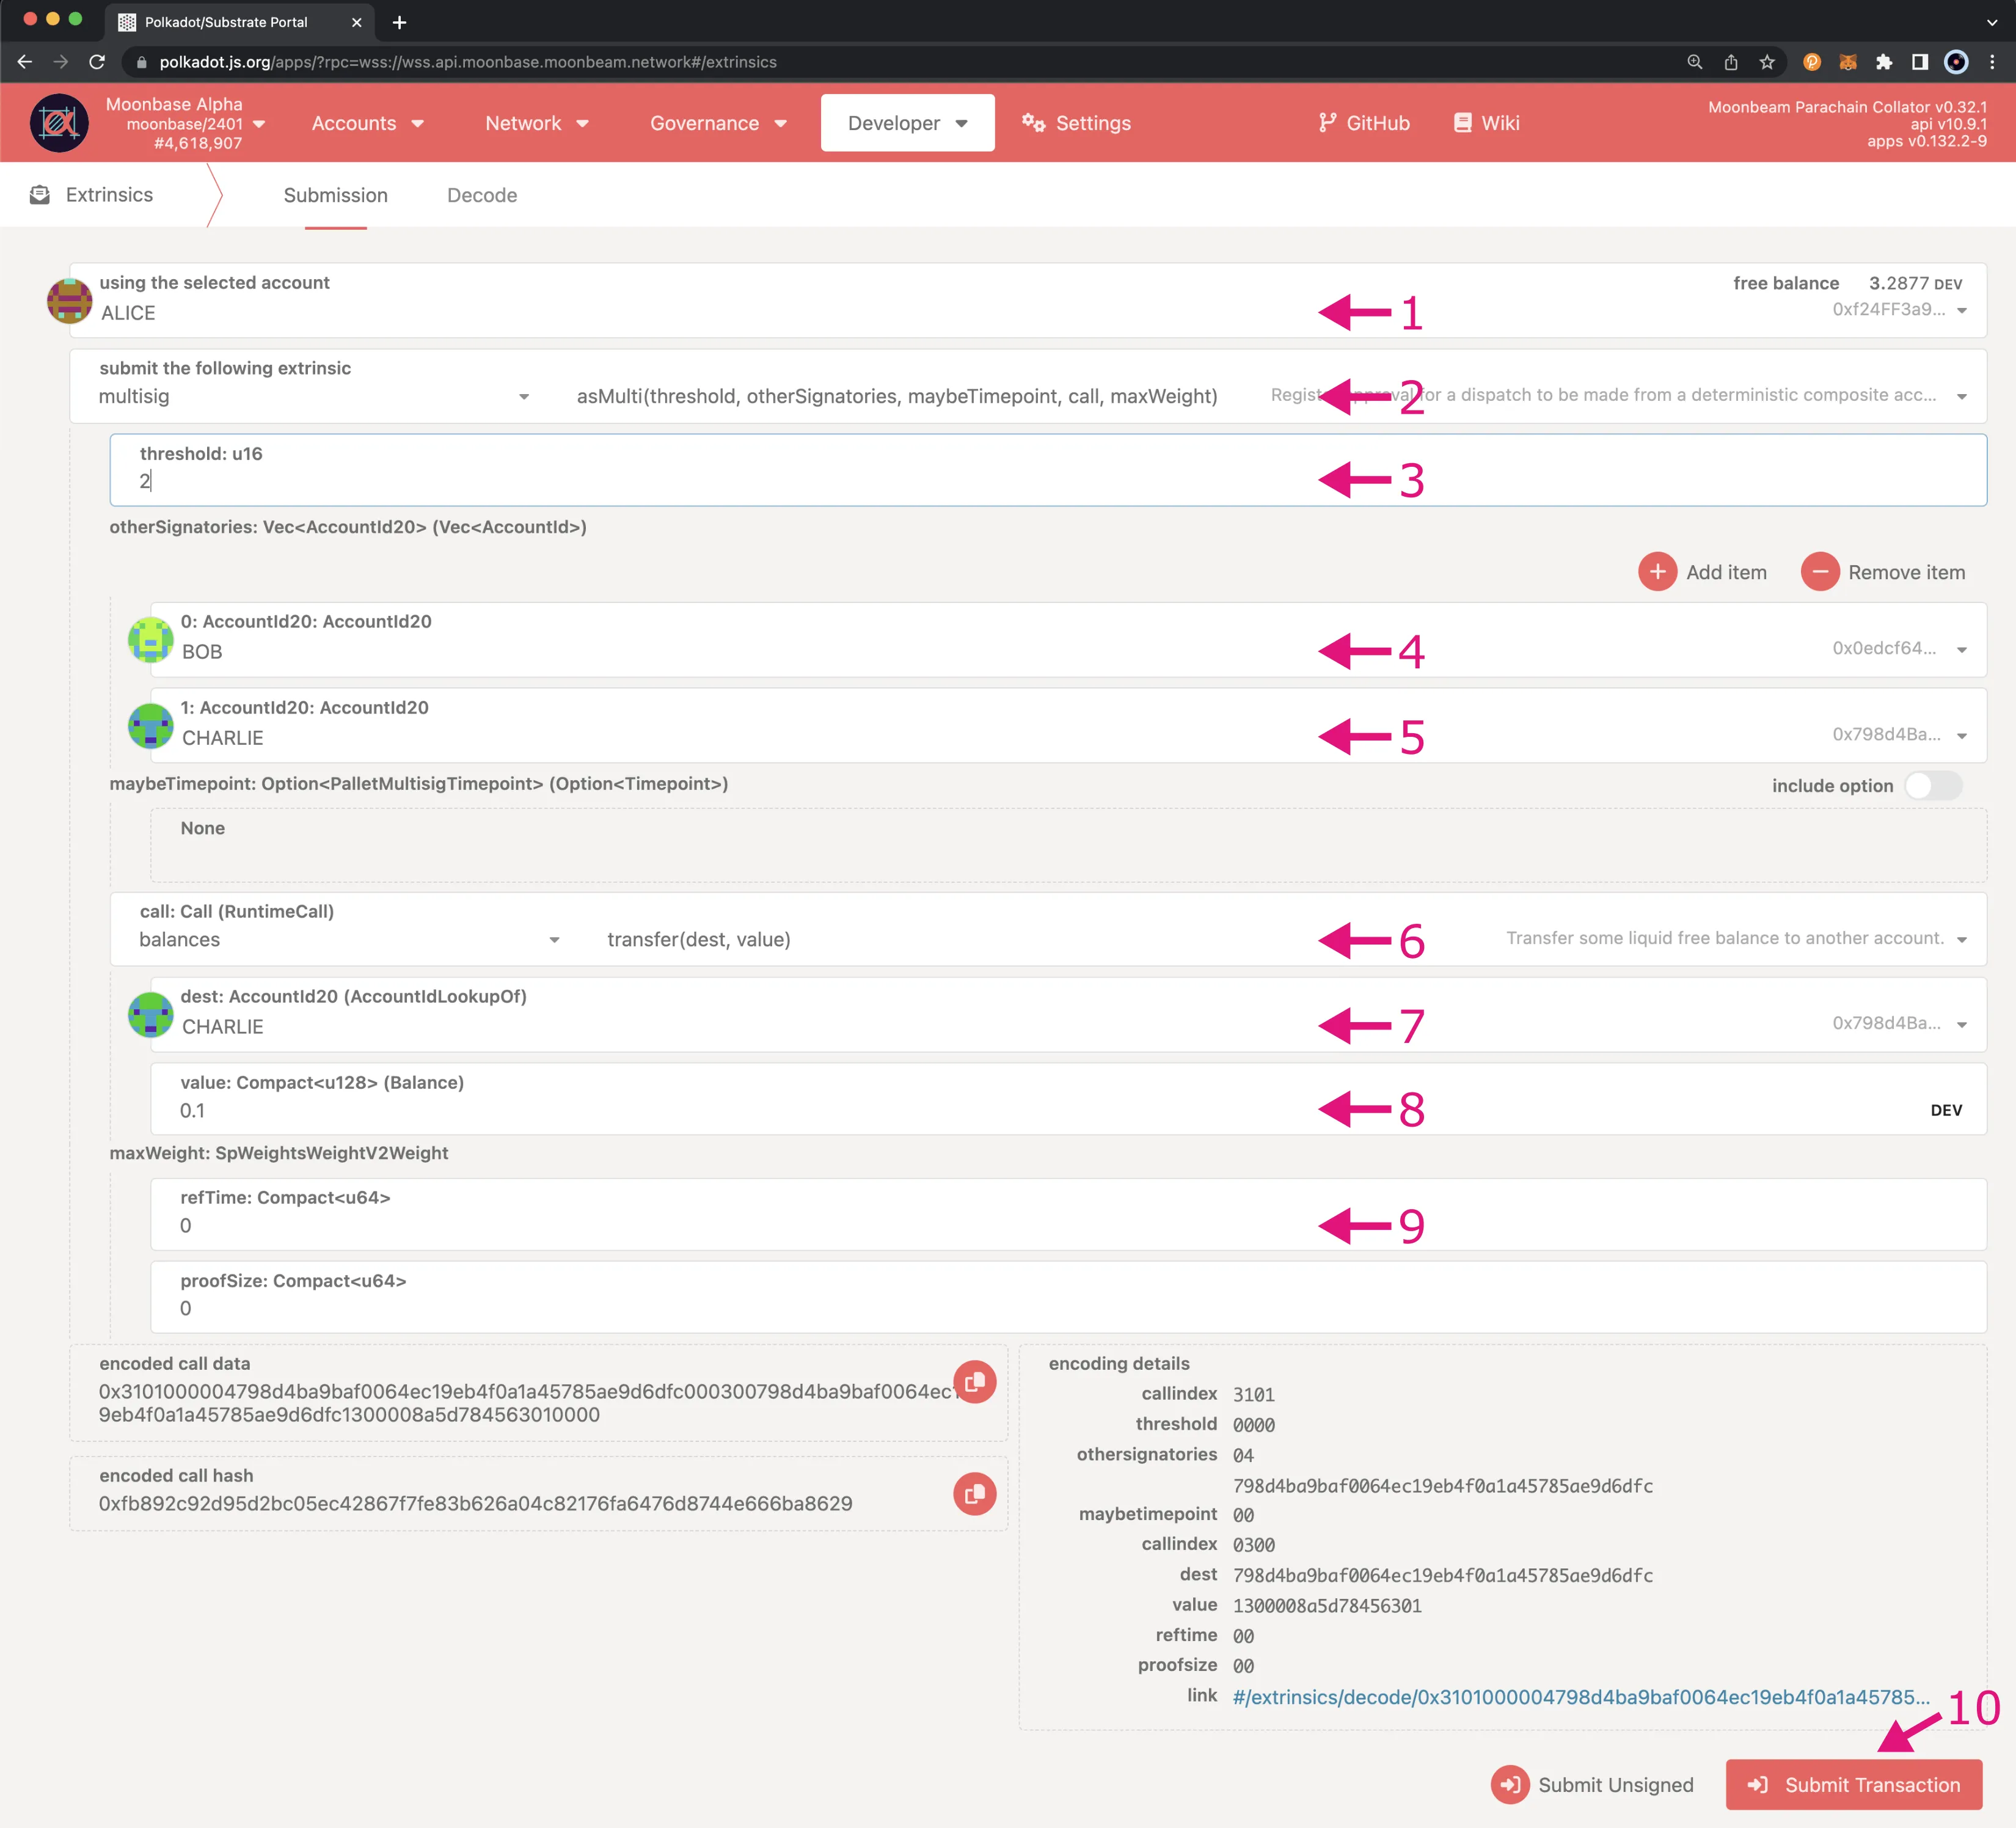
Next, you can create the multisig call by using the asMulti extrinsic, you'll take the following steps:
- Select the account you want to create the call with. For this example, Alice is used
- Select the multisig pallet and the asMulti extrinsic
- Set the threshold of the multisig to the same value as you initially set from the Accounts page, which should be
2 - Add the other accounts that are associated with the multisig: Bob and Charlie
- Since this is the first transaction to create the multisig call, make sure the include option slider is toggled off for the maybeTimepoint field. You would only enter this information for approvals that rely on knowing the timepoint at which the call was created
- Provide the call information for the balance transfer similarly to how you did it in the previous set of steps. Select the balances pallet and the transfer extrinsic
- Set the dest account to Charlie
- Set the value to
0.1DEV tokens - You can leave the refTime and proofSize fields set to
0 - Click Submit Transaction to create the multisig call
Now that you've created the multisig call, you can submit approval transactions from either Bob's or Charlie's account, or both. Remember, for the call to be approved and dispatched, you need to have at least two of three members of the multisig to approve it. Since Alice created the multisig call, that means she has already automatically approved it.
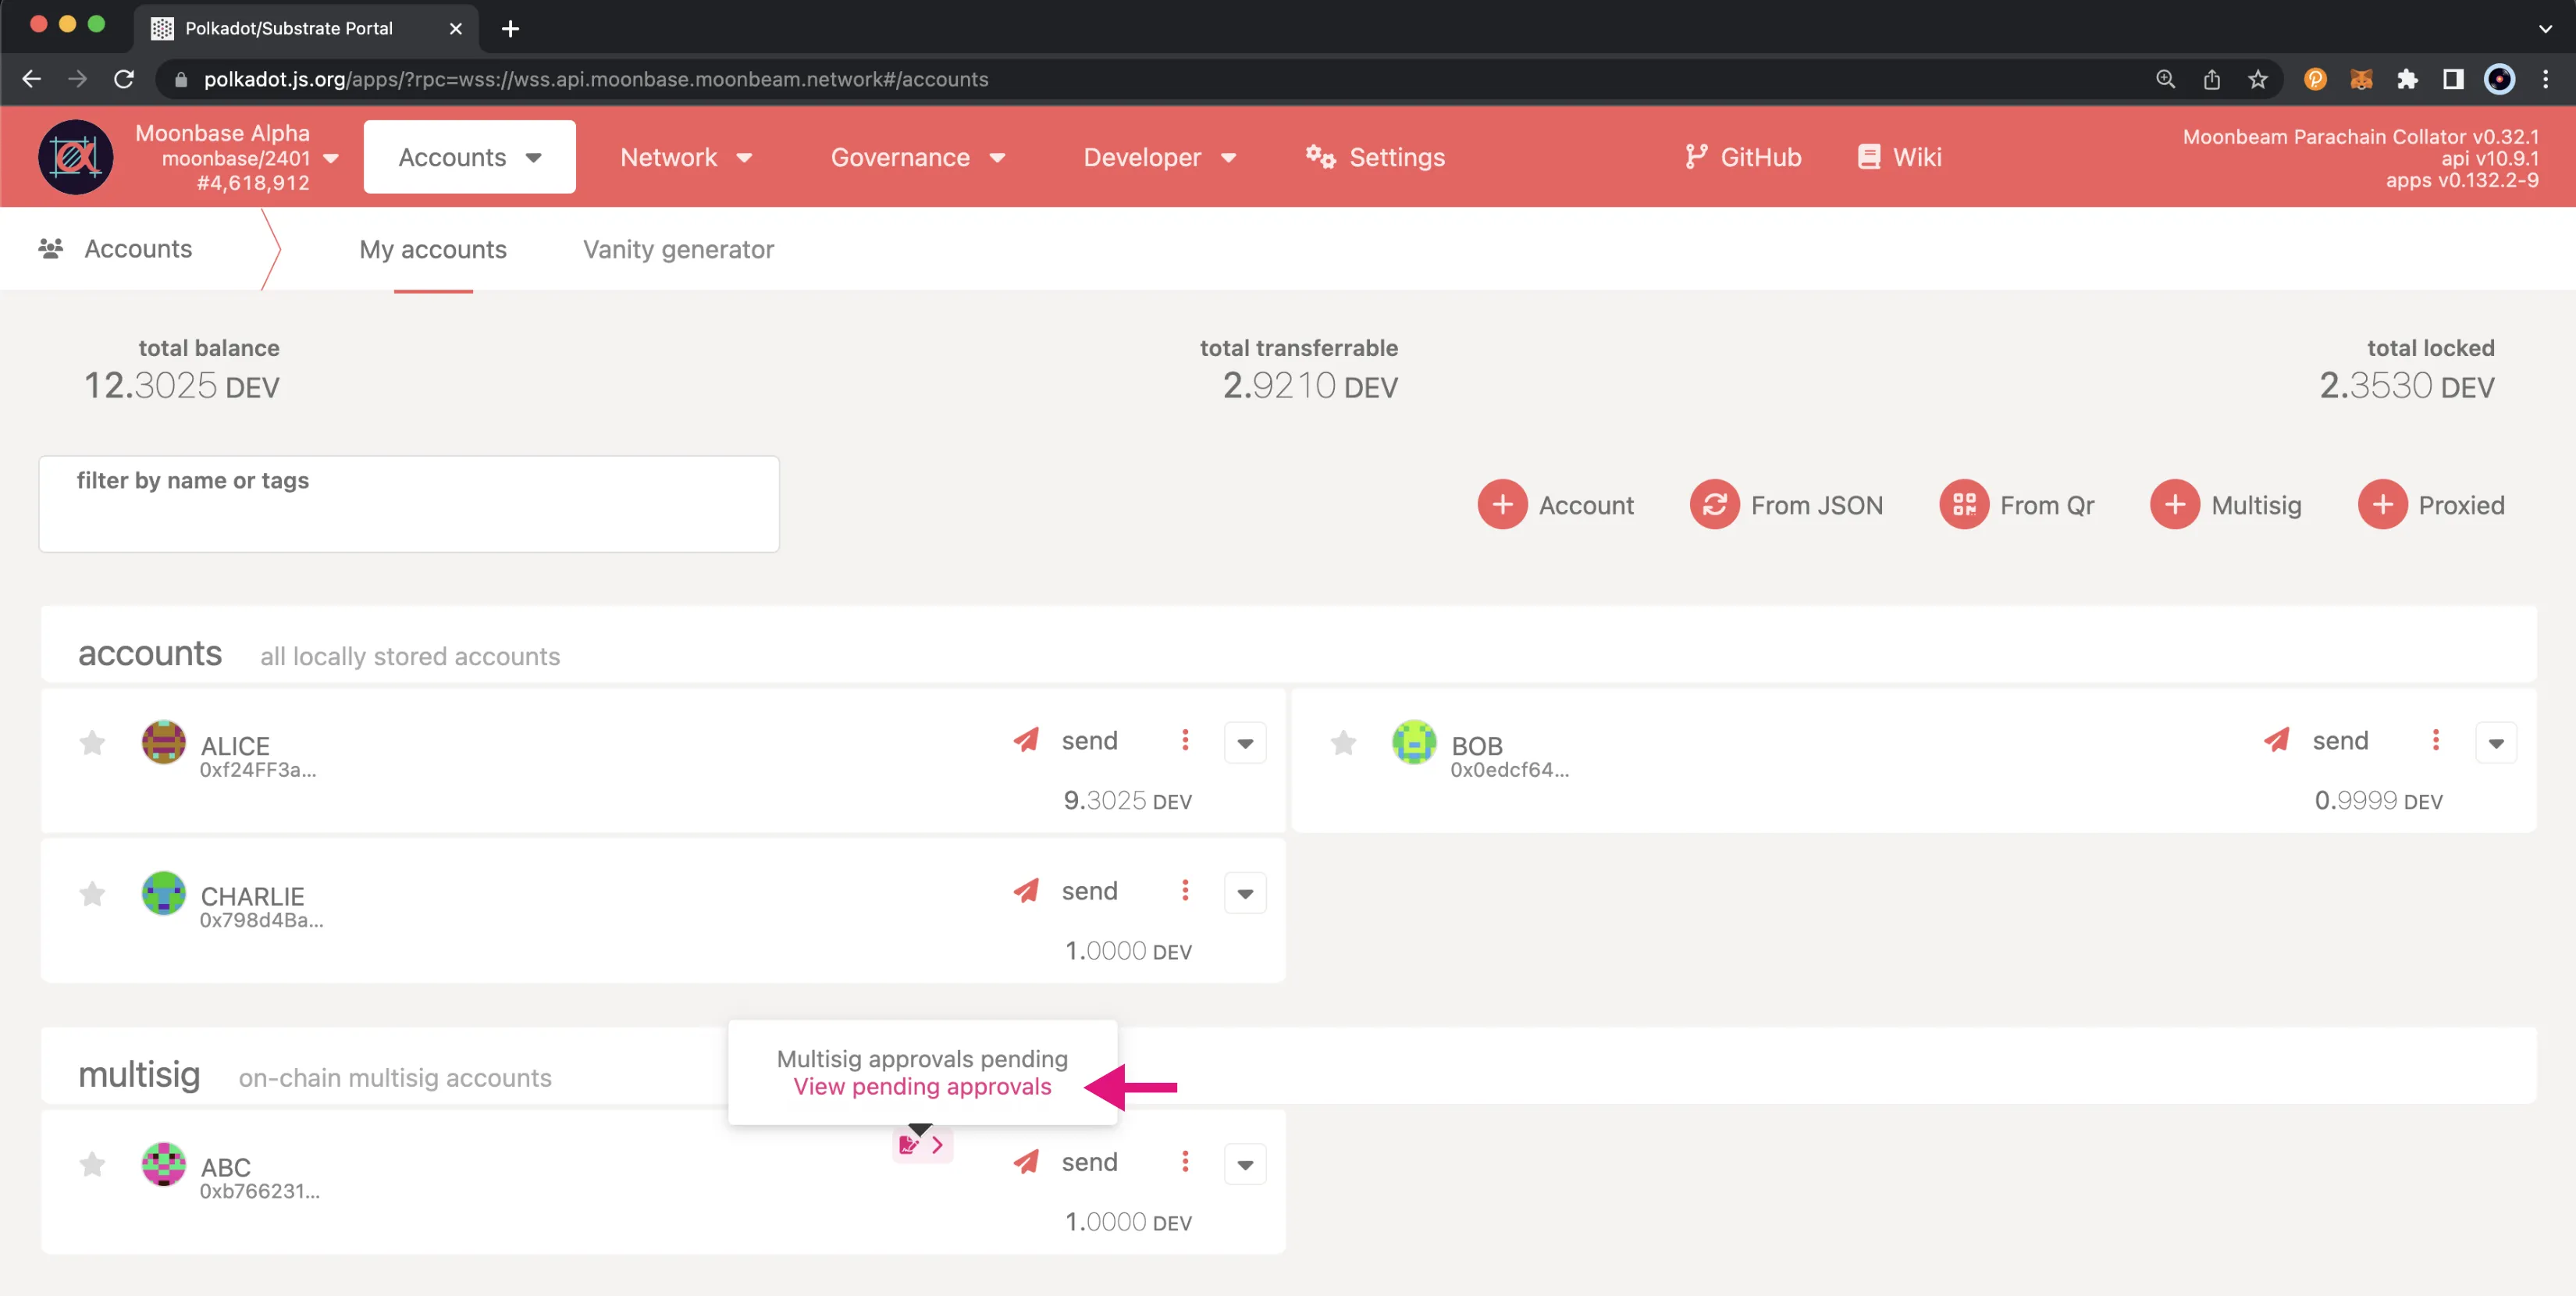
You can easily approve the transactions through the Accounts page of Polkadot.js Apps. Next to your multisig account, you'll notice there is a multisig icon there that you can hover over. Once you hover over it, you'll be able to click on View pending approvals.
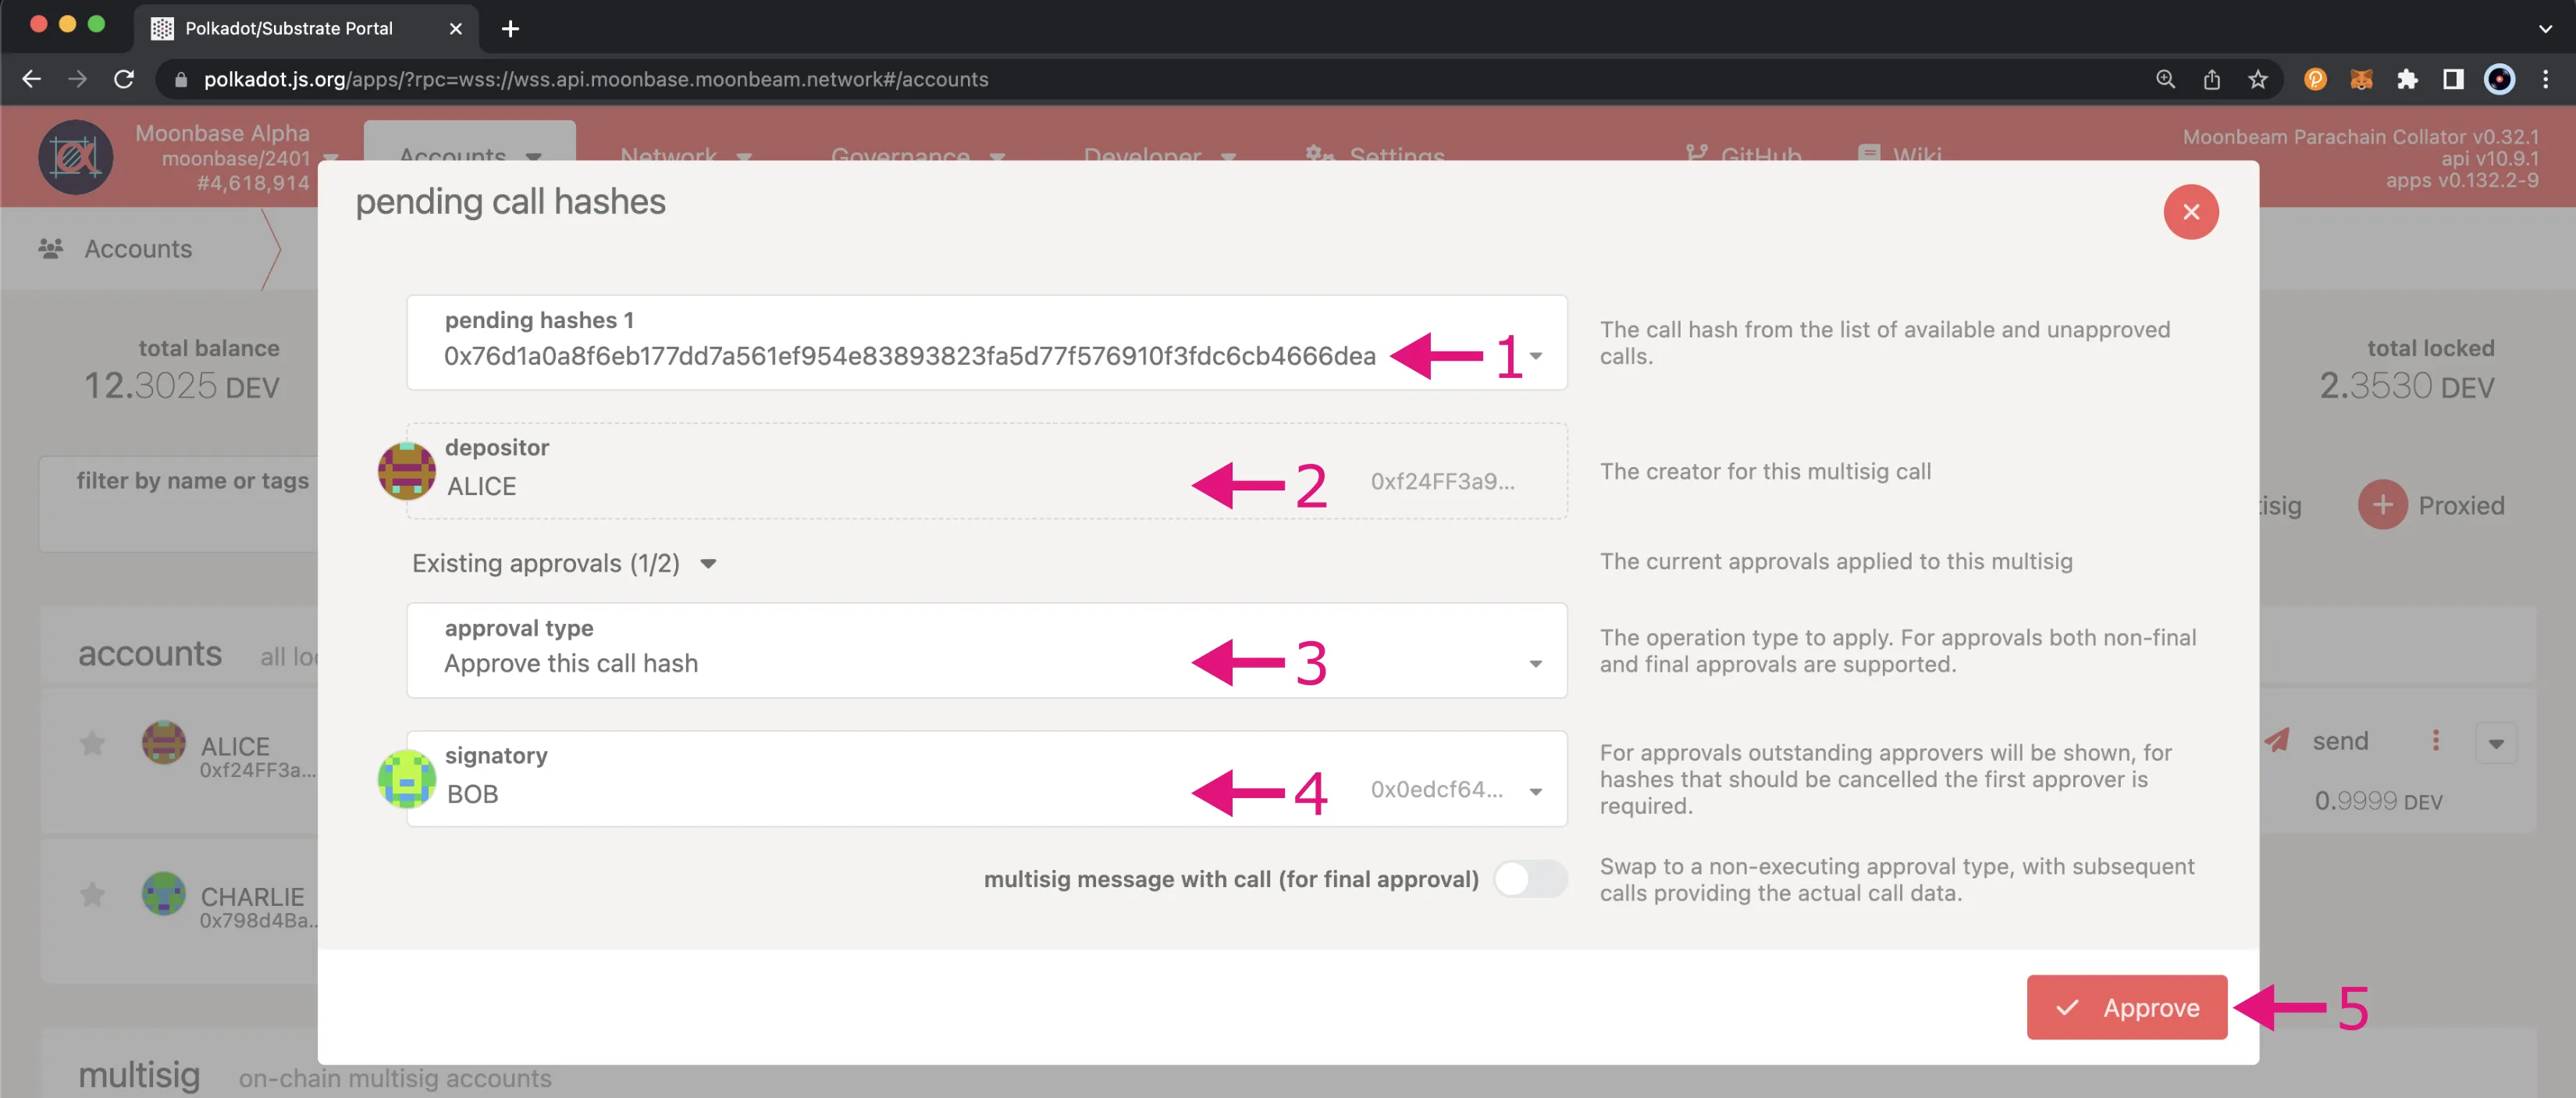
The pending call hashes pop-up will appear where you can follow these steps:
- Since you should only have one hash at this point, you can select it from this list. If you have multiple hashes, you can compare the hashes in the list with the encoded call hash you copied earlier on in this section
- The depositor should be automatically populated. For this example, it should be Alice
- For the approval type, you can choose to either approve or reject the call. For this example, you can select Approve this call hash
- Choose the account you want to approve the transaction from. This example uses Bob's account
- Click Approve to submit the approval transaction. Under the hood, this uses the
approveAsMultiextrinsic of the Multisig Pallet
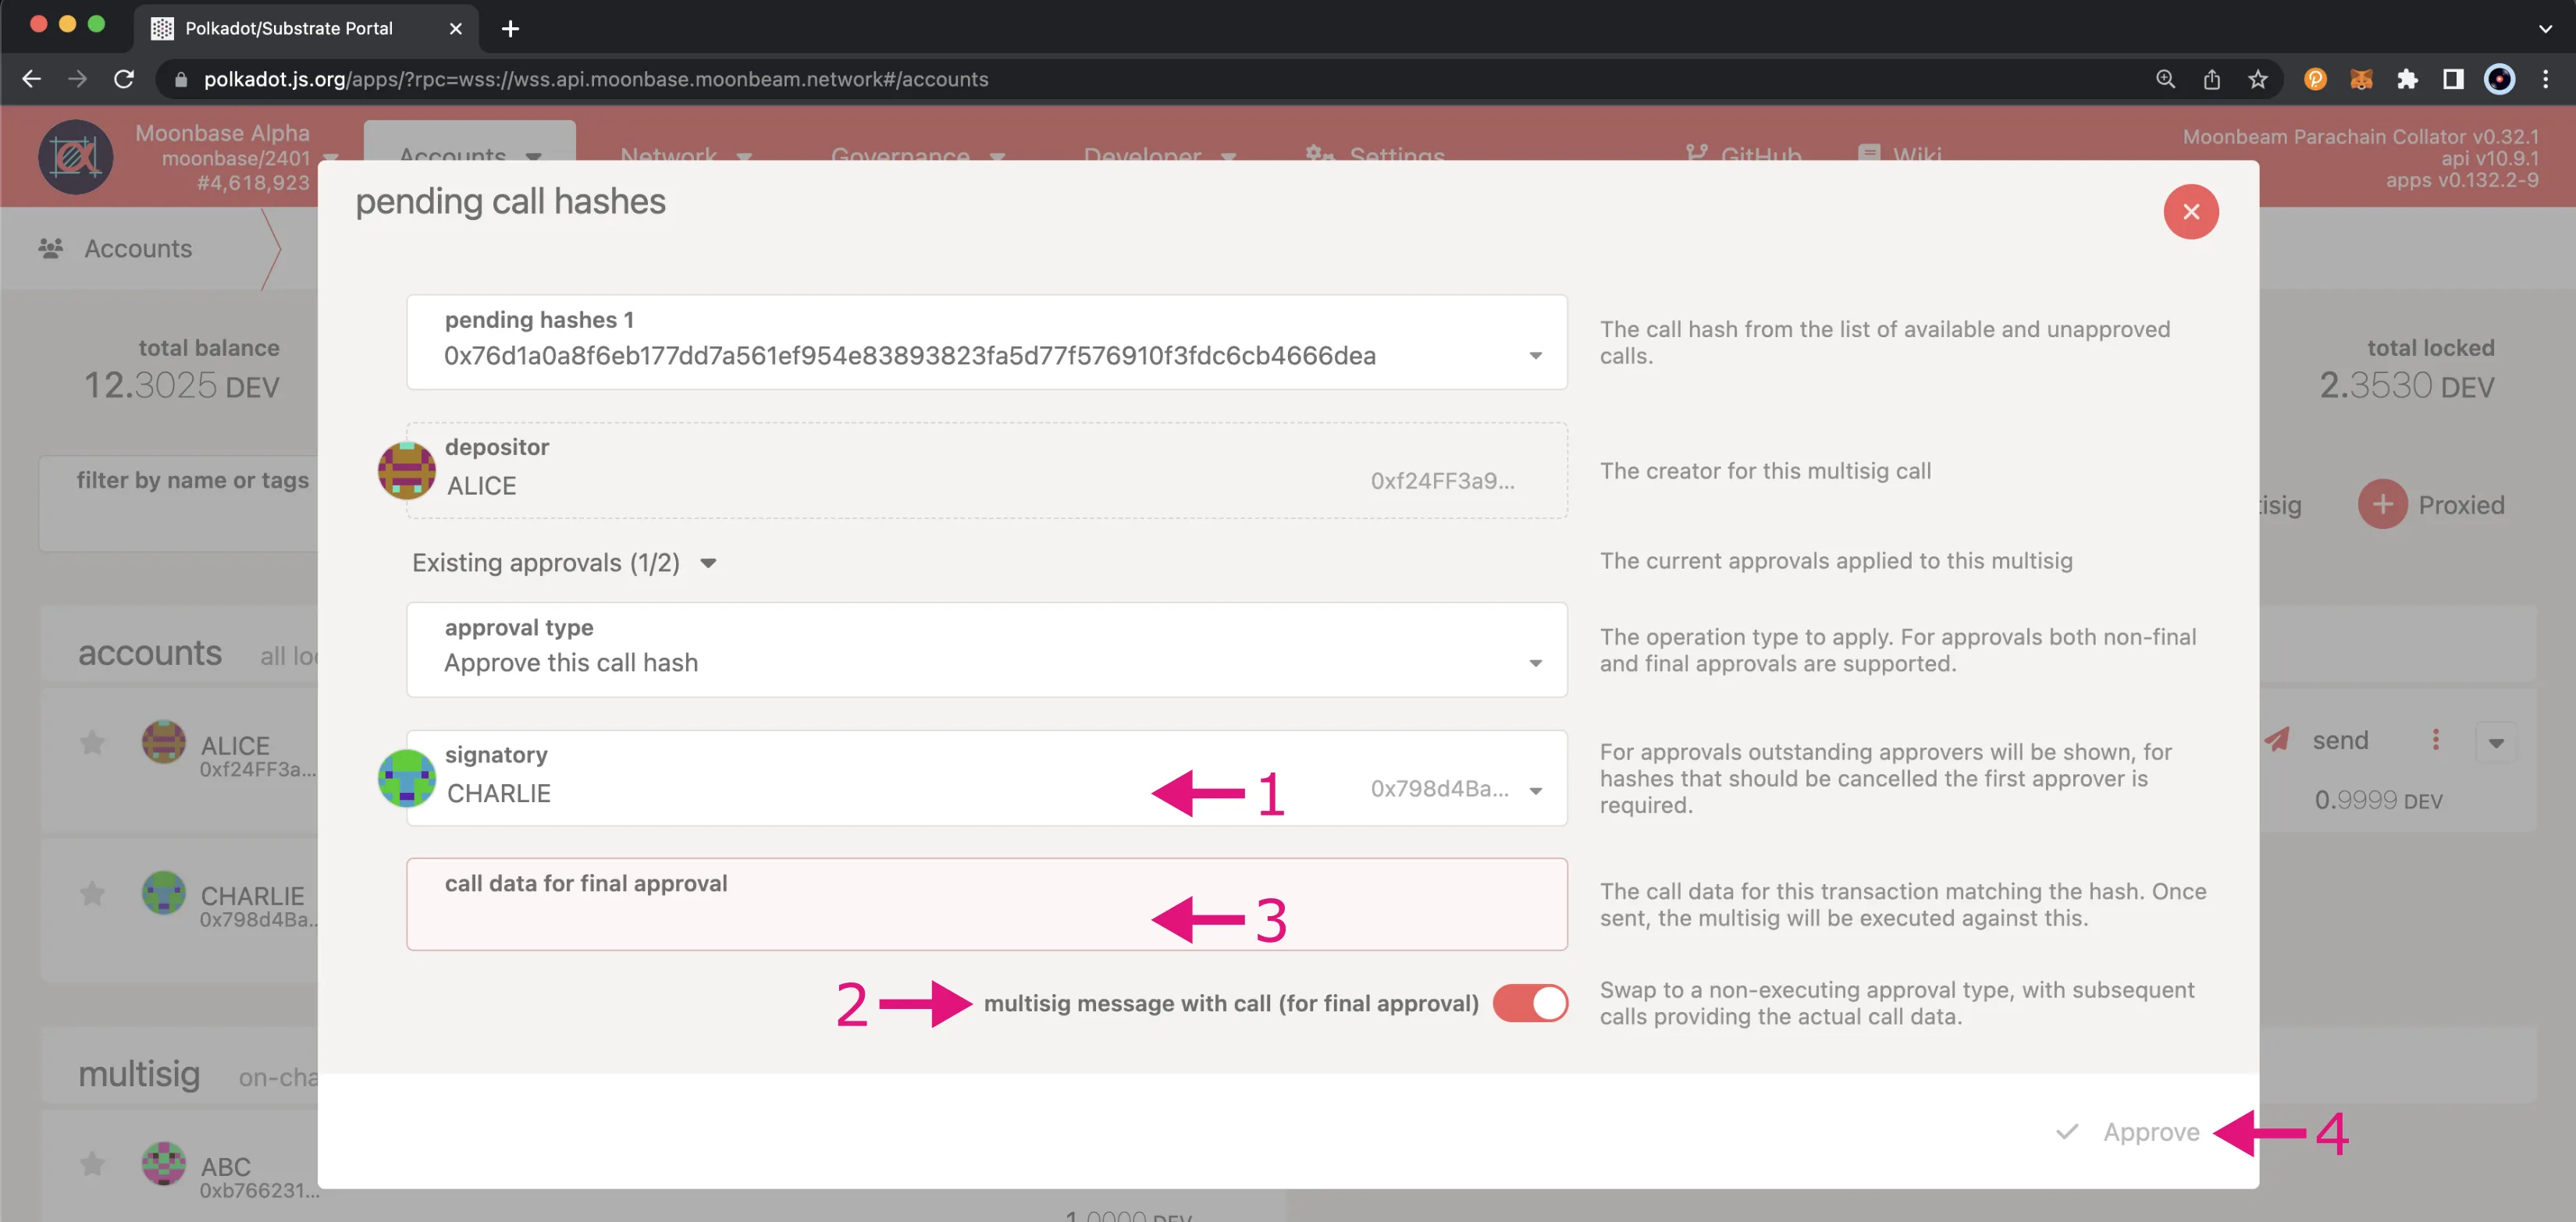
So far, Alice and Bob have approved the multisig call, which means the threshold has been met. However, the call has not been dispatched yet since you have not yet submitted an executing approval. To do so, you'll take the same steps as above plus these additional steps:
- Select the account you want to approve the transaction from. This example uses Charlie's account
- Toggle the multisig message with call (for final approval) switch to on. Under the hood, this switches the extrinsic to
asMulti, which automatically approves and dispatches the call if the threshold for approvals has been met as is the case at this point - The call data for final approval field will appear. Enter the encoded call data that you copied earlier on in this section
- Click Approve to submit the approval, which will also dispatch the multisig call
Once the final transaction has been submitted, 0.1 DEV tokens will be transferred from the ABC multisig account to Charlie's account and the multisig deposit will be returned to Alice's account. And that's it! You've successfully created a multisig call, approved the call, and dispatched it.
| Created: June 20, 2023