Interact with XC-20s on Moonbeam
Introduction
As mentioned in the XC-20s Overview page, XC-20s are a unique asset class on Moonbeam. Although they are Substrate-native assets, they also have an ERC-20 interface and can be interacted with like any other ERC-20. Additionally, the ERC-20 Permit interface is available for all external XC-20s.
This guide covers the XC-20 Solidity interfaces, including the standard ERC-20 interface and the ERC-20 Permit interface, and how to interact with external XC-20s using these interfaces.
XC-20s Solidity Interface
Both types of XC-20s have the standard ERC-20 interface. In addition, all external XC-20s also possess the ERC-20 Permit interface. The following two sections describe each of the interfaces separately.
The ERC-20 Solidity Interface
As mentioned, you can interact with XC-20s via an ERC-20 interface. The ERC20.sol interface on Moonbeam follows the EIP-20 Token Standard, which is the standard API interface for tokens within smart contracts. The standard defines the required functions and events that a token contract must implement to be interoperable with different applications.
The interface includes the following functions:
- name() — read-only function that returns the name of the token
- symbol() — read-only function that returns the symbol of the token
- decimals() — read-only function that returns the decimals of the token
- totalSupply() — read-only function that returns the total number of tokens in existence
- balanceOf(address who) — read-only function that returns the balance of the specified address
- allowance(address owner, address spender) — read-only function that checks and returns the amount of tokens that a spender is allowed to spend on behalf of the owner
- transfer(address to, uint256 value) — transfers a given amount of tokens to a specified address and returns
trueif the transfer was successful - approve(address spender, uint256 value) — approves the provided address to spend a specified amount of tokens on behalf of
msg.sender. Returnstrueif successful - transferFrom(address from, address to, uint256 value) — transfers tokens from one given address to another given address and returns
trueif successful
Note
The ERC-20 standard does not specify the implications of multiple calls to approve. Changing an allowance with this function numerous times enables a possible attack vector. To avoid incorrect or unintended transaction ordering, you can first reduce the spender allowance to 0 and then set the desired allowance afterward. For more details on the attack vector, you can check out the ERC-20 API: An Attack Vector on Approve/TransferFrom Methods overview.
The interface also includes the following required events:
- Transfer(address indexed from, address indexed to, uint256 value) - emitted when a transfer has been performed
- Approval(address indexed owner, address indexed spender, uint256 value) - emitted when an approval has been registered
The ERC-20 Permit Solidity Interface
External XC-20s also have the ERC-20 Permit interface. The Permit.sol interface on Moonbeam follows the EIP-2612 standard, which extends the ERC-20 interface with the permit function. Permits are signed messages that can be used to change an account's ERC-20 allowance. Note that local XC-20s can have also the Permit interface, but it is not a requirement for them to be XCM-ready.
The standard ERC-20 approve function is limited in its design as the allowance can only be modified by the sender of the transaction, the msg.sender. This can be seen in OpenZeppelin's implementation of the ERC-20 interface, which sets the owner through the msgSender function, which ultimately sets it to msg.sender.
Instead of signing the approve transaction, a user can sign a message, and that signature can be used to call the permit function to modify the allowance. As such, it allows for gas-less token transfers. In addition, users no longer need to send two transactions to approve and transfer tokens. To see an example of the permit function, you can check out OpenZeppelin's implementation of the ERC-20 Permit extension.
The Permit.sol interface includes the following functions:
- permit(address owner, address spender, uint256, value, uint256, deadline, uint8 v, bytes32 r, bytes32 s) - consumes an approval permit, which can be called by anyone
- nonces(address owner) - returns the current nonce for the given owner
- DOMAIN_SEPARATOR() - returns the EIP-712 domain separator, which is used to avoid replay attacks. It follows the EIP-2612 implementation
The DOMAIN_SEPARATOR() is defined in the EIP-712 standard, and is calculated as:
keccak256(PERMIT_DOMAIN, name, version, chain_id, address)
The parameters of the hash can be broken down as follows:
- PERMIT_DOMAIN - is the
keccak256ofEIP712Domain(string name,string version,uint256 chainId,address verifyingContract) - name - is the token name but with the following considerations:
- If the token has a name defined, the name for the domain is
XC20: <name>, where<name>is the token name - If the token has no name defined, the name for the domain is
XC20: No name
- If the token has a name defined, the name for the domain is
- version - is the version of the signing domain. For this case, version is set to
1 - chainId - is the chain ID of the network
- verifyingContract - is the XC-20 address
Note
Prior to runtime upgrade 1600, the name field did not follow the standard EIP-2612 implementation.
The calculation of the domain separator can be seen in Moonbeam's EIP-2612 implementation, with a practical example shown in OpenZeppelin's EIP712 contract.
Aside from the domain separator, the hashStruct guarantees that the signature can only be used for the permit function with the given function arguments. It uses a given nonce to ensure the signature is not subject to a replay attack. The calculation of the hash struct can be seen in Moonbeam's EIP-2612 implementation, with a practical example shown in OpenZeppelin's ERC20Permit contract.
The domain separator and the hash struct can be used to build the final hash of the fully encoded message. A practical example is shown in OpenZeppelin's EIP712 contract.
With the final hash and the v, r, and s values, the signature can be verified and recovered. If successfully verified, the nonce will increase by one and the allowance will be updated.
Interact with External XC-20s Using an ERC-20 Interface
This section of the guide will show you how to interact with XC-20s via the ERC-20 interface using Remix. Because local XC-20s are representations of regular ERC-20s, this section is focused on external XC-20s.
To interact with external XC-20s, you'll need to first calculate the precompile address of the XC-20 asset you want to interact with. Then, you can interact with the ERC-20 interface as you would with any other ERC-20.
You can adapt the instructions in this section to be used with the Permit.sol interface.
Checking Prerequisites
To approve a spend or transfer external XC-20s via the ERC-20 interface, you will need:
- MetaMask installed and connected to the Moonbase Alpha TestNet
- Create or have two accounts on Moonbase Alpha
- At least one of the accounts will need to be funded with
DEVtokens. You can get DEV tokens for testing on Moonbase Alpha once every 24 hours from the Moonbase Alpha Faucet
Calculate External XC-20 Precompile Addresses
Before you can interact with an external XC-20 via the ERC-20 interface, you need to derive the external XC-20's precompile address from the asset ID.
The external XC-20 precompile address is calculated using the following:
address = '0xFFFFFFFF...' + DecimalToHex(AssetId)
Given the above calculation, the first step is to take the u128 representation of the asset ID and convert it to a hex value. You can use your search engine of choice to look up a simple tool for converting decimals to hex values. For asset ID 42259045809535163221576417993425387648, the hex value is 1FCACBD218EDC0EBA20FC2308C778080.
External XC-20 precompiles can only fall between 0xFFFFFFFF00000000000000000000000000000000 and 0xFFFFFFFFFFFFFFFFFFFFFFFFFFFFFFFFFFFFFFFF.
Since Ethereum addresses are 40 characters long, you will need to start with the initial eight Fs and then prepend 0s to the hex value until the address has 40 characters.
The hex value that was already calculated is 32 characters long, so prepending eight Fs to the hex value will give you the 40-character address you need to interact with the XC-20 precompile. For this example, the full address is 0xFFFFFFFF1FCACBD218EDC0EBA20FC2308C778080.
Now that you've calculated the external XC-20 precompile address, you can use the address to interact with the XC-20 like you would with any other ERC-20 in Remix.
Add & Compile the Interface
You can interact with the ERC-20 interface using Remix. First, you will need to add the interface to Remix:
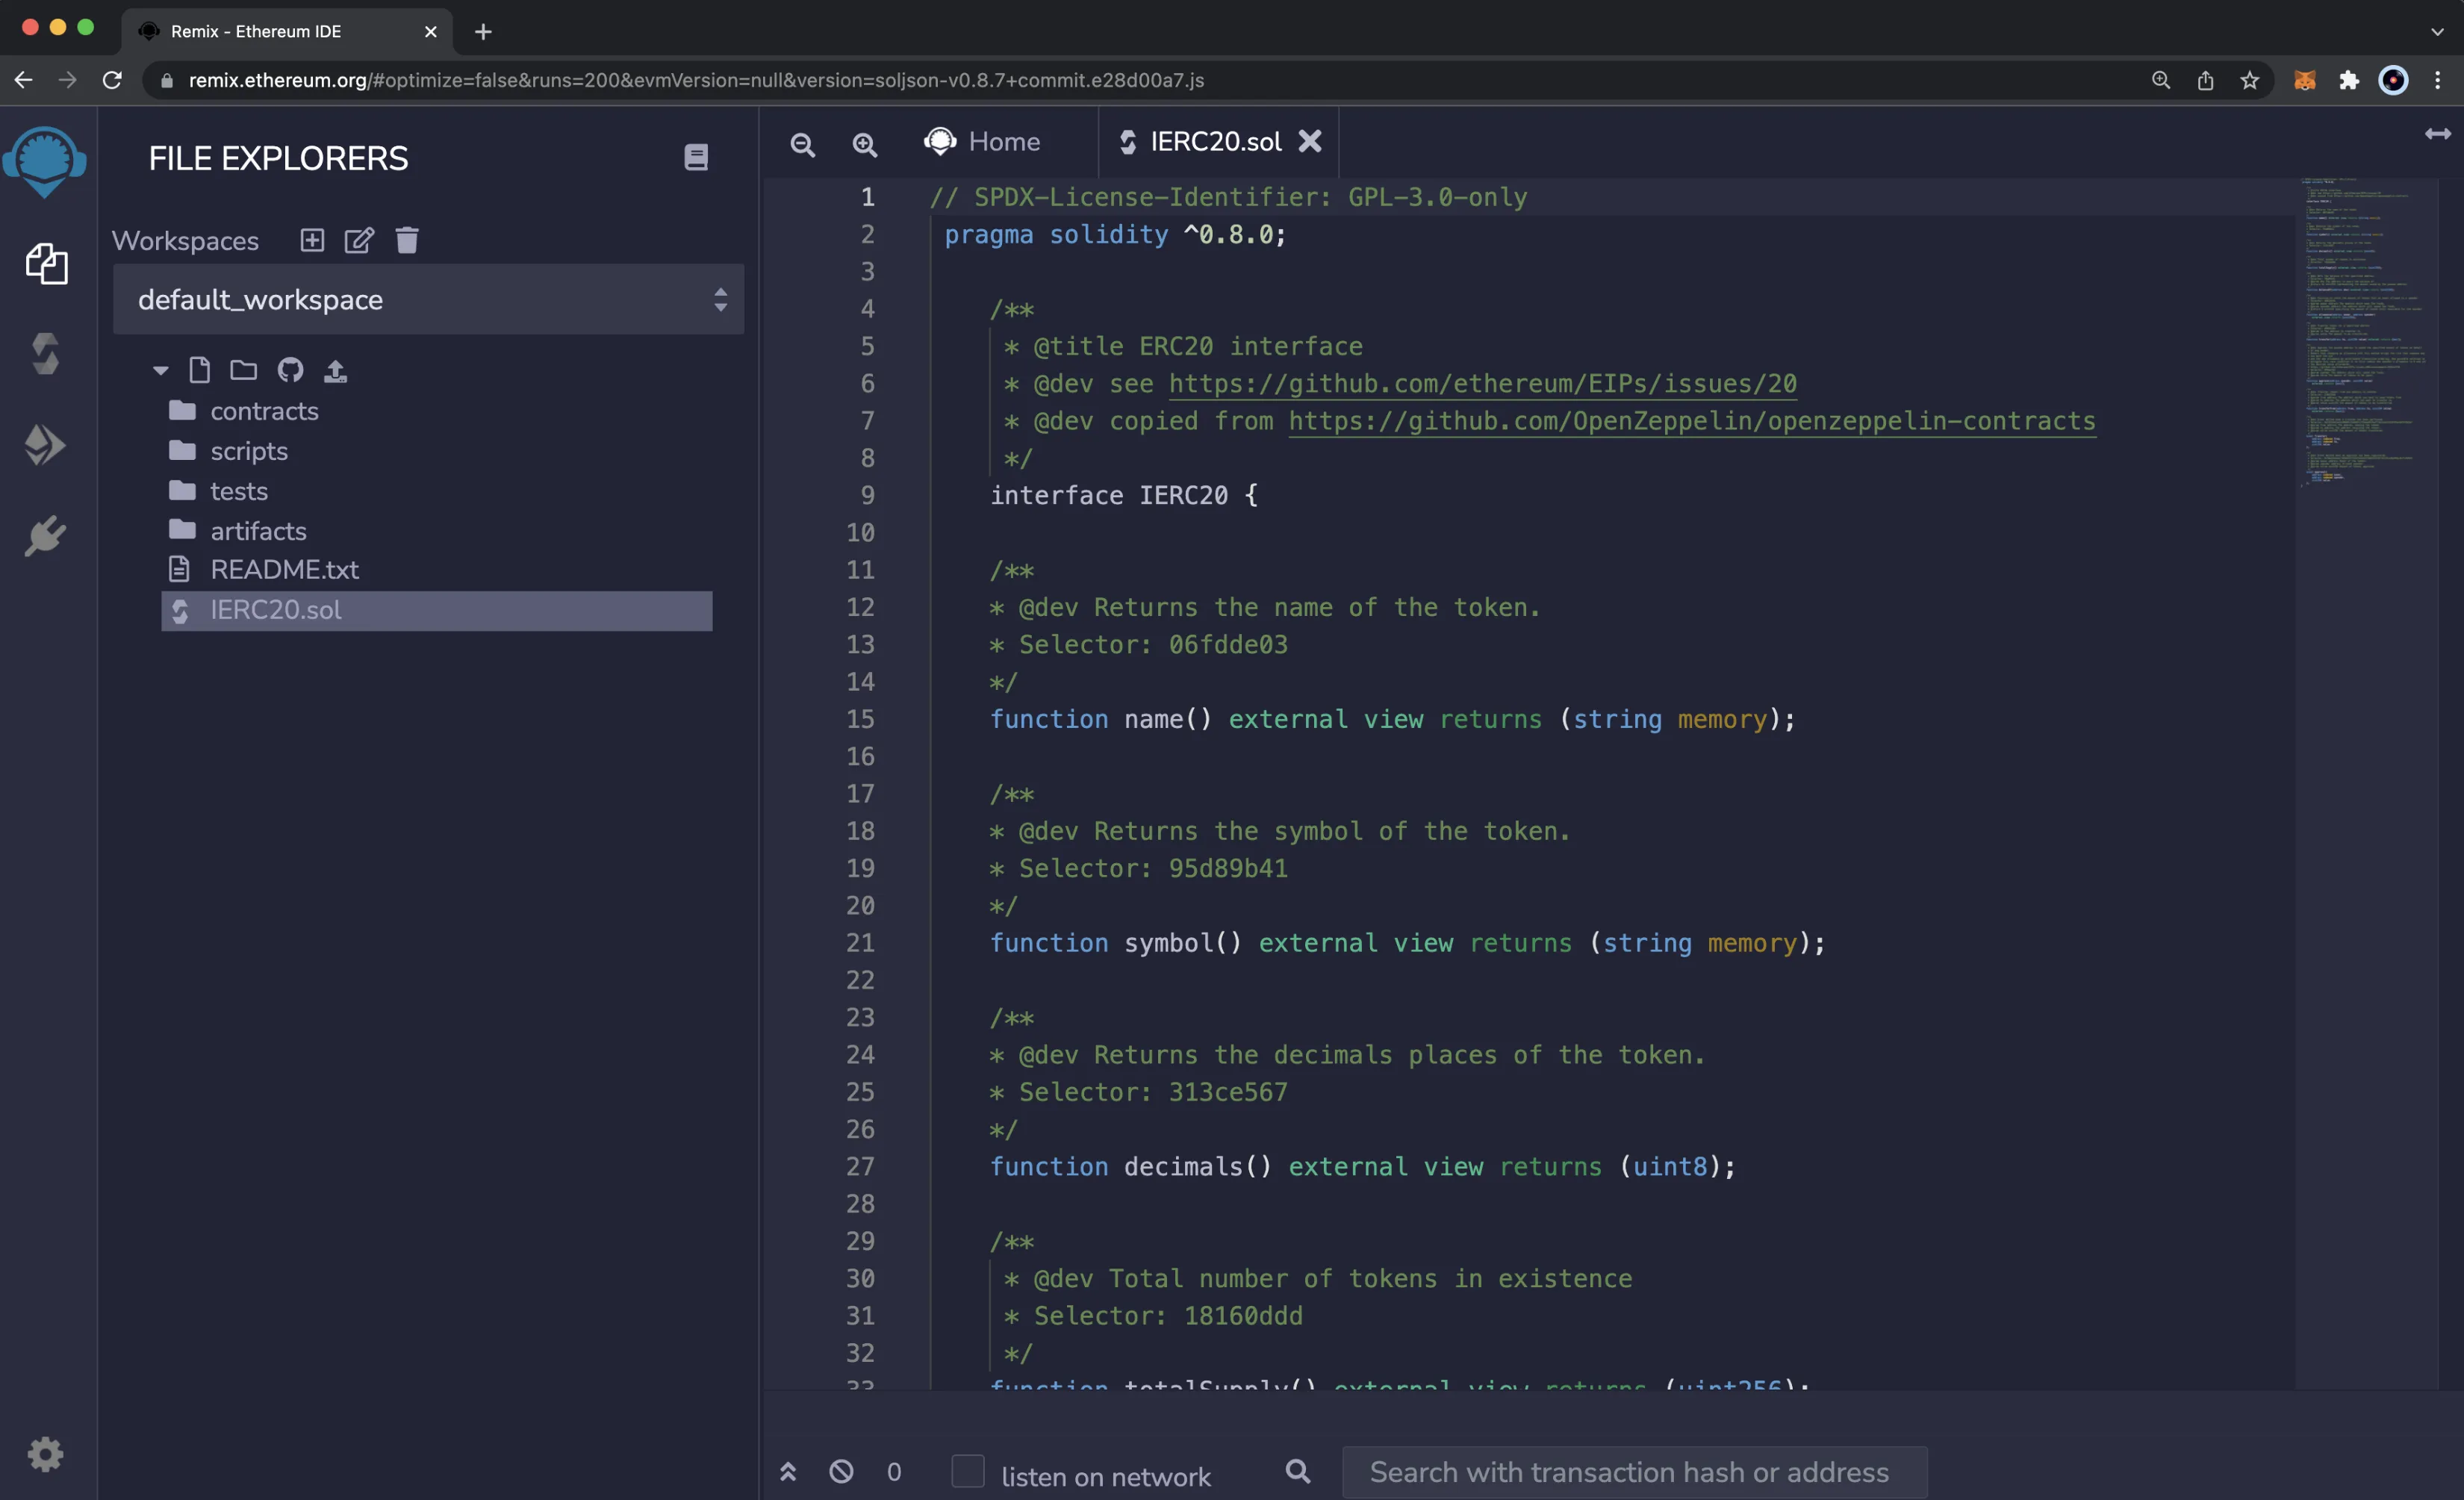
- Get a copy of ERC20.sol
- Paste the file contents into a Remix file named IERC20.sol
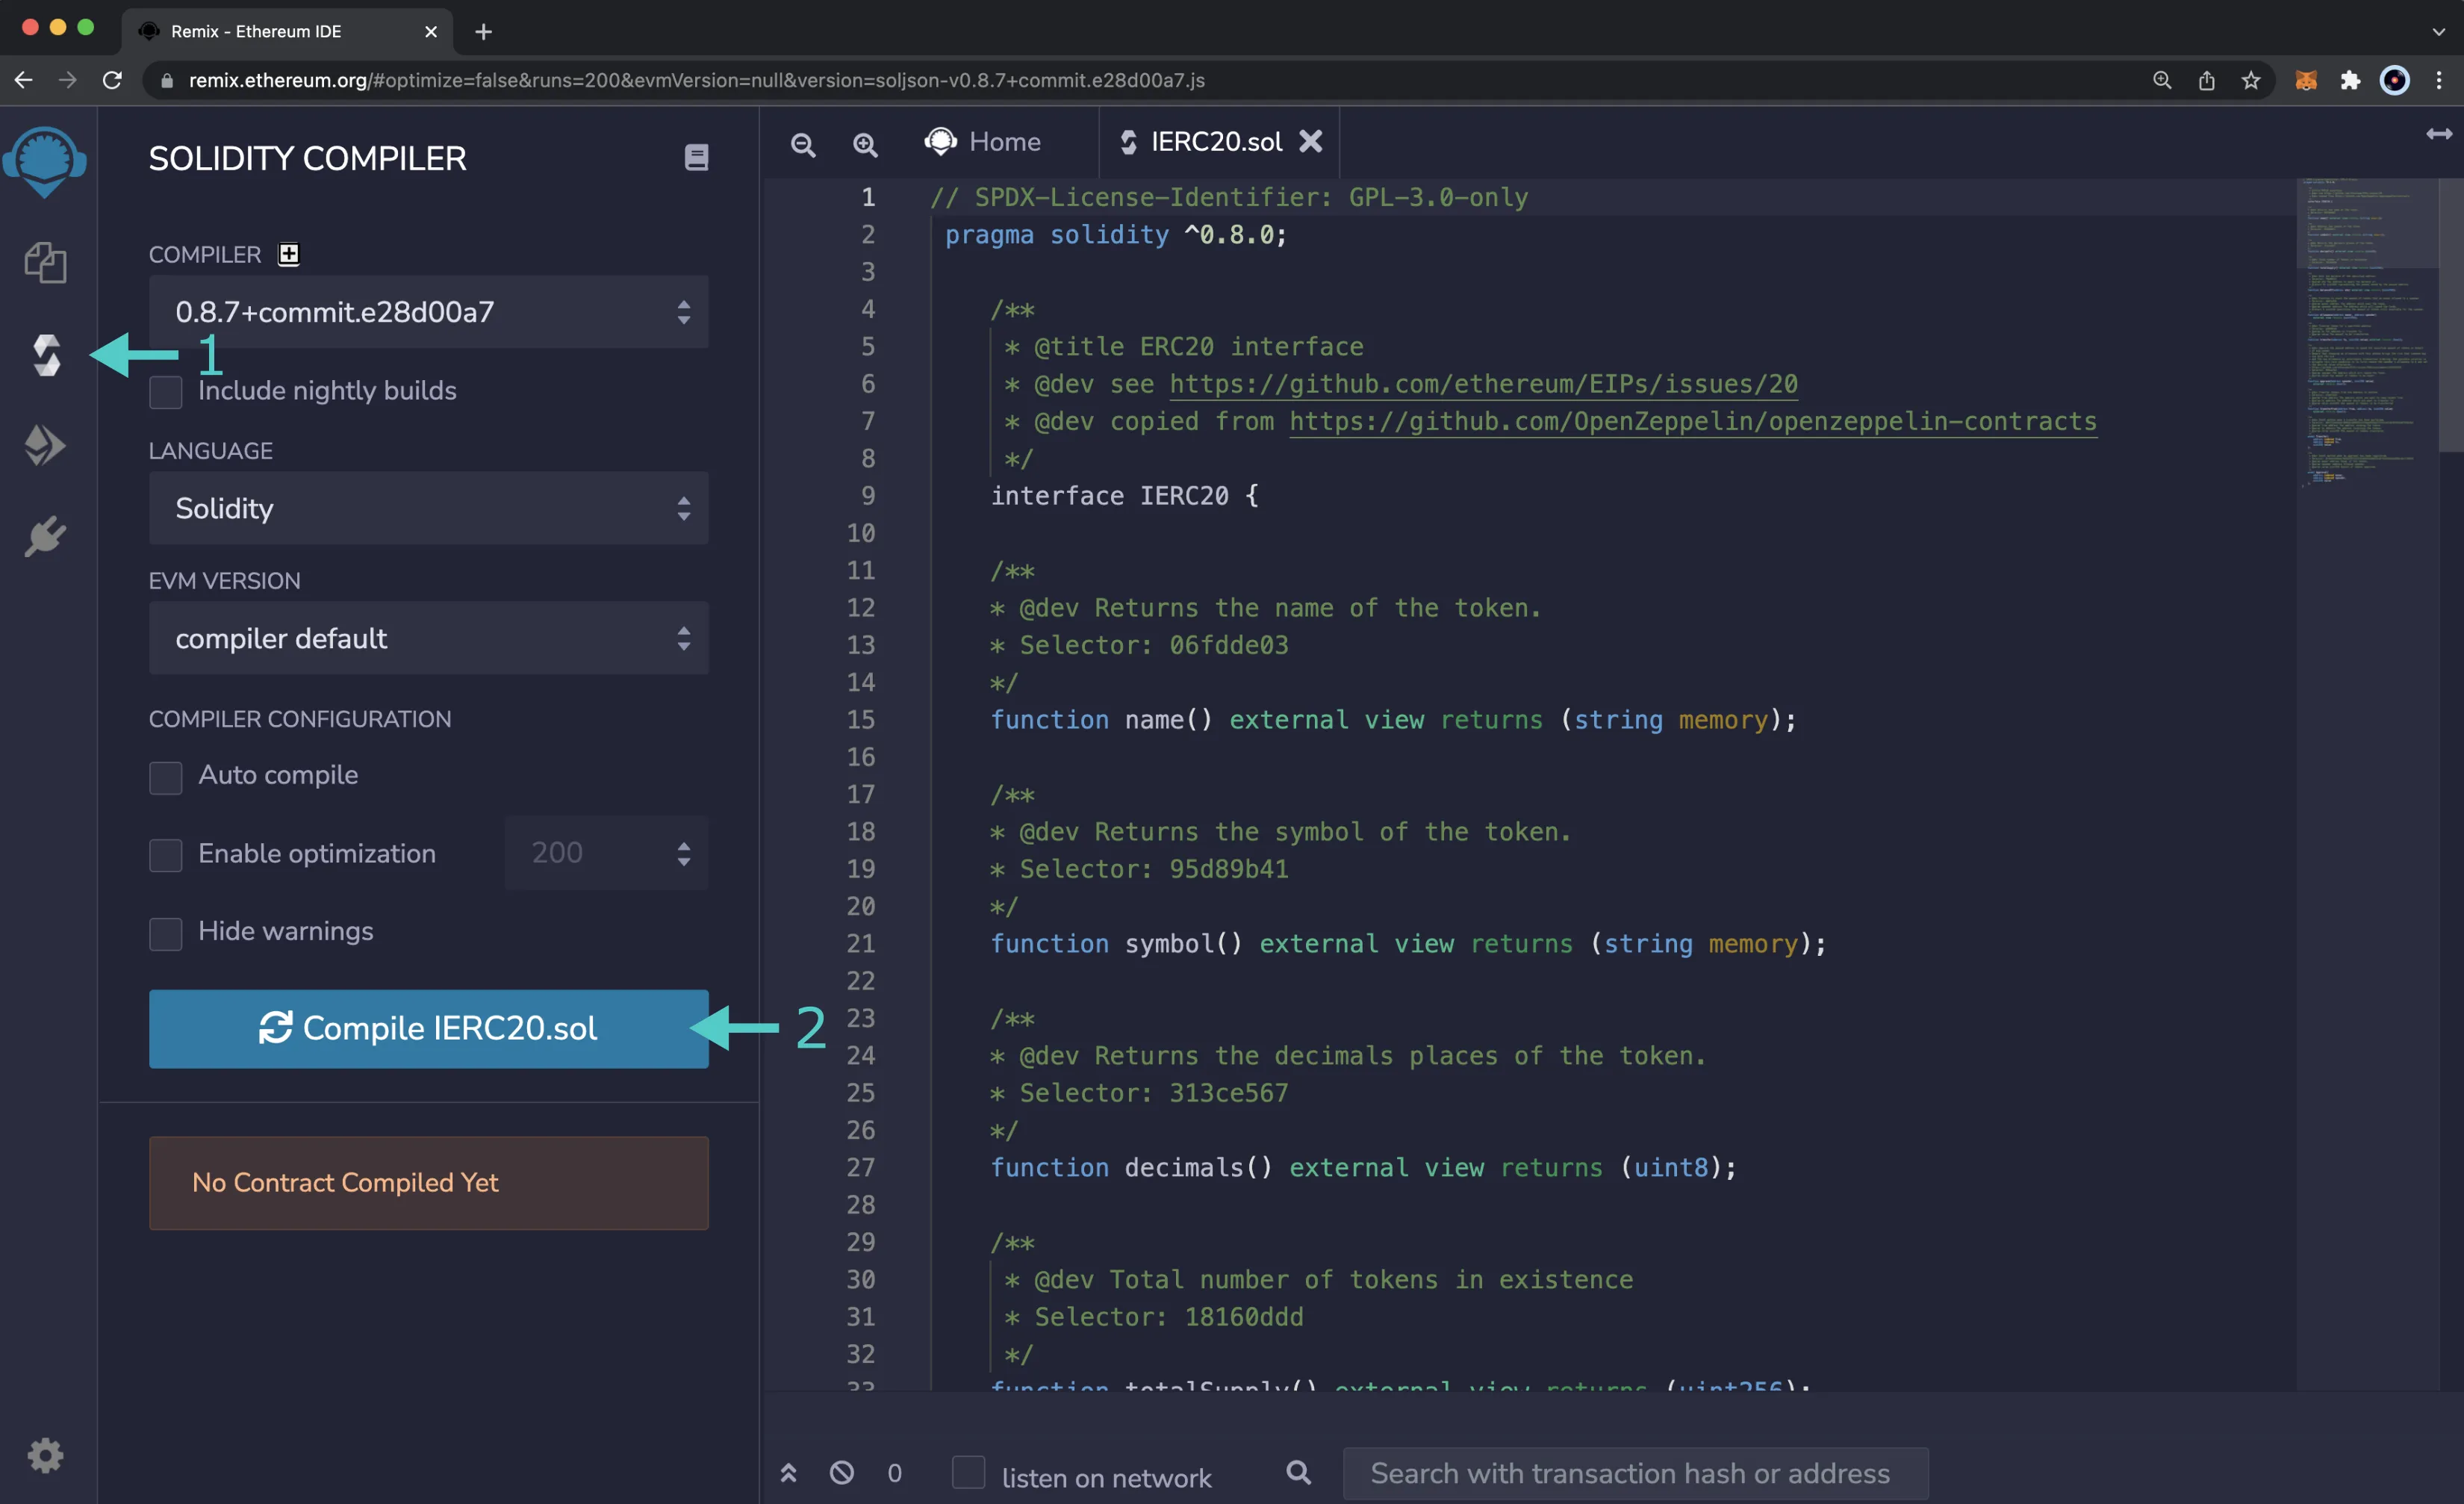
Once you have the ERC-20 interface loaded in Remix, you will need to compile it:
- Click on the Compile tab, second from top
- Compile the IERC20.sol file
If the interface was compiled successfully, you will see a green checkmark next to the Compile tab.
Access the Precompile
Instead of deploying the ERC-20 precompile, you will access the interface given the address of the XC-20:
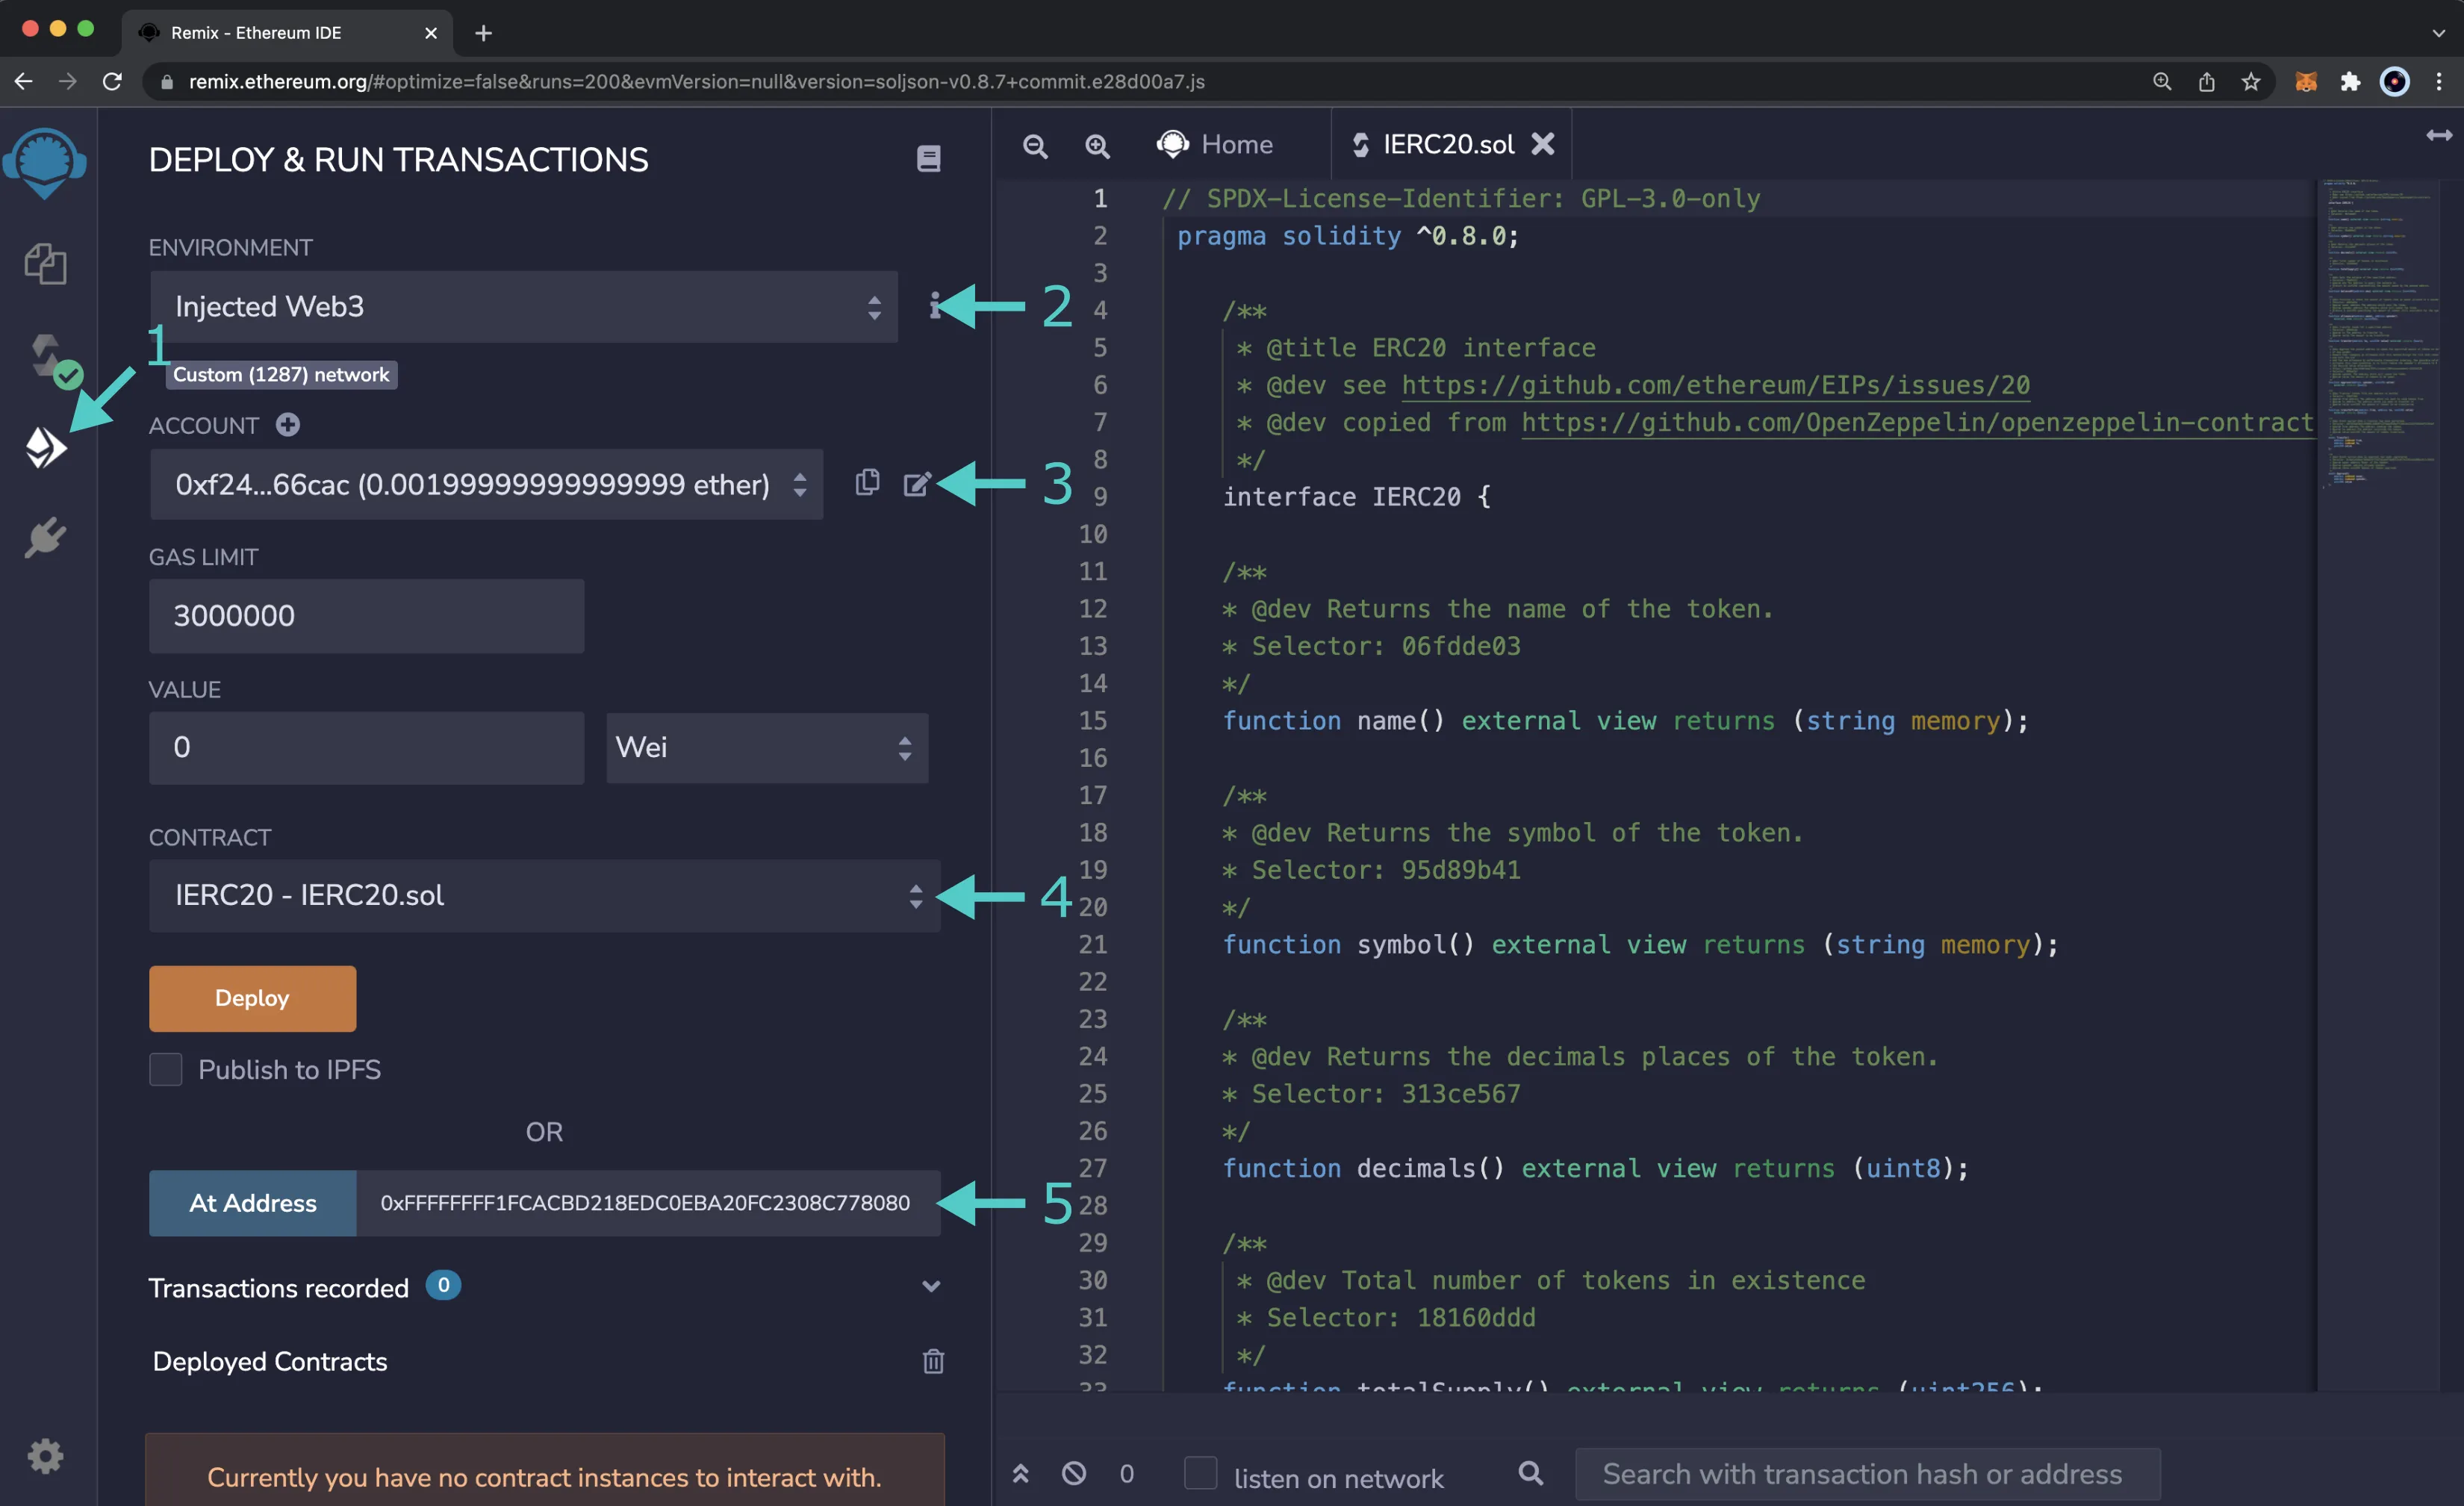
- Click on the Deploy and Run tab directly below the Compile tab in Remix. Please note that the precompiled contract is already deployed
- Make sure Injected Web3 is selected in the ENVIRONMENT dropdown. Once you select Injected Web3, you might be prompted by MetaMask to connect your account to Remix
- Make sure the correct account is displayed under ACCOUNT
- Ensure IERC20 - IERC20.sol is selected in the CONTRACT dropdown. Since this is a precompiled contract, there is no need to deploy any code. Instead, you are going to provide the address of the precompile in the At Address field
- Provide the address of the XC-20. For local XC-20s, which you should have already calculated in the Calculate External XC-20 Precompile Addresses section. For this example, you can use
0xFFFFFFFF1FCACBD218EDC0EBA20FC2308C778080and click At Address
Note
Optionally, you can checksum the XC-20 precompile address by going to your search engine of choice and searching for a tool to checksum the address. Once the address has been checksummed, you can use it in the At Address field instead.
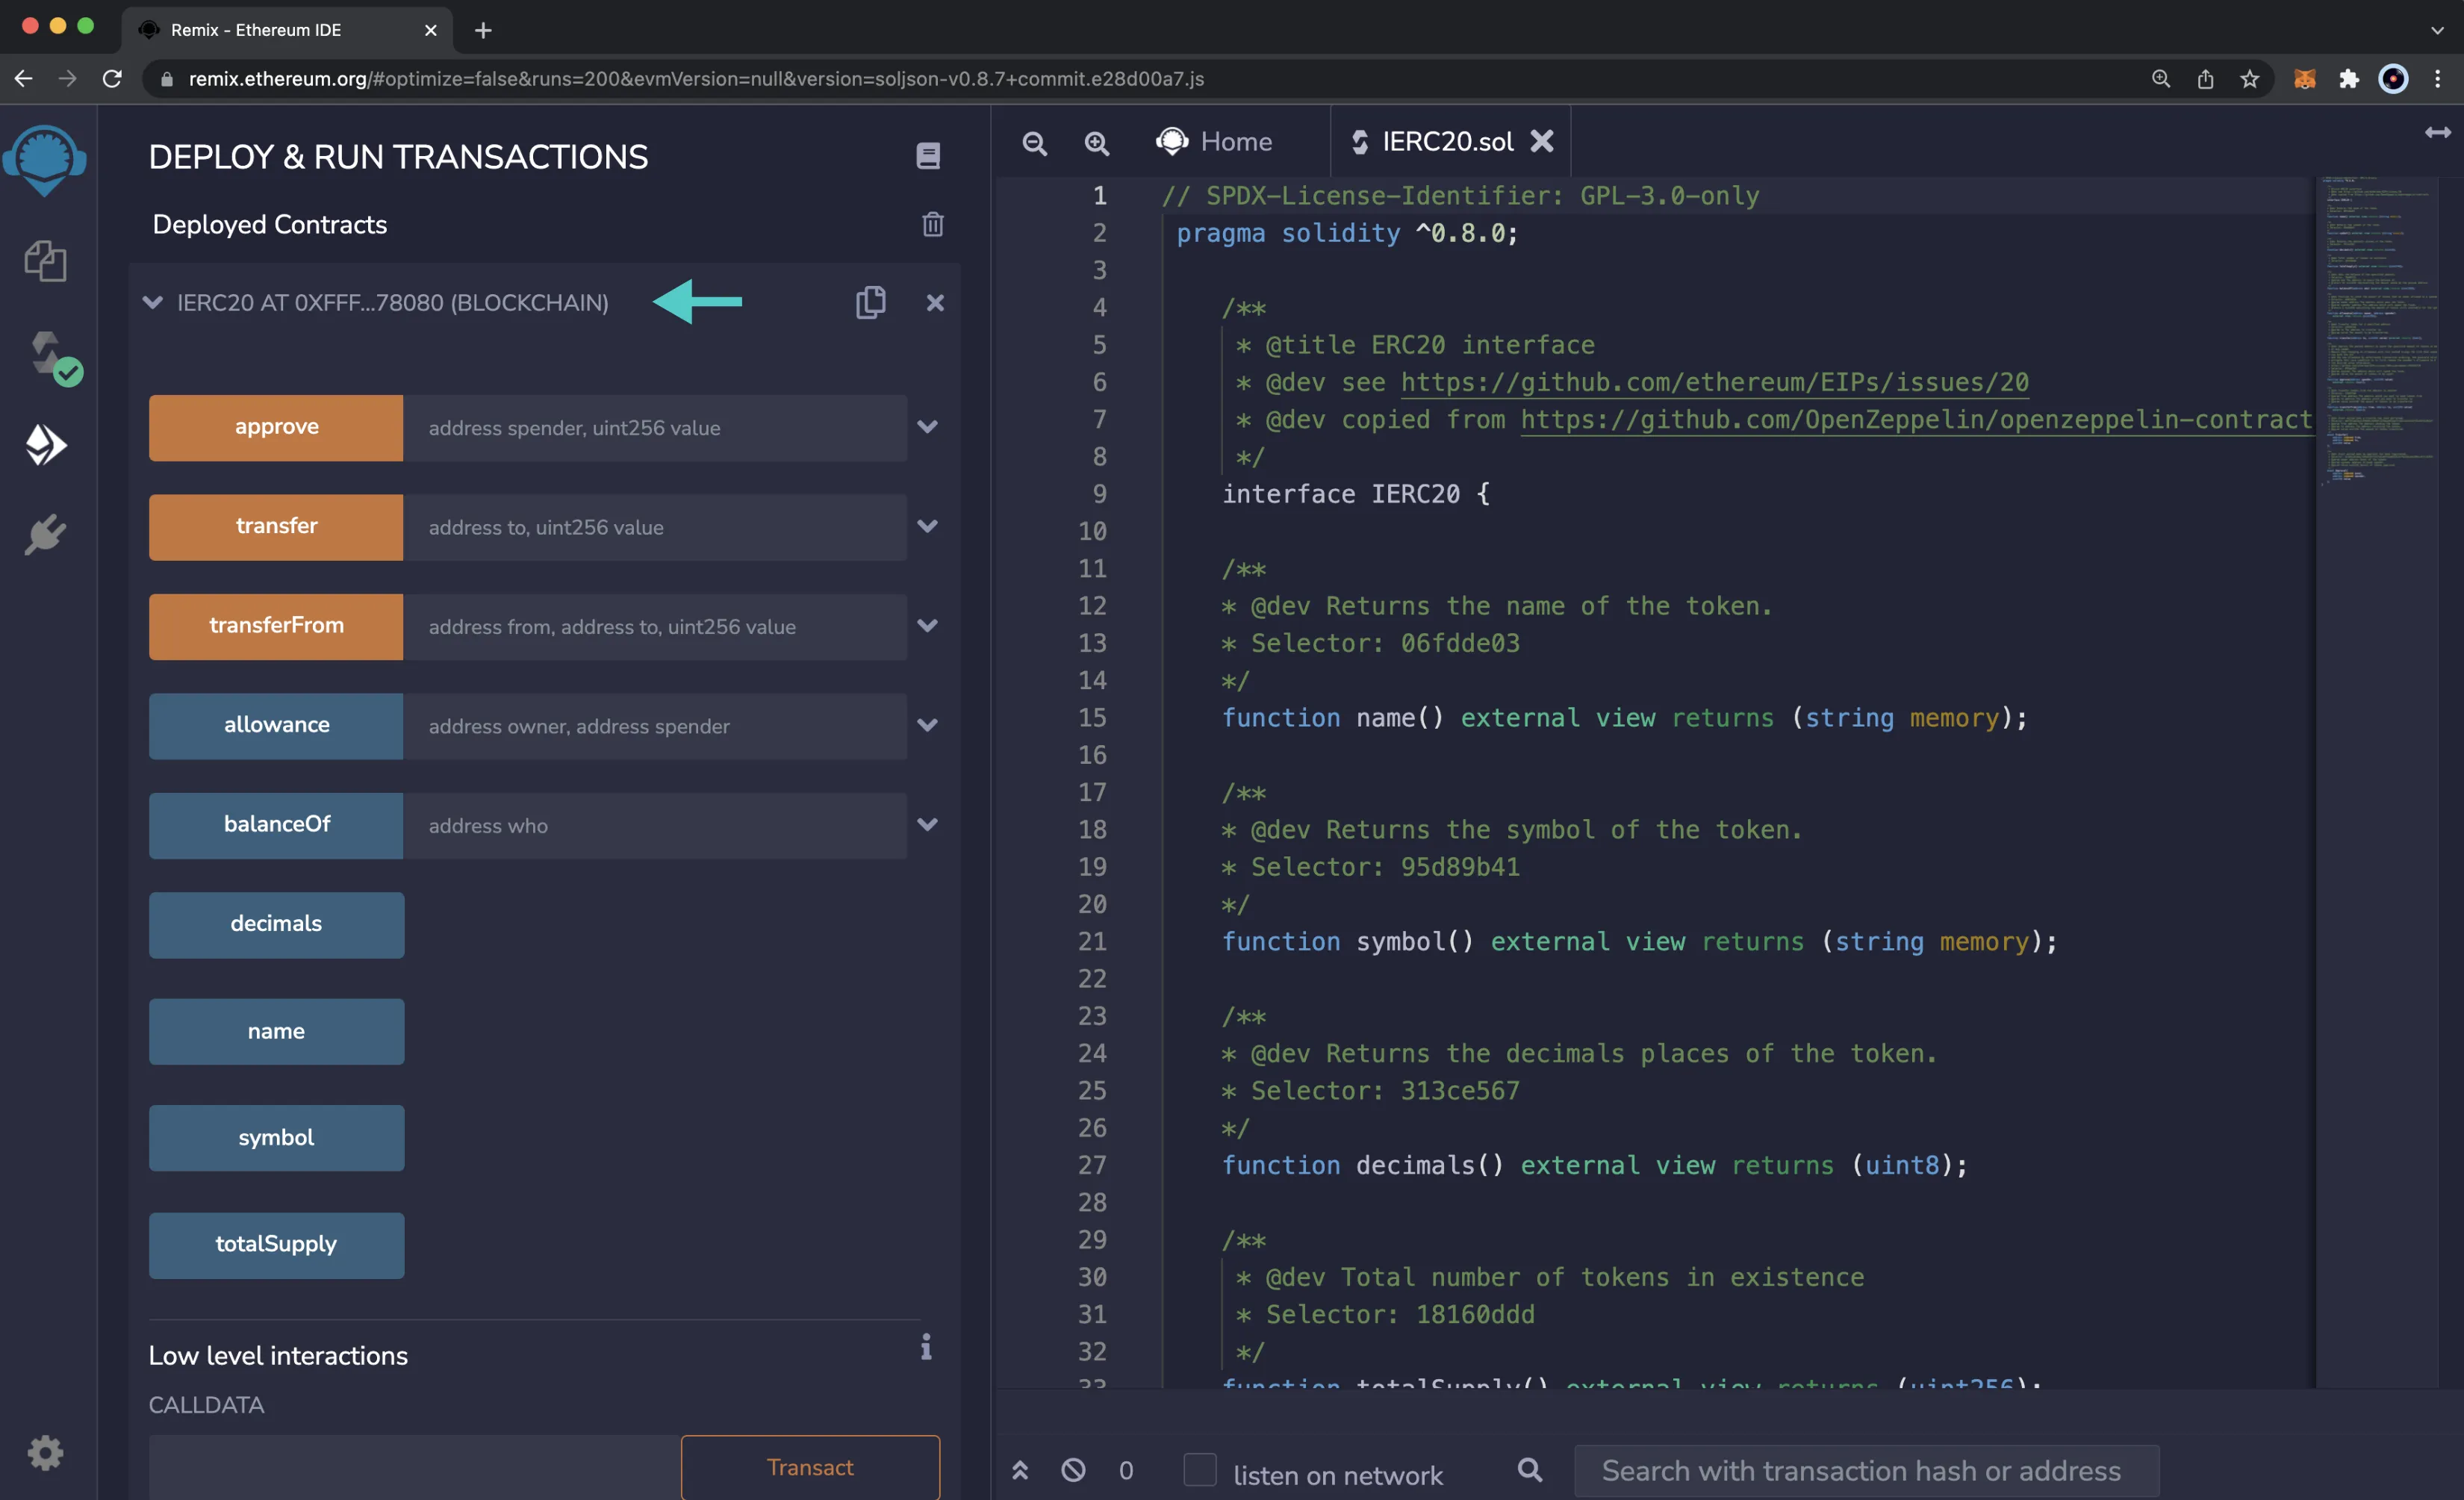
The IERC20 precompile for the XC-20 will appear in the list of Deployed Contracts. Now you can feel free to call any of the standard ERC-20 functions to get information about the XC-20 or transfer the XC-20.
To learn how to interact with each of the functions, you can check out the ERC-20 Precompile guide and modify it for interacting with the XC-20 Precompile.
| Created: July 27, 2023


