How to Establish an XC Integration with Moonbeam
Introduction
While Cross-Chain Message Passing (XCMP) is being developed, a stop-gap protocol has been implemented called Horizontal Relay-routed Message Passing (HRMP). It has the same interface and functionality as XCMP, but the messages are stored in and read from the relay chain. Whereas with XCMP, only the message's associated metadata is stored in the relay chain. Since all messages are passed via the relay chain with HRMP, it is much more demanding on resources. As such, HRMP will be phased out once XCMP is implemented.
All XCMP channel integrations with Moonbeam are unidirectional, meaning messages flow only in one direction. If chain A initiates a channel to chain B, chain A will only be allowed to send messages to B, and B will not be able to send messages back to chain A. As such, chain B will also need to initiate a channel with chain A to send messages back and forth between the two chains.
Once the XCMP (or HRMP) channels have been opened, the corresponding assets from both chains will need to be registered on the opposing chain before being able to be transferred. To find step-by-step details on how to register an asset, you can refer to the How to Register Cross-Chain Assets guide.
This guide will cover the process of opening and accepting an HRMP channel between a parachain and a Moonbeam-based network. In addition, the guide provides the necessary steps to create a batch proposal that combines opening and accepting a channel and registering an asset on Moonbeam into a single proposal.
All of the examples in this guide use a CLI tool developed to ease the entire process, which you can find in the xcm-tools GitHub repository.
git clone https://github.com/Moonsong-Labs/xcm-tools && \
cd xcm-tools && \
yarn
Moonbase Alpha XCM Integration Overview
The first step for a Moonriver/Moonbeam XCM integration is to integrate with the Moonbase Alpha TestNet through the Alphanet relay chain. Then a Moonriver integration must be completed before proceeding with Moonbeam (if applicable).
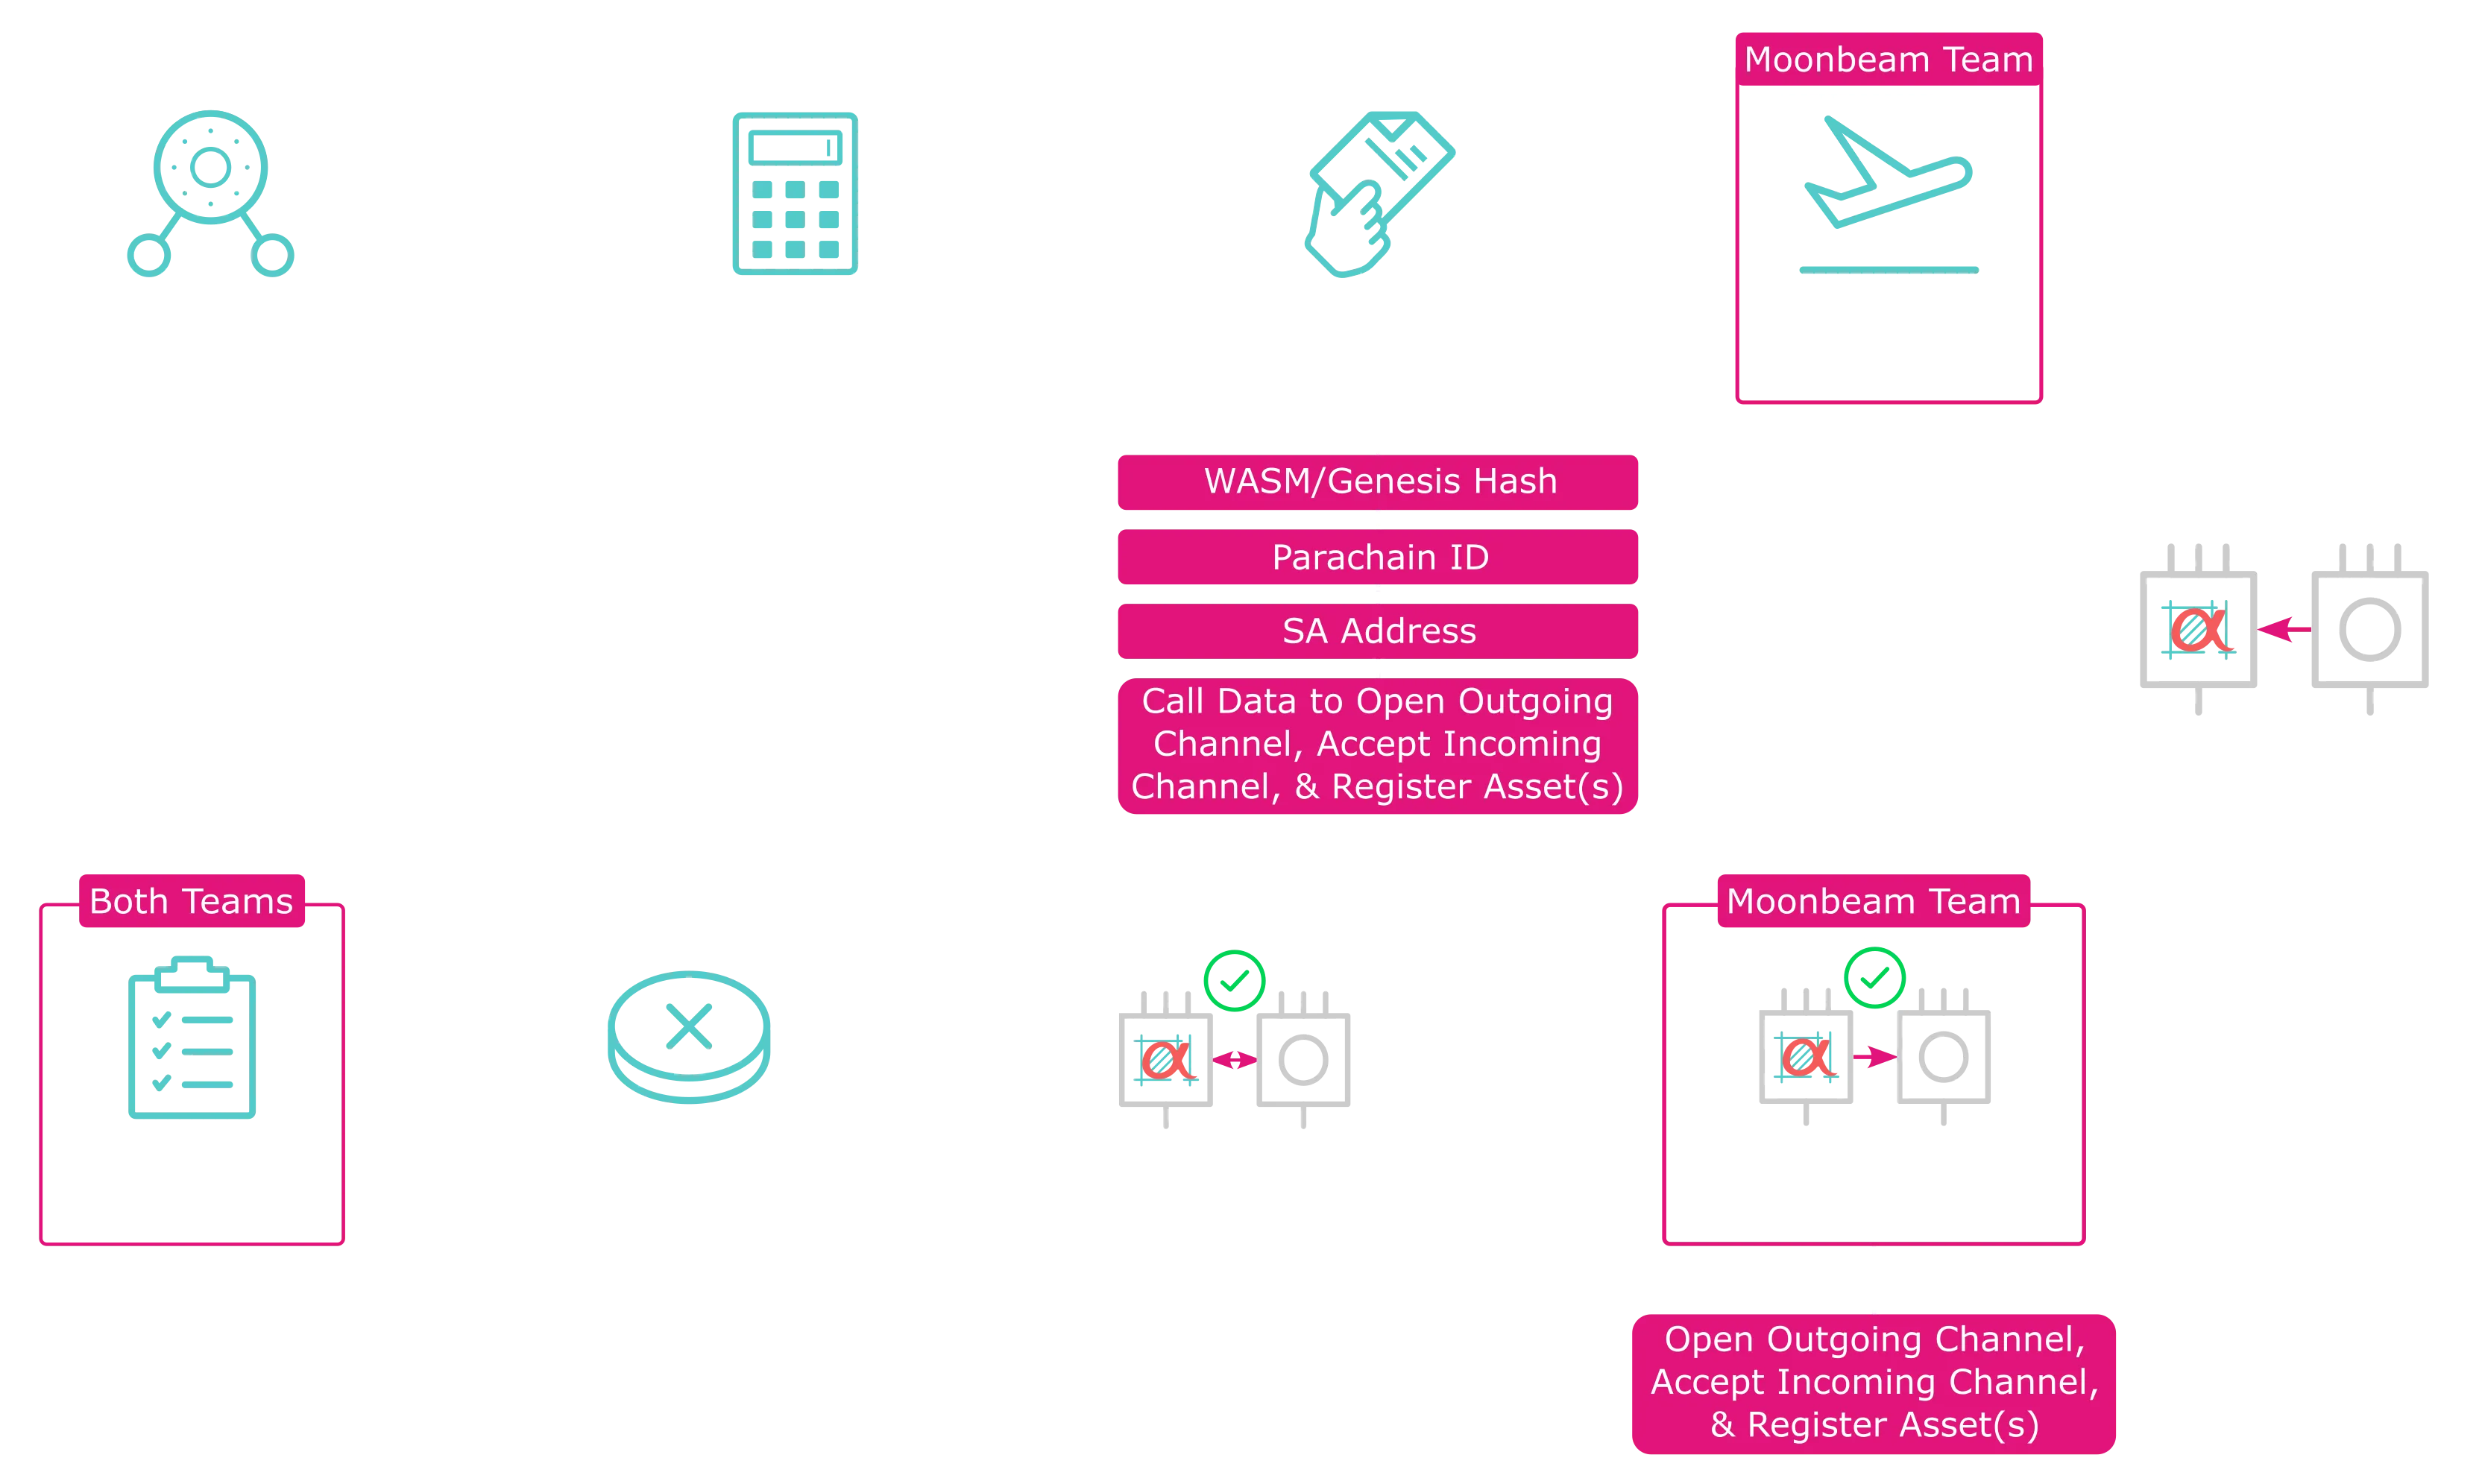
The entire process of getting started with Moonbase Alpha can be summarized as follows:
- Sync a node with the Alphanet relay chain
- Calculate your parachain Sovereign account on the Alphanet relay chain
- Once your node is fully synced, please get in touch with the Moonbeam team on Telegram or Discord, so the team can onboard your parachain to the relay chain. Provide the following information for onboarding:
- The WASM/Genesis head hash
- Your parachain ID
- Your Sovereign account's address. The Moonbeam team will fund your Sovereign account at the relay chain level. This step is required to be able to create the HRMP channel
- The encoded call data to open an HRMP channel to your parachain, accept the incoming HRMP channel, and register the assets (if applicable). This will be executed through sudo
- Open an HRMP channel to Moonbase Alpha from your parachain (through sudo or via governance)
- Accept the HRMP channel from Moonbase Alpha (through sudo or via governance)
- (Optional) Register Moonbase Alpha's DEV token on your parachain
- For testing the XCM integration, please send some tokens to:
AccountId (Encoded): 5GWpSdqkkKGZmdKQ9nkSF7TmHp6JWt28BMGQNuG4MXtSvq3e
Decoded (32-Bytes):  0xc4db7bcb733e117c0b34ac96354b10d47e84a006b9e7e66a229d174e8ff2a063
- Test the XCM integration
Once all of these steps are completed and both teams have successfully tested asset transfers, your parachain token can be added to the Cross Chain Assets section of the Moonbeam DApp. If deposits and withdrawals work as expected, integration with Moonriver can begin.
Sync a Node
To sync a node, you can use the Alphanet relay chain specs (note: the relay chain is Westend-based, and will probably take one day to sync).
For reference, you can use Moonbase Alpha's spec file. You'll need to adapt it to your chain.
There are also some snapshots for the Alphanet ecosystem relay chain you can use to quickly get started, these are provided by the community.
Calculate and Fund the Parachain Sovereign Account
You can calculate the Sovereign account information using a script from the xcm-tools repository. To run the script, you must provide the parachain ID and the name of the associated relay chain.
You can find the parachain IDs that have already been used on the relay chain's Polkadot.js Apps page.
The accepted values for the relay chain are polkadot (default), kusama, and moonbase.
For example, Moonbase Alpha's Sovereign account for both the relay chain and other parachains can be obtained with the following:
yarn calculate-sovereign-account --p 1000 --r moonbase
Which should result in the following response:
Sovereign Account Address on Relay: 0x70617261e8030000000000000000000000000000000000000000000000000000
Sovereign Account Address on other Parachains (Generic): 0x7369626ce8030000000000000000000000000000000000000000000000000000
Sovereign Account Address on Moonbase Alpha: 0x7369626ce8030000000000000000000000000000
Moonriver & Moonbeam XCM Integration Overview
From a technical perspective, the process of creating an HRMP channel with Moonriver and Moonbeam is nearly identical. However, engagement with the Moonbeam community is crucial and required before a proposal will pass.
Please check the HRMP channel guidelines that the community voted on for Moonriver and Moonbeam before starting.
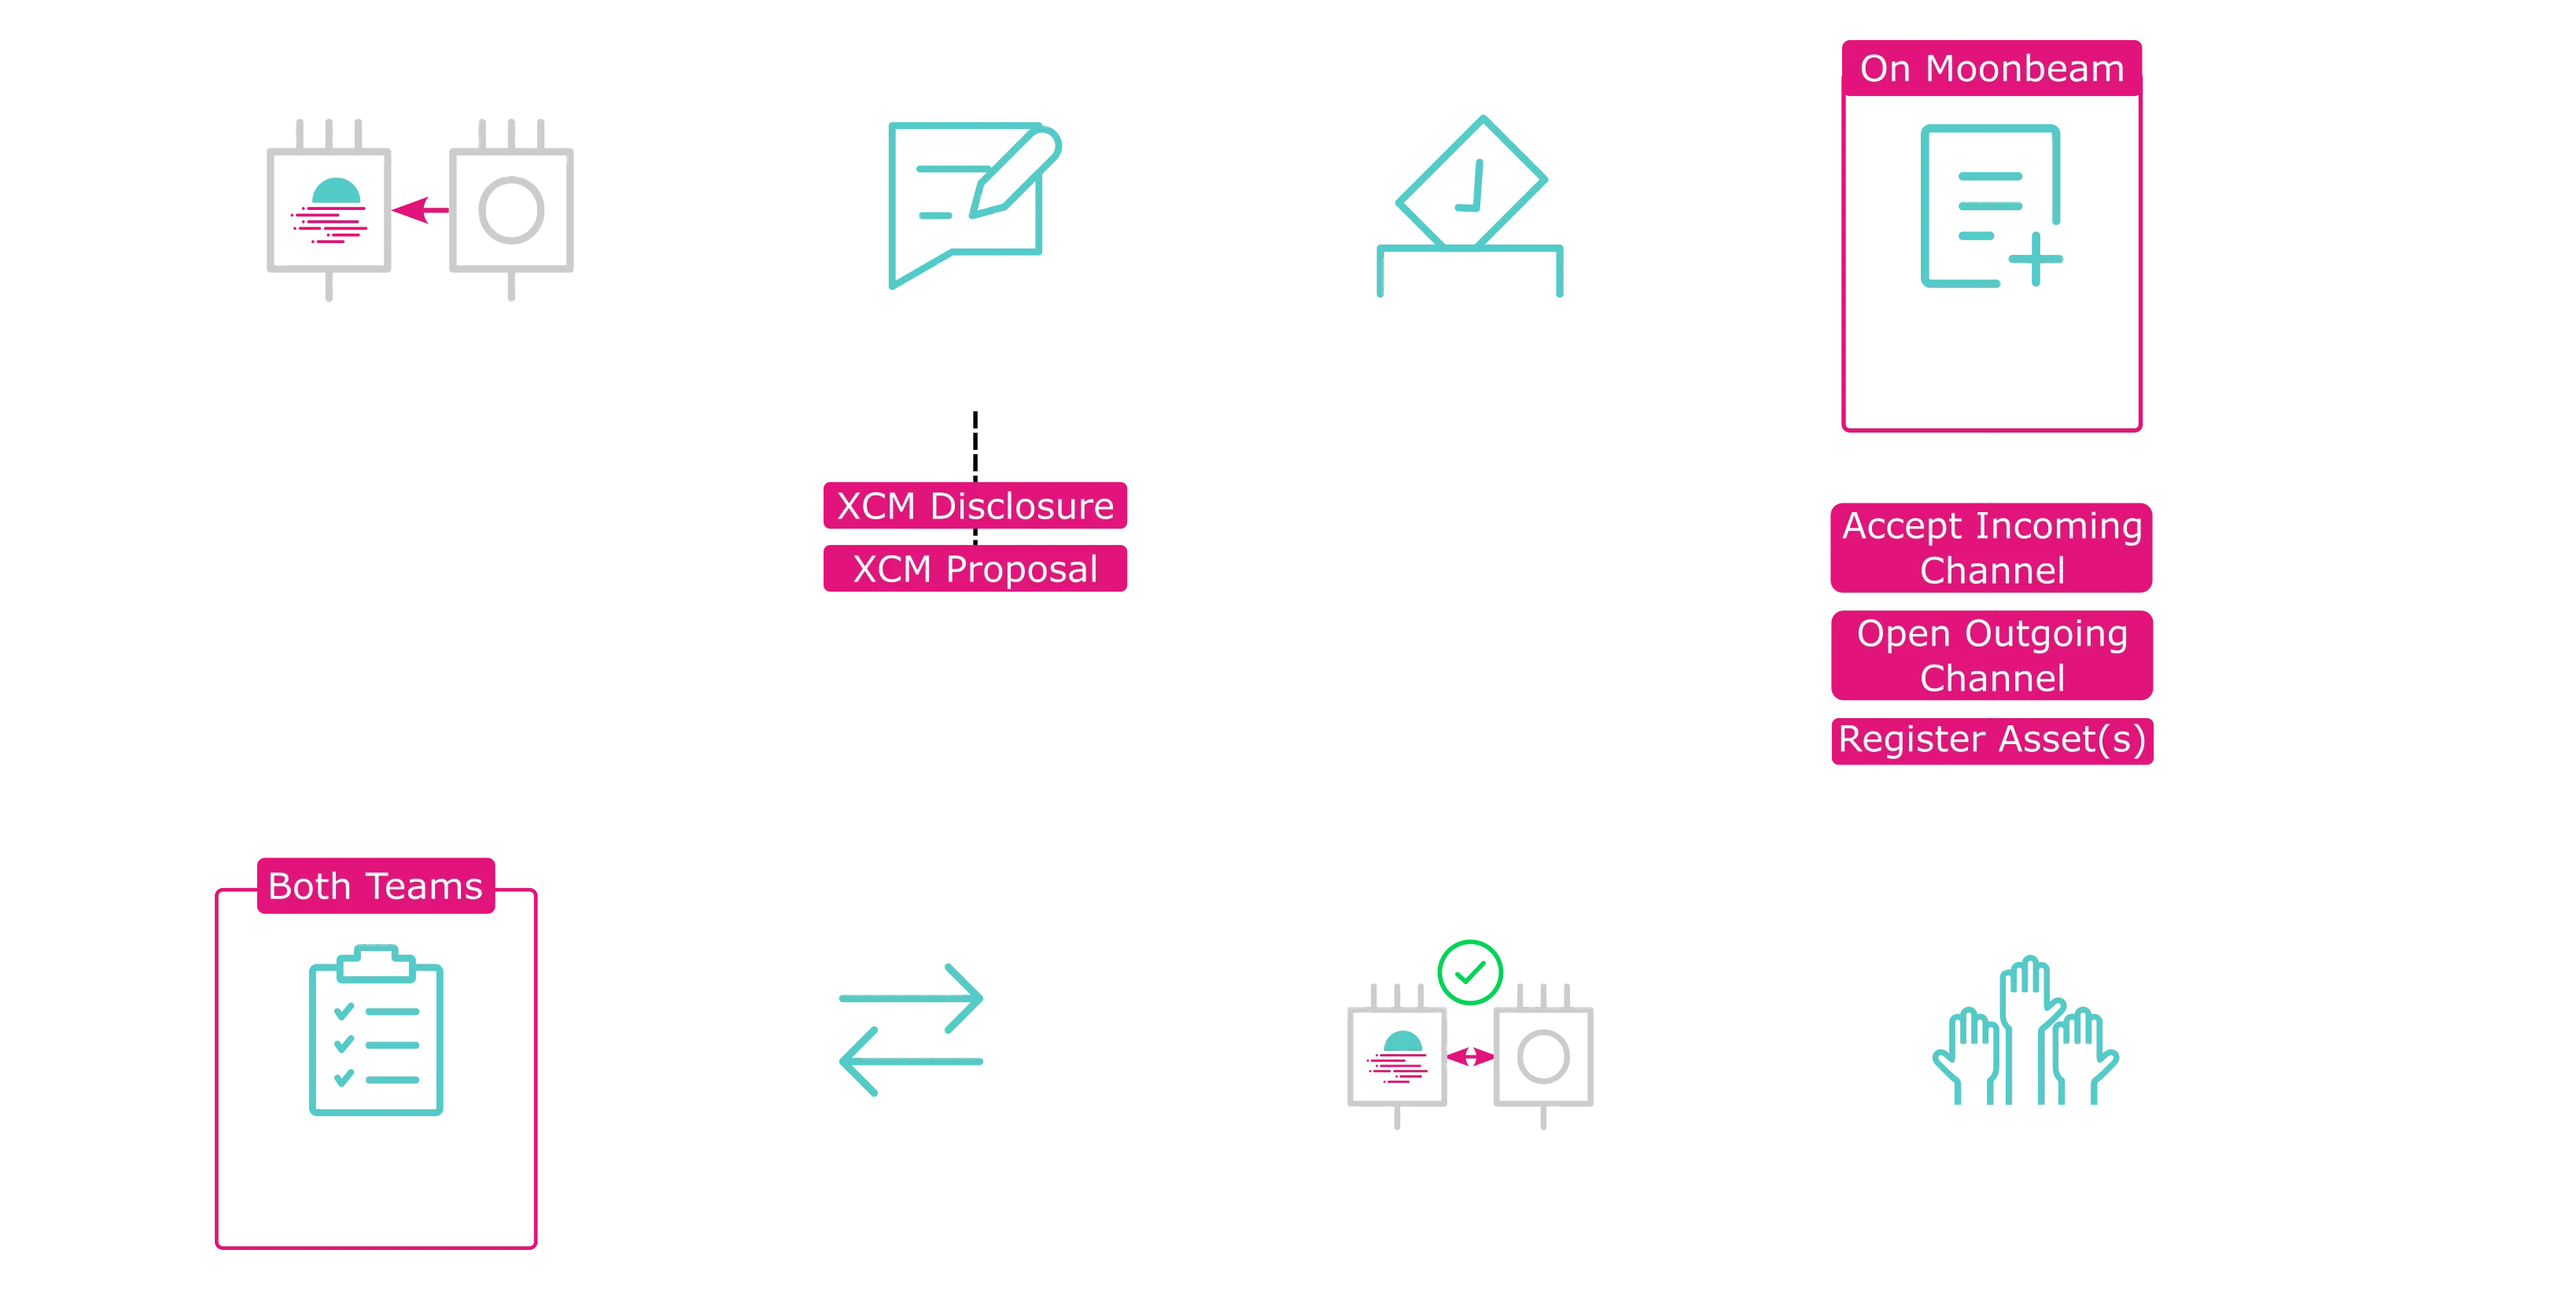
The process can be summarized in the following steps:
- Open (or ensure there is) an HRMP channel from your chain to Moonriver/Moonbeam. Optionally, register MOVR/GLMR
- Create two Moonbeam Community forum posts with some key information for the XCM integration:
- An XCM Disclosure post, where you'll provide some disclosures about the project, the code base, and social network channels
- An XCM Proposal post, where you'll provide some technical information about the proposal itself
-
Create a batch proposal on Moonbeam/Moonriver to:
-
Accept the incoming HRMP channel
- Propose the opening of an outgoing HRMP channel from Moonriver/Moonbeam
- Register the asset as an XC-20 token (if applicable)
Proposals should be done in the General Admin Track from OpenGov. The normal enactment times are as follows:
- Moonriver - the Decision Period is approximately 14 days and the enactment time is at least 1 day
-
Moonbeam - the Decision Period is approximately 14 days and the enactment time is at least 1 day
-
Accept the HRMP channel from Moonriver/Moonbeam on the connecting parachain
- Exchange $50 worth of tokens for testing the XCM integration. Please send the tokens to:
AccountId (Encoded): 5E6kHM4zFdH5KEJE3YEzX5QuqoETVKUQadeY8LVmeh2HyHGt
Decoded (32-Bytes):  0x5a071f642798f89d68b050384132eea7b65db483b00dbb05548d3ce472cfef48
- Provide an Ethereum-styled address for MOVR/GLMR
- Test the XCM integration with the provided tokens
An example of this process with a successful proposal on Moonbeam is depicted in the following diagram.
Once these steps are successfully completed, marketing efforts can be coordinated, and the new XC-20 on Moonriver/Moonbeam can be added to the Cross Chain Assets section of the Moonbeam DApp.
Create Forum Posts
To create forum posts on the Moonbeam Community Forum, you'll need to make sure that you're adding the posts to the correct category and adding relevant content. For general guidelines and templates to follow, please refer to the Moonbeam Community Forum Templates for XCM Integrations page.
Creating HRMP Channels
Before any messages can be sent from your parachain to Moonbeam, an HRMP channel must be opened. To create an HRMP channel, you'll need to send an XCM message to the relay chain that will request a channel be opened through the relay chain. The message will need to contain at least the following XCM instructions:
- WithdrawAsset - takes funds out of the Sovereign account (in the relay chain) of the origin parachain to a holding state
- BuyExecution - buys execution time from the relay chain to execute the XCM message
- Transact - provides the relay chain call data to be executed. In this case, the call will be an HRMP extrinsic
Note
You can add DepositAsset to refund the leftover funds after the execution. If this is not provided, no refunds will be made. In addition, you could also add a RefundSurplus after Transact to get any leftover funds not used for the Transact. But you'll have to calculate if it is worth paying the execution cost of the extra XCM instructions.
To send these XCM messages to the relay chain, the Polkadot XCM Pallet is typically invoked. Moonbeam also has an XCM Transactor Pallet that simplifies the process into a call that abstracts the XCM messaging constructor.
You could potentially generate the calldata for an HRMP action by using Polkadot.js Apps, but the xcm-tools GitHub repository can build it for you, and it is the recommended tool for this process.
git clone https://github.com/Moonsong-Labs/xcm-tools && \
cd xcm-tools && \
yarn
The xcm-tools repository has a specific script for HRMP interactions called hrmp-channel-manipulator.ts. This command generates encoded calldata for a specific HRMP action, as long as it is given the correct details. The script builds the XCM message with the DepositAsset XCM instruction but not with RefundSurplus.
The encoded calldata is then used to submit a governance proposal that will execute the HRMP action. All HRMP-related proposals should be assigned to the General Admin Track.
The hrmp-channel-manipulator.ts script is meant to be generic. It should work for any chain that includes the Polkadot XCM Pallet, although it will try to use the hrmpManage extrinsic of the XCM Transactor Pallet first. If the XCM Transactor Pallet doesn't exist on a chain, the send extrinsic of the Polkadot XCM Pallet will be used. Note that it expects the pallet name to be polkadotXcm, as the extrinsic will be built as api.tx.polkadotXcm.send(). For Moonbeam, the General Admin Track can't execute polkadotXcm.send calls, as such the xcmTransactor.hrmpManage extrinsic must be used.
The following sections go through the steps of creating and accepting open channel requests in a Moonbeam-based network, but they can also be adapted to your parachain.
Accept an HRMP Channel on Moonbeam
When a parachain receives an incoming HRMP channel open request from another parachain, it must signal to the relay chain that it accepts this channel before the channel can be used. This requires an XCM message to the relay chain with the Transact instruction calling the HRMP Pallet and hrmpAcceptOpenChannel extrinsic.
Fortunately, the xcm-tools GitHub repository's hrmp-channel-manipulator.ts script can build the XCM for you!
To use the script, you'll need to provide the following required arguments:
--parachain-ws-provideror--w- specifies the parachain WebSocket provider that will be issuing the requests--relay-ws-provideror--wr- specifies the relay chain WebSocket provider that will be issuing the requests--hrmp-actionor--hrmp- accepts the following action to take, which can be any of the following:accept,cancel,close, andopen--target-para-idor-p- the target parachain ID for the requests
Running the following command will provide the encoded calldata to accept an open HRMP channel request on a Moonbeam network. Replace YOUR_PARACHAIN_ID with the ID of your parachain:
yarn hrmp-manipulator --target-para-id YOUR_PARACHAIN_ID \
--parachain-ws-provider wss://wss.api.moonbeam.network  \
--relay-ws-provider wss://rpc.polkadot.io \
--hrmp-action accept
yarn hrmp-manipulator --target-para-id YOUR_PARACHAIN_ID \
--parachain-ws-provider wss://wss.api.moonriver.moonbeam.network  \
--relay-ws-provider wss://kusama-rpc.polkadot.io \
--hrmp-action accept
yarn hrmp-manipulator --target-para-id YOUR_PARACHAIN_ID \
--parachain-ws-provider wss://wss.api.moonbase.moonbeam.network  \
--relay-ws-provider wss://relay.api.moonbase.moonbeam.network \
--hrmp-action accept
Note
You can adapt the script for your parachain by changing the parachain-ws-provider.
After running the script, you'll see output that looks like the following:
Running the script as shown above will return the encoded calldata to accept an HRMP channel. You can also use the script to create and submit a preimage and proposal on chain for the given HRMP action. For Moonbeam and Moonriver, the proposal must be submitted via the General Admin Track.
Please refer to the README for a complete list of the arguments, including optional arguments, and examples on how to use the HRMP-manipulator script.
If you plan to batch the transaction with other calls, copy the resultant calldata for later use when using the batch transactions script.
Open HRMP Channels from Moonbeam
Parachains need bidirectional HRMP channels before sending XCM to each other. The first step to establishing an HRMP channel is to create an open channel request. This requires an XCM message to the relay chain with the Transact instruction calling the HRMP Pallet and hrmpInitOpenChannel extrinsic.
Fortunately, the xcm-tools GitHub repository's hrmp-channel-manipulator.ts script can build the XCM for you!
To use the script, you'll need to provide the following required arguments:
--parachain-ws-provideror--w- specifies the parachain WebSocket provider that will be issuing the requests--relay-ws-provideror--wr- specifies the relay chain WebSocket provider that will be issuing the requests--hrmp-actionor--hrmp- accepts the following action to take, which can be any of the following:accept,cancel,close, andopen--target-para-idor-p- the target parachain ID for the requests
Running the following command will provide the encoded calldata to create the HRMP channel request from a Moonbeam network. The maximum message size and capacity values can be obtained from the relay chain's Configuration Pallet and activeConfig extrinsic. Replace YOUR_PARACHAIN_ID with the ID of your parachain:
yarn hrmp-manipulator --target-para-id YOUR_PARACHAIN_ID \
--parachain-ws-provider wss://wss.api.moonbeam.network  \
--relay-ws-provider wss://rpc.polkadot.io \
--max-capacity 1000 --max-message-size 102400 \
--hrmp-action open
yarn hrmp-manipulator --target-para-id YOUR_PARACHAIN_ID \
--parachain-ws-provider wss://wss.api.moonriver.moonbeam.network  \
--relay-ws-provider wss://kusama-rpc.polkadot.io \
--max-capacity 1000 --max-message-size 102400 \
--hrmp-action open
yarn hrmp-manipulator --target-para-id YOUR_PARACHAIN_ID \
--parachain-ws-provider wss://wss.api.moonbase.moonbeam.network  \
--relay-ws-provider wss://relay.api.moonbase.moonbeam.network \
--max-capacity 1000 --max-message-size 102400 \
--hrmp-action open
Note
You can adapt the script for your parachain by changing the parachain-ws-provider.
After running the script, you'll see output that looks like the following:
Running the script as shown above will return the encoded calldata to open an HRMP channel. You can also use the script to create and submit a preimage and proposal on-chain for the given HRMP action. For Moonbeam and Moonriver, the proposal must be submitted via the General Admin Track.
Please refer to the README for a complete list of the arguments, including optional arguments, and examples on how to use the HRMP-manipulator script.
If you plan to batch the transaction with other calls, copy the resultant calldata for later use when using the batch transactions script.
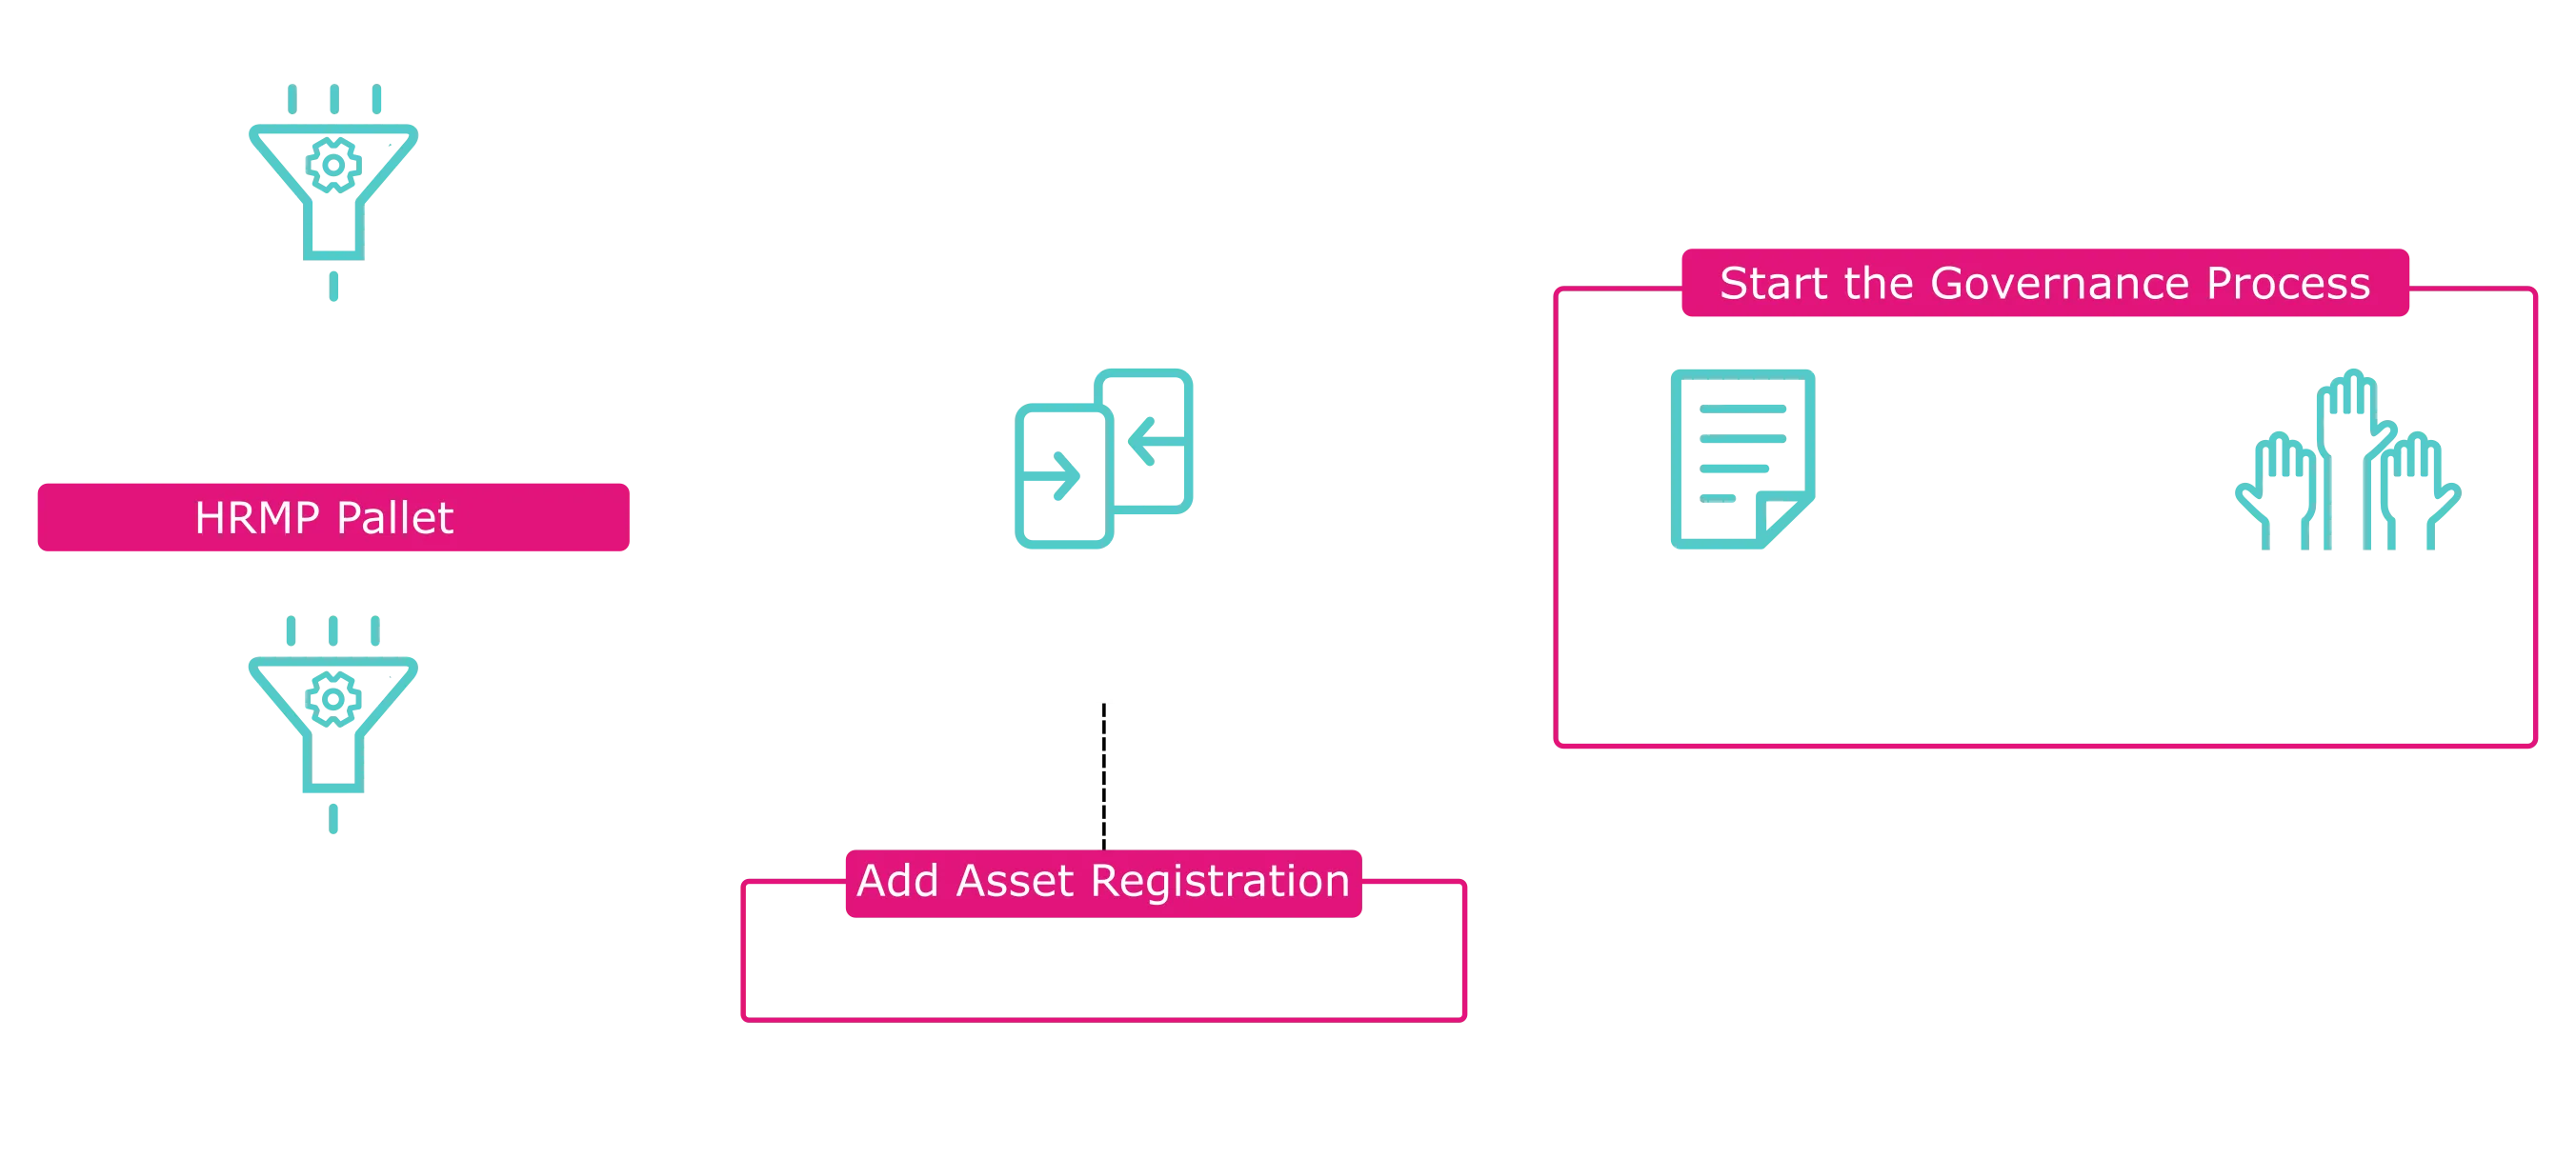
Batch Actions Into One
The most efficient way to complete the XCM process on parachains is to batch all transactions together. The xcm-tools repository provides a script to batch extrinsic calls into a single call, thus requiring only a single transaction. This can be helpful if your parachain would like to open an HRMP channel and register an asset simultaneously. This should be used when proposing channel registration on a Moonbeam network.
If you are registering an asset in addition to establishing a channel, please refer to the How to Register Cross-Chain Assets guide to learn how to generate the encoded calldata required for asset registration.
The process of batching all of the transactions into one is depicted in the following diagram.
You will now use the encoded calldata outputs for opening a channel, accepting a channel, and registering an asset and insert them into the following command to send the batch proposal to democracy.
You can add a --call "INSERT_CALL" for each call you want to batch. Replace the following values before running the command:
OPEN_CHANNEL_CALLis the SCALE encoded calldata for opening an HRMP channel from Moonbeam to your parachainACCEPT_INCOMING_CALLis the SCALE encoded calldata for accepting the channel request from your parachainREGISTER_ASSET_CALLis the SCALE encoded calldata for registering a cross-chain asset. If you have more than one asset to be registered on Moonbeam, you can include additional registration SCALE encoded calldata with additional--callflags
yarn generic-call-propose -w wss://wss.api.moonbeam.network \
--call "OPEN_CHANNEL_CALL" \
--call "ACCEPT_INCOMING_CALL" \
--call "REGISTER_ASSET_CALL" \
yarn generic-call-propose -w wss://wss.api.moonriver.moonbeam.network \
--call "OPEN_CHANNEL_CALL" \
--call "ACCEPT_INCOMING_CALL" \
--call "REGISTER_ASSET_CALL" \
yarn generic-call-propose -w wss://wss.api.moonbase.moonbeam.network  \
--call "OPEN_CHANNEL_CALL" \
--call "ACCEPT_INCOMING_CALL" \
--call "REGISTER_ASSET_CALL" \
Note
You can readapt the script for your parachain by changing the parachain-ws-provider.
With the encoded calldata, you can then submit the governance proposal. For Moonbeam and Moonriver, you must assign the proposal to the General Admin Track. It is recommended to become familiar with the OpenGov: Governance v2 process on Moonbeam-based networks.
If you want to send the governance proposal directly from the CLI, you'll need to use these additional flags:
--account-priv-key YOUR_PRIVATE_KEY \
--send-preimage-hash true \
--send-proposal-as v2 \
--track '{ "Origins": "GeneralAdmin" }'
For Moonbase Alpha, you will not need to provide a private key or go through governance. Instead, you can use the --sudo flag and provide the output to the Moonbeam team so that the asset and channel can be added quickly through sudo.
Feel free to check out the additional flags available for this script.
Additional Flags for XCM-Tools
The xcm-tools GitHub repository and most of its functions can be called with some additional flags that create some wrappers around the actions being taken. For example, you might want to wrap the send of the XCM message in sudo, or via a democracy proposal.
The complete options that can be used with the script are as follows:
| Flag | Type | Description |
|---|---|---|
| account-priv-key | string | (Required for send-proposal-as, send-preimage-hash) The private key of the account to send a transaction with |
| sudo | boolean | Whether to wrap the extrinsic calldata inside of a sudo.sudo extrinsic. If account-priv-key is present, it will attempt to send the transaction |
| send-preimage-hash | boolean | Whether to submit the encoded calldata as a preimage and retrieve its hash |
| send-proposal-as | democracy/council-external/v2 | Whether to send the encoded calldata through democracy or Council (Governance v1), or OpenGov (Governance v2) |
| collective-threshold | number | (Required for council-external) The threshold for the Council deciding the proposal |
| delay | number | (Required for v2) The number of blocks to delay an OpenGovV2 proposal's execution by |
| track | string (JSON encoded origin) | (Required for v2) The JSON encoded origin for an OpenGovV2 proposal. For Moonbeam networks: "Root", "WhitelistedCaller", "GeneralAdmin", "ReferendumCanceller", "ReferendumKiller" |
| at-block | number | Whether to wrap the extrinsic calldata inside of a scheduler.schedule extrinsic. The block in the future that the action should be scheduled to take place |
| fee-currency | string (multilocation) | (Required for non-Moonbeam chains that use XCM Transactor) The multilocation of the relay chain's asset |
Note
The track option must be specified like so: '{ "Origins": "INSERT_ORIGIN" }', where you can insert any of the following as the Origin: "Root", "WhitelistedCaller", "GeneralAdmin", "ReferendumCanceller", "ReferendumKiller".
| Created: July 27, 2023