Remote EVM Calls Through XCM
Introduction
The XCM Transactor Pallet provides a simple interface to perform remote cross-chain calls through XCM. However, this does not consider the possibility of doing remote calls to Moonbeam's EVM, only to Substrate-specific pallets (functionalities).
Moonbeam's EVM is only accessible through the Ethereum Pallet. Among many other things, this pallet handles certain validations of transactions before getting them into the transaction pool. Then, it performs another validation step before inserting a transaction from the pool into a block. Lastly, it provides the interface through a transact function to execute a validated transaction. All these steps follow the same behavior as an Ethereum transaction in terms of structure and signature scheme.
However, calling the Ethereum Pallet directly through an XCM Transact is not feasible. Mainly because the dispatcher account for the remote EVM call (referred to as msg.sender in Ethereum) does not sign the XCM transaction on the Moonbeam side. The XCM extrinsic is signed in the origin chain, and the XCM executor dispatches the call, through the Transact instruction, from a known caller linked to the sender in the origin chain. In this context, the Ethereum Pallet will not be able to verify the signature and, ultimately, validate the transaction.
To this end, the Ethereum XCM Pallet was introduced. It acts as a middleware between the XCM Transact instruction and the Ethereum Pallet, as special considerations need to be made when performing EVM calls remotely through XCM. The pallet performs the necessary checks and validates the transaction. Next, the pallet calls the Ethereum Pallet to dispatch the transaction to the EVM. Due to how the EVM is accessed, there are some differences between regular and remote EVM calls.
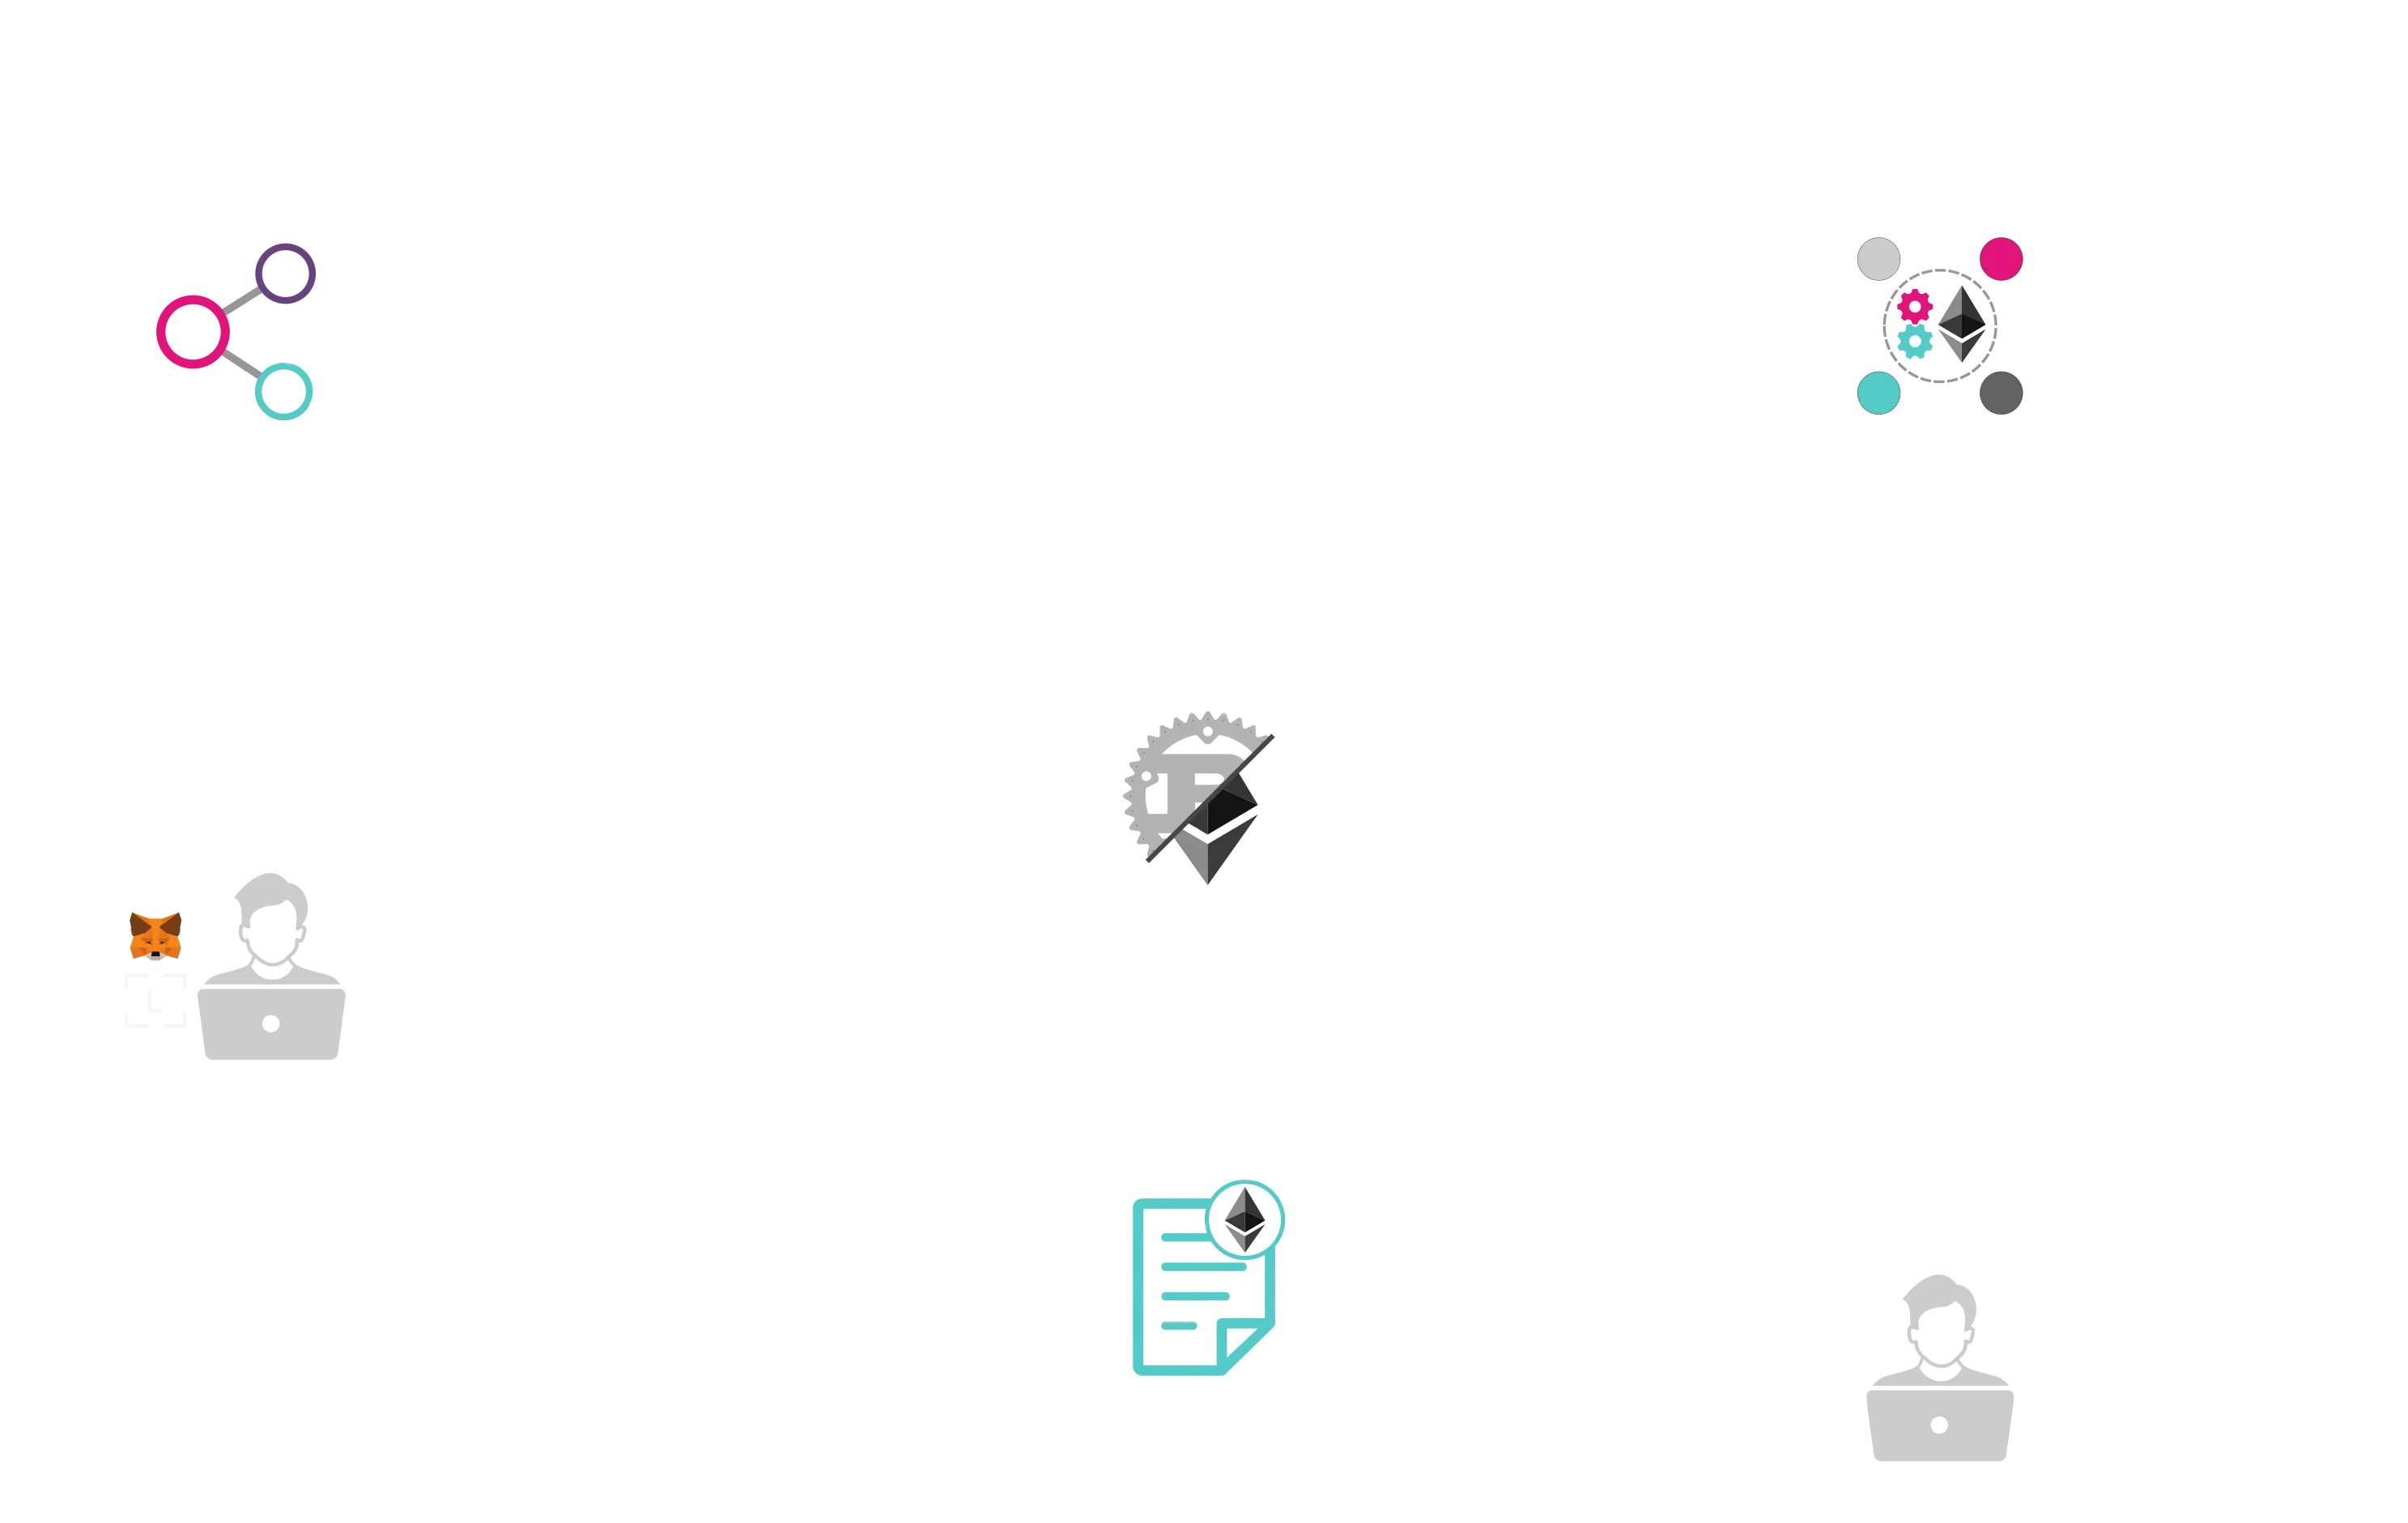
The happy path for both regular and remote EVM calls through XCM is portrayed in the following diagram:
This guide will go through the differences between regular and remote EVM calls. In addition, it will show you how to perform remote EVM calls through the extrinsic exposed by the Ethereum XCM pallet.
Note
Remote EVM calls are done through the XCM Transactor Pallet. Therefore, it is recommended to get familiar with XCM Transactor concepts before trying to perform remote EVM calls through XCM.
Note that remote calls to Moonbeam's EVM through XCM are still being actively developed. In addition, developers must understand that sending incorrect XCM messages can result in the loss of funds. Consequently, it is essential to test XCM features on a TestNet before moving to a production environment.
Differences between Regular and Remote EVM Calls through XCM
As explained in the introduction, the paths that regular and remote EVM calls take to get to the EVM are quite different. The main reason behind this difference is the dispatcher of the transaction.
A regular EVM call has an apparent sender who signs the Ethereum transaction with its private key. The signature, of ECDSA type, can be verified with the signed message and the r-s values that are produced by the signing algorithm. Ethereum signatures use an additional variable called v, which is the recovery identifier.
With remote EVM calls, the signer signs an XCM transaction in another chain. Moonbeam receives that XCM message, which follows the conventional remote execution via XCM form:
DescendOrigin(optional)WithdrawAssetBuyExecutionTransact
XCM execution happens through a Computed Origin account mechanism, which by default uses the source chain's Sovereign account in the destination chain. If DescendOrigin is included, Moonbeam will mutate the origin of the XCM call to a keyless account that a user from the source chain can control remotely via XCM. The remote EVM call is dispatched from that keyless account (or a related proxy). Therefore, because the transaction is not signed, it does not have the real v-r-s values of the signature, but 0x1 instead.
Since remote EVM calls do not have the actual v-r-s values of the signature, there could be collision problems with the EVM transaction hash, as it is calculated as the keccak256 hash of the signed transaction blob. In consequence, if two accounts with the same nonce submit the same transaction object, they will end up with the same EVM transaction hash. Therefore, all remote EVM transactions use a global nonce that is attached to the Ethereum XCM Pallet.
Another significant difference is in terms of the gas price. The fee for remote EVM calls is charged at an XCM execution level. Consequently, the gas price at an EVM level is zero, and the EVM will not charge for the execution itself. This can also be seen in the receipt of a remote EVM call transaction. Accordingly, the XCM message must be configured so that the BuyExecution buys enough weight to cover the gas cost.
The last difference is in terms of the gas limit. Ethereum uses a gas-metered system to moderate the amount of execution that can be done in a block. On the contrary, Moonbeam uses a weight-based system in which each call is characterized by the time it takes to execute in a block. Each unit of weight corresponds to one picosecond of execution time.
As of runtime 2900, the configuration of the XCM queue suggests that XCM messages should be executable within the following weight units:
125,000,000,000 (0.125 seconds of block execution time)
500,000,000,000 (0.5 seconds of block execution time)
500,000,000,000 (0.5 seconds of block execution time)
Note
Prior to runtime 2900, the weight limit of XCM messages across all networks was 20,000,000,000 weight units (this is, 0.02 seconds of block execution time).
Suppose the XCM message can't be executed due to the lack of execution time in a given block, and the weight requirement exceeds the above limits. In that case, the XCM message will be marked as overweight and only be executable through democracy.
The maximum weight limit per XCM message constrains the gas limit available for remote EVM calls through XCM. For all Moonbeam-based networks, there is a ratio of 25,000 units of gas per unit of weight (WEIGHT_REF_TIME_PER_SECOND / GAS_PER_SECOND). Considering that you need some XCM message weight to execute the XCM instructions, a remote EVM call might consume 2,000,000,000 units. The following equation can be used to determine the maximum gas units for a remote EVM call:
Maximum Gas Units = (Maximum Weight Units - Remote EVM Weight Units) / 25,000
Therefore, the maximum gas limit you can provide for a remote EVM call can be calculated:
Maximum Gas Units = (125,000,000,000 - 2,000,000,000) / 25,000
Maximum Gas Units = 4,920,000
Maximum Gas Units = (500,000,000,000 - 2,000,000,000) / 25,000
Maximum Gas Units = 19,920,000
Maximum Gas Units = (500,000,000,000 - 2,000,000,000) / 25,000
Maximum Gas Units = 19,920,000
Note
These values are subject to change in the future.
In summary, these are the main differences between regular and remote EVM calls:
- Remote EVM calls use a global nonce (owned by the Ethereum XCM Pallet) instead of a nonce per account
- The
v-r-svalues of the signature for remote EVM calls are0x1. The sender can't be retrieved from the signature through standard methods (for example, through ECRECOVER). Nevertheless, thefromis included in both the transaction receipt and when getting the transaction by hash (using the Ethereum JSON-RPC) - The gas price for all remote EVM calls is zero. The EVM execution is charged at an XCM execution level and not at an EVM level
- The current maximum gas limit you can set for a remote EVM call is different, as outlined above
Ethereum XCM Pallet Interface
Extrinsics
The Ethereum XCM Pallet provides the following extrinsics (functions) that can be called by the Transact instruction to access Moonbeam's EVM through XCM:
transact(xcmTransaction) — function to remotely call the EVM through XCM. Only callable through the execution of an XCM message
xcmTransaction- the Ethereum transaction details of the call that will be dispatched. ThexcmTransactionstructure, which is versioned, contains the following:gasLimit- the gas limit for the Ethereum transactionaction- the action to be executed, which provides two options:CallandCreate. The current implementation of the Ethereum XCM Pallet does not support theCREATEoperation. Therefore, you can't deploy a smart contract through remote EVM calls. ForCall, you'll need to specify the contract address you're interacting withvalue- the amount of native tokens to sendinput- the encoded call data of the contract interaction
import { ApiPromise, WsProvider } from '@polkadot/api';

const xcmTransaction = {
  V2: {
    gasLimit: INSERT_GAS_LIMIT,
    action: { Call: 'INSERT_CONTRACT_ADDRESS_TO_CALL' },
    value: INSERT_VALUE,
    input: 'INSERT_CONTRACT_CALL_DATA',
  },
};

const main = async () => {
  const api = await ApiPromise.create({
    provider: new WsProvider('INSERT_WSS_ENDPOINT'),
  });
  const tx = api.tx.ethereumXcm.transact(xcmTransaction);
};

main();
Note
In the following sections, you'll learn exactly how to get the Ethereum transaction call data and build an XCM message using this extrinsic.
transactThroughProxy(transactAs, xcmTransaction) — function to remotely call the EVM through XCM and be dispatched from a given account with known keys (the msg.sender)
xcmTransaction- the Ethereum transaction details of the call that will be dispatched. ThexcmTransactionstructure, which is versioned, contains the following:gasLimit- the gas limit for the Ethereum transactionaction- the action to be executed, which provides two options:CallandCreate. The current implementation of the Ethereum XCM Pallet does not support theCREATEoperation. Therefore, you can't deploy a smart contract through remote EVM calls. ForCall, you'll need to specify the contract address you're interacting withvalue- the amount of native tokens to sendinput- the encoded call data of the contract interaction
xcmTransactAs- the account from which the remote EVM call will be dispatched (themsg.sender). This account needs to have set the Computed Origin account as a proxy of typeanyon Moonbeam, or the remote EVM call will fail. Transaction fees are still paid by the Computed Origin account
import { ApiPromise, WsProvider } from '@polkadot/api';

const xcmTransaction = {
  V2: {
    gasLimit: INSERT_GAS_LIMIT,
    action: { Call: 'INSERT_CONTRACT_ADDRESS_TO_CALL' },
    value: INSERT_VALUE,
    input: 'INSERT_CONTRACT_CALL_DATA',
  },
};
const xcmTransactAs = 'INSERT_COMPUTED_ORIGIN_PROXY_ADDRESS';

const main = async () => {
  const api = await ApiPromise.create({
    provider: new WsProvider('INSERT_WSS_ENDPOINT'),
  });
  const tx = api.tx.ethereumXcm.transactThroughProxy(
    xcmTransaction,
    xcmTransactAs
  );
};

main();
Building a Remote EVM Call Through XCM
This guide covers building an XCM message for remote EVM calls using the XCM Pallet from the relay chain to Moonbase Alpha. More specifically, it will use the transact function. The steps to use the transactThroughProxy function are identical. However, you'll need to provide the transactAs account and ensure that this account has set the Computed Origin account as a proxy of type any on Moonbase Alpha.
Note
When using transactThroughProxy, the EVM call is dispatched by the transactAs account you provide, acting as the msg.sender, as long as this account has set the Computed Origin account as a proxy of type any in the Moonbeam-based network you are using. However, transaction fees are still paid by the Computed Origin account, so you need to ensure it has enough funds to cover them.
The process for building and performing the remote execution can be summarized as follows:
- Calculate the call data for the EVM call that will be performed on Moonbase Alpha
- Use the EVM call data to generate the call data for the
transactextrinsic of the Ethereum XCM Pallet on Moonbase Alpha - Build the XCM message on the relay chain, which will include the
WithdrawAsset,BuyExecution, andTransactinstructions. In theTransactinstruction, you'll use the Ethereum XCMtransactcall data - Using Alice's account on the relay chain, you'll send the XCM message via the
sendextrinsic of the XCM Pallet - Alice's Computed Origin account on Moonbase Alpha will dispatch the EVM call data
Checking Prerequisites
To be able to send the call from the relay chain, you need the following:
- An account on the relay chain with funds (UNIT) to pay for the transaction fees. You can acquire some xcUNIT by swapping for DEV tokens (Moonbase Alpha's native token) on Moonbeam-Swap, a demo Uniswap-V2 clone on Moonbase Alpha, and then send them to the relay chain. Additionally, you can contact us on Discord to get some UNIT tokens directly
- The address of your Computed Origin account. Please refer to the Computed Origin guide to learn how to calculate your Computed Origin address
- To fund your Computed Origin account. The account must have enough DEV tokens (or GLMR/MOVR for Moonbeam/Moonriver) to cover the cost of the XCM execution of the remote EVM call. Note that this is the account from which the remote EVM call will be dispatched (the
msg.sender). Consequently, the account must satisfy whatever conditions are required for the EVM call to be executed correctly. For example, hold any relevant ERC-20 token if you are doing an ERC-20 transfer
Note
Suppose you are using the transactThroughProxy function. In that case, the transactAs account must satisfy whatever conditions are required for the EVM call to be executed correctly, as it acts as the msg.sender. However, the Computed Origin account is the one that needs to hold the DEV tokens (or GLMR/MOVR for Moonbeam/Moonriver) to cover the cost of the XCM execution of the remote EVM call.
Ethereum XCM Transact Call Data
Before you send the XCM message from the relay chain to Moonbase Alpha, you need to get the encoded call data that will be dispatched through the execution of the Transact XCM instruction.
In this example, you'll be interacting with the transact function of the Ethereum XCM Pallet, which accepts an xcmTransaction as a parameter.
The xcmTransaction parameter requires you to define the gasLimit, action, value, and input.
For the action to be executed, you'll be performing a contract interaction with a simple incrementer contract, which is located at 0xa72f549a1a12b9b49f30a7f3aeb1f4e96389c5d8. You'll be calling the increment function, which has no input argument and will increase the value of the number by one. It will also store the block's timestamp in which the function is executed to the timestamp variable.
The encoded call data for the increment function is 0xd09de08a, which is the function selector and is the first eight hexadecimal characters (or 4 bytes) of the keccak256 hash of increment(). If you choose to interact with a function that has input parameters, they also need to be encoded. The easiest way to get the encoded call data is to emulate a transaction either in Remix or Moonscan. Then, in Metamask, check the HEX DATA: 4 BYTES selector under the HEX tab to get the call data. You don't need to sign the transaction.
Now that you have the encoded contract interaction data, you can determine the gas limit for this call using the eth_estimateGas JSON-RPC method. For this example, you can set the gas limit to 155000.
For the value, you can set it to 0 since this particular interaction does not need DEV (or GLMR/MOVR for Moonbeam/Moonriver). For an interaction that requires DEV, you'll need to modify this value accordingly.
Now that you have all of the components required for the xcmTransaction parameter, you can build it:
const xcmTransaction = {
  V2: {
    gasLimit: 155000,
    action: { Call: '0xa72f549a1a12b9b49f30a7f3aeb1f4e96389c5d8' },
    value: 0,
    input: '0xd09de08a',
  },
};
Next, you can write the script to get the encoded call data for the transaction. You'll take the following steps:
- Provide the input data for the call. This includes:
- The Moonbase Alpha endpoint URL to create the provider
- The value for the
xcmTransactionparameter of thetransactfunction
- Create the Polkadot.js API provider
- Craft the
ethereumXcm.transactextrinsic with thexcmTransactionvalue - Get the encoded call data for the extrinsic. You don't need to sign and send the transaction
import { ApiPromise, WsProvider } from '@polkadot/api'; // Version 10.13.1

// 1. Input data
const providerWsURL = 'wss://wss.api.moonbase.moonbeam.network';
const xcmTransaction = {
  V2: {
    gasLimit: 155000,
    action: { Call: '0xa72f549a1a12b9b49f30a7f3aeb1f4e96389c5d8' },
    value: 0,
    input: '0xd09de08a',
  },
};

const getEncodedCalldata = async () => {
  // 2. Create Substrate API Provider
  const substrateProvider = new WsProvider(providerWsURL);
  const api = await ApiPromise.create({ provider: substrateProvider });

  // 3. Create the extrinsic
  const tx = api.tx.ethereumXcm.transact(xcmTransaction);

  // 4. Get the encoded call data
  const encodedCall = tx.method.toHex();
  console.log(`Encoded Calldata: ${encodedCall}`);

  api.disconnect();
};

getEncodedCalldata();
Note
You can view an example of the output of the above script on Polkadot.js Apps using the following encoded call data: 0x260001785d02000000000000000000000000000000000000000000000000000000000000a72f549a1a12b9b49f30a7f3aeb1f4e96389c5d8000000000000000000000000000000000000000000000000000000000000000010d09de08a00.
You'll use the encoded call data in the Transact instruction in the following section.
Estimate Weight Required at Most
When using the Transact instruction, you'll need to define the requireWeightAtMost field, which is the required weight for the transaction. This field accepts two arguments: the refTime and proofSize. The refTime is the amount of computational time that can be used for execution, and the proofSize is the amount of storage in bytes that can be used.
To get an estimate for the refTime and proofSize, you can use the paymentInfo method of the Polkadot.js API. Since these weights are required for the Transact call data, you can extend the script from the previous section to add in the call to paymentInfo.
The paymentInfo method accepts the same parameters you would normally pass to the .signAndSend method, which is the sending account and, optionally, some additional values such as a nonce or signer.
To modify the encoded call data script, you'll need to add Alice's Computed Origin address and use it to call the tx.paymentInfo method.
Modified script
import { ApiPromise, WsProvider } from '@polkadot/api'; // Version 10.13.1

// 1. Input data
const providerWsURL = 'wss://wss.api.moonbase.moonbeam.network';
const xcmTransaction = {
  V2: {
    gasLimit: 155000,
    action: { Call: '0xa72f549a1a12b9b49f30a7f3aeb1f4e96389c5d8' },
    value: 0,
    input: '0xd09de08a',
  },
};

const getEncodedCalldata = async () => {
  // 2. Create Substrate API Provider
  const substrateProvider = new WsProvider(providerWsURL);
  const api = await ApiPromise.create({ provider: substrateProvider });

  // 3. Create the extrinsic
  const tx = api.tx.ethereumXcm.transact(xcmTransaction);

  // 4. Estimate the required weight
  const alice = '0xdd2399f3b5ca0fc584c4637283cda4d73f6f87c0';
  const info = await tx.paymentInfo(alice);
  console.log(`Required Weight: ${info.weight}`);

  api.disconnect();
};

getEncodedCalldata();
The script, at the time of writing, returns an estimate of 3900000000 for refTime and 9687 for proofSize.
Building the XCM for Remote XCM Execution
Now that you've generated the call data for the EVM call, you're going to use the XCM Pallet on the relay chain to perform the remote execution. To do so, you'll use the send function, which accepts two parameters:
dest- the XCM versioned multilocation representing a chain in the ecosystem where the XCM message is being sent to (the target chain)message- the SCALE-encoded versioned XCM message to be executed
You can start assembling these parameters by taking the following steps:
-
Build the multilocation of the destination, which is Moonbase Alpha:
const dest = { V4: { parents: 0, interior: { X1: [{ Parachain: 1000 }] } } }; -
Build the
WithdrawAssetinstruction, which will require you to define:- The multilocation of the DEV token on Moonbase Alpha
- The amount of DEV tokens to withdraw
const instr1 = { WithdrawAsset: [ { id: { parents: 0, interior: { X1: [{ PalletInstance: 3 }] } }, fun: { Fungible: 10000000000000000n }, // 0.01 DEV }, ], }; -
Build the
BuyExecutioninstruction, which will require you to define:- The multilocation of the DEV token on Moonbase Alpha
- The amount of DEV tokens to buy for execution
- The weight limit
const instr2 = { BuyExecution: [ { id: { parents: 0, interior: { X1: [{ PalletInstance: 3 }] } }, fun: { Fungible: 10000000000000000n }, // 0.01 DEV }, { Unlimited: null }, ], }; -
Build the
Transactinstruction, which will require you to define:- The origin kind
- The required weight for the transaction, which you calculated in the Estimate Weight Required at Most section
- The encoded call data, which you generated in the Ethereum XCM Transact Call Data section
const instr3 = { Transact: { originKind: 'SovereignAccount', requireWeightAtMost: { refTime: 3900000000n, proofSize: 9687n }, call: { encoded: '0x260001785d02000000000000000000000000000000000000000000000000000000000000a72f549a1a12b9b49f30a7f3aeb1f4e96389c5d8000000000000000000000000000000000000000000000000000000000000000010d09de08a00', }, }, }; -
Combine the XCM instructions into a versioned XCM message:
const message = { V4: [instr1, instr2, instr3] };
Now that you have the values for each of the parameters, you can write the script for the execution. You'll take the following steps:
- Provide the input data for the call. This includes:
- The relay chain endpoint URL to create the provider
- The values for each of the parameters of the
sendfunction
- Create a Keyring instance that will be used to send the transaction
- Create the Polkadot.js API provider
- Craft the
xcmPallet.sendextrinsic with thedestandmessagevalues - Send the transaction using the
signAndSendextrinsic and the Keyring instance you created in the second step
Remember
This is for demo purposes only. Never store your private key in a JavaScript file.
import { ApiPromise, WsProvider, Keyring } from '@polkadot/api'; // Version 10.13.1
import { cryptoWaitReady } from '@polkadot/util-crypto';

// 1. Input data
const providerWsURL =
  'wss://relay.api.moonbase.moonbeam.network';
const privateKey = 'INSERT_PRIVATE_KEY';
const dest = { V4: { parents: 0, interior: { X1: [{ Parachain: 1000 }] } } };
const instr1 = {
  WithdrawAsset: [
    {
      id: { parents: 0, interior: { X1: [{ PalletInstance: 3 }] } },
      fun: { Fungible: 10000000000000000n }, // 0.01 DEV
    },
  ],
};
const instr2 = {
  BuyExecution: [
    {
      id: { parents: 0, interior: { X1: [{ PalletInstance: 3 }] } },
      fun: { Fungible: 10000000000000000n }, // 0.01 DEV
    },
    { Unlimited: null },
  ],
};
const instr3 = {
  Transact: {
    originKind: 'SovereignAccount',
    requireWeightAtMost: { refTime: 3900000000n, proofSize: 9687n },
    call: {
      encoded:
        '0x260001785d02000000000000000000000000000000000000000000000000000000000000a72f549a1a12b9b49f30a7f3aeb1f4e96389c5d8000000000000000000000000000000000000000000000000000000000000000010d09de08a00',
    },
  },
};
const message = { V4: [instr1, instr2, instr3] };

const sendXcmMessage = async () => {
  // 2. Create Keyring instance
  await cryptoWaitReady();
  const keyring = new Keyring({ type: 'sr25519' });
  const alice = keyring.addFromUri(privateKey);

  // 3. Create Substrate API Provider
  const substrateProvider = new WsProvider(providerWsURL);
  const api = await ApiPromise.create({ provider: substrateProvider });

  // 4. Create the extrinsic
  const tx = api.tx.xcmPallet.send(dest, message);

  // 5. Send the transaction
  const txHash = await tx.signAndSend(alice);
  console.log(`Submitted with hash ${txHash}`);

  api.disconnect();
};

sendXcmMessage();
Note
You can view an example of the output of the above script on Polkadot.js Apps using the following encoded call data: 0x630004000100a10f040c000400010403001300008a5d784563011300010403001300008a5d784563010006010300286bee007901260001581501000000000000000000000000000000000000000000000000000000000000a72f549a1a12b9b49f30a7f3aeb1f4e96389c5d8000000000000000000000000000000000000000000000000000000000000000010d09de08a00.
Once the transaction is processed, you can check the relevant extrinsics and events in the relay chain and Moonbase Alpha.
In the relay chain, the extrinsic is xcmPallet.send, and the associated event is xcmPallet.Sent (among others related to the fee). In Moonbase Alpha, the XCM execution happens within the parachainSystem.setValidationData extrinsic, and there are multiple associated events that can be highlighted:
- parachainSystem.DownwardMessagesReceived — event that signals that a message from the relay chain was received. With the current XCM implementation, messages from other parachains will show the same event
- balances.Withdraw — event related to the withdrawing of tokens to pay for the execution of the call. Note that the
whoaddress is the Computed Origin account calculated before - ethereum.Executed — event associated with the execution of the remote EVM call. It provides the
from,to,transactionHash(calculated with the non-standard signature and global pallet nonce), and theexitReason. Currently, some common EVM errors, like out of gas, will showRevertedin the exit reason - polkadotXcm.AssetsTrapped — event that is emitted when part of the tokens withdrawn from the account (for fees) are not used. Generally, when there are leftover tokens in the registry that are not allocated to an account. These tokens are temporarily burned and can be retrieved through a democracy proposal. A combination of both
RefundSurplusandDepositAssetXCM instructions can prevent assets from getting trapped
To verify that the remote EVM call through XCM was successful, you can head to the contract's page in Moonscan and verify the new value for the number and its timestamp.
Remote EVM Call Transaction by Hash
As mentioned before, there are some differences between regular and remote XCM EVM calls. Some main differences can be seen when retrieving the transaction by its hash using the Ethereum JSON-RPC.
To do so, you first need to retrieve the transaction hash you want to query. For this example, you can use the transaction hash from the previous section, which is 0x753588d6e59030eeffd31aabccdd0fb7c92db836fcaa8ad71512cf3a7d0cb97f. Open the terminal, and execute the following command:
curl --location --request POST 'https://rpc.api.moonbase.moonbeam.network' \
--header 'Content-Type: application/json' \
--data-raw '{
    "jsonrpc":"2.0",
    "id":1,
    "method":"eth_getTransactionByHash",
    "params": ["0x753588d6e59030eeffd31aabccdd0fb7c92db836fcaa8ad71512cf3a7d0cb97f"]
  }
'
If the JSON-RPC request is sent correctly, the response should look like this:
{
    "jsonrpc": "2.0",
    "result": {
        "hash": "0x753588d6e59030eeffd31aabccdd0fb7c92db836fcaa8ad71512cf3a7d0cb97f",
        "nonce": "0x129",
        "blockHash": "0xeb8222567e434215f472f0c53f68a606c77ea8f475e5fbc3a5b715db6cce8887",
        "blockNumber": "0x46c268",
        "transactionIndex": "0x0",
        "from": "0xdd2399f3b5ca0fc584c4637283cda4d73f6f87c0",
        "to": "0xa72f549a1a12b9b49f30a7f3aeb1f4e96389c5d8",
        "value": "0x0",
        "gasPrice": "0x0",
        "maxFeePerGas": "0x0",
        "maxPriorityFeePerGas": "0x0",
        "gas": "0x25d78",
        "input": "0xd09de08a",
        "creates": null,
        "raw": "0x02eb820507820129808083025d7894a72f549a1a12b9b49f30a7f3aeb1f4e96389c5d88084d09de08ac0010101",
        "publicKey": "0x14745b9075ac0f0426c61c9a2895f130ea6f3b964e8f49cefdb4e2d248306f19396361d877f8b9ad60a94a5ec28325a1b9baa2ae59e7a9f6fe1731caec130ab4",
        "chainId": "0x507",
        "standardV": "0x1",
        "v": "0x1",
        "r": "0x1",
        "s": "0x1",
        "accessList": [],
        "type": "0x2"
    },
    "id": 1
}
Note that the v-r-s values are set to 0x1, and the gas price-related fields are set to 0x0. In addition, the nonce field corresponds to a global nonce of the Ethereum XCM Pallet, and not the transaction count of the dispatcher account.
Note
You might be able to find some transaction hash collisions in the Moonbase Alpha TestNet, as early versions of remote EVM calls through XCM did not use a global nonce of the Ethereum XCM Pallet.
| Created: May 25, 2022