OpenZeppelin Defender
Introduction
OpenZeppelin Defender is a web-based application that allows developers to perform and automate smart contract operations in a secure way. Defender V2 offers the following components:
- Code Inspector — Automatic code analysis powered by AI models and tools developed by OpenZeppelin engineers
- Audit — Manage the smart contract audit process and track issues and resolutions
- Deploy — Manage deployments and upgrades to ensure secure releases
- Monitor — to monitor your smart contract's events, functions, and transactions, and receive notifications via email
- Incident Response — Configure predefined incident response scenarios triggered automatically by monitors or on-demand
- Actions — Create automated actions to perform on-chain and off-chain operations
- Access Control — Manage smart contract accounts, roles, and permissions easily
OpenZeppelin Defender can be used on Moonbeam, Moonriver, and the Moonbase Alpha TestNet. This guide will show you how to get started with Defender and demonstrate using OpenZeppelin Actions and Access Control to pause a smart contract on Moonbase Alpha. This guide can be adapted for Moonbeam and Moonriver.
Getting Started with Defender
This section goes through the steps for getting started with OpenZeppelin Defender on Moonbase Alpha.
Checking Prerequisites
The steps described in this section assume you have MetaMask installed and connected to the Moonbase Alpha TestNet. If you haven't connected MetaMask to the TestNet, check out our MetaMask integration guide.
In addition, you need to sign up for a free OpenZeppelin Defender account, which you can do on the main Defender website.
Deploying the Pausable Box Contract
The contract used in this guide is an extension of the Box.sol contract used in the upgrading smart contracts guide from the OpenZeppelin documentation. Also, the contract was made upgradable and pausable to take full advantage of the Admin component. You can deploy your contract using the following code and following the upgrading smart contracts guide:
// SPDX-License-Identifier: MIT
pragma solidity ^0.8.0;

import "@openzeppelin/contracts-upgradeable/security/PausableUpgradeable.sol";
import "@openzeppelin/contracts-upgradeable/access/OwnableUpgradeable.sol";

contract PausableBox is Initializable, PausableUpgradeable, OwnableUpgradeable {
    uint256 private value;

    // Emitted when the stored value changes
    event ValueChanged(uint256 newValue);

    // Initialize
    function initialize() initializer public {
        __Ownable_init(_msgSender());
        __Pausable_init_unchained();
    }

    // Stores a new value in the contract
    function store(uint256 newValue) whenNotPaused public {
        value = newValue;
        emit ValueChanged(newValue);
    }

    // Reads the last stored value
    function retrieve() public view returns (uint256) {
        return value;
    }

    function pause() public onlyOwner {
        _pause();
    }

    function unpause() public onlyOwner {
        _unpause();
    }
}
Note
After deploying the above contract using Remix or another tool such as Hardhat, you'll need to call the initialize function to properly set the owner of the upgradeable contract. If you don't call this function, the owner will be set to the zero address, and you will be unable to proceed with the remainder of this tutorial.
Using the Access Control Component
This section goes through the steps for getting started with the OpenZeppelin Defender Access Control component to manage smart contracts on Moonbase Alpha.
Importing Your Contract
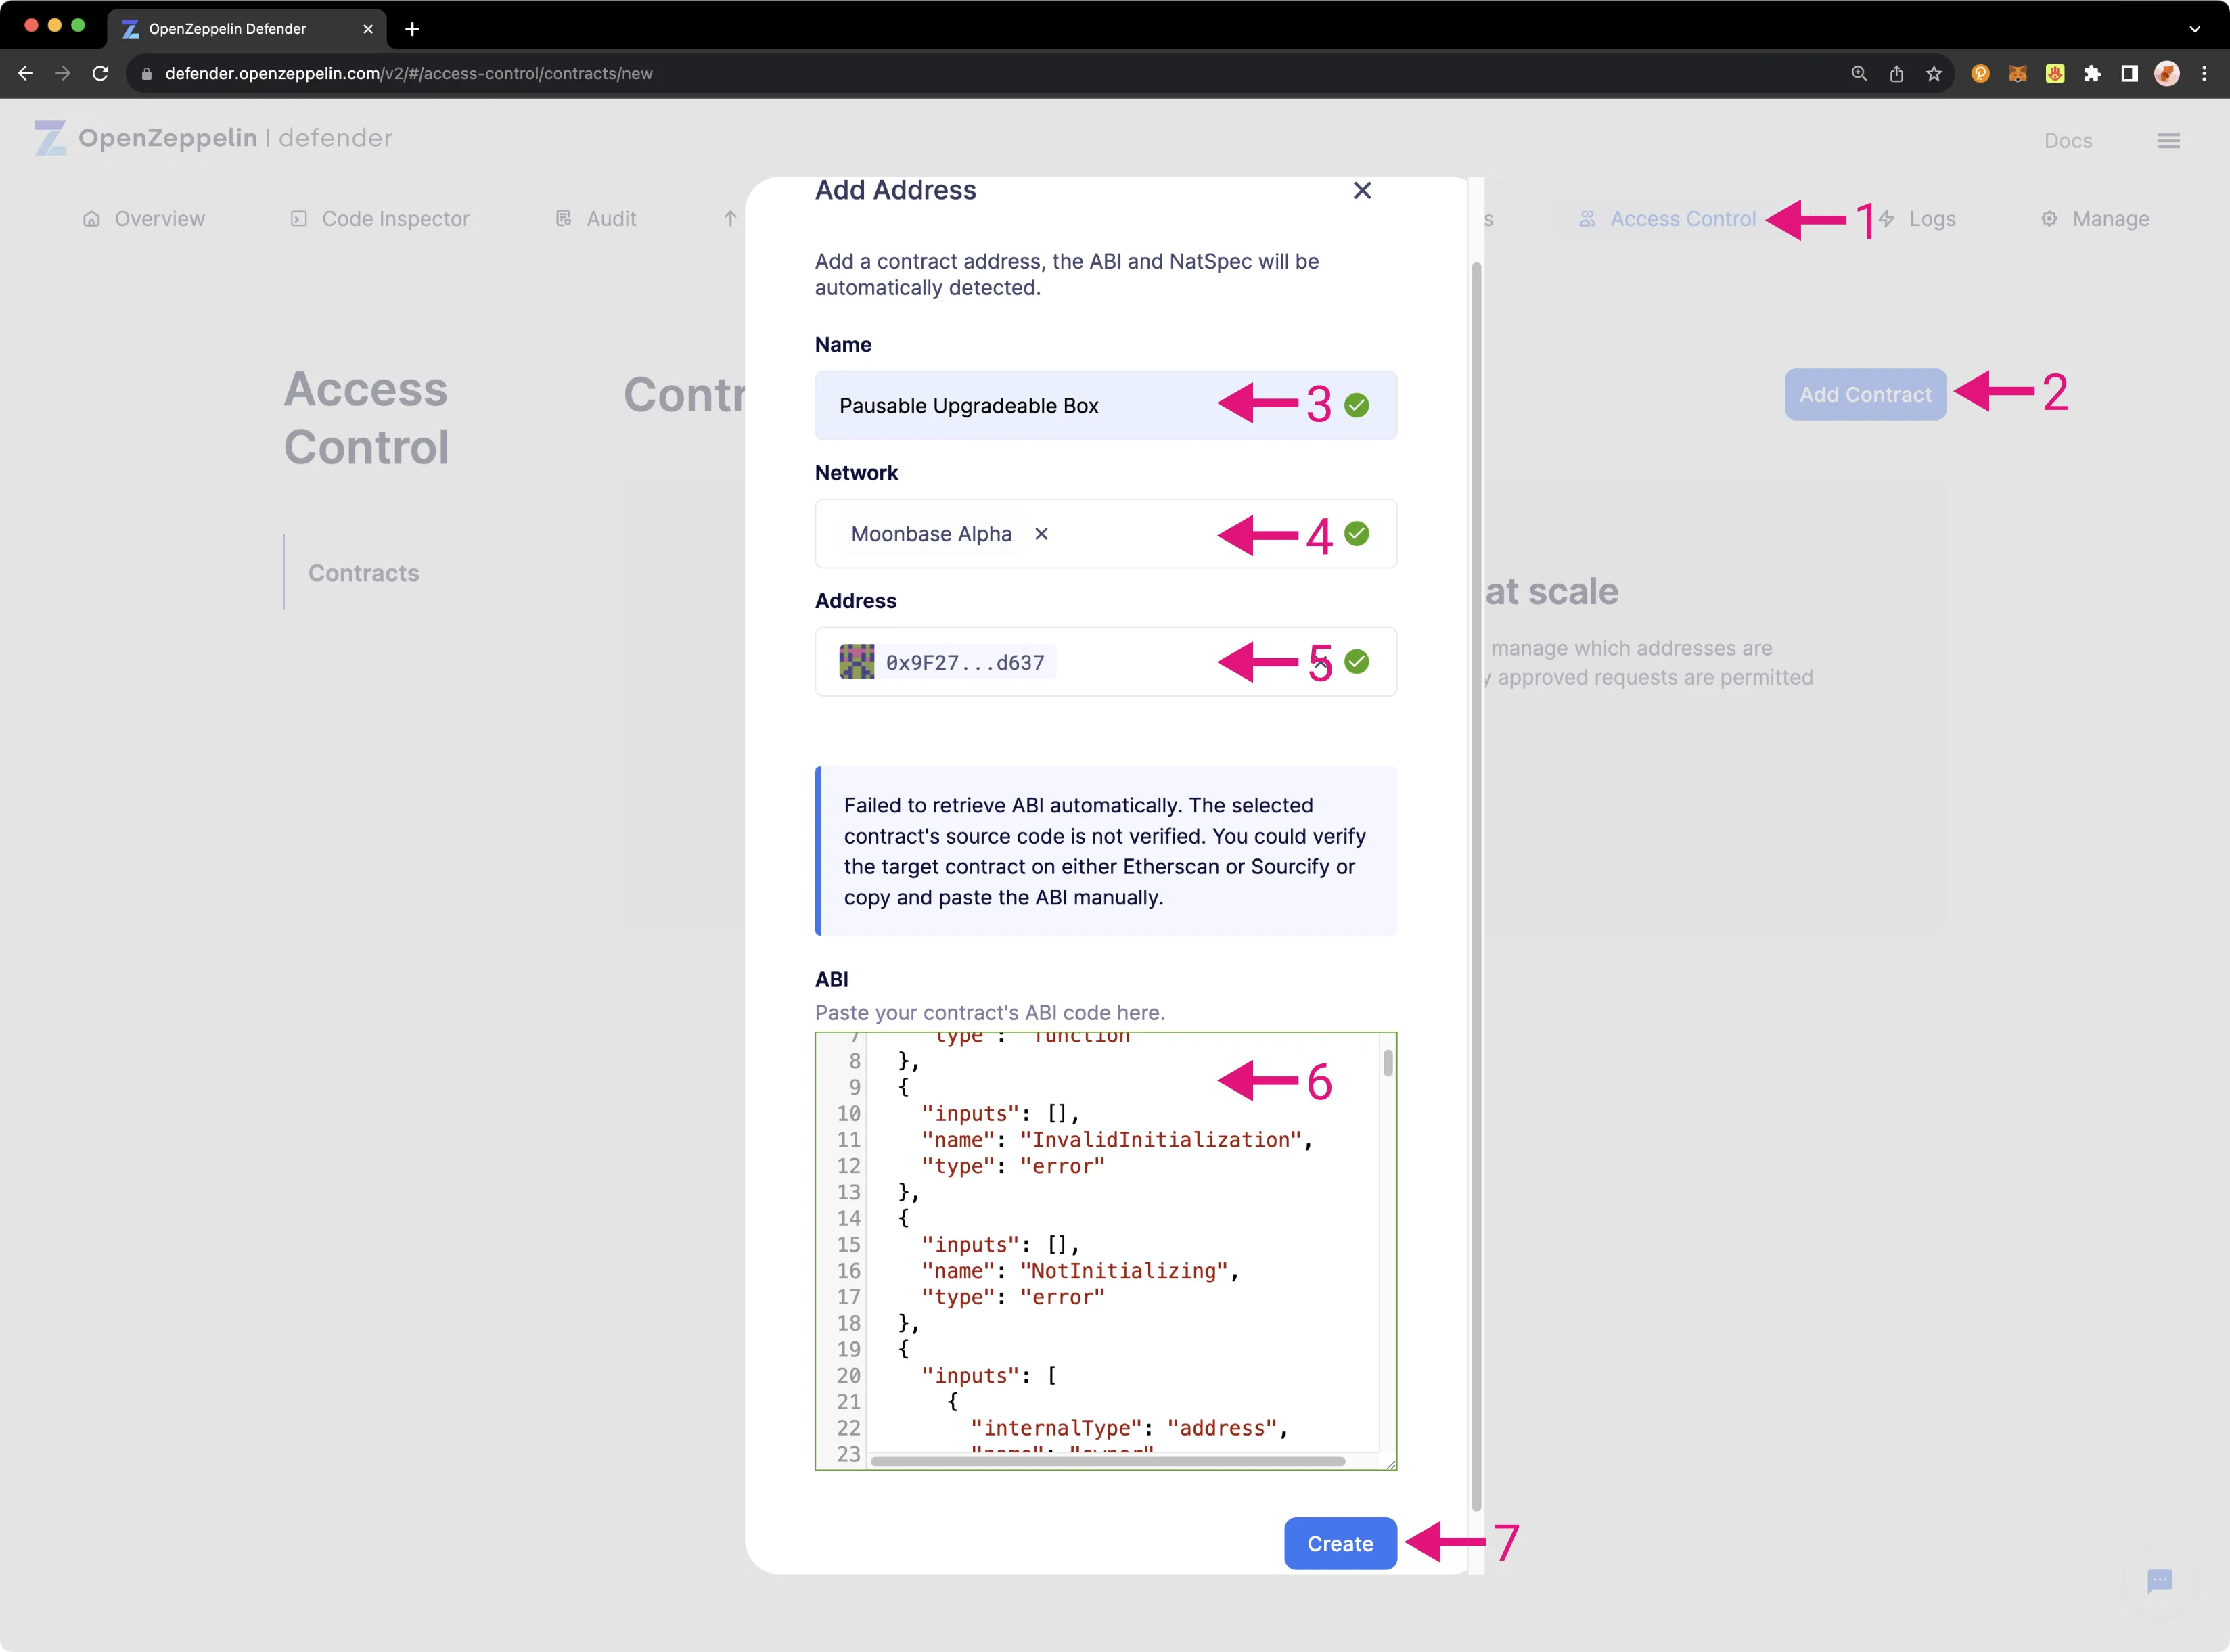
The first step to using Defender Access Control is to add the contract you want to manage. To do so, take the following steps:
- Click on the Access Control menu item
- Click Add Contract
- Add a name for your contract
- Select the Network on which the contract is deployed. For the demo, Moonbase Alpha is selected
- Paste the contract address
- If you have verified your contract, the ABI will be automatically imported. Otherwise, paste the contract ABI. This can be obtained either in Remix or in the
.jsonfile generally created after the compilation process (for example, in Hardhat) - Once you've checked all the information, click on the Create button
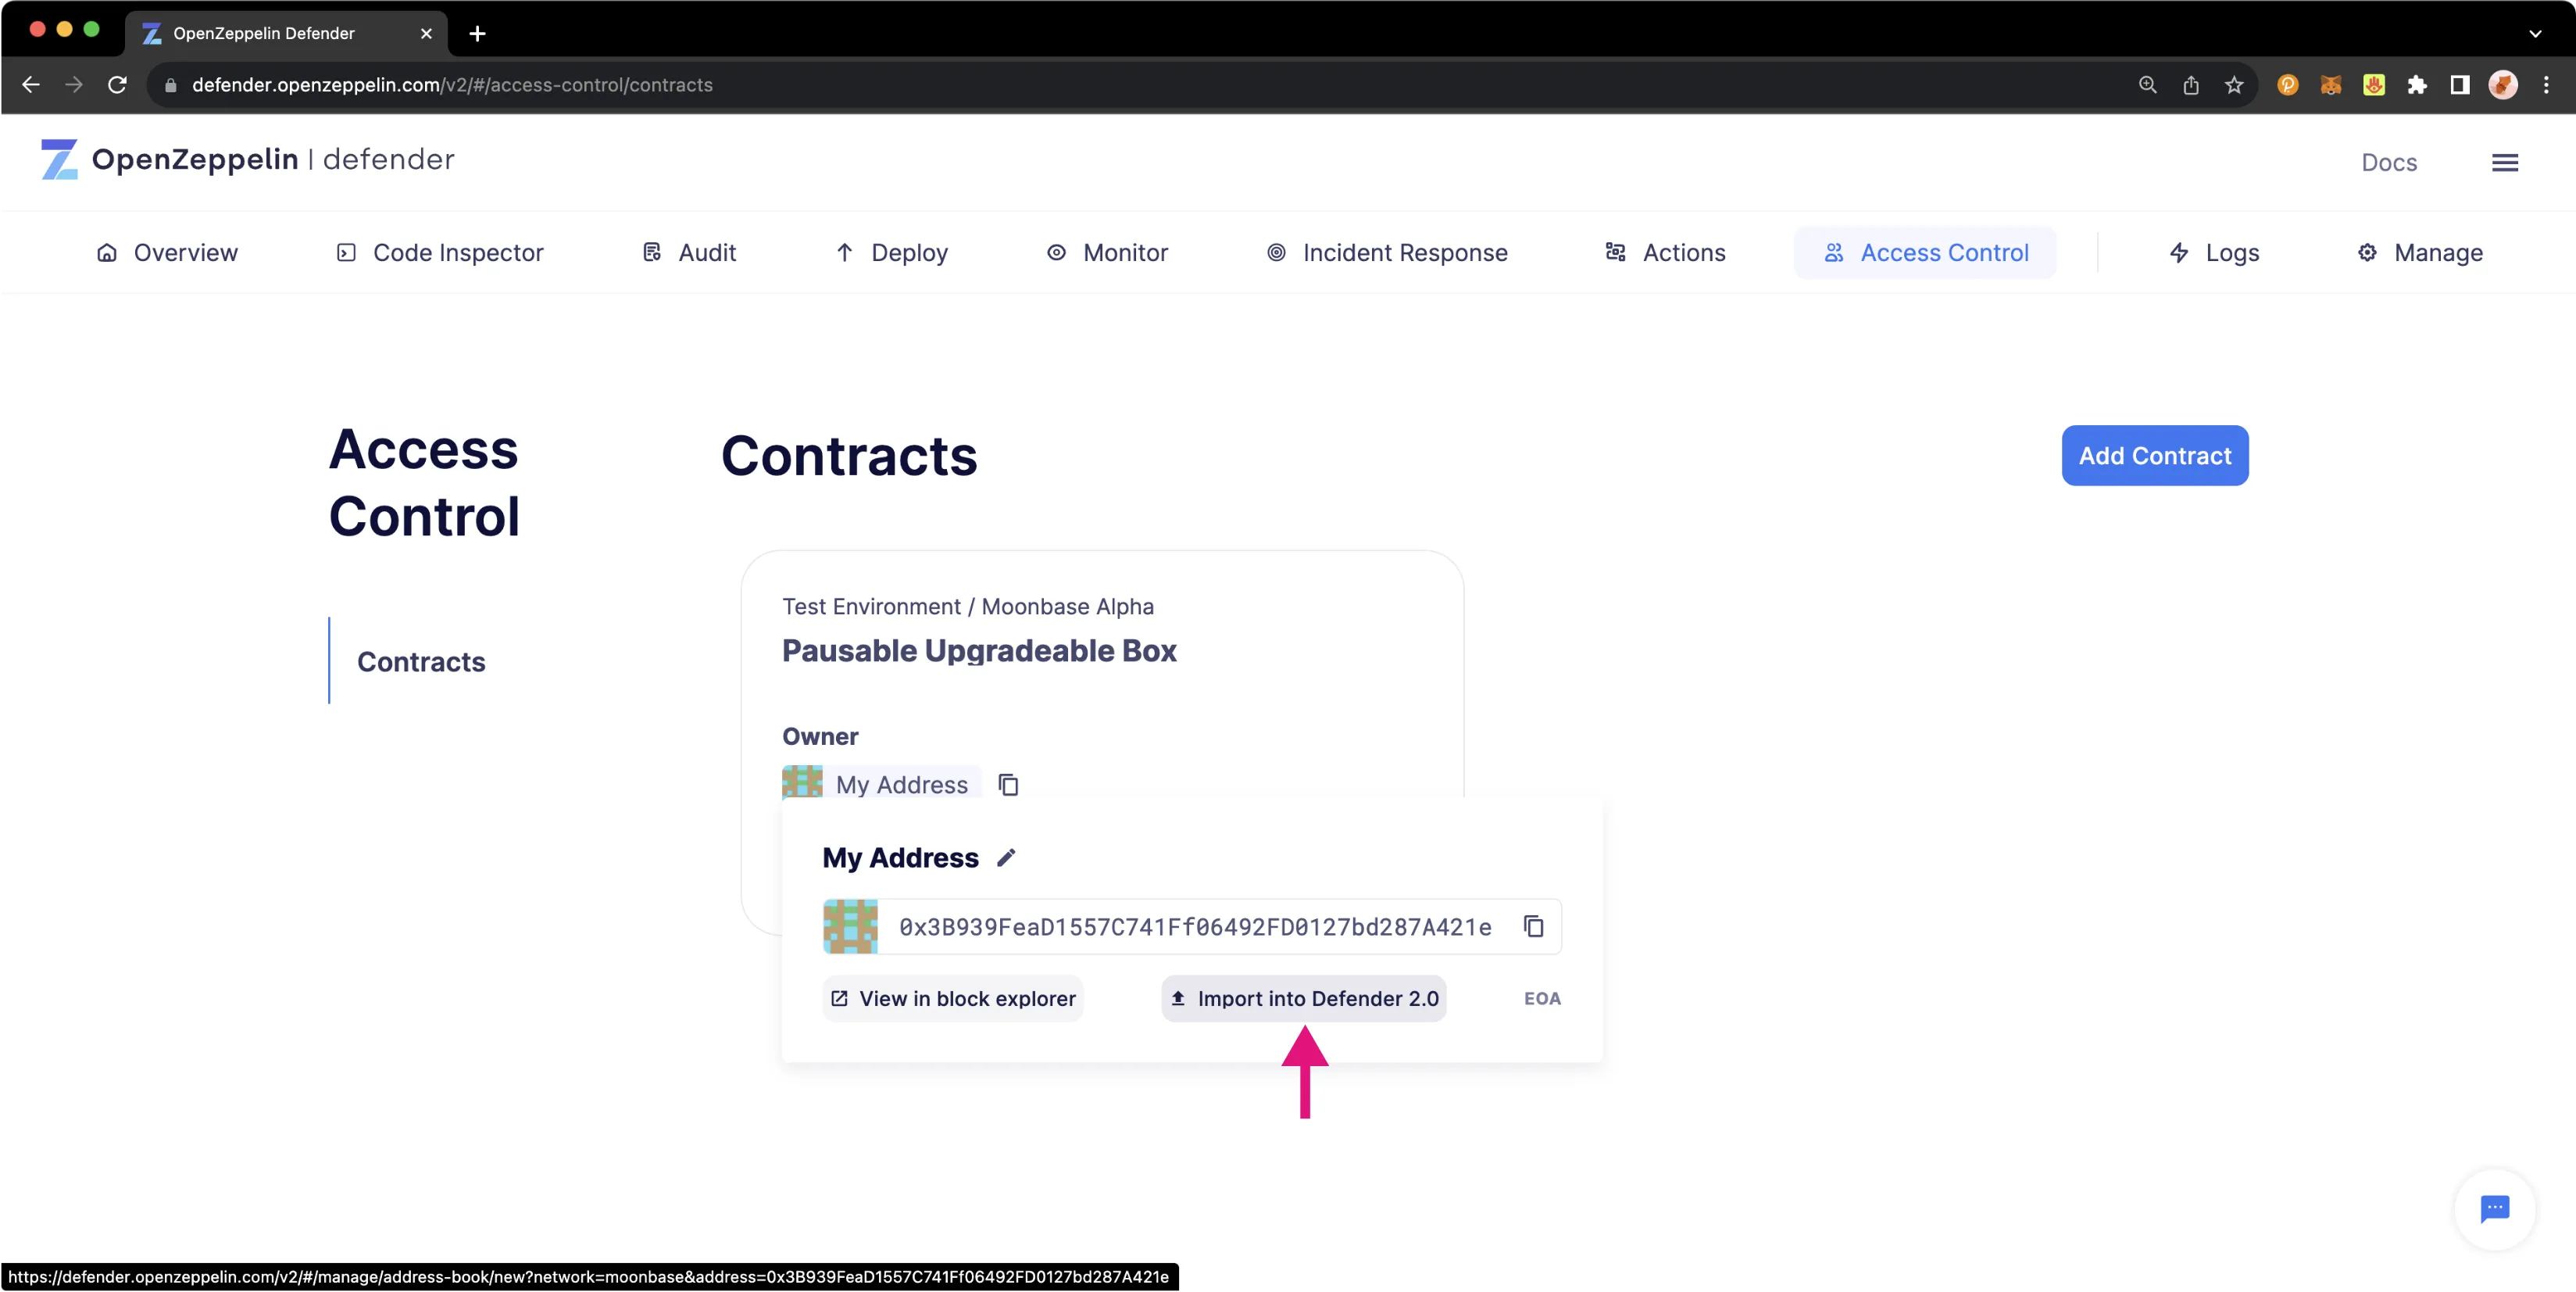
If everything was successfully imported, you should see your contract on the Access Control Contracts main screen. You should see the address that you used to deploy the Pausable Box contract in the Owner field. If you see 0x0000000000000000000000000000000000000000, this means that you didn't call the initialize function after deploying the Pausable Box contract. To simplify a later step, take a moment to add your address to your Defender Address Book by hovering over the address in the Owner field and clicking Import into Defender 2.0.
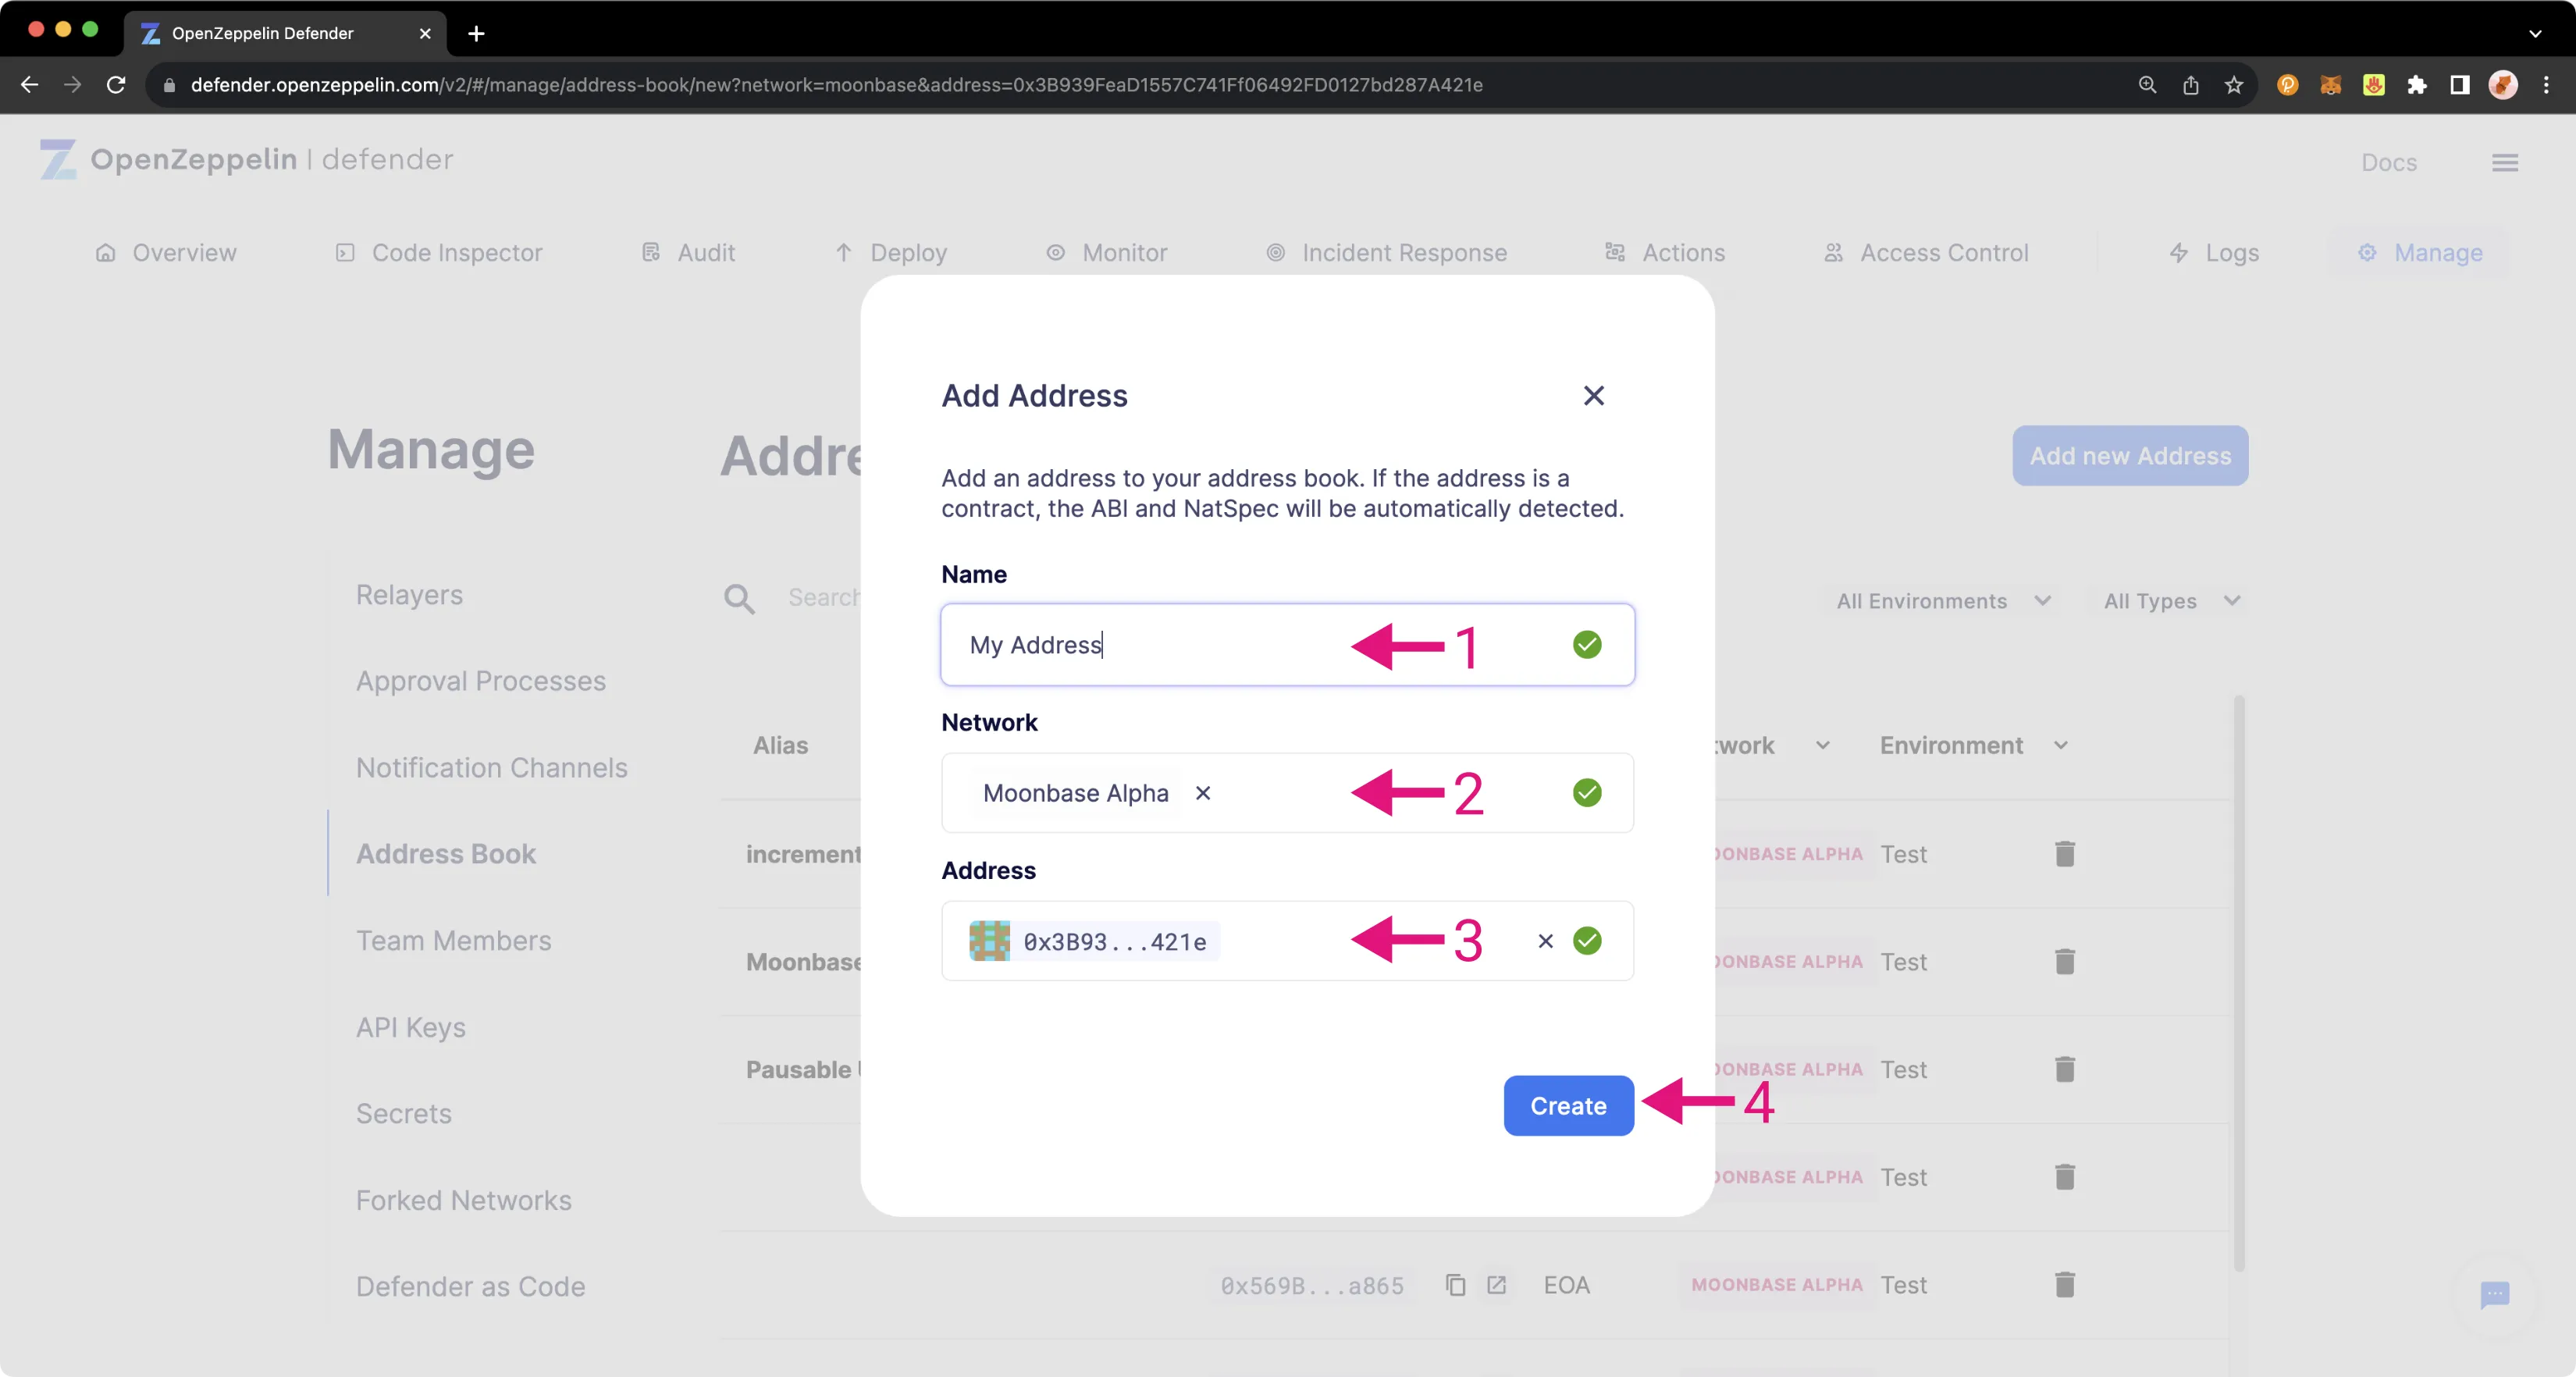
Then, you can add your address to the Defender Address Book as follows:
- Enter a name for your address
- Select the relevant network that the address pertains to
- Paste the address
- Review all the information and press Create
Create a Contract Proposal
Proposals are actions to be carried out in the contract. You can propose any function of the contract to be enacted, including but not limited to:
- Pause — available if the pause feature is detected. Pauses token transfers, minting, and burning
- Upgrade — available if the upgrade feature is detected. Allows for a contract to be upgraded via a proxy contract
- Admin action — call to any function in the managed contract
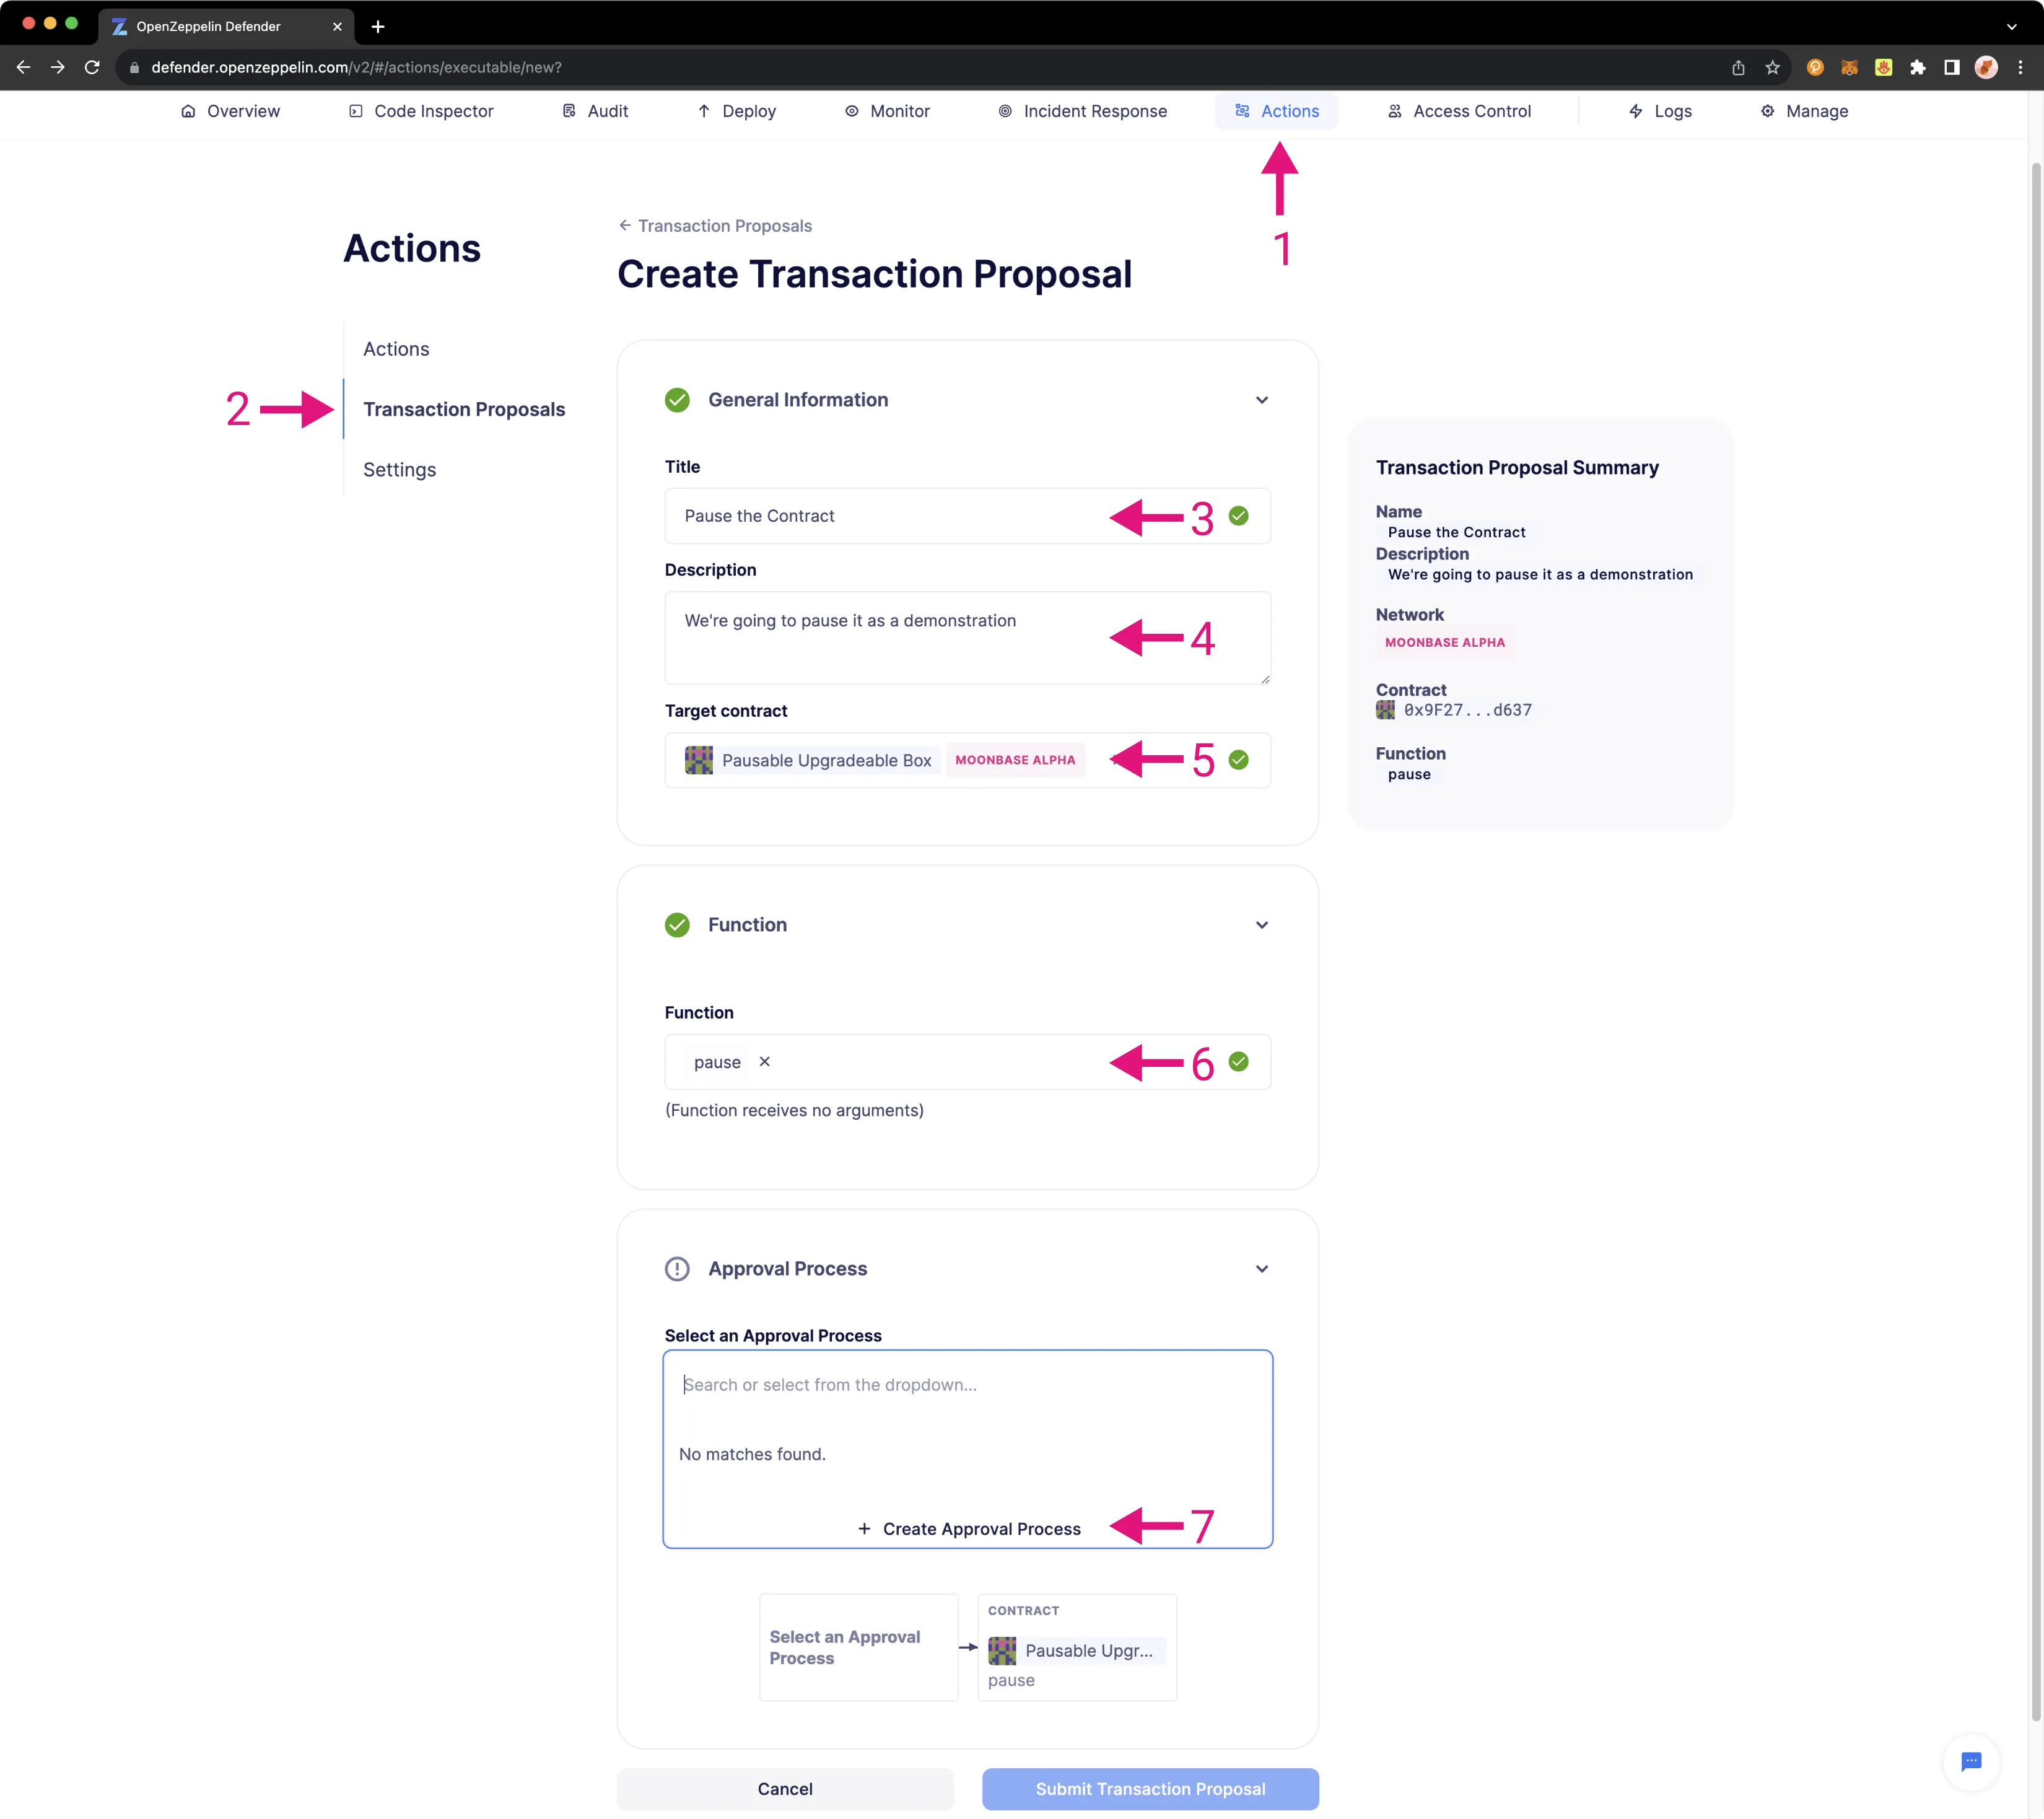
In this case, a new proposal is created to pause the contract. To do so, take the following steps:
- Click on the Actions menu item
- Click Transaction Proposals
- Enter a name for the proposal
- Optionally, you may enter a description of the proposal
- Select the target contract from the dropdown of imported contracts
- Select the function to be carried out as part of the proposal
- Select the desired approval process. For demo purposes, a simple approval process consisting of only the owner will be created in the following step
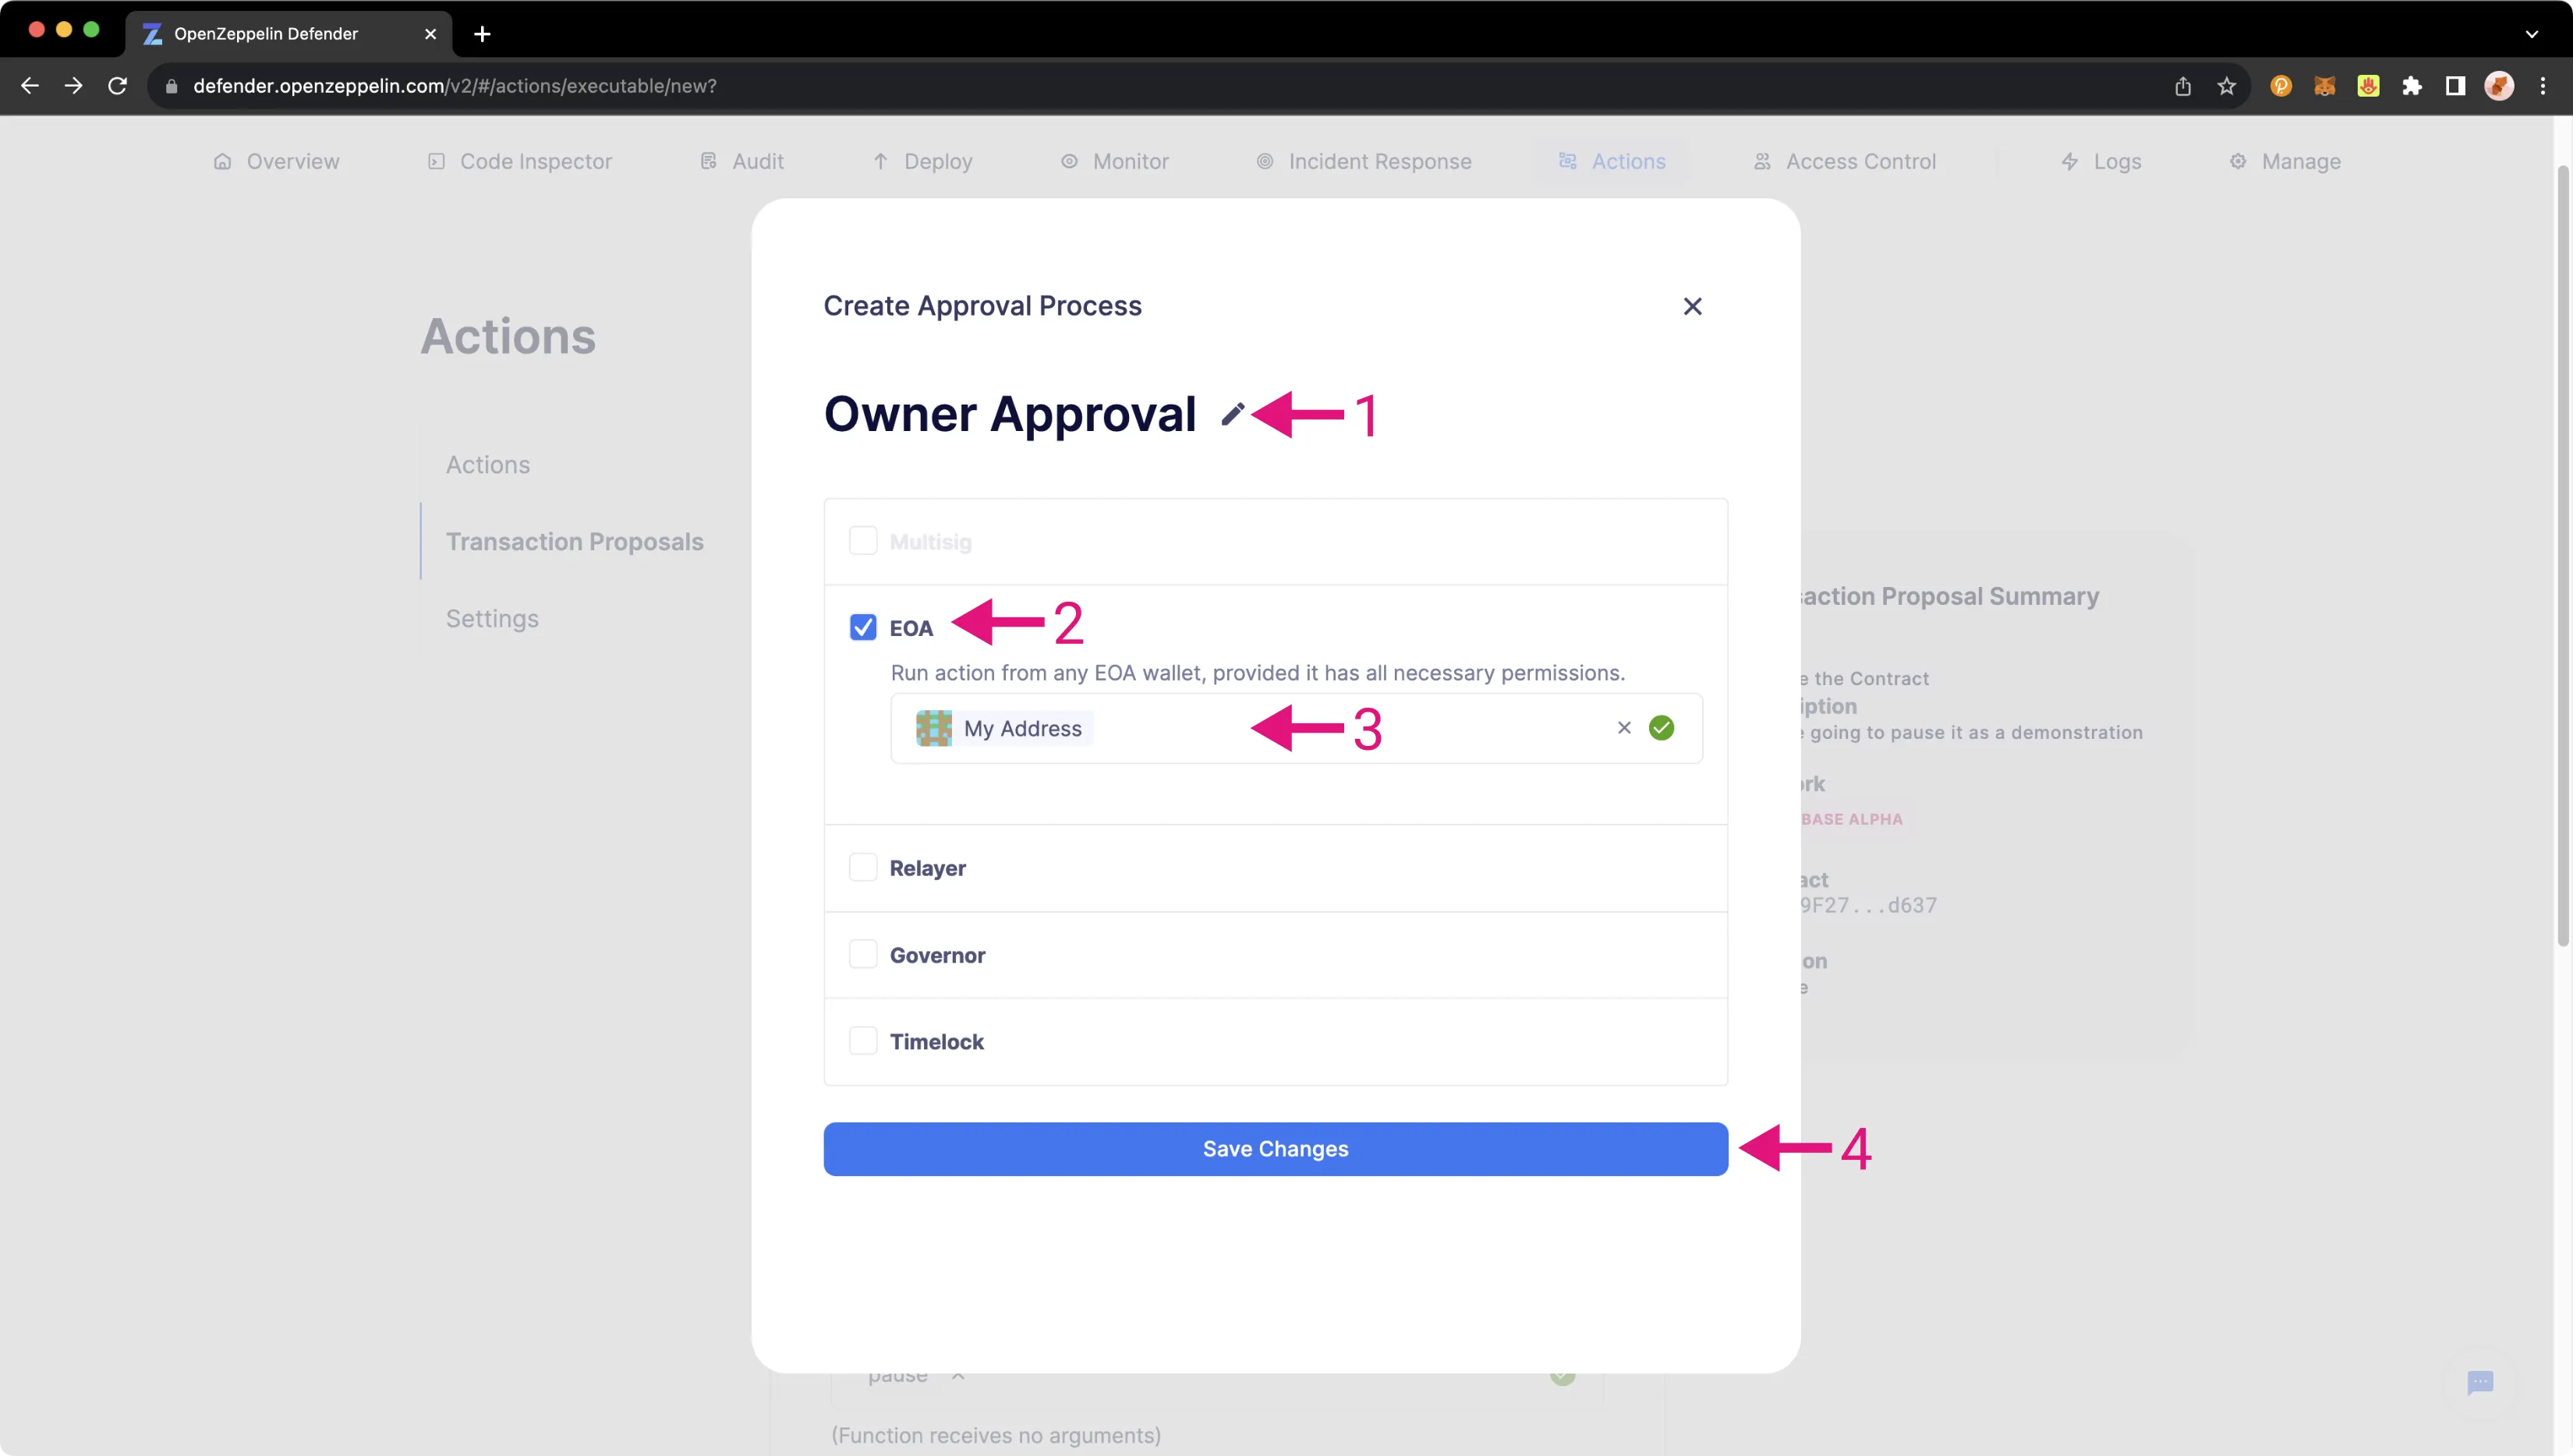
To create a simple new approval process consisting of only the contract owner, take the following steps:
- Enter a name for the approval process
- Select EOA
- Select the owner of the Pausable Box contract
- Review all information and press Save Changes
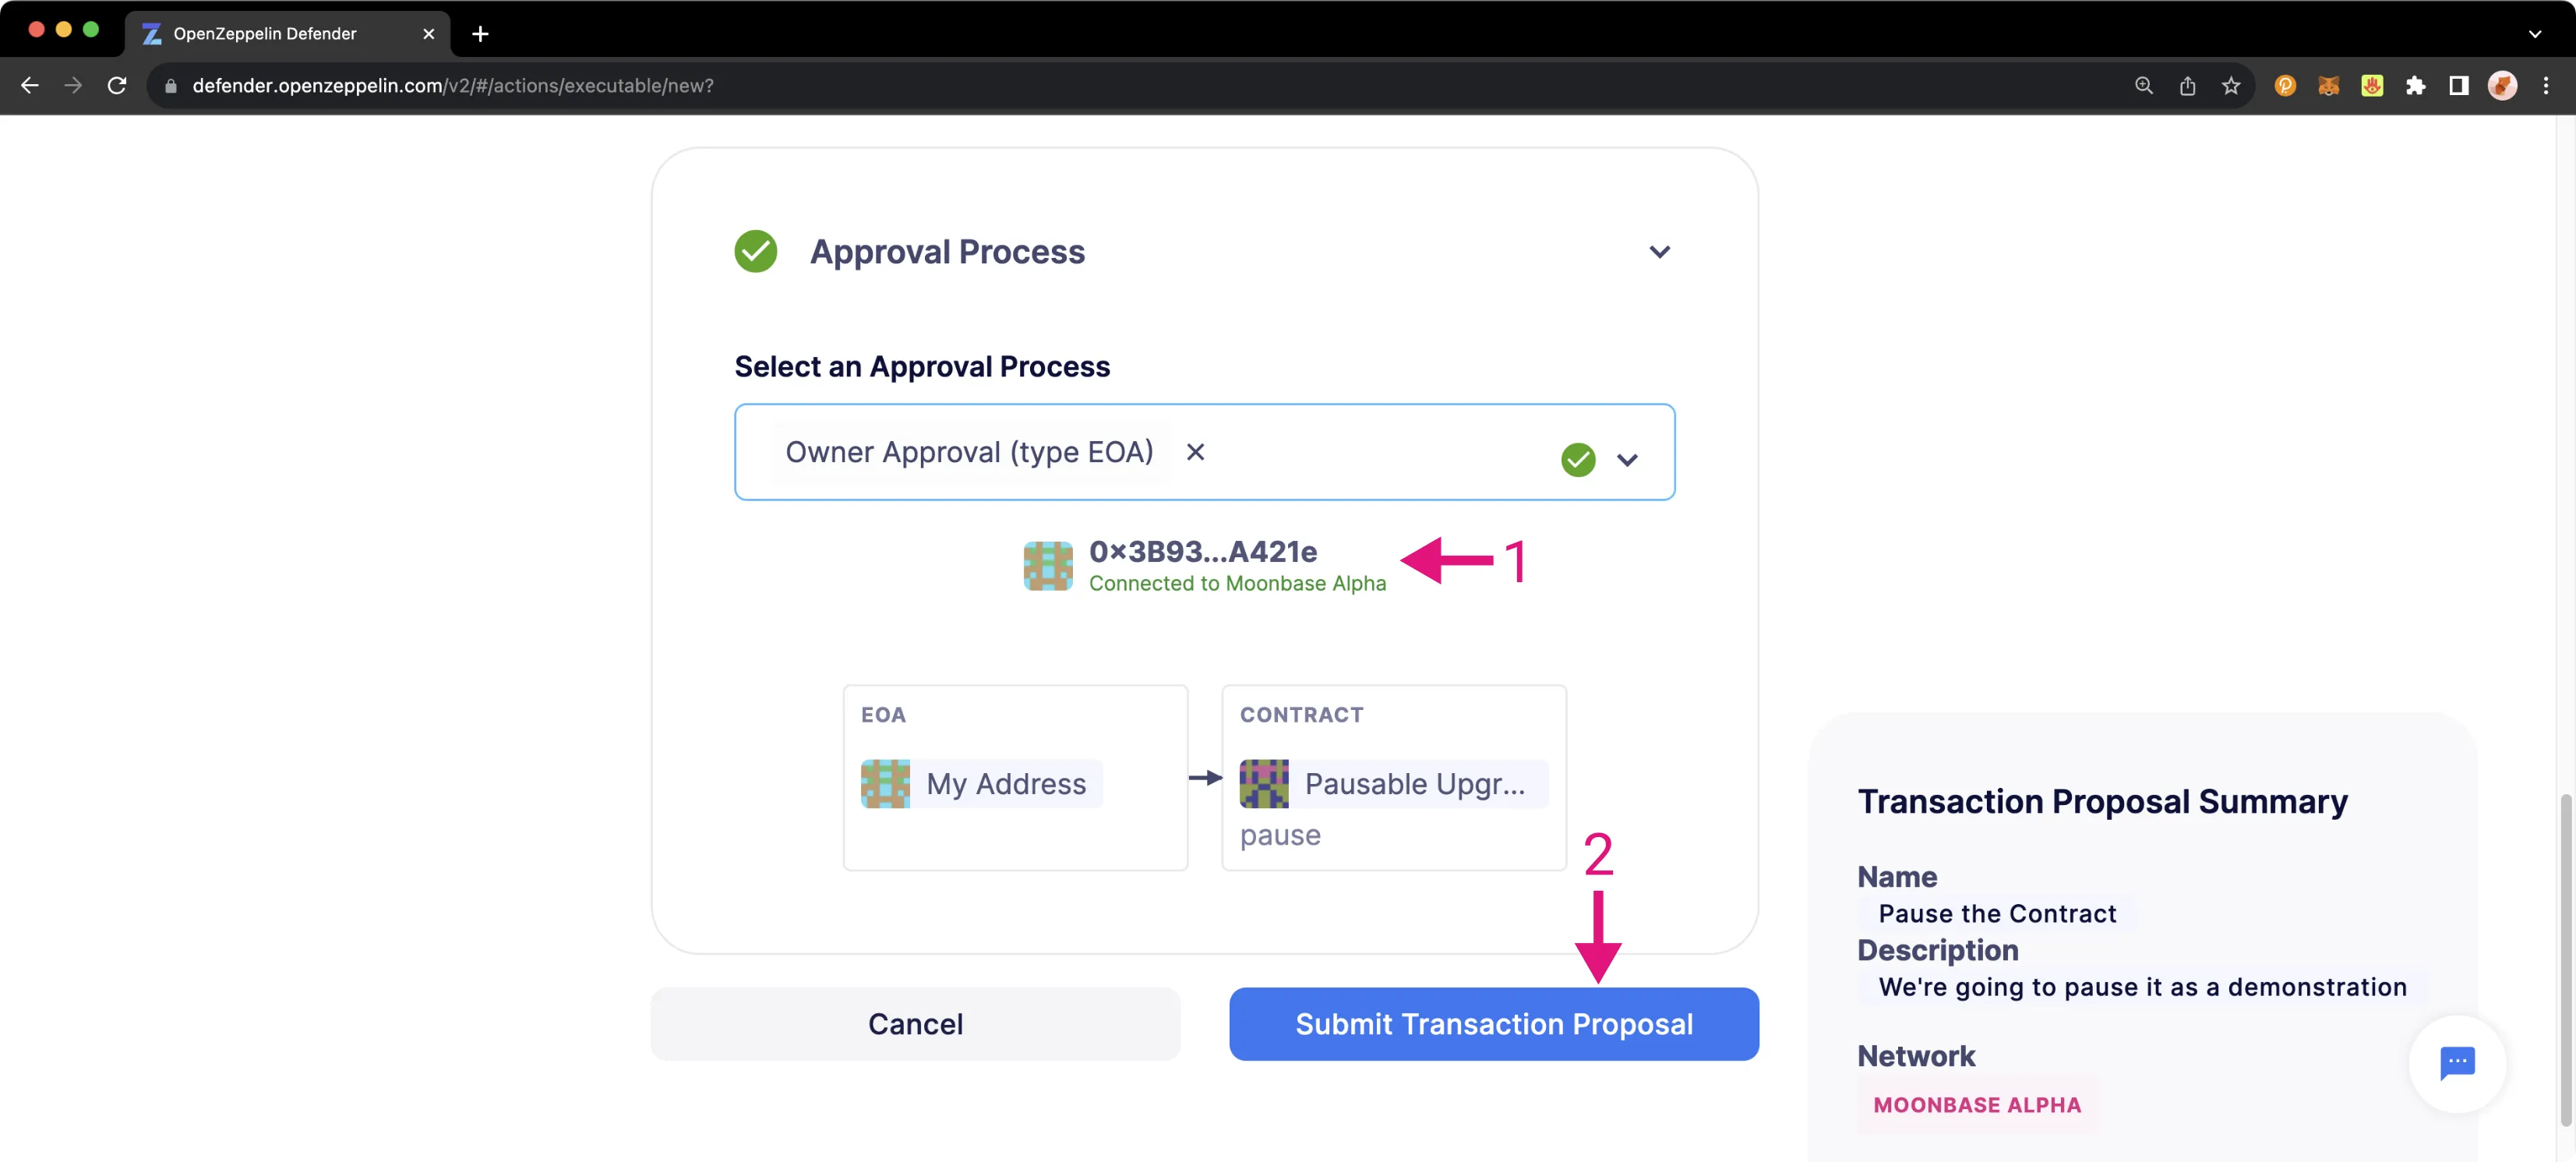
The last step remaining is to submit the transaction proposal. To do so, take the following steps:
- Press Connect Wallet and connect your EVM account to Defender
- Press Submit Transaction Proposal
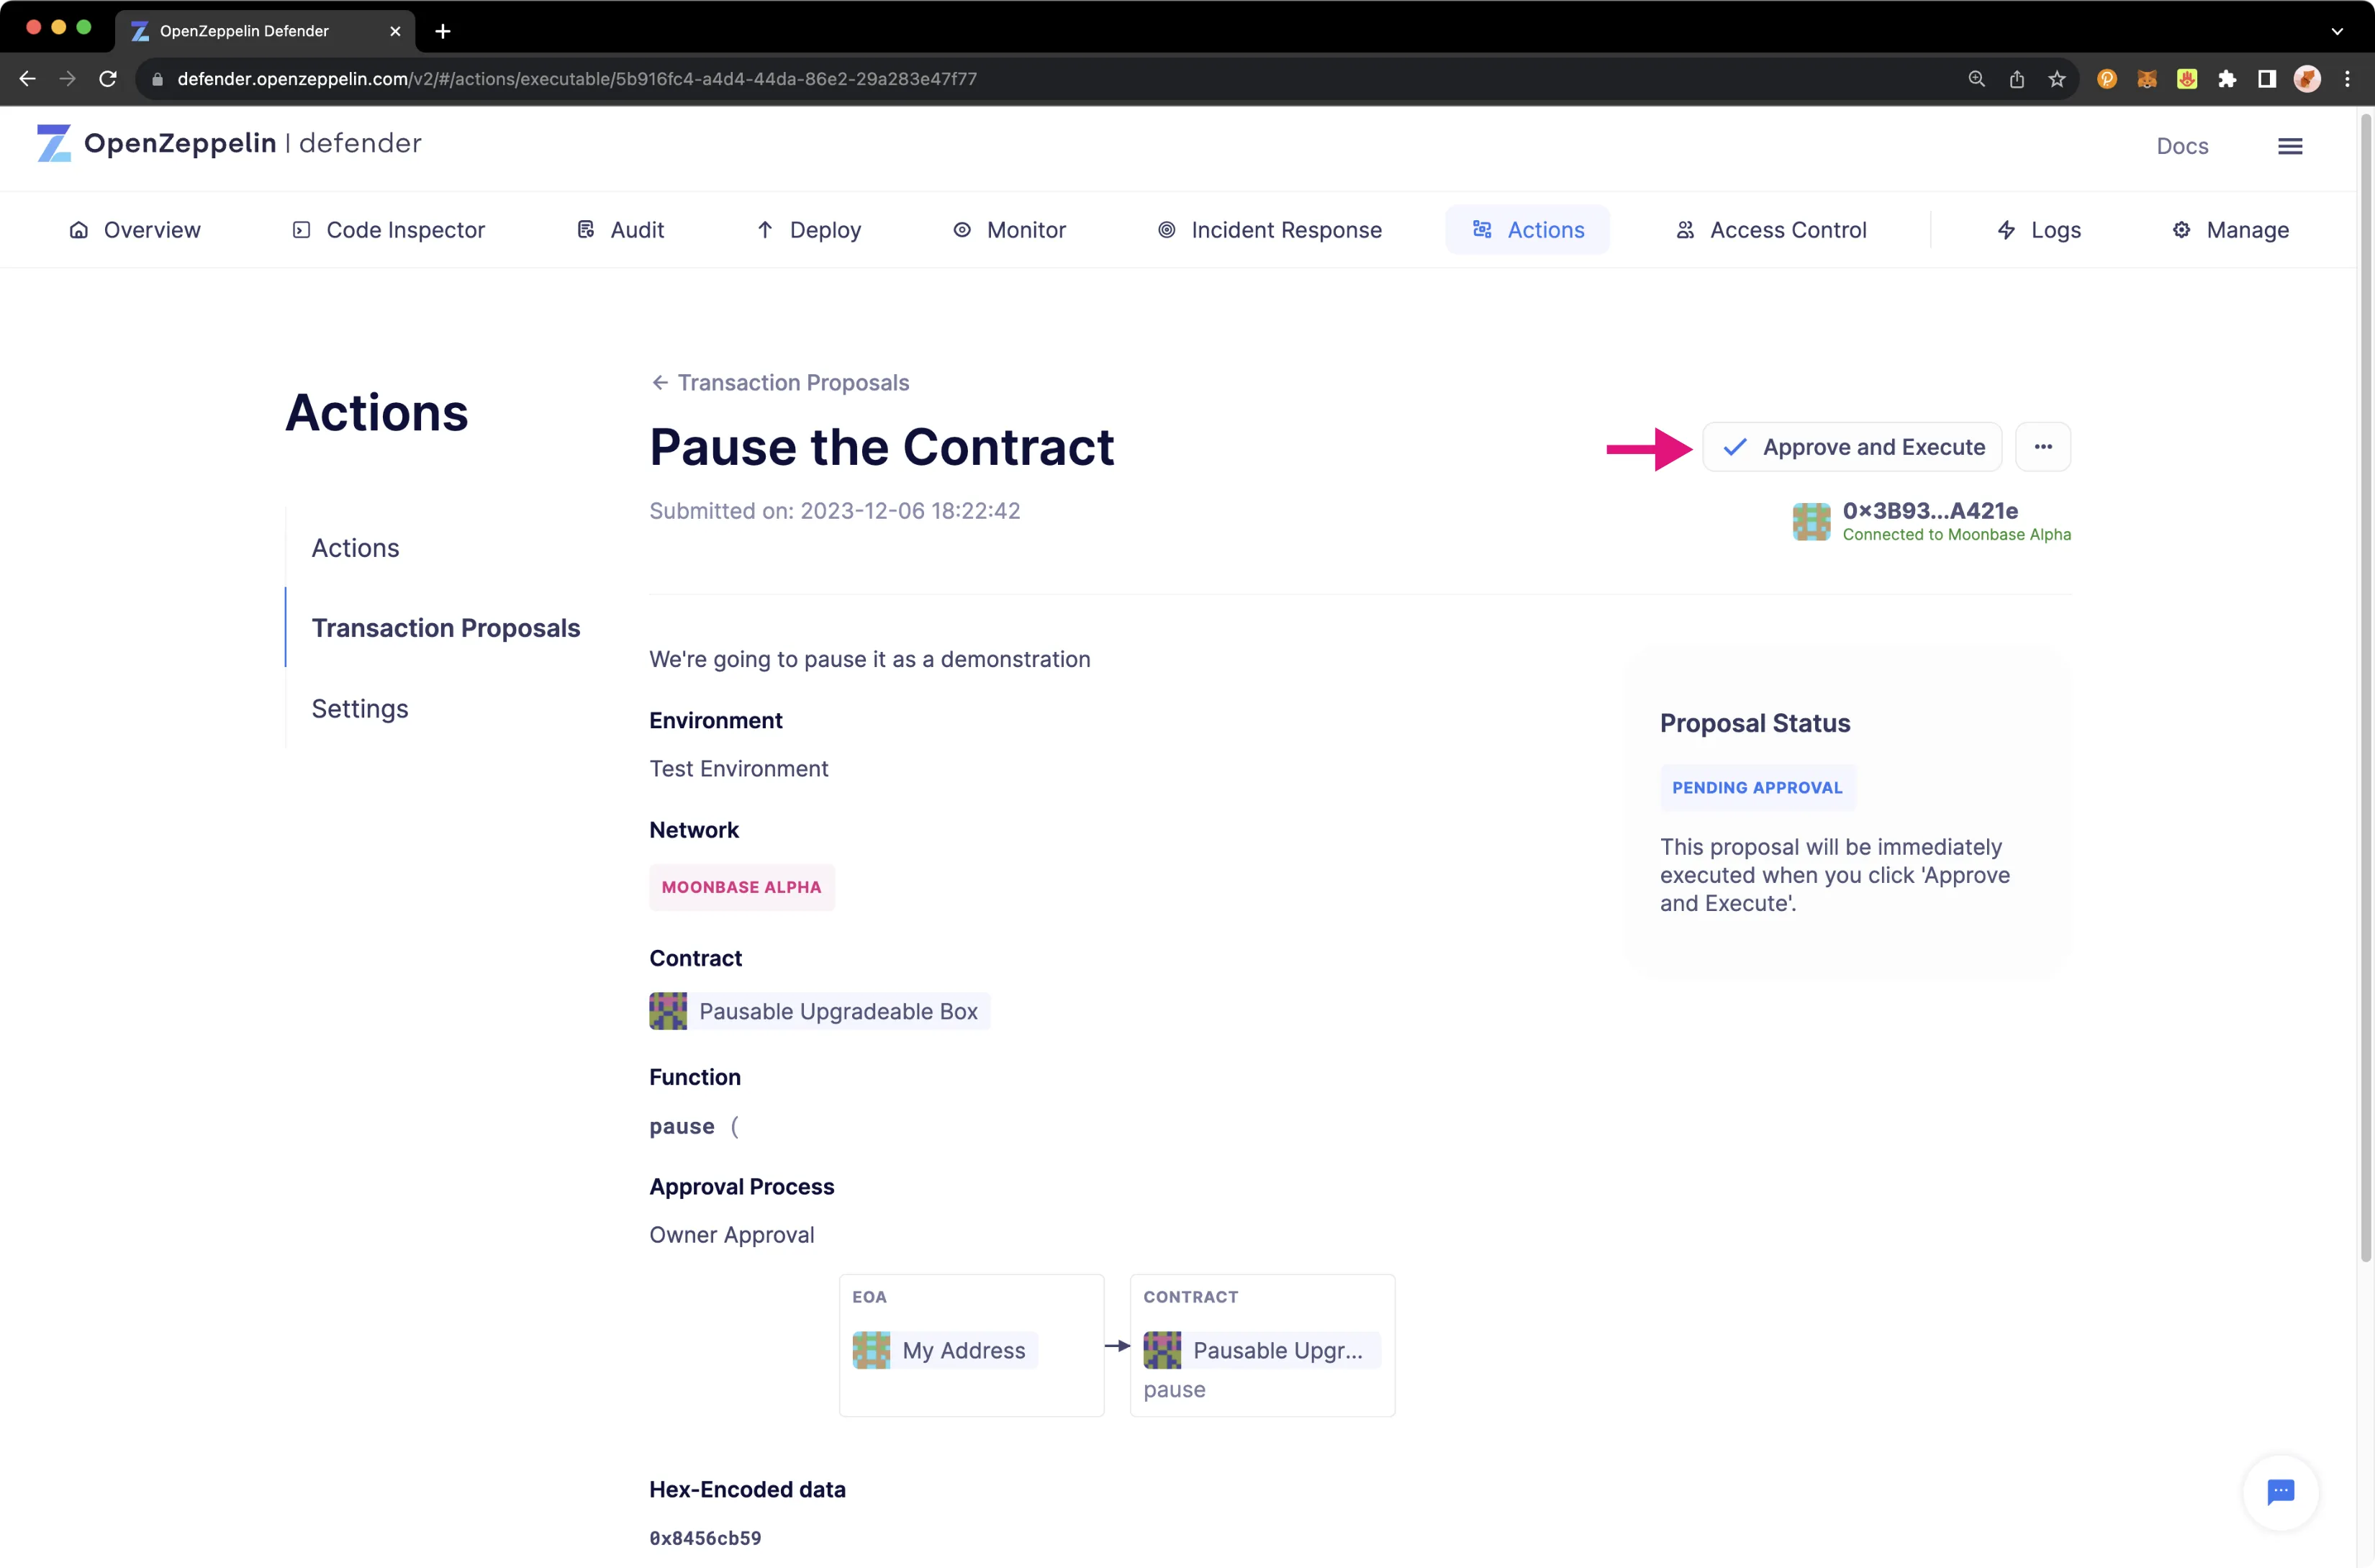
Approve a Contract Proposal
Press Continue, and you'll be taken to the proposal status page. Here, you'll be able to execute the proposal. Press Approve and Execute, and confirm the transaction in your EVM wallet. Once the transaction is processed, the status should show Executed.
If all went smoothly, your Pausable Box Contract is now paused. If you'd like to try out additional scenarios, you can try creating a proposal to unpause your contract. And that's it! You're now well on your way to mastering OpenZeppelin Defender to manage your smart contracts on Moonbeam. For more information, be sure to check out the OpenZeppelin Defender Docs.
| Created: April 30, 2021