Using OpenZeppelin Contracts and Remix To Deploy To Moonbeam
Introduction
OpenZeppelin contracts and libraries have become a standard in the industry. They help developers minimize risk, as their open-source code templates are battle-tested for Ethereum and other blockchains. Their code includes the most used implementations of ERC standards and add-ons and often appears in guides and tutorials around the community.
Because Moonbeam is fully Ethereum compatible, all of OpenZeppelin's contracts and libraries can be implemented without any changes.
This guide is divided into two sections. The first part describes the OpenZeppelin Contracts Wizard, a great online tool to help you create smart contracts using OpenZeppelin code. The second section provides a step-by-step guide on how you can deploy these contracts using Remix on Moonbeam.
OpenZeppelin Contract Wizard
OpenZeppelin has developed an online web-based interactive contract generator tool that is probably the easiest and fastest way to write your smart contract using OpenZeppelin code, called Contracts Wizard.
Currently, the Contracts Wizard support the following ERC standards:
- ERC-20 — a fungible token standard that follows EIP-20. Fungible means that all tokens are equivalent and interchangeable that is, of equal value. One typical example of fungible tokens is fiat currencies, where each equal-denomination bill has the same value
- ERC-721 — a non-fungible token contract that follows EIP-721. Non-fungible means that each token is different, and therefore, unique. An ERC-721 token can represent ownership of that unique item, whether it is a collectible item in a game, real estate, and so on
- ERC-1155 — also known as the multi-token contract, because it can represent both fungible and non-fungible tokens in a single smart contract. It follows EIP-1155
The wizard is comprised of the following sections:
- Token standard selection — shows all the different standards supported by the wizard
- Settings — provides the baseline settings for each token standard, such as token name, symbol, pre-mint (token supply when the contract is deployed), and URI (for non-fungible tokens)
- Features — list of all features available for each token standard. You can find more information about the different features in the following links:
- Access Control — list of all the available access control mechanisms for each token standard
- Interactive code display — shows the smart contract code with the configuration as set by the user

Once you have set up your contract with all the settings and features, it is just as easy as copying and pasting the code into your contract file.
Deploying OpenZeppelin Contracts on Moonbeam
This section goes through the steps for deploying OpenZeppelin contracts on Moonbeam. It covers the following contracts:
- ERC-20 (fungible tokens)
- ERC-721 (non-fungible tokens)
- ERC-1155 (multi-token standard)
All the code of the contracts was obtained using OpenZeppelin Contract Wizard.
Checking Prerequisites
The steps described in this section assume you have MetaMask installed and connected to the Moonbase Alpha TestNet. If you're adapting this guide for Moonbeam or Moonriver, make sure you're connected to the correct network. Contract deployment is done using the Remix IDE via the Injected Provider environment. You can find corresponding tutorials in the following links:
Deploying an ERC-20 Token
For this example, an ERC-20 token will be deployed to Moonbase Alpha. The final code used combines different contracts from OpenZeppelin:
ERC20.sol— ERC-20 token implementation with the optional features from the base interface. Includes the supply mechanism with amintfunction but needs to be explicitly called from within the main contractOwnable.sol— extension to restrict access to certain functions
The mintable ERC-20 OpenZeppelin token contract provides a mint function that the owner of the contract can only call. By default, the owner is the contract's deployer address. There is also a premint of 1000 tokens sent to the contract's deployer configured in the constructor function.
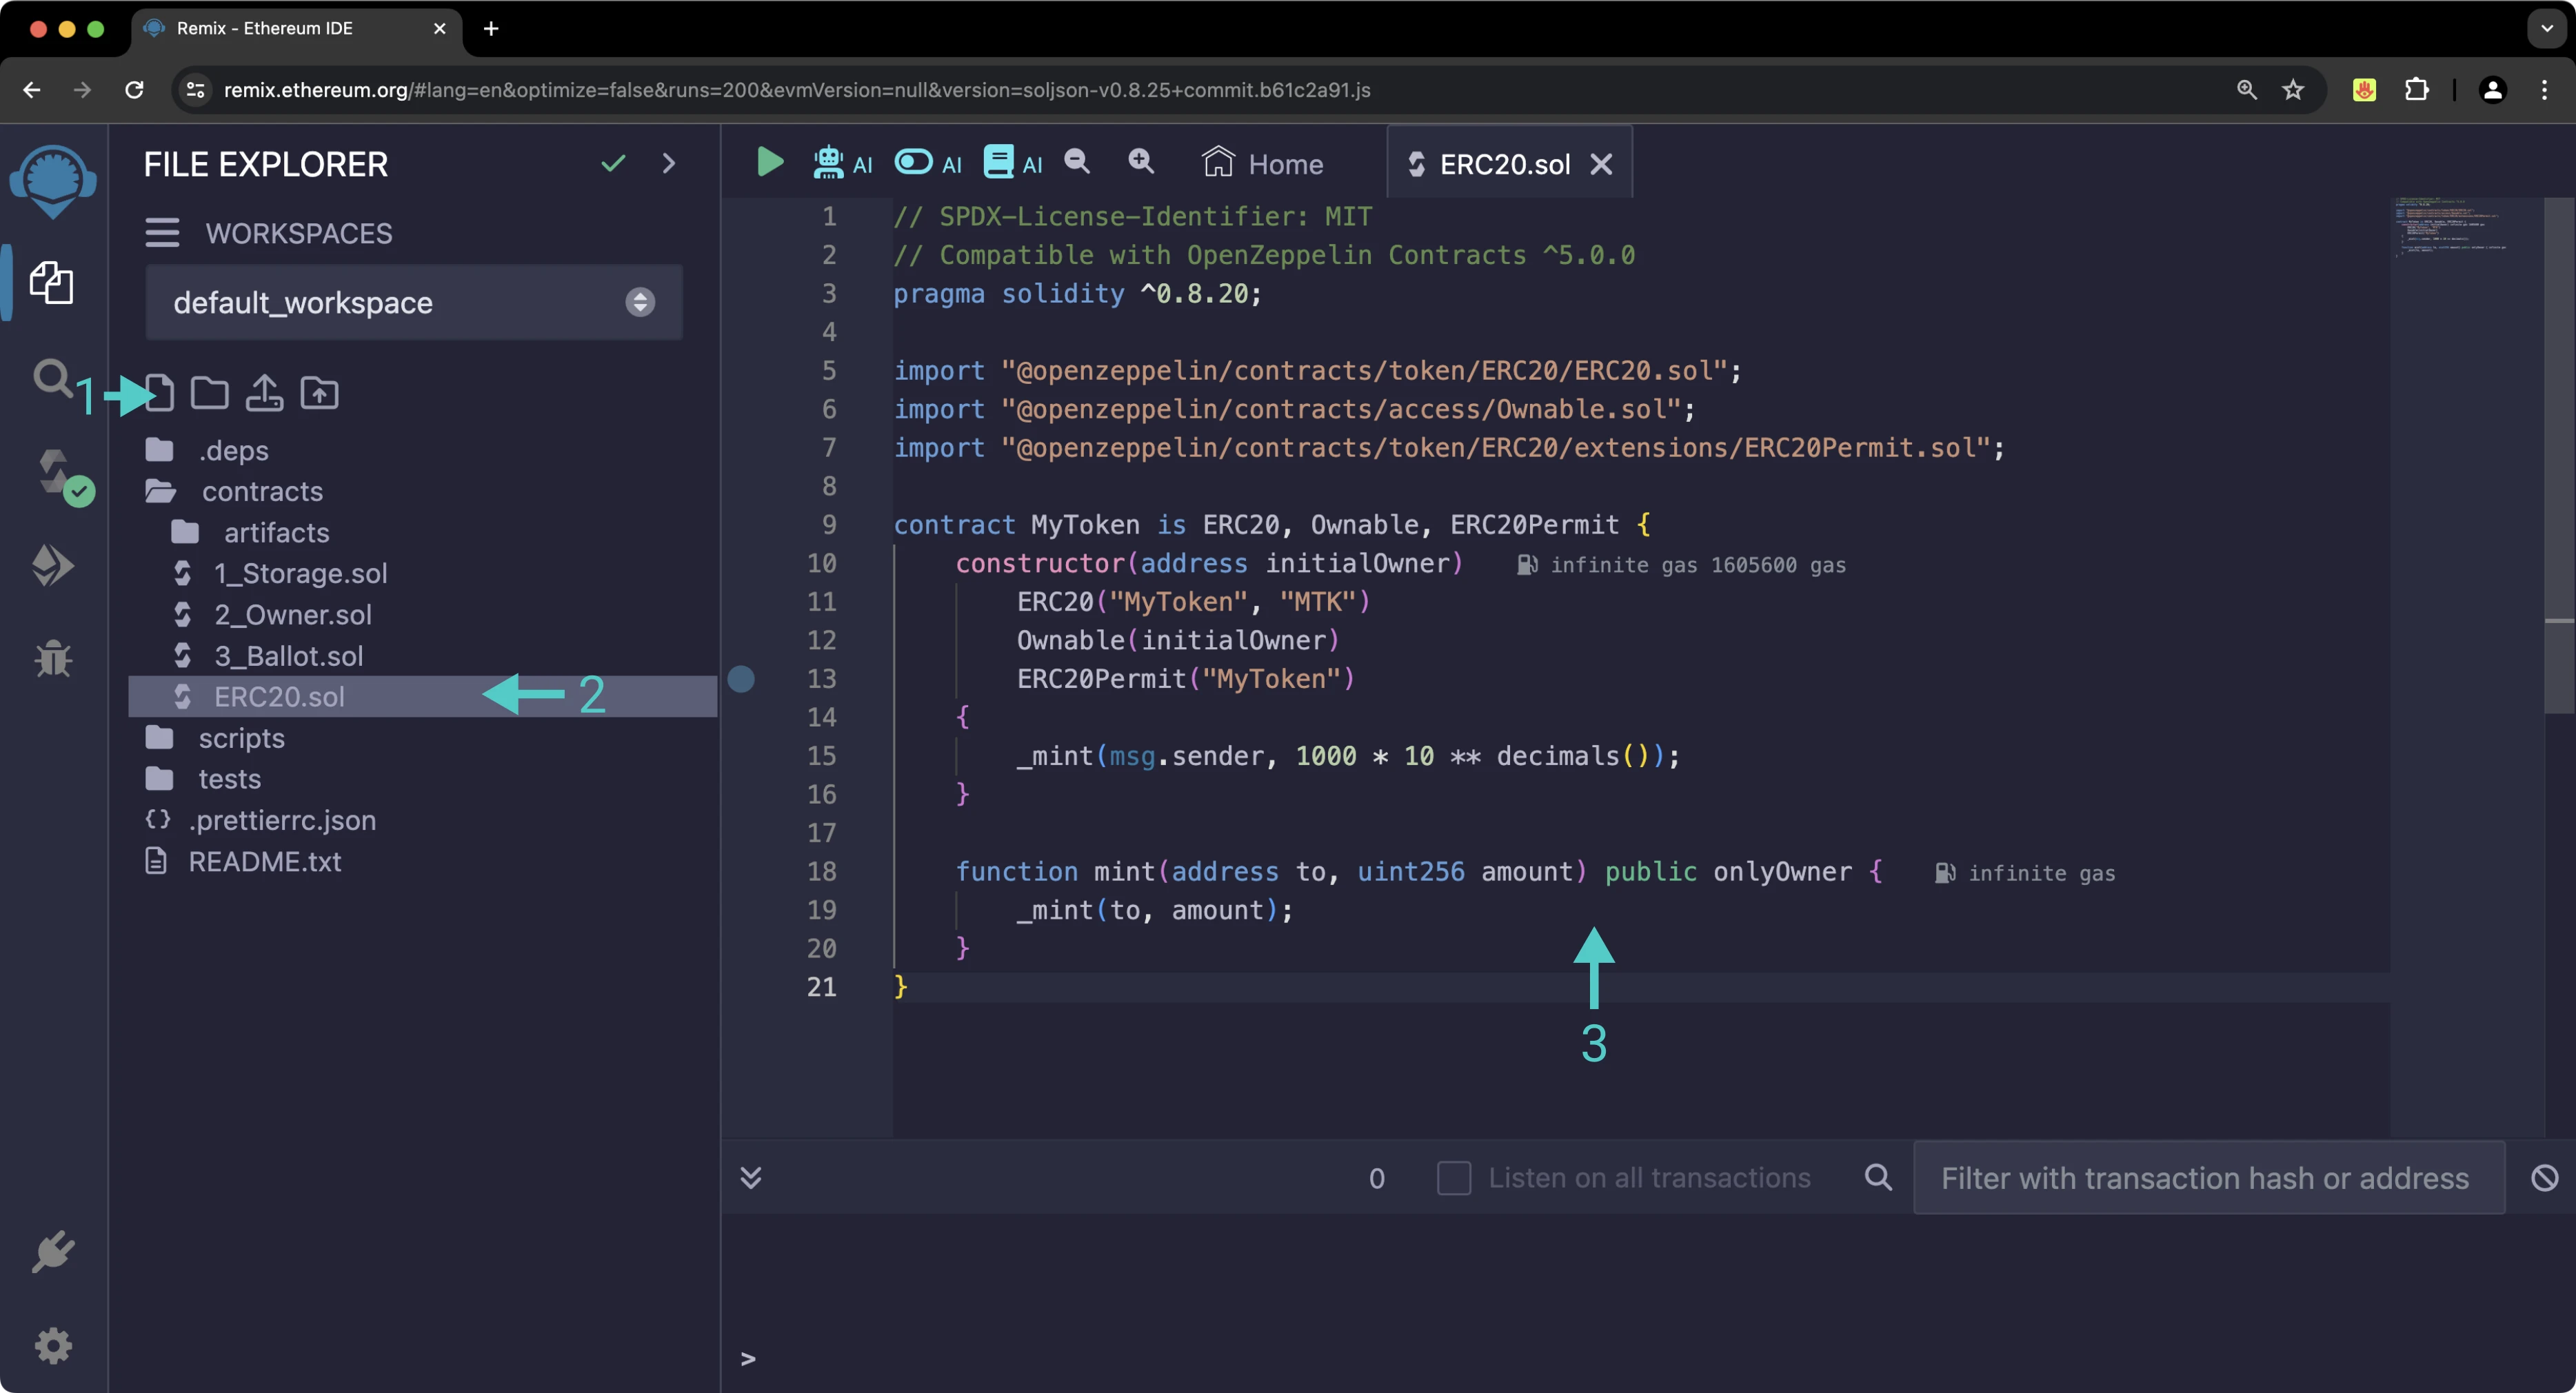
The first step is to go to Remix and take the following steps:
- Click on the Create New File icon and set a file name. For this example, it was set to
ERC20.sol - Make sure the file was created successfully. Click on the file to open it up in the text editor
- Write your smart contract using the file editor. For this example, the following code was used:
// SPDX-License-Identifier: MIT
// Compatible with OpenZeppelin Contracts ^5.0.0
pragma solidity ^0.8.20;

import "@openzeppelin/contracts/token/ERC20/ERC20.sol";
import "@openzeppelin/contracts/access/Ownable.sol";
import "@openzeppelin/contracts/token/ERC20/extensions/ERC20Permit.sol";

contract MyToken is ERC20, Ownable, ERC20Permit {
    constructor(address initialOwner)
        ERC20("MyToken", "MTK")
        Ownable(initialOwner)
        ERC20Permit("MyToken")
    {
        _mint(msg.sender, 1000 * 10 ** decimals());
    }

    function mint(address to, uint256 amount) public onlyOwner {
        _mint(to, amount);
    }
}
This ERC-20 token smart contract was extracted from the Contract Wizard, setting a premint of 1000 tokens and activating the Mintable and Permit features.
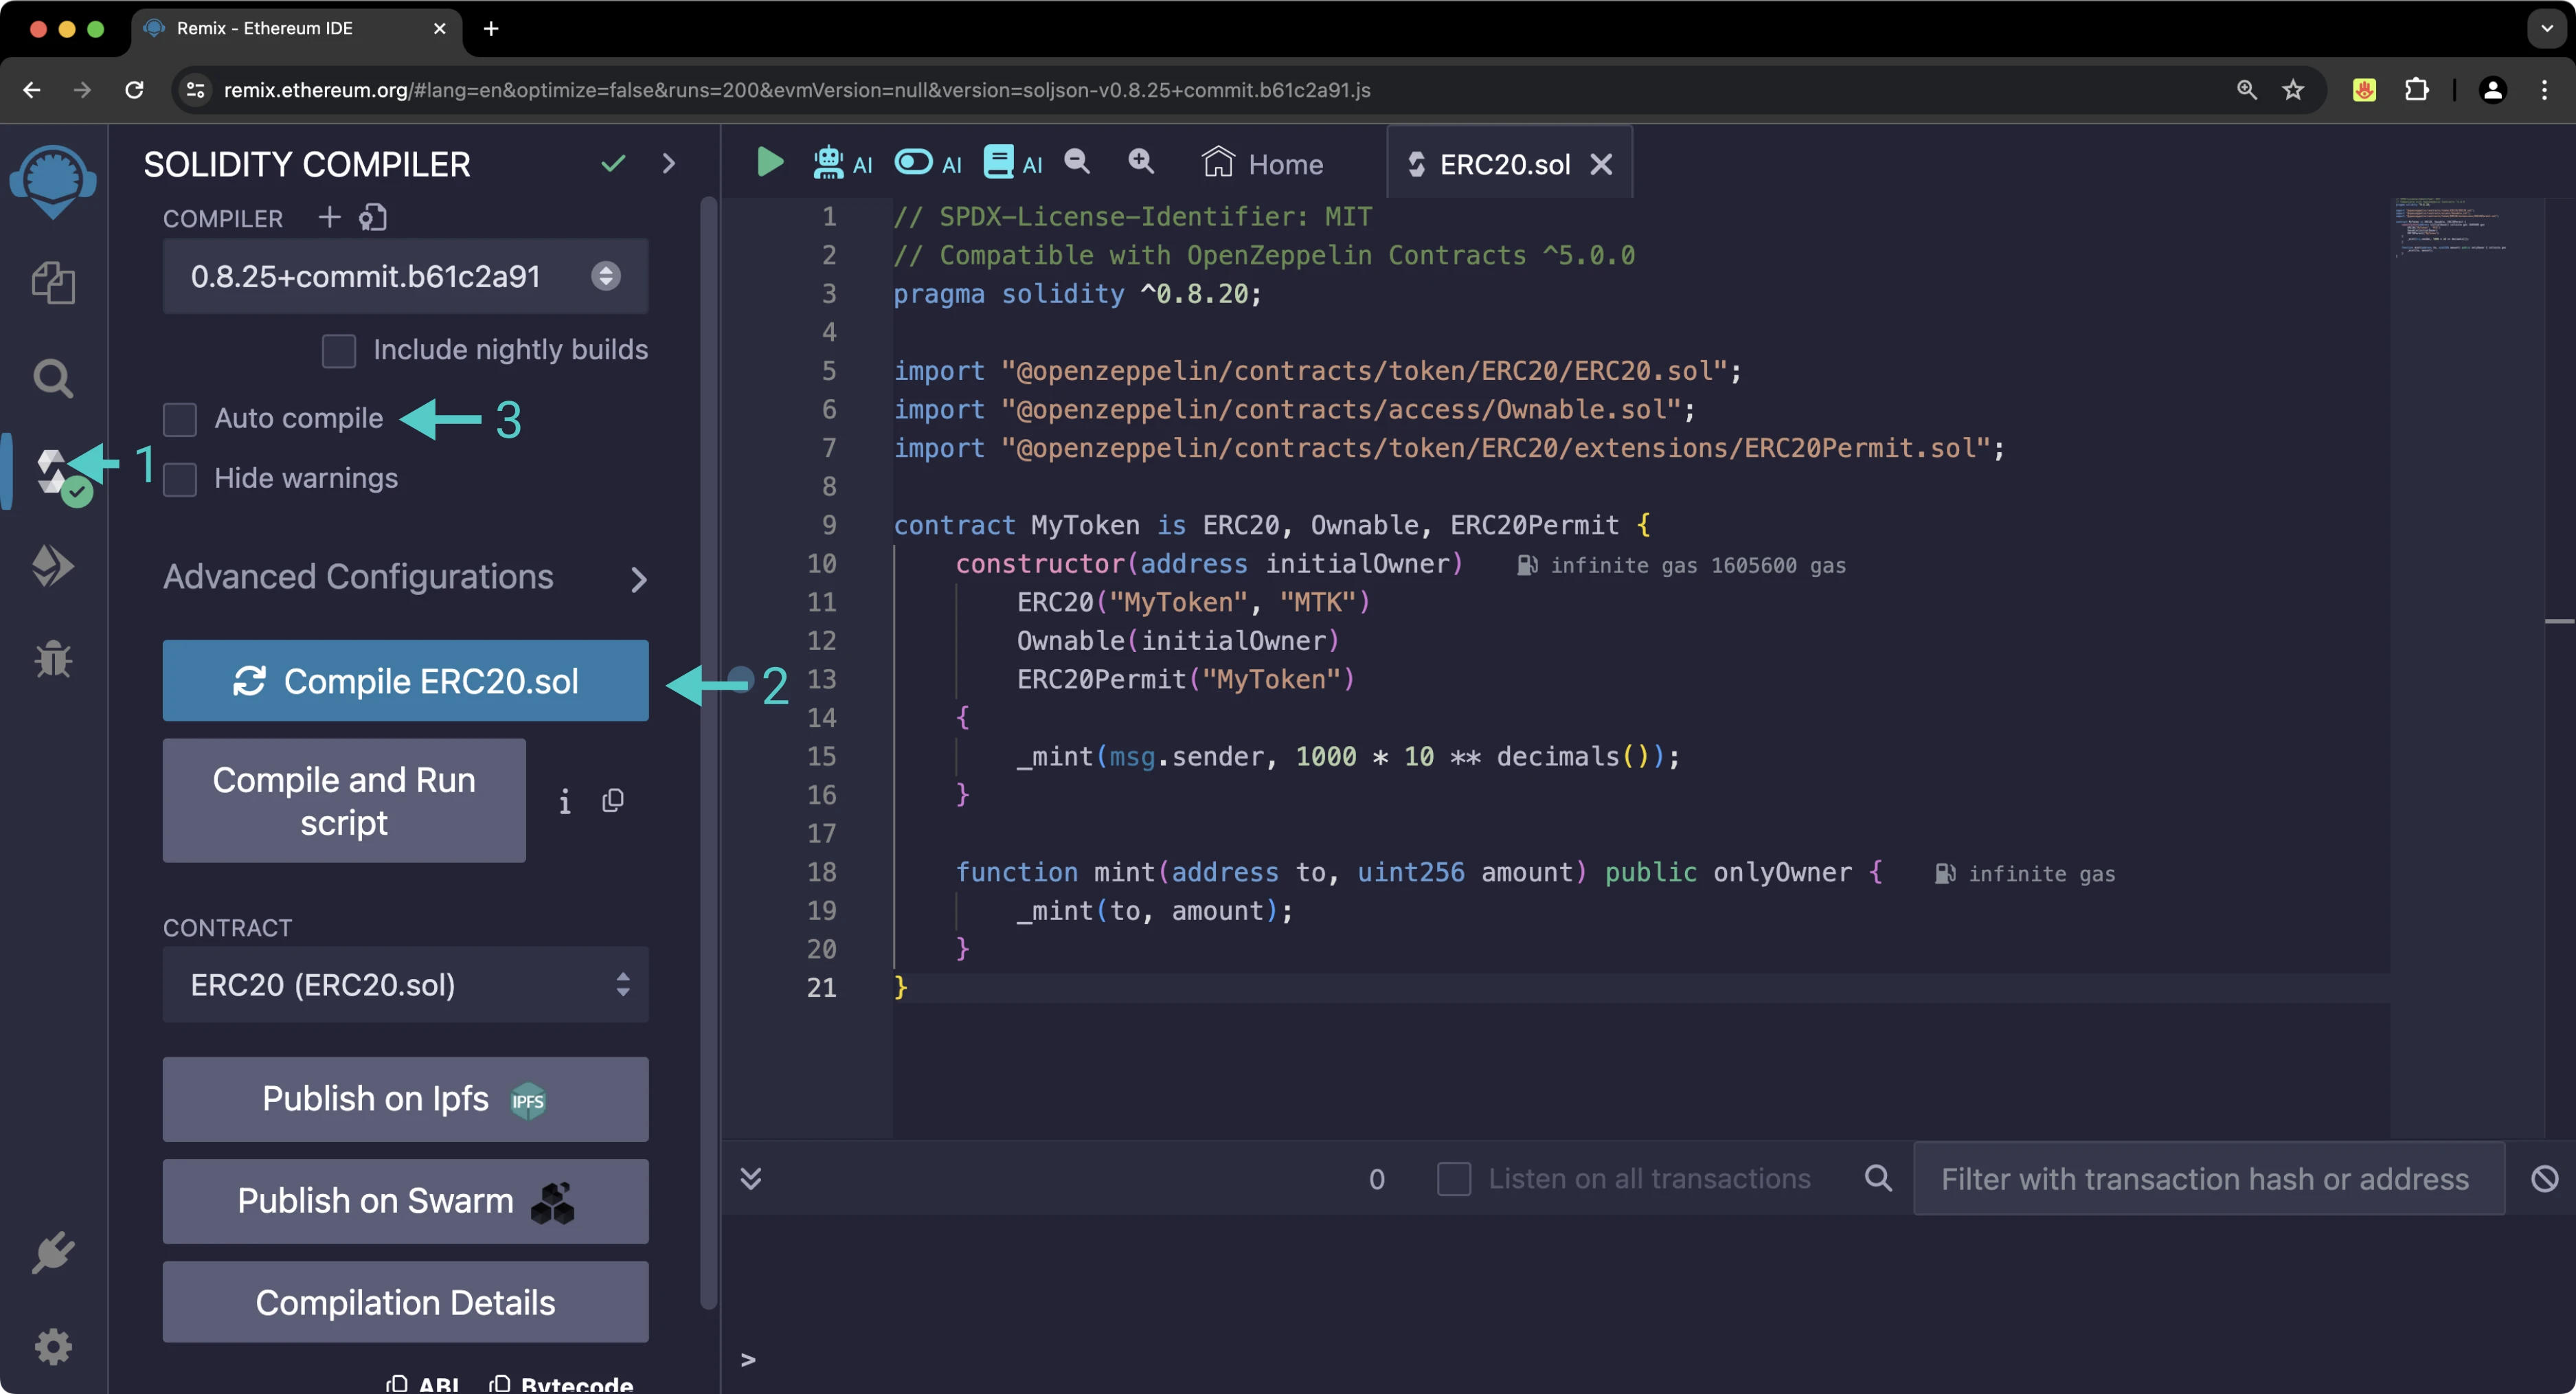
Once your smart contract is written, you can compile it by taking the following steps:
- Head to the Solidity Compiler
- Click on the compile button
- Alternatively, you can check the Auto compile feature
With the contract compiled, you are ready to deploy it taking the following steps:
- Head to the Deploy & Run Transactions tab
- Change the environment to Injected Provider. This will use MetaMask's injected provider. Consequently, the contract will be deployed to whatever network MetaMask is connected to. MetaMask might show a pop-up outlining that Remix is trying to connect to your wallet
- Select the proper contract to deploy. In this example, it is the
MyTokencontract inside theERC20.solfile - Enter the address of the initial owner and click on the Deploy button. Review the transaction information in MetaMask and confirm it
- After a few seconds, the transaction should get confirmed, and you should see your contract under Deployed Contracts
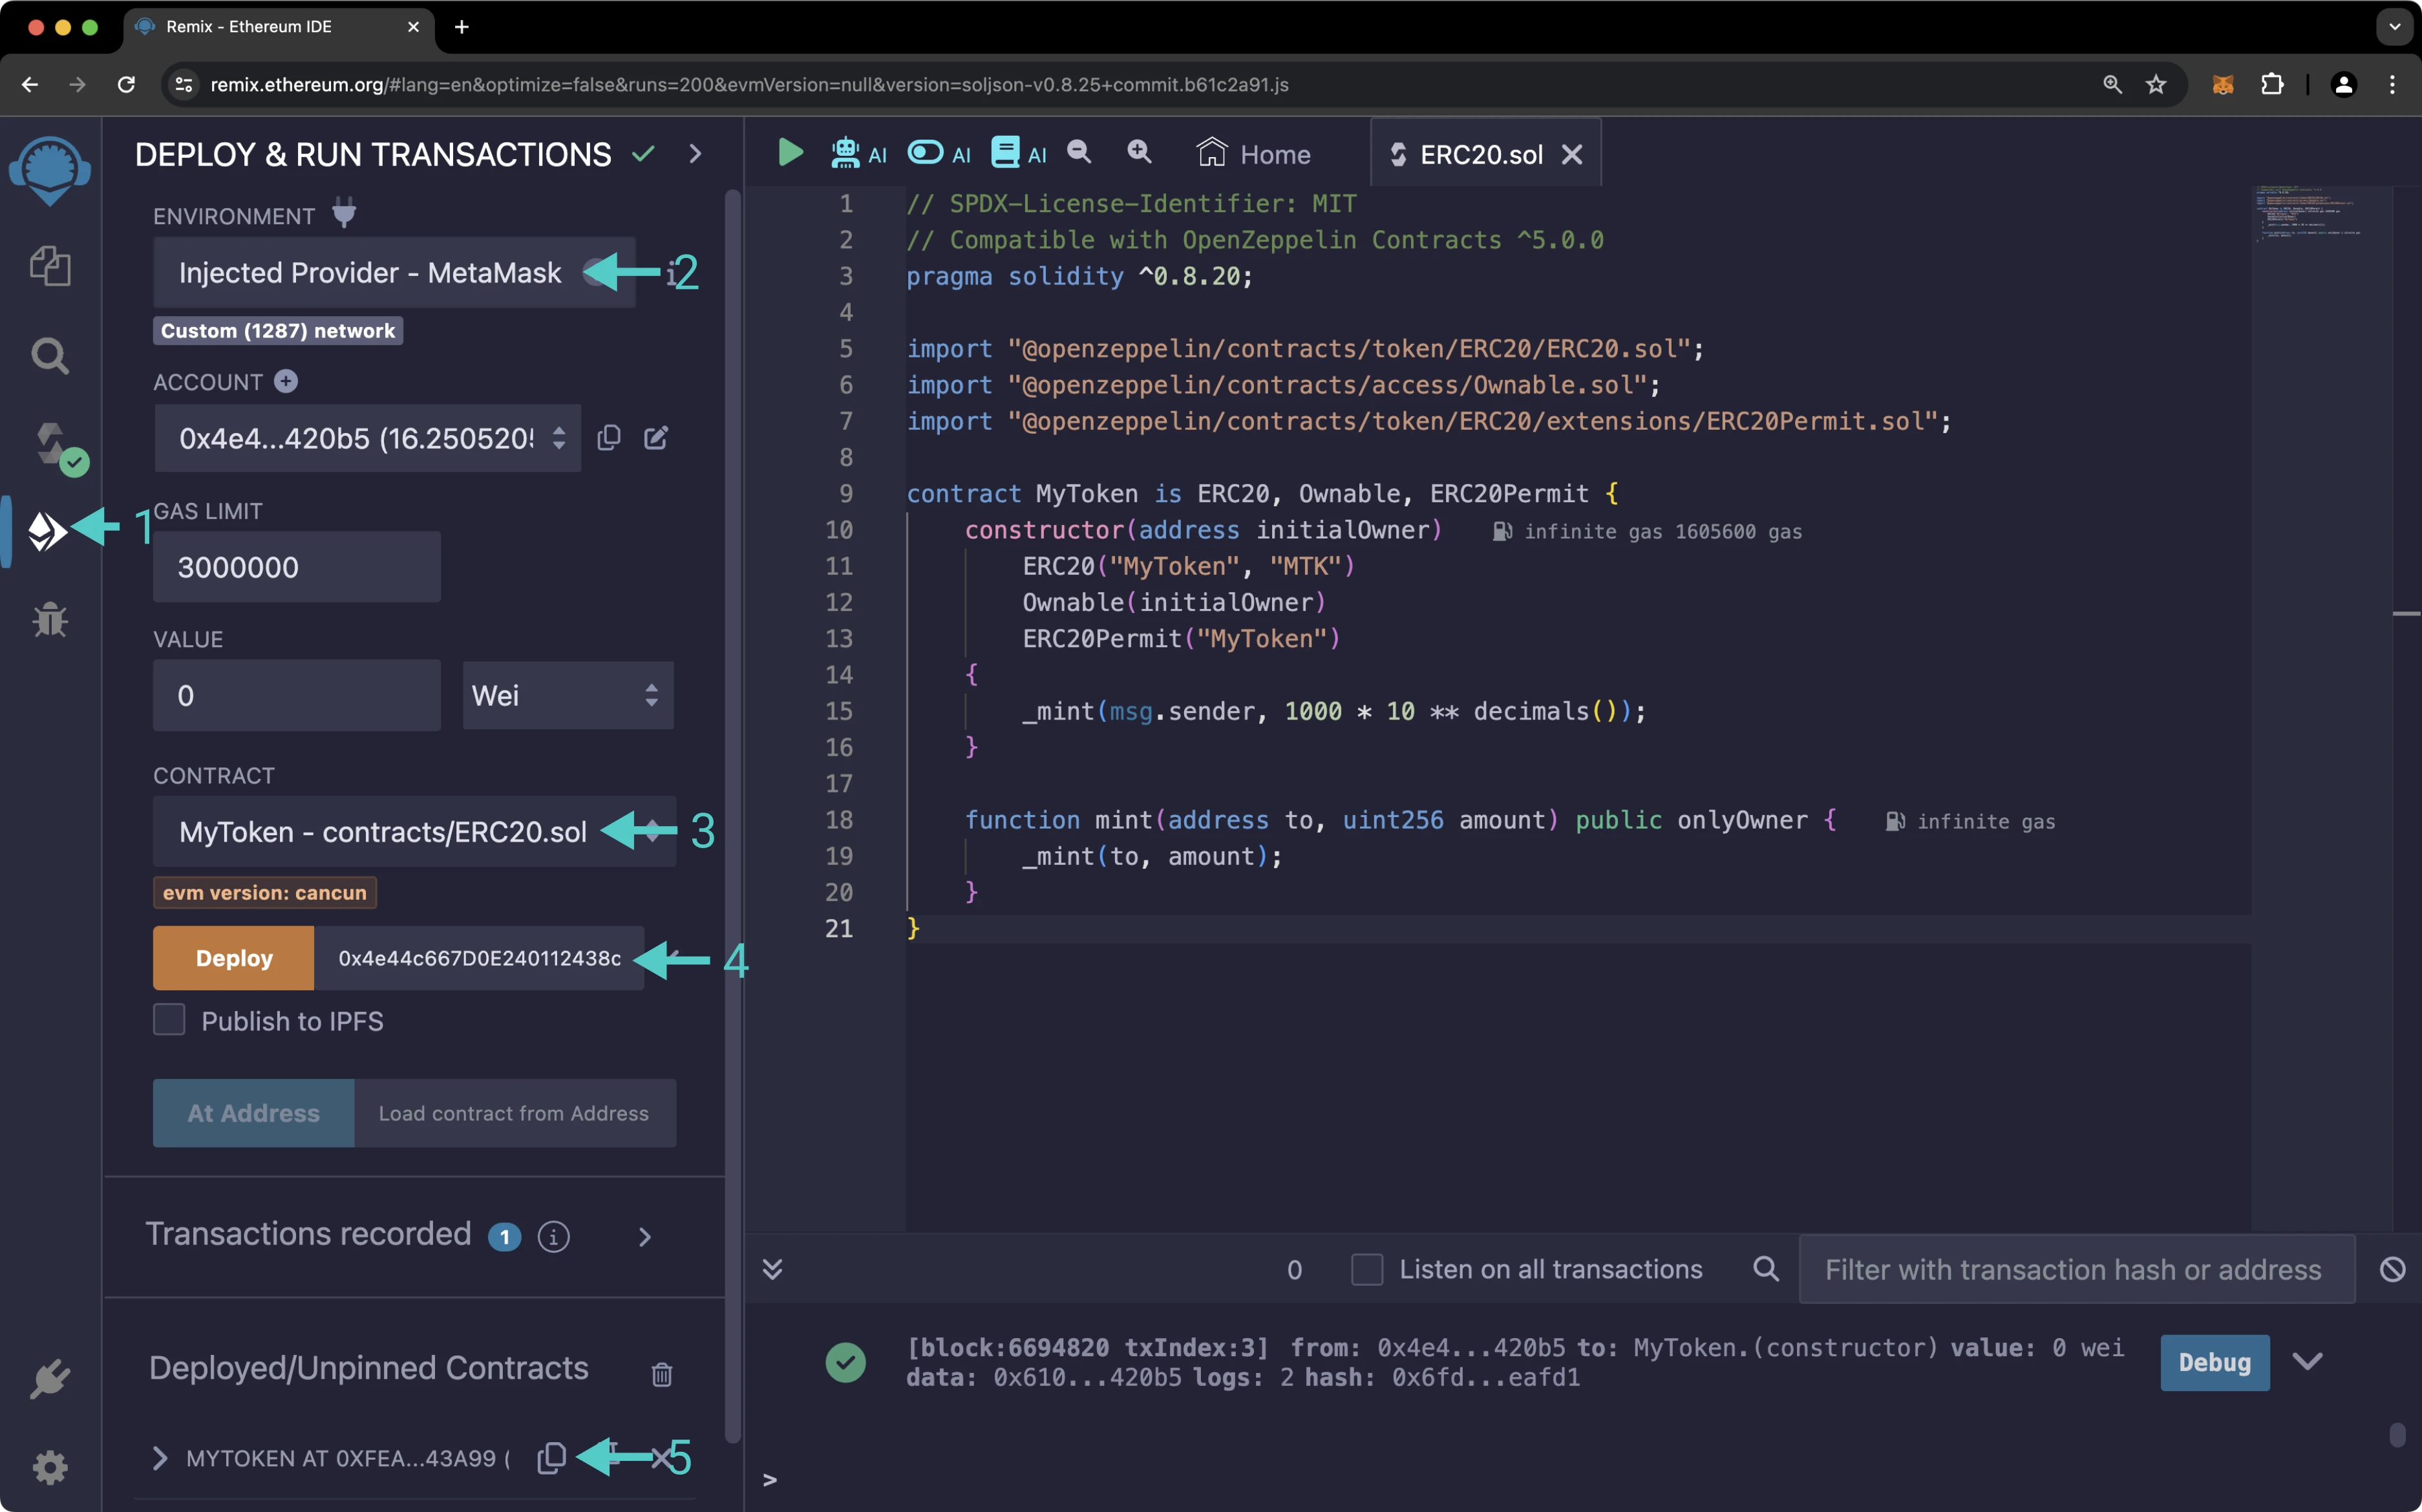
And that is it! You've deployed an ERC-20 token contract using OpenZeppelin's contracts and libraries. Next, you can interact with your token contract via Remix, or add it to MetaMask.
Deploying an ERC-721 Token
For this example, an ERC-721 token will be deployed to Moonbase Alpha. The final code used combines different contracts from OpenZeppelin:
ERC721.sol— ERC-721 token implementation with the optional features from the base interface. Includes the supply mechanism with a_mintfunction but needs to be explicitly called from within the main contractERC721Burnable.sol— extension to allow tokens to be destroyed by their owners (or approved addresses)ERC721Enumerable.sol— extension to allow on-chain enumeration of tokensOwnable.sol— extension to restrict access to certain functions
The mintable ERC-721 OpenZeppelin token contract provides a mint function that can only be called by the owner of the contract. By default, the owner is the contract's deployer address.
As with the ERC-20 contract, the first step is to go to Remix and create a new file. For this example, the file name will be ERC721.sol.
Next, you'll need to write the smart contract and compile it. For this example, the following code is used:
// SPDX-License-Identifier: MIT
// Compatible with OpenZeppelin Contracts ^5.0.0
pragma solidity ^0.8.20;

import "@openzeppelin/contracts/token/ERC721/ERC721.sol";
import "@openzeppelin/contracts/token/ERC721/extensions/ERC721Enumerable.sol";
import "@openzeppelin/contracts/token/ERC721/extensions/ERC721Burnable.sol";
import "@openzeppelin/contracts/access/Ownable.sol";

contract MyToken is ERC721, ERC721Enumerable, ERC721Burnable, Ownable {
    constructor(address initialOwner)
        ERC721("MyToken", "MTK")
        Ownable(initialOwner)
    {}

    function _baseURI() internal pure override returns (string memory) {
        return "Test";
    }

    function safeMint(address to, uint256 tokenId) public onlyOwner {
        _safeMint(to, tokenId);
    }

    // The following functions are overrides required by Solidity
    function _update(address to, uint256 tokenId, address auth)
        internal
        override(ERC721, ERC721Enumerable)
        returns (address)
    {
        return super._update(to, tokenId, auth);
    }

    function _increaseBalance(address account, uint128 value)
        internal
        override(ERC721, ERC721Enumerable)
    {
        super._increaseBalance(account, value);
    }

    function supportsInterface(bytes4 interfaceId)
        public
        view
        override(ERC721, ERC721Enumerable)
        returns (bool)
    {
        return super.supportsInterface(interfaceId);
    }
}
This ERC-721 token smart contract was extracted from the Contract Wizard, setting the Base URI as Test and activating the Mintable, Burnable, and Enumerable features.
With the contract compiled, next you will need to:
- Head to the Deploy & Run Transactions tab
- Change the environment to Injected Provider. This will use MetaMask's injected provider. Consequently, the contract will be deployed to whatever network MetaMask is connected to. MetaMask might show a pop-up outlining that Remix is trying to connect to your wallet
- Select the proper contract to deploy. In this example, it is the
MyTokencontract inside theERC721.solfile - Enter the address of the initial owner and click on the Deploy button. Review the transaction information in MetaMask and confirm it
- After a few seconds, the transaction should get confirmed, and you should see your contract under Deployed Contracts
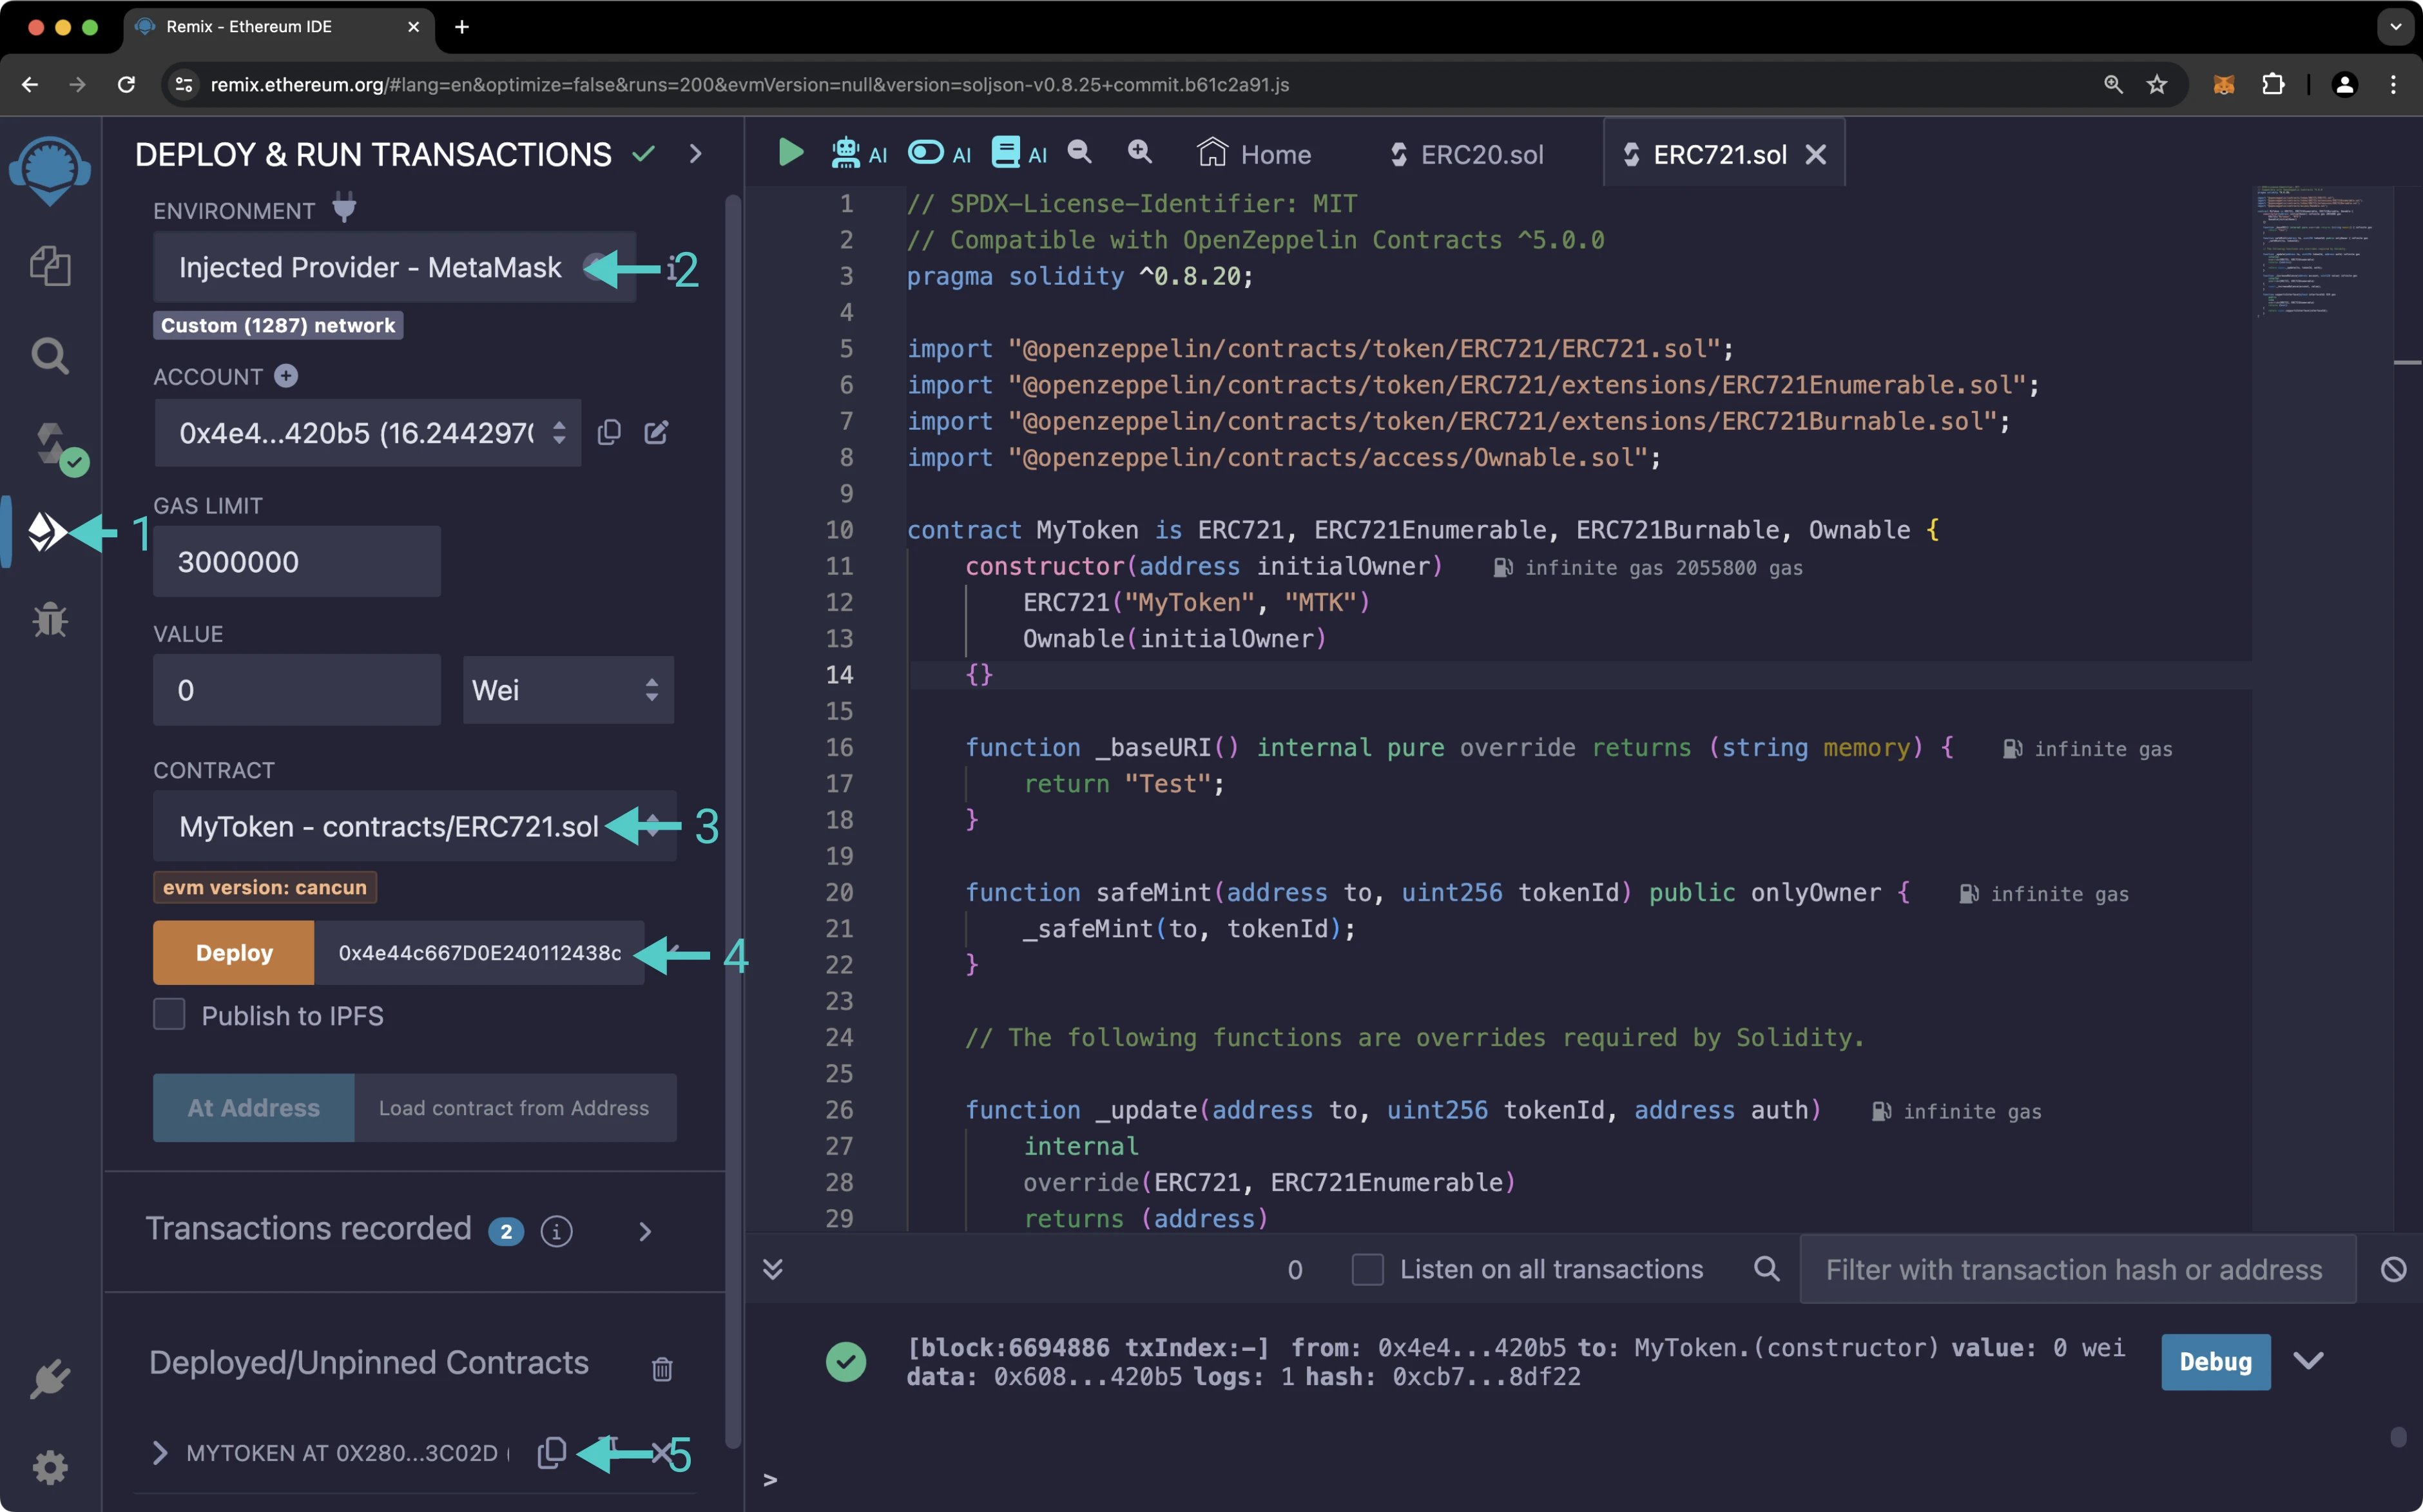
And that is it! You've deployed an ERC-721 token contract using OpenZeppelin's contracts and libraries. Next, you can interact with your token contract via Remix, or add it to MetaMask.
Deploying an ERC-1155 Token
For this example, an ERC-1155 token will be deployed to Moonbase Alpha. The final code used combines different contracts from OpenZeppelin:
ERC1155.sol— ERC-1155 token implementation with the optional features from the base interface. Includes the supply mechanism with a_mintfunction but needs to be explicitly called from within the main contractPausable.sol— extension to allows pausing tokens transfer, mintings and burningsOwnable.sol— extension to restrict access to certain functions
OpenZeppelin's ERC-1155 token contract provides a _mint function that can only be called in the constructor function. Therefore, this example creates 1000 tokens with an ID of 0, and 1 unique token with an ID of 1.
The first step is to go to Remix and create a new file. For this example, the file name will be ERC1155.sol.
As shown for the ERC-20 token, you'll need to write the smart contract and compile it. For this example, the following code is used:
// SPDX-License-Identifier: MIT
// Compatible with OpenZeppelin Contracts ^5.0.0
pragma solidity ^0.8.20;

import "@openzeppelin/contracts/token/ERC1155/ERC1155.sol";
import "@openzeppelin/contracts/access/Ownable.sol";
import "@openzeppelin/contracts/token/ERC1155/extensions/ERC1155Pausable.sol";

contract MyToken is ERC1155, Ownable, ERC1155Pausable {
    constructor() ERC1155("") Ownable() {
        _mint(msg.sender, 0, 1000 * 10 ** 18, "");
        _mint(msg.sender, 1, 1, "");
    }

    function setURI(string memory newuri) public onlyOwner {
        _setURI(newuri);
    }

    function pause() public onlyOwner {
        _pause();
    }

    function unpause() public onlyOwner {
        _unpause();
    }

    // The following function is an override required by Solidity
    function _update(address from, address to, uint256[] memory ids, uint256[] memory values)
        internal
        override(ERC1155, ERC1155Pausable)
    {
        super._update(from, to, ids, values);
    }
}
This ERC-1155 token smart contract was extracted from the Contract Wizard, setting no Base URI and activating Pausable feature. The constructor function was modified to include the minting of both a fungible and a non-fungible token.
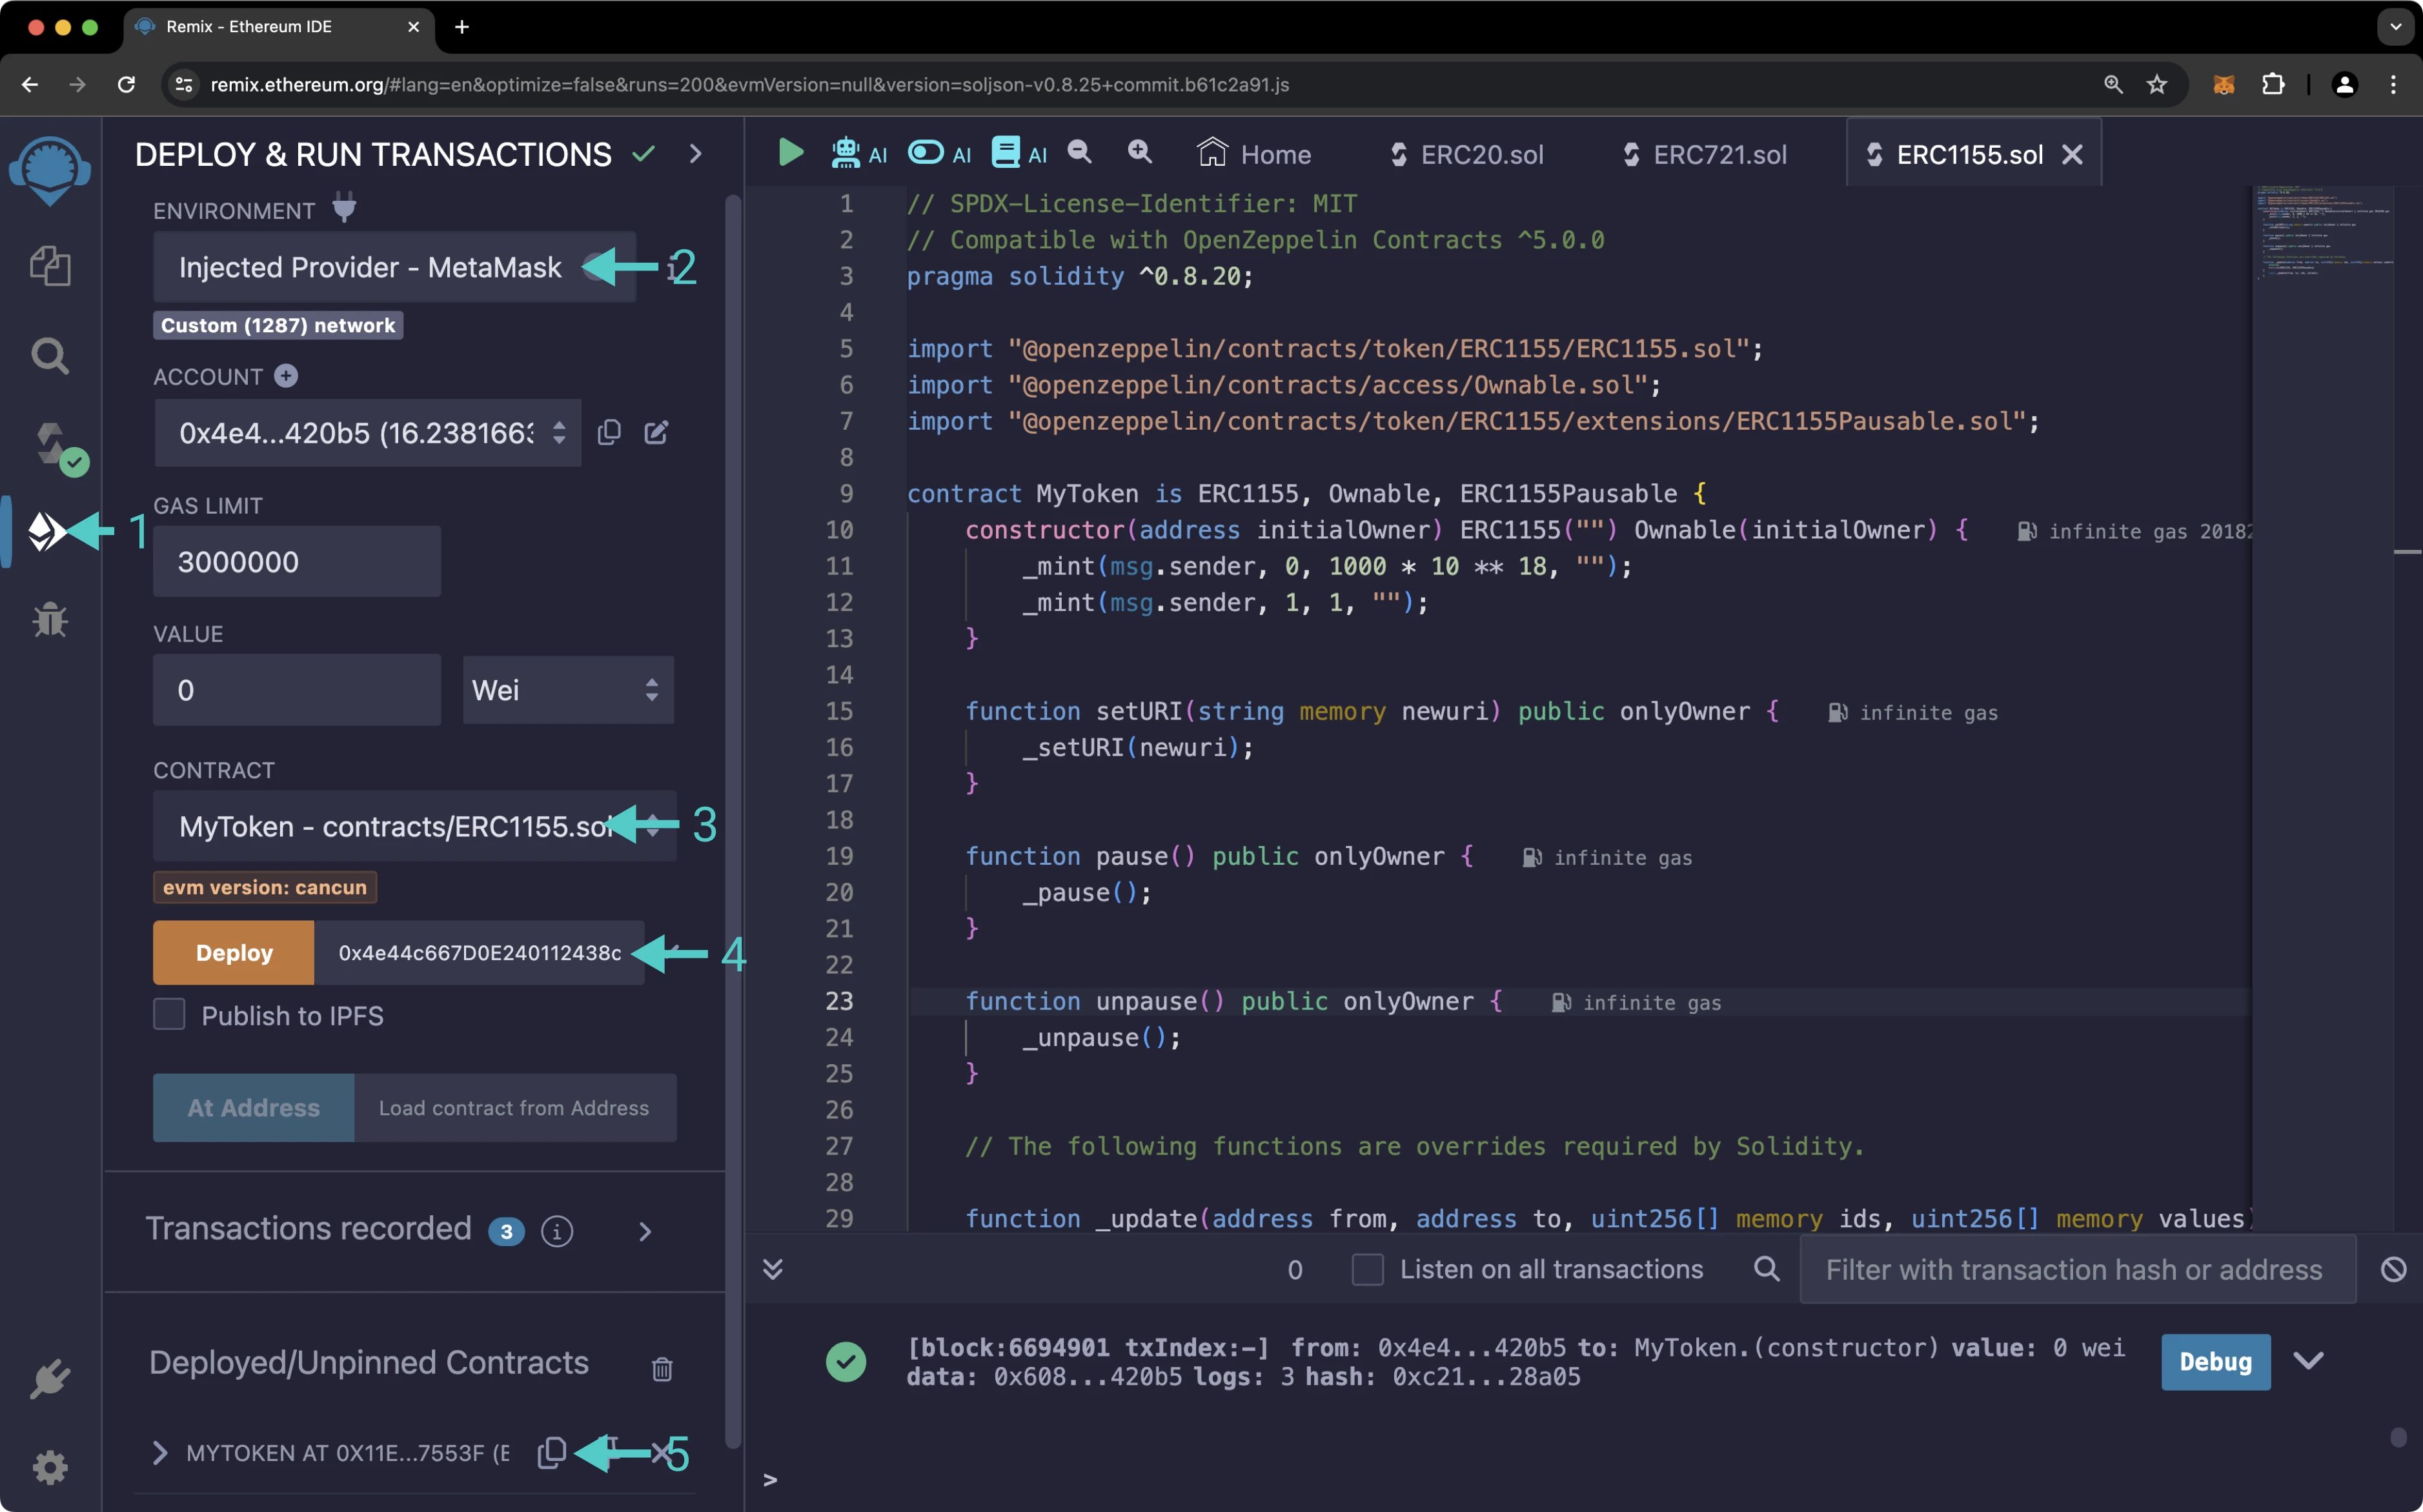
With the contract compiled, next you will need to:
- Head to the Deploy & Run Transactions tab
- Change the environment to Injected Provider. This will use MetaMask's injected provider. Consequently, the contract will be deployed to whatever network MetaMask is connected to. MetaMask might show a pop-up outlining that Remix is trying to connect to your wallet
- Select the proper contract to deploy. In this example, it is the
MyTokencontract inside theERC1155.solfile - Enter the address of the initial owner and click on the Deploy button. Review the transaction information in MetaMask and confirm it
- After a few seconds, the transaction should get confirmed, and you should see your contract under Deployed Contracts
And that is it! You've deployed an ERC-1155 token contract using OpenZeppelin's contracts and libraries. Next, you can interact with your token contract via Remix.
| Created: April 30, 2021