Integrate WalletConnect into a DApp
Introduction
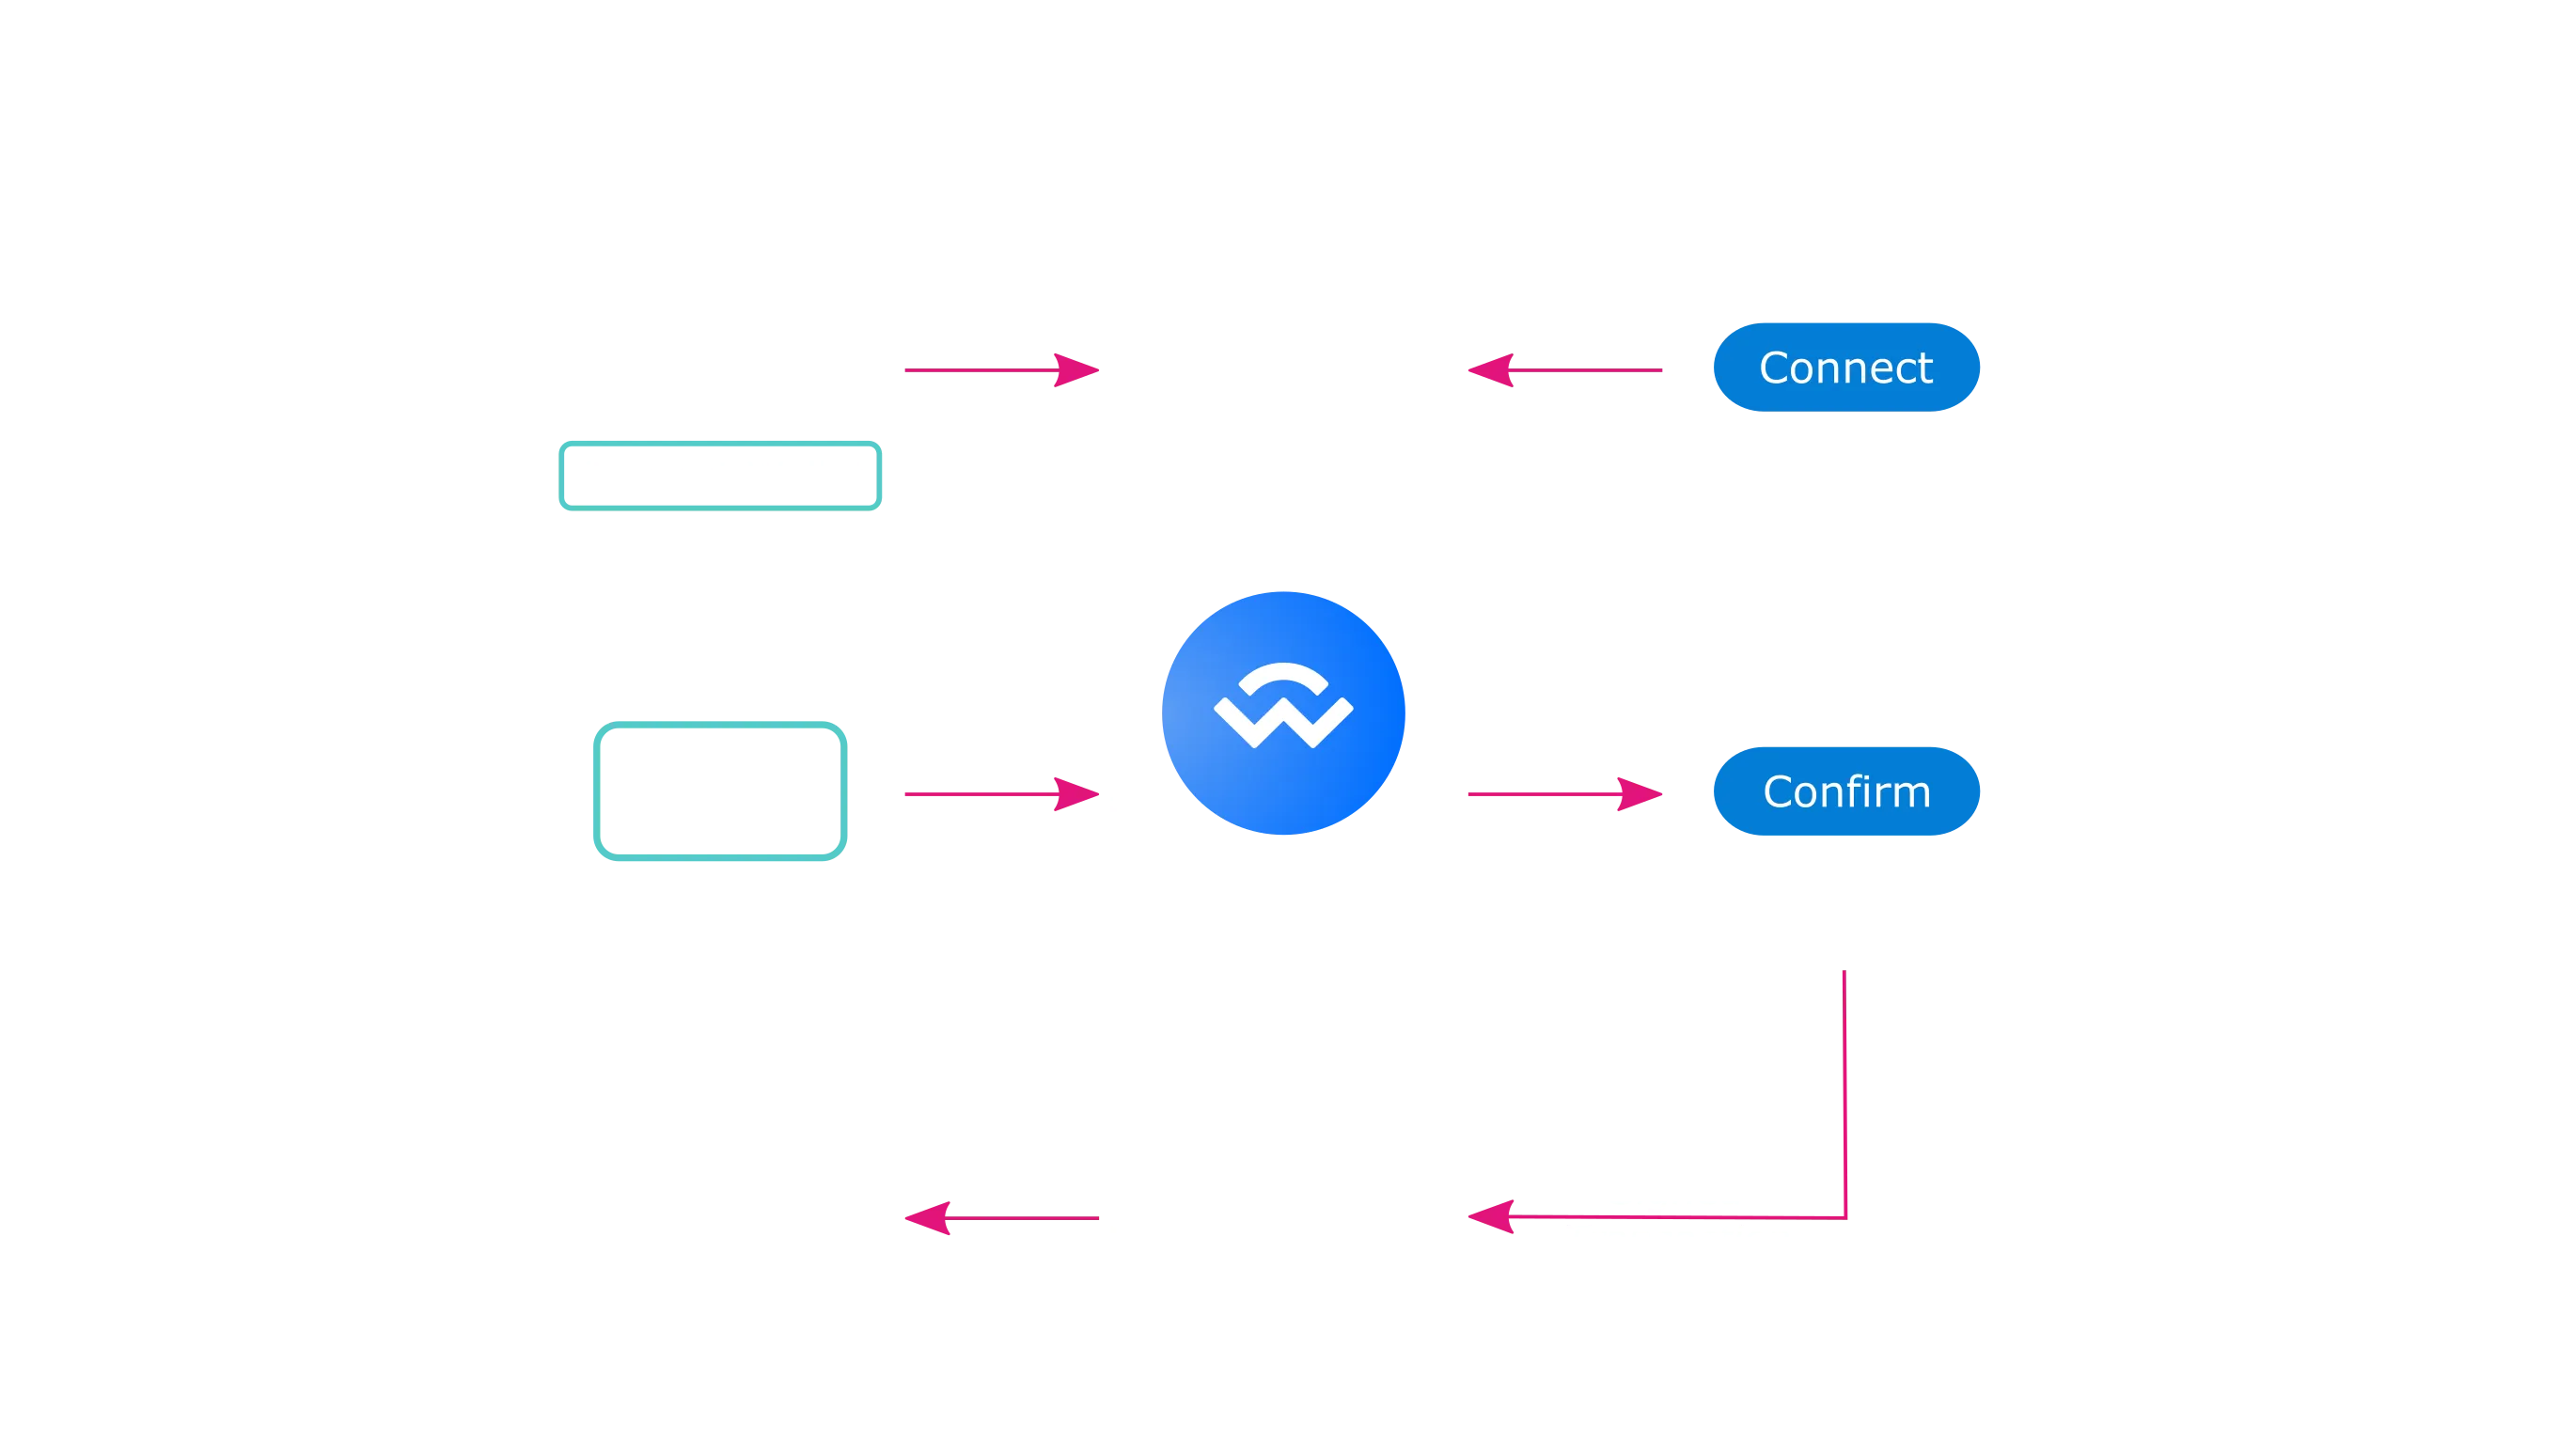
WalletConnect is an open protocol to communicate securely between wallets and DApps.
WalletConnect establishes a remote connection between a DApp and mobile wallet by using a bridge server to relay payloads. The connection is initiated via a QR code displayed in a DApp, which will need to be scanned and approved by a mobile wallet. When a connection is established, the payloads between the DApp and wallet are encrypted through a shared key.
WalletConnect can also be used to establish a connection between a DApp and a desktop wallet. However, this guide will only cover a mobile wallet connection.
In this guide, you'll learn how to integrate WalletConnect into a simple DApp built on the Moonbase Alpha TestNet. The guide will be divided into a few different sections. The first section will cover connecting your DApp to MetaMask mobile. After the connection has been established, the guide will cover disconnections. This way, when you are testing your DApp you will be able to connect and then disconnect so you don't end up with a bunch of unnecessary WalletConnect sessions lingering in MetaMask mobile. Afterwards you will learn how to display network and account details when connected, and send transactions from your DApp to MetaMask mobile for confirmation.
This guide is an adaptation of the WalletConnect Example Dapp (source code). To view the end result, you can check out the Moonbeam WalletConnect Demo app (source code).
Quick Start
If you already have a DApp with WalletConnect support, and just want to add Moonbeam support, you can use the following network configurations:
{
  name: "Moonbeam",
  short_name: "moonbeam",
  chain: "Moonbeam",
  network: "mainnet",
  chain_id: 1284,
  network_id: 1284,
  rpc_url: "https://rpc.api.moonbeam.network",
  native_currency: {
    symbol: "GLMR",
    name: "Glimmer",
    decimals: "18",
    contractAddress: "",
    balance: "",
  },
},
{
  name: "Moonriver",
  short_name: "moonriver",
  chain: "Moonriver",
  network: "mainnet",
  chain_id: 1285,
  network_id: 1285,
  rpc_url: "https://rpc.api.moonriver.moonbeam.network",
  native_currency: {
    symbol: "MOVR",
    name: "Moonriver",
    decimals: "18",
    contractAddress: "",
    balance: "",
  },
},
{
  name: "Moonbase Alpha",
  short_name: "moonbase",
  chain: "Moonbase",
  network: "testnet",
  chain_id: 1287,
  network_id: 1287,
  rpc_url: "https://rpc.api.moonbase.moonbeam.network",
  native_currency: {
    symbol: "DEV",
    name: "DEV",
    decimals: "18",
    contractAddress: "",
    balance: "",
  },
},
Checking Prerequisites
Throughout this guide, you'll use a simple front-end DApp built with React to connect to a mobile wallet via WalletConnect. So you will need a React project and the MetaMask mobile app installed for testing purposes. A template has been created that includes the required packages, some basic styling, and placeholders where logic and UI elements will need to be added. However, if you would to use your own DApp, you'll need to install the following required dependencies:
npm install ethers @walletconnect/client @walletconnect/qrcode-modal
This guide will use MetaMask mobile for testing purposes. To install MetaMask mobile, you can go to metamask.io/download/ and switch to either the iOS or Android tab.
Lastly, you will need to have an account funded with DEV tokens, so that you can test out sending a transaction. You can get DEV tokens for testing on Moonbase Alpha once every 24 hours from the Moonbase Alpha Faucet.
Getting Started
To get started quickly with the Moonbeam WalletConnect template, which provides everything you need to dive right in, you'll need to take the following steps:
- Clone the walletconnect-template GitHub repository
- Run
npm installto install the required dependencies - Run
npm startto spin up a local instance of the DApp
To test the WalletConnect connection, you can use the MetaMask mobile app. For the purposes of this guide, you will need to already be connected to the Moonbase Alpha TestNet on the MetaMask mobile app. Later on in the guide, you will learn how to check if the connected network is a supported network, and if not display an error that will suggest users to switch to a network that is supported.
There are a couple of ways you can connect your MetaMask mobile wallet to the Moonbase Alpha TestNet. You can manually add the Moonbase Alpha TestNet configurations from the Networks section of the Settings menu. Or you can also open up the Browser from MetaMask mobile and navigate to docs.moonbeam.network, click on Connect MetaMask at the top of the page, and select Moonbase Alpha from the menu. This will prompt you to automatically add Moonbase Alpha as a custom network and saves you from inputting the network configurations manually.
Connect DApp to MetaMask Mobile
In this section, you will learn how to make a connection between your DApp and MetaMask mobile. WalletConnect establishes a remote connection between a DApp and mobile wallet by using a bridge server to relay payloads. The connection is initiated via a QR code displayed in the DApp, which will need to be scanned and approved by the mobile wallet.
To get started, you can open up the App.js file of the template and the first changes will be made within the connect function. This function will handle the connection logic by creating a new instance of the WalletConnect connector. You'll notice that the setFetching state hook is already in place. This will be used to set the fetching state variable to true while the connection is being established. In general the connect function will:
- Create the WalletConnect Connector and pass in the URL for the bridge server and the WalletConnect QR code modal
- Use the
setConnectorstate hook to update theconnectorstate variable - Check if the connection has been established, and if not create a new session request
const connect = async () => {
  setFetching(true);

  // 1. Create connector
  const connector = new WalletConnect({
    bridge: 'https://bridge.walletconnect.org',
    qrcodeModal: QRCodeModal,
  });

  // 2. Update the connector state
  setConnector(connector);

  // 3. If not connected, create a new session
  if (!connector.connected) {
    await connector.createSession();
  }
};
Now that you have the connect function setup, you can create a Connect Wallet button that will call it onClick. You can replace the {/* buttons and network details will go here */} comment in the template with the following button:
<Button onClick={connect}>Connect Wallet</Button>
To test out the code so far, if you haven't already you can run npm start to spin up a local instance of your DApp. Then click on Connect Wallet. The WalletConnect QR code modal will pop-up.
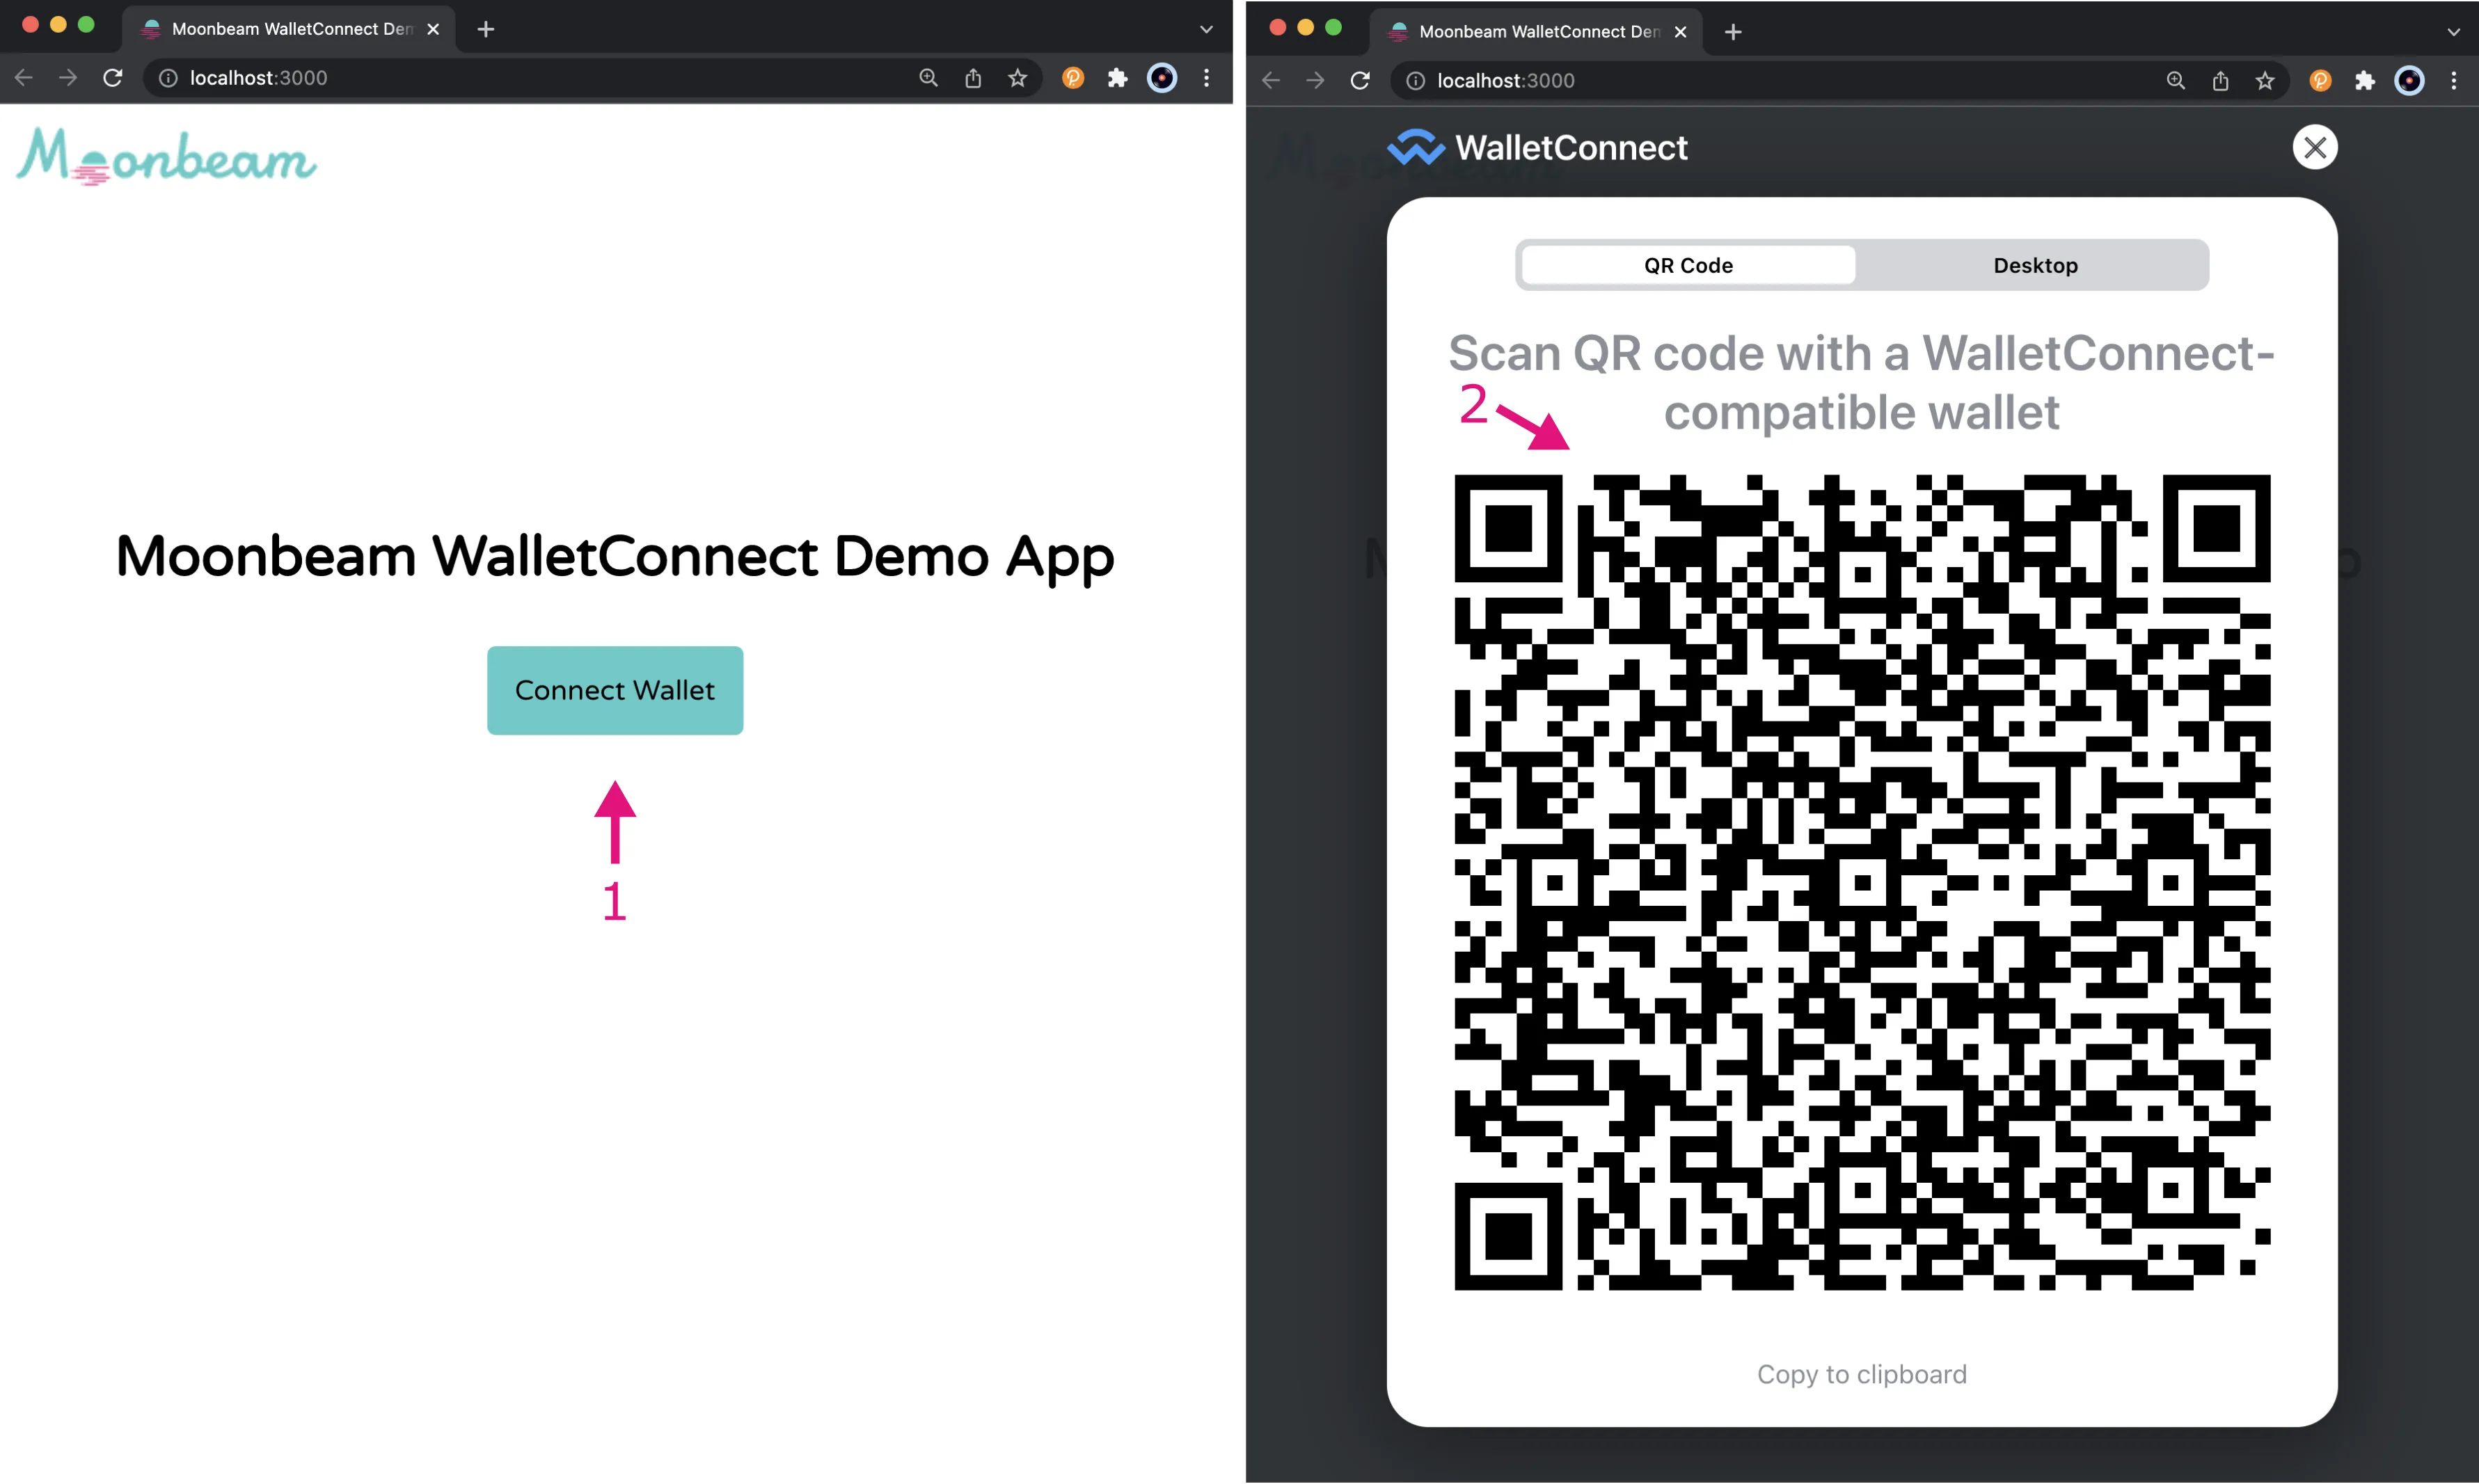
To establish the connection from MetaMask mobile, you can:
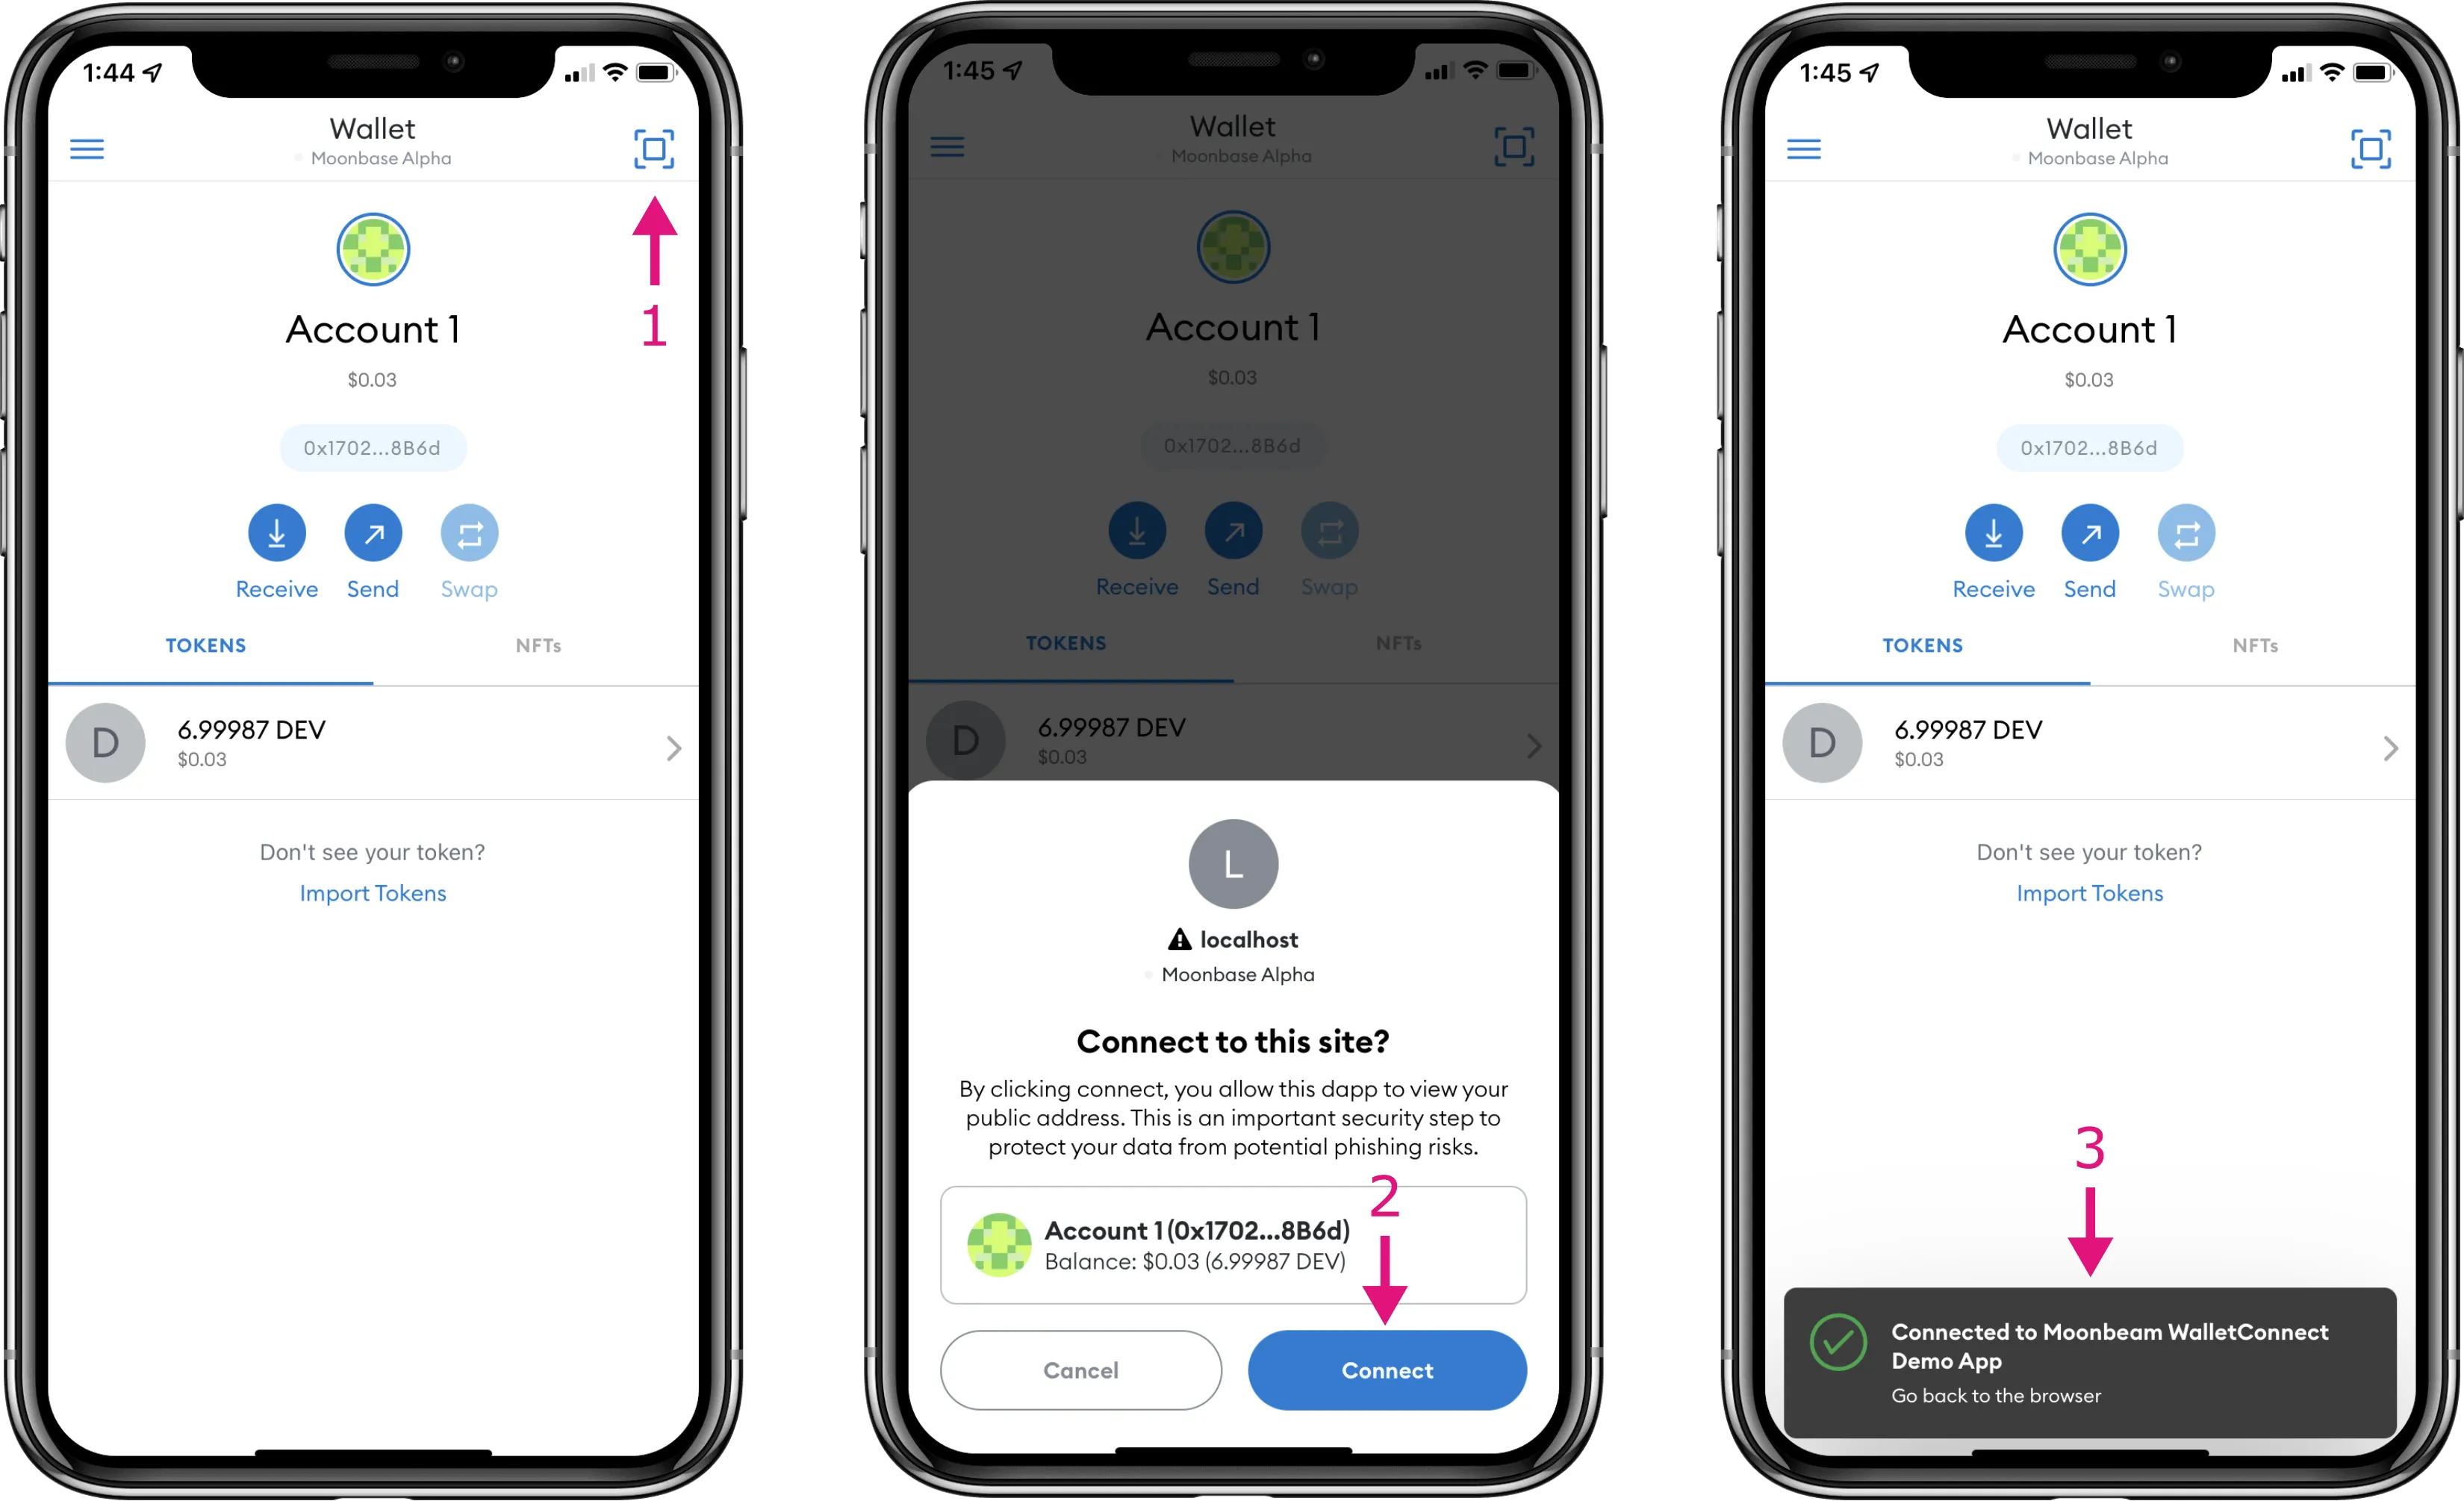
- Click on the scan icon in the top right corner and scan the QR code
- A window will pop-up at the bottom of the screen and prompt you to connect to the DApp. Click Connect
- If you were able to successfully connect, you will see a pop-up in MetaMask that says Connected to Moonbeam WalletConnect Demo App
Currently, your DApp will still show the Connect Wallet button, so the next step will be to display a Disconnect button when connected instead.
Handle Disconnections
When you're developing your DApp and the WalletConnect integration, it is important to handle disconnections so that you can properly test the flow of the integration. You also don't want to end up with a bunch of lingering WalletConnect sessions within MetaMask mobile.
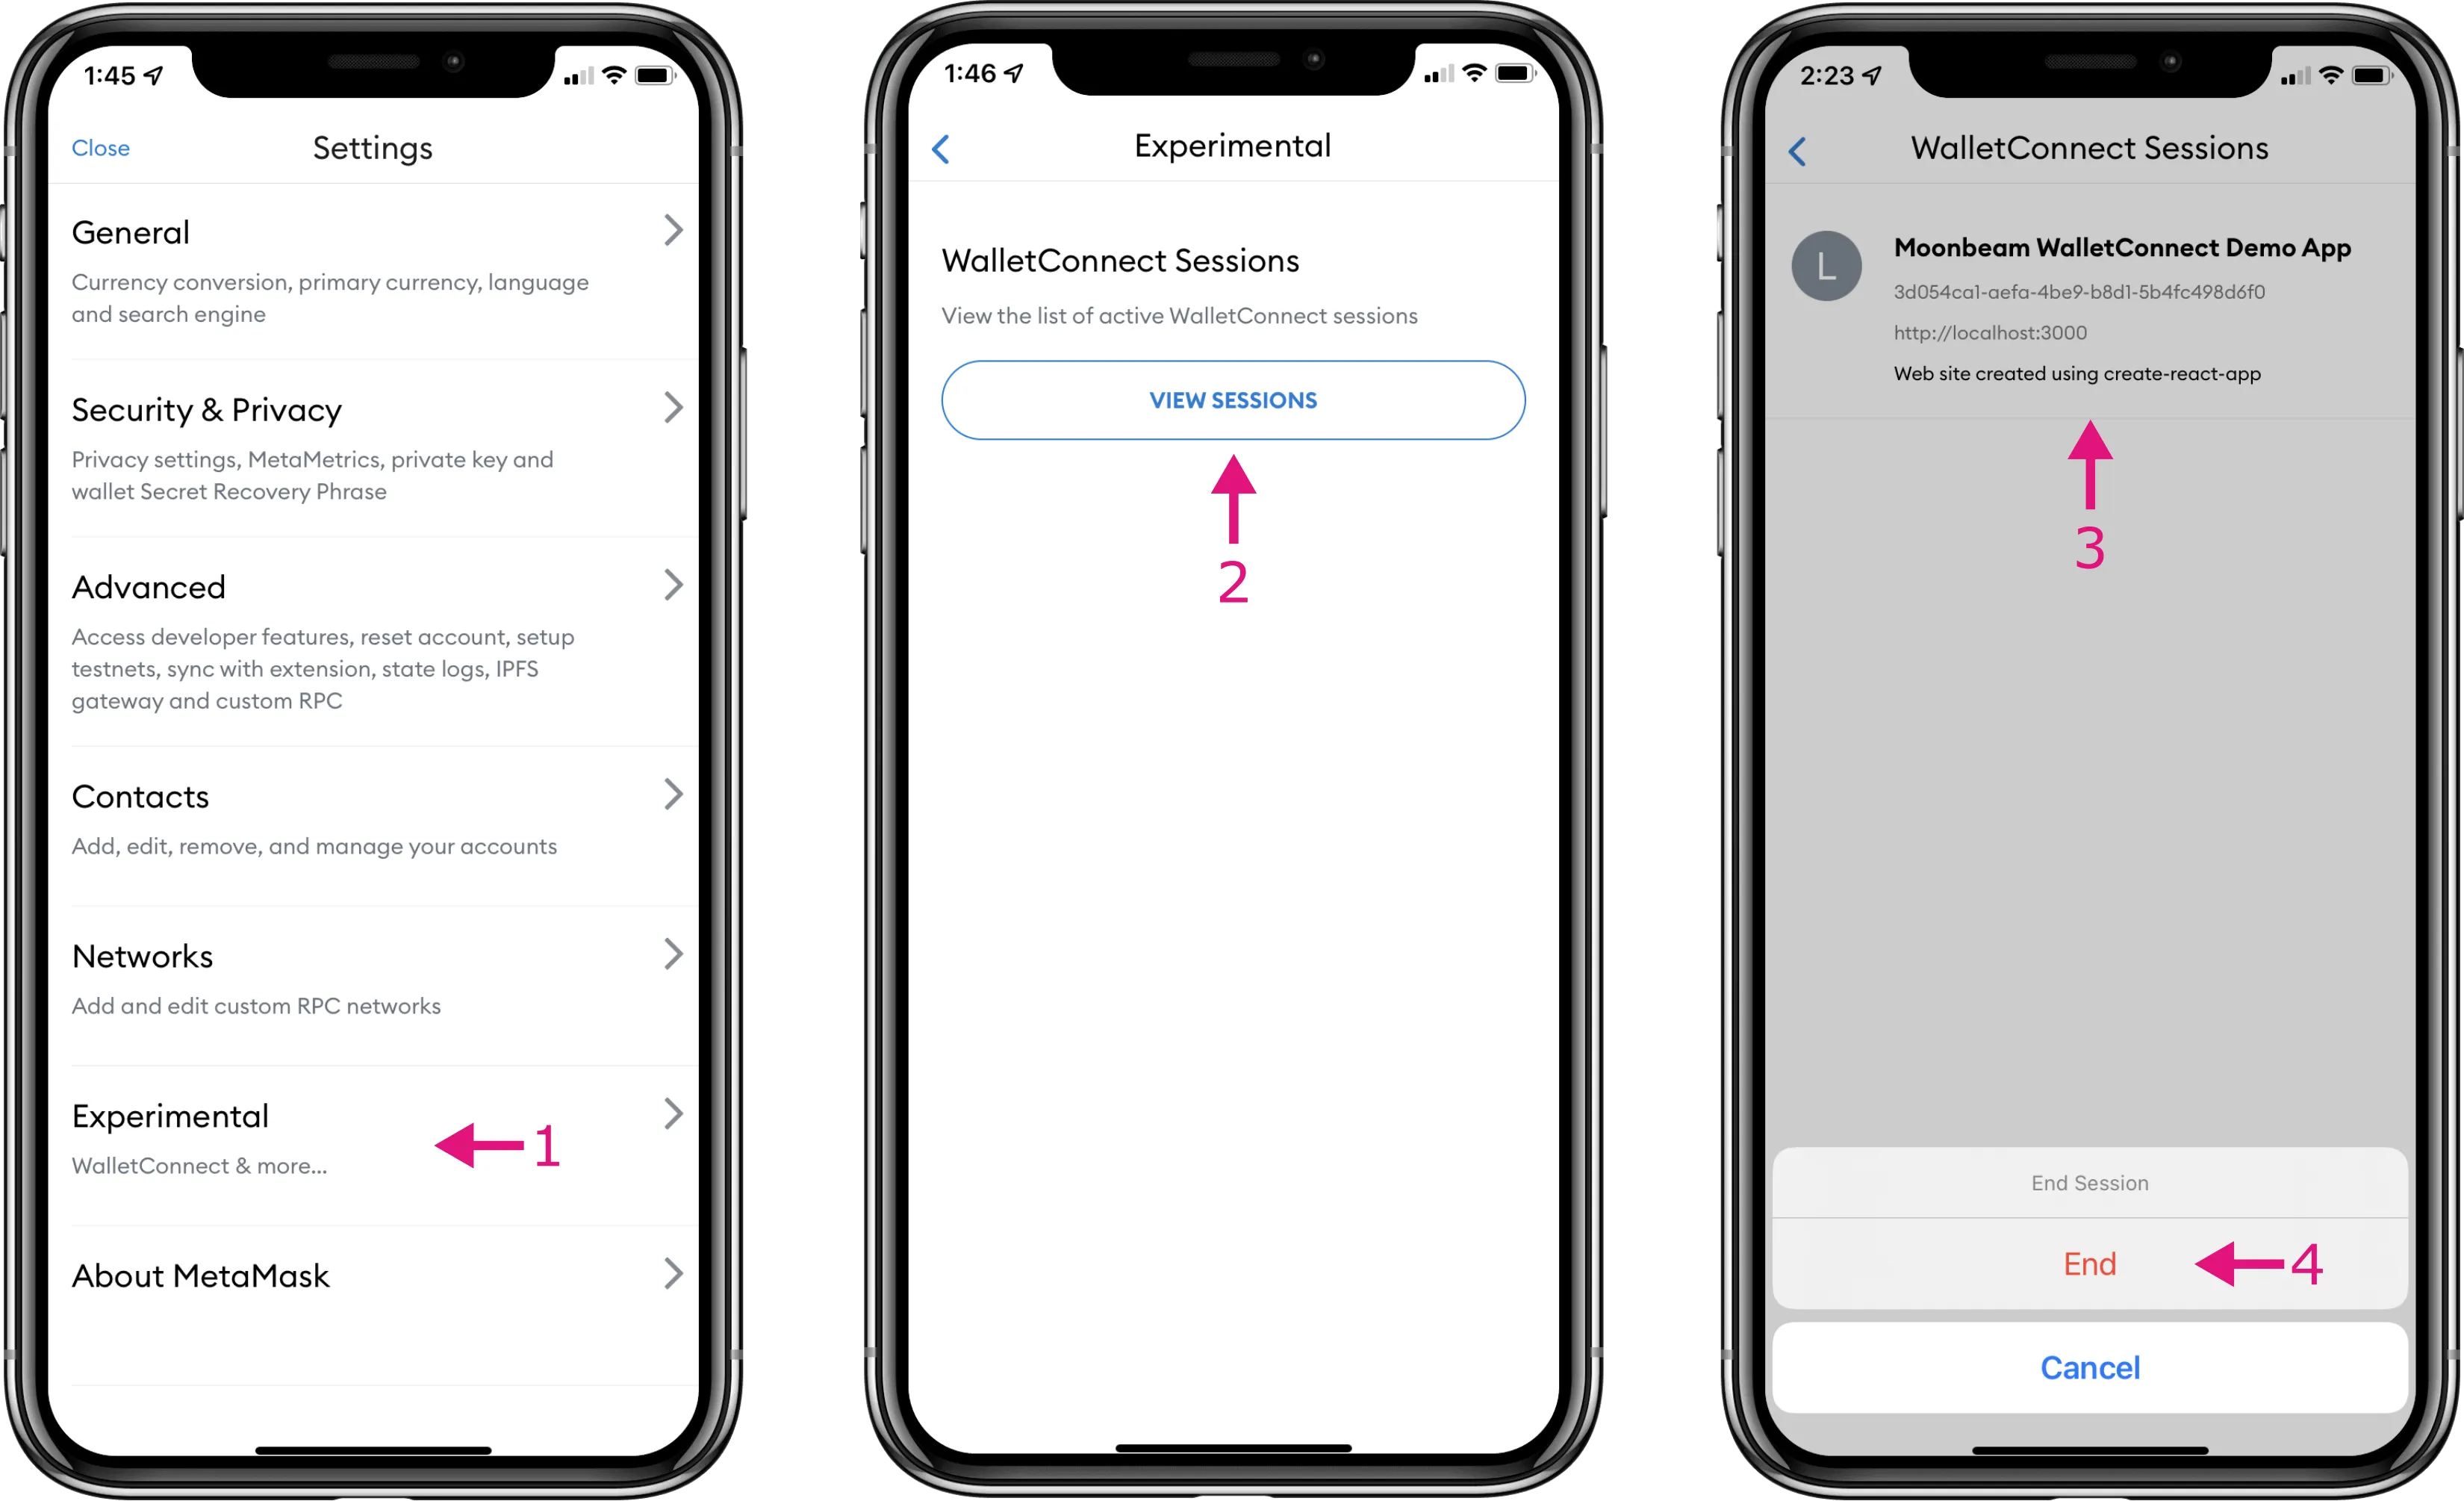
If at any time, you need to manually end a session, you can do so from MetaMask mobile by naivgating to Settings and take the following steps:
- Select Experimental
- Under WalletConnect Sessions, tap on View Sessions
- To remove a specific session, you can hold down on the session
- A pop-up will appear at the bottom of the screen where you can then tap End.
Although this is important for development, this way of disconnecting a session can also be done by a user. The next couple of sections will cover the logic for how to handle disconnections from your DApp and from MetaMask mobile.
Disconnect from DApp
To make it easy for users, your DApp should have a Disconnect button that will end the active session on their mobile wallet. First you can create the logic and then you can create the button.
Upon disconnecting, you will need to reset the state of your DApp back to the initial state. To reset the state, you can create a resetApp function that uses the state hooks.
const resetApp = () => {
  setConnector(null);
  setFetching(false);
};
In addition to resetting the state of the DApp, you will also need to kill the session using the connector and the WalletConnect killSession function. Since all of this functionality should happen when the user clicks on the Disconnect button, you can create a single killSession function to handle the reset and the disconnection.
const killSession = () => {
  // Make sure the connector exists before trying to kill the session
  if (connector) {
    connector.killSession();
  }
  resetApp();
};
Now that you have all of the logic required to handle the disconnection, you will need the Disconnect button that onClick will call the killSession function. Since you only want to display the Disconnect button once a user is connected, you can use conditional renderering. Conditional rendering allows you to check against certain variables and if a condition applies you can render one element or another. In this case, if you are not fetching the initial connection and the connector exists, you can render the Disconnect button, otherwise render the Connect Wallet button. You can replace the existing <Button> with the following:
{
  connector && !fetching ? (
    <OutlinedButton onClick={killSession}>Disconnect</OutlinedButton>
  ) : (
    <Button onClick={connect}>Connect Wallet</Button>
  );
}
If you go to test the disconnection logic and nothing happens when you click Connect Wallet, make sure you have manually ended any preexisting sessions from MetaMask mobile. If you're still running into problems, do a hard refresh on your browser.
Now when a user clicks on Disconnect the DApp will be reset, the connection will be disconnected on the user's mobile wallet, and the Connect Wallet button will be displayed again.
Disconnect from MetaMask Mobile
As previously mentioned, a user can also disconnect and end the session from within their mobile wallet. If this happens, WalletConnect emits a disconnect event that the DApp will need to listen for. Upon receiving the disconnect event, the state will need to be reset back to the initial state. In this scenario, there is no reason to use killSession to end the session on the mobile wallet as the user has already ended the session on their mobile wallet.
You'll notice that in the template, the disconnect event is listened for within the React Effect Hook. The effect hook lets you perform side effects in function components such as fetching data and setting up a subscription.
In the disconnect event callback, you can add the resetApp function so that whenever a disconnect event is emitted, you reset the state of your DApp.
connector.on('disconnect', async (error) => {
  if (error) {
    // Handle errors as you see fit
    console.error(error);
  }
  resetApp();
});
So far you've setup the minimum logic required for connecting and disconnecting your DApp and the MetaMask mobile app. When the connection has been established, a Disconnect button is now displayed. In the next section, you'll expand on what is displayed when connected to include account and network details.
Check Network Support & Display Results
With the basics of connecting and disconnecting out of the way, you can expand on what is displayed in the DApp when a user is connected. The first thing you'll want to do is check if the network they are on is supported and if not display a message that requests them to switch the network.
The template comes with a list of supported networks, you can find it under src/helpers/networks.js. For the purposes of this guide, Moonbase Alpha is the only one that you'll be testing but you can feel free to uncomment the Moonbeam and Moonriver network configurations and add additional networks as needed.
You can add the logic to check if the connected network is supported to the onConnect function. The onConnect function is called anytime a connect event is emitted. If the user is connected to a supported network, you can display network details such as the chain ID, network name, and more. You can add the following state variables and hooks:
const [account, setAccount] = useState(null);
const [chainId, setChainId] = useState(null);
const [supported, setSupported] = useState(false);
const [network, setNetwork] = useState(null);
const [symbol, setSymbol] = useState(null);
Make sure that you also add these state hooks in the resetApp function, so that all of the state variables can be reset to their initial state.
You'll notice that the onConnect function already accepts two parameters: the connected chain ID and account. You can set the state variables for the chainId and account then check to see if the network is supported. You'll use the chain ID to see if the network exists in the list of supported networks. If it does, you can use the setSupported state hook to set the state to true, and if not set it to false.
const onConnect = async (chainId, connectedAccount) => {
  setAccount(connectedAccount);
  setChainId(chainId);

  // get chain data
  const networkData = SUPPORTED_NETWORKS.filter(
    (chain) => chain.chain_id === chainId
  )[0];

  if (!networkData) {
    setSupported(false);
  } else {
    setSupported(true);
    // set additional network data here
  }
};
If the network does exist in the list of supported networks, you can then save additional network name and symbol. The symbol will be used later on to display the connected account's balance.
You can replace the // set additional network data here comment with the following:
setNetwork(networkData.name);
setSymbol(networkData.native_currency.symbol);
You will also need to update the useEffect dependency array to include the chainId and account state variables so that it re-renders with any changes to either variable.
useEffect(() => {
  ...
}, [connector, chainId, account]);
Then to render these state variables on the page, you can include additional UI elements alongside the Disconnect button. Again, you can use conditional rendering to display specific details or an error message if the network is supported or not.
{
  connector && !fetching ? (
    <LoadedData>
      <Data>
        <strong>Connected Account: </strong>
        {account}
      </Data>
      <Data>
        <strong>Chain ID: </strong>
        {chainId}
      </Data>
      {supported ? (
        <>
          <Data>
            <strong>Network: </strong>
            {network}
          </Data>
        </>
      ) : (
        <strong>
          Network not supported. Please disconnect, switch networks, and connect
          again.
        </strong>
      )}
      <OutlinedButton onClick={killSession}>Disconnect</OutlinedButton>
    </LoadedData>
  ) : (
    <Button onClick={connect}>Connect Wallet</Button>
  );
}
You can adapt the above code snippet as needed to provide better error handling.
Refresh Data
While you're developing the DApp, you'll want to handle page refreshes and update the data as needed based on the WalletConnect connection. Otherwise, you might find yourself manually disconnecting from MetaMask mobile more often then not.
The template already has a refreshData function, it just needs to be called under certain circumstances. If the connector exists and is connected, but the chainId or account doesn't you should call the refreshData function and use the connector configurations to update state and re-render the variables on the page.
You can replace the // check state variables here & if needed refresh the app comment with the following:
// If any of these variables do not exist and the connector is connected, refresh the data
if ((!chainId || !account) && connector.connected) {
  refreshData();
}
You can test this logic out by refreshing the page after establishing a connection. Instead of defaulting to the Connect Wallet button, you'll see that the account and network details, and the Disconnect button are displayed.
Add Account Balance
Depending on your needs, you might want to show the connected account's balance for the connected network. To do so, you can use Ethers to create a provider which can then be used to fetch the balance of the connected account.
You can start by adding another state variable for balance.
const [balance, setBalance] = useState(null);
Make sure that you add this state hook in the resetApp function, and use it to reset the balance variable to its initial state.
For simplicity, you can add the logic for fetching the account balance and saving it to state directly in the onConnect function. You will need to:
- Create an Ethers provider by passing in the network's RPC url, chain ID, and name
- Use the provider to call
getBalance, which will return the balance as aBigNumber - Convert the
BigNumberrepresentation of the balance to a string representation of the balance in Ether - Use the
setBalancestate hook to save the balance to state
const onConnect = async (chainId, address) => {
  setAccount(address);

  const networkData = SUPPORTED_NETWORKS.filter(
    (network) => network.chain_id === chainId
  )[0];

  if (!networkData) {
    setSupported(false);
  } else {
    setSupported(true);
    setNetwork(networkData.name);
    setSymbol(networkData.native_currency.symbol);
    setChainId(chainId);

    // 1. Create an Ethers provider
    const provider = new ethers.JsonRpcProvider(networkData.rpc_url, {
      chainId,
      name: networkData.name,
    });

    // 2. Get the account balance
    const balance = await provider.getBalance(address);
    // 3. Format the balance
    const formattedBalance = ethers.formatEther(balance);
    // 4. Save the balance to state
    setBalance(formattedBalance);
  }
};
You will need to add the balance state variable to the useEffect dependency array alongside the connector, chainId, and account variables.
You can also use the balance state variable to refresh the data on the page.
// If any of these variables do not exist and the connector is connected, refresh the data
if ((!chainId || !account || !balance) && connector.connected) {
  refreshData();
}
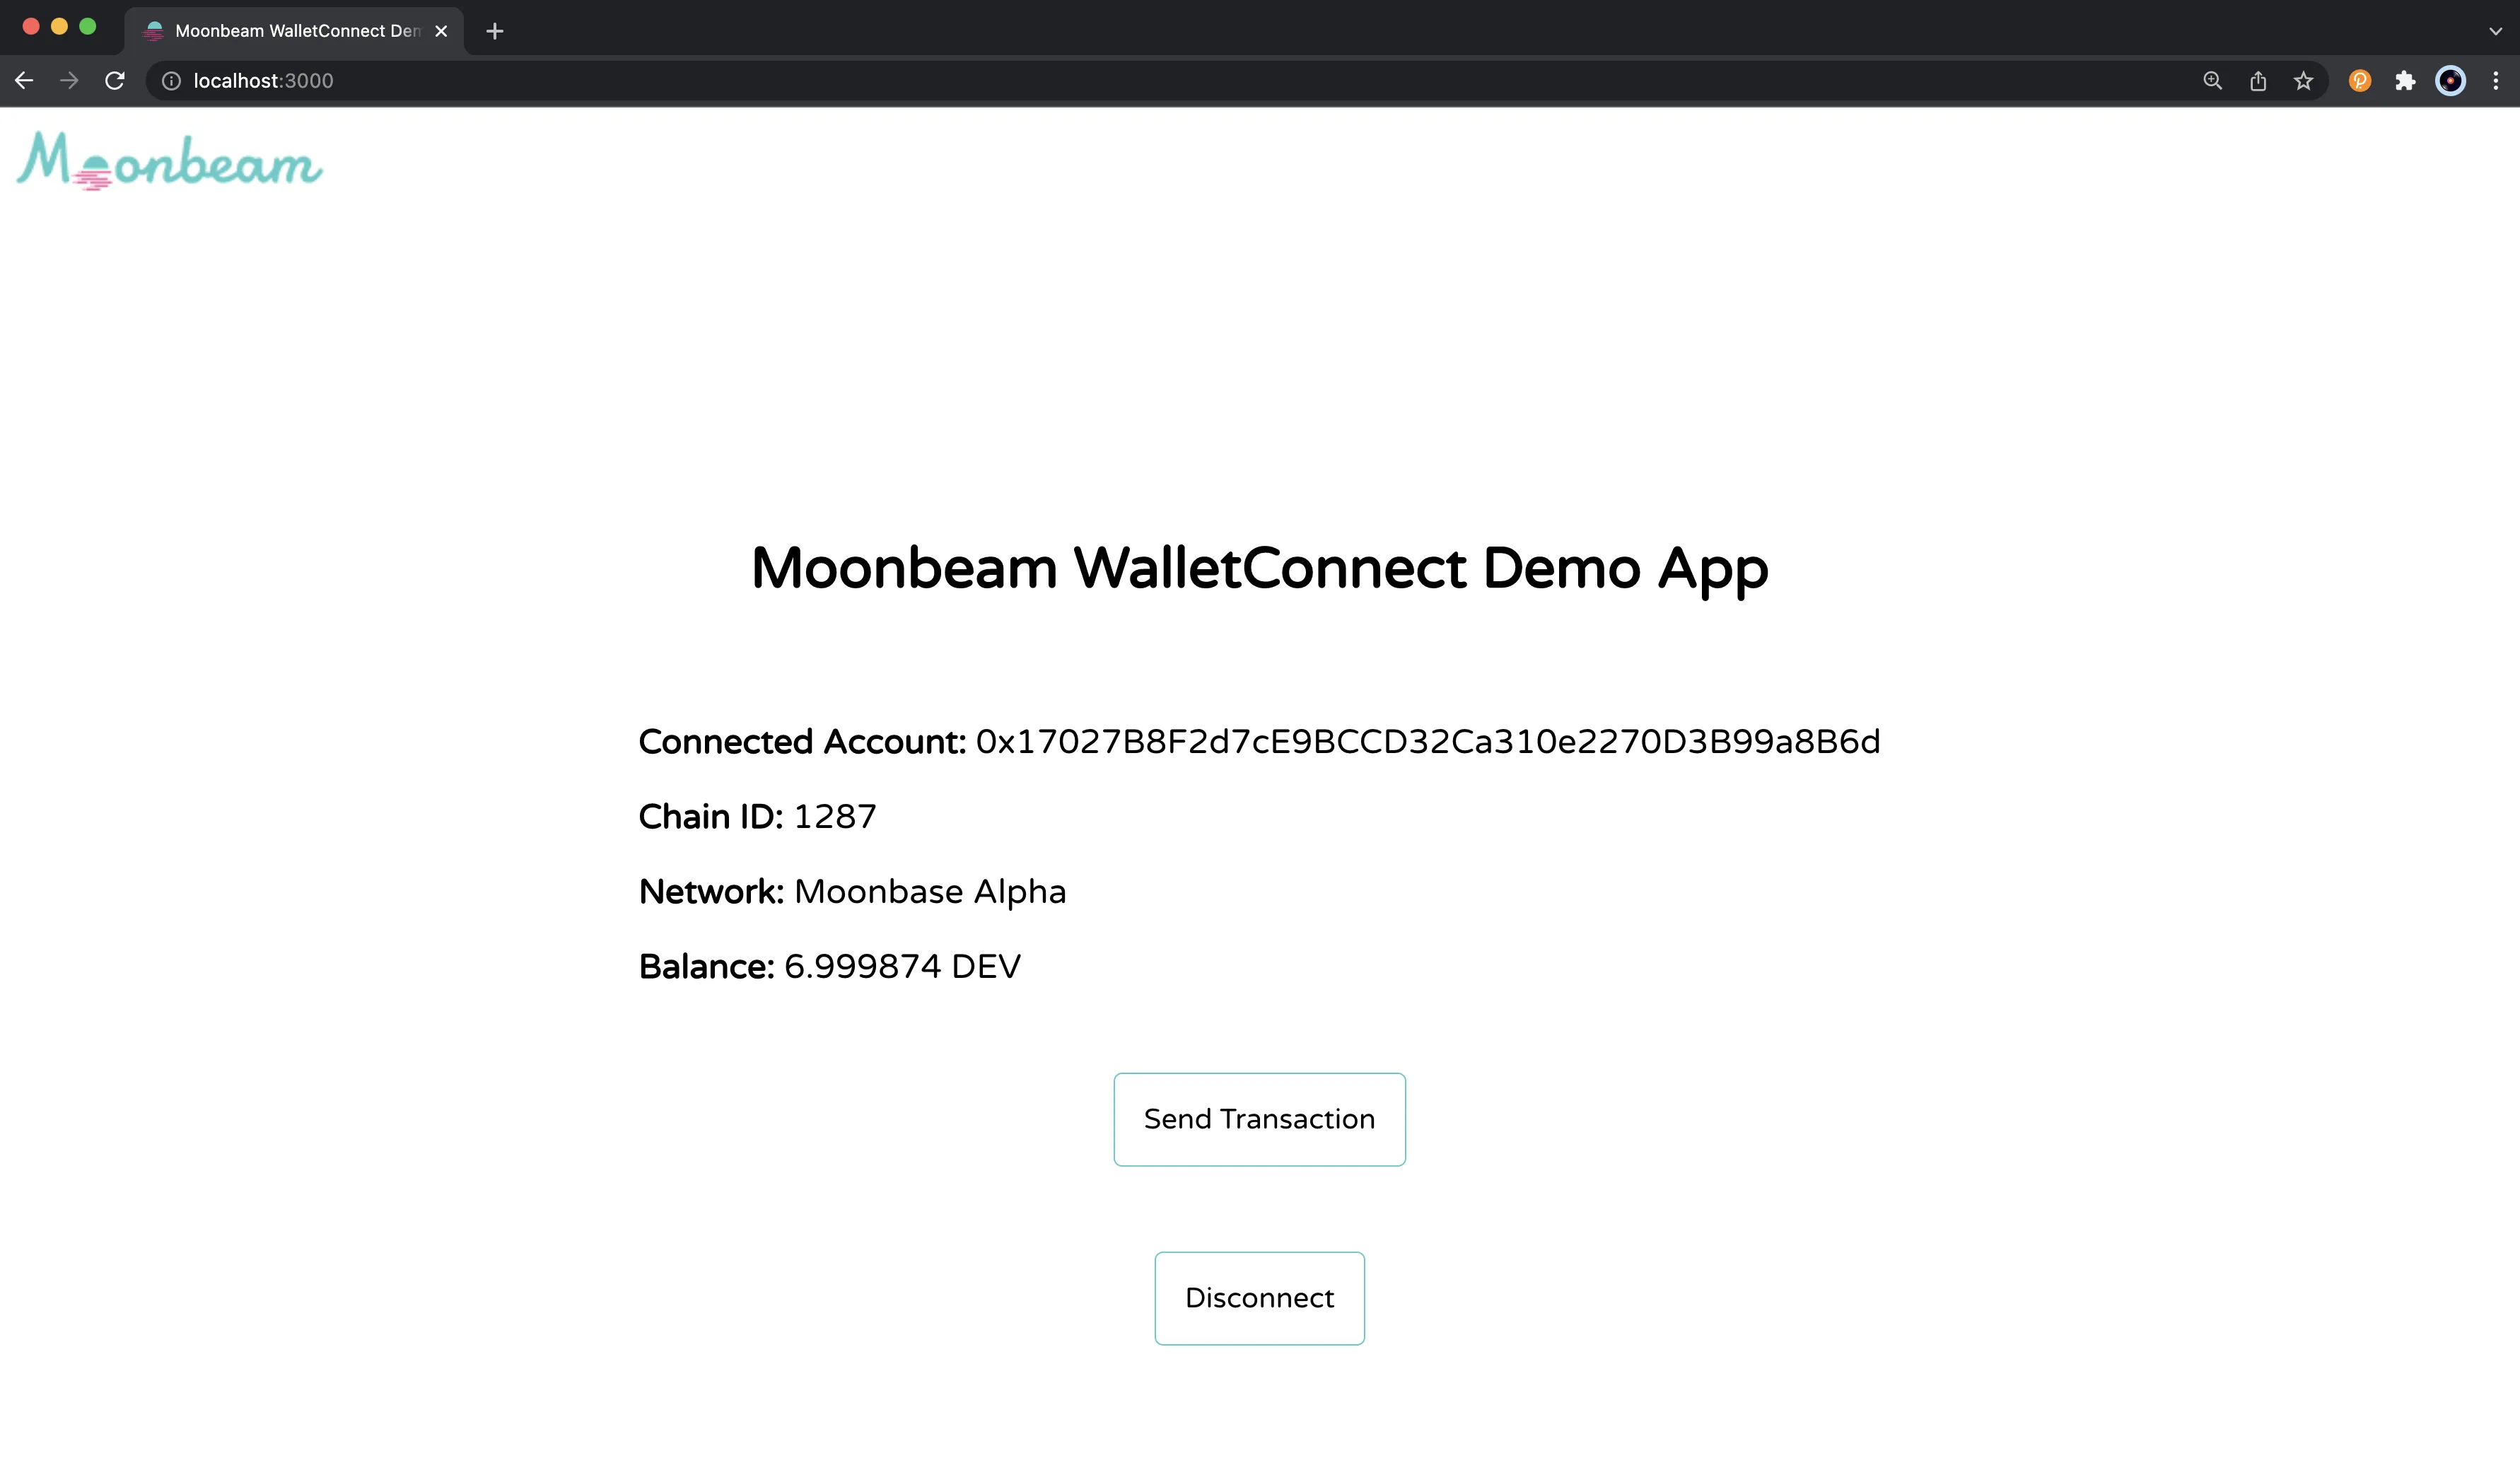
Finally, you can display the account balance if the user is connected to a supported network. You can use the symbol state variable that was created earlier on in the guide to show the balance in DEV for Moonbase Alpha.
{
  supported ? (
    <>
      <Data>
        <strong>Network: </strong>
        {network}
      </Data>
      <Data>
        <strong>Balance: </strong>
        {balance} {symbol}
      </Data>
    </>
  ) : (
    <strong>
      Network not supported. Please disconnect, switch networks, and connect
      again.
    </strong>
  );
}
This example can be adapted to retrieve other data from Ethers as needed.
Send a Transaction
To truly take advantage of the value that WalletConnect provides, you can send a transaction which will be initiated from within your DApp and then confirmed and signed from MetaMask mobile.
To get started, you will need to update the sendTransaction function that has already been created in the template. The function will use the WalletConnect connector to send a transaction. For example purposes, you can send 2 DEV tokens on Moonbase Alpha to your own account.
const sendTransaction = async () => {
  try {
    await connector.sendTransaction({
      from: account,
      to: account,
      value: '0x1BC16D674EC80000',
    });
  } catch (e) {
    // Handle the error as you see fit
    console.error(e);
  }
};
To initiate the transaction from the DApp, you will need to create a button, that onClick calls the sendTransaction function. This should only be done if the connected network is a supported network.
{
  supported ? (
    <>
      <Data>
        <strong>Network: </strong>
        {network}
      </Data>
      <Data>
        <strong>Balance: </strong>
        {balance} {symbol}
      </Data>
      <OutlinedButton onClick={sendTransaction}>
        Send Transaction
      </OutlinedButton>
    </>
  ) : (
    <strong>
      Network not supported. Please disconnect, switch networks, and connect
      again.
    </strong>
  );
}
When you click on Send Transaction, a pop-up will appear in MetaMask mobile with the transaction details:
- To sign and send the transaction, you can click on Confirm
- If successful you should see a notification in the MetaMask mobile app

You can also confirm the transaction went through by searching for your account in a block explorer such as Moonscan.
Final Result
To review the code for this tutorial in one place, you can check out the moonbeam-walletconnect-demo GitHub repository.
To see all of the code in action, you can check out the deployed Moonbeam WalletConnect Demo App.
Additional Considerations
This guide covers the basics for setting up a WalletConnect connection, but there are many ways in which you can improve the experience for your users or yourself as you develop the integration. You might want to consider adding in support for the following items:
- Adding a loader for when your transaction is waiting to be confirmed or a message that informs your users to check their mobile wallet and confirm the transaction from there
- Adding notifications on your DApp for the status of sent transactions
- Adding appropriate error handling
- Adding in logic to automatically update your users balances
| Created: February 2, 2022